


HELP-The Grandfather Bike-Vintage Shimano Cantilever Brake Pads?
 01-22-17, 11:14 AM
#1
Senior Member
Thread Starter
Join Date: Nov 2015
Location: Lacey, WA
Posts: 1,707
Bikes: Stevenson Custom, Stevenson Custom Tandem, Nishiki Professional
Mentioned: 35 Post(s)
Tagged: 0 Thread(s)
Quoted: 367 Post(s)
Likes: 0
Liked 196 Times
in
128 Posts
HELP-The Grandfather Bike-Vintage Shimano Cantilever Brake Pads?
P1050943.JPG
What you see is 24 years worth of brake pad development and the problem in two axis. First the modern cantilever brake pad has too many washers stacked to allow any bite in the threads by the nut when mounted in the Shimano cantilever arm on the Schwinn Paramount Series 30 mountain bike, thus the one washer removed. But that takes us to the second problem.
The length of the modern pad will not clear the front fork, and barely clears the rear seat stay.
Yes, I can remove a spacer, one of the dished in ones, and the brakes work in back, but in the front while they too will work without the same spacer when the cable is release they spring stop on the the inside of the fork. Tires will easily get through but I don't like it.
I am also not sure if it is safe to use the brake pads when they are missing one of the two matching dished in washers and then there's the issue of pads that are too long.
I have found one pair of OEM pads, but given that the rubber is 24 years I old doubt if they would work any better than those already on the bike which are also likely 24 years old.
So here's my call for help, does anyone make a modern replacement for this old style Shimano threaded bolt cantilever brake pad?
It's not a threaded post, instead the bolt head is one of the dished in surfaces and the bolt screws into a captured nut in the pad, quite compact.
If not then what modern Shimano cantilever brakes would be compatible and what should I measure to make sure that they are?
Would like to keep this as stock as I can, but the goal is a bike I can ride safely.
Thanks for your help and suggestions.
 01-22-17, 12:27 PM
#2
Senior Member
Thread Starter
Join Date: Nov 2015
Location: Lacey, WA
Posts: 1,707
Bikes: Stevenson Custom, Stevenson Custom Tandem, Nishiki Professional
Mentioned: 35 Post(s)
Tagged: 0 Thread(s)
Quoted: 367 Post(s)
Likes: 0
Liked 196 Times
in
128 Posts
prod130684_IMGSET.jpg
Spotted these and wonder if they will work? I will see if REI has them and check them out. The length will work, the only question is the length of the shaft and the width of the shaft in the current brake body.
Spotted these and wonder if they will work? I will see if REI has them and check them out. The length will work, the only question is the length of the shaft and the width of the shaft in the current brake body.
01-22-17, 12:32 PM
#3

Freewheel Medic

Join Date: Oct 2005
Location: An Island on the Coast of GA!
Posts: 12,881
Bikes: Snazzy* Schwinns, Classy Cannondales & a Super Pro Aero Lotus (* Ed.)
Mentioned: 140 Post(s)
Tagged: 0 Thread(s)
Quoted: 1452 Post(s)
Liked 2,186 Times
in
961 Posts
Here's a set that might work for you.
https://www.amazon.com/Universal-Cyc...+pads+threaded
They look as if they are short enough.
https://www.amazon.com/Universal-Cyc...+pads+threaded
They look as if they are short enough.
__________________
Bob
Enjoying the GA coast all year long!
Thanks for visiting my website: www.freewheelspa.com
Bob
Enjoying the GA coast all year long!
Thanks for visiting my website: www.freewheelspa.com
01-22-17, 04:37 PM
#4
Senior Member
Thread Starter
Join Date: Nov 2015
Location: Lacey, WA
Posts: 1,707
Bikes: Stevenson Custom, Stevenson Custom Tandem, Nishiki Professional
Mentioned: 35 Post(s)
Tagged: 0 Thread(s)
Quoted: 367 Post(s)
Likes: 0
Liked 196 Times
in
128 Posts
P1050945.JPG
Well I went to REI and looked at the Shimano pad pictured above. its the right size, but won't put its brake surface flat on the rim. Then I brought home a set of Avocet pads, but they have the same problem, they are a better fit and have adequate bolt shank to tighten down, but when pressed into the rim they are at an angle rather than being flat so only a third of the pad material is in contact with the rim surface.
In the pad above there's a little bit of offset from the bolt such that when the lever pulls the pad into contact with the rim the pad is flat on the rim, rather than being at an angle.
Pastorbob and wrk101 your parts look right, but I can't tell if there is a little offset built into the rubber of the pad. The Niagara Cycle site is a real gem, again a couple pads looked right including their Jagwire pad, but again could not see if the pad angle would lie flat on the rim or as with the Avocet and the Jagwire Mountain Pad if only a third of the pad would be in contact and that an an angle.
I'll share this problem with my bike guru who built our two custom bikes and see if he has a suggestion. Hate to have to change brakes for want of a pad, seems there was a poem about such an event in past history.
Last edited by since6; 01-22-17 at 04:43 PM.
01-22-17, 04:49 PM
#5
Senior Member
Thread Starter
Join Date: Nov 2015
Location: Lacey, WA
Posts: 1,707
Bikes: Stevenson Custom, Stevenson Custom Tandem, Nishiki Professional
Mentioned: 35 Post(s)
Tagged: 0 Thread(s)
Quoted: 367 Post(s)
Likes: 0
Liked 196 Times
in
128 Posts
So as I scratch my head and figure out what next to do, here's a little humor, a paraphrase of Benjamin Franklin, in thanks for your help:
For the want of a pad the brake was lost,
For the want of a brake the stop was lost,
For the want of a stop the trail edge was lost,
For the want of a trail edge the air borne rider was lost,
And all for the want of a cantilever brake pad.
Needless to say somewhere in the above usually a collarbone gets lost too.
Last edited by since6; 01-22-17 at 04:54 PM.
01-22-17, 05:09 PM
#6
Senior Member
Join Date: Mar 2007
Location: SF Bay Area, East bay
Posts: 7,647
Bikes: Miyata 618 GT, Marinoni, Kestral 200 2002 Trek 5200, KHS Flite, Koga Miyata, Schwinn Spitfire 5, Mondia Special, Univega Alpina, Miyata team Ti, Santa Cruz Highball
Mentioned: 52 Post(s)
Tagged: 0 Thread(s)
Quoted: 1605 Post(s)
Liked 2,569 Times
in
1,217 Posts
I see some shorter bmx brake pads at Niagara that are threaded. If you replaced the larger concaved nut with another short one, would that give you enough thread?
01-22-17, 05:16 PM
#7
Senior Member
Thread Starter
Join Date: Nov 2015
Location: Lacey, WA
Posts: 1,707
Bikes: Stevenson Custom, Stevenson Custom Tandem, Nishiki Professional
Mentioned: 35 Post(s)
Tagged: 0 Thread(s)
Quoted: 367 Post(s)
Likes: 0
Liked 196 Times
in
128 Posts
I may have found an answer from a UK post. The Kool Stop Eagle 2 pad. It is threaded and looks like it would have enough shaft length. But it also looks like I would have to do some additional washers to make things work.
01-23-17, 06:02 AM
#8
Freewheel Medic
Join Date: Oct 2005
Location: An Island on the Coast of GA!
Posts: 12,881
Bikes: Snazzy* Schwinns, Classy Cannondales & a Super Pro Aero Lotus (* Ed.)
Mentioned: 140 Post(s)
Tagged: 0 Thread(s)
Quoted: 1452 Post(s)
Liked 2,186 Times
in
961 Posts
@since6 can you put up some pictures of your cantilevers and how the pads mount to the arms? I believe you might be missing something because they should be able to be adjusted to match the rims and thus fit flat against them when applying the brakes.
I search my pictures of the couple of cantilever equipped bikes I own, and all of mine use a side mount system which allows for "squaring" the pad to the rim. The only exception are these circa 1980 MAFAC cantilevers on my Santana tandem. I believe there is a locking nut on the other side but you can easily imagine how these are "squared" to the rim.
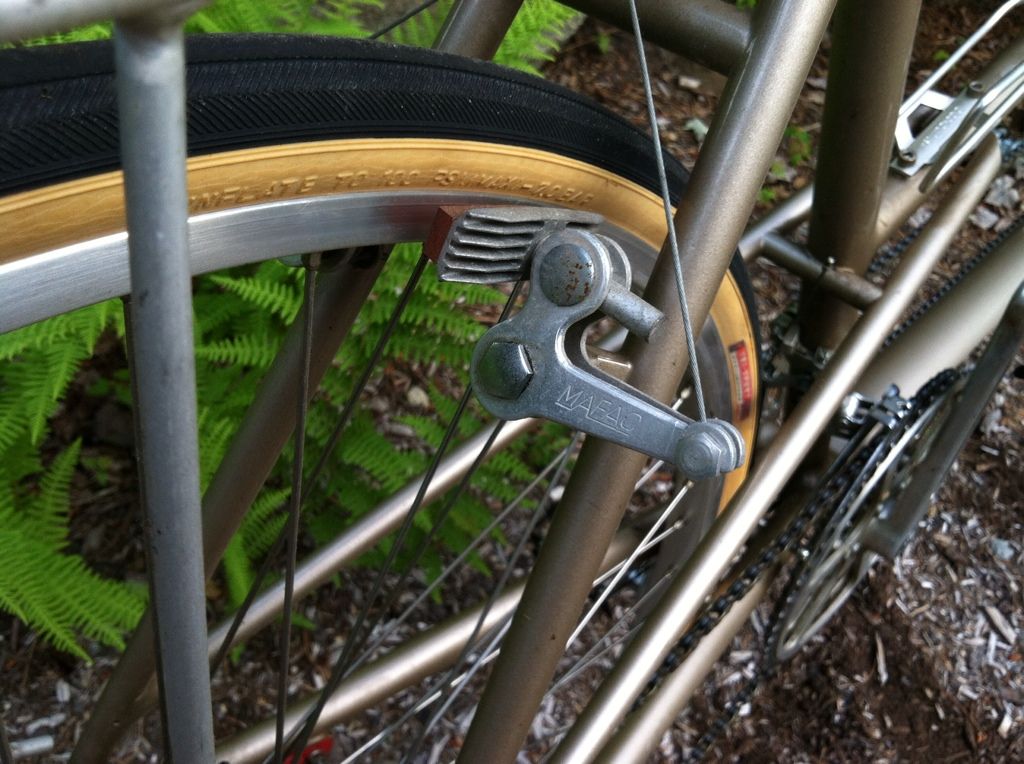
I search my pictures of the couple of cantilever equipped bikes I own, and all of mine use a side mount system which allows for "squaring" the pad to the rim. The only exception are these circa 1980 MAFAC cantilevers on my Santana tandem. I believe there is a locking nut on the other side but you can easily imagine how these are "squared" to the rim.
__________________
Bob
Enjoying the GA coast all year long!
Thanks for visiting my website: www.freewheelspa.com
Bob
Enjoying the GA coast all year long!
Thanks for visiting my website: www.freewheelspa.com
01-23-17, 09:11 AM
#9
Senior Member
Thread Starter
Join Date: Nov 2015
Location: Lacey, WA
Posts: 1,707
Bikes: Stevenson Custom, Stevenson Custom Tandem, Nishiki Professional
Mentioned: 35 Post(s)
Tagged: 0 Thread(s)
Quoted: 367 Post(s)
Likes: 0
Liked 196 Times
in
128 Posts
P1050957.JPG
Pastorbob I hope these pictures help.
The brakes are Shimano BR-M550 cantilever brakes. The parts as shown above (going from right to left) include the brake pad with a dished in captive nut, a dished out washer and a flat serrated washer. These parts go on the side of the brake lever closest to the rim. Then there is the brake lever, followed by the thin dished in washer and then the dished out bolt head.
In following pictures you'll see that the brake pad top is angled so that it clears the tire when the brake is applied.
Last edited by since6; 01-23-17 at 09:33 AM.
01-23-17, 09:14 AM
#10
Senior Member
Thread Starter
Join Date: Nov 2015
Location: Lacey, WA
Posts: 1,707
Bikes: Stevenson Custom, Stevenson Custom Tandem, Nishiki Professional
Mentioned: 35 Post(s)
Tagged: 0 Thread(s)
Quoted: 367 Post(s)
Likes: 0
Liked 196 Times
in
128 Posts
P1050959.JPG
Here are the pad with dished captured nut and the dished washer, the flat washer that would be stacked above the dished washer I have left out of this picture. This is part of how you would adjust the angle of the pad.
Here are the pad with dished captured nut and the dished washer, the flat washer that would be stacked above the dished washer I have left out of this picture. This is part of how you would adjust the angle of the pad.
01-23-17, 09:16 AM
#11
Senior Member
Thread Starter
Join Date: Nov 2015
Location: Lacey, WA
Posts: 1,707
Bikes: Stevenson Custom, Stevenson Custom Tandem, Nishiki Professional
Mentioned: 35 Post(s)
Tagged: 0 Thread(s)
Quoted: 367 Post(s)
Likes: 0
Liked 196 Times
in
128 Posts
P1050958.JPG
Here is the assembly that is on the far side of the brake lever. Next to the brake lever body is the thin flat dished washer and then the dished bolt head goes into it. This is the second means of adjusting the angle of the pad to the rim surface.
Here is the assembly that is on the far side of the brake lever. Next to the brake lever body is the thin flat dished washer and then the dished bolt head goes into it. This is the second means of adjusting the angle of the pad to the rim surface.
01-23-17, 09:18 AM
#12

feros ferio

Join Date: Jul 2000
Location: www.ci.encinitas.ca.us
Posts: 21,793
Bikes: 1959 Capo Modell Campagnolo; 1960 Capo Sieger (2); 1962 Carlton Franco Suisse; 1970 Peugeot UO-8; 1982 Bianchi Campione d'Italia; 1988 Schwinn Project KOM-10;
Mentioned: 44 Post(s)
Tagged: 0 Thread(s)
Quoted: 1391 Post(s)
Liked 1,322 Times
in
835 Posts
If you value safety, I strongly recommend finding a way to make KoolStop pads work for your caliper-and-rim combination. I have tried various other brands, including 1960s Universals and Weinmanns, 1970s DiaCompes, and ca. 2000 Shimanos, and nothing works as well for me as KoolStop.
__________________
"Far and away the best prize that life offers is the chance to work hard at work worth doing." --Theodore Roosevelt
Capo: 1959 Modell Campagnolo, S/N 40324; 1960 Sieger (2), S/N 42624, 42597
Carlton: 1962 Franco Suisse, S/N K7911
Peugeot: 1970 UO-8, S/N 0010468
Bianchi: 1982 Campione d'Italia, S/N 1.M9914
Schwinn: 1988 Project KOM-10, S/N F804069
01-23-17, 09:24 AM
#13
Senior Member
Thread Starter
Join Date: Nov 2015
Location: Lacey, WA
Posts: 1,707
Bikes: Stevenson Custom, Stevenson Custom Tandem, Nishiki Professional
Mentioned: 35 Post(s)
Tagged: 0 Thread(s)
Quoted: 367 Post(s)
Likes: 0
Liked 196 Times
in
128 Posts
P1050962.JPG
P1050961.JPG
When assembled this is how the parts stack together and how the arm action aligns the pad surface with the rim.
This is a fiddly process as I have to hold the arm against its spring while I get the height of the pad right with the rim and then with the bolt loose enough to move press the pad tight into the rim surface to get it aligned flat via the two sets of dished washers. Then of course its tighten things while not moving them. If there's a better/easier way to do this please share.
I have found through the advice of several posters pads that look like they would work, however unlike REI which is local and I can return stuff, these will need to be ordered and that may be what I end up doing ordering a sample of each type and then trying until I find one that works, and then buying a back up supply!
I think the Mafac system looks much easier to both install and adjust the pads.
Thanks again for any suggestions or ideas hope the above helps.
Last edited by since6; 01-23-17 at 09:31 AM.
01-23-17, 09:28 AM
#14
Senior Member
Thread Starter
Join Date: Nov 2015
Location: Lacey, WA
Posts: 1,707
Bikes: Stevenson Custom, Stevenson Custom Tandem, Nishiki Professional
Mentioned: 35 Post(s)
Tagged: 0 Thread(s)
Quoted: 367 Post(s)
Likes: 0
Liked 196 Times
in
128 Posts
I absolutely agree John E which is why the Kool Stop Eagle 2 pads are the top of my list to try next.
01-23-17, 06:22 PM
#15
Senior Member
Thread Starter
Join Date: Nov 2015
Location: Lacey, WA
Posts: 1,707
Bikes: Stevenson Custom, Stevenson Custom Tandem, Nishiki Professional
Mentioned: 35 Post(s)
Tagged: 0 Thread(s)
Quoted: 367 Post(s)
Likes: 0
Liked 196 Times
in
128 Posts
P1050967.JPG
P1050969.JPG
Well hitting up the local bike shops I found these and they are nearly identical to the original pads which are on the right and the bottom in the pictures above (except instead of being hard as a rock/these are grippy). The only issue is that the threaded shank is just a little shorter, so I have to omit the dished washer on the nut side. I'll look for a very thin stainless steel washer to put under the nut just to spread the force of the nut around and use Lock-tite on the threads when I do the final adjustment.
I know these are not Kool-Stop, but they do lie flat and I get the entire brake pad surface on the rim. This bike is going to be a cruiser with grand-kids so I believe they will stop things fine. No descents of Mt. Rainier in their future.
01-23-17, 06:25 PM
#16
Senior Member
Thread Starter
Join Date: Nov 2015
Location: Lacey, WA
Posts: 1,707
Bikes: Stevenson Custom, Stevenson Custom Tandem, Nishiki Professional
Mentioned: 35 Post(s)
Tagged: 0 Thread(s)
Quoted: 367 Post(s)
Likes: 0
Liked 196 Times
in
128 Posts
P1050977.JPG
For those encountering this problem in the future with vintage Shimano cantilever brakes these pads are Sunlite U-Brake Pads.
For those encountering this problem in the future with vintage Shimano cantilever brakes these pads are Sunlite U-Brake Pads.
04-26-22, 04:54 PM
#17
Newbie
Join Date: Aug 2021
Posts: 1
Mentioned: 0 Post(s)
Tagged: 0 Thread(s)
Quoted: 0 Post(s)
Likes: 0
Liked 1 Time
in
1 Post
Attachment 550038
For those encountering this problem in the future with vintage Shimano cantilever brakes these pads are Sunlite U-Brake Pads.
For those encountering this problem in the future with vintage Shimano cantilever brakes these pads are Sunlite U-Brake Pads.
Likes For dork:

