


Is hood repair possible?
 05-25-22, 05:57 PM
#1

Senior Member
Thread Starter

Join Date: Feb 2012
Location: Williamsburg, VA Sebastian, FL
Posts: 1,363
Bikes: 1987 Centurion Ironman Master, 1992 Koga Miyata Exerciser, 1992 Schwinn Crosscut
Mentioned: 6 Post(s)
Tagged: 0 Thread(s)
Quoted: 209 Post(s)
Likes: 0
Liked 175 Times
in
92 Posts
Is hood repair possible?
Probably not, but you guys have amazed me in the past so I thought I'd ask.
(For reference, it's the inside of the right shifter...)
Could this split be tucked back together, then somehow re-fused to itself?

(For reference, it's the inside of the right shifter...)
Could this split be tucked back together, then somehow re-fused to itself?
 05-25-22, 08:08 PM
#3
South Carolina Ed
Join Date: Mar 2007
Location: Greer, SC
Posts: 3,889
Bikes: Holdsworth custom, Macario Pro, Ciocc San Cristobal, Viner Nemo, Cyfac Le Mythique, Giant TCR, Tommasso Mondial, Cyfac Etoile
Mentioned: 5 Post(s)
Tagged: 0 Thread(s)
Quoted: 344 Post(s)
Liked 291 Times
in
138 Posts
put some backing material inside (maybe fabric?) and glue it all together with gel super glue - amazing stuff
05-25-22, 08:09 PM
#4
Banned.
Join Date: Jan 2022
Posts: 1,070
Mentioned: 2 Post(s)
Tagged: 0 Thread(s)
Quoted: 359 Post(s)
Liked 582 Times
in
336 Posts
Depending on the contamination of the rubber, maybe. I�ve had minor luck with that PlastiDip stuff, using decal backing to smooth it. Not pretty, but functioned.
05-25-22, 09:00 PM
#6
Junior Member
I've heard of people using automotive, form-a-gasket type stuff. Never tried it myself, but I did buy a tube thinking I might.
05-25-22, 09:28 PM
#7
Bike Butcher of Portland

Join Date: Jul 2014
Location: Portland, OR
Posts: 11,634
Bikes: It's complicated.
Mentioned: 1299 Post(s)
Tagged: 0 Thread(s)
Quoted: 4678 Post(s)
Liked 5,795 Times
in
2,281 Posts
__________________
If someone tells you that you have enough bicycles and you don't need any more, stop talking to them. You don't need that kind of negativity in your life.
If someone tells you that you have enough bicycles and you don't need any more, stop talking to them. You don't need that kind of negativity in your life.
Likes For gugie:
05-25-22, 09:35 PM
#8
Senior Member
Join Date: Mar 2007
Location: SF Bay Area, East bay
Posts: 7,658
Bikes: Miyata 618 GT, Marinoni, Kestral 200 2002 Trek 5200, KHS Flite, Koga Miyata, Schwinn Spitfire 5, Mondia Special, Univega Alpina, Miyata team Ti, Santa Cruz Highball
Mentioned: 53 Post(s)
Tagged: 0 Thread(s)
Quoted: 1609 Post(s)
Liked 2,589 Times
in
1,224 Posts
I've wondered, never tried, if that Flex seal would work. Those the 7400's? Good luck.
 05-26-22, 03:28 AM
#9
verktyg

Join Date: Jul 2006
Location: SF Bay Area
Posts: 4,030
Bikes: Current favorites: 1988 Peugeot Birraritz, 1984 Gitane Super Corsa, 1980s DeRosa, 1981 Bianchi Campione Del Mondo, 1992 Paramount OS, 1988 Colnago Technos, 1985 RalieghUSA SBDU Team Pro
Mentioned: 207 Post(s)
Tagged: 0 Thread(s)
Quoted: 1036 Post(s)
Liked 1,238 Times
in
654 Posts
A little trick that I recently discovered by accident...
First off take some 70% or 91% Isopropyl Alcohol and clean off any grease or oil that may be on the rubber surface.
Next, get a reinforced paper towel like Bounty and cut a small piece to use as a "boot" or backup over the inside of the tear. Next apply some instant glue to both sides of the gap in the tear and also to the inside of the hood in that area.
Place the piece of paper towel over the instant glue so that it soaks in. Hold the tear together until the glue hardens. If need be, add a little more glue on top of the paper towel boot.
I like Loctite Ultra Super Glue as it's easy to apply.
I should have taken some pictures the last time I did this.
verktyg
__________________
Don't believe everything you think! History is written by those who weren't there....
Chas. ;-)
Don't believe everything you think! History is written by those who weren't there....
Chas. ;-)
05-26-22, 09:06 AM
#10
South Carolina Ed
Join Date: Mar 2007
Location: Greer, SC
Posts: 3,889
Bikes: Holdsworth custom, Macario Pro, Ciocc San Cristobal, Viner Nemo, Cyfac Le Mythique, Giant TCR, Tommasso Mondial, Cyfac Etoile
Mentioned: 5 Post(s)
Tagged: 0 Thread(s)
Quoted: 344 Post(s)
Liked 291 Times
in
138 Posts
I had another thought
something like Gorilla tape inside https://www.walmart.com/ip/Gorilla-B...-Roll/15160148
something like black silicone outside to fill gaps https://www.harborfreight.com/3-oz-r...ack-90024.html
something like Gorilla tape inside https://www.walmart.com/ip/Gorilla-B...-Roll/15160148
something like black silicone outside to fill gaps https://www.harborfreight.com/3-oz-r...ack-90024.html
05-26-22, 09:21 AM
#11
Senior Member

Join Date: Nov 2003
Location: Soviet of Oregon or Pensacola FL
Posts: 5,342
Bikes: Still have a few left!
Mentioned: 48 Post(s)
Tagged: 0 Thread(s)
Quoted: 467 Post(s)
Liked 532 Times
in
267 Posts
No longer have the bike, but repaired a black French half hood using some of this liquid rubber + similar method to @verktyg above. Worth a try, has other uses too.
https://www.amazon.com/Star-brite-Li...6&sr=1-17&th=1
https://www.amazon.com/Star-brite-Li...6&sr=1-17&th=1
05-26-22, 02:14 PM
#12
se�or miembro

Join Date: Dec 2018
Location: Pac NW
Posts: 6,622
Bikes: '70s - '80s Campagnolo
Mentioned: 92 Post(s)
Tagged: 0 Thread(s)
Quoted: 3885 Post(s)
Liked 6,479 Times
in
3,205 Posts
This, at least for that hole. Black, of course. Find a few more projects around the house for it, because once you open the package, it doesn't keep. Like that hole at the rear of your Turbo saddle and the torn rubber clips on your grocery pannier. And wear disposable rubber gloves!
05-26-22, 02:48 PM
#13
Senior Member

Shoe Goo. You can get it in clear or black.
05-28-22, 07:56 PM
#14
Senior Member
Thread Starter
Join Date: Feb 2012
Location: Williamsburg, VA Sebastian, FL
Posts: 1,363
Bikes: 1987 Centurion Ironman Master, 1992 Koga Miyata Exerciser, 1992 Schwinn Crosscut
Mentioned: 6 Post(s)
Tagged: 0 Thread(s)
Quoted: 209 Post(s)
Likes: 0
Liked 175 Times
in
92 Posts
Thanks for all the suggestions!
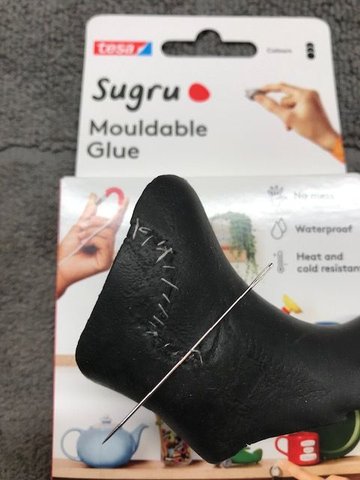
I decided to try the Sugru. If it proves strong enough, despite a fairly thin layer, I will be duly impressed.
It went on easily, allowing plenty of time to mold. As you can see in the pics I sewed the rip together to "clamp" it while applying. I also spread a thin layer on a few other degraded spots, and may try a final coat of liquid electrical tape to smooth everything out.
Of course I did not heed the warning about using latex gloves, but acetone cleaned me up just fine.")
I will report the final result after complete curing. The real test, of course, will be stretching it over the levers!
I decided to try the Sugru. If it proves strong enough, despite a fairly thin layer, I will be duly impressed.
It went on easily, allowing plenty of time to mold. As you can see in the pics I sewed the rip together to "clamp" it while applying. I also spread a thin layer on a few other degraded spots, and may try a final coat of liquid electrical tape to smooth everything out.
Of course I did not heed the warning about using latex gloves, but acetone cleaned me up just fine.
I will report the final result after complete curing. The real test, of course, will be stretching it over the levers!
Last edited by 67tony; 05-29-22 at 06:05 AM.
Likes For 67tony:
05-30-22, 06:51 PM
#15
Senior Member
Thread Starter
Join Date: Feb 2012
Location: Williamsburg, VA Sebastian, FL
Posts: 1,363
Bikes: 1987 Centurion Ironman Master, 1992 Koga Miyata Exerciser, 1992 Schwinn Crosscut
Mentioned: 6 Post(s)
Tagged: 0 Thread(s)
Quoted: 209 Post(s)
Likes: 0
Liked 175 Times
in
92 Posts
Snagged some Liquid Electrical Tape today, and applied a coat.
Looks decent enough, and I figure another layer might smooth things out a bit more.
It's quite tacky, but I presume that'll dry up some with use.
No matter what the result, they're way better than previously...and I saved about a Ben Franklin!
Question.
Not wanting to over-stretch my Sugru repair, what would I use to install the hoods, in as SLICK a way as possible?
WD-40? Baby Powder? Dawn Dishsoap? Some other magical super-slippery concoction?


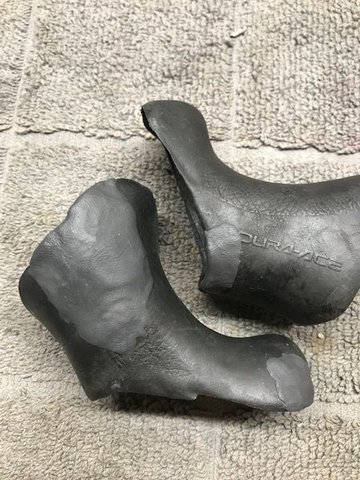
This pic is where the hole and bad rip was, on the outside of the right shifter. (post #1)
I stitched it up, then used the Sugru.

Looks decent enough, and I figure another layer might smooth things out a bit more.
It's quite tacky, but I presume that'll dry up some with use.
No matter what the result, they're way better than previously...and I saved about a Ben Franklin!
Question.
Not wanting to over-stretch my Sugru repair, what would I use to install the hoods, in as SLICK a way as possible?
WD-40? Baby Powder? Dawn Dishsoap? Some other magical super-slippery concoction?
This pic is where the hole and bad rip was, on the outside of the right shifter. (post #1)
I stitched it up, then used the Sugru.
Last edited by 67tony; 05-30-22 at 07:18 PM.
Likes For 67tony:
05-30-22, 07:31 PM
#16
Senior Member
Thread Starter
Join Date: Feb 2012
Location: Williamsburg, VA Sebastian, FL
Posts: 1,363
Bikes: 1987 Centurion Ironman Master, 1992 Koga Miyata Exerciser, 1992 Schwinn Crosscut
Mentioned: 6 Post(s)
Tagged: 0 Thread(s)
Quoted: 209 Post(s)
Likes: 0
Liked 175 Times
in
92 Posts
Final result. Not perfect, but definitely serviceable.
Hopefully the Dura Ace groupset outweighs judgement of the refurbished hoods!
This is the side that had the hole.

The other three sides look pretty much like this one.

Hopefully the Dura Ace groupset outweighs judgement of the refurbished hoods!
This is the side that had the hole.
The other three sides look pretty much like this one.
Likes For 67tony:
05-30-22, 07:52 PM
#17
Senior Member
Join Date: Mar 2007
Location: SF Bay Area, East bay
Posts: 7,658
Bikes: Miyata 618 GT, Marinoni, Kestral 200 2002 Trek 5200, KHS Flite, Koga Miyata, Schwinn Spitfire 5, Mondia Special, Univega Alpina, Miyata team Ti, Santa Cruz Highball
Mentioned: 53 Post(s)
Tagged: 0 Thread(s)
Quoted: 1609 Post(s)
Liked 2,589 Times
in
1,224 Posts
I have a spray bottle with alcohol I use but I'm not sure what that would do to your repair materials.
05-30-22, 09:19 PM
#18
se�or miembro
Join Date: Dec 2018
Location: Pac NW
Posts: 6,622
Bikes: '70s - '80s Campagnolo
Mentioned: 92 Post(s)
Tagged: 0 Thread(s)
Quoted: 3885 Post(s)
Liked 6,479 Times
in
3,205 Posts
"What would [you] use to install the hoods, in as SLICK a way as possible?"
Dish soap.
Dish soap.
05-30-22, 09:57 PM
#19

don't try this at home.

Join Date: Jan 2006
Location: N. KY
Posts: 5,939
Mentioned: 10 Post(s)
Tagged: 0 Thread(s)
Quoted: 973 Post(s)
Liked 511 Times
in
351 Posts
You probably should have installed the hoods on the brake levers before the Sugru. It's adhesive, but can be peeled off of smooth surfaces with some effort. Stretching the hoods back on the levers will likely break the bond, but the sewing will help a lot.
I got the black 8 pack three years ago, and just used the last two packets this week. It keeps for at least 3 years in the fridge. I'll get another 8 pack soon, so I have it when I need it.
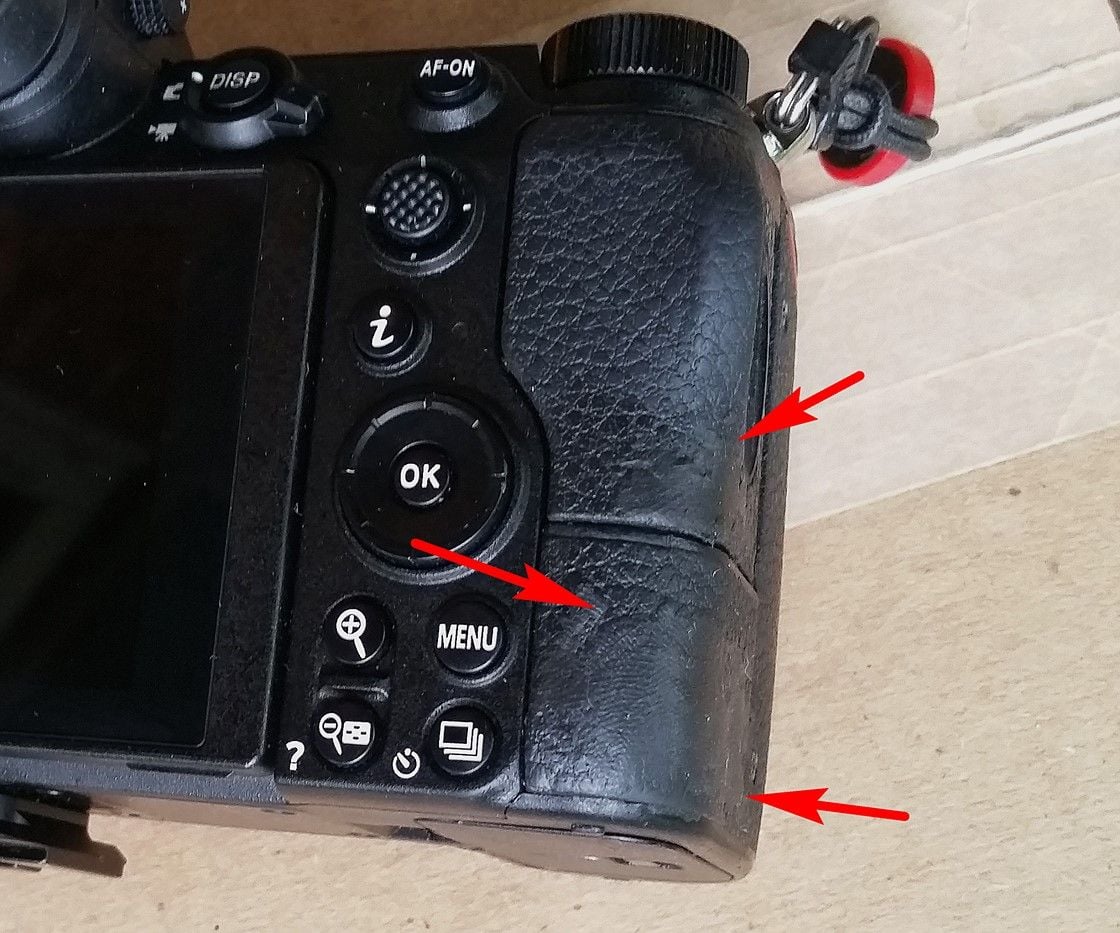
This was first, after using one pack for testing on some surfaces. My Nikon had the surface layer of the rubber facing peeling off where my hand held the camera. I cleaned the surface with rubbing alcohol, then lightly scuffed the surface with fine sandpaper.
The sugru is best applied by mashing small pieces onto the surface, pressing them in. Then it can be smoothed and worked with a finger. Wipe the finger with dry paper towels then smooth some more, ripples and bumps can be smoothed with enough passes. It can be worked for quite a while. It's pretty easy after the first session for practice.
Rubbing alcohol with a paper towel cleaned off my fingers when the job was complete.
This patch job isn't perfect -- I could do a better job now, and would probably also get some textured item to press into the surface for a better visual match. But it's been great, no peeling or wear for almost 3 years now. It looks a lot better in person than it does in this picture with highlights reflecting off the surface. The edge of the patch blends smoothly into the rest of the body -- nice!
A full pack. The packets are quite small, and have to be used up in the 30 minute time frame.
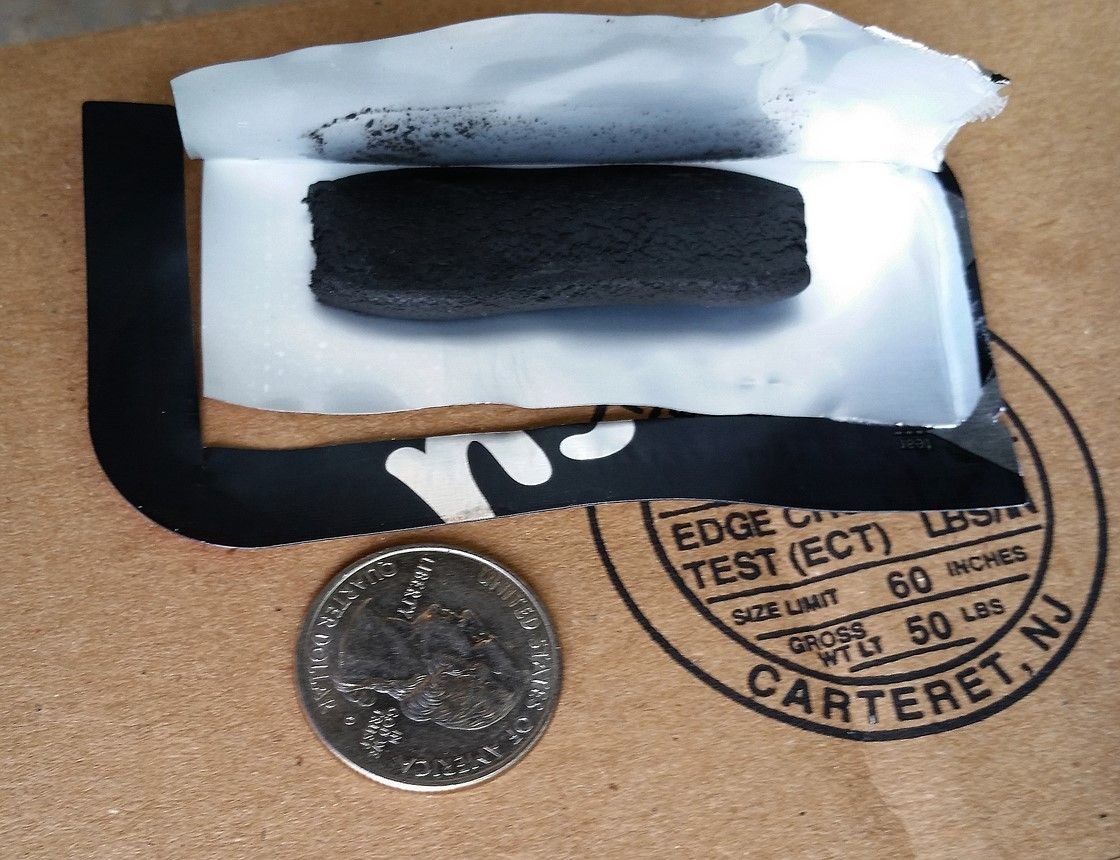
That camera repair used a small portion of one packet, as shown below. They can be smeared out to a thin layer if needed.

Other uses for the rest of it:
Fraying sewn seams on black biking shorts. I pressed a very thin coating over the threads. It's kind of ugly, but it completely stopped the fraying, and it's flexible so the shorts are still good.
Sticking a plastic kitchen towel hook to the side of the fridge. Very secure, but a putty knife should be able to remove it some day.
Molding a small "fin" to a micro usb2 plug, so I no longer try to use it upside down.
Fixing some broken black trim on the car -- not invisible, but good enough. That took a few packets to fill.
Molding longer zipper pulls on a winter jacket, so I can zip it with gloves on. I molded over a few loops of strong thread through the metal zipper hole for pulling strength.
I got the black 8 pack three years ago, and just used the last two packets this week. It keeps for at least 3 years in the fridge. I'll get another 8 pack soon, so I have it when I need it.
This was first, after using one pack for testing on some surfaces. My Nikon had the surface layer of the rubber facing peeling off where my hand held the camera. I cleaned the surface with rubbing alcohol, then lightly scuffed the surface with fine sandpaper.
The sugru is best applied by mashing small pieces onto the surface, pressing them in. Then it can be smoothed and worked with a finger. Wipe the finger with dry paper towels then smooth some more, ripples and bumps can be smoothed with enough passes. It can be worked for quite a while. It's pretty easy after the first session for practice.
Rubbing alcohol with a paper towel cleaned off my fingers when the job was complete.
This patch job isn't perfect -- I could do a better job now, and would probably also get some textured item to press into the surface for a better visual match. But it's been great, no peeling or wear for almost 3 years now. It looks a lot better in person than it does in this picture with highlights reflecting off the surface. The edge of the patch blends smoothly into the rest of the body -- nice!
A full pack. The packets are quite small, and have to be used up in the 30 minute time frame.
That camera repair used a small portion of one packet, as shown below. They can be smeared out to a thin layer if needed.
Other uses for the rest of it:
Fraying sewn seams on black biking shorts. I pressed a very thin coating over the threads. It's kind of ugly, but it completely stopped the fraying, and it's flexible so the shorts are still good.
Sticking a plastic kitchen towel hook to the side of the fridge. Very secure, but a putty knife should be able to remove it some day.
Molding a small "fin" to a micro usb2 plug, so I no longer try to use it upside down.
Fixing some broken black trim on the car -- not invisible, but good enough. That took a few packets to fill.
Molding longer zipper pulls on a winter jacket, so I can zip it with gloves on. I molded over a few loops of strong thread through the metal zipper hole for pulling strength.
Last edited by rm -rf; 05-30-22 at 10:07 PM.
