


Cable Length past the pinch
 02-22-21, 09:40 AM
#1

Senior Member
Thread Starter

Join Date: May 2008
Location: Fredericksburg, Va
Posts: 9,579
Bikes: '65 Frejus TDF, '73 Bottecchia Giro d'Italia, '83 Colnago Superissimo, '84 Trek 610, '84 Trek 760, '88 Pinarello Veneto, '88 De Rosa Pro, '89 Pinarello Montello, '94 Burley Duet, 97 Specialized RockHopper, 2010 Langster, Tern Link D8
Mentioned: 73 Post(s)
Tagged: 0 Thread(s)
Quoted: 1607 Post(s)
Liked 2,214 Times
in
1,103 Posts
Cable Length past the pinch
I am too lazy to do a search.
How much do you leave or how long is the cable past the pinch bolt on your brakes and derailleurs?
If you like, include if you cap them and if so, how, glue or pinch. Ok we can go one step further, color.
How much do you leave or how long is the cable past the pinch bolt on your brakes and derailleurs?
If you like, include if you cap them and if so, how, glue or pinch. Ok we can go one step further, color.
__________________
Bikes don't stand alone. They are two tired.
Bikes don't stand alone. They are two tired.
 02-22-21, 10:04 AM
#2
Senior Member
Join Date: Jan 2007
Location: Ontario
Posts: 2,648
Mentioned: 16 Post(s)
Tagged: 0 Thread(s)
Quoted: 478 Post(s)
Liked 634 Times
in
336 Posts
I too am lazy, and cheap on top of that. I typically (after making sure I am really happy with routing) cut off at around 2-3" from the pinch, just to allow for some adjustment in future. And I bought a big bag of those aluminum crimp ends for cables off fleabay and use them on everything....Can't remember but it was something like $2 for 1000 or something.....
Likes For markk900:
02-22-21, 10:17 AM
#3
Senior Member
Thread Starter
Join Date: May 2008
Location: Fredericksburg, Va
Posts: 9,579
Bikes: '65 Frejus TDF, '73 Bottecchia Giro d'Italia, '83 Colnago Superissimo, '84 Trek 610, '84 Trek 760, '88 Pinarello Veneto, '88 De Rosa Pro, '89 Pinarello Montello, '94 Burley Duet, 97 Specialized RockHopper, 2010 Langster, Tern Link D8
Mentioned: 73 Post(s)
Tagged: 0 Thread(s)
Quoted: 1607 Post(s)
Liked 2,214 Times
in
1,103 Posts
I opted for these:

__________________
Bikes don't stand alone. They are two tired.
Bikes don't stand alone. They are two tired.
Likes For SJX426:
 02-22-21, 10:28 AM
#5
Extraordinary Magnitude

Join Date: Aug 2009
Location: Waukesha WI
Posts: 13,644
Bikes: 1978 Trek TX700; 1978/79 Trek 736; 1984 Specialized Stumpjumper Sport; 1984 Schwinn Voyageur SP; 1985 Trek 620; 1985 Trek 720; 1986 Trek 400 Elance; 1987 Schwinn High Sierra; 1990 Miyata 1000LT
Mentioned: 84 Post(s)
Tagged: 0 Thread(s)
Quoted: 2607 Post(s)
Liked 1,696 Times
in
935 Posts
I don't swap out components like I used to a few years ago- but I would have loved all the pretty colors. 
I used to leave (and I still do) a fair amount of cable, just in case I wanted to use something different.
I used to leave (and I still do) a fair amount of cable, just in case I wanted to use something different.
__________________
*Recipient of the 2006 Time Magazine "Person Of The Year" Award*
Commence to jigglin� huh?!?!
"But hey, always love to hear from opinionated amateurs." -says some guy to Mr. Marshall.
Commence to jigglin� huh?!?!
"But hey, always love to hear from opinionated amateurs." -says some guy to Mr. Marshall.
02-22-21, 10:29 AM
#6
Ride, Wrench, Swap, Race

Join Date: Jan 2010
Location: Northern California
Posts: 9,182
Bikes: Cheltenham-Pedersen racer, Boulder F/S Paris-Roubaix, Varsity racer, '52 Christophe, '62 Continental, '92 Merckx, '75 Limongi, '76 Presto, '72 Gitane SC, '71 Schwinn SS, etc.
Mentioned: 132 Post(s)
Tagged: 0 Thread(s)
Quoted: 1562 Post(s)
Liked 1,287 Times
in
858 Posts
I cut them at about an inch and a half to two inches, any longer and tend to get out of control.
Some V-brakes require a bit longer tail length in order to tuck them in as intended.
I crimp the caps with the corner of my pliers' jaws, from one side and then the other. This flattens the middle of the cap's length and allows the cap to be easily removed/re-used later with just one quick squeeze along the widened area. This also applies a distinctive grid pattern which allows me to know that I was the last person to service the cabling.
Yeah, I usually re-use the caps.
02-22-21, 10:48 AM
#7
Senior Member
Thread Starter
Join Date: May 2008
Location: Fredericksburg, Va
Posts: 9,579
Bikes: '65 Frejus TDF, '73 Bottecchia Giro d'Italia, '83 Colnago Superissimo, '84 Trek 610, '84 Trek 760, '88 Pinarello Veneto, '88 De Rosa Pro, '89 Pinarello Montello, '94 Burley Duet, 97 Specialized RockHopper, 2010 Langster, Tern Link D8
Mentioned: 73 Post(s)
Tagged: 0 Thread(s)
Quoted: 1607 Post(s)
Liked 2,214 Times
in
1,103 Posts
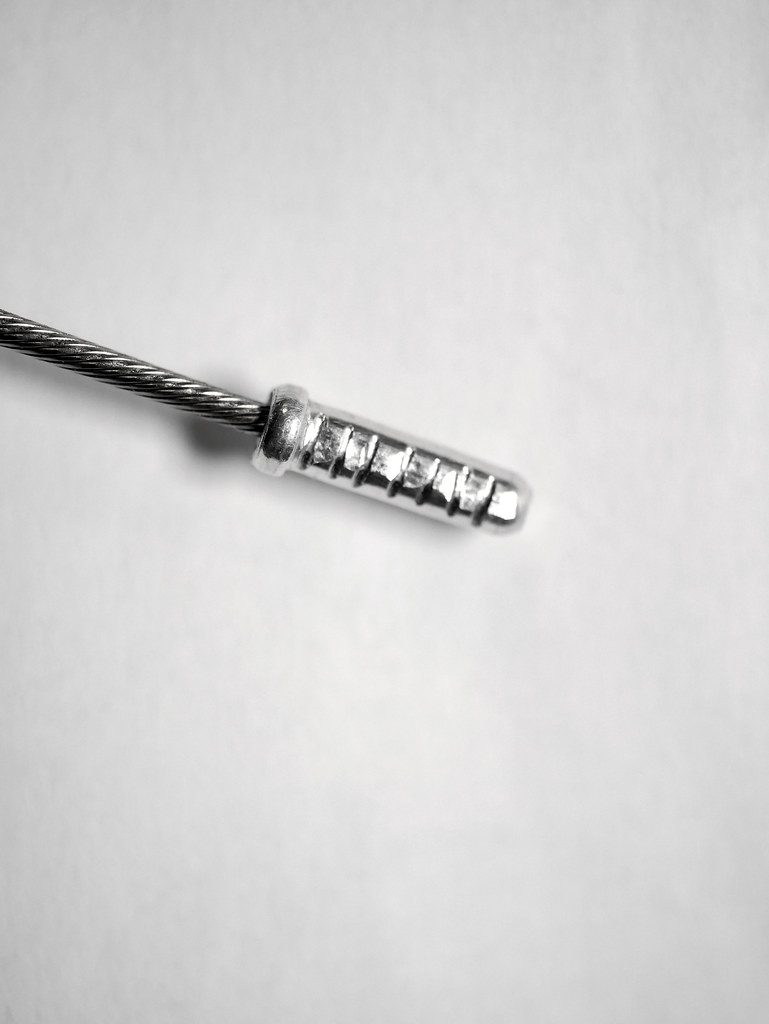
To answer my own question, I usually leave way to much, I think. I super glue the ends prior to cutting and then glue the caps, now that I can pick a color. Removal is easy with a little slide from the cable end to knock off the caps. I don't use much glue, enough to hold it in. There aren't any forces associated with it so it doesn't have to be "welded" in place.
Crimped before thinking about gluing.
 P1040377 on Flickr
Crimped before thinking about gluing.
P1040377 on Flickr
__________________
Bikes don't stand alone. They are two tired.
Bikes don't stand alone. They are two tired.
02-22-21, 10:59 AM
#8
Phyllo-buster

Join Date: Jan 2010
Location: Nova Scotia
Posts: 8,844
Bikes: roadsters, club bikes, fixed and classic
Mentioned: 133 Post(s)
Tagged: 0 Thread(s)
Quoted: 2297 Post(s)
Liked 2,047 Times
in
1,253 Posts
Weight weenies cut short, really short.
Not me.
Not me.
02-22-21, 11:35 AM
#9
Senior Member

I'm not aware of any rules or guidelines for this, and I don't count Velominati as canon.
I don't have any personal hard/fast rules for post-clamp cable length, it's a balance of practicality and looks. I want it long enough to be able to grab the end with my hand/fingers if/when I need to adjust cable tension. I think a tiny stub looks too short, and you'd need pliers to grab the end to adjust tension. And ponytail-long, flapping-in-the-breeze just looks too long.
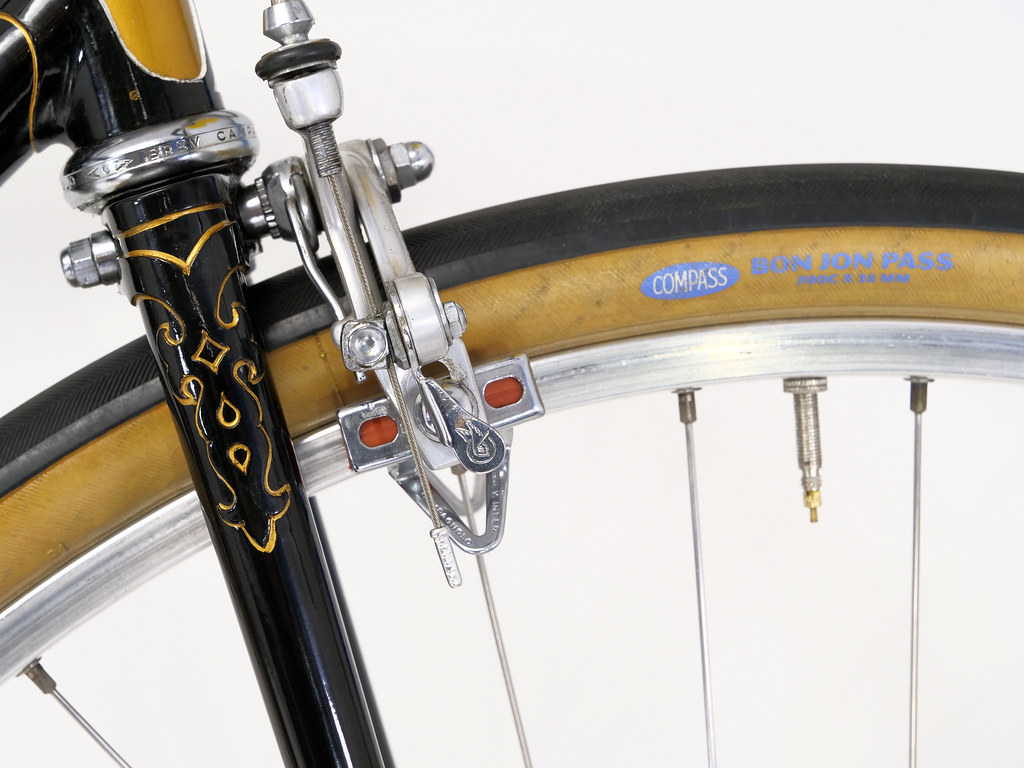
Visually I generally don't want a sidepull caliper cable end protruding much past the bottom of the tire guide, or rder cable ends past the forward/lower edge of the body plate. Fder ends are generally a little shorter than rder, and I bend 'em a bit towards the non-drive side after they exit the clamp to make sure they can't ever poke my leg. The cable end in the Hetchins photo is maybe a couple mm on the long side looking at it in isolation, and up close. A little excess goes with the visual excess of the lugs.
I'll sometimes trim a little shorter on lighter/zippier go-fast builds.
One exception to avoiding too-short stubs is a canti transverse cable yoke. Sometimes, depending on the build, you only have room for a short stub. Gotta avoid tire/fender/rack contact. That's less trouble for tension adjusting, though, since you can unhook the transverse cable and not have to adjust the tension, so you don't need hand strength/grip to pull against the component. Even without clearance issues, I trim these on the shorter side, don't like them on the longer side. Paramount photo is trimmed short for a front rack to be installed. The Zanconato with cantis is a build from 7yrs ago, cable is a little longer than the Paramount, but not much.
If a canti/v-brake has a dedicated/effective cable-tuck boss/doohickie I'll leave the cable long enough to tuck it. If not, and I need a longish cable length to tuck it behind the brake boss, I'll trim it short/stubby. More recent photo of the Zanc with Paul v-brakes kinda shows the cable tucked behind the non-drive arm.
Cable end cap crimping is where I get True Religion.
BITD LBS wrenches would often develop signature cable end cap crimps, so you'd know who to holler at if a build/repair came back with problems. This is the most important use of the Shimano cable cutting/crimping tool. The key is to not just use the crimper, you need to use the cutting jaws to incise a recognizable pattern into the cap. Mine is just as many perpendicular cuts as possible; it's pretty hard to get much than 8 cuts. I always thought of mine as kinda being like a rattlesnake tail. Usually it's a set pattern of perpendicular cuts, but some would get fancy with criss-crossed "X"s.
I flatten the cap a little first with a couple of light squeezes with the flat inner surface of the Shimano tool, then do the cuts. Sounds like work, but it gets pretty quick and natural after a few hundred, then very automatic and 2nd nature after thousands. Spotting a sloppy cap later on tells me I was working really late on that particular bike, or it gave me a hard time. Really sloppy caps don't leave the stand---they get redone. I generally like to leave short-ish cut cables, so more than one redo and I'm getting into trouble.
Caps, btw, are the last thing I do. That's my sign that everything's done, checked and ready to roll. This one in the photo just got 7 cuts. Shoulda been 8, but I'll let 6-7 slide.
And you do need two different cap sizes for brake/der cables. Shimano has 1.2mm/1.6mm, there are also cheaper/bulk fatties at 1.8mm.
Though I like the idea of multicolors, I stick with silver, because back in my day that's all there was.


I don't have any personal hard/fast rules for post-clamp cable length, it's a balance of practicality and looks. I want it long enough to be able to grab the end with my hand/fingers if/when I need to adjust cable tension. I think a tiny stub looks too short, and you'd need pliers to grab the end to adjust tension. And ponytail-long, flapping-in-the-breeze just looks too long.
Visually I generally don't want a sidepull caliper cable end protruding much past the bottom of the tire guide, or rder cable ends past the forward/lower edge of the body plate. Fder ends are generally a little shorter than rder, and I bend 'em a bit towards the non-drive side after they exit the clamp to make sure they can't ever poke my leg. The cable end in the Hetchins photo is maybe a couple mm on the long side looking at it in isolation, and up close. A little excess goes with the visual excess of the lugs.
I'll sometimes trim a little shorter on lighter/zippier go-fast builds.
One exception to avoiding too-short stubs is a canti transverse cable yoke. Sometimes, depending on the build, you only have room for a short stub. Gotta avoid tire/fender/rack contact. That's less trouble for tension adjusting, though, since you can unhook the transverse cable and not have to adjust the tension, so you don't need hand strength/grip to pull against the component. Even without clearance issues, I trim these on the shorter side, don't like them on the longer side. Paramount photo is trimmed short for a front rack to be installed. The Zanconato with cantis is a build from 7yrs ago, cable is a little longer than the Paramount, but not much.
If a canti/v-brake has a dedicated/effective cable-tuck boss/doohickie I'll leave the cable long enough to tuck it. If not, and I need a longish cable length to tuck it behind the brake boss, I'll trim it short/stubby. More recent photo of the Zanc with Paul v-brakes kinda shows the cable tucked behind the non-drive arm.
Cable end cap crimping is where I get True Religion.
BITD LBS wrenches would often develop signature cable end cap crimps, so you'd know who to holler at if a build/repair came back with problems. This is the most important use of the Shimano cable cutting/crimping tool. The key is to not just use the crimper, you need to use the cutting jaws to incise a recognizable pattern into the cap. Mine is just as many perpendicular cuts as possible; it's pretty hard to get much than 8 cuts. I always thought of mine as kinda being like a rattlesnake tail. Usually it's a set pattern of perpendicular cuts, but some would get fancy with criss-crossed "X"s.
I flatten the cap a little first with a couple of light squeezes with the flat inner surface of the Shimano tool, then do the cuts. Sounds like work, but it gets pretty quick and natural after a few hundred, then very automatic and 2nd nature after thousands. Spotting a sloppy cap later on tells me I was working really late on that particular bike, or it gave me a hard time. Really sloppy caps don't leave the stand---they get redone. I generally like to leave short-ish cut cables, so more than one redo and I'm getting into trouble.
Caps, btw, are the last thing I do. That's my sign that everything's done, checked and ready to roll. This one in the photo just got 7 cuts. Shoulda been 8, but I'll let 6-7 slide.
And you do need two different cap sizes for brake/der cables. Shimano has 1.2mm/1.6mm, there are also cheaper/bulk fatties at 1.8mm.
Though I like the idea of multicolors, I stick with silver, because back in my day that's all there was.
__________________
Fuggedaboutit!
Fuggedaboutit!
Likes For pcb:
02-22-21, 11:43 AM
#10
Senior Member
Thread Starter
Join Date: May 2008
Location: Fredericksburg, Va
Posts: 9,579
Bikes: '65 Frejus TDF, '73 Bottecchia Giro d'Italia, '83 Colnago Superissimo, '84 Trek 610, '84 Trek 760, '88 Pinarello Veneto, '88 De Rosa Pro, '89 Pinarello Montello, '94 Burley Duet, 97 Specialized RockHopper, 2010 Langster, Tern Link D8
Mentioned: 73 Post(s)
Tagged: 0 Thread(s)
Quoted: 1607 Post(s)
Liked 2,214 Times
in
1,103 Posts
@pcb - Comprehensive response! I like it!
Do you find that with all the cuts you can use the cap as part of your grip?
Do you find that with all the cuts you can use the cap as part of your grip?
__________________
Bikes don't stand alone. They are two tired.
Bikes don't stand alone. They are two tired.
02-22-21, 11:56 AM
#11
Senior Member
Thanks, but important topics deserve the proper amount of electrons!
The cap does give your fingers a little extra to grip, and makes it a little easier to pull. Especially if your fingers are greased or Tri-Flowed.
If you do the cuts right, the cap won't ever slip off. Will also almost never pull off intentionally, without extreme downward force anyway. You have to cut them off.
I should note that I'm a frequent re-user of cables, will cut used longer/rear ones to use in the front, etc. And if I've paid (relatively) big buck$ for a highest-end Jagwire Pro cable, I'll re-use one on a rder even if all that's sticking out past the clamp is the cap. And I'll cap those before the build is done, because otherwise they get pulled back out of the rder, and having to constantly re-fish the cable through/into the rder is a pain.
@pcb - Comprehensive response! I like it!
Do you find that with all the cuts you can use the cap as part of your grip?
Do you find that with all the cuts you can use the cap as part of your grip?
__________________
Fuggedaboutit!
Fuggedaboutit!
Likes For pcb:
02-22-21, 12:03 PM
#12
Senior Member

Join Date: Sep 2005
Location: Oakland, CA
Posts: 3,265
Bikes: '82 Univega Competizione, '72 Motobecane Grand Record, '83 Mercian KOM Touring, '85 Univega Alpina Uno, '76 Eisentraut Limited
Mentioned: 57 Post(s)
Tagged: 0 Thread(s)
Quoted: 1088 Post(s)
Liked 1,205 Times
in
701 Posts
I tinker a lot, so I generally leave enough cable to grab with a cable puller easily, usually about 2.5 to 3 inches, and cap it with a crimped silver end. Like markk900 above, I bought a bag several years ago that very well might give me a lifetime supply of caps.
I channeled my inner weight weenie and cut the ends very short on my Moto GR, and for better or worse, it's kind of a deterrent to my tinkering with it more. It feels like a finishing touch.
I channeled my inner weight weenie and cut the ends very short on my Moto GR, and for better or worse, it's kind of a deterrent to my tinkering with it more. It feels like a finishing touch.
02-22-21, 12:07 PM
#13
Senior Member
And I'm not OCD at all, but it really bothers me now that I missed seeing the cable clamp plate on this Campy brake is rotated downward/forward. Should be parallel to the clamp/qr assembly. I usually tweak that with a small adjustable.
Looks crooked, and I'm not clamping with full cable contact. Tsk-tsk, gotta go fix that now.

Looks crooked, and I'm not clamping with full cable contact. Tsk-tsk, gotta go fix that now.
__________________
Fuggedaboutit!
Fuggedaboutit!


Likes For thinktubes:
02-22-21, 12:59 PM
#15
SE Wis
Join Date: Apr 2005
Location: Milwaukee, WI
Posts: 10,501
Bikes: '68 Raleigh Sprite, '02 Raleigh C500, '84 Raleigh Gran Prix, '91 Trek 400, 2013 Novara Randonee, 1990 Trek 970
Mentioned: 40 Post(s)
Tagged: 0 Thread(s)
Quoted: 2742 Post(s)
Liked 3,389 Times
in
2,052 Posts
I leave at least a couple inches. Cap with heat shrink tubing in color to match the cable housing.
02-22-21, 01:03 PM
#16
Klaatu..Verata..Necktie?
Join Date: May 2007
Location: SF Bay Area
Posts: 17,913
Bikes: Litespeed Ultimate, Ultegra; Canyon Endurace, 105; Battaglin MAX, Chorus; Bianchi 928 Veloce; Ritchey Road Logic, Dura Ace; Cannondale R500 RX100; Schwinn Circuit, Sante; Lotus Supreme, Dura Ace
Mentioned: 41 Post(s)
Tagged: 0 Thread(s)
Quoted: 10397 Post(s)
Liked 11,860 Times
in
6,072 Posts
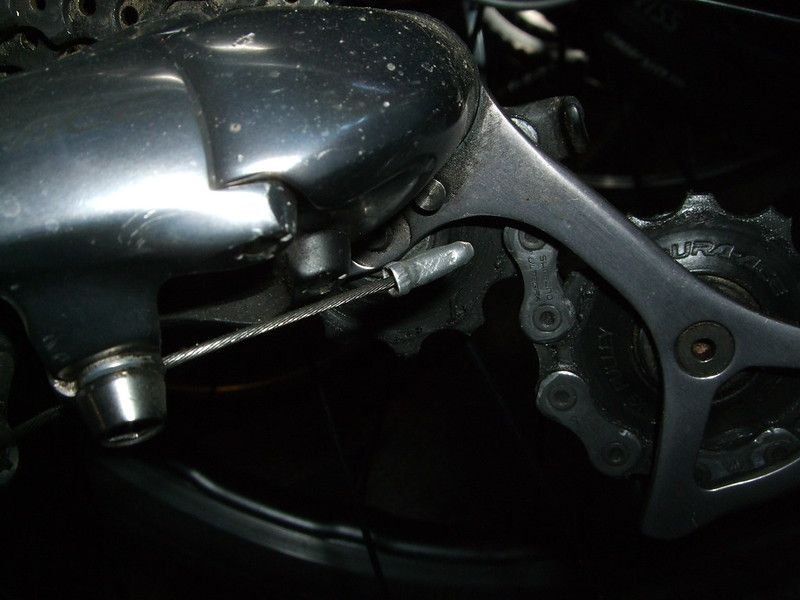
P1040377 on FlickrEDIT: To be more specific, I cut it about where your cable crimp begins. The front derailleur cable then gets looped back around the pivot so it doesn't keep poking my leg every pedal stroke. When I changed wheelsets on one bike to wider rims, I had to let adjust the cable to be longer from lever to brakes, and that made the end too short, but I had to recable shortly after that anyway.
__________________
"Don't take life so serious-it ain't nohow permanent."
"Everybody's gotta be somewhere." - Eccles
"Don't take life so serious-it ain't nohow permanent."
"Everybody's gotta be somewhere." - Eccles
Last edited by genejockey; 02-22-21 at 01:10 PM.
Likes For genejockey:
02-22-21, 01:56 PM
#17
Senior Member
I leave about 2" and cap them with heat shrink tubing. You can find heat shrink in a number of colors and it is easily removed if you have to pull the cable out for some reason.
Likes For gearbasher:
02-22-21, 02:32 PM
#18
Senior Member

Join Date: Apr 2007
Location: Thunder Bay, Ontario, Canada - burrrrr!
Posts: 11,674
Bikes: 1958 Rabeneick 120D, 1968 Legnano Gran Premio, 196? Torpado Professional, 2000 Marinoni Piuma
Mentioned: 210 Post(s)
Tagged: 0 Thread(s)
Quoted: 1372 Post(s)
Likes: 0
Liked 1,749 Times
in
937 Posts
@pcb - Comprehensive response! I like it!
Do you find that with all the cuts you can use the cap as part of your grip?
Do you find that with all the cuts you can use the cap as part of your grip?
__________________
"98% of the bikes I buy are projects".
"98% of the bikes I buy are projects".
02-22-21, 02:41 PM
#19
Passista
Join Date: Jul 2005
Posts: 7,596
Bikes: 1998 Pinarello Asolo, 1992 KHS Monta�a pro, 1980 Raleigh DL-1, IGH Hybrid, IGH Utility
Mentioned: 5 Post(s)
Tagged: 0 Thread(s)
Quoted: 866 Post(s)
Liked 720 Times
in
395 Posts
I like short cable ends, about 2 - 3cm. Usually with standard crimped caps, but sometimes with an old crimped nipple or soldered if the cable allows it.
02-22-21, 02:47 PM
#20
Ride, Wrench, Swap, Race
Join Date: Jan 2010
Location: Northern California
Posts: 9,182
Bikes: Cheltenham-Pedersen racer, Boulder F/S Paris-Roubaix, Varsity racer, '52 Christophe, '62 Continental, '92 Merckx, '75 Limongi, '76 Presto, '72 Gitane SC, '71 Schwinn SS, etc.
Mentioned: 132 Post(s)
Tagged: 0 Thread(s)
Quoted: 1562 Post(s)
Liked 1,287 Times
in
858 Posts
One more detail, about re-using the caps.
Usually these are crimped with side-cutters, i.e. dikes. This usually means that one can't un-crimp them easily, because of the deep local indentation.
To fix this, I apply the corner of my pliers to the center barrel of the cap, including the crimp, and flatten the barrel, which flattens the crimp internally against the cable.
Then, rotating the plier to 90-degrees around the barrel, the now-flattened section can be restored to a round/square shape, which opens up the barrel and releases the cable.
From that point on, re-crimping using the corner of a plier across the entire center-section of the barrel leaves the cap in an easily-opened, flat section, for future servicing and re-use.
Sometimes the cap still needs to be spun onto the cut end of the cable, the sharp edges helping to restore the inside bore for full insertion of the cable.
Four or five uses can be expected from most caps as long as they aren't mangled!
Here's a good example of a previously-used cap that is in great condition for future servicing and re-use.
While the opening "ring" was damaged by pliers during a previous installation, it's been opened up and the center section alone re-crimped (from both sides at a 45-degree angle) with the corner of the serrated pliers' jaws, leaving the tell-tale X's through the middle section. It can be released in seconds with one squeeze of a plier to the same central section of the cap's length.
Here's one that had been double-crimped with dikes, though only gently, so easy to restore by first flattening the crimps, then squeezing open the cap with another squeeze of the pliers from 90-degrees around the middle section of the crimp.
It looks almost new, and has been re-installed using one squeeze of a sturdy needle-nose plier, ready for future easy removal and re-use.
Last edited by dddd; 02-22-21 at 03:02 PM.
02-22-21, 02:54 PM
#21
Banned.

Join Date: Jul 2009
Location: PAZ
Posts: 12,294
Mentioned: 255 Post(s)
Tagged: 0 Thread(s)
Quoted: 2588 Post(s)
Liked 4,823 Times
in
1,709 Posts
Surely a personal preference kind of thing, and a detail that allows for lots of "personal reflection" 
Myself, I'm all over the place with my cable ends. I used to crimp the ends by lightly clamping twice using the cutting part of my pliers' jaws. Then I figured out what those little notches were on my Park cable cutter and have been using that approach ever since. I usually allow 2" to remain in case I need to re-tension; the extra bit allows me to get a good grip with pliers; I snip off whatever bit got smooshed by the pliers during re-tensioning, add a new cap and it's ready to ride.
Most of my bikes wear standar silver caps, but on the Medici I went with red for a little added bling:
DD
 02-22-21, 03:17 PM
#22
Ride, Wrench, Swap, Race
Join Date: Jan 2010
Location: Northern California
Posts: 9,182
Bikes: Cheltenham-Pedersen racer, Boulder F/S Paris-Roubaix, Varsity racer, '52 Christophe, '62 Continental, '92 Merckx, '75 Limongi, '76 Presto, '72 Gitane SC, '71 Schwinn SS, etc.
Mentioned: 132 Post(s)
Tagged: 0 Thread(s)
Quoted: 1562 Post(s)
Liked 1,287 Times
in
858 Posts
That's what I would call a long tail.
In forty year's time, I've never run out of cable "crimps", but I did recently buy these to really top off my quite-varied horde of new and old ones.
https://www.ebay.com/itm/100x-Bike-B...kAAOSwbVhe4Grz
There are also some very poor, paper-thin ones out there that turn up cheaply. Too thin to grip really well, but easily distinguishable by their squared-off closed end, by their most shiny appearance, and by their absence of any ring around the opening. They work, just not as good as the traditional thicker ones.
Last edited by dddd; 02-22-21 at 03:23 PM.
02-22-21, 04:46 PM
#23

Senior Member
Join Date: Dec 2005
Posts: 17,146
Mentioned: 481 Post(s)
Tagged: 0 Thread(s)
Quoted: 3804 Post(s)
Liked 6,643 Times
in
2,602 Posts
I think mullet length is appropriate.

Likes For nlerner:
02-22-21, 05:39 PM
#24
Full Member
Join Date: Aug 2014
Location: ETX/ SNH
Posts: 225
Bikes: 2011 Handsome/ Twin Six Speedy Devil, 2006 Soma Groove, 1991 Haro Impulse Comp, 1987 KHS Montana Pro, 1986 Ross Mount Hood, 1986 Mongoose ATB, 1985 Shogun Prairie Breaker I, 1973 World Voyageur, 1941 Schwinn DX "Klunker"
Mentioned: 3 Post(s)
Tagged: 0 Thread(s)
Quoted: 83 Post(s)
Liked 96 Times
in
45 Posts
I just measured six of mine, first time ever. They were all within a quarter inch of two inches, most within 1/8 inch on the short side. Guess I'm pretty consistent without even trying.
02-22-21, 05:45 PM
#25
Garage tetris expert

Join Date: May 2016
Location: Texas Hill Country
Posts: 889
Bikes: A few. Ok, a lot
Mentioned: 16 Post(s)
Tagged: 0 Thread(s)
Quoted: 386 Post(s)
Liked 691 Times
in
328 Posts
I coil up the complete uncut cable and secure with zip-ties. This way I can simultaneously enjoy the soldered ends from factory and save a bundle on caps. A bundle I tell you.