


Flip the chain wheel so that it sits on the inside of the crank arm bolts
 11-20-21, 05:44 AM
#1
Junior Member
Thread Starter
Flip the chain wheel so that it sits on the inside of the crank arm bolts
Hi,
I wondering if someone can explain what something means.
The backstory is I bought a fixed gear bike about 6 months ago and recently looked at the reviews for it from the site it was bought.
One of the reviewers said the below should be done to the stock bike...
"Flip the chain wheel so that it sits on the inside of the crank arm bolts (on the stock bike, it is opposite, so the chain is warped and under unnecessary torque). When you flip it, the chain will sit perfectly straight."
Can any explain way the reviewer means by this? Maybe explain it in different words
Cheers

Likes For b1983:
11-20-21, 05:57 AM
#2

2-Wheeled Fool

Join Date: Sep 2016
Location: New Hampshire
Posts: 2,346
Bikes: Surly Ogre, Brompton
Mentioned: 18 Post(s)
Tagged: 0 Thread(s)
Quoted: 1385 Post(s)
Liked 677 Times
in
457 Posts
Here ya go: https://www.sheldonbrown.com/chainline.html
Likes For J.Higgins:
11-20-21, 06:09 AM
#3
Junior Member
Thread Starter
Thanks but I think there are too many gaps in my knowledge to understand the information from that link.
What I hoping someone can tell me is something like you need to use tool 'x' to remove part 'y' then do 'xyz'
Once I get a bit hands on I think the sheldon brown info would make sense
What I hoping someone can tell me is something like you need to use tool 'x' to remove part 'y' then do 'xyz'
Once I get a bit hands on I think the sheldon brown info would make sense
11-20-21, 06:54 AM
#4
Senior Member
Join Date: Jan 2013
Posts: 2,673
Bikes: too many sparkly Italians, some sweet Americans and a couple interesting Japanese
Mentioned: 9 Post(s)
Tagged: 0 Thread(s)
Quoted: 565 Post(s)
Liked 557 Times
in
402 Posts
Probably dozens of videos on You Tube that will help, search:
How to Replace a Chainring
Likes For easyupbug:
11-20-21, 06:57 AM
#5
Old fart

Join Date: Nov 2004
Location: Appleton WI
Posts: 24,773
Bikes: Several, mostly not name brands.
Mentioned: 153 Post(s)
Tagged: 0 Thread(s)
Quoted: 3580 Post(s)
Liked 3,390 Times
in
1,927 Posts
I think what you're asking is how to optimize the chainline when using a road-type double crank for a single front ring. It is often enough to mount whatever ring you intend to use on the inner plateau of the crank arm rather than the outer plateau.
First, does your crank actually have a removable outer ring? Some low-end cranks have the outer ring permanently swaged onto the arm. If that's the case, game over. Run the chain on the inner ring and ignore the outer ring and live with what you have, or buy a different crank.
If the ring is removable, you'll need tools to fit the mounting bolts. Usually a 5mm Allen key for the front of the bolt and a special spanner to hold the back.

Remove the mounting bolts, then remove the rings from the crank arm. Mount the ring you intend to use on the inner plateau and secure with mounting bolts. You may need to use shorter mounting bolts or spacers.
11-20-21, 07:33 AM
#6
Junior Member
Thread Starter
I would need to find a video showing someone 'Installing a chain wheel so it sits on the inside of the crank arm bolts' as opposed to my current setup which guess is a chain wheel on the outside of the crank arm bolts
Last edited by b1983; 11-20-21 at 07:46 AM.
11-20-21, 07:35 AM
#8
Junior Member
Thread Starter
Here are some pics
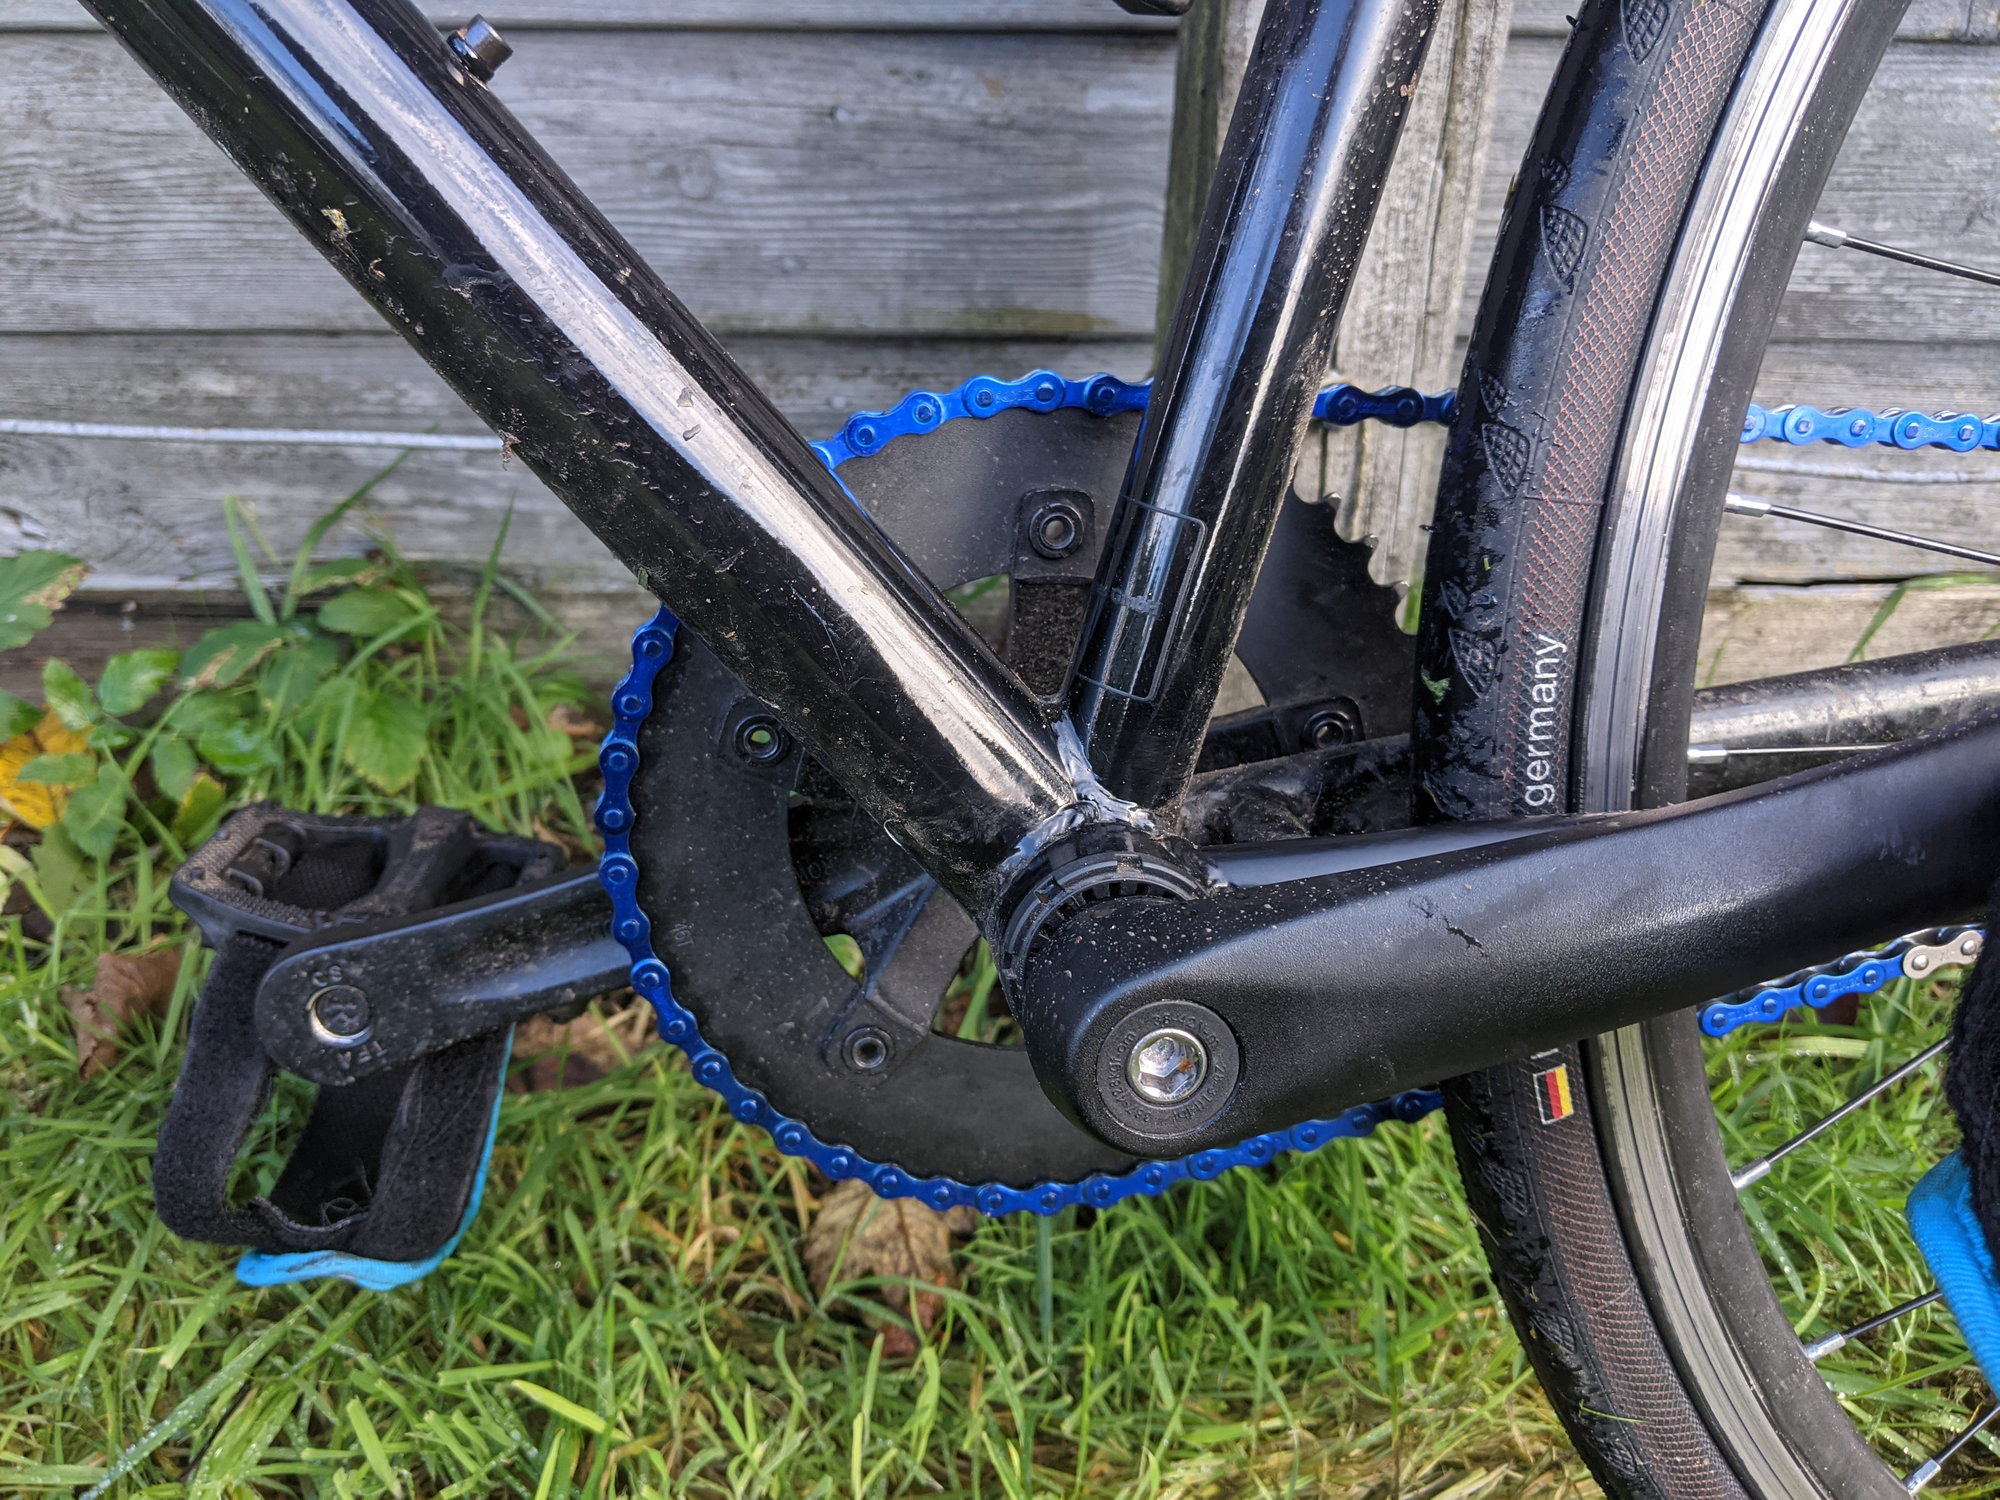
I still don't know what 'Flip the chain wheel so that it sits on the inside of the crank arm bolts' means though. Maybe I need to take it apart to find out..
I still don't know what 'Flip the chain wheel so that it sits on the inside of the crank arm bolts' means though. Maybe I need to take it apart to find out..
11-20-21, 07:46 AM
#9
Junior Member
Undo the bolts using your tool and a 5 mm allen key, remove the ring, thread it back over the spider (fiver-armed thing) such that the indentations around the five holes sit on the inside (towards the frame), put the bolts back in the original orientation.
Likes For Jonneh:
11-20-21, 08:14 AM
#10
Junior Member
Thread Starter
I just gave it a go but could not get the bolts loose.. However I now totally understand what I'm trying to do.
I will try again
Likes For b1983:
11-20-21, 08:14 AM
#11
Sr Member on Sr bikes

Dan
Likes For _ForceD_:
11-20-21, 09:43 AM
#12
Newbie
It's a shame it's not setup properly stock, because it doesn't look as nice with the chainring on the inside, but it also looks like he can't go any narrower with the bottom bracket... Oh well, happy riding!
11-20-21, 10:02 AM
#13
Senior Member

Join Date: Nov 2014
Location: Eugene, Oregon, USA
Posts: 27,547
Mentioned: 217 Post(s)
Tagged: 0 Thread(s)
Quoted: 18347 Post(s)
Liked 4,495 Times
in
3,342 Posts
If the current chainring comes within 1mm to 3mm or so of the chainstay, you can't move it in any further. Ignore all the above.
It is possible to dimple the chainstay for more clearance without harming structural integrity, but that is another project.
If the chainline is a problem, I'd look back at the rearend.

Likes For CliffordK:
11-20-21, 11:00 AM
#14
Senior Member
Join Date: Jun 2002
Location: Montreal, Quebec
Posts: 5,917
Mentioned: 16 Post(s)
Tagged: 0 Thread(s)
Quoted: 1813 Post(s)
Liked 1,691 Times
in
972 Posts
Good point. What cannot be seen from the photos the OP sent is how close the chainring is to the chainstay. If the gap is too small, installing the chainring on the inside of the crank spider will result in the chainring rubbing the frame, not a good result
11-20-21, 11:26 AM
#15
Senior Member
Join Date: Nov 2014
Location: Eugene, Oregon, USA
Posts: 27,547
Mentioned: 217 Post(s)
Tagged: 0 Thread(s)
Quoted: 18347 Post(s)
Liked 4,495 Times
in
3,342 Posts
Another tradeoff is chainring size and rear sprocket size.
So if your current chainring is too close to the chainstay, you could get a smaller chainring, and move the sprocket in closer by either choosing a narrower bottom bracket, or moving the chainring to the inside of the crank spider.
If you can adjust both the chainring size and rear sprocket size, you may not impact gearing very much.
11-20-21, 11:26 AM
#16
Senior Member

Join Date: Feb 2015
Location: Mission Viejo
Posts: 5,799
Bikes: 1986 Cannondale SR400 (Flat bar commuter), 1988 Cannondale Criterium XTR, 1992 Serotta T-Max, 1995 Trek 970
Mentioned: 20 Post(s)
Tagged: 0 Thread(s)
Quoted: 1942 Post(s)
Liked 2,162 Times
in
1,321 Posts
Hi,
I wondering if someone can explain what something means.
The backstory is I bought a fixed gear bike about 6 months ago and recently looked at the reviews for it from the site it was bought.
One of the reviewers said the below should be done to the stock bike...
"Flip the chain wheel so that it sits on the inside of the crank arm bolts (on the stock bike�
Cheers
Can the rear cog be moved in or out to improve the chainline?
If you can add/remove a spacer, that is the way to go.
Sorry, but I don�t have any experience with a fixie.
John
11-20-21, 04:51 PM
#17
Sr Member on Sr bikes
Dan
11-20-21, 05:35 PM
#18
Senior Member
Join Date: Oct 2014
Location: Portland, OR
Posts: 12,878
Bikes: (2) ti TiCycles, 2007 w/ triple and 2011 fixed, 1979 Peter Mooney, ~1983 Trek 420 now fixed and ~1973 Raleigh Carlton Competition gravel grinder
Mentioned: 129 Post(s)
Tagged: 0 Thread(s)
Quoted: 4782 Post(s)
Liked 3,899 Times
in
2,536 Posts
If the �new� bike is a fixed gear, the first thing to do is to eyeball the chain to the rear hub to see if it is perpendicular. If it is close, just ride it.
Can the rear cog be moved in or out to improve the chainline?
If you can add/remove a spacer, that is the way to go.
Sorry, but I don�t have any experience with a fixie.
John
Can the rear cog be moved in or out to improve the chainline?
If you can add/remove a spacer, that is the way to go.
Sorry, but I don�t have any experience with a fixie.
John
So, OP, stand behind your bike (elevated on a stand or kneel on the floor) and line your eye up with the chain. Does it run straight from the cog to the chainring or does it have to jog over because the chainring doesn't line up? (3mm or less is as good as dead on straight.)
Until you do this with your bike, not an "identical" bike you saw on a U-tube, you have no idea whether you are better off with the chainring inside or outside.
Likes For 79pmooney:
11-20-21, 05:48 PM
#19
Senior Member
Join Date: Feb 2001
Location: Houston
Posts: 134
Mentioned: 0 Post(s)
Tagged: 0 Thread(s)
Quoted: 3 Post(s)
Likes: 0
Liked 2 Times
in
2 Posts
Finally someone asking the real question. I was wondering this morning when I saw this thread but I didn't have time to reply.
So, OP, stand behind your bike (elevated on a stand or kneel on the floor) and line your eye up with the chain. Does it run straight from the cog to the chainring or does it have to jog over because the chainring doesn't line up? (3mm or less is as good as dead on straight.)
Until you do this with your bike, not an "identical" bike you saw on a U-tube, you have no idea whether you are better off with the chainring inside or outside.
11-20-21, 11:58 PM
#20
Senior Member
Join Date: Oct 2017
Location: Chapel Hill NC
Posts: 1,683
Bikes: 2000 Litespeed Vortex Chorus 10, 1995 DeBernardi Cromor S/S
Mentioned: 4 Post(s)
Tagged: 0 Thread(s)
Quoted: 645 Post(s)
Liked 797 Times
in
446 Posts
Hi,
I wondering if someone can explain what something means.
The backstory is I bought a fixed gear bike about 6 months ago and recently looked at the reviews for it from the site it was bought.
One of the reviewers said the below should be done to the stock bike...
"Flip the chain wheel so that it sits on the inside of the crank arm bolts (on the stock bike, it is opposite, so the chain is warped and under unnecessary torque). When you flip it, the chain will sit perfectly straight."
Can any explain way the reviewer means by this? Maybe explain it in different words
Cheers
Bear in mind also that using a single chainring on a double crank will likely require new chainring screws/nuts - the original nuts are long enough to accommodate two rings and the crank arm, but will likely be too long for only a single ring and the crank arm. You can get a set of shorter "single stack" chainring screws/nuts from most bike shops

Last edited by Litespud; 11-21-21 at 12:02 AM.
11-21-21, 12:23 AM
#21
Method to My Madness
Join Date: Nov 2020
Location: Orange County, California
Posts: 3,638
Bikes: Trek FX 2, Cannondale Synapse, Cannondale CAAD4, Santa Cruz Stigmata GRX
Mentioned: 4 Post(s)
Tagged: 0 Thread(s)
Quoted: 1938 Post(s)
Liked 1,460 Times
in
1,011 Posts
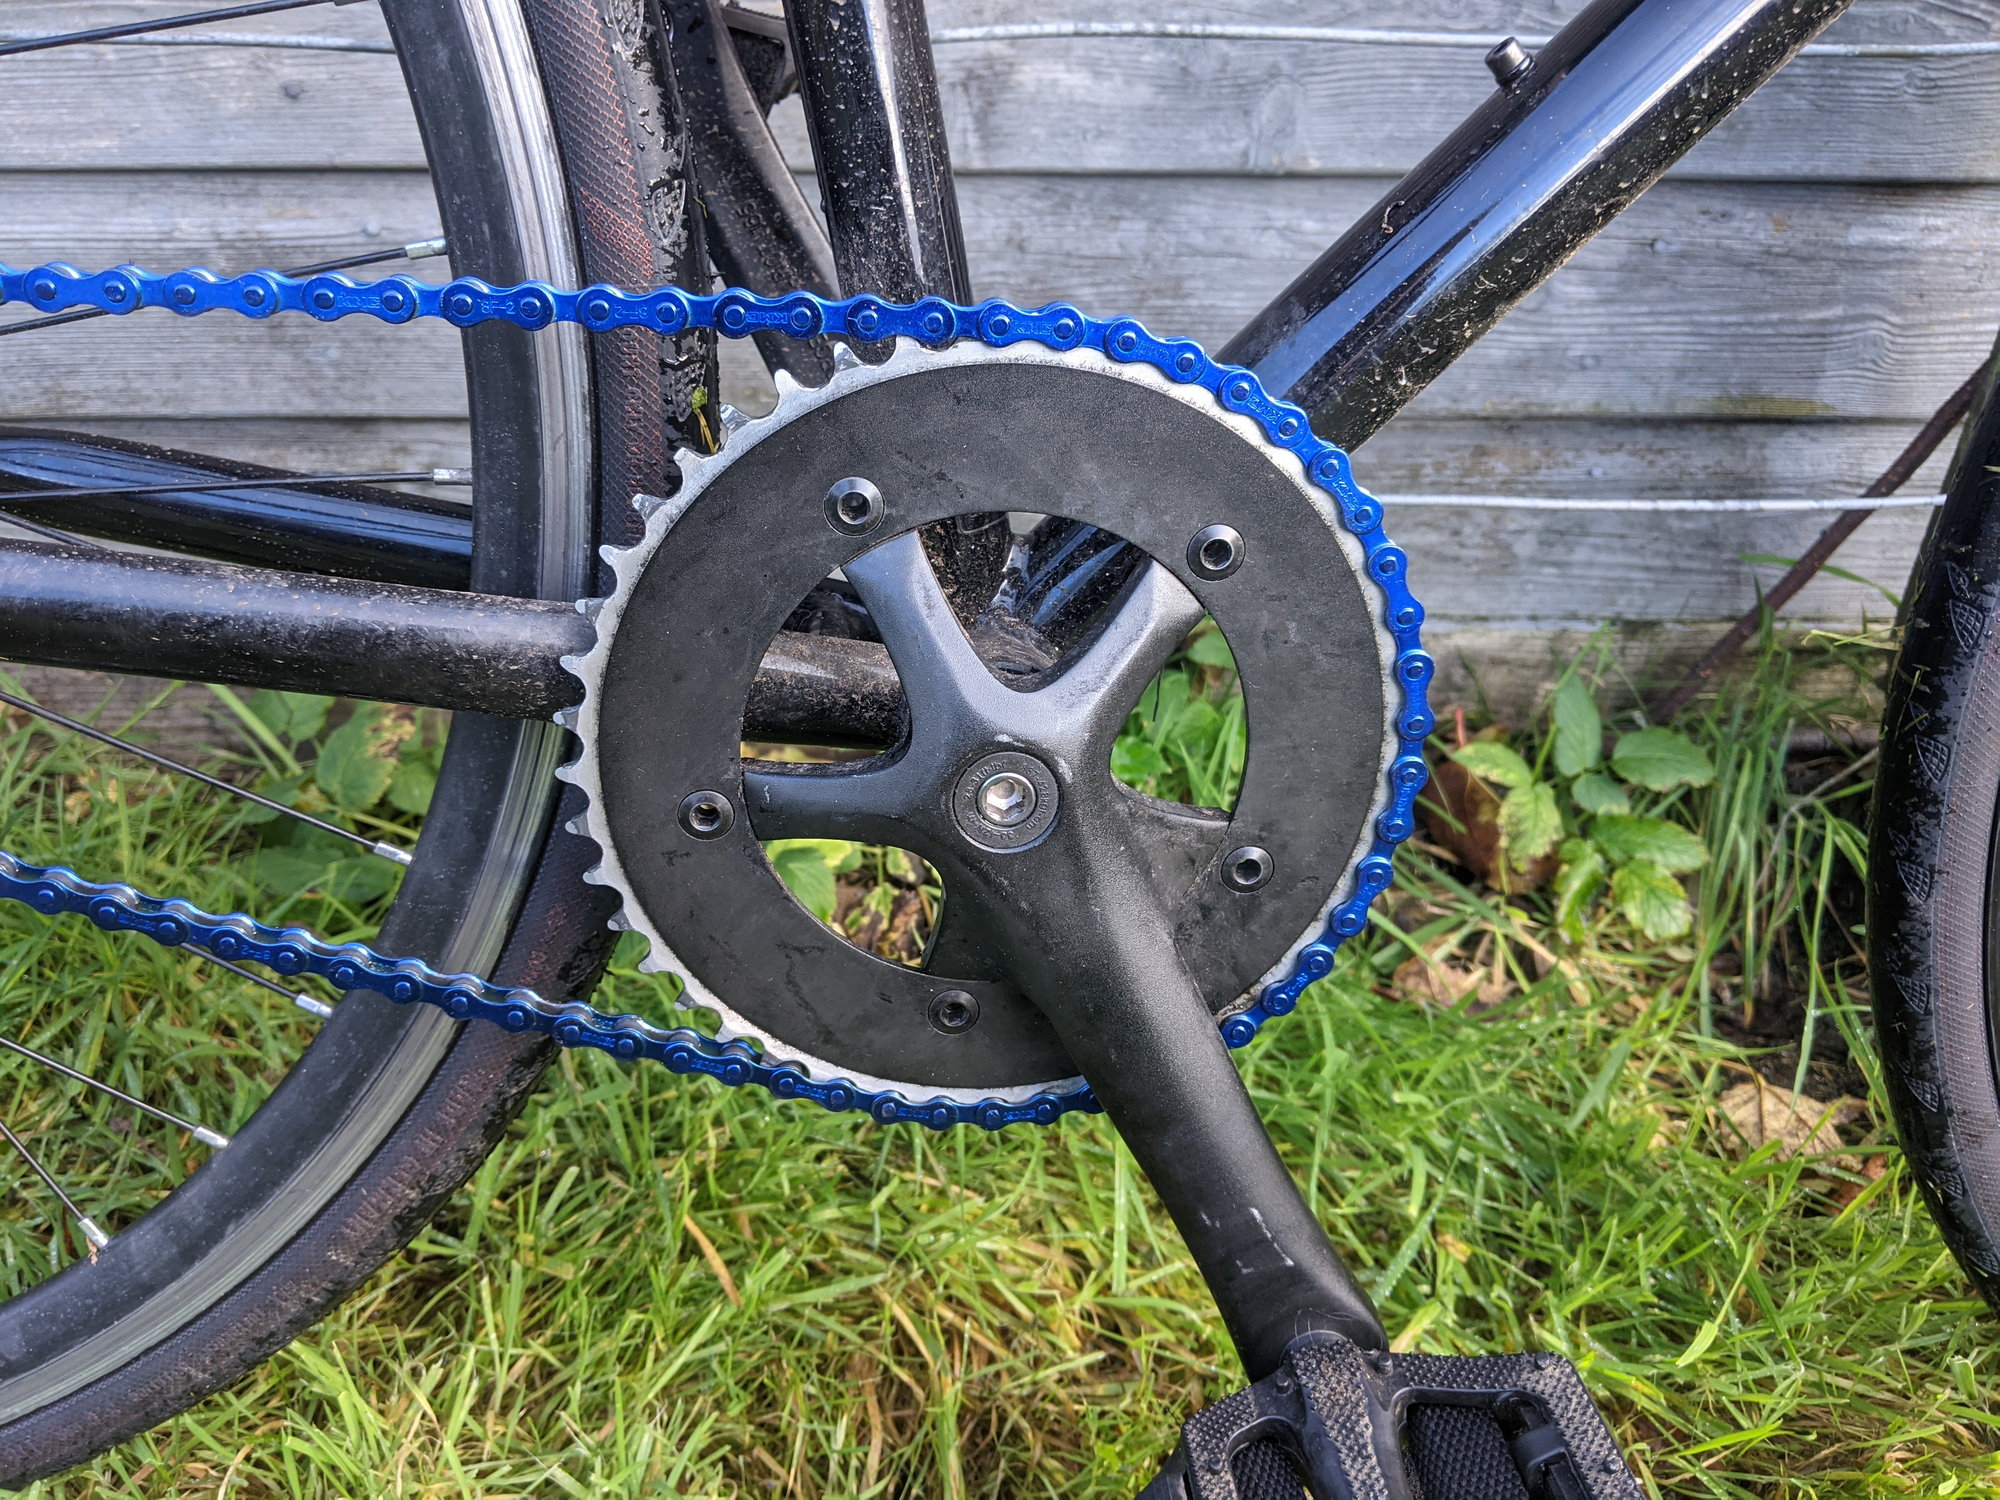
With reference to the above photo, the chain ring is mounted in front of, i.e., closer to the viewer than, the spider.
Another option is to mount the chain ring behind, i.e., further from the viewer than, the spider.
11-21-21, 12:41 AM
#22
Method to My Madness
Join Date: Nov 2020
Location: Orange County, California
Posts: 3,638
Bikes: Trek FX 2, Cannondale Synapse, Cannondale CAAD4, Santa Cruz Stigmata GRX
Mentioned: 4 Post(s)
Tagged: 0 Thread(s)
Quoted: 1938 Post(s)
Liked 1,460 Times
in
1,011 Posts
11-21-21, 12:42 AM
#23
Senior Member
Join Date: Feb 2015
Location: Mission Viejo
Posts: 5,799
Bikes: 1986 Cannondale SR400 (Flat bar commuter), 1988 Cannondale Criterium XTR, 1992 Serotta T-Max, 1995 Trek 970
Mentioned: 20 Post(s)
Tagged: 0 Thread(s)
Quoted: 1942 Post(s)
Liked 2,162 Times
in
1,321 Posts
To sum up the advice…
First check the chain angle from the chainring to the cog to see how straight it is running.
If it is not exactly how you want it, measure the distance from the current chainring to the chainstay at its closest point. Moving the chainring from the outer position to inner moves it 5mm closer to the chainstay. I would think you would want to have at least 8mm from your current ring setup to the chainstay so you end up with 3mm after moving the ring.
John
Likes For 70sSanO:
11-21-21, 12:45 AM
#24
Junior Member
Oops! I deleted my post by accident while trying to edit it, and now you're quoting a non-existent post. Anyway, it's true that the solid ring has a narrower inner circle than a typical 38T chainring, but yeah, the triangles being deeper than the stepped extensions of the arm that the ring bolts to mean that the ring must pass! ;-)
11-21-21, 01:05 AM
#25
Senior Member
Join Date: Feb 2015
Location: Mission Viejo
Posts: 5,799
Bikes: 1986 Cannondale SR400 (Flat bar commuter), 1988 Cannondale Criterium XTR, 1992 Serotta T-Max, 1995 Trek 970
Mentioned: 20 Post(s)
Tagged: 0 Thread(s)
Quoted: 1942 Post(s)
Liked 2,162 Times
in
1,321 Posts
Also, Race Face sells chainring tab shims to fill in the shoulder where the outer ring mounts. I haven’t used them, but I made my own tabs from a worn ring.
It does look better with them than without. But if you have 1x bolts with a double crank, you’ll need longer ones.
John
It does look better with them than without. But if you have 1x bolts with a double crank, you’ll need longer ones.
John
Last edited by 70sSanO; 11-21-21 at 01:23 AM.

