


WTB: Bottom Bracket Post
 11-23-22, 04:20 PM
#1

Senior Member
Thread Starter
Join Date: Aug 2007
Location: Evanston, IL
Posts: 5,084
Bikes: many
Mentioned: 63 Post(s)
Tagged: 0 Thread(s)
Quoted: 1442 Post(s)
Liked 1,388 Times
in
758 Posts
WTB: Bottom Bracket Post
I have a number of frames that need their alignment checked/adjusted. My most immediate need is a mid-50s Automoto which is pretty far out of whack. (My guess is someone cold set it, but only moved one side.) I could take them one-by-one to someone, but most are currently assembled into bikes, so the disassemble, schlef, reassemble process seems tedious. I'd like to shorten the schlep distance out to my garage and do the work myself, if possible. For the moment, I plan to use my old table saw with its cast iron table and extensions as my "alignment table." I am looking for a bottom bracket post. I don't need anything modern. All my bikes/frames have vintage British or Italian bottom bracket shells and 120mm or 126mm rear spacing. If someone has one surplus to their needs they'd like to move along, let's talk.
 11-23-22, 04:49 PM
#2
Senior Member
Join Date: Feb 2012
Location: Rochester, NY
Posts: 18,056
Bikes: Stewart S&S coupled sport tourer, Stewart Sunday light, Stewart Commuting, Stewart Touring, Co Motion Tandem, Stewart 3-Spd, Stewart Track, Fuji Finest, Mongoose Tomac ATB, GT Bravado ATB, JCP Folder, Stewart 650B ATB
Mentioned: 0 Post(s)
Tagged: 0 Thread(s)
Quoted: 4195 Post(s)
Liked 3,837 Times
in
2,295 Posts
MY first thought is how stiff the table saw top is with such a localized force clamped to it (the whipping post). Most pre made posts I've seen have a fairly small diameter base.
Second was that most of the bikes you'll be working on don't need really tightly held alignment tolerances. As you do this stuff you'll get a feel for what's "good enough" and what's " a good improvement" and what is "way too much time for so little added benefit" (point of dimensioning returns).
Third is that you'll learn (if not already know) that anatomical alignment and tracking alignment are not the same and some of each is not always correctable
An option is to clamp the BB edge to the table with a large C clamp thing when checking the alignment (yes, this method has it's issues and often bad assumptions) but use a solid bench vise when doing the whipping on the frame. More time and back and forth but no special tools and ones that you want anyways as you progress with frame stuff.
Any thoughts on fork alignment? Andy
__________________
AndrewRStewart
AndrewRStewart
11-23-22, 05:02 PM
#3
Senior Member

Join Date: May 2010
Location: Bastrop Texas
Posts: 4,467
Bikes: Univega, Peu P6, Peu PR-10, Ted Williams, Peu UO-8, Peu UO-18 Mixte, Peu Dolomites
Mentioned: 13 Post(s)
Tagged: 0 Thread(s)
Quoted: 957 Post(s)
Liked 1,619 Times
in
1,039 Posts
Hey... I know of this guy Andrew Stewart... He'll be able to figure it out!
I am so looking forward ta seeing how ya get it done...
I am so looking forward ta seeing how ya get it done...
__________________
 No matter where you're at... There you are... Δf:=f(1/2)-f(-1/2)
No matter where you're at... There you are... Δf:=f(1/2)-f(-1/2)
11-23-22, 08:21 PM
#4
Senior Member
Thread Starter
Join Date: Aug 2007
Location: Evanston, IL
Posts: 5,084
Bikes: many
Mentioned: 63 Post(s)
Tagged: 0 Thread(s)
Quoted: 1442 Post(s)
Liked 1,388 Times
in
758 Posts
Thanks for the feedback. I'm not terribly worried about my table saw's strength. It's my dad's old early 50s Craftsman with a cast iron top (and ribbed bracing underneath). The extensions are also cast iron. It's not going to be as sturdy as Doug's Johnny Berry table I've been using in his class, but it's also not a cheapo Home Depot saw. In my brief experience working on my own frame, I haven't found a ton of effort was required to make small alignment changes. Further on down the line I would also like to maybe make another frame or two, so having a post would come in handy for that. Doug mentioned that some of his students have used a table saw going forward. Maybe not permanently, but I think it would be a fine place to start.
Edit: And though I have both a vise and a workbench, the vise isn't all that great, it's not firmly attached to the bench, nor the bench to the floor. All in all, I think the table saw is a better option in the near term.
Edit: And though I have both a vise and a workbench, the vise isn't all that great, it's not firmly attached to the bench, nor the bench to the floor. All in all, I think the table saw is a better option in the near term.
Last edited by smontanaro; 11-23-22 at 08:40 PM.
11-24-22, 07:40 AM
#5


Randomhead
Join Date: Aug 2008
Location: Happy Valley, Pennsylvania
Posts: 24,387
Mentioned: 0 Post(s)
Tagged: 0 Thread(s)
Quoted: 4 Post(s)
Liked 3,687 Times
in
2,510 Posts
I think I would go with something like the Bringheli c-channel for bending. I have used my milling machine table, but it's a lot stronger than a tablesaw table. I also used to have a piece of 2" square tubing with a post, I'll have to look to see if I still have it. The tablesaw top might be okay for checking alignment, but I'm not so sure about bending anything. Maybe Doug can clarify. It seems to me that bending a seat tube with seat stays attached takes a goodly amount of force. YMMV.
11-24-22, 08:10 AM
#6
Senior Member
Thread Starter
Join Date: Aug 2007
Location: Evanston, IL
Posts: 5,084
Bikes: many
Mentioned: 63 Post(s)
Tagged: 0 Thread(s)
Quoted: 1442 Post(s)
Liked 1,388 Times
in
758 Posts
For my immediate use case, I suspect most of the action will be in the rear triangles. If I get to the point where I really have a hard time with a main triangle that is way out of whack, I can make the trip to Niles and enlist Doug's help. The system he teaches results in a bunch of very small alignment steps while the frame is being built. None of the adjustments to my frame were very difficult.
11-24-22, 09:59 AM
#7
Senior Member
Join Date: Feb 2012
Location: Rochester, NY
Posts: 18,056
Bikes: Stewart S&S coupled sport tourer, Stewart Sunday light, Stewart Commuting, Stewart Touring, Co Motion Tandem, Stewart 3-Spd, Stewart Track, Fuji Finest, Mongoose Tomac ATB, GT Bravado ATB, JCP Folder, Stewart 650B ATB
Mentioned: 0 Post(s)
Tagged: 0 Thread(s)
Quoted: 4195 Post(s)
Liked 3,837 Times
in
2,295 Posts
Eric- I have rocked my 350lbish 2x3 cast surface plate up and onto 2 of the 3 pads when cold setting a built frame's main triangle before. Took a 1" bar bell shaft about 4 feet long. What amazed me was that the frame tubing took all that and never showed any ripples. The surface plate is now bolted to a stand that adds about 100lb and a larger footprint. Still I nudged it around a bit, but no longer any rocking
smontanaro- If you suspected the table top was flexing a steel plate pad (there's that word again) could be added. Do you know any local machinist type people? For someone with a lathe making a post is quite easy. For your needs common grade steel is all that would be needed. If there's a used tool shop (ours is a non profit for a senior center) it can be a good place to network from. There's a local model/craft store near me and the RC model guys can often be a good source for others who take on evening work. Even if the table top works out well you've got to do something about the lacking vise mount A solid vise is one of the first 10 tools I would have.
Off for a ride than prep the clay pot turkey breast w/ mashed potato... hope your dinners are good too. Andy
smontanaro- If you suspected the table top was flexing a steel plate pad (there's that word again) could be added. Do you know any local machinist type people? For someone with a lathe making a post is quite easy. For your needs common grade steel is all that would be needed. If there's a used tool shop (ours is a non profit for a senior center) it can be a good place to network from. There's a local model/craft store near me and the RC model guys can often be a good source for others who take on evening work. Even if the table top works out well you've got to do something about the lacking vise mount
A solid vise is one of the first 10 tools I would have. Off for a ride than prep the clay pot turkey breast w/ mashed potato... hope your dinners are good too. Andy
__________________
AndrewRStewart
AndrewRStewart
11-24-22, 10:47 AM
#8
Senior Member
Thread Starter
Join Date: Aug 2007
Location: Evanston, IL
Posts: 5,084
Bikes: many
Mentioned: 63 Post(s)
Tagged: 0 Thread(s)
Quoted: 1442 Post(s)
Liked 1,388 Times
in
758 Posts
Likes For smontanaro:
11-24-22, 01:54 PM
#9
Randomhead
Join Date: Aug 2008
Location: Happy Valley, Pennsylvania
Posts: 24,387
Mentioned: 0 Post(s)
Tagged: 0 Thread(s)
Quoted: 4 Post(s)
Liked 3,687 Times
in
2,510 Posts
If I lived near a place with a good makerspace, I would definitely join. We have one that pretty much just replicates the tools I have so I haven't gotten around to joining it. The training classes might be annoying.
Rear triangle alignment definitely takes a bit less force. You don't really need a post if that's what you are going to do though.
Rear triangle alignment definitely takes a bit less force. You don't really need a post if that's what you are going to do though.
11-24-22, 03:28 PM
#10
Senior Member
Join Date: Feb 2012
Location: Rochester, NY
Posts: 18,056
Bikes: Stewart S&S coupled sport tourer, Stewart Sunday light, Stewart Commuting, Stewart Touring, Co Motion Tandem, Stewart 3-Spd, Stewart Track, Fuji Finest, Mongoose Tomac ATB, GT Bravado ATB, JCP Folder, Stewart 650B ATB
Mentioned: 0 Post(s)
Tagged: 0 Thread(s)
Quoted: 4195 Post(s)
Liked 3,837 Times
in
2,295 Posts
I visited one of our community's maker spaces shortly after I had moved back to Rochester. After a couple of evenings I decided to not return, Not because of the management or space (although the ban on an OA torch and brazing would have been too bad) but I didn't get along with a few that I could tell were core attendee/members. This was one of my motivations to get my mill. Still I advise others to check the maker space resource out. Andy
__________________
AndrewRStewart
AndrewRStewart
11-24-22, 08:29 PM
#11
Senior Member
Join Date: Aug 2012
Location: Seattle
Posts: 507
Mentioned: 0 Post(s)
Tagged: 0 Thread(s)
Quoted: 103 Post(s)
Liked 144 Times
in
88 Posts
Park Tool Frame Alignment Gauge - Accessories (competitivecyclist.com)
__________________
https://www.flickr.com/photos/54319503@N05/
https://www.draper-cycles.com
https://www.flickr.com/photos/54319503@N05/
https://www.draper-cycles.com
11-25-22, 09:57 AM
#12
Randomhead
Join Date: Aug 2008
Location: Happy Valley, Pennsylvania
Posts: 24,387
Mentioned: 0 Post(s)
Tagged: 0 Thread(s)
Quoted: 4 Post(s)
Liked 3,687 Times
in
2,510 Posts
If it's something like a Lemond Poprad with oversized tubes, it's probably best to ignore it if the front triangle is a little out. There are definitely pictures out there of buckled oversized downtubes.
A bb post isn't a good place to reference off of for just measurement. It's really unlikely to survive the joining process in a flat cylindrical state. There is a Paul Brodie video where he talks about that, I have to say that even after almost 50 years of building I learned something from that video. Vintage bikes are unlikely to have had a post-construction bb facing. I know we didn't do it at trek when I was there. We did lots of things a little off, tbh.
OTOH, a bb post is a good point to bend things from, so it's useful to have one. The other thing to consider is if a vintage bike made it this long without being aligned, is there really any reason to align it if it's not displaying serious handling problems?
11-27-22, 12:01 PM
#13
Senior Member
Thread Starter
Join Date: Aug 2007
Location: Evanston, IL
Posts: 5,084
Bikes: many
Mentioned: 63 Post(s)
Tagged: 0 Thread(s)
Quoted: 1442 Post(s)
Liked 1,388 Times
in
758 Posts
Thanks for all the feedback.
Since it seemed clear no bottom bracket post was going to just fall into my lap, I got a bit more creative. Some leftover blocks from a tubing block building exercise, a bit of shimming, and a "custom made" spacing checker served to give me what I needed to bring the rear end to 120mm spacing and much closer to proper centering with respect to the seat tube.


That allows this project to continue moving forward. A better long-term solution will have to wait until after the new year...
Since it seemed clear no bottom bracket post was going to just fall into my lap, I got a bit more creative. Some leftover blocks from a tubing block building exercise, a bit of shimming, and a "custom made" spacing checker served to give me what I needed to bring the rear end to 120mm spacing and much closer to proper centering with respect to the seat tube.
That allows this project to continue moving forward. A better long-term solution will have to wait until after the new year...
11-27-22, 03:26 PM
#14
Randomhead
Join Date: Aug 2008
Location: Happy Valley, Pennsylvania
Posts: 24,387
Mentioned: 0 Post(s)
Tagged: 0 Thread(s)
Quoted: 4 Post(s)
Liked 3,687 Times
in
2,510 Posts
You might want to ask dsaul about a post, I got some head tube cones from him and they were really nice.
If I figure out where my old fixture post is, I'll let you know. I can't see why I would need it any more.
If I figure out where my old fixture post is, I'll let you know. I can't see why I would need it any more.
11-27-22, 11:18 PM
#15
framebuilder
1. My post(s} put the center of the frame 100 mm off the top of the table. Since a English bottom bracket shell is 68mm wide, 100 � 34 = 66. That is the height of the top flat of the post off of the table. This is arbitrary. It wouldn�t matter if you made it so the center of the frame is at 110mm.
2. Constant tightening of a frame to the table can depress (make a round circle dent) on the face of the post where the bb touches it. To prevent that, I put a hardened washer about �� (6mm) thick on top of the post. This washer has 3 purposes. 1st to keep the post from getting a dent ring when the frame is tightened against it (because it is heat treated to be harder than the post) and 2nd, to make it easy to take off and clean melted flux that has dripped on it. And 3rd, if it gets indented, it is easier to replace.
3. The post base is 3� at the bottom tapering to 2� at the top. It is 66 � 6mm in length (in other words 60mm. The 6mm washer will make its total height to be 66mm). The taper allows for checking alignment more easily. The wider base provides more support when bending the frame into alignment.
a. The bottom of the post has a �� X 13 tpi (threads per inch) treaded hole. My early posts had a big threaded rod at the bottom of the post (it was all one piece actually) go through the table and held in place with a big nut underneath the table. It is easier and cheaper to attach the post to the table with a separate �� bolt that screws into the post hole from the bottom of the table. It has enough force to hold the post.
b. Coming out of the top of the base is a 7/8� X 9 tpi (teeth per inch) post 4� (100mm) long. It can be one piece with the base or a combined 2 pieces. With a nut, this is what holds the frame to the table.
i. The bottom 68mm of this post does not have threads. It probably wouldn�t matter if it was threaded the whole distance.
ii. The top 32 mm is threaded. The actual length of the treaded post should be long enough so that the holding nut will fit entirely on the post when a frame is tightened to the table. That length would include the thickness of the 2nd step of the step washer, the thickness of a regular flat washer and the total thickness of the holding nut.
4. On top of the hardened washer is a ring to help center the frame on the post. The outside diameter of this ring is 1.316� (33.43mm). This diameter is so it can fit inside an English bb shell with little play. The inside diameter hole is .877� so it can slide over the center post. And it is about .4� (10mm) thick. The .4� is an arbitrary thickness. It can be much less thick. This washer a separate piece so it is easy to remove for cleaning.
5. The top lock down washer is a step washer. The 1st step is also has an outside diameter of 1.316�. It also is 10mm long. It is this diameter size so it can fit inside an English bottom bracket shell. The 2ndstep has an outside diameter of about 2� or 50mm. The inside hole diameter is .877� to slide over the 7/8� post.
6. A regular thick flat washer to go between the step washer and the nut. Mine is �� thick with an outside diameter of 1 ��. It hole is also bigger than 7/8�.
7. The 7/8� X 9 tpi nut is about �� thick.
There is nothing sacred about any of these dimensions. The ones on my table were chosen because of the stock that was available in English (Imperial) sizes. They should be changed to fit metric sizes.

My original BB post
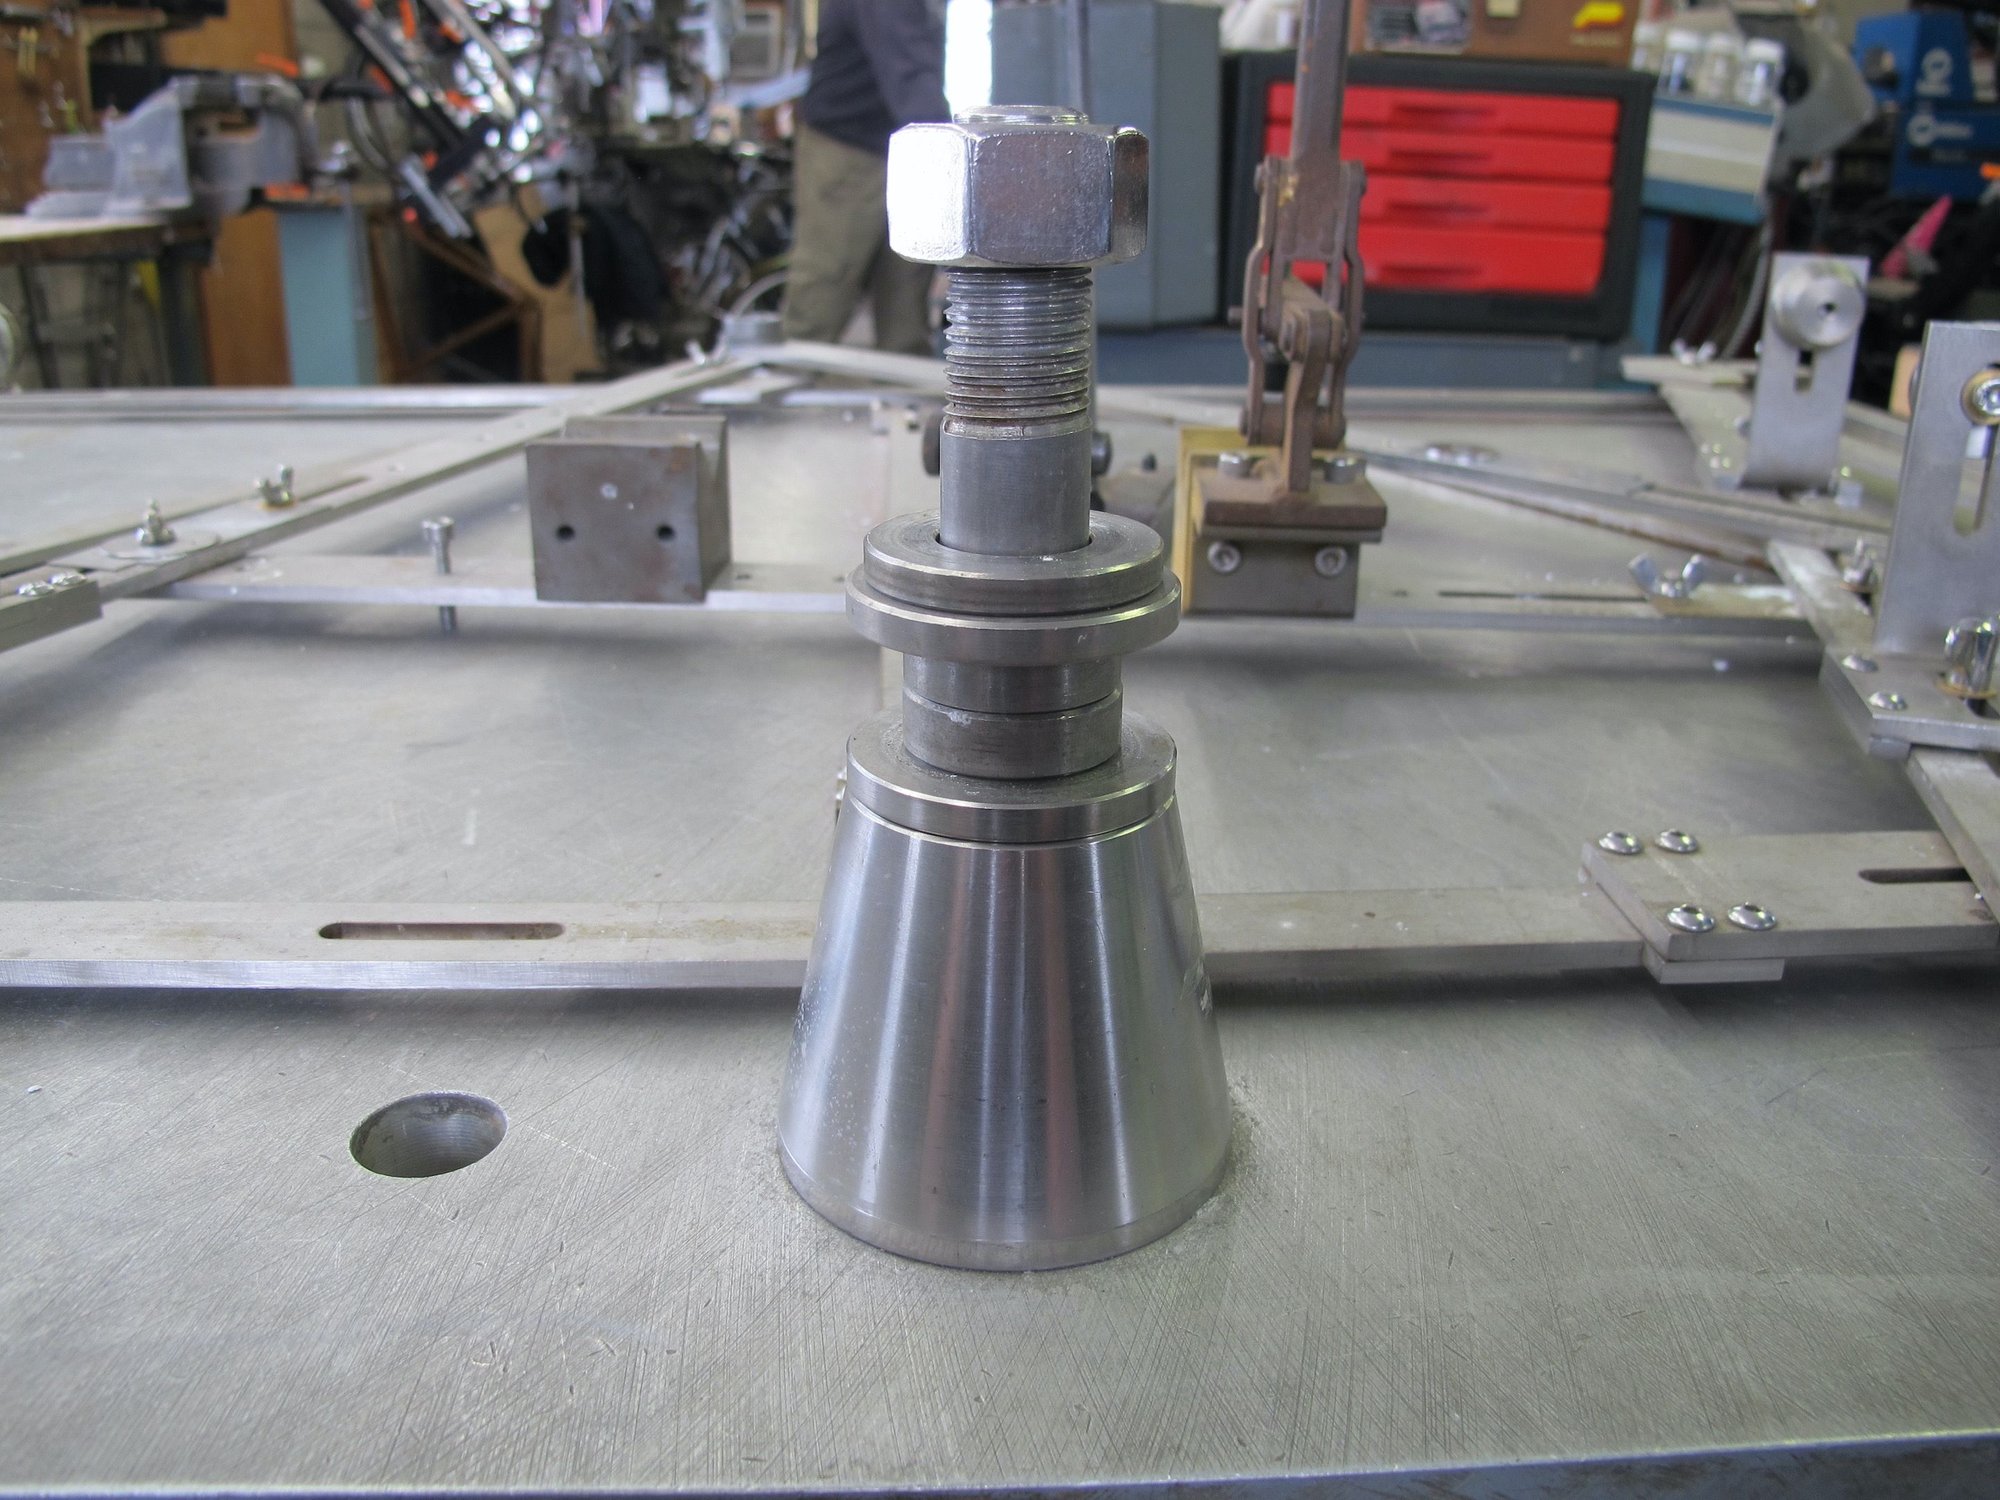
My SS one attached to my cast aluminum table

Showing the individual pieces
2. Constant tightening of a frame to the table can depress (make a round circle dent) on the face of the post where the bb touches it. To prevent that, I put a hardened washer about �� (6mm) thick on top of the post. This washer has 3 purposes. 1st to keep the post from getting a dent ring when the frame is tightened against it (because it is heat treated to be harder than the post) and 2nd, to make it easy to take off and clean melted flux that has dripped on it. And 3rd, if it gets indented, it is easier to replace.
3. The post base is 3� at the bottom tapering to 2� at the top. It is 66 � 6mm in length (in other words 60mm. The 6mm washer will make its total height to be 66mm). The taper allows for checking alignment more easily. The wider base provides more support when bending the frame into alignment.
a. The bottom of the post has a �� X 13 tpi (threads per inch) treaded hole. My early posts had a big threaded rod at the bottom of the post (it was all one piece actually) go through the table and held in place with a big nut underneath the table. It is easier and cheaper to attach the post to the table with a separate �� bolt that screws into the post hole from the bottom of the table. It has enough force to hold the post.
b. Coming out of the top of the base is a 7/8� X 9 tpi (teeth per inch) post 4� (100mm) long. It can be one piece with the base or a combined 2 pieces. With a nut, this is what holds the frame to the table.
i. The bottom 68mm of this post does not have threads. It probably wouldn�t matter if it was threaded the whole distance.
ii. The top 32 mm is threaded. The actual length of the treaded post should be long enough so that the holding nut will fit entirely on the post when a frame is tightened to the table. That length would include the thickness of the 2nd step of the step washer, the thickness of a regular flat washer and the total thickness of the holding nut.
4. On top of the hardened washer is a ring to help center the frame on the post. The outside diameter of this ring is 1.316� (33.43mm). This diameter is so it can fit inside an English bb shell with little play. The inside diameter hole is .877� so it can slide over the center post. And it is about .4� (10mm) thick. The .4� is an arbitrary thickness. It can be much less thick. This washer a separate piece so it is easy to remove for cleaning.
5. The top lock down washer is a step washer. The 1st step is also has an outside diameter of 1.316�. It also is 10mm long. It is this diameter size so it can fit inside an English bottom bracket shell. The 2ndstep has an outside diameter of about 2� or 50mm. The inside hole diameter is .877� to slide over the 7/8� post.
6. A regular thick flat washer to go between the step washer and the nut. Mine is �� thick with an outside diameter of 1 ��. It hole is also bigger than 7/8�.
7. The 7/8� X 9 tpi nut is about �� thick.
There is nothing sacred about any of these dimensions. The ones on my table were chosen because of the stock that was available in English (Imperial) sizes. They should be changed to fit metric sizes.
My original BB post
My SS one attached to my cast aluminum table
Showing the individual pieces
