


Raleigh M40 All Terrain Cromoly
 11-29-22, 12:25 PM
#1
Newbie
Thread Starter
Join Date: Nov 2022
Location: Little Pike
Posts: 20
Bikes: 1995 Raleigh M40 All Terrain Chromoly
Mentioned: 0 Post(s)
Tagged: 0 Thread(s)
Quoted: 10 Post(s)
Likes: 0
Liked 6 Times
in
3 Posts
Raleigh M40 All Terrain Cromoly
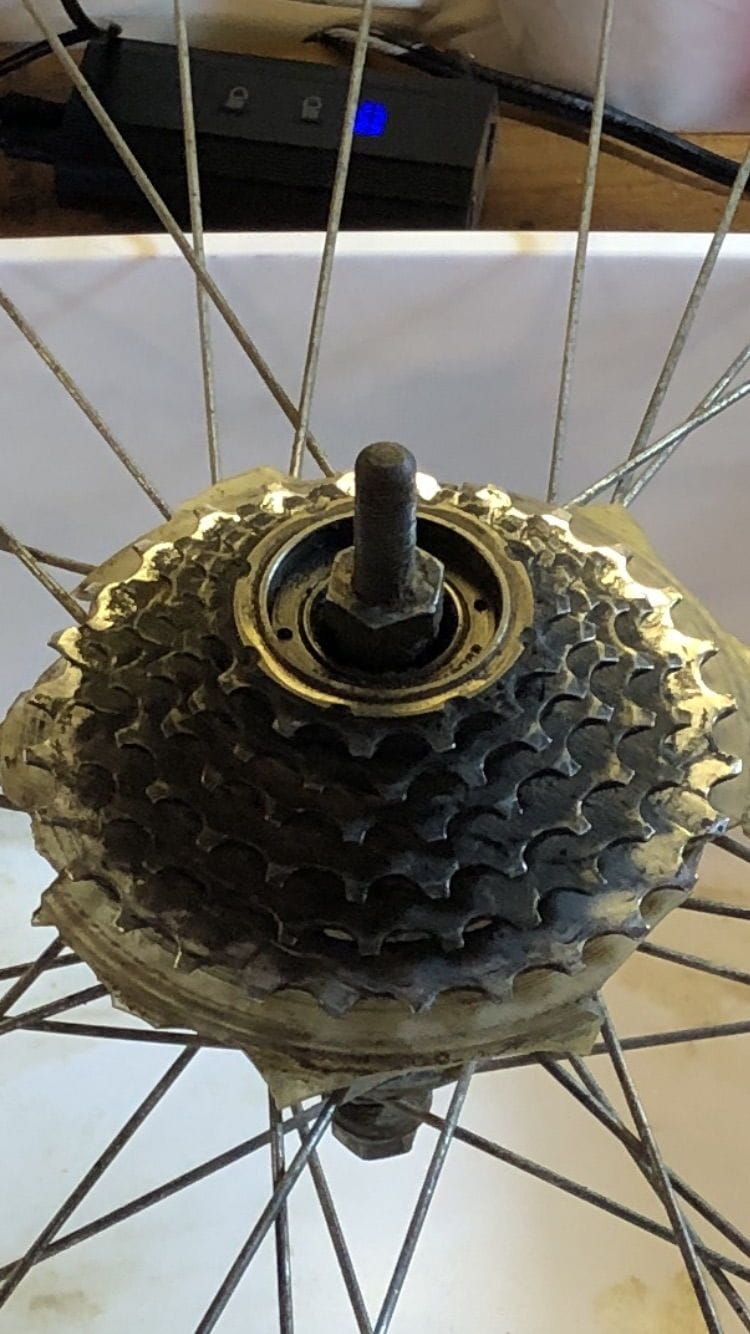
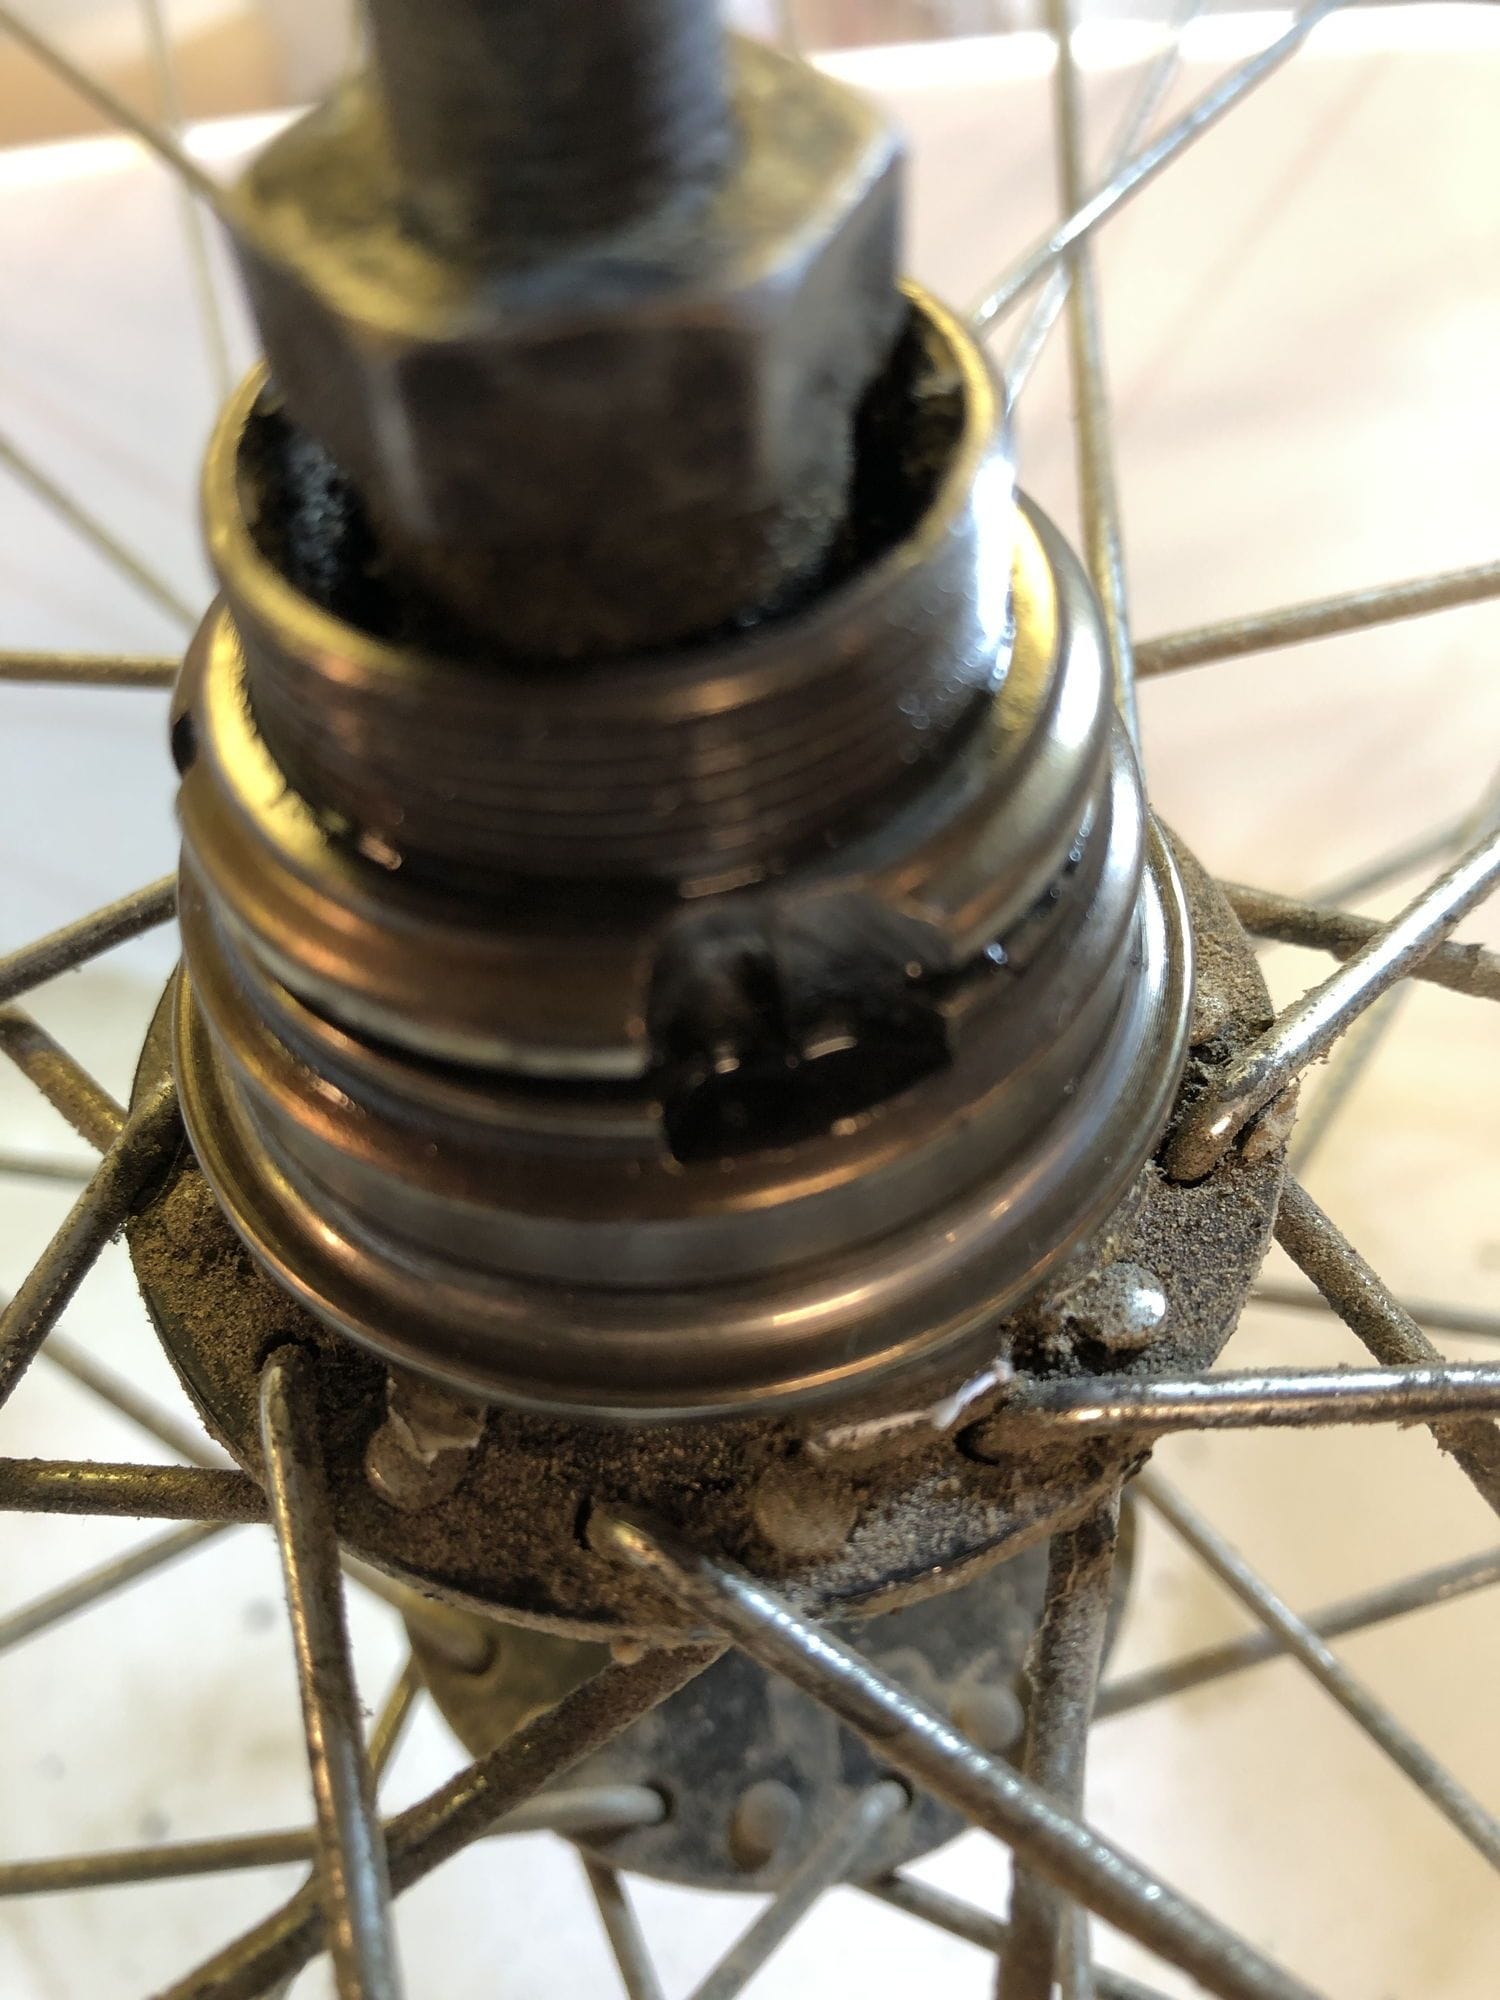
I removed the flywheel in the course of replacing a broken spoke on this bike. The model year of the bike is 1995. It has Shimano Altus C90 components. I cleaned up and re-greased the freewheel, including the bearings and bearing races. I did the same for the non-drive side hub bearing. However, I could not figure out how to remove the drive-side hub bearing. All I could see in the top of where the freewheel came off is what appears to be the lock nut and the top of a spacer. I could not see any way to get a cone spanner onto the bearing cup. The way I removed the freewheel was to first unscrew the freewheel lock ring. Then I lifted off the freewheel. What then remained on the wheel was the bottom part of the freewheel having the inner freewheel bearing race and the component with the pawls held on with a split ring. I have a feeling that I ought to have removed the freewheel in such a way as to have this component come off with the rest of the freewheel assembly. This probably would have revealed the rest of the spacer and the hub bearing cone. But I could not see any way to do this. I have Bike Hand freewheel removal tools YC-126-1A and YC-26BB-1A that clearly are not designed to be used with this freewheel. The part number on the freewheel lock ring is FB SHIMANO 515 MF-HG20 Singapore. For the time being I will make do with what I have done for the non-drive side bearing and the freewheel - thinking that at least this is an improvement. But if someone can suggest how I could get at the drive-side hub bearing I would be much obliged. (Sorry, but I am unable to include any photos as this forum will not allow the inclusion of photos unless one has submitted at least ten postings previously.). I love this bike and would like to look after this properly.
 11-29-22, 12:34 PM
#2

I'm good to go!
Join Date: Jul 2017
Location: Mississippi
Posts: 14,931
Bikes: Tarmac Disc Comp Di2 - 2020
Mentioned: 51 Post(s)
Tagged: 0 Thread(s)
Quoted: 6163 Post(s)
Liked 4,780 Times
in
3,298 Posts
Usually for freewheels, I removed the cone on the non-drive side of the hub and just pulled the axle out the other side. Then fished out the bearings with a magnet or just flushed the trough with a stream of mineral spirits depending on how I was going about things that day.
It is the axle bearings you are asking about getting to isn't it?
It is the axle bearings you are asking about getting to isn't it?
 11-29-22, 12:53 PM
#3
I'm good to go!
Join Date: Jul 2017
Location: Mississippi
Posts: 14,931
Bikes: Tarmac Disc Comp Di2 - 2020
Mentioned: 51 Post(s)
Tagged: 0 Thread(s)
Quoted: 6163 Post(s)
Liked 4,780 Times
in
3,298 Posts
Are these the pic's you wanted to put with this post? All you have to do is just let us know you put them in the Gallery here on BF and someone will find them and post them for you.
https://www.bikeforums.net/g/picture/27334257
https://www.bikeforums.net/g/picture/27334235
https://www.bikeforums.net/g/picture/27334257
https://www.bikeforums.net/g/picture/27334235
11-29-22, 01:00 PM
#4
I'm good to go!
Join Date: Jul 2017
Location: Mississippi
Posts: 14,931
Bikes: Tarmac Disc Comp Di2 - 2020
Mentioned: 51 Post(s)
Tagged: 0 Thread(s)
Quoted: 6163 Post(s)
Liked 4,780 Times
in
3,298 Posts
I don't agree. As long as you don't remove the cone on the drive side from the axle, then all your adjusting of the axle bearings can be done from the non-drive side. At least that's the way I did it on all the freewheel equipped bikes I use to have. Are there some FW's that don't allow that?
Likes For Iride01:
11-29-22, 01:10 PM
#5
Newbie
Thread Starter
Join Date: Nov 2022
Location: Little Pike
Posts: 20
Bikes: 1995 Raleigh M40 All Terrain Chromoly
Mentioned: 0 Post(s)
Tagged: 0 Thread(s)
Quoted: 10 Post(s)
Likes: 0
Liked 6 Times
in
3 Posts
Tried this. The inner component of the freewheel that is still on the hub is in the way.
11-29-22, 01:18 PM
#6
I'm good to go!
Join Date: Jul 2017
Location: Mississippi
Posts: 14,931
Bikes: Tarmac Disc Comp Di2 - 2020
Mentioned: 51 Post(s)
Tagged: 0 Thread(s)
Quoted: 6163 Post(s)
Liked 4,780 Times
in
3,298 Posts
If you have the cone removed from the other side of the hub, just pull the axle out with the drive side cone and all else attached to that axle. Be sure you have something to catch bearings that might be stuck to the cone and they fall to bounce off to unknown parts of your shop.
11-29-22, 01:19 PM
#7
Newbie
Thread Starter
Join Date: Nov 2022
Location: Little Pike
Posts: 20
Bikes: 1995 Raleigh M40 All Terrain Chromoly
Mentioned: 0 Post(s)
Tagged: 0 Thread(s)
Quoted: 10 Post(s)
Likes: 0
Liked 6 Times
in
3 Posts
Thanks SurferRosa. This tool seems to be what I need to remove the freewheel in it’s entirety. I will trust that it is compatible. I suppose the hub could be adjusted from just one side - and I did do just this. However, I need to get into the drive-side to properly clean and re-grease the bearing.
And thanks to the person who dug out my photos. I thought they had gone into the ether.
And thanks to the person who dug out my photos. I thought they had gone into the ether.
Likes For Raimund:
11-29-22, 01:25 PM
#8
Newbie
Thread Starter
Join Date: Nov 2022
Location: Little Pike
Posts: 20
Bikes: 1995 Raleigh M40 All Terrain Chromoly
Mentioned: 0 Post(s)
Tagged: 0 Thread(s)
Quoted: 10 Post(s)
Likes: 0
Liked 6 Times
in
3 Posts
Hey IRide01. When I try to do this the drive-side cone bumps into the back of the freewheel that is still on the hub. You can see in the photo that there is not enough room for it to come through. Appreciate the suggestion though.
11-29-22, 01:30 PM
#9
Newbie
Thread Starter
Join Date: Nov 2022
Location: Little Pike
Posts: 20
Bikes: 1995 Raleigh M40 All Terrain Chromoly
Mentioned: 0 Post(s)
Tagged: 0 Thread(s)
Quoted: 10 Post(s)
Likes: 0
Liked 6 Times
in
3 Posts
BTW, the freewheel looks much better now that it did for the photo. Looks good as new after a good cleanup. No rust at all. Pretty good for the age of the thing. And the bearings and races look fine.
11-29-22, 01:41 PM
#10
I'm good to go!
Join Date: Jul 2017
Location: Mississippi
Posts: 14,931
Bikes: Tarmac Disc Comp Di2 - 2020
Mentioned: 51 Post(s)
Tagged: 0 Thread(s)
Quoted: 6163 Post(s)
Liked 4,780 Times
in
3,298 Posts
I think you might be bumping against a five post daily limit. But we'll be here tomorrow!
11-29-22, 01:58 PM
#11
I'm good to go!
Join Date: Jul 2017
Location: Mississippi
Posts: 14,931
Bikes: Tarmac Disc Comp Di2 - 2020
Mentioned: 51 Post(s)
Tagged: 0 Thread(s)
Quoted: 6163 Post(s)
Liked 4,780 Times
in
3,298 Posts
Shimano's tech doc site doesn't even bring up a MF-HG20. However it does bring up a MF-HG22. It shows the removal tool being a Shimano TL-FW30. Whether the park tool SurferRosa pointed you to is the same in every respect I do not know.
https://www.universalcycles.com/shop...s.php?id=17706
https://si.shimano.com/en/pdfs/ev/MF...20(Y)-1948.pdf
https://si.shimano.com/en/manual/sea...ut_model=mf-hg
Nor do I know if this is the tool you need.
https://www.universalcycles.com/shop...s.php?id=17706
https://si.shimano.com/en/pdfs/ev/MF...20(Y)-1948.pdf
https://si.shimano.com/en/manual/sea...ut_model=mf-hg
Nor do I know if this is the tool you need.
11-29-22, 06:24 PM
#12
SE Wis
Join Date: Apr 2005
Location: Milwaukee, WI
Posts: 10,491
Bikes: '68 Raleigh Sprite, '02 Raleigh C500, '84 Raleigh Gran Prix, '91 Trek 400, 2013 Novara Randonee, 1990 Trek 970
Mentioned: 40 Post(s)
Tagged: 0 Thread(s)
Quoted: 2738 Post(s)
Liked 3,380 Times
in
2,045 Posts
You should have been able to pull the axle when the NDS was apart. Often you cannot fit the freewheel tool in without removing DS stuff
11-30-22, 04:28 PM
#13
Newbie
Thread Starter
Join Date: Nov 2022
Location: Little Pike
Posts: 20
Bikes: 1995 Raleigh M40 All Terrain Chromoly
Mentioned: 0 Post(s)
Tagged: 0 Thread(s)
Quoted: 10 Post(s)
Likes: 0
Liked 6 Times
in
3 Posts
Thought I had sent the jist of the following earlier so I apologize if I am repeating myself somehow. You folks are awesome for your quick and helpful advice here. I realize now that I had not actually removed the freewheel but sort of disassembled it in place. Looking at the removal tool you have suggested I now see how this engages on the freewheel. The notches where the tool engages were well hidden (for me) and full of gunk. As somebody said - there is nothing like looking, if you want to find something.
I will now carry on to true the wheel then overhaul the rest of the bearings on the bike and wait for the snow to melt!
I will now carry on to true the wheel then overhaul the rest of the bearings on the bike and wait for the snow to melt!
11-30-22, 06:26 PM
#15
SE Wis
Join Date: Apr 2005
Location: Milwaukee, WI
Posts: 10,491
Bikes: '68 Raleigh Sprite, '02 Raleigh C500, '84 Raleigh Gran Prix, '91 Trek 400, 2013 Novara Randonee, 1990 Trek 970
Mentioned: 40 Post(s)
Tagged: 0 Thread(s)
Quoted: 2738 Post(s)
Liked 3,380 Times
in
2,045 Posts
https://www.bikeforums.net/classic-v...oto-heavy.html
11-30-22, 08:02 PM
#16
Newbie
Thread Starter
Join Date: Nov 2022
Location: Little Pike
Posts: 20
Bikes: 1995 Raleigh M40 All Terrain Chromoly
Mentioned: 0 Post(s)
Tagged: 0 Thread(s)
Quoted: 10 Post(s)
Likes: 0
Liked 6 Times
in
3 Posts
Seems I managed to do all the stuff in those photos only I did not take apart each individual gear for cleaning. I just used a wooden kitchen skewer, a toothbrush and WD-40 to clean in between. I rested the wheel (which I left attached to the freewheel body) over and across a small plastic washtub lined in the bottom with paper towels to keep the fluids from pooling and prevent any ballbearings from bouncing about. Used separate little pill bottles to hold and clean the ballbearings from the two races. A small screw driver with a magnetic end was used to lift and place the ballbearings in the greased races. Should have taken more photos I suppose. I will when I take it off again to service the hub bearings.
12-01-22, 04:11 PM
#17
Newbie
Thread Starter
Join Date: Nov 2022
Location: Little Pike
Posts: 20
Bikes: 1995 Raleigh M40 All Terrain Chromoly
Mentioned: 0 Post(s)
Tagged: 0 Thread(s)
Quoted: 10 Post(s)
Likes: 0
Liked 6 Times
in
3 Posts
They actually have an FR-1.3 in the little bike shop in the little town close to me. How much grease should I be putting in these races? I have been putting in just enough to make it squeeze out a tiny bit when I fix the cover onto it. Same with whatever I am doing - threads on a shaft or whatever.


