


Is it ok for the gap between stem and spacers?
 08-15-21, 12:53 PM
#1
Junior Member
Thread Starter
Is it ok for the gap between stem and spacers?
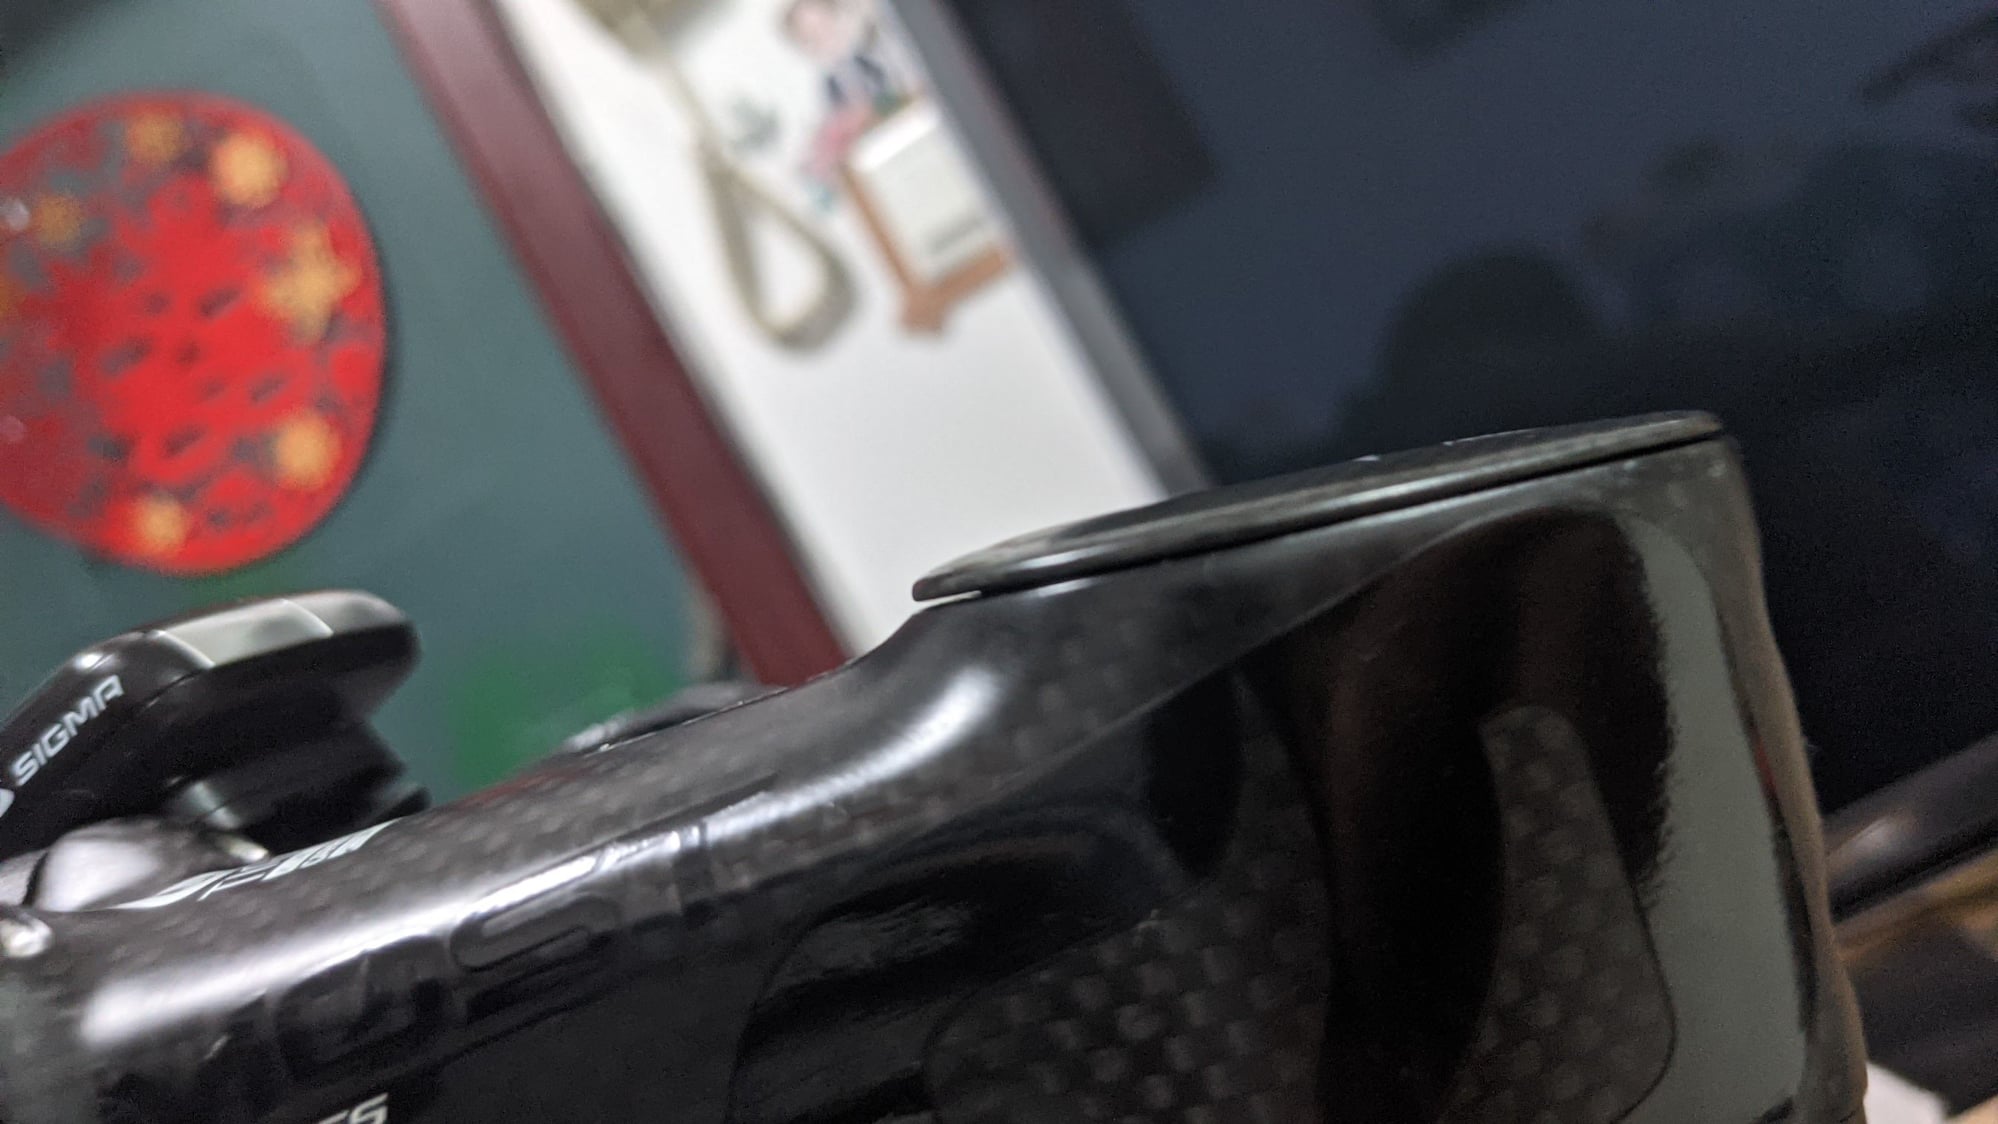

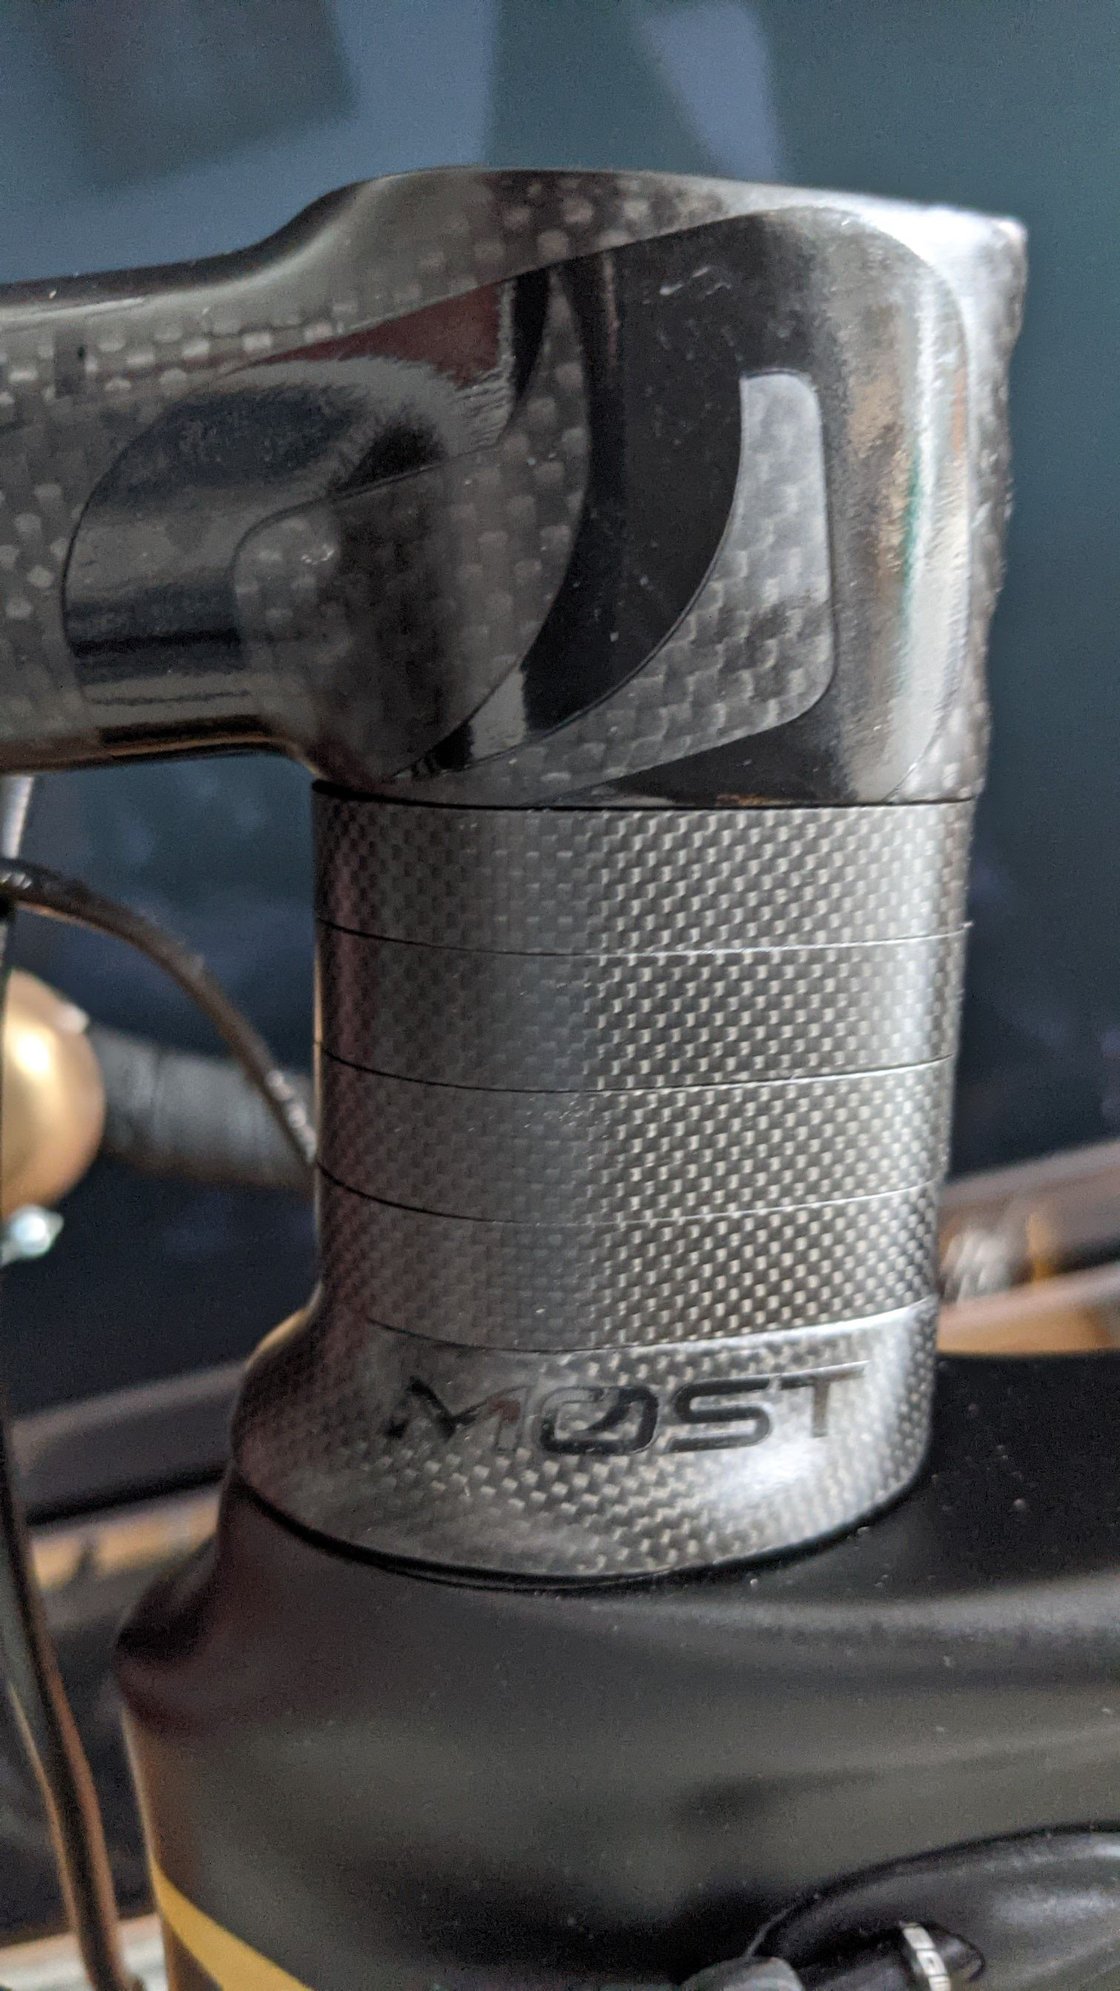

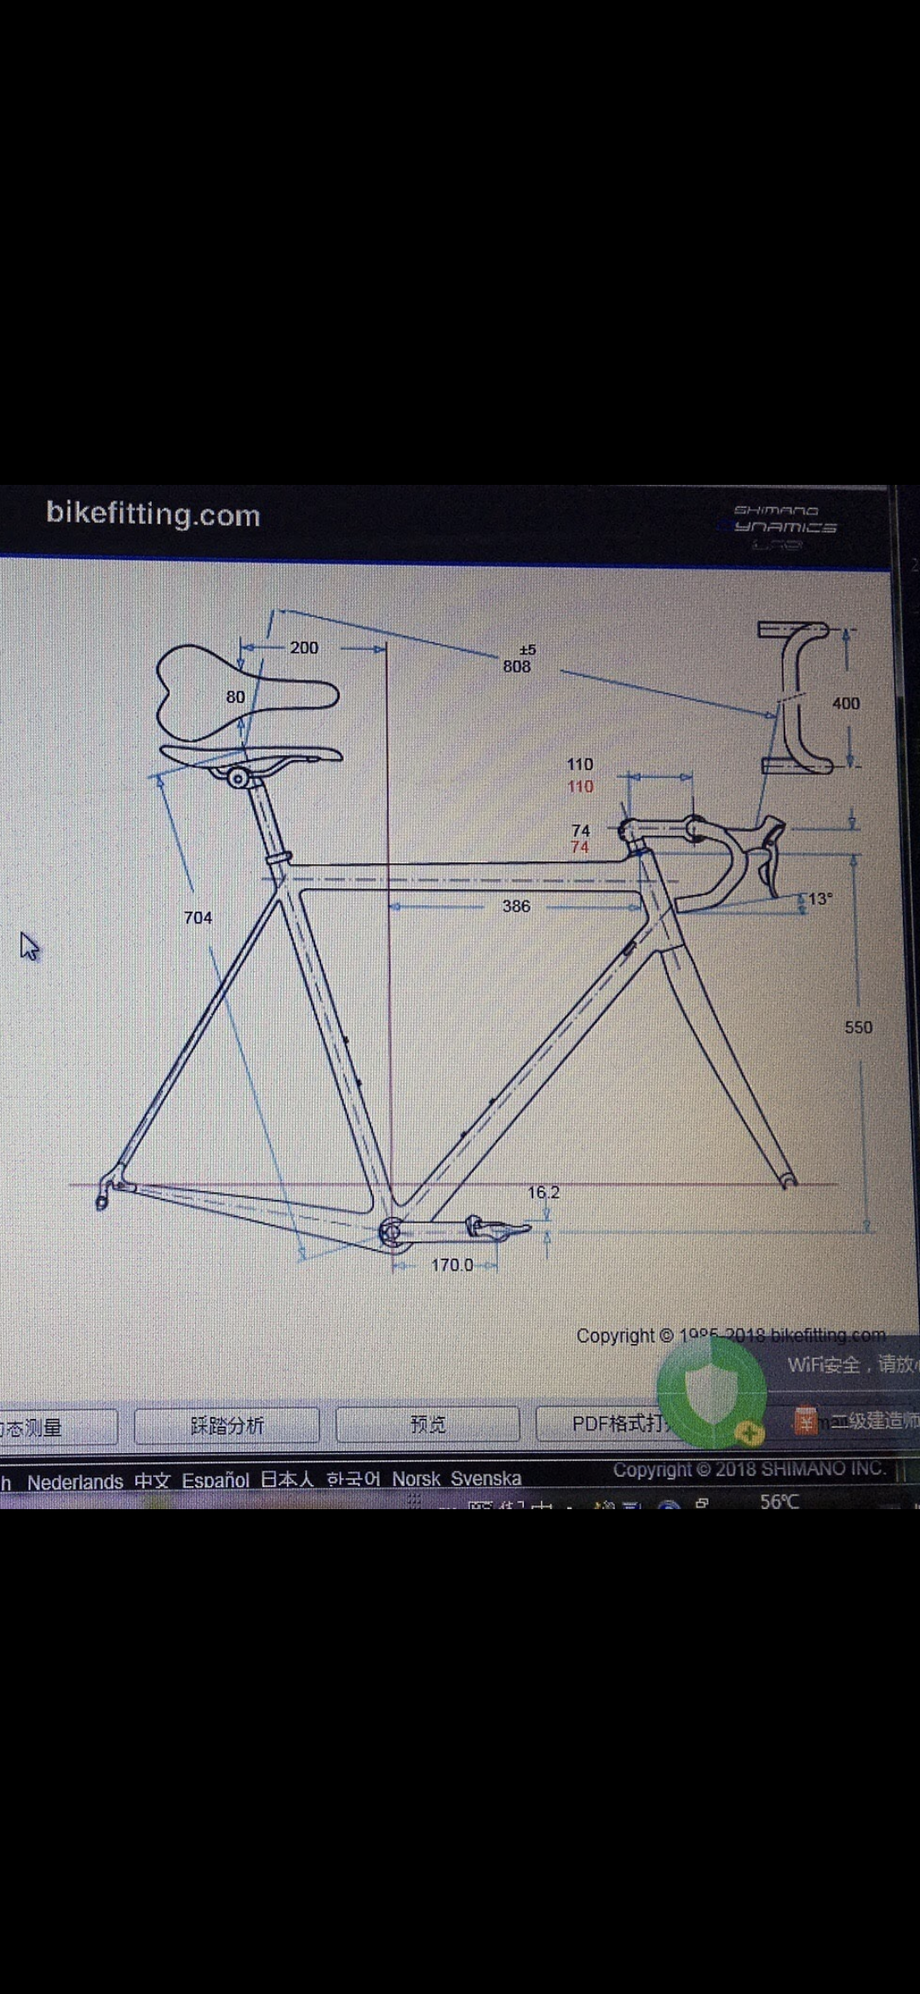
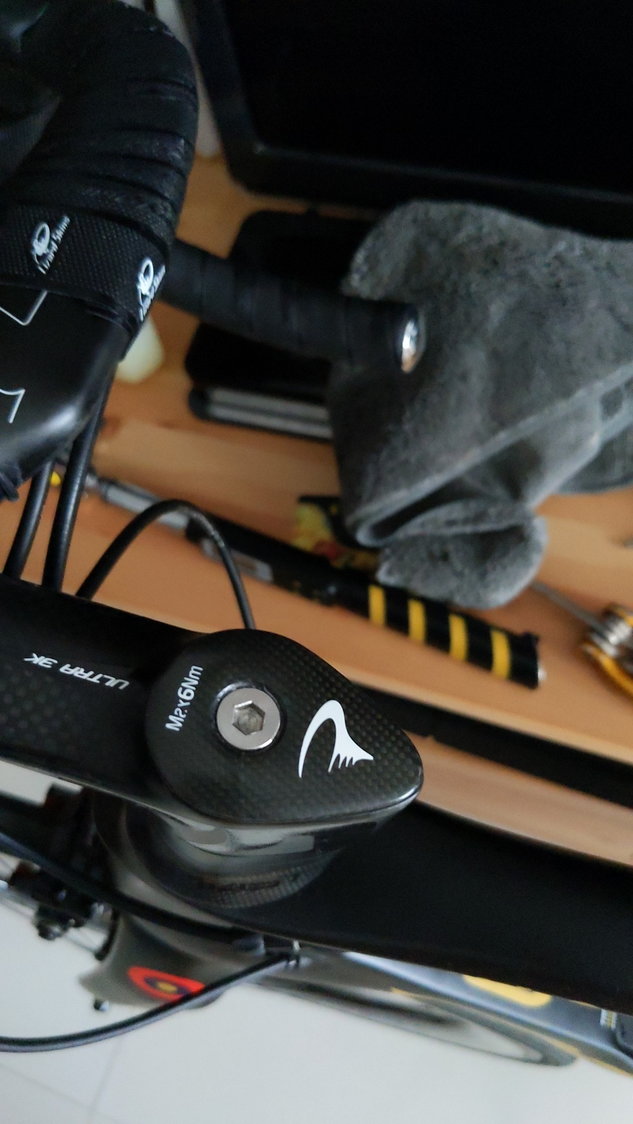
There is a gap between top cap and stem, is that a problem?According to the fitting, spacers should be 74mm,now it's 74/75mm.if I remove a 5mm spacer and add a 2.5mm spacer under top cap,the handlebar will lower the 2.5mm,but I ride my bike from 2019 and used to it.what should I do?
Last edited by cycling2012; 08-15-21 at 05:49 PM.
 08-15-21, 12:57 PM
#2
Banned
Join Date: Feb 2008
Location: Mississauga/Toronto, Ontario canada
Posts: 8,721
Bikes: I have 3 singlespeed/fixed gear bikes
Mentioned: 30 Post(s)
Tagged: 0 Thread(s)
Quoted: 4227 Post(s)
Liked 2,489 Times
in
1,286 Posts
Not OK to me, I would never ride like that...Fix it with a different size spaces until there is no gap.
08-15-21, 02:24 PM
#3
Senior Member
Join Date: Jul 2013
Location: Nor-Cal
Posts: 3,767
Bikes: lots
Mentioned: 7 Post(s)
Tagged: 0 Thread(s)
Quoted: 1958 Post(s)
Liked 2,932 Times
in
1,489 Posts
Looks like the top cap is bottoming on the steerer and you need a couple mm more spacer in the stack somewhere...with that bike I'm betting it won't work above.
Likes For cxwrench:
08-15-21, 02:34 PM
#4
Thread Killer
Join Date: Aug 2008
Location: Ann Arbor, MI
Posts: 12,508
Bikes: 15 Kinesis Racelight 4S, 76 Motebecane Gran Jubil�e, 17 Dedacciai Gladiatore2, 12 Breezer Venturi, 09 Dahon Mariner, 12 Mercier Nano, 95 DeKerf Team SL, 19 Tern Rally, 21 Breezer Doppler Cafe+, 19 T-Lab X3, 91 Serotta CII, 23 3T Strada
Mentioned: 30 Post(s)
Tagged: 0 Thread(s)
Quoted: 3207 Post(s)
Liked 1,749 Times
in
1,055 Posts
It�s hard for me to tell what�s going on in the picture; is there a uniform gap all around? What�s the point of contact on the right edge?
In any case, a top cap is not needed at all after the bearing preload is set, so depending on how that was done, if this is a case of the cap not being perfectly flat, it could be a non issue.
What I�d do is just unscrew and remove the top cap, loosen everything up, add in another spacer above the stem, and reinstall the top cap and tighten the headset down appropriately. Then, I�d torque the stem bolts, remove the spacer above the stem, and replace the top cap as a cosmetic element.
08-15-21, 05:51 PM
#5
Junior Member
Thread Starter
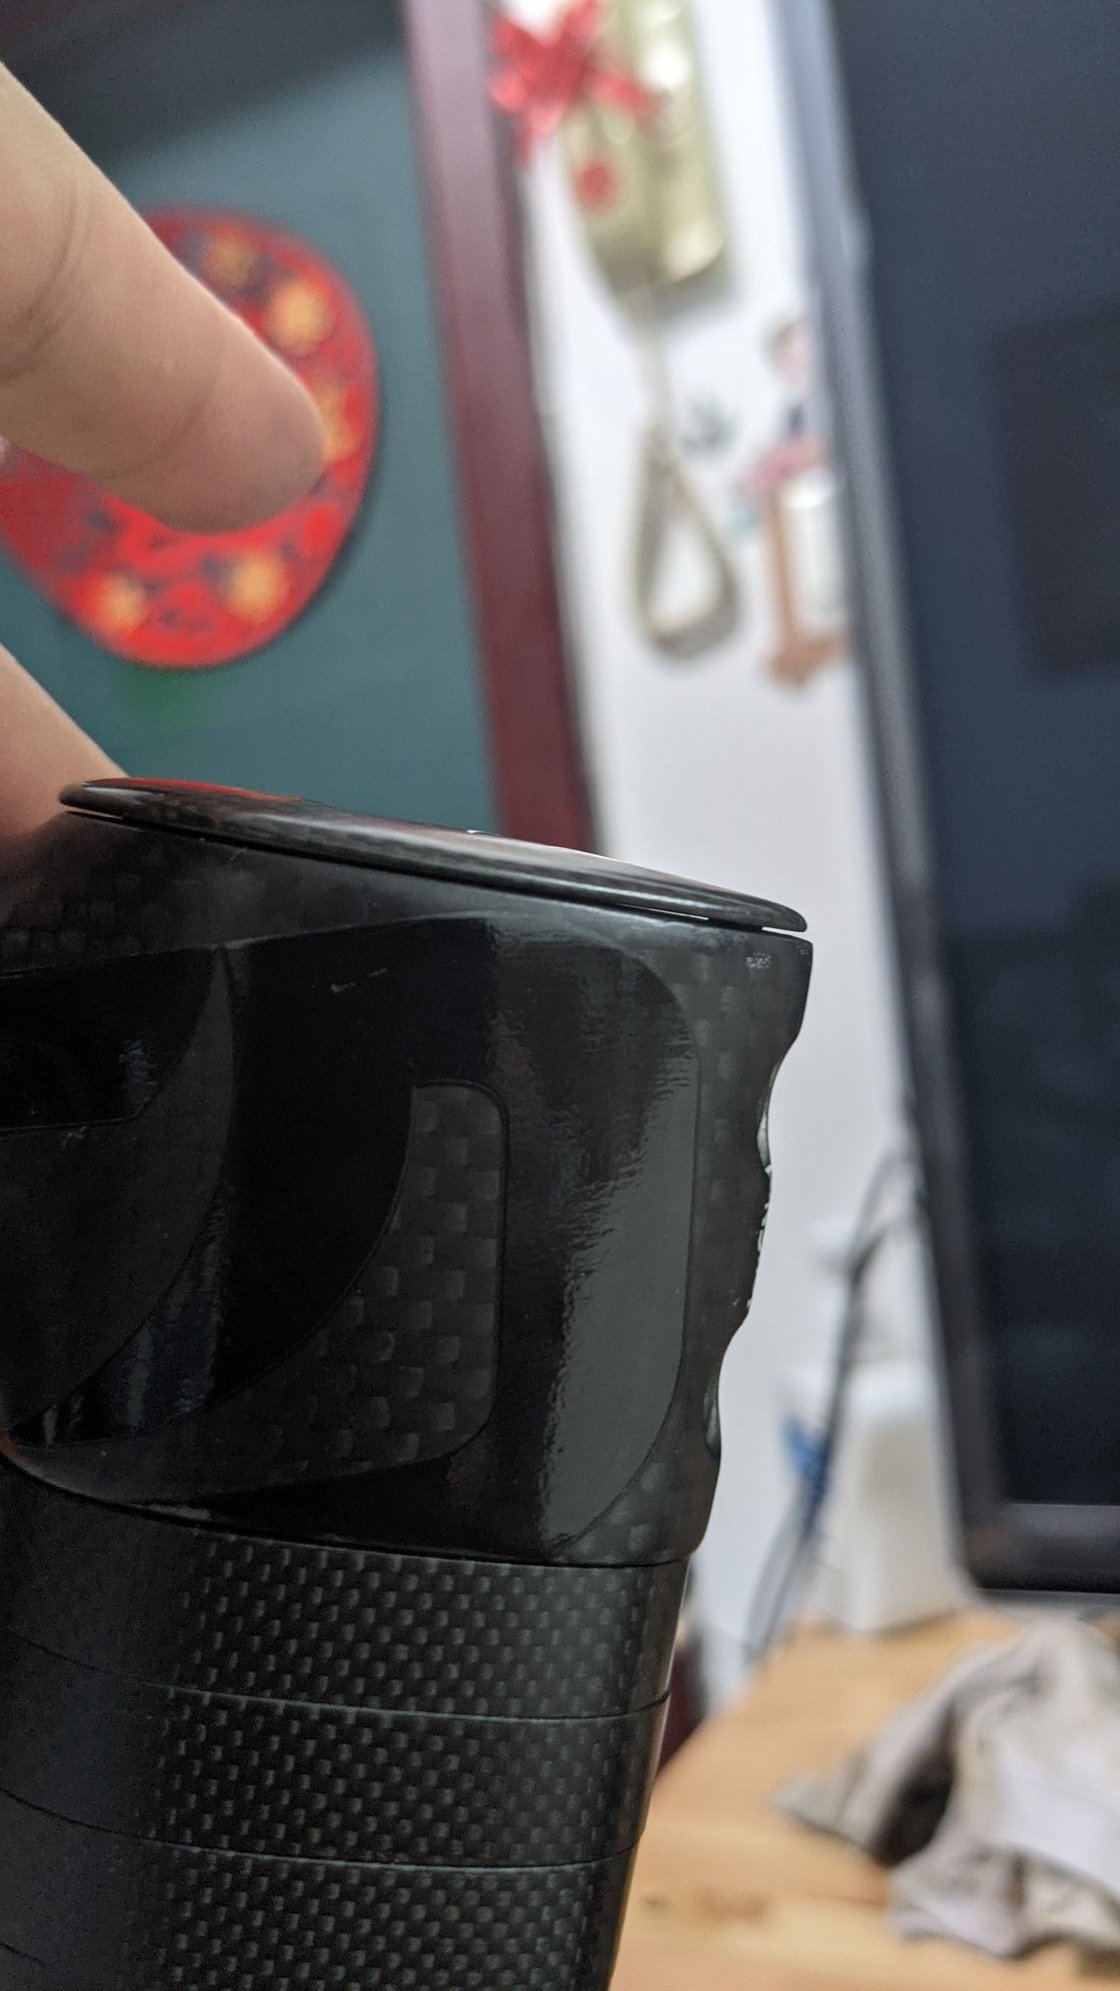
Update on #1,I unscrew all and install again with torque wrench , accurate NM.same cap there.
When I install the top screw,the pressure will be in center,so the side will up? Is it the reason?
When I install the top screw,the pressure will be in center,so the side will up? Is it the reason?
08-15-21, 08:07 PM
#6
Senior Member
Join Date: Jul 2013
Location: Nor-Cal
Posts: 3,767
Bikes: lots
Mentioned: 7 Post(s)
Tagged: 0 Thread(s)
Quoted: 1958 Post(s)
Liked 2,932 Times
in
1,489 Posts
Do NOT use the torque wrench on the top cap. ADJUST the preload on the bearings properly and then tighten the clamp bolts to the recommended torque. What you see is a MAX torque value, not what you'd most likely normally do. It's like the max pressure on a tire, it's there to keep you from being stupid.
Likes For cxwrench:
08-15-21, 09:44 PM
#7
OM boy

Join Date: Jul 2005
Location: Goleta CA
Posts: 4,430
Bikes: a bunch
Mentioned: 11 Post(s)
Tagged: 0 Thread(s)
Quoted: 545 Post(s)
Liked 686 Times
in
461 Posts
Once you set the load via the tightening screws on the stem, the cap shouldn't really come into play - in a perfect world.
In reality the tight stem cap would assure less possible slipping/loosening of the stem. So, I always prefer to have the stemcap snug to the top of the stem, providing a little downward 'insurance'.
I'm not familiar with that particular config, bit it works just like they all do - and need some small space between the top of steerer and the stemcap, when everything is properly set.
Simplest solution I would use:
Add a mm or 2 of spacer to allow the stemcap to snug down to the stem.
If you can't get a 2 mm spacer of that shape... I would go to an office supply shop - purchase a plastic three-hole binder in black - those plastic covers are usually 1mm to 1.5mm thick.
Take a spacer and trace the outside outline of the 'carbon' spacer onto the plastic cover sheet. Cut out to match, cut the inside appropriately (doesn't need to be exact.
Insert additional thin plastic spacer somewhere into the spacer array. Tighten all up - should be enough to be able to tighten the stemcap to the stem top.
If not enough... cut another spacer and add... No one will ever notice, only you will know...
Ride the bike...
Thx
Yuri
EDIT - another reason for a snug stemcap... If you ride ONLY on Sunny days - no worries...
If you ride when there's moisture in the air or on the road, or perspire somewhat, and drip on the bike... you might want a snug stemcap.
Moisture seems to find all small tight spaces... and if there's a chance for some corrosion in spaces you can't see or often reach - it'll happen..
Last edited by cyclezen; 08-15-21 at 09:56 PM.
Likes For cyclezen:
08-16-21, 01:48 AM
#8
Thread Killer
Join Date: Aug 2008
Location: Ann Arbor, MI
Posts: 12,508
Bikes: 15 Kinesis Racelight 4S, 76 Motebecane Gran Jubil�e, 17 Dedacciai Gladiatore2, 12 Breezer Venturi, 09 Dahon Mariner, 12 Mercier Nano, 95 DeKerf Team SL, 19 Tern Rally, 21 Breezer Doppler Cafe+, 19 T-Lab X3, 91 Serotta CII, 23 3T Strada
Mentioned: 30 Post(s)
Tagged: 0 Thread(s)
Quoted: 3207 Post(s)
Liked 1,749 Times
in
1,055 Posts
Given the OP has been edited with new information, new pics, and a new question, I’d say you should not worry about the 1mm (or less?) of height above the fitter’s spec, and should just return it to the original setup you were riding (assuming it was set up was done properly and working right). 1mm almost certainly makes no difference whatsoever.
08-16-21, 06:20 AM
#9
Senior Member

Join Date: May 2005
Location: Queanbeyan, Australia.
Posts: 4,135
Mentioned: 85 Post(s)
Tagged: 0 Thread(s)
Quoted: 3450 Post(s)
Liked 420 Times
in
289 Posts
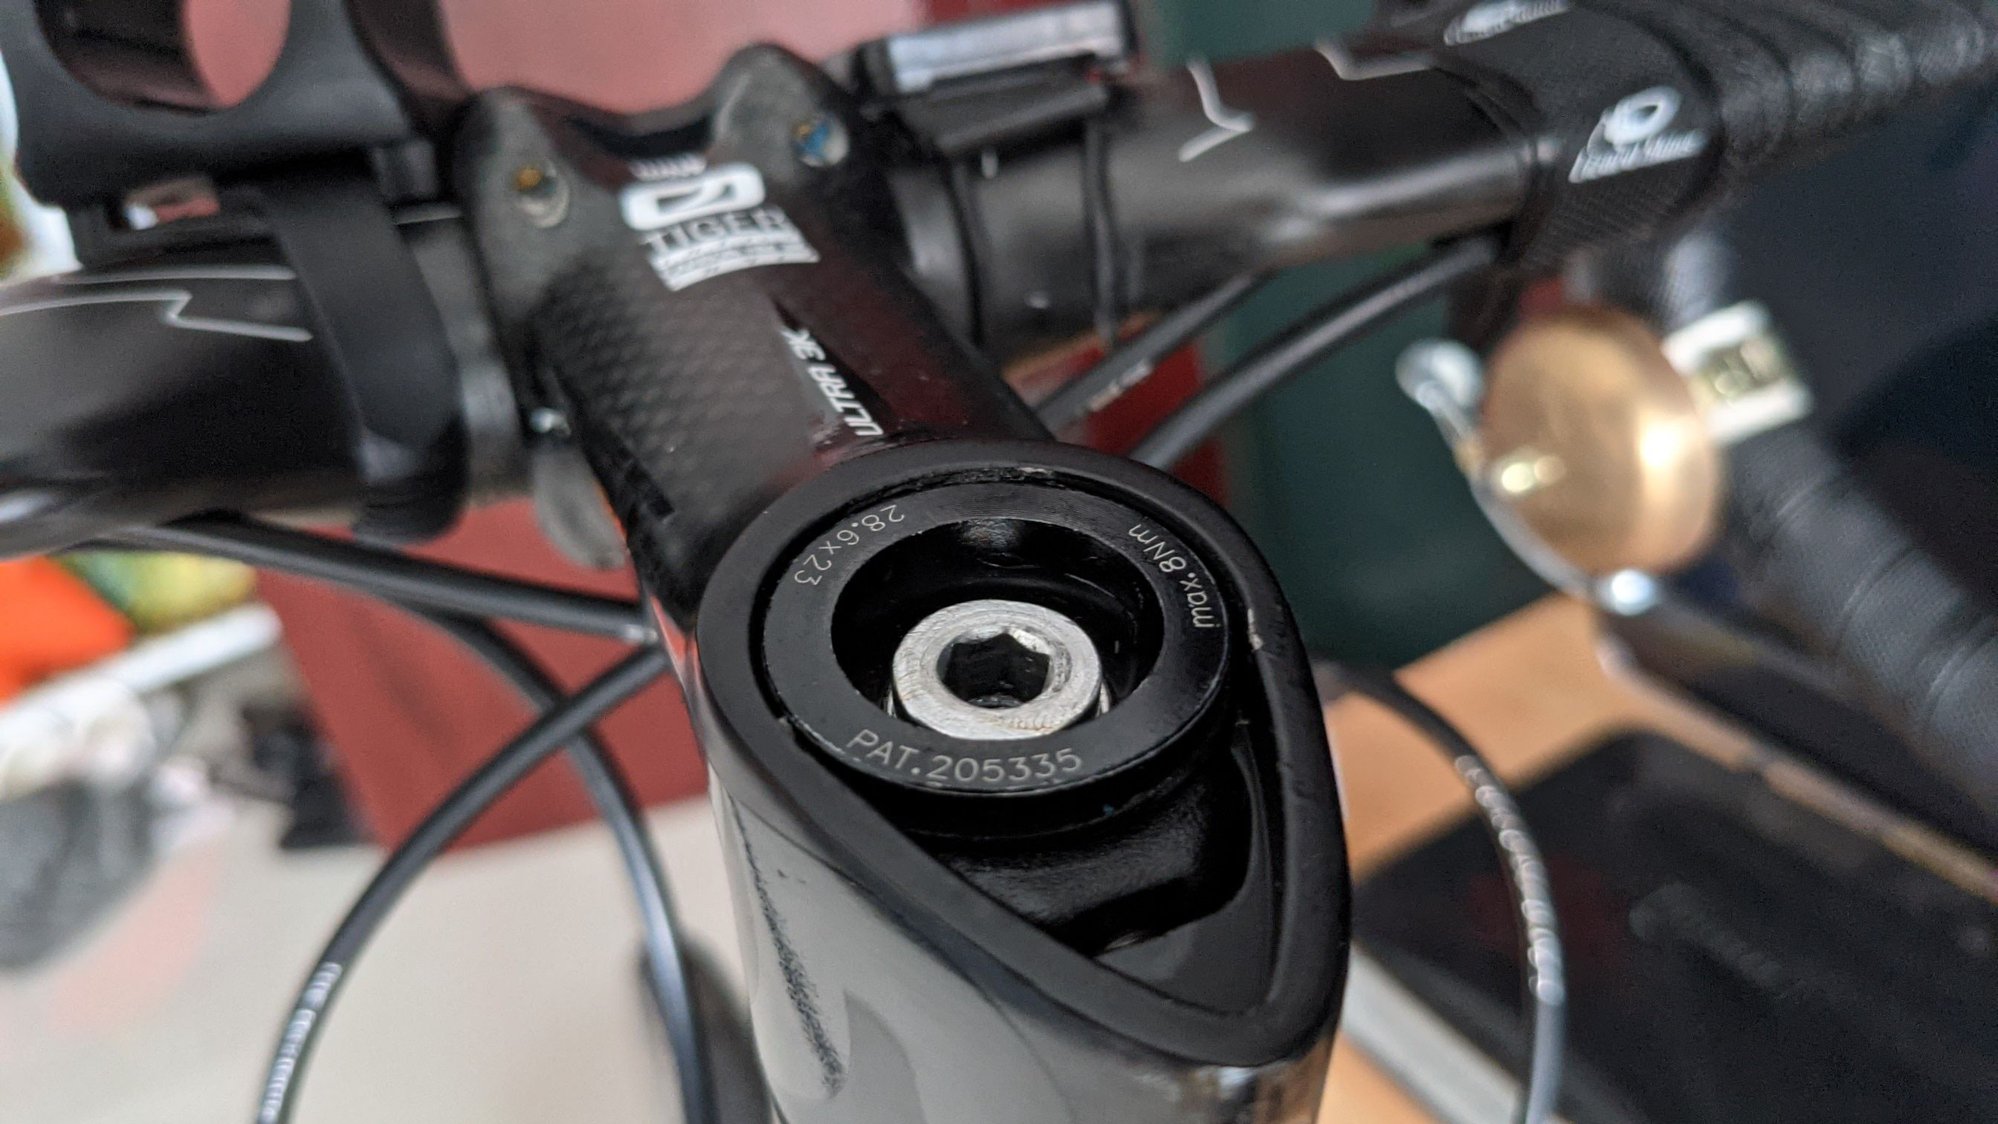
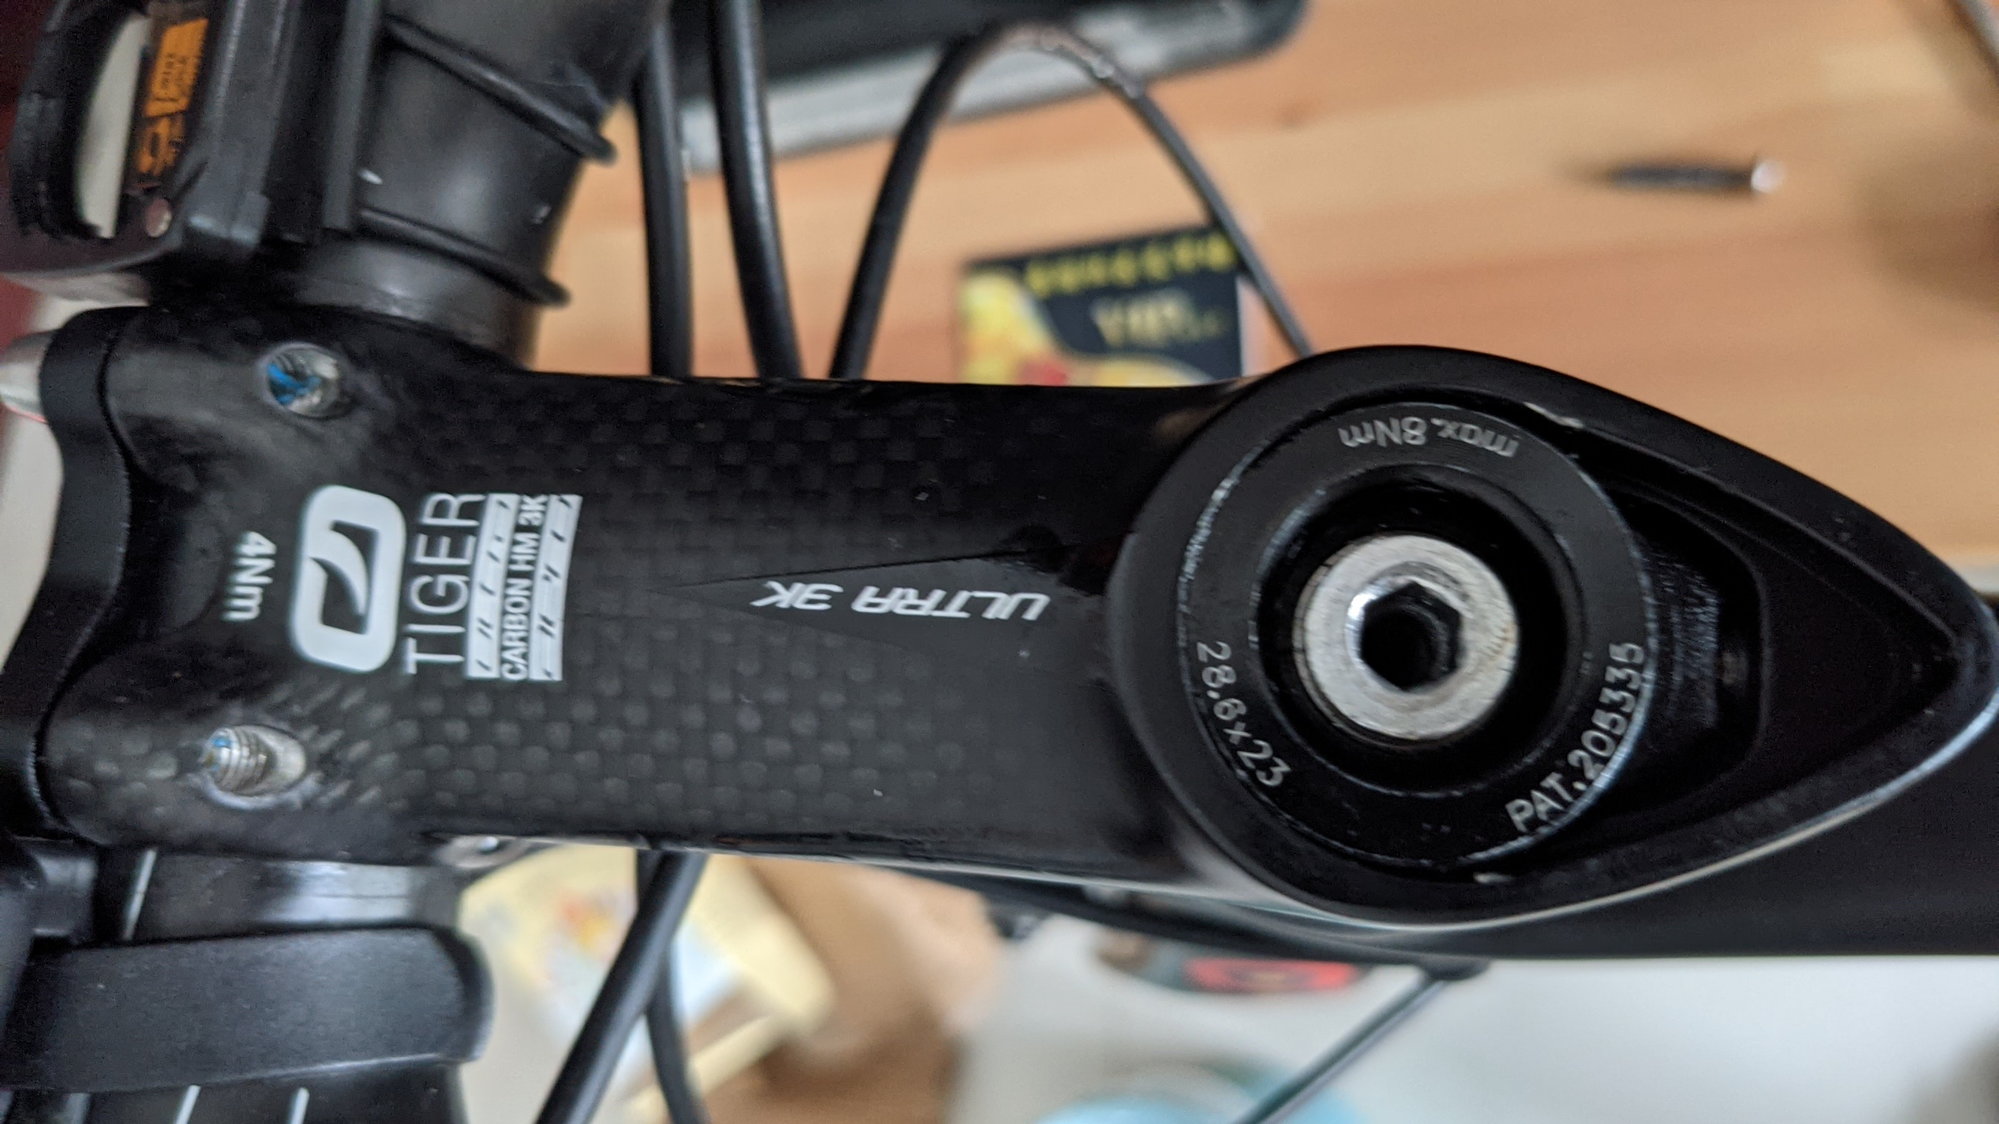
I'd need to know more to be certain, yet I suspect that the adjustment hex screw is the one underneath. I suspect that the top one is just a dust cap.
I'd want to find out for sure before trying to do any more work on it.
EDIT: so the minor gap doesn't look right if it was taking any load at all but I don't think that it is taking any load at all, not withstanding that once the stem clamp is tightened up, these adjustment screws never take any load anyway. You only use them to get the bearing tightness just right, which isn't much at all and then you tighten the stem bolts. Of course the stem bolts have to be loose to effect any adjustment in the first place.
Last edited by AnthonyG; 08-16-21 at 06:25 AM.
08-16-21, 09:50 AM
#10
OM boy
Join Date: Jul 2005
Location: Goleta CA
Posts: 4,430
Bikes: a bunch
Mentioned: 11 Post(s)
Tagged: 0 Thread(s)
Quoted: 545 Post(s)
Liked 686 Times
in
461 Posts
I'd need to know more to be certain, yet I suspect that the adjustment hex screw is the one underneath. I suspect that the top one is just a dust cap.
I'd want to find out for sure before trying to do any more work on it.
EDIT: so the minor gap doesn't look right if it was taking any load at all but I don't think that it is taking any load at all, not withstanding that once the stem clamp is tightened up, these adjustment screws never take any load anyway. You only use them to get the bearing tightness just right, which isn't much at all and then you tighten the stem bolts. Of course the stem bolts have to be loose to effect any adjustment in the first place.
I'd want to find out for sure before trying to do any more work on it.
EDIT: so the minor gap doesn't look right if it was taking any load at all but I don't think that it is taking any load at all, not withstanding that once the stem clamp is tightened up, these adjustment screws never take any load anyway. You only use them to get the bearing tightness just right, which isn't much at all and then you tighten the stem bolts. Of course the stem bolts have to be loose to effect any adjustment in the first place.
but there does seem to be a ledge on the stem which this 'ring' might be set on and providing the down pressure adjustment (prior to tightening the stem bolts...)
.if so then the torque value on the cap is in reference to that adjustment... and the stemcap is just a dust/dirt cap.
...but I still worry about moisture getting in there, thru that space.. LOL!
Thx
Yuri
08-16-21, 05:14 PM
#11
Senior Member
Join Date: May 2005
Location: Queanbeyan, Australia.
Posts: 4,135
Mentioned: 85 Post(s)
Tagged: 0 Thread(s)
Quoted: 3450 Post(s)
Liked 420 Times
in
289 Posts
The joys of owning ex elite race bikes. They were designed and built in the first place expecting that professional mechanics would be adjusting and cleaning them very regularly.
08-16-21, 05:38 PM
#12
Senior Member
Join Date: Jan 2010
Location: TC, MN
Posts: 39,520
Bikes: R3 Disc, Haanjo
Mentioned: 354 Post(s)
Tagged: 1 Thread(s)
Quoted: 20810 Post(s)
Liked 9,456 Times
in
4,672 Posts
Just shave the top of the steerer another mm and you'll be fine.
The thing with the patent number on it is an expanding plug - it holds on to the inside of the steerer and acts as an anchor for when you're adjusting preload against it with the top cap.
so looking again at pic - you may be correct. The headset adjustment may be done from that hex bolt on the inner ring (marked PAT.205335) - bit hard to see.
but there does seem to be a ledge on the stem which this 'ring' might be set on and providing the down pressure adjustment (prior to tightening the stem bolts...)
.if so then the torque value on the cap is in reference to that adjustment... and the stemcap is just a dust/dirt cap.
...but I still worry about moisture getting in there, thru that space.. LOL!
Thx
Yuri
Likes For WhyFi:
08-16-21, 07:09 PM
#13
Senior Member
Join Date: May 2005
Location: Queanbeyan, Australia.
Posts: 4,135
Mentioned: 85 Post(s)
Tagged: 0 Thread(s)
Quoted: 3450 Post(s)
Liked 420 Times
in
289 Posts
I'm not 100% sure. I'd need to check it out in person to know for sure, unless someone else really knows for sure.
08-16-21, 07:31 PM
#14
Senior Member
Join Date: Jan 2010
Location: TC, MN
Posts: 39,520
Bikes: R3 Disc, Haanjo
Mentioned: 354 Post(s)
Tagged: 1 Thread(s)
Quoted: 20810 Post(s)
Liked 9,456 Times
in
4,672 Posts
 08-16-21, 07:48 PM
#15
Senior Member
Join Date: Apr 2005
Location: Northern CA
Posts: 743
Bikes: Cannondale tandems: '92 Road, '97 Mtn. Mongoose 10.9 Ti, Kelly Deluxe, Tommaso Chorus, Cdale MT2000, Schwinn Deluxe Cruiser, Torker Unicycle, among others.
Mentioned: 5 Post(s)
Tagged: 0 Thread(s)
Quoted: 279 Post(s)
Liked 207 Times
in
129 Posts
Given the OP has been edited with new information, new pics, and a new question, I�d say you should not worry about the 1mm (or less?) of height above the fitter�s spec, and should just return it to the original setup you were riding (assuming it was set up was done properly and working right). 1mm almost certainly makes no difference whatsoever.
Without direct contact with the stem, the headset will not be preloaded and the bearing will be too loose and exhibit play. This is bad for the bearing and may damage it. It's also bad for everything else - frame tubes, headset cups, crown race, etc. If loose enough, this could lead to catastrophic failure. Unlikely, but in this libelous world, it has to be said. A really loose headset could injure or kill a rider.
So yes, a 1mm space could be VERY SERIOUS!
And it appears obvious to me that the OP also doesn't understand how this headset functions. It's relatively simple in theory, however it can be difficult to explain via written word and then properly interpreted on the other end. Cyclezen below is correct, however his statement about "extra space" could easily be misunderstood! I strongly recommend the OP take his bike to a reputable LBS and have them determine if the steerer tube needs an extra washer, trimmed a little bit, or who knows what else may be going on in this situation.
Either way, it is not a good idea to not know EXACTLY what you're doing when it comes to headset and fork/stem installation and headset adjustment. The downside is just too great.
Good luck.
08-16-21, 08:04 PM
#16
On Your Left

Join Date: Nov 2011
Location: Long Island, New York, USA
Posts: 8,373
Bikes: Trek Emonda SLR, Sram eTap, Zipp 303
Mentioned: 34 Post(s)
Tagged: 0 Thread(s)
Quoted: 3004 Post(s)
Liked 2,434 Times
in
1,187 Posts
08-16-21, 08:09 PM
#17
Thread Killer
Join Date: Aug 2008
Location: Ann Arbor, MI
Posts: 12,508
Bikes: 15 Kinesis Racelight 4S, 76 Motebecane Gran Jubil�e, 17 Dedacciai Gladiatore2, 12 Breezer Venturi, 09 Dahon Mariner, 12 Mercier Nano, 95 DeKerf Team SL, 19 Tern Rally, 21 Breezer Doppler Cafe+, 19 T-Lab X3, 91 Serotta CII, 23 3T Strada
Mentioned: 30 Post(s)
Tagged: 0 Thread(s)
Quoted: 3207 Post(s)
Liked 1,749 Times
in
1,055 Posts
I'm sorry, but your post CLEARLY indicates you don't understand how a top cap is supposed to interface with the stem. A 1mm gap is indeed a problem! It indicates that the top cap is not providing pre-load onto the stem and thus the headset in the Aheadset-style system. It definitely looks like the top cap is bottoming out on the steerer tube. Not supposed to do this.
Without direct contact with the stem, the headset will not be preloaded and the bearing will be too loose and exhibit play. This is bad for the bearing and may damage it. It's also bad for everything else - frame tubes, headset cups, crown race, etc. If loose enough, this could lead to catastrophic failure. Unlikely, but in this libelous world, it has to be said. A really loose headset could injure or kill a rider.
So yes, a 1mm space could be VERY SERIOUS!
And it appears obvious to me that the OP also doesn't understand how this headset functions. It's relatively simple in theory, however it can be difficult to explain via written word and then properly interpreted on the other end. Cyclezen below is correct, however his statement about "extra space" could easily be misunderstood! I strongly recommend the OP take his bike to a reputable LBS and have them determine if the steerer tube needs an extra washer, trimmed a little bit, or who knows what else may be going on in this situation.
Either way, it is not a good idea to not know EXACTLY what you're doing when it comes to headset and fork/stem installation and headset adjustment. The downside is just too great.
Good luck.
Get a grip, guy..
08-16-21, 08:18 PM
#18
Thread Killer
Join Date: Aug 2008
Location: Ann Arbor, MI
Posts: 12,508
Bikes: 15 Kinesis Racelight 4S, 76 Motebecane Gran Jubil�e, 17 Dedacciai Gladiatore2, 12 Breezer Venturi, 09 Dahon Mariner, 12 Mercier Nano, 95 DeKerf Team SL, 19 Tern Rally, 21 Breezer Doppler Cafe+, 19 T-Lab X3, 91 Serotta CII, 23 3T Strada
Mentioned: 30 Post(s)
Tagged: 0 Thread(s)
Quoted: 3207 Post(s)
Liked 1,749 Times
in
1,055 Posts
08-16-21, 08:35 PM
#19
Thread Killer
Join Date: Aug 2008
Location: Ann Arbor, MI
Posts: 12,508
Bikes: 15 Kinesis Racelight 4S, 76 Motebecane Gran Jubil�e, 17 Dedacciai Gladiatore2, 12 Breezer Venturi, 09 Dahon Mariner, 12 Mercier Nano, 95 DeKerf Team SL, 19 Tern Rally, 21 Breezer Doppler Cafe+, 19 T-Lab X3, 91 Serotta CII, 23 3T Strada
Mentioned: 30 Post(s)
Tagged: 0 Thread(s)
Quoted: 3207 Post(s)
Liked 1,749 Times
in
1,055 Posts
It looks like what the OP did was to swap the 5mm spacer originally above the stem to below the stem, and remove a 2.5mm spacer which was also below the stem. Provided that 2.5mm was used above the stem to set the preload and the stem bolts were tightened, the spacer can then be removed and just the top cap installed atop the stem, regardless of whether there�s a gap between it and the stem or not, as it�s primary function is merely aesthetic at that point, although it does serve, as mentioned by cyclezen , as a dust cap and protective cover as well.
