


Converting a SRAM road brake/shifter from 10 speed to 11
 03-07-21, 05:42 PM
#1
Converting a SRAM road brake/shifter from 10 speed to 11
This isn't quite a howto, but is more of an addendum to any existing ones such as I assume exists elsewhere, but since I've done this a couple of times, I figure I may as well document my knowledge, brief and scattered as that may be.
There's still a lot of life left in old SRAM 10 speed road groups, and since there are conversions to 12 speed with Ratio Technologies upgrades, people who have upgraded may be willing to part with their old 11 speed gear ratchets. These can be used to convert many 10 speed systems to 11.
The internal shifter mechanisms of SRAM 10 & 11 speed shifters are mostly the same between Force, Rival, Apex, and even S-700 groups- either cable brake or hydraulic. This means many parts are interchangeable, including the gear ratchets, although older parts may differ in construction and are not as easily upgraded.
Also, since 10 and 11 speed road shifters use the same derailleur pull ratio, you can continue to use your old rear derailleur. But you will need an 11 speed cassette which may require a new cassette body/hub/wheel upgrade.
Honestly, I haven't seen the Ratio Tech upgrade instructions for upgrading 11 speed road shifters to 12, but they should also mostly apply for upgrading 10 to 11 speed too. So if you have newer shifters- such as the 10-speed S-700 shifters- an upgrade will be pretty straightforward.
These instructions focus more on older shifters- usually cable brake- and common difficulties upgrading them.
First, make sure your shifter is actually upgradeable. This means that you want to make sure it has a red cable takeup spool. Some 10 speed shifters have red spools, but others have white spools. The 11 speed gear ratchets will not work with the white ones. If you can get a complete shifter to replace a white spool, you will need to change over not just the takeup spool and gear ratchet (or upgrade it) but also the shift lever and the pawl that is mounted to the plastic body, but that is beyond the scope of this post.

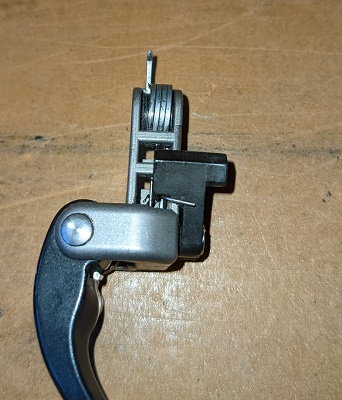
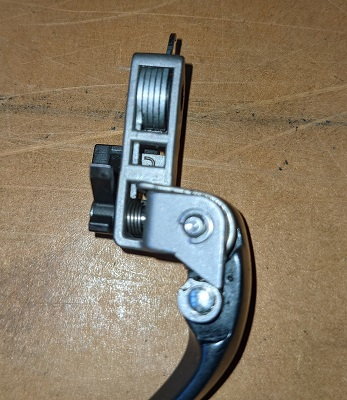
Red spool good. White spool not good yet. Ignore the fact that one lever is hydraulic and other is cable brake. But see that with the lever on the left, the shift lever is attached to and rotates on a black part, and the lever on the right, the shift lever is attached to and rotates on a silver part. This will be covered later, but the former makes things slightly easier.
Regular instructions will probably cover removing the lever from the bar, removing the brake hood and unscrewing the side cover, so I'll let you figure that out or look it up yourself.
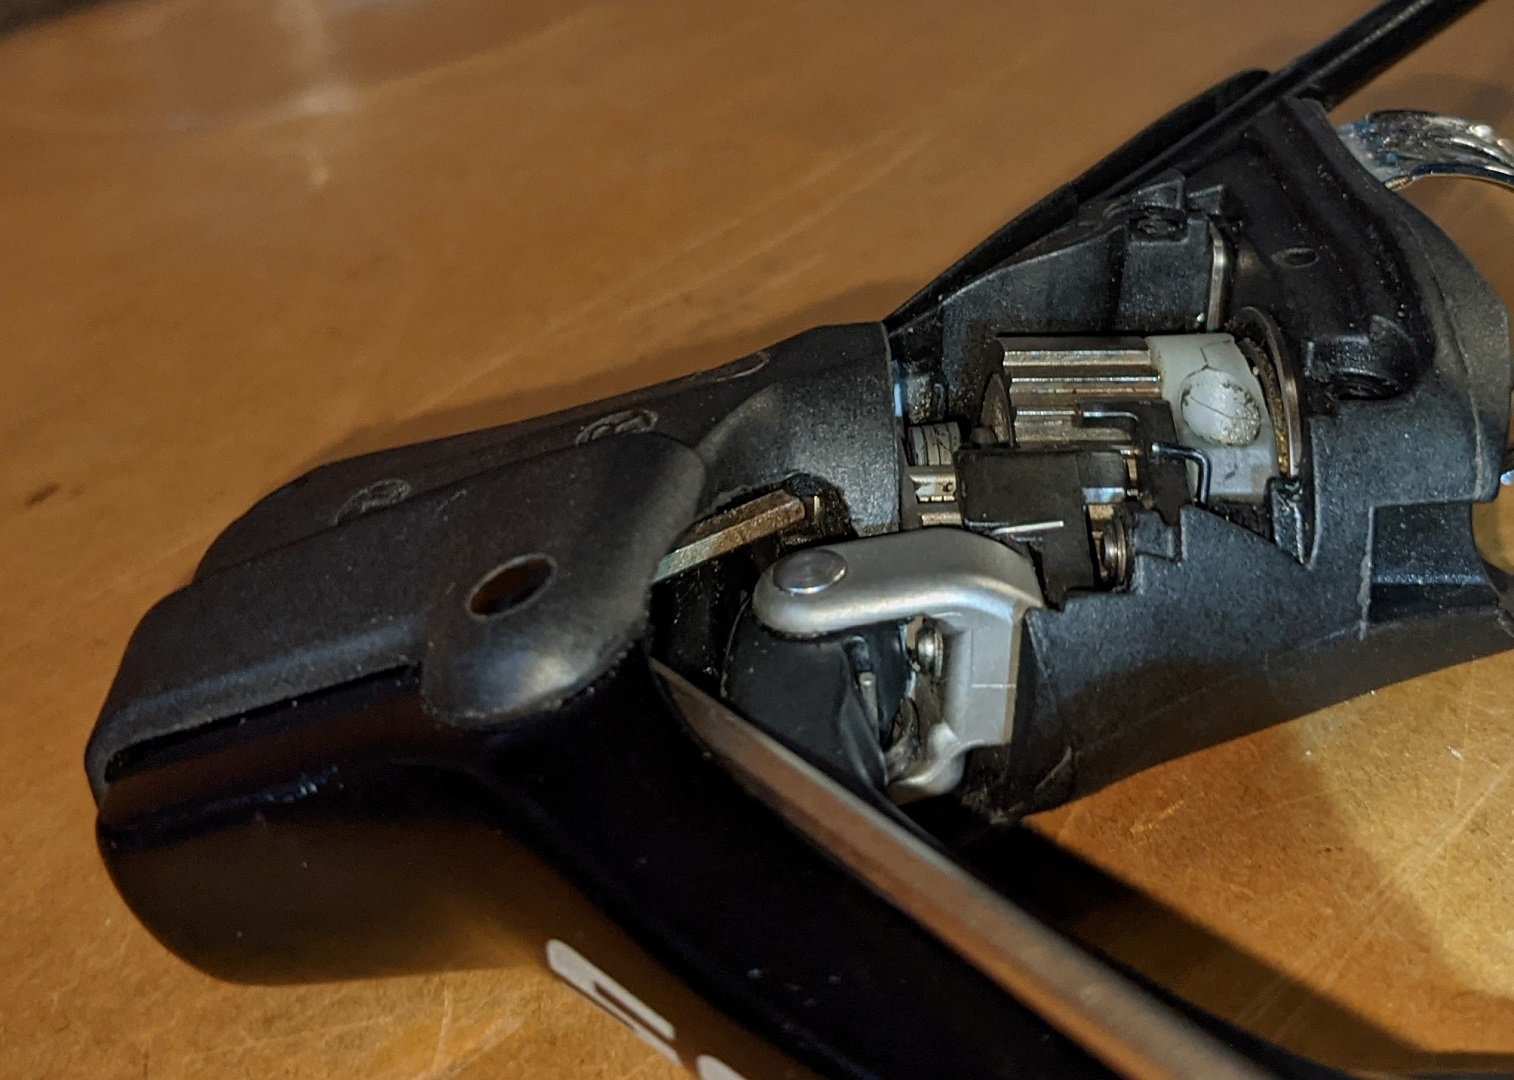
Next comes removing the shaft that the cable takeup spool and gear ratchet are mounted to. For hydraulic systems it's pretty straightforward since there's a threaded hole in that shaft that you can fit an M2 screw (correction: it's really an M2.5 threading, but the M2.0 spoke works, it's just a bit loose) or threaded 2mm spoke into and then pull out (after unscrewing the fixing screw that prevents it from falling out). Cable brake levers do not have the threaded hole, so the shaft has to be pressed out from the front.
The front of the shaft is somewhat accessible from the bottom/side of the brake lever.

End of shaft hidden way in there
I'm not going to lie, it's a bit fiddly to remove. I use a 2mm L-shape allen wrench to press the shaft out as much as possible, then pull it the rest of the way out, being careful not to lose the lever return spring. You can use a smaller allen wrench, but don't be surprised if you bend it, so don't use a good one. L-shaped allen wrenches are nice because they have the bend to the that allows you to not only press on the shaft, but also to lever against the body for more force to press the shaft out.
Push with it sort of like this- the allen wrench should really be inline with the shaft, but it's too hard to take a picture with it like that.

Pressed partway
Again, other instructions should cover how to remove the gear ratchet and shifter spool, install the new gear ratchet onto the spool and install those back into the lever body.
However, before reinstalling the parts, first check clearance and how far the shifter can rotate around the shaft. At the extreme range of motion, the pawl should be able to move a couple of millimeters past the last ratchet. The top corner of some gear levers can run into the tab on the gear ratchet. I think they're the ones with the shift lever attached to the silver part and the spring that easily falls out- the levers attached to the black parts don't have this problem. If there is too much interference, you need to file the inside corner of the gear ratchet until the lever can move far enough, otherwise the shifter will get stuck in the lowest gear.
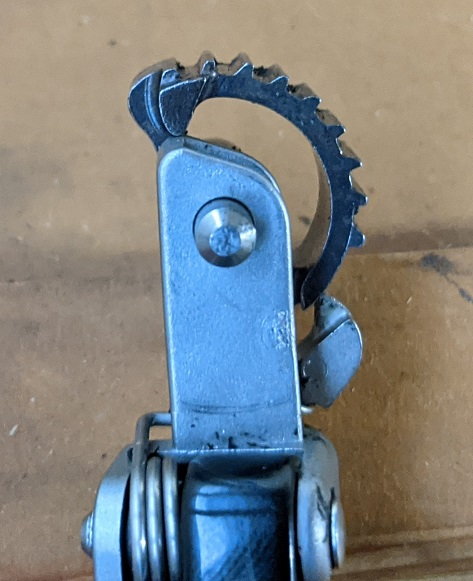
10 speed with enough clearance
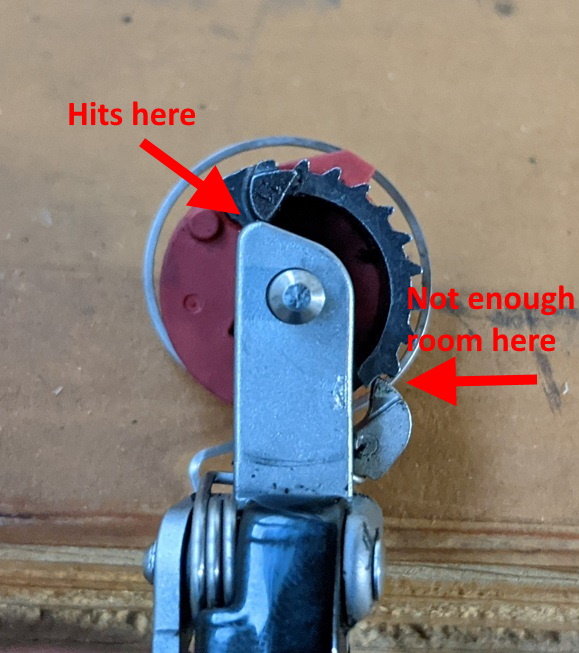
11 speed with too little clearance

File down gear ratchet
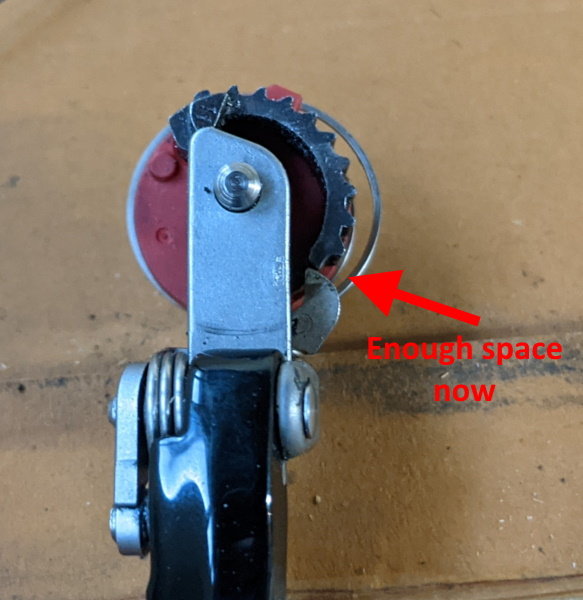
11 speed with more clearance
At this point, you can reassemble the shifter. If the spring has fallen out of the shift lever assembly, reinsert it with the round plastic tube inside it. The long, straight end of the spring fits inside the assembly as shown.
This is how the spring fits in, viewed from either side.
Installing the takeup spool and gear ratchet is relatively easy, there's just a bit of technique to get them past the pawl with the gear ratchet going over it, rotating them around a bit to get the takeup spool into the proper orientation, pressing the shaft partway in, then rotating them more so the shift lever fits past the tab on the gear ratchet (sorry, no pictures- my fat hands would have just been in the way anyway. And again, other instructions should detail that technique).
Pushing the lever in with the spring always trying to pop free is a bit of a challenge. I press on the spring with either my thumb or the end of an allen wrench to keep it in place while trying to press the shaft through, and remembering to tighten the retaining screw when you're done.
Test the operation of the shifter throughout its range before screwing the side cover back on, putting on the hood and reinstalling on the bar.
There's still a lot of life left in old SRAM 10 speed road groups, and since there are conversions to 12 speed with Ratio Technologies upgrades, people who have upgraded may be willing to part with their old 11 speed gear ratchets. These can be used to convert many 10 speed systems to 11.
The internal shifter mechanisms of SRAM 10 & 11 speed shifters are mostly the same between Force, Rival, Apex, and even S-700 groups- either cable brake or hydraulic. This means many parts are interchangeable, including the gear ratchets, although older parts may differ in construction and are not as easily upgraded.
Also, since 10 and 11 speed road shifters use the same derailleur pull ratio, you can continue to use your old rear derailleur. But you will need an 11 speed cassette which may require a new cassette body/hub/wheel upgrade.
Honestly, I haven't seen the Ratio Tech upgrade instructions for upgrading 11 speed road shifters to 12, but they should also mostly apply for upgrading 10 to 11 speed too. So if you have newer shifters- such as the 10-speed S-700 shifters- an upgrade will be pretty straightforward.
These instructions focus more on older shifters- usually cable brake- and common difficulties upgrading them.
First, make sure your shifter is actually upgradeable. This means that you want to make sure it has a red cable takeup spool. Some 10 speed shifters have red spools, but others have white spools. The 11 speed gear ratchets will not work with the white ones. If you can get a complete shifter to replace a white spool, you will need to change over not just the takeup spool and gear ratchet (or upgrade it) but also the shift lever and the pawl that is mounted to the plastic body, but that is beyond the scope of this post.
Red spool good. White spool not good yet. Ignore the fact that one lever is hydraulic and other is cable brake. But see that with the lever on the left, the shift lever is attached to and rotates on a black part, and the lever on the right, the shift lever is attached to and rotates on a silver part. This will be covered later, but the former makes things slightly easier.
Regular instructions will probably cover removing the lever from the bar, removing the brake hood and unscrewing the side cover, so I'll let you figure that out or look it up yourself.
Next comes removing the shaft that the cable takeup spool and gear ratchet are mounted to. For hydraulic systems it's pretty straightforward since there's a threaded hole in that shaft that you can fit an M2 screw (correction: it's really an M2.5 threading, but the M2.0 spoke works, it's just a bit loose) or threaded 2mm spoke into and then pull out (after unscrewing the fixing screw that prevents it from falling out). Cable brake levers do not have the threaded hole, so the shaft has to be pressed out from the front.
The front of the shaft is somewhat accessible from the bottom/side of the brake lever.
End of shaft hidden way in there
I'm not going to lie, it's a bit fiddly to remove. I use a 2mm L-shape allen wrench to press the shaft out as much as possible, then pull it the rest of the way out, being careful not to lose the lever return spring. You can use a smaller allen wrench, but don't be surprised if you bend it, so don't use a good one. L-shaped allen wrenches are nice because they have the bend to the that allows you to not only press on the shaft, but also to lever against the body for more force to press the shaft out.
Push with it sort of like this- the allen wrench should really be inline with the shaft, but it's too hard to take a picture with it like that.
Pressed partway
Again, other instructions should cover how to remove the gear ratchet and shifter spool, install the new gear ratchet onto the spool and install those back into the lever body.
However, before reinstalling the parts, first check clearance and how far the shifter can rotate around the shaft. At the extreme range of motion, the pawl should be able to move a couple of millimeters past the last ratchet. The top corner of some gear levers can run into the tab on the gear ratchet. I think they're the ones with the shift lever attached to the silver part and the spring that easily falls out- the levers attached to the black parts don't have this problem. If there is too much interference, you need to file the inside corner of the gear ratchet until the lever can move far enough, otherwise the shifter will get stuck in the lowest gear.
10 speed with enough clearance
11 speed with too little clearance
File down gear ratchet
11 speed with more clearance
At this point, you can reassemble the shifter. If the spring has fallen out of the shift lever assembly, reinsert it with the round plastic tube inside it. The long, straight end of the spring fits inside the assembly as shown.
This is how the spring fits in, viewed from either side.
Installing the takeup spool and gear ratchet is relatively easy, there's just a bit of technique to get them past the pawl with the gear ratchet going over it, rotating them around a bit to get the takeup spool into the proper orientation, pressing the shaft partway in, then rotating them more so the shift lever fits past the tab on the gear ratchet (sorry, no pictures- my fat hands would have just been in the way anyway. And again, other instructions should detail that technique).
Pushing the lever in with the spring always trying to pop free is a bit of a challenge. I press on the spring with either my thumb or the end of an allen wrench to keep it in place while trying to press the shaft through, and remembering to tighten the retaining screw when you're done.
Test the operation of the shifter throughout its range before screwing the side cover back on, putting on the hood and reinstalling on the bar.
Last edited by Geekage; 04-10-21 at 10:20 PM. Reason: Updated info regarding threading

Likes For Geekage:
11-29-22, 09:42 AM
#2
To offer another addendum. There are a couple things in this process that may appear to work until you actually get the lever on to the bike.
Problem 1: If upgrading from a white spool to a red spool you may be tempted to leave the old ratchet pawl and actuator. When assembled on the bench, they will correctly move the ratchet and everything will feel fine. For me, once assembled with cable tension from a rear derailleur, 2 problems present themselves:
1. The shift from 1st cassette sprocket to the 2nd is almost impossible to feel, 90% of the time I would miss the 2nd sprocket and do a double shift to the 3rd.
2. The pawl doesn't engage the ratchet well enough and will sometimes slip several gears
One would be best served swapping out the pawl, which is a bit fiddly with its tiny c-clip and spring, but fairly straight forward. If you have an entire functional shift paddle with the actuator, you can use that, otherwise you've got another c-clip and spring to deal with. Not hard, just fiddly.
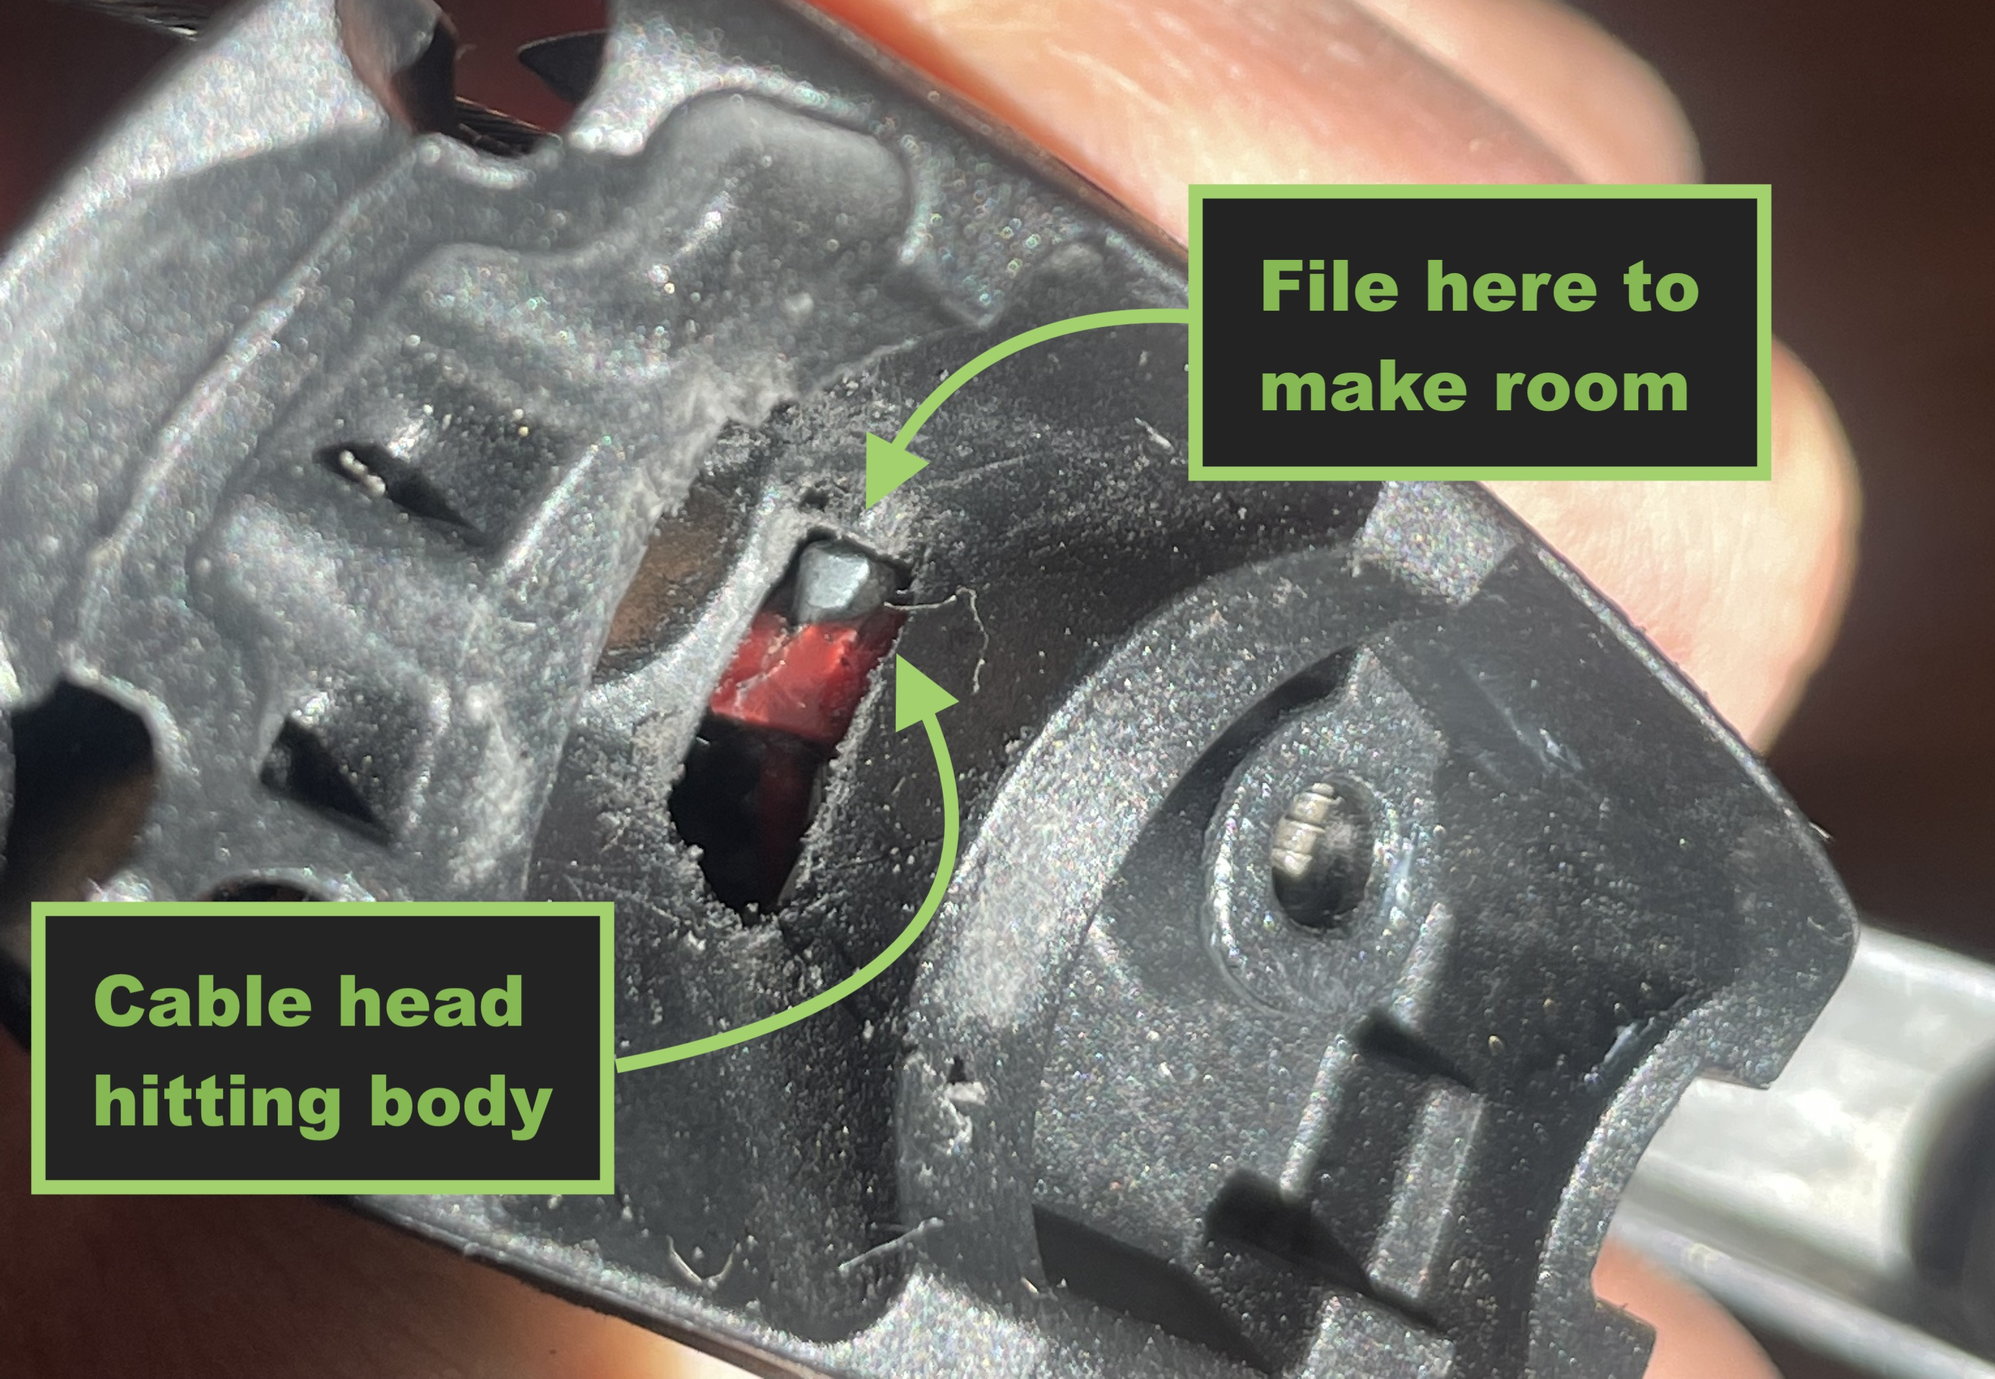
Problem 2: When upgrading to 11s, as Geekage notes, you'll need to file off a bit of the ratchet to get all 11 gears. On the bench you'll shift through them and say "Ah, everything works!". Typically, if you're in the lowest gear, and try to go lower, the SRAM paddle will click loudly and the lever will over-shift without changing, to let you know you've run out of gears. Once a cable head is present in the spool though, you'll lose this feature as the 10s body doesn't have space for the overage in the 11th shift and you'll end up in the 10th gear if you try to shift past the 11th. This can be fixed with a bit of needle file work on the body, as seen here from the rear of the body:
Problem 1: If upgrading from a white spool to a red spool you may be tempted to leave the old ratchet pawl and actuator. When assembled on the bench, they will correctly move the ratchet and everything will feel fine. For me, once assembled with cable tension from a rear derailleur, 2 problems present themselves:
1. The shift from 1st cassette sprocket to the 2nd is almost impossible to feel, 90% of the time I would miss the 2nd sprocket and do a double shift to the 3rd.
2. The pawl doesn't engage the ratchet well enough and will sometimes slip several gears
One would be best served swapping out the pawl, which is a bit fiddly with its tiny c-clip and spring, but fairly straight forward. If you have an entire functional shift paddle with the actuator, you can use that, otherwise you've got another c-clip and spring to deal with. Not hard, just fiddly.
Problem 2: When upgrading to 11s, as Geekage notes, you'll need to file off a bit of the ratchet to get all 11 gears. On the bench you'll shift through them and say "Ah, everything works!". Typically, if you're in the lowest gear, and try to go lower, the SRAM paddle will click loudly and the lever will over-shift without changing, to let you know you've run out of gears. Once a cable head is present in the spool though, you'll lose this feature as the 10s body doesn't have space for the overage in the 11th shift and you'll end up in the 10th gear if you try to shift past the 11th. This can be fixed with a bit of needle file work on the body, as seen here from the rear of the body:
Last edited by fliplap; 12-22-22 at 06:12 PM.
Likes For fliplap:
 06-12-23, 05:29 AM
#4
Newbie
Join Date: Jun 2023
Posts: 1
Likes: 0
Liked 0 Times
in
0 Posts
Great guide Geekage!
Felix from Ratio Technology here.
We've not come across the issue of the interference between the ratchet's gear 1 upstand and the shifter paddle's body on some models of 10spd shifter in our own testing. Thank you for documenting it so well.
We'd like to add a note warning of this issue to our support documents. Please may we use your images?
09-07-23, 11:31 AM
#5
Newbie
Join Date: Sep 2023
Posts: 1
Likes: 0
Liked 0 Times
in
0 Posts
Great guide Geekage!
Felix from Ratio Technology here.
We've not come across the issue of the interference between the ratchet's gear 1 upstand and the shifter paddle's body on some models of 10spd shifter in our own testing. Thank you for documenting it so well.
We'd like to add a note warning of this issue to our support documents. Please may we use your images?
Felix from Ratio Technology here.
We've not come across the issue of the interference between the ratchet's gear 1 upstand and the shifter paddle's body on some models of 10spd shifter in our own testing. Thank you for documenting it so well.
We'd like to add a note warning of this issue to our support documents. Please may we use your images?
Will Ratio Tech, provide a solution to upgrade 10 speed to 11 speed SRAM shifters for 2x groupsets ? Reading Ratio Tech web site there is only options for 11 to 12 in 2x configurations...
Cheers,
Pericles
11-30-23, 01:15 PM
#6
Not trying to be rude but, are you asking a different question to what this thread is all about? Am I missing something?
11-30-23, 02:12 PM
#7
SE Wis
Join Date: Apr 2005
Location: Milwaukee, WI
Posts: 10,811
Bikes: '68 Raleigh Sprite, '02 Raleigh C500, '84 Raleigh Gran Prix, '91 Trek 400, 2013 Novara Randonee, 1990 Trek 970
Liked 3,655 Times
in
2,201 Posts
