


Crank removal ideas?
 04-20-24, 12:27 AM
#1
Full Member
Thread Starter
Crank removal ideas?
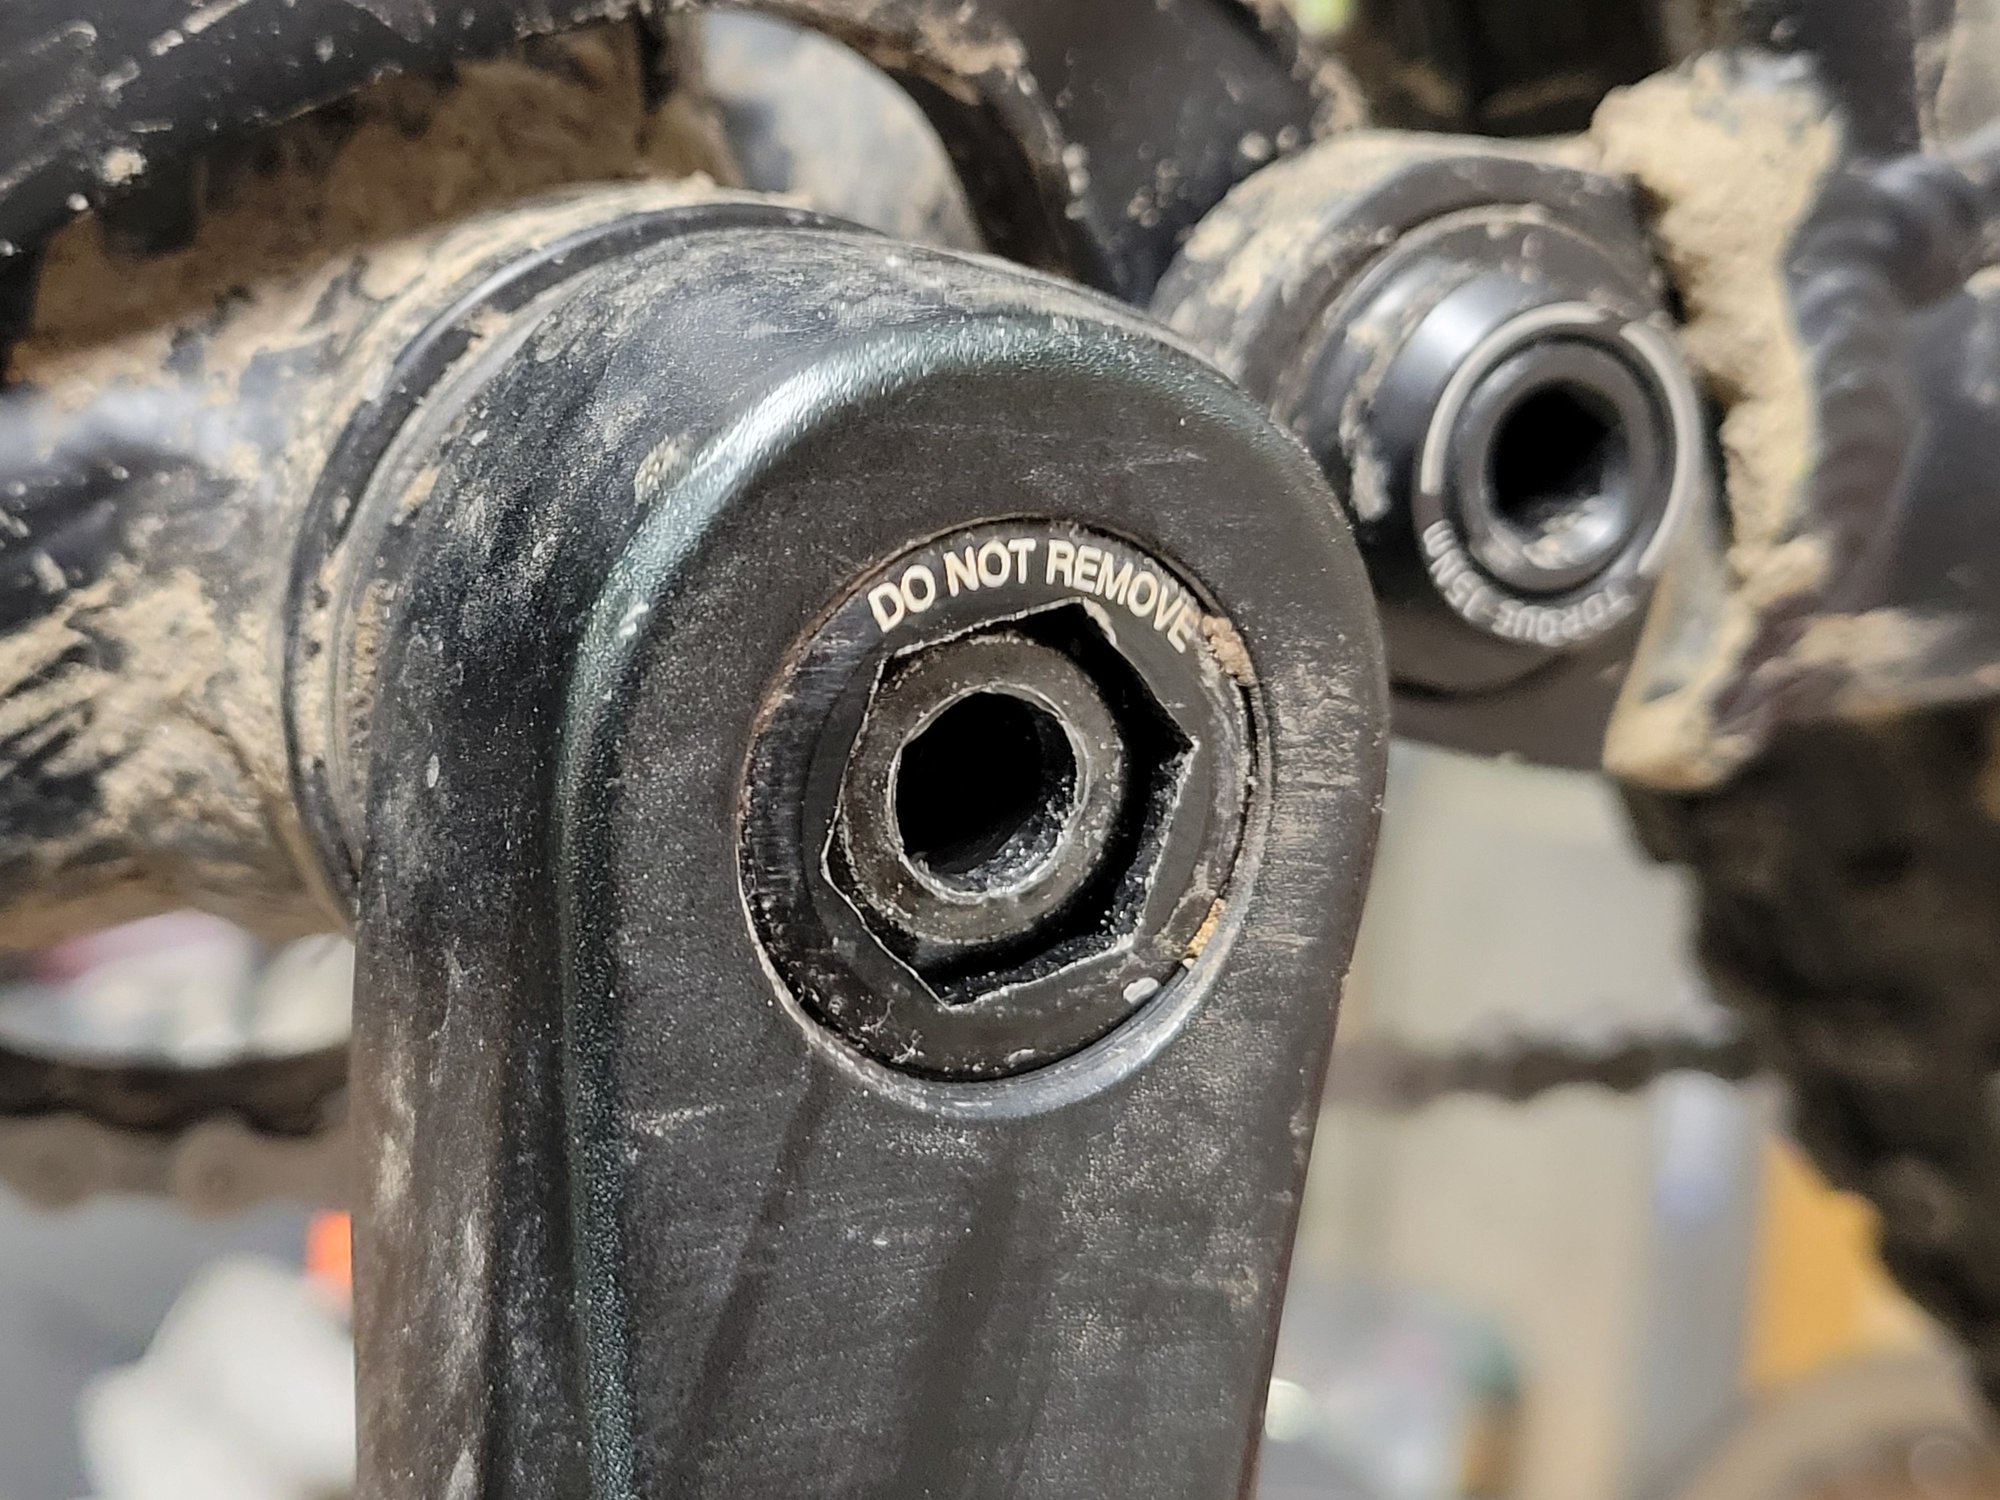
The bike is a 2018 Giant Anthem 3, a used bike the GF bought. The crank is a Praxis, the drive side looks like a typical HT2 but the NDS doesn't, maybe something like an octalink? The round center hole in the pics gives me the impression it wasn't always round, pretty sure a 8mm allen key once fit there. So now what? I'm OK with destructive methods. The BB doesn't have a lot of life left, and if/when I get this crank off it's likely going in the recycle bin. Thanks for any help!
 04-20-24, 02:14 AM
#2
(above) It would be good to show the drive side. The NDS is not showing external bearings typical of HT2 style, so I doubt different on the DS. The bolts look to be for the crank to be "self-extracting" rather than a crank tool. I think you just loosen those bolts, the head pushes on the cap, and the arms come off. Then BB is either cartridge or cone and cup, conventional disassembly applies. EDIT: Oh, I think I see the problem... is that an allen bolt in the center, or is it just a round hole? Ah, you said it is round but looks stripped. Let me think a minute...
OK, the big hex cap that says "DO NOT REMOVE", remove it with the appropriate size allen wrench. Non-destructive of crank: If you have a dremel tool with a small cutoff disc, cut slots into the bolt head, try to use large screwdriver to loosen bolt. Destructive of crank: If you can't make that slot in the head with mini cutoff disc, use a larger one to cut groove in bolt head, but also cuts into crank. Darn, the crank aluminum will clog the disc. Thinking more...
OK, since you said destructive is OK, use thin cutoff wheel on 4" die grinder to cut through the BB spindle between the crank and BB cup, looks like there is sufficient space without external bearings. Don't worry about a bit of scratching/grinding on face of BB ends, you're going to replace, but DO make sure you do NOT grind the end of the BB shell. As long as the end/cup protrudes on both sides, it should protect the BB shell ends. Do non-drive side first, then see if you can access to do same on drive side, if not, you may need to cut a couple arms of the spider with a hacksaw (after removing chainring(s)), then cut through BB spindle on drive side, that will give access on both sides to remove BB cartridge or end cups.
Other option is using a cutting torch or plasma cutter to cut BB spindle off on both sides, and will make quick work of cutting of the DS spider for access on that side.
Replace parts.
Last edited by Duragrouch; 04-20-24 at 02:40 AM.
04-20-24, 05:32 AM
#3
SE Wis
Join Date: Apr 2005
Location: Milwaukee, WI
Posts: 10,814
Bikes: '68 Raleigh Sprite, '02 Raleigh C500, '84 Raleigh Gran Prix, '91 Trek 400, 2013 Novara Randonee, 1990 Trek 970
Liked 3,657 Times
in
2,203 Posts
First thing I'd try. Use the appropriate size hex to remove the self extractor collar. If not enough bite to do that, drill 2 holes 180� apart in the collar and use a pin spanner. Find an appropriate size cape chisel with hex handle and pound it into the rounded off recess of the crank bolt. Use the appropriate size wrench on the hex handle of the chisel to turn it. I can't tell you how many broken off pipe nipples I've removed with this method.
Another common method of stripped allen bolts is pound the appropriate size Torx bit into the recess and turn that.
If that didn't work
Collar already removed. Get the appropriate size drill (basically bigger than threaded diameter and smaller than head OD) and because its recessed hex head, it'll center well and drill until the head pops off. Extra points if you use a LH drill bit and it unscrews while drilling.
Once bolt head is off a standard crank removal tool to remove crank.
It may be "octalink" size rather than square taper size and require the right end on the crank extractor. Once the crank is off, there should be enough stub to grab with a vise grip. If not it still should be reasonable easy to remove now that the pressure is released.
Final method remove collar and insert an "close enough" allen wrench in and have someone tack weld it to the bolt
Last edited by dedhed; 04-20-24 at 05:55 AM.
04-20-24, 05:42 AM
#4
(above) I think you're right. For some reason I had ruled out drilling the head off the bolt, thinking it was too hard, but I think you are right. If it's soft enough to round-off the hex socket, it should be soft enough to drill.
04-20-24, 05:52 AM
#5
SE Wis
Join Date: Apr 2005
Location: Milwaukee, WI
Posts: 10,814
Bikes: '68 Raleigh Sprite, '02 Raleigh C500, '84 Raleigh Gran Prix, '91 Trek 400, 2013 Novara Randonee, 1990 Trek 970
Liked 3,657 Times
in
2,203 Posts
I did chuckle a bit on plasma cutter/torch. Thought that was a bit of overthinking the problem for the average home guy and I have a torch at home.
added a couple more methods as well.
Likes For dedhed:
04-20-24, 06:33 AM
#6

Senior Member

Join Date: Mar 2024
Location: San Diego
Posts: 1,205
Bikes: Columbine, Paramount Track Bike, Colnago Super, Santana Tandems (1995 & 2007), Gary Fisher Piranha, Trek Wahoo, Bianchi Track Bike, a couple of Honda mountain bikes
Liked 433 Times
in
267 Posts
(above) It would be good to show the drive side. The NDS is not showing external bearings typical of HT2 style, so I doubt different on the DS. The bolts look to be for the crank to be "self-extracting" rather than a crank tool. I think you just loosen those bolts, the head pushes on the cap, and the arms come off. Then BB is either cartridge or cone and cup, conventional disassembly applies. EDIT: Oh, I think I see the problem... is that an allen bolt in the center, or is it just a round hole? Ah, you said it is round but looks stripped. Let me think a minute...
OK, the big hex cap that says "DO NOT REMOVE", remove it with the appropriate size allen wrench. Non-destructive of crank: If you have a dremel tool with a small cutoff disc, cut slots into the bolt head, try to use large screwdriver to loosen bolt. Destructive of crank: If you can't make that slot in the head with mini cutoff disc, use a larger one to cut groove in bolt head, but also cuts into crank. Darn, the crank aluminum will clog the disc. Thinking more...
OK, since you said destructive is OK, use thin cutoff wheel on 4" die grinder to cut through the BB spindle between the crank and BB cup, looks like there is sufficient space without external bearings. Don't worry about a bit of scratching/grinding on face of BB ends, you're going to replace, but DO make sure you do NOT grind the end of the BB shell. As long as the end/cup protrudes on both sides, it should protect the BB shell ends. Do non-drive side first, then see if you can access to do same on drive side, if not, you may need to cut a couple arms of the spider with a hacksaw (after removing chainring(s)), then cut through BB spindle on drive side, that will give access on both sides to remove BB cartridge or end cups.
Other option is using a cutting torch or plasma cutter to cut BB spindle off on both sides, and will make quick work of cutting of the DS spider for access on that side.
Replace parts.
OK, the big hex cap that says "DO NOT REMOVE", remove it with the appropriate size allen wrench. Non-destructive of crank: If you have a dremel tool with a small cutoff disc, cut slots into the bolt head, try to use large screwdriver to loosen bolt. Destructive of crank: If you can't make that slot in the head with mini cutoff disc, use a larger one to cut groove in bolt head, but also cuts into crank. Darn, the crank aluminum will clog the disc. Thinking more...
OK, since you said destructive is OK, use thin cutoff wheel on 4" die grinder to cut through the BB spindle between the crank and BB cup, looks like there is sufficient space without external bearings. Don't worry about a bit of scratching/grinding on face of BB ends, you're going to replace, but DO make sure you do NOT grind the end of the BB shell. As long as the end/cup protrudes on both sides, it should protect the BB shell ends. Do non-drive side first, then see if you can access to do same on drive side, if not, you may need to cut a couple arms of the spider with a hacksaw (after removing chainring(s)), then cut through BB spindle on drive side, that will give access on both sides to remove BB cartridge or end cups.
Other option is using a cutting torch or plasma cutter to cut BB spindle off on both sides, and will make quick work of cutting of the DS spider for access on that side.
Replace parts.
__________________
Cheers, Mike
-Stupid hurts....ride safe
Cheers, Mike
-Stupid hurts....ride safe
04-20-24, 06:45 AM
#7
Senior Member
Join Date: Jan 2007
Location: Eastern VA
Posts: 1,816
Bikes: 2022 Fuel EX 8, 2021 Domane SL6, Black Beta (Nashbar frame), 2004 Trek 1000C for the trainer
Liked 580 Times
in
305 Posts
You could pound a torx bit in then use and impact driver to try and back it out. If soak it with Kryoil first.
Been there done this for a square taper bb. I ended up removing the bolt and using a fly wheel puller to pull the crank arm. I ended up reusing the crank arm but replaced the bolt and screw in puller cap thing. Still have it.
Been there done this for a square taper bb. I ended up removing the bolt and using a fly wheel puller to pull the crank arm. I ended up reusing the crank arm but replaced the bolt and screw in puller cap thing. Still have it.
04-20-24, 10:22 AM
#8
It looks like the outer 1/8" of hex has been rounded off. Have you actually pushed (or hammered) an allen wrench at least 1/2" in to make sure there isn't still engagement? I'd try that first.
If you have an opening on the DS, you can try using a long shaft allen from that side going into the back of the NDS allen bolt.
If you have an opening on the DS, you can try using a long shaft allen from that side going into the back of the NDS allen bolt.
Last edited by Kontact; 04-20-24 at 05:41 PM.
Likes For Kontact:
04-20-24, 05:52 PM
#10
Newbie
Join Date: Apr 2024
Posts: 1
Likes: 0
Liked 0 Times
in
0 Posts
Have had this happen to me before! I used an SAE allen wrench and tapped it in with a hammer. Believe it was a 5/16 or maybe a 3/8. Worked like a charm for me and was nice not to have to resort to destructive methods. Hope this helps!
04-20-24, 05:59 PM
#11
Senior Member
Join Date: Oct 2013
Location: Mich
Posts: 7,867
Bikes: RSO E-tire dropper fixie brifter
Liked 3,302 Times
in
2,096 Posts
dremel it to take the next size up allen key/hex.
__________________
-YMMV
-YMMV
04-20-24, 06:05 PM
#12
Just Pedaling

The bike is a 2018 Giant Anthem 3, a used bike the GF bought. The crank is a Praxis, the drive side looks like a typical HT2 but the NDS doesn't, maybe something like an octalink? The round center hole in the pics gives me the impression it wasn't always round, pretty sure a 8mm allen key once fit there. So now what? I'm OK with destructive methods. The BB doesn't have a lot of life left, and if/when I get this crank off it's likely going in the recycle bin. Thanks for any help!
04-20-24, 06:07 PM
#13
Ooo, that's a good idea, if there is a small enough diameter cylindrical stone. The corners are not a problem, they have found that sockets with the corners relieved with a radius, are actually less likely to strip; it's called Flank Drive, invented by Snap-On in the middle 1960s in response to the US military having problems with rounding off high-strength high-torque fastener heads when removing.
04-20-24, 06:07 PM
#14
Just Pedaling
It looks like the outer 1/8" of hex has been rounded off. Have you actually pushed (or hammered) an allen wrench at least 1/2" in to make sure there isn't still engagement? I'd try that first.
If you have an opening on the DS, you can try using a long shaft allen from that side going into the back of the NDS allen bolt.
If you have an opening on the DS, you can try using a long shaft allen from that side going into the back of the NDS allen bolt.
04-20-24, 06:08 PM
#15
Senior Member
Join Date: Oct 2013
Location: Mich
Posts: 7,867
Bikes: RSO E-tire dropper fixie brifter
Liked 3,302 Times
in
2,096 Posts
Ooo, that's a good idea, if there is a small enough diameter cylindrical stone. The corners are not a problem, they have found that sockets with the corners relieved with a radius, are actually less likely to strip; it's called Flank Drive, invented by Snap-On in the middle 1960s in response to the US military having problems with rounding off high-strength high-torque fastener heads when removing.
__________________
-YMMV
-YMMV
04-20-24, 06:10 PM
#16
04-20-24, 06:15 PM
#17
Ooo, that's a good idea, if there is a small enough diameter cylindrical stone. The corners are not a problem, they have found that sockets with the corners relieved with a radius, are actually less likely to strip; it's called Flank Drive, invented by Snap-On in the middle 1960s in response to the US military having problems with rounding off high-strength high-torque fastener heads when removing.
04-20-24, 06:22 PM
#19
Likes For Kontact:
04-20-24, 06:28 PM
#20
I think the same concept would apply, just in reverse; The socket head (allen) bolt is analogous with the (ratchet wrench) socket, with corners relieved so less likely to strip, and the allen wrench is analogeous with the external hex bolt head. If A=B, B=A.
But as noted above, perhaps there is still plenty of allen socket remaining to torque on.
But as noted above, perhaps there is still plenty of allen socket remaining to torque on.
Last edited by Duragrouch; 04-20-24 at 06:31 PM.
04-20-24, 06:36 PM
#21
I think the same concept would apply, just in reverse; The socket head (allen) bolt is analogous with the (ratchet wrench) socket, with corners relieved so less likely to strip, and the allen wrench is analogeous with the external hex bolt head. If A=B, B=A.
But as noted above, perhaps there is still plenty of allen socket remaining to torque on.
But as noted above, perhaps there is still plenty of allen socket remaining to torque on.
04-20-24, 07:44 PM
#22
Well I was responding to someone who suggested to grind the hole up to the next size allen wrench, which I thought would be a good idea, if feasible. But perhaps they meant to grind on the outside of the bolt head to make an external hex, and with the cap removed, they could get a socket on it. Either sounded better than my earlier ideas. When I make a suggestion, I'm never certain it will work, unless I've actually done it before. Something like this problem, someone says something better, I'm glad to hear it.
04-20-24, 09:28 PM
#23
Well I was responding to someone who suggested to grind the hole up to the next size allen wrench, which I thought would be a good idea, if feasible. But perhaps they meant to grind on the outside of the bolt head to make an external hex, and with the cap removed, they could get a socket on it. Either sounded better than my earlier ideas. When I make a suggestion, I'm never certain it will work, unless I've actually done it before. Something like this problem, someone says something better, I'm glad to hear it.
Likes For Kontact:
04-21-24, 02:26 AM
#24
Senior Member
Join Date: Oct 2013
Location: Mich
Posts: 7,867
Bikes: RSO E-tire dropper fixie brifter
Liked 3,302 Times
in
2,096 Posts
04-21-24, 07:39 AM
#25
You grind it with a mini carbide burr to move each corner outwards - then the next size of hex key doesn't hang up on the corners and can be pounded in, so it engages with the part next to where you ground it out. Or of course you can weld a nut on it. 😁