


Vintage Peugeot
 05-16-24, 11:06 AM
#51
Senior Member
Join Date: Jan 2007
Location: Ontario
Posts: 2,673
Mentioned: 16 Post(s)
Tagged: 0 Thread(s)
Quoted: 486 Post(s)
Liked 661 Times
in
351 Posts
They will�. The reason I have my Sugino cups in the spare parts bin is that the stock cups worked fine with the SR bottom bracket I installed several iterations ago.

Likes For markk900:
05-16-24, 07:25 PM
#52
Newbie
Thread Starter
Got the cotter pin out of the crank on my rusty white parts bike in literally 60 seconds or less. Hallelujah!
Cleaned the adjustable cup and loose ball bearings up. Here are photos of the white rusty bike adjustable cup on the left and the blue UO-8 cup on the right. White Rusty parts bike cup is wider. Put the 11 loose bearings into the White Rusty bike cup and screwed it in. Plenty of threads for the lock nut. The loose ball bearings help a bunch. Gonna put 11 new bearings in on both sides when the bearings arrive in the mail tomorrow.


Cleaned the adjustable cup and loose ball bearings up. Here are photos of the white rusty bike adjustable cup on the left and the blue UO-8 cup on the right. White Rusty parts bike cup is wider. Put the 11 loose bearings into the White Rusty bike cup and screwed it in. Plenty of threads for the lock nut. The loose ball bearings help a bunch. Gonna put 11 new bearings in on both sides when the bearings arrive in the mail tomorrow.

Likes For RustyPeugeot:
05-17-24, 06:05 AM
#53
Senior Member
Join Date: Jan 2007
Location: Ontario
Posts: 2,673
Mentioned: 16 Post(s)
Tagged: 0 Thread(s)
Quoted: 486 Post(s)
Liked 661 Times
in
351 Posts
One of the �joys� of old bikes is never knowing all the details. I was not aware there were such different sized adjustable cups! For posterity can you measure the two and post the results so future Pug-o-philes can check if they run into a similar problem?
Likes For markk900:
05-17-24, 07:31 AM
#54
Newbie
Thread Starter
Mechanically I am thinking that deeper adjustable cup didn't resolve the problem. The deeper cup will screw in until the bearings contact the axle. The shallower adjustable cup would screw in and do the exact same thing. The original/shallower adjustable cup does have some scoring inside from the caged bearings. So the deeper adjustable cup from the white rusty bike is in better condition and the 11 loose ball bearings seem to make a difference, compared to the caged bearings which seem to be messed up. I'm looking forward to getting the new loose ball bearings installed and the crank all back together so I can move on to the brakes and shifter cables.
Likes For RustyPeugeot:
05-17-24, 09:33 AM
#55

Bad example
Join Date: Nov 2015
Location: Seattle and Reims
Posts: 3,220
Bikes: Peugeot: AO-8 1973, PA-10 1971, PR-10 1973, Sante 1988; Masi Gran Criterium 1975, Stevenson Tourer 1980, Stevenson Criterium 1981, Schwinn Paramount 1972, Rodriguez 2006, Gitane Federal ~1975, Holdsworth Pro, Follis 172 ~1973, Bianchi '62
Mentioned: 37 Post(s)
Tagged: 0 Thread(s)
Quoted: 876 Post(s)
Liked 357 Times
in
172 Posts
Mechanically I am thinking that deeper adjustable cup didn't resolve the problem. The deeper cup will screw in until the bearings contact the axle. The shallower adjustable cup would screw in and do the exact same thing. The original/shallower adjustable cup does have some scoring inside from the caged bearings. So the deeper adjustable cup from the white rusty bike is in better condition and the 11 loose ball bearings seem to make a difference, compared to the caged bearings which seem to be messed up. I'm looking forward to getting the new loose ball bearings installed and the crank all back together so I can move on to the brakes and shifter cables.
__________________
Keeping Seattle�s bike shops in business since 1978
Keeping Seattle�s bike shops in business since 1978
Likes For Aubergine:
05-17-24, 09:38 AM
#56
Senior Member
Join Date: Jan 2007
Location: Ontario
Posts: 2,673
Mentioned: 16 Post(s)
Tagged: 0 Thread(s)
Quoted: 486 Post(s)
Liked 661 Times
in
351 Posts
On the subject of shifter cables, simplex shifters seem to have used a smaller �cup� to hold the end of the cable. You can still get the smaller ends (sometimes) but in my experience the universal cables most sell today don�t always fit. If you run into this, since you seem to have plenty of spares, I would drill out the hole slightly to fit rather than stress over getting the �exact� cable or trying (as I once did) to file the end down to fit.
05-17-24, 09:43 AM
#57
Newbie
Thread Starter
On the subject of shifter cables, simplex shifters seem to have used a smaller �cup� to hold the end of the cable. You can still get the smaller ends (sometimes) but in my experience the universal cables most sell today don�t always fit. If you run into this, since you seem to have plenty of spares, I would drill out the hole slightly to fit rather than stress over getting the �exact� cable or trying (as I once did) to file the end down to fit.
05-17-24, 09:54 AM
#58
Bad example
Join Date: Nov 2015
Location: Seattle and Reims
Posts: 3,220
Bikes: Peugeot: AO-8 1973, PA-10 1971, PR-10 1973, Sante 1988; Masi Gran Criterium 1975, Stevenson Tourer 1980, Stevenson Criterium 1981, Schwinn Paramount 1972, Rodriguez 2006, Gitane Federal ~1975, Holdsworth Pro, Follis 172 ~1973, Bianchi '62
Mentioned: 37 Post(s)
Tagged: 0 Thread(s)
Quoted: 876 Post(s)
Liked 357 Times
in
172 Posts
On the subject of shifter cables, simplex shifters seem to have used a smaller �cup� to hold the end of the cable. You can still get the smaller ends (sometimes) but in my experience the universal cables most sell today don�t always fit. If you run into this, since you seem to have plenty of spares, I would drill out the hole slightly to fit rather than stress over getting the �exact� cable or trying (as I once did) to file the end down to fit.
__________________
Keeping Seattle�s bike shops in business since 1978
Keeping Seattle�s bike shops in business since 1978
05-17-24, 10:00 AM
#59
Bad example
Join Date: Nov 2015
Location: Seattle and Reims
Posts: 3,220
Bikes: Peugeot: AO-8 1973, PA-10 1971, PR-10 1973, Sante 1988; Masi Gran Criterium 1975, Stevenson Tourer 1980, Stevenson Criterium 1981, Schwinn Paramount 1972, Rodriguez 2006, Gitane Federal ~1975, Holdsworth Pro, Follis 172 ~1973, Bianchi '62
Mentioned: 37 Post(s)
Tagged: 0 Thread(s)
Quoted: 876 Post(s)
Liked 357 Times
in
172 Posts
markk900 Would you have a photo to help me understand what you mean? I’m brand new to bike repair, so I appreciate all the tips you guys have to help me avoid obstacles along the way.
__________________
Keeping Seattle�s bike shops in business since 1978
Keeping Seattle�s bike shops in business since 1978
Likes For Aubergine:
05-17-24, 10:17 AM
#60
Newbie
Thread Starter
Gotcha. Thanks guys. I'm getting it. I'm guessing Campagnolo shift cables are more expensive than my $10 bike. haha
Likes For RustyPeugeot:
05-17-24, 10:21 AM
#61
Edumacator
Join Date: Jan 2018
Location: Goose Creek, SC
Posts: 7,067
Bikes: '87 Crestdale, '87 Basso Gap, '92 Rossin Performance EL-OS, 1990 VanTuyl, 1980s Losa, 1985 Trek 670, 1982 AD SLE, 1987 PX10, etc...
Mentioned: 59 Post(s)
Tagged: 0 Thread(s)
Quoted: 2526 Post(s)
Liked 3,346 Times
in
2,097 Posts
You can also file down normal cheap cables but then run the risk of weakening them. And it�s sort of a pain.
__________________
1987 Crest Cannondale, 1987 Basso Gap, 1992 Rossin Performance EL, 1990ish Van Tuyl, 1985 Trek 670, 2003 Pinarello Surprise, 1990ish MBK Atlantique, 1987 Peugeot Competition, 1987 Nishiki Tri-A, 1981 Faggin, 1996 Cannondale M500, 1984 Mercian, 1982 AD SuperLeicht, 1985 Massi (model unknown), 1988 Daccordi Griffe , 1989 Fauxsin MTB, 1981 Ciocc Mockba, 1992 Bianchi Giro, 1977 Colnago Super, 1971 Raleigh International, 1998 Corratec Ap & Dun, 1991 Peugeot Slimestone
1987 Crest Cannondale, 1987 Basso Gap, 1992 Rossin Performance EL, 1990ish Van Tuyl, 1985 Trek 670, 2003 Pinarello Surprise, 1990ish MBK Atlantique, 1987 Peugeot Competition, 1987 Nishiki Tri-A, 1981 Faggin, 1996 Cannondale M500, 1984 Mercian, 1982 AD SuperLeicht, 1985 Massi (model unknown), 1988 Daccordi Griffe , 1989 Fauxsin MTB, 1981 Ciocc Mockba, 1992 Bianchi Giro, 1977 Colnago Super, 1971 Raleigh International, 1998 Corratec Ap & Dun, 1991 Peugeot Slimestone
Likes For jdawginsc:
05-17-24, 11:00 AM
#62
Senior Member
Join Date: Jan 2007
Location: Ontario
Posts: 2,673
Mentioned: 16 Post(s)
Tagged: 0 Thread(s)
Quoted: 486 Post(s)
Liked 661 Times
in
351 Posts
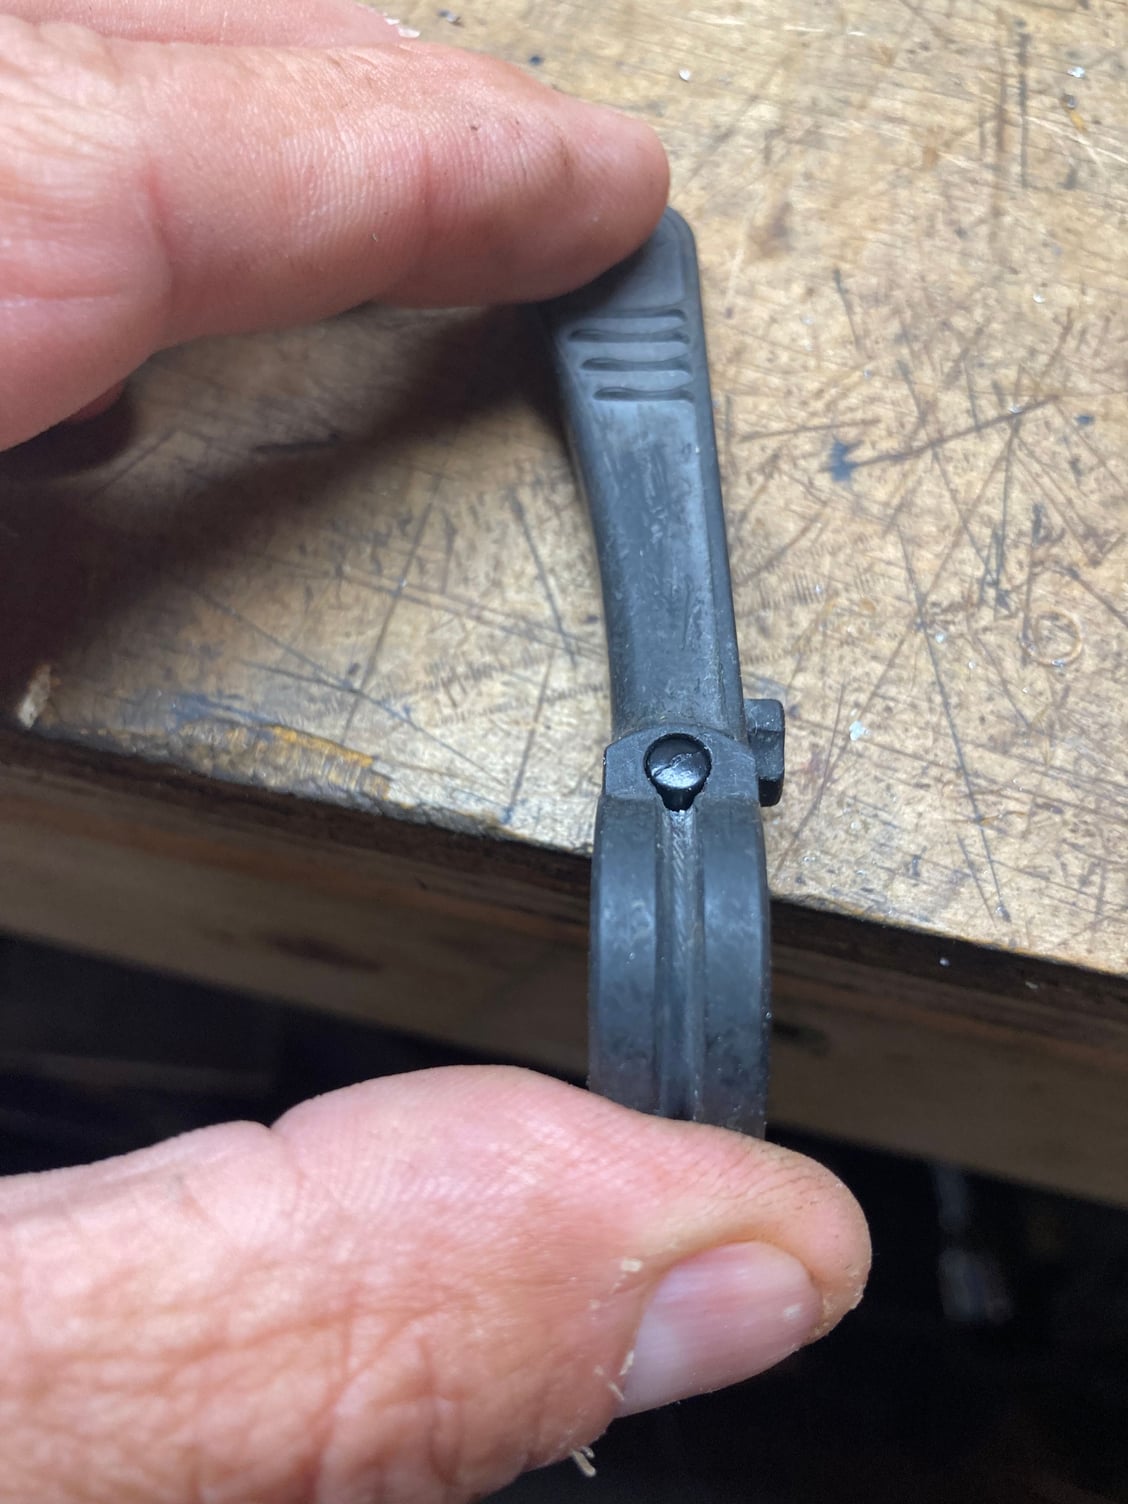
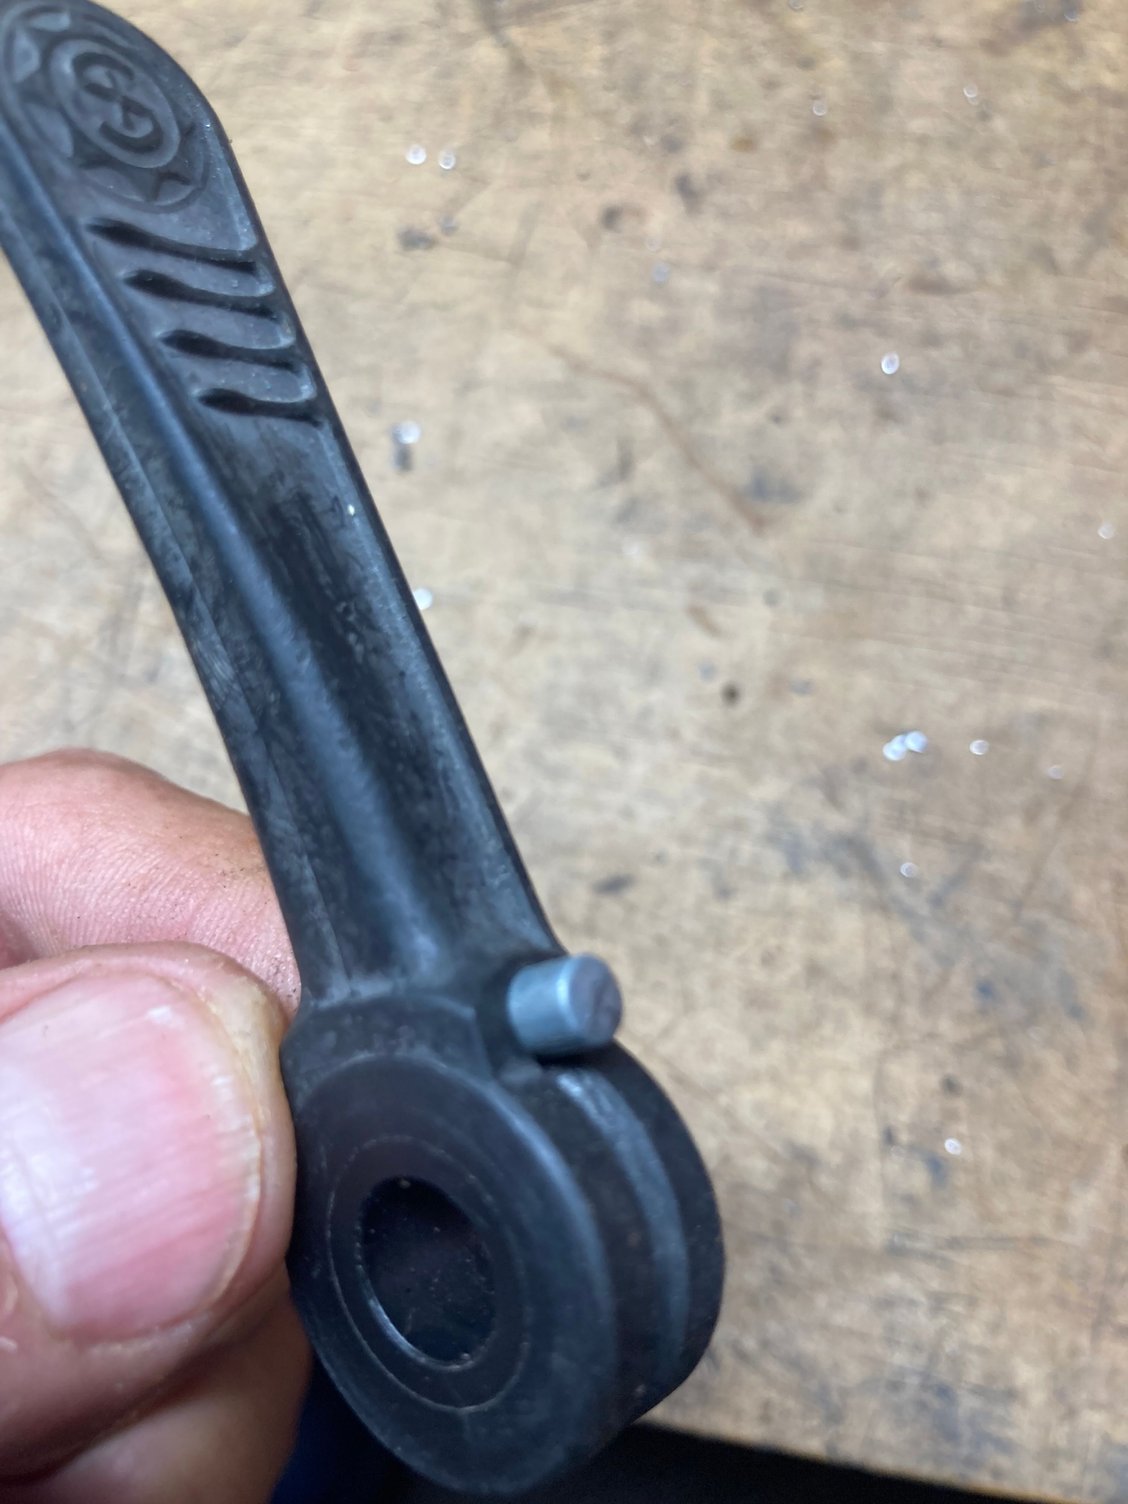
Just to drive the point home: first picture cable fits, second it doesn�t. My suggestion is that given you have a supply of (what I think of as crappy) plastic shift levers, it only takes a little drilling to hog the hole out if you end up with the end that doesn�t fit.
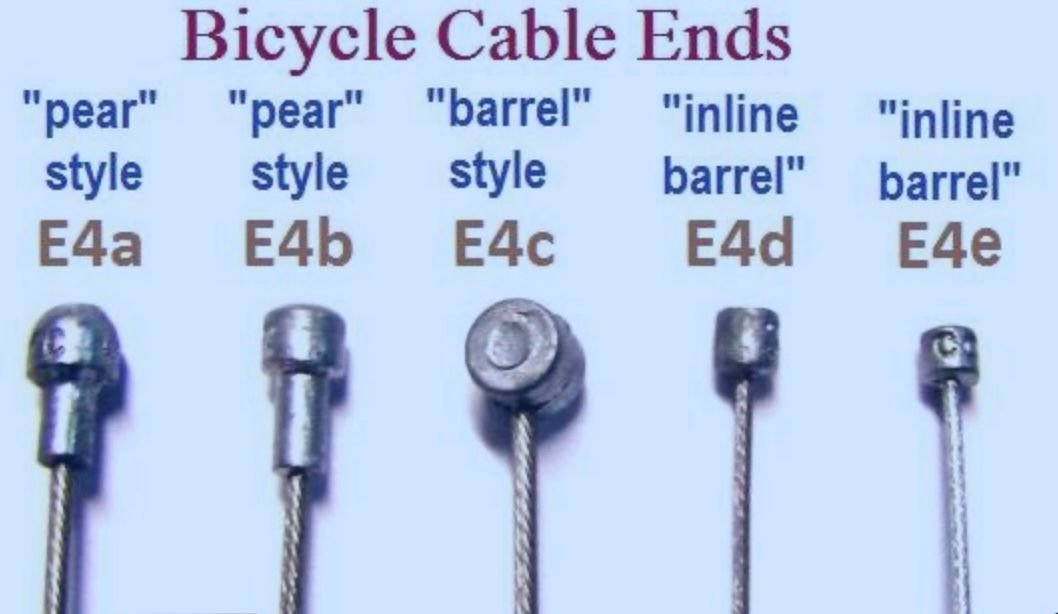
BTW: I am getting that you don�t have a sympathetic bike shop nearby, and so are ordering a lot of stuff online. Aubergine �s picture is the first time in 45 years I found out there were actually designations for those cable ends�..not sure they�d necessarily show up on a Google search. Luckily I have a really good and very vintage friendly LBS so I can go in and ask for stuff like �shifter cables with the small ends on them� and they will take time to help me find them.
And as I stated before I am �frugal� and have found anything that says Campagnolo on it tends to be marked up something awful.
Last edited by markk900; 05-17-24 at 11:09 AM.
Likes For markk900:
05-17-24, 11:30 AM
#63
Bad example
Join Date: Nov 2015
Location: Seattle and Reims
Posts: 3,220
Bikes: Peugeot: AO-8 1973, PA-10 1971, PR-10 1973, Sante 1988; Masi Gran Criterium 1975, Stevenson Tourer 1980, Stevenson Criterium 1981, Schwinn Paramount 1972, Rodriguez 2006, Gitane Federal ~1975, Holdsworth Pro, Follis 172 ~1973, Bianchi '62
Mentioned: 37 Post(s)
Tagged: 0 Thread(s)
Quoted: 876 Post(s)
Liked 357 Times
in
172 Posts
Tell me about it. Besides all the vintage stuff I love, my more modern bikes all use Campagnolo ten speed drivetrains.
__________________
Keeping Seattle�s bike shops in business since 1978
Keeping Seattle�s bike shops in business since 1978
Likes For Aubergine:
05-17-24, 11:33 AM
#64
Newbie
Thread Starter
Thanks guys, I'm getting it. Yes, I think I have an abundance of plastic shifter levers. haha
Likes For RustyPeugeot:
05-17-24, 07:01 PM
#65
Newbie
Thread Starter
Bad news. With loose ball bearings in there, the adjustable cup is in too far and no threads to lock it down. I�m guessing I need a new fixed cup or a new axle. With caged bearings installed backwards on the drive side, there are threads to lock it down�..but it doesn�t spin smoothly because the caged bearings are backwards.
05-17-24, 08:39 PM
#66
Bad example
Join Date: Nov 2015
Location: Seattle and Reims
Posts: 3,220
Bikes: Peugeot: AO-8 1973, PA-10 1971, PR-10 1973, Sante 1988; Masi Gran Criterium 1975, Stevenson Tourer 1980, Stevenson Criterium 1981, Schwinn Paramount 1972, Rodriguez 2006, Gitane Federal ~1975, Holdsworth Pro, Follis 172 ~1973, Bianchi '62
Mentioned: 37 Post(s)
Tagged: 0 Thread(s)
Quoted: 876 Post(s)
Liked 357 Times
in
172 Posts
Well nuts. Rusty, you should look for a different axle rather than different cups. I think you'll have better luck with that option.
__________________
Keeping Seattle�s bike shops in business since 1978
Keeping Seattle�s bike shops in business since 1978
05-18-24, 06:35 AM
#67
Senior Member
Join Date: Jan 2007
Location: Ontario
Posts: 2,673
Mentioned: 16 Post(s)
Tagged: 0 Thread(s)
Quoted: 486 Post(s)
Liked 661 Times
in
351 Posts
That blows! We have a long weekend here in Canada but when I get back to where my bike is I am gonna pull my bottom bracket apart, and check all measurements. This shouldn�t be that hard!!!!
I think I will also reinstall my 3S axle that I pictured above and see what happens.
Edit: found something in a footnote on Sheldon�s site:
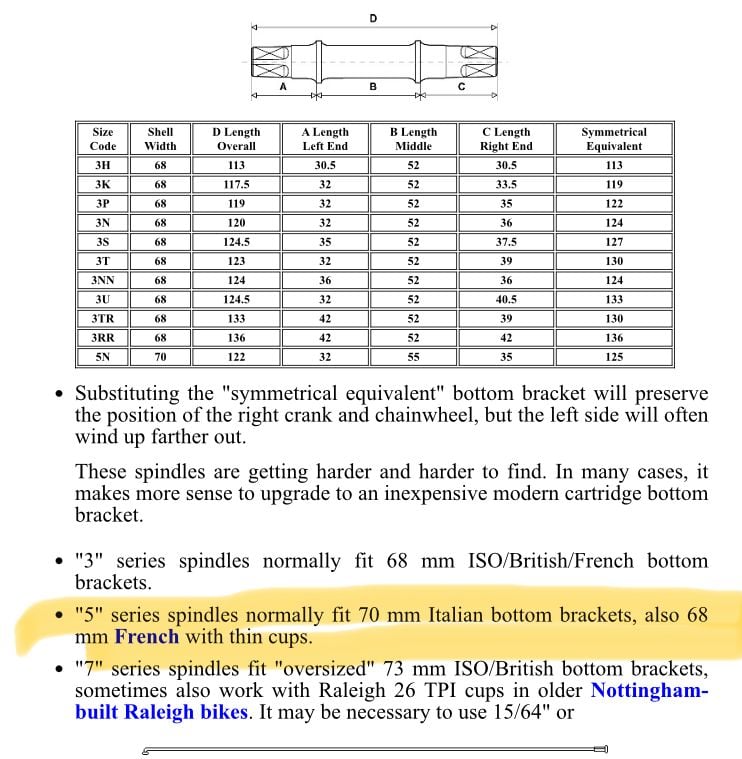
So there are thin and thick French cups; difference is about 3mm which would make it possible to get the lock ring on. So Rusty look for a 5N axle instead of a 3S, or as an experiment try putting your existing axle into one of the �spare� frames to see if you can get it to fit there (thick cups?).
I think I will also reinstall my 3S axle that I pictured above and see what happens.
Edit: found something in a footnote on Sheldon�s site:
So there are thin and thick French cups; difference is about 3mm which would make it possible to get the lock ring on. So Rusty look for a 5N axle instead of a 3S, or as an experiment try putting your existing axle into one of the �spare� frames to see if you can get it to fit there (thick cups?).
Last edited by markk900; 05-18-24 at 06:44 AM.
Likes For markk900:
05-18-24, 07:25 AM
#68
Newbie
Thread Starter
Thanks! I�m going on vacation for a couple of weeks, so I�ll wait to see what happens with your axle swap before I buy a 5N axle.
05-18-24, 07:38 AM
#69
Newbie
Thread Starter

One pedal on the blue UO8 was missing an end cap. Snagged a Made in France pedal cap from the rusty white bike.
Last edited by RustyPeugeot; 05-19-24 at 05:53 AM.
Likes For RustyPeugeot:
05-21-24, 11:52 AM
#70
Senior Member
Join Date: Jan 2007
Location: Ontario
Posts: 2,673
Mentioned: 16 Post(s)
Tagged: 0 Thread(s)
Quoted: 486 Post(s)
Liked 661 Times
in
351 Posts
Ok - I know RustyPeugeot is on vacation but I am documenting this here now.
Part 1: stock bottom bracket
picture 1 - AO-8 with stock bottom bracket. Note the position of the lock ring relative to the adjustable cup.
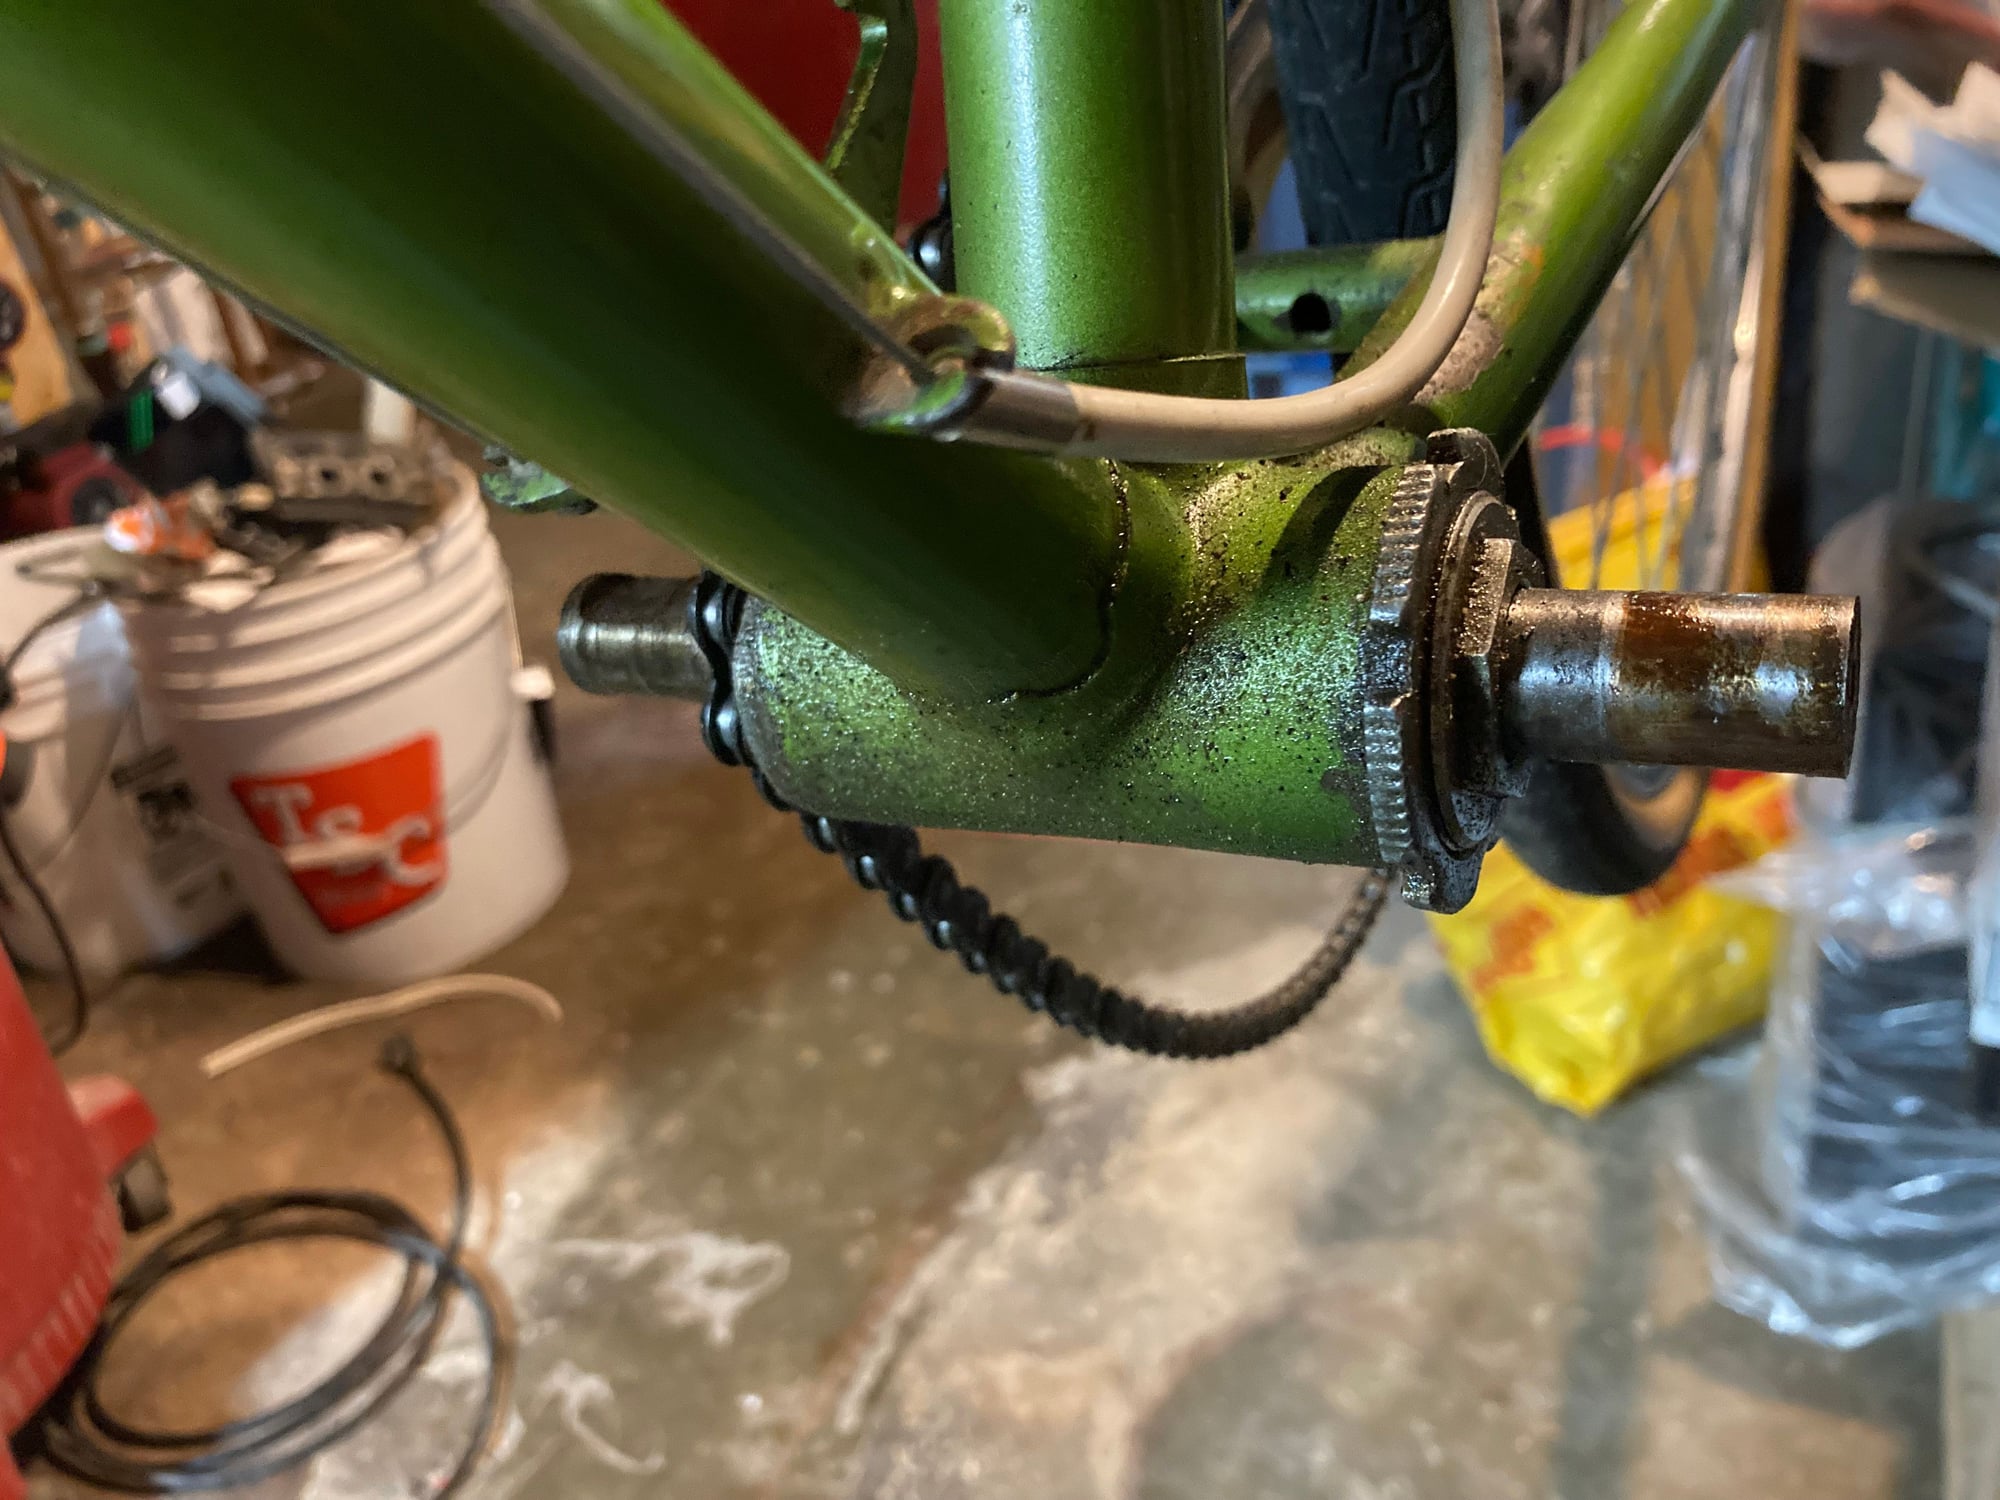
Pic 2: lock ring removed:

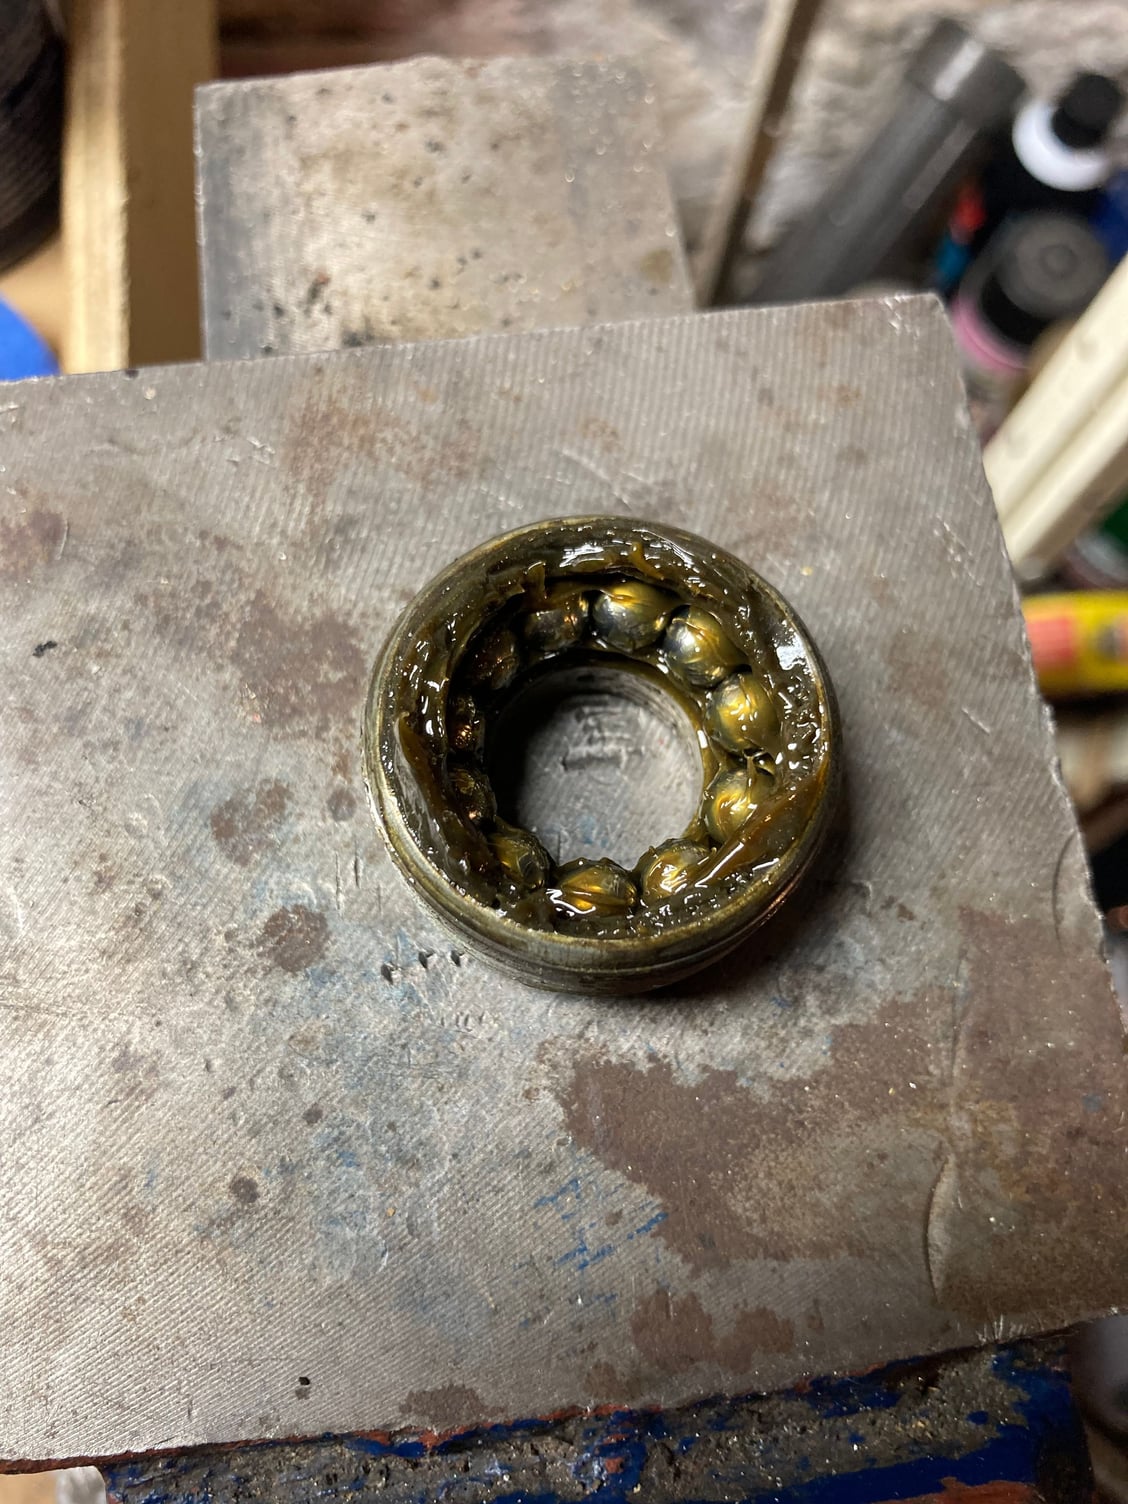
pic 3: confirm 11 loose balls in cup. Same on drive side
pic 4-6 Measurements of the cottered axle (imprecision due to one handed measuring)�


Part 1: stock bottom bracket
picture 1 - AO-8 with stock bottom bracket. Note the position of the lock ring relative to the adjustable cup.
Pic 2: lock ring removed:
pic 3: confirm 11 loose balls in cup. Same on drive side
pic 4-6 Measurements of the cottered axle (imprecision due to one handed measuring)�
Likes For markk900:
05-21-24, 12:01 PM
#71
Senior Member
Join Date: Jan 2007
Location: Ontario
Posts: 2,673
Mentioned: 16 Post(s)
Tagged: 0 Thread(s)
Quoted: 486 Post(s)
Liked 661 Times
in
351 Posts
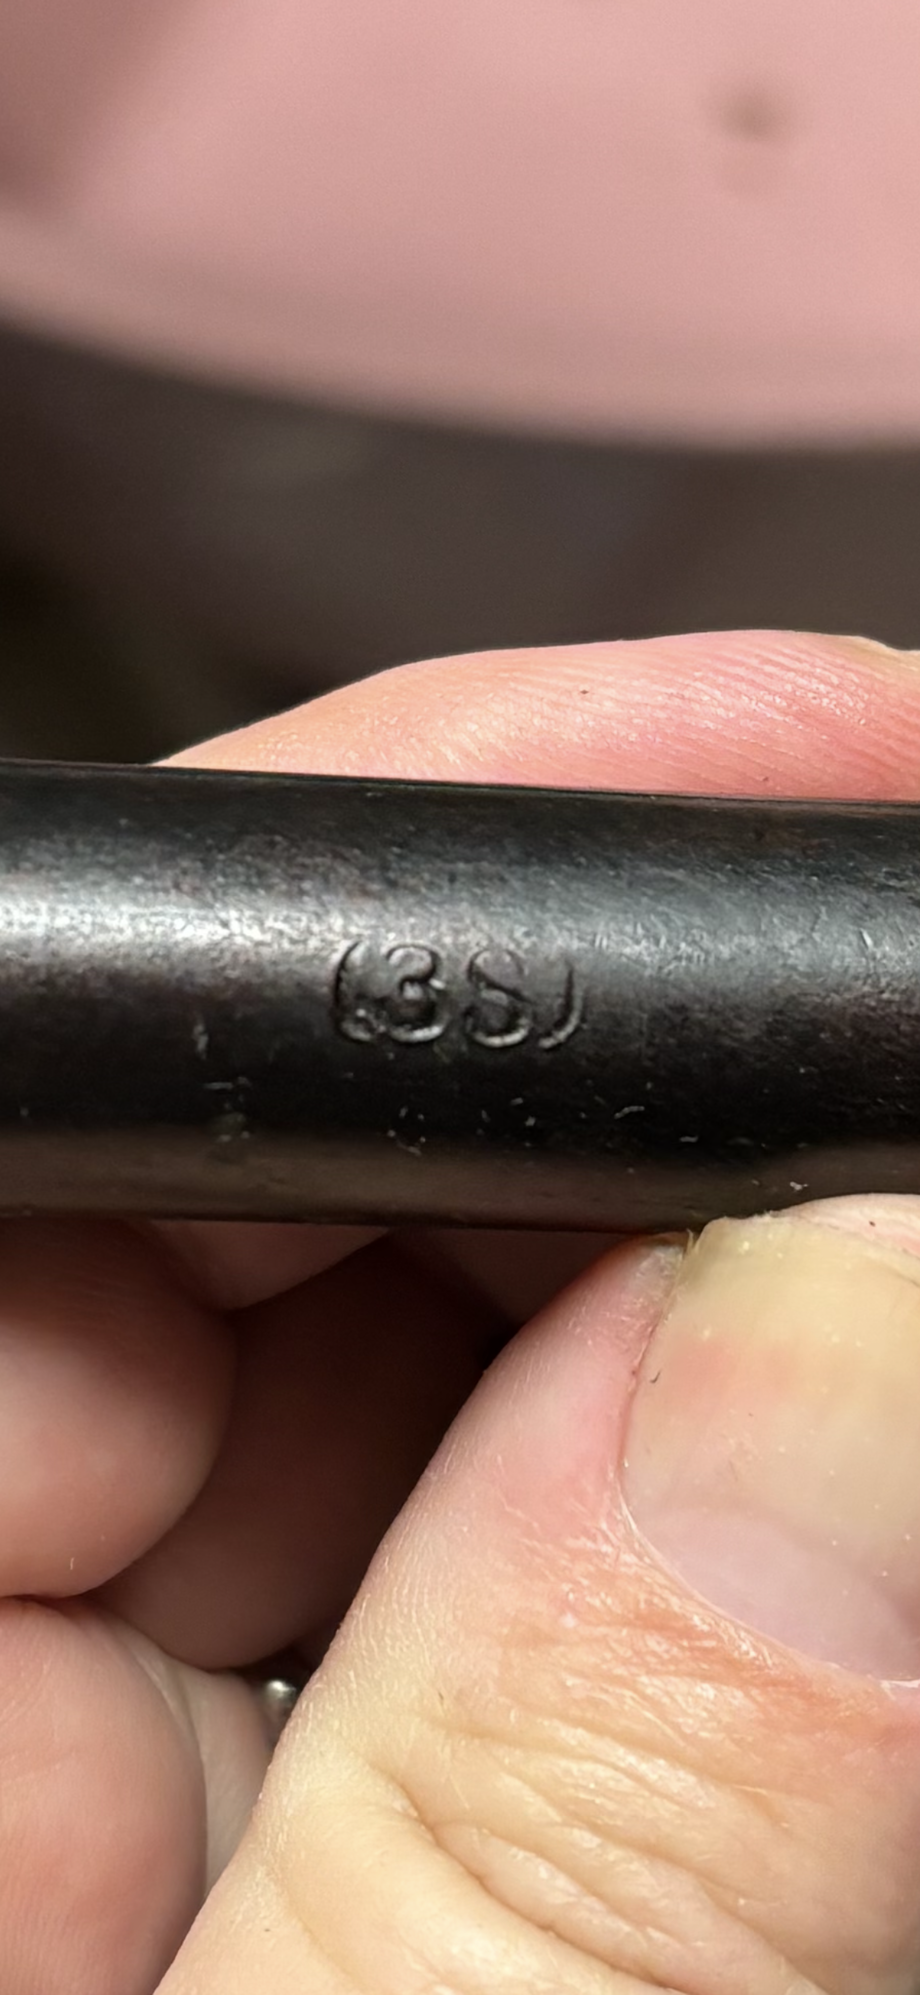
Part 2: cotterless crank axle
Pic 1-3 : measurements of axle (3S):


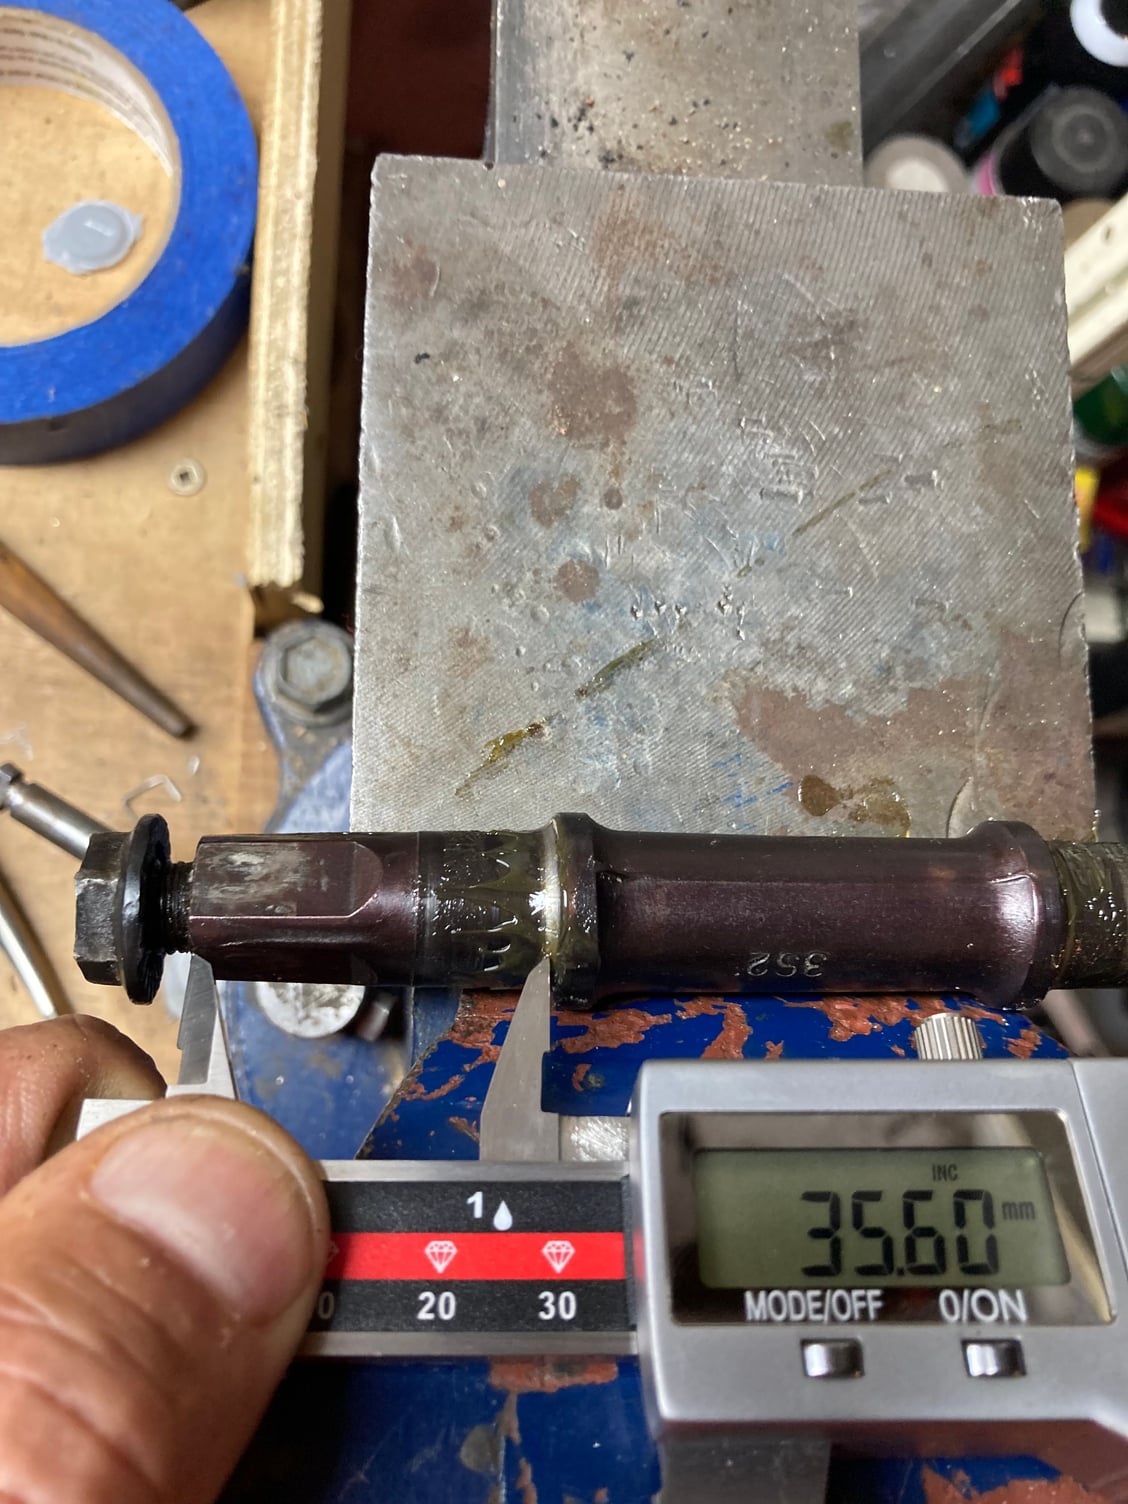
Pic 4 and 5: axle installed and adjusted. Note that while the adjustable cup had less threads showing there was still plenty of thread for the lock ring to catch and hold. The 3S axle was only 54mm between races, as compared to the 55mm of the stock axle. Also note I changed absolutely nothing about the bearings themselves.


Also for people intimidated about doing bottom bracket work, the entire process of disassembly, measurement, assembly with new axle; and back again took less than 20min. Only problem was even with the BikeSmith cotter press I had trouble with the drive side cotter due to clearances: I did end up putting a slight bend in the threaded part during removal which is fine for now: I have spares but it usually take 1-2 hours to file the new ones to a proper fit and it�s a nice day out 😂😎
Pic 1-3 : measurements of axle (3S):
Pic 4 and 5: axle installed and adjusted. Note that while the adjustable cup had less threads showing there was still plenty of thread for the lock ring to catch and hold. The 3S axle was only 54mm between races, as compared to the 55mm of the stock axle. Also note I changed absolutely nothing about the bearings themselves.
Also for people intimidated about doing bottom bracket work, the entire process of disassembly, measurement, assembly with new axle; and back again took less than 20min. Only problem was even with the BikeSmith cotter press I had trouble with the drive side cotter due to clearances: I did end up putting a slight bend in the threaded part during removal which is fine for now: I have spares but it usually take 1-2 hours to file the new ones to a proper fit and it�s a nice day out 😂😎
Last edited by markk900; 05-21-24 at 12:05 PM.
Likes For markk900:
Likes For RustyPeugeot:
05-21-24, 02:45 PM
#73
Senior Member
Join Date: Jan 2007
Location: Ontario
Posts: 2,673
Mentioned: 16 Post(s)
Tagged: 0 Thread(s)
Quoted: 486 Post(s)
Liked 661 Times
in
351 Posts
While you have one of the parts bike apart, check the orientation of the bearings and check the relevant measurements of the stock cottered bottom bracket pieces just to get a �baseline�.
Oh and BTW the fixed cup can be a real b*stard to get out - and you want to do two of them . There are special wrenches but the most important element is to not let whatever wrench you use slip off the thin surface it has to bite on. You can make a clamp by using some big washers and a large through bolt to hold everything pretty snug sandwiching the wrench so it doesn�t slip.
Oh and BTW the fixed cup can be a real b*stard to get out - and you want to do two of them
. There are special wrenches but the most important element is to not let whatever wrench you use slip off the thin surface it has to bite on. You can make a clamp by using some big washers and a large through bolt to hold everything pretty snug sandwiching the wrench so it doesn�t slip.
Likes For markk900:
05-22-24, 09:32 PM
#74
Junior Member
RustyPeugeot - thanks for showing me this is possible!!! Something I plan to do Jun / Jul 2024
Overhaul Bottom Bracket On Vintage Peugeot Bike - RJ The Bike Guy
Made notes:
5:52 - remove the adjustable cup
6:02 - turn locknut - lockring - counter clockwise to loosen
6:20 - remove the adjustable cup - with wrench counterclockwise
6:52 - Note Direction - shorter part of spindle = non drive side - longer part of spindle = drive side
6:56 - loose bearings
7:30 - Remove Fixed Cup
Vintage French and Italian bikes - right hand threaded - remove by turning counter clockwise
Park Tool HCW4 Wrench
8:04 - use mallet to remove fixed cup
9:08 - broken loose - knock it off
8:30 - use solvent to clean parts
8:35 - use rag with solvent to wipe out the bottom bracket shell to remove grease and dirt and get threads as clean as you can get them
8:50 - cleaned parts with mineral spirits
9:01 - 22 1/4" bearings = 11 on each side
9:16 - Brand new - Sunlite P/N 1915 - Loose Ball Bearings 1/4 inch 144 pcs / bag 72774 01915 - Dist J&B Importers, Miami, Fl
9:20 - grease gun with marine grease
9:49 - insert bearing with tweezers
10:10 - both cups filled with marine grease plus 11 new ball bearings each
10:18 - Drive Side - put marine grease on threads of the cup - seals bottom bracket
10:44 - by hand - screw fixed cup to the right
11:03 - use Park Tool HCW4 Wrench -
11:11 - tighten by tapping with mallet
11:33 - Non Drive Side - thin coating of grease around the races and on the axle
12:00 - put Long Side of axle in 1st to be on the drive side
12:05 - slide axle into shell
12:18 - add thin coating of grease to outer threads
12:32 - insert by hand - turn to the right carefully until it hits the bearings
12:50 - want it tight enough so you don't get play on the axle but the axle turns smoothly
13:04 - the axle turns smoothly - no play on there
13:10 - add locknut lockring - thread to the right - finger tight
13:34 - adjust axle turn nice and smoothly without play
13:49 - tighten lockring - see how it feels
14:01 - turn axle - make sure there is no play there
14:14 - make it slightly tighter - loosen lockring -
14:21 - tighten adjustable cup just a touch -- feel the axle - go just a little bit more - feel it
14:39 - tighten lockring
14:50 - see how it feels turning the axle - turns smooth - no play - feels good
15:00 - check lockring is good and tight
15:20 - Cotter pins = 9mm diameter - need to file bevel down to match the bevel of the pins that were in there
15:56 - filing bevel on cotter pin
17:20 - installing cotter pins
17:36 - insert cotter pin facing up into the flat part of the axle - line it up / slide it in
17:50 - tap in cotter pin
17:56 - add washer and nut - tighten with wrench
18:16 - Do not use the nut to draw it through - only want to use the nut to lock the pin in
18:26 - tap the pin - use the hammer to tap the pin in some more
18:36 - tighten the nut down again - tape the pin - tighten the nut
18:40 - keep doing this until the nut doesn't come loose again - you know the pin is all the way in
19:05 - put the chain around the bottom bracket
19:10 - put the crank arm on
19:16 - drive side crank = up with non drive side crank down
19:26 - grease the pin and threads
19:34 - linsert Pin with flat part facing down add washer and nut
20:20 - repeat process of tapping in pin after first 50 miles of riding - so nut doesn not come loose
20:46 - remount chain onto crank rings
Last edited by Liquidfusion; 05-22-24 at 09:47 PM.
05-23-24, 05:55 AM
#75

Senior Member

Join Date: Jan 2005
Location: Baltimore, MD
Posts: 5,593
Mentioned: 18 Post(s)
Tagged: 0 Thread(s)
Quoted: 2611 Post(s)
Liked 3,143 Times
in
1,790 Posts
<snip>
Also for people intimidated about doing bottom bracket work, the entire process of disassembly, measurement, assembly with new axle; and back again took less than 20min. Only problem was even with the BikeSmith cotter press I had trouble with the drive side cotter due to clearances: I did end up putting a slight bend in the threaded part during removal which is fine for now: I have spares but it usually take 1-2 hours to file the new ones to a proper fit and it’s a nice day out 😂😎
Then I'd smack the top of the nut with a hammer once or twice until the cotter moved, at which point gentle tapping would knock it out of the crank arm.
Even 2 mm or so of clearance between the washer and the nut was enough to ensure that the cotter pin would come out undamaged.
By the way, you can straighten the bend in the threaded part safely. Just reinstall the cotter pin just far enough that it can't wiggle.
Then thread the nut on such that the threaded portion of the cotter pin is flush with the top of the nut.
There should be a small amount of clearance between the bottom of the nut and the surface of the crank arm.
Then fit a socket onto the nut and use the socket handle as a lever to bend the threaded part of the cotter straight. It won't take much effort, so bend gently.
Instructional video:
Last edited by Trakhak; 05-23-24 at 06:01 AM.
Likes For Trakhak: