


Huffy AeroWind Rat Rod
 05-17-24, 02:21 PM
#26

The Huffmeister

Join Date: Jul 2008
Location: The Le Grande HQ
Posts: 3,132
Bikes: G�ngl, Trek 938, Raleigh Professional, Paramount, Allez, Guerciotti, Specialized Stumpjumper, Trek 750, Miyata 1000 < Huffy
Liked 4,008 Times
in
1,618 Posts
I have lots of questions, with the first one being: do you have your therapist on speed dial?
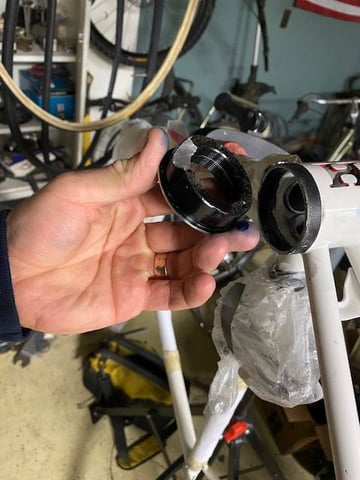
Lots of conundrums with these things. I find it an absolute joy that most Huffys have no qualms about stuck seatposts and stems, because they are steel, so the thing could be sitting on the side of a barn outside for 30 years and there is a good chance the seatpost and stem will pull right now. Now, the bad news is that this bike is the exception, because they came with an alloy seatpost and stem, but more good news: the tolerances are often so loose it is of no concern, and this bike is no exception.
All the Huffys I have pulled apart have had at least 1 headset cup just fall out, and every crown race has been loose. Look at it like a feature, not a flaw. No need for pesky, expensive removal tools, tools that certainly will cost many times the cost of the bike. Although back in the day, from various catalogs I've seen, they bikes were usually between the $100-$150 range, depending on whatever sale happened to be happening / not happening. Which is amusing to me, given how we as a collective approach valuations on bicycles today.
I used very thin brass shim stock for the Campy crown race on mine I got from Mad Honk .
If you need anything for this beauty, let me know.
EDIT: I vote a full Dura Ace 7700 build.
__________________
There were 135 Confentes, but only one...Huffente!

There were 135 Confentes, but only one...Huffente!
 05-17-24, 03:37 PM
#27
Senior Member
Thread Starter

Join Date: Jan 2008
Location: Beaverton, OR
Posts: 14,960
Bikes: Yes
Liked 4,294 Times
in
1,582 Posts
This raises the question, how many takes were required to get that shot of the guy riding hands-free in the commercial? I have terrible balance, so I struggle to ride hands-free with a well-adjusted headset. There's not a chance I could do it with something as sloppy as this one was.
__________________
My Bikes
My Bikes
05-17-24, 04:25 PM
#28
The Huffmeister
Join Date: Jul 2008
Location: The Le Grande HQ
Posts: 3,132
Bikes: G�ngl, Trek 938, Raleigh Professional, Paramount, Allez, Guerciotti, Specialized Stumpjumper, Trek 750, Miyata 1000 < Huffy
Liked 4,008 Times
in
1,618 Posts
This raises the question, how many takes were required to get that shot of the guy riding hands-free in the commercial? I have terrible balance, so I struggle to ride hands-free with a well-adjusted headset. There's not a chance I could do it with something as sloppy as this one was.
When I got the Huffente, I would attempt to ride with no hands, but the bike would violently pull to the left. When I pulled the fork, it was visibly off to one side. I did some real crude measurements, and eventually yanked it open enough that it ended up being nearly perfectly straight.
The handling is basically slightly vaguely unpredictable, with a dash of that 'eyes-on-the-road-and-don't-daydream' Italian race panache, just without the race panache. But if you can stay upright, it tracks straight!
__________________
There were 135 Confentes, but only one...Huffente!
There were 135 Confentes, but only one...Huffente!
05-17-24, 06:15 PM
#29
Edumacator
Join Date: Jan 2018
Location: Goose Creek, SC
Posts: 7,560
Bikes: '87 Crestdale, '87 Basso Gap, '92 Rossin Performance EL-OS, 1990 VanTuyl, 1980s Losa, 1985 Trek 670, 1982 AD SLE, 1987 PX10, etc...
Liked 3,590 Times
in
2,254 Posts
The Huffmeister and his Padawan learner. This thread is going to be awesome!
__________________
1987 Crest Cannondale, 1987 Basso Gap, 1992 Rossin Performance EL, 1990ish Van Tuyl, 1985 Trek 670, 2003 Pinarello Surprise, 1990ish MBK Atlantique, 1987 Peugeot Competition, 1987 Nishiki Tri-A, 1981 Faggin, 1996 Cannondale M500, 1984 Mercian, 1982 AD SuperLeicht, 1985 Massi (model unknown), 1988 Daccordi Griffe , 1989 Fauxsin MTB, 1981 Ciocc Mockba, 1992 Bianchi Giro, 1977 Colnago Super, 1971 Raleigh International, 1998 Corratec Ap & Dun, 1991 Peugeot Slimestone
1987 Crest Cannondale, 1987 Basso Gap, 1992 Rossin Performance EL, 1990ish Van Tuyl, 1985 Trek 670, 2003 Pinarello Surprise, 1990ish MBK Atlantique, 1987 Peugeot Competition, 1987 Nishiki Tri-A, 1981 Faggin, 1996 Cannondale M500, 1984 Mercian, 1982 AD SuperLeicht, 1985 Massi (model unknown), 1988 Daccordi Griffe , 1989 Fauxsin MTB, 1981 Ciocc Mockba, 1992 Bianchi Giro, 1977 Colnago Super, 1971 Raleigh International, 1998 Corratec Ap & Dun, 1991 Peugeot Slimestone
Likes For jdawginsc:
05-17-24, 06:19 PM
#30

And, of course this is required for any Huffy AeroWind thread
https://youtu.be/jMgYNm4Q6dM?feature=shared
https://youtu.be/jMgYNm4Q6dM?feature=shared
Likes For jethin:
05-17-24, 08:05 PM
#31
Bike Butcher of Portland

Join Date: Jul 2014
Location: Portland, OR
Posts: 11,803
Bikes: It's complicated.
Liked 6,164 Times
in
2,399 Posts
I honestly can't think of another bicycle commercial.
__________________
If someone tells you that you have enough bicycles and you don't need any more, stop talking to them. You don't need that kind of negativity in your life.
If someone tells you that you have enough bicycles and you don't need any more, stop talking to them. You don't need that kind of negativity in your life.
05-17-24, 10:07 PM
#32
Senior Member
Join Date: Oct 2008
Location: Portland, OR
Posts: 4,077
Bikes: Trek Domane SL6 Gen 3, Soma Fog Cutter, Focus Mares AL, Detroit Bikes Sparrow FG, Volae Team, Nimbus MUni
Liked 2,322 Times
in
1,220 Posts
It obliterates all other bike commercials.
I remember that commercial. And I remember when a coworker bought one, and talked about flying around the neighborhood on his Aerowind. He was in Huffy totality, and it was kind of cute.
I expect it has really slack angles and could actually be ridden hands-free all day long, as long as the headset is smooth and wheels are true.
Personally I'd do a fixie build with unwrapped track bars and a dual pivot front brake activated by a city lever mounted right by the stem. Decent alloy wheels. Slammed quill stem, to the extent you can slam a quill stem. I'd definitely leave the patina. It doesn't need any stickers or cards in the spokes, it's a statement bike already.
Edit: As a geared build, it begs for a massively loud hub. I'd go 1x with a White Industries 11-speed with GRX RD and a stem mount friction shifter.
Edit edit: How wide a rubber can you fit in there? Because rocking 32mm GP5000s with that geometry it would ride like butter.
Last edited by downtube42; 05-17-24 at 10:14 PM.
05-17-24, 10:29 PM
#33
The Huffmeister
Join Date: Jul 2008
Location: The Le Grande HQ
Posts: 3,132
Bikes: G�ngl, Trek 938, Raleigh Professional, Paramount, Allez, Guerciotti, Specialized Stumpjumper, Trek 750, Miyata 1000 < Huffy
Liked 4,008 Times
in
1,618 Posts
 05-17-24, 10:42 PM
#34
Newbie
05-17-24, 10:45 PM
#35
Senior Member
Thread Starter
Join Date: Jan 2008
Location: Beaverton, OR
Posts: 14,960
Bikes: Yes
Liked 4,294 Times
in
1,582 Posts

__________________
My Bikes
My Bikes
05-17-24, 11:12 PM
#36
The Huffmeister
Join Date: Jul 2008
Location: The Le Grande HQ
Posts: 3,132
Bikes: G�ngl, Trek 938, Raleigh Professional, Paramount, Allez, Guerciotti, Specialized Stumpjumper, Trek 750, Miyata 1000 < Huffy
Liked 4,008 Times
in
1,618 Posts
Likes For AdventureManCO:
05-17-24, 11:33 PM
#37
Senior Member
Thread Starter
Join Date: Jan 2008
Location: Beaverton, OR
Posts: 14,960
Bikes: Yes
Liked 4,294 Times
in
1,582 Posts
Earlier today I grabbed the bottom bracket adapter to give it a test fit.

It's definitely the right size, but it didn't go in very far on either side before it started to snag. I figure it was just rust or something, so I took a closer look.

Yeah, probably rust. No worries. But what about the stumps of the chainstays. I measured(!) and found that the cups are about 15.5mm deep while the clearance from the edge of the shell to the chainstays is about 10.5.
Not a problem, I says to myself, I'll just go back to the Huffente thread and see how [MENTION=133054]AdventureManCO[/MENTION] dealt with this. (Confession: I didn't read most of the Huffente thread the first time around. Ain't nobody got time for all that.) So, I scroll through a bunch of pages. Oh look, there's a bottom bracket picture. I'm almost there. More pages. More bottom bracket pictures. Hey, there's one showing the inside of the shell with the stays poking through. Now we're talking! Nope. Page...page...page. Oh look, he ground them down. Broke his Dremel tool. Bunch of people saying he shoulda used a die grinder. But he left a few millimeters sticking out. That didn't fix the problem. Page...page...page. Post 1071 -- pressing the shell in. Wait...did I miss something? He didn't say anything about it. Post 1075 -- the bottom bracket shell cracked! Post 1084 -- Kurt says, " It's a failed weld, (though I'm also curious if the cups were deep enough to interfere with the chainstays)." Post 1088 -- AMCO says, "I will measure the cups. I didn't, because who does that?"
At this point, I'm starting to consider the possibility that I didn't really think this whole thing through before committing myself to it. Back to the Huffente thread... Post 1215 -- AMCO says, "So for all of YOU that build up the next Huffy..." (Hey! That's me! He's talking to me!) "...do pay special attention to the adapter sizes and assume nothing!" Also in post 1215, though I didn't see this bit of grinding mentioned anywhere...
And this:

Well, I guess that's it. No backing out of it now.
If you look at my interior picture above, you can see a couple of places where the rust got scraped off from my test fit. One of those is on the seam. After checking to make sure my tetanus shots were up to date, I ran my finger around the edge and sure enough I can feel a bump there. My shell might have actually been brazed together in some way. But this is quality American-branded workmanship. Surely I'm not going to have a problem with that seam, am I?

At this point I'm thinking some combination of filing the rough spots in the shell until the adapter goes in easily and filing a hole for the stays to sit in should take care of the problem. Wish me luck.
__________________
My Bikes
My Bikes
Likes For Andy_K:
05-18-24, 08:28 AM
#38
The Huffmeister
Join Date: Jul 2008
Location: The Le Grande HQ
Posts: 3,132
Bikes: G�ngl, Trek 938, Raleigh Professional, Paramount, Allez, Guerciotti, Specialized Stumpjumper, Trek 750, Miyata 1000 < Huffy
Liked 4,008 Times
in
1,618 Posts
Funny you should mention that...
Earlier today I grabbed the bottom bracket adapter to give it a test fit.
It's definitely the right size, but it didn't go in very far on either side before it started to snag. I figure it was just rust or something, so I took a closer look.
Yeah, probably rust. No worries. But what about the stumps of the chainstays. I measured(!) and found that the cups are about 15.5mm deep while the clearance from the edge of the shell to the chainstays is about 10.5.
Not a problem, I says to myself, I'll just go back to the Huffente thread and see how [MENTION=133054]AdventureManCO[/MENTION] dealt with this. (Confession: I didn't read most of the Huffente thread the first time around. Ain't nobody got time for all that.) So, I scroll through a bunch of pages. Oh look, there's a bottom bracket picture. I'm almost there. More pages. More bottom bracket pictures. Hey, there's one showing the inside of the shell with the stays poking through. Now we're talking! Nope. Page...page...page. Oh look, he ground them down. Broke his Dremel tool. Bunch of people saying he shoulda used a die grinder. But he left a few millimeters sticking out. That didn't fix the problem. Page...page...page. Post 1071 -- pressing the shell in. Wait...did I miss something? He didn't say anything about it. Post 1075 -- the bottom bracket shell cracked! Post 1084 -- Kurt says, " It's a failed weld, (though I'm also curious if the cups were deep enough to interfere with the chainstays)." Post 1088 -- AMCO says, "I will measure the cups. I didn't, because who does that?"
At this point, I'm starting to consider the possibility that I didn't really think this whole thing through before committing myself to it. Back to the Huffente thread... Post 1215 -- AMCO says, "So for all of YOU that build up the next Huffy..." (Hey! That's me! He's talking to me!) "...do pay special attention to the adapter sizes and assume nothing!" Also in post 1215, though I didn't see this bit of grinding mentioned anywhere...
And this:
Well, I guess that's it. No backing out of it now.
If you look at my interior picture above, you can see a couple of places where the rust got scraped off from my test fit. One of those is on the seam. After checking to make sure my tetanus shots were up to date, I ran my finger around the edge and sure enough I can feel a bump there. My shell might have actually been brazed together in some way. But this is quality American-branded workmanship. Surely I'm not going to have a problem with that seam, am I?
At this point I'm thinking some combination of filing the rough spots in the shell until the adapter goes in easily and filing a hole for the stays to sit in should take care of the problem. Wish me luck.
Oh man. This thread is now bringing up all sorts of past emotions. I may need a moment

I used two different sets of adapter cups. The first set (the OMAS) I got from thumpism actually fit better, but the issue is because they were not inset, the flanges increased the spindle length about 5-6mm (or in other words, increasing the overall BB width to 73-ish mm), thereby negating the use of the Campy NR BB spindle I had. Mad Honk sent me another set that had an inset central area (thereby keeping the 68mm spacing intact) but these were much deeper AND they had a slightly larger OD so I just pressed them in without checking. BAD IDEA! It cracked the BB at the seam. But it really wasn't a huge deal. That seam wasn't designed for strength, seeing as how it was effectively a butt-joint, brazed with a thin line of brass flowing to it, but Huffy knew this and the put the seam across where the chainstays meet up, which was a good idea. Its just those very end flanges that are a little weak.
I did a few things to get the adapter to fit. I ground out a relief for the stays sticking out, as you saw. I also ground down the stays inside the BB shell a bit. But. I didn't grind them flush. Upon closer inspection, there was some brazing area on the ID of the shell/stay interface. If you look at the outside of the joint, there is not a lot of build up of brass. Think of it as a fillet braze, but some of that strength is in the joint inside as well. Therefore if I ground it totally flush, I was worried about removing some of the strength from the joint. So I left just a little there still.
When Huffy brazed these things up and installed their steel BB cups they say 'I ain't got time for that' ala HUFFY EMPLOYEE DON'T CARE and they just mashed the heck out of those stay ends in the BB shell and went on w/ life. Good news is the cups (and nothing else, for that matter) is really tight in there, as you found out.

So its a good idea to watch the tension of the cups as you install them. They should be snug, but not TIGHT, if you know what I mean. Another thing to keep in mind when putting these in is that those 3 (or 4) bolt holes in the adapters need to be aligned together so that they will bolt together straight so that the screw holes won't be off. And also, with all that extra material inside, I would test fit without pressing them on so that you can get the rotation right - there is surprisingly little room for those 3 bolts to go through with those frame tubes sticking out inside the BB.
In short, it will do you well to read through the entire Huffente thread, maybe memorize the whole thing, so that after reading that monumentally pointless waste of time, any possible temptation to feel the same with wasting time on your own bike will immediately be put into perspective. I call it iab 's Law, which is the 'After reading this, I feel way better about my own life' effect

__________________
There were 135 Confentes, but only one...Huffente!
There were 135 Confentes, but only one...Huffente!
Last edited by AdventureManCO; 05-18-24 at 08:34 AM.
Likes For AdventureManCO:
05-18-24, 10:01 AM
#39
Senior Member
Join Date: Oct 2008
Location: Portland, OR
Posts: 4,077
Bikes: Trek Domane SL6 Gen 3, Soma Fog Cutter, Focus Mares AL, Detroit Bikes Sparrow FG, Volae Team, Nimbus MUni
Liked 2,322 Times
in
1,220 Posts
I really did put a lot of thought into tire selection, and briefly considered RH. I feel they are simply too pretentious for this build. Perhaps the Soma Supple Vitesse would provide the desired road feel without even the pretense of the Paris-Roubaix winning GP5K.
05-18-24, 10:13 AM
#40
Senior Member

Join Date: May 2010
Location: Bastrop Texas
Posts: 4,768
Bikes: Univega, Peu P6, Peu PR-10, Ted Williams, Peu UO-8, Peu UO-18 Mixte, Peu Dolomites
Liked 1,843 Times
in
1,181 Posts
 No matter where you're at... There you are... Δf:=f(1/2)-f(-1/2)
05-18-24, 10:23 AM
No matter where you're at... There you are... Δf:=f(1/2)-f(-1/2)
05-18-24, 10:23 AM
#41

Senior Member
A Huffy might be the one bike where running Gatorskins makes no difference in performance.
Likes For nlerner:
05-24-24, 01:23 AM
#42
Senior Member
Thread Starter
Join Date: Jan 2008
Location: Beaverton, OR
Posts: 14,960
Bikes: Yes
Liked 4,294 Times
in
1,582 Posts

In which I definitively answer the question, "Who is the more foolish, the fool or the fool who follows?"
You'll recall from my earlier posts that I carefully considered the bottom bracket fit, and scoured the Huffente thread for nuggets of wisdom on how to handle the protruding chainstay stubs in the inside of the shell. I headed to the garage tonight, congratulating myself on prudently taking care that I would not repeat [MENTION=133054]AdventureManCO[/MENTION]'s mistakes. I started by grinding a bit off the inside of the bottom bracket shell to provide a smooth entry for the new cups. I then inserted the screws and hand fit one cup to ensure that the screws wouldn't meet interference from any of the protruding tubes inside the shell. It was tight, but there was one angle that looked like it would work. I turned the cup into the proper location, and then pressed the cup in enough that I could mark the location where the relief needed to be filed into the cup for the chainstays.

The careful reader may have noticed that nowhere in the step-by-step description above did I mention checking to make sure that I was putting the drive-side cup in the drive-side before pressing it in. Yeah, that's because I didn't do that.
But I'm getting ahead of myself. I didn't notice that straightaway. No, first I knocked the cup back out (which was much harder than I expected), and set about filing a relief for the stay. I started with a convex metal file, lost patience with it, grabbed the Dremel and ground a bit of a groove before deciding this tool wasn't really up for the challenge of this kind of grinding. I switched back the the file, which did a bit better now with a start having been made with the Dremel. Then I switched to a round file, which was easier to handle, but didn't cut as well as the flatter file. I rotated through these for a while until I had a divot about half the size of what I needed. Then I lined up the threaded holes on this cup with the holes on the other cup to mark it and repeated the whole process with the second cup.
It was at this point that it occurred to me that I hadn't checked the threading. So I stopped and did that. Are you familiar with the 50/50/90 rule? Whenever you have a 50/50 chance, there's a 90% chance you'll get it wrong. Yeah. That happened.
I put the screws back in one cup and gave it a test fit on the other side to see if by some miracle there would be enough leeway to make it work with the divots I had just spent so much time making. I took a picture, but my phone somehow decided to focus on exactly the wrong thing. That seems kind of fitting for this post, so I kept it.

What you'd see if the picture was in focus is that two of the three screws interfere with protruding tubes. #%&$!
I sat in the garage and pondered for a moment. I thought to myself, you know what would be cooler than learning from AMCO's mistakes and not repeating them? Repeating them and maybe adding a few more! So I did that. No more grinding. I decided to just press the cups in and let them bend the stays out of the way.

I believe "I wasn't asking" is the phrase applied to this particular tool configuration. Even with this, it was a struggle to get the cups all the way in. Guess what the result was! Yep!

If you followed the Huffente thread, you'll know that AMCO's solution when this happened to him was to take it all apart and braze the seam back together. That's the Huffente solution. I've decided that the rat rod solution is to shrug and say, "I've seen worse." I have confidence that like the rust, this particular problem will not cause a catastrophic failure within the lifetime of this bike.
I mentioned not just repeating AMCO's mistakes but also finding new ones to make, right? So when I pressed the first cup in, I didn't take out the screws. I'm honestly not sure what I was thinking. Then I doubled down and pressed the second cup in without removing them. For some reason, I expected them to just kind of bend and tuck in behind the cup. What actually happened was that they squirmed their way through into the threaded opening. It took a bit of work, but I was able to knock them back out.
Given the effort that was required to get the cups in, I'm actually pretty confident that they won't slip during use. They may creak a bit, and that failed seam probably will too, but I think it'll hold together long enough to get some rides in. So, I proceeded to go ahead and install the bottom bracket and crank. That part, I'm happy to say, went off without a hitch.


Here's hoping phase three goes better!
__________________
My Bikes
My Bikes
05-24-24, 03:23 AM
#43

Senior Member

Slack angles make for less stability, but the associated longer wheelbase means that deviations from straight ahead happen more slowly.
05-24-24, 05:36 AM
#44
Edumacator
Join Date: Jan 2018
Location: Goose Creek, SC
Posts: 7,560
Bikes: '87 Crestdale, '87 Basso Gap, '92 Rossin Performance EL-OS, 1990 VanTuyl, 1980s Losa, 1985 Trek 670, 1982 AD SLE, 1987 PX10, etc...
Liked 3,590 Times
in
2,254 Posts
What I have gotten from your latest escapade is that Huffys do not like retro-modding. They are cursed to wear their original clothing!
That crack would worry me for any bike other than a Huffy. Throw some Gorilla Glue in the crack and pedal on!
That crack would worry me for any bike other than a Huffy. Throw some Gorilla Glue in the crack and pedal on!
__________________
1987 Crest Cannondale, 1987 Basso Gap, 1992 Rossin Performance EL, 1990ish Van Tuyl, 1985 Trek 670, 2003 Pinarello Surprise, 1990ish MBK Atlantique, 1987 Peugeot Competition, 1987 Nishiki Tri-A, 1981 Faggin, 1996 Cannondale M500, 1984 Mercian, 1982 AD SuperLeicht, 1985 Massi (model unknown), 1988 Daccordi Griffe , 1989 Fauxsin MTB, 1981 Ciocc Mockba, 1992 Bianchi Giro, 1977 Colnago Super, 1971 Raleigh International, 1998 Corratec Ap & Dun, 1991 Peugeot Slimestone
1987 Crest Cannondale, 1987 Basso Gap, 1992 Rossin Performance EL, 1990ish Van Tuyl, 1985 Trek 670, 2003 Pinarello Surprise, 1990ish MBK Atlantique, 1987 Peugeot Competition, 1987 Nishiki Tri-A, 1981 Faggin, 1996 Cannondale M500, 1984 Mercian, 1982 AD SuperLeicht, 1985 Massi (model unknown), 1988 Daccordi Griffe , 1989 Fauxsin MTB, 1981 Ciocc Mockba, 1992 Bianchi Giro, 1977 Colnago Super, 1971 Raleigh International, 1998 Corratec Ap & Dun, 1991 Peugeot Slimestone
05-24-24, 06:12 AM
#45
Senior Member
My guess is that you won’t hear that bottom bracket creak over your screaming in terror from the ride quality.
05-24-24, 08:03 AM
#46
Edumacator
Join Date: Jan 2018
Location: Goose Creek, SC
Posts: 7,560
Bikes: '87 Crestdale, '87 Basso Gap, '92 Rossin Performance EL-OS, 1990 VanTuyl, 1980s Losa, 1985 Trek 670, 1982 AD SLE, 1987 PX10, etc...
Liked 3,590 Times
in
2,254 Posts
It�ll be a veritable Cadillac...
__________________
1987 Crest Cannondale, 1987 Basso Gap, 1992 Rossin Performance EL, 1990ish Van Tuyl, 1985 Trek 670, 2003 Pinarello Surprise, 1990ish MBK Atlantique, 1987 Peugeot Competition, 1987 Nishiki Tri-A, 1981 Faggin, 1996 Cannondale M500, 1984 Mercian, 1982 AD SuperLeicht, 1985 Massi (model unknown), 1988 Daccordi Griffe , 1989 Fauxsin MTB, 1981 Ciocc Mockba, 1992 Bianchi Giro, 1977 Colnago Super, 1971 Raleigh International, 1998 Corratec Ap & Dun, 1991 Peugeot Slimestone
1987 Crest Cannondale, 1987 Basso Gap, 1992 Rossin Performance EL, 1990ish Van Tuyl, 1985 Trek 670, 2003 Pinarello Surprise, 1990ish MBK Atlantique, 1987 Peugeot Competition, 1987 Nishiki Tri-A, 1981 Faggin, 1996 Cannondale M500, 1984 Mercian, 1982 AD SuperLeicht, 1985 Massi (model unknown), 1988 Daccordi Griffe , 1989 Fauxsin MTB, 1981 Ciocc Mockba, 1992 Bianchi Giro, 1977 Colnago Super, 1971 Raleigh International, 1998 Corratec Ap & Dun, 1991 Peugeot Slimestone
Likes For jdawginsc:
05-24-24, 10:38 AM
#47
Senior Member
Likes For nlerner:
05-24-24, 11:18 AM
#48
Tinker-er
Join Date: Oct 2007
Location: Mid-Atlantic
Posts: 676
Bikes: 1956 Rudge Sports; 1983 Univega Alpina Uno; 1981 Miyata 610; 1973 Raleigh Twenty; 1994 Breezer Lightning XTR; V4 Yuba Mundo aka "The Schlepper"; 1987 Raleigh "The Edge" Mountain Trials; 1952 R.O. Harrison "Madison"; 1994 Concorde Aquila
Liked 424 Times
in
270 Posts
JB Weld that and ride into the sunset.
I really like fancy lugs and sculpture... If I ever come into ownership of an AeroWind, I'm going to add some sculpted lugs made of JB Weld in the spirit of Ephgrave and Oscar Egg. Then again, adding a heart cutout and creating a HuffRosa (DeHuffy?) might be my jam. If I had F.U. money, I'd stick in a set of 808 wheels.
This thread is truly the maker of dreams.
Phil
Likes For PhilFo:
05-24-24, 12:04 PM
#49
Senior Member
Thread Starter
Join Date: Jan 2008
Location: Beaverton, OR
Posts: 14,960
Bikes: Yes
Liked 4,294 Times
in
1,582 Posts
I was thinking maybe duct tape for the seam.
__________________
My Bikes
My Bikes
Likes For Andy_K:
05-24-24, 12:32 PM
#50
aka: Dr. Cannondale