


how to mount rear rack to single centered hole on rear fork
 04-08-13, 08:22 PM
#1

bill nyecycles
Thread Starter

Join Date: Mar 2013
Location: Houston TX
Posts: 3,328
Mentioned: 19 Post(s)
Tagged: 0 Thread(s)
Quoted: 789 Post(s)
Liked 350 Times
in
190 Posts
how to mount rear rack to single centered hole on rear fork - or other option
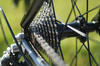
my wife has an older schwinn world, and wants to add a rear rack for her commute. after checking out her hookups, we noticed she doesn't have the traditional screw holes on either side of the seat post, or on the rear fork. instead it's just a single, centered hole on a cross bar between the rear fork (picture attached)
is there an adapter or something so we can fit a rack? she ordered the Topeak Explorer rack.
it was a fixie we converted to a single speed flywheel, so it doesn't have a read brake yet (just the front), is that where we would mount the rear brakes? If so, is there another option to mount the rack?
thanks for any help or suggestions.
 04-08-13, 08:34 PM
#2
Senior Member
Join Date: Aug 2008
Posts: 2,589
Mentioned: 5 Post(s)
Tagged: 0 Thread(s)
Quoted: 239 Post(s)
Likes: 0
Liked 7 Times
in
7 Posts
many racks, in addition to having slots at the end for bolting on the two upper supports, will also have centerline boltholes for using a single stay down the center to your single hole on the frame.
online images of the topeak rack seem to show they have opted to place the topeak logo in this location instead
either find a rack that will mount center style
or drill the one you've got
or use 'p-clamps' to attach to your frame instead of using the pretapped mounting points
online images of the topeak rack seem to show they have opted to place the topeak logo in this location instead
either find a rack that will mount center style
or drill the one you've got
or use 'p-clamps' to attach to your frame instead of using the pretapped mounting points
04-08-13, 08:59 PM
#3
bill nyecycles
Thread Starter
Join Date: Mar 2013
Location: Houston TX
Posts: 3,328
Mentioned: 19 Post(s)
Tagged: 0 Thread(s)
Quoted: 789 Post(s)
Liked 350 Times
in
190 Posts
as a newbie - could you point me in the direction of where to find said p clamp? is there a place online to order? or should i go to my LBS and inquire? i know i could google it myself, but sometimes its better for someone who knows what they're talking about to just straight up say THIS ONE! instead of poking around and hoping I pick the right thing! lol
she's already ordered the rack from amazon, soo....
she's already ordered the rack from amazon, soo....
04-08-13, 09:09 PM
#4
Senior Member
04-08-13, 10:47 PM
#5
S'Cruzer

I believe what I'd do is, take the chrome straps off entirely, hammer them flat (to take out the 90 degree twist), then bend the last inch of each one 90 degrees down. reattach them to the rack so that the two 90 degree ends meet in the middle where that brake bridge is and bolt them to that hole, with the rack adjusted to be level on the bike. if you add a rear brake (whch uses that same hole), the brake goes on the rear facing side of the bridge, so have the 'straps' go over the brake and over the bridge, and secure them via the brake's locknut thats on the front-facing side of the bridge.
04-09-13, 03:49 AM
#6
Senior Member
Join Date: Feb 2001
Location: England
Posts: 12,948
Mentioned: 0 Post(s)
Tagged: 0 Thread(s)
Quoted: 19 Post(s)
Likes: 0
Liked 7 Times
in
7 Posts
Most rack fitting are for 4-point fitting.
You can buy 3-point brackets for rear racks that fit the seat-stay brake-bridge hole.
Any workshop can cut out and bend a bit of steel to do that job.
Tubus make superior quality P-clamp kits.
You can buy 3-point brackets for rear racks that fit the seat-stay brake-bridge hole.
Any workshop can cut out and bend a bit of steel to do that job.
Tubus make superior quality P-clamp kits.
04-09-13, 06:20 AM
#7
Senior Member

Join Date: Nov 2010
Location: Deep South
Posts: 1,335
Bikes: Cannondale SR's and ST's from the '80's
Mentioned: 4 Post(s)
Tagged: 0 Thread(s)
Quoted: 340 Post(s)
Likes: 0
Liked 46 Times
in
20 Posts
Here is a more elegant solution:
https://www.ebay.com/sch/i.html?_from...adapter&_rdc=1
Just get the correct clamp size to fit your seat post.
https://www.ebay.com/sch/i.html?_from...adapter&_rdc=1
Just get the correct clamp size to fit your seat post.
04-09-13, 06:30 AM
#8
Friendship is Magic

Join Date: Nov 2010
Location: Sacramento, CA
Posts: 22,985
Bikes: old ones
Mentioned: 304 Post(s)
Tagged: 0 Thread(s)
Quoted: 26425 Post(s)
Liked 10,381 Times
in
7,209 Posts
They are used for running wiring and wiring harnesses.
Most hardware stores have some version.
They come in various sizes, so you need to measure the diameter of your stays, and buy
ones that are small enough to tighten down securely on the stays.
When i do this, it usually works out best if the tabs with the holes on the clamp are pointed
toward the front of the bike, then a short nut, bolt, and lock washer inserts through the
clamp tabs and the rack's mounting holes. You'll see what this means when you do it.
there is almost always enough room to adjust position higher or lower on the stay to
take care of leveling the rack prior to snugging down your clamps.
04-09-13, 06:35 AM
#9
Senior Member
Join Date: Mar 2013
Location: NW UK
Posts: 418
Bikes: 1992 Marin Eldridge Grade, 2007 Kona PHD and 199? Trek 1000 (current build project)
Mentioned: 0 Post(s)
Tagged: 0 Thread(s)
Quoted: 0 Post(s)
Likes: 0
Liked 0 Times
in
0 Posts
It might also be a good idea to put some small cut pieces of old innertube, or some helicopter tape underneath where you mount the clips to help protect the paint. Using rubber should also help with preventing loosening from vibration. 
04-09-13, 06:39 AM
#10
Senior Member
as a newbie - could you point me in the direction of where to find said p clamp? is there a place online to order? or should i go to my LBS and inquire? i know i could google it myself, but sometimes its better for someone who knows what they're talking about to just straight up say THIS ONE! instead of poking around and hoping I pick the right thing! lol. she's already ordered the rack from amazon, soo....
/K
04-09-13, 10:17 AM
#11
Senior Member
Join Date: Sep 2009
Location: SW Washington
Posts: 167
Bikes: '10 C'Dale CAAD9 4, '09 S-Works Tricross, Gary Fisher Tassahara
Mentioned: 0 Post(s)
Tagged: 0 Thread(s)
Quoted: 0 Post(s)
Likes: 0
Liked 0 Times
in
0 Posts
I just used the brackets that came on my rack and bent then into the shape I needed so I still had 2 brackets connecting to the single point on the frame. It worked great hauling my laptop in my pannier until I sold the bike.
04-09-13, 10:36 AM
#12
Senior Member
Join Date: Aug 2005
Location: Pittsburgh, PA
Posts: 33,656
Bikes: '96 Litespeed Catalyst, '05 Litespeed Firenze, '06 Litespeed Tuscany, '20 Surly Midnight Special, All are 3x10. It is hilly around here!
Mentioned: 39 Post(s)
Tagged: 0 Thread(s)
Quoted: 2026 Post(s)
Likes: 0
Liked 1,096 Times
in
742 Posts
If the bike has a freewheel and is no longer a fixie, get a rear brake on it NOW.
Blackburn and others make racks with provisions for a single center strut that bolts to the brake bridge. A 3/16" drill bit and a couple of M5 bolts will adapt that Topeak rack to a center bracket or, as recommended, you can attach it to the seatastays with P-clamps.
Blackburn and others make racks with provisions for a single center strut that bolts to the brake bridge. A 3/16" drill bit and a couple of M5 bolts will adapt that Topeak rack to a center bracket or, as recommended, you can attach it to the seatastays with P-clamps.
04-09-13, 10:53 AM
#14
Friendship is Magic
Join Date: Nov 2010
Location: Sacramento, CA
Posts: 22,985
Bikes: old ones
Mentioned: 304 Post(s)
Tagged: 0 Thread(s)
Quoted: 26425 Post(s)
Liked 10,381 Times
in
7,209 Posts
is that the bans are usually stainless steel, and they come with a swell molded
rubber doohickie that insulates whatever goes within the circle of the clip.
I just did a couple of Blackburn racks with these last week.
thus:
and so:
Last edited by 3alarmer; 04-09-13 at 11:04 AM.
04-09-13, 11:01 AM
#15

Senior Member
Join Date: Dec 2006
Location: So Cal
Posts: 2,678
Mentioned: 0 Post(s)
Tagged: 0 Thread(s)
Quoted: 0 Post(s)
Likes: 0
Liked 0 Times
in
0 Posts
I'd just get one of these I have one and works great as long as you have some seat post exposed. TransIt Seatpost Rack https://www.performancebike.com/bikes...17_-1___000000
__________________
It may not be fancy but it gets me were I need to go.
https://www.jtgraphics.net/cyclist_bicycles.htm
It may not be fancy but it gets me were I need to go.
https://www.jtgraphics.net/cyclist_bicycles.htm
Last edited by JTGraphics; 04-09-13 at 11:04 AM.


