


Bleeding brakes - skill level required?
 06-29-18, 12:11 AM
#1
Senior Member
Thread Starter

Bleeding brakes - skill level required?
I have a spongy lever on the rear brake for one of my bikes. The bike is still under warranty so I could take it back to the shop and get them to have a look at it. However, I may be without my bike for a couple of weeks if I did that.
Alternatively, I could try to bleed the brake myself. I can do very basic maintenance myself, but I�ve never bled brakes before.
I�ve got all of the tools that would be needed so I�d just need to buy a bleed kit.
What would you do in this situation, given that the bike is still under warranty?
Alternatively, I could try to bleed the brake myself. I can do very basic maintenance myself, but I�ve never bled brakes before.
I�ve got all of the tools that would be needed so I�d just need to buy a bleed kit.
What would you do in this situation, given that the bike is still under warranty?
 06-29-18, 12:25 AM
#2
Banned.
Join Date: May 2018
Location: Arvada, Colorado
Posts: 96
Bikes: Trek DS 3
Mentioned: 2 Post(s)
Tagged: 0 Thread(s)
Quoted: 42 Post(s)
Likes: 0
Liked 0 Times
in
0 Posts
Still under warranty as in "they will do it for free," or as in, "will I void my warranty?"
If it is "free," and you don't want to learn the skill, why not? But why pay someone at those prices to do it for you for the rest of your life for you when you can do it for yourself and the ROI is ten fold in many ways??
Youtube is your best friend for such projects. If you are not completely mechanically challenged, illiterate, whatever... why not take the opportunity to learn the skill yourself and have more confidence in your skill set once you are done?
Watch a couple of hours of youtube videos if you have to, until you are comfortable with what they are talking about and you have seen it done start to finish enough so that you know what to expect, what warnings they talk about while doing things, and usually you pick up other tips about things you are not thinking about or a freebie bonus lesson when someone goes off on a tangent about something completely irrelevant from the video, but serendipity paid you off with the bonus lesson about something else
If you make a mistake, you pick up another skill set trying to figure out or correcting whatever you broke. You can stop, start, pause, and the absolute best...wait for it...you can rewind! Follow along every step of the way in exact detail.
The world is a new playground with technology! Gotta love that aspect of it!!!
"What would you do in this situation, given that the bike is still under warranty?"
Learn enough so that once it leaves the bike shop, not to have to ever return to the bike shop again
06-29-18, 12:38 AM
#3
41 calories/30 min typing

Join Date: May 2018
Posts: 97
Mentioned: 0 Post(s)
Tagged: 0 Thread(s)
Quoted: 32 Post(s)
Likes: 0
Liked 0 Times
in
0 Posts
06-29-18, 12:49 AM
#4
Banned.
Join Date: May 2018
Location: Arvada, Colorado
Posts: 96
Bikes: Trek DS 3
Mentioned: 2 Post(s)
Tagged: 0 Thread(s)
Quoted: 42 Post(s)
Likes: 0
Liked 0 Times
in
0 Posts
Oh BTW...I am not an expert on brake bleeding, but I just actually gave you advice that I follow, and have watched enough videos on the subject to know this one warning, "You will also need a bleed block to keep the brake caliper pistons spread apart throughout the bleeding process." That is the only real warning that comes to mind while doing it. DON'T press the brake lever AT ALL while you have the pads out of the caliber. I honestly can't tell you what exactly will happen, but from every video I have watched on the subject they discuss how much of a nightmare it is trying to get the caliber piston separated again if you make this mistake. So after tons of those videos, that is the one thing I have heard the teachers on the subject say over and over again of the mistake that I wouldn't want to make.
06-29-18, 03:12 AM
#5
Senior Member
Thread Starter
I don't think the bike shop I bought it from will do it for free, so my question was more related to voiding the warranty. Having said that I've changed the entire braking system on a brand new bike before (got a bike shop to do it) so have no warranty on that bike anyway!
For the bike in question, I already have a bleed block, pad separator tool (the very overpriced Park Tool one), all of the required Torx/hex wrenches, etc. I have spent several hours watching YouTube videos and it doesn't seem to be terribly complex but there are a load of gotchas.
I've ordered a Tektro/TRP brake bleed kit so I'm going to give it a go myself. My LBS charges a LOT for bleeding one brake.
06-29-18, 05:40 AM
#6
Senior Member
Join Date: Feb 2012
Location: Golden, CO and Tucson, AZ
Posts: 2,837
Bikes: 2016 Fuji Tread, 1983 Trek 520
Mentioned: 13 Post(s)
Tagged: 0 Thread(s)
Quoted: 676 Post(s)
Liked 741 Times
in
430 Posts
Much depends on your general mechanical aptitude and experience. First time I saw it done by an experienced bike mechanic, I could see him make some minor logical errors and he made a bit of a mess. I'm an experienced shade-tree auto mechanic, been servicing and bleeding auto brakes for decades, and frankly I did better than he did on my first try. There are a few tricks specific to bikes that you can pick up on YouTube, for sure.
Good advice above about watching more than one video--not everyone on YouTube is an expert and you'll see some mistakes there, too. For that reason, I'm a fan of also reading a factory service manual if possible.
Good advice above about watching more than one video--not everyone on YouTube is an expert and you'll see some mistakes there, too. For that reason, I'm a fan of also reading a factory service manual if possible.
06-29-18, 07:44 AM
#7
Senior Member
Thread Starter
Whilst I'm waiting for my bleed kit to arrive, I've been looking at the brake lever for the rear brake. What's not immediately obvious is where the bleed port is. The bike is a Specialized CrossTrail.
Unfortunately I've not been able to ID this lever and I was on the phone to TRP for ages but they could not identify it either, so I have no documentation for this brake lever.
The hex reservoir bolts are on the top. I have located a T15 bolt on the side of the lever. Here are three pictures taken from the top, side and underneath. The pictures here are for the front brake lever, but the other one is the same.


Would that T15 on the side be the bleed port? If this is the case, then how would I orient the lever correctly for bleeding?
Unfortunately I've not been able to ID this lever and I was on the phone to TRP for ages but they could not identify it either, so I have no documentation for this brake lever.
The hex reservoir bolts are on the top. I have located a T15 bolt on the side of the lever. Here are three pictures taken from the top, side and underneath. The pictures here are for the front brake lever, but the other one is the same.
Would that T15 on the side be the bleed port? If this is the case, then how would I orient the lever correctly for bleeding?
06-29-18, 11:11 AM
#8
Hello

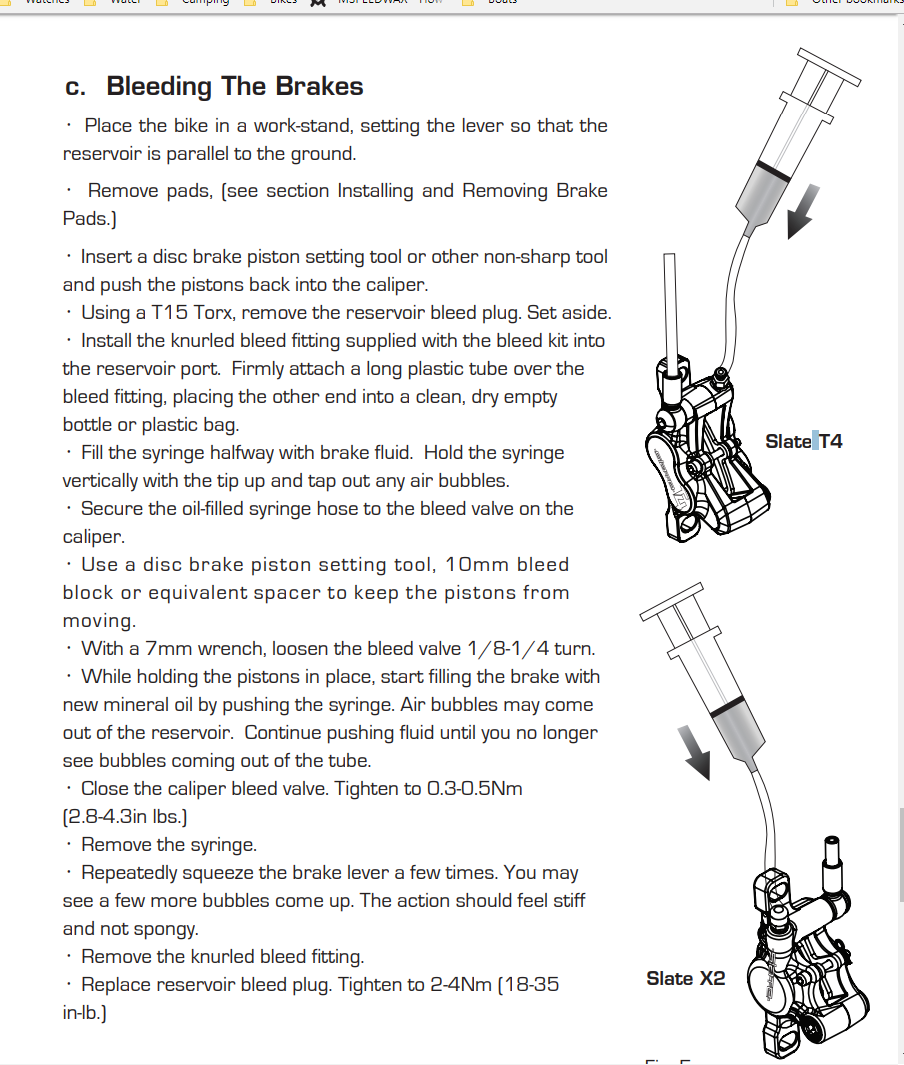
At the wheel
-remove pads
-put in pad spacer
-attach hose to bleed valve on brake (not brake lever)
-submerge other end of hose in bag or reservoir of brake fluid
At the lever
-level lever with the ground
-remove top cover and bladder if present
-pour in fluid
-squeeze lever
Back at the wheel
-crack open bleed valve
Back at the lever
-squeeze lever until no bubbles in bag or reservoir
-top fluid
Back at the wheel
-close bleed valve
Button the system back up clean any spills before re-installing pads
06-29-18, 12:09 PM
#9
Senior Member
I suppose other brakes may be different, but that's what happened on mine. Popped the piston back in and followed the procedure for filling and bleeding - not a real big deal.
06-29-18, 02:04 PM
#11

Junior Member
This might help
. . Also on my 2018 Crosstrail Expert.
__________________
2011 Trek Madone 5.2 WSD
2009 Trek 2.1 WSD
2011 Trek Madone 5.2 WSD
2009 Trek 2.1 WSD
06-29-18, 02:49 PM
#12
Senior Member
Thread Starter
As it's a brake issue, they want me to take it in, evaluate it and keep it until they can find a slot to fix the (possible) issue. That could take up to two weeks, even for a brake bleed apparently!
I just don't want to be without the bike for that long over something that's possibly very easy to fix.
I just don't want to be without the bike for that long over something that's possibly very easy to fix.
06-29-18, 02:55 PM
#13
Senior Member
Thread Starter
This might help https://www.youtube.com/watch?v=oDTL20bZylA. . Also on my 2018 Crosstrail Expert.
It does show the exact TRP brake lever that I have, and probably you too. However, I cannot locate the bleed port on it!
06-30-18, 05:33 AM
#14
Senior Member
Thread Starter
So I did my first ever brake bleed this morning and it went quite well. I used Tektro's video as a guide and I had the basic Tektro bleed kit.
The lever feels a little better but I'm still not happy with it.
Here's where I think something went wrong:
After injecting the brake fluid at the caliper end using the syringe, I clipped the overflow hose at the lever. I then unscrewed the syringe at the caliper and fixed the bleed bolt back into the caliper.
Then I moved to the stage where you pump the brake lever a few times. There was some fluid in the overflow hose and also some air bubbles. I watched the fluid travel slowly back into the lever body, along with a couple of air bubbles as I was pumping the lever.
Question: why would brake fluid drop back into the reservoir at this stage?
I think I need to do do the procedure again some day but the lever feel is good enough for now.
06-30-18, 05:47 AM
#15
Hello
By sheer coincidence, I was on the phone to TRP's UK distributor today. He was Googling away and found that video for me to watch. He wasn't able to locate a part number, a spec sheet or anything useful information about that lever.
It does show the exact TRP brake lever that I have, and probably you too. However, I cannot locate the bleed port on it!
It does show the exact TRP brake lever that I have, and probably you too. However, I cannot locate the bleed port on it!
 06-30-18, 06:23 AM
#16
Senior Member
Thread Starter
@zebede: Apologies, I used the wrong term. I was referring the to reservoir port. I have in fact found it, it's on the side of the lever (second photograph above). Well, at least that's what I used!
I had to take the caliper off to get to the bleed valve.
I had to take the caliper off to get to the bleed valve.
07-02-18, 04:10 PM
#17
Banned.
Join Date: May 2018
Location: Arvada, Colorado
Posts: 96
Bikes: Trek DS 3
Mentioned: 2 Post(s)
Tagged: 0 Thread(s)
Quoted: 42 Post(s)
Likes: 0
Liked 0 Times
in
0 Posts
This is probably something not mentioned or reinforced enough to us laymen.
07-02-18, 04:15 PM
#18
Banned.
Join Date: May 2018
Location: Arvada, Colorado
Posts: 96
Bikes: Trek DS 3
Mentioned: 2 Post(s)
Tagged: 0 Thread(s)
Quoted: 42 Post(s)
Likes: 0
Liked 0 Times
in
0 Posts
Question for anyone...do you need to worry about any air bubbles getting into the line? I would think with this small of a system compared to automotive, it is even a bigger deal, but I really don't know so trying to learn.
Is this why you think you need to redo it? Because air bubbles got into it?
07-02-18, 04:29 PM
#19
Senior Member
Thread Starter
No, my rear brake has always been a bit spongy. I�ve replaced the pads and ended up doing three full bleeds. None of them were that great mainly due to the ridiculous positioning of the bleed screw - it�s on the side of the lever, and very awkward to get to.
Anyway, lots of brake fluid loss and rebleeding attempts later, I decided to remove the cover on the reservoir and drip some fluid in directly and pump the lever for several minutes. The lever is good enough now.
On most levers the bleed screw is positioned on top of the reservoir so it�s easily accessible and air will go upwards. On my levers it�s on the side so i really should have taken the lever off and hung it at 90 degrees up in the air. It just wasn�t practical. I may change the brakes one day to Shimano SLX as I�ve already done on my fat bike as they are amazing and very easy to maintain. The TRP ones I have on my hybrid are a nightmare.
07-03-18, 01:11 PM
#21
Banned.
Join Date: May 2018
Location: Arvada, Colorado
Posts: 96
Bikes: Trek DS 3
Mentioned: 2 Post(s)
Tagged: 0 Thread(s)
Quoted: 42 Post(s)
Likes: 0
Liked 0 Times
in
0 Posts
Well I am literally right behind you, probably this weekend doing the same for the first time myself. I hit the bake brakes this morning and realized they are worse than I thought. I just purchased the bike bleeding kit, pads, and mineral oil. I have two questions:
1) You mentioned lots of spillage...is one of these smaller mineral oils going to be enough for one set of pads to be changed and then bled?
2) (for anyone) Is all mineral oil pretty much the same quality for the most part?
Finish Line High Performance Mineral Oil Brake Fluid, 4-Ounce (118ml) $8
Forgun Bicycle Brake Mineral Oil System 60ml Fluid Cycling Mountain Bikes For Shimano $4
Cyclo Mineral Oil Brake Fluid 125ml $48
Fucung Mineral Bicycal Brake Oil,60ml Mountain Bikes Cycling Fluid For Shimano. $14
So anyone know why the drastic different prices? Does it really matter on quality from one to the other?
I ended up choosing "Finish Line" because of the reputation with chain lube and what I use, but I really have no idea about the actual quality of contents.
07-03-18, 01:41 PM
#22
Senior Member
Thread Starter
Most bleed kits will supply enough oil for a front and rear bleed. I bought two kits as I bled the rear brakes three times.
The spillage was down to the hoses popping off when I used them again the next day. It was also down to the ridiculous positioning of the reservoir port on the lever: very awkwardly placed on the side of the lever - the hose plus bag was almost impossible to position correctly. With hindsight I probably needed to take the lever off and position it at 90 degrees in order to get the reservoir port. Here's what I mean:

The spillage was down to the hoses popping off when I used them again the next day. It was also down to the ridiculous positioning of the reservoir port on the lever: very awkwardly placed on the side of the lever - the hose plus bag was almost impossible to position correctly. With hindsight I probably needed to take the lever off and position it at 90 degrees in order to get the reservoir port. Here's what I mean:
07-03-18, 07:13 PM
#23
Banned.
Join Date: May 2018
Location: Arvada, Colorado
Posts: 96
Bikes: Trek DS 3
Mentioned: 2 Post(s)
Tagged: 0 Thread(s)
Quoted: 42 Post(s)
Likes: 0
Liked 0 Times
in
0 Posts
Most bleed kits will supply enough oil for a front and rear bleed. I bought two kits as I bled the rear brakes three times.
The spillage was down to the hoses popping off when I used them again the next day. It was also down to the ridiculous positioning of the reservoir port on the lever: very awkwardly placed on the side of the lever - the hose plus bag was almost impossible to position correctly. With hindsight I probably needed to take the lever off and position it at 90 degrees in order to get the reservoir port. Here's what I mean:
The spillage was down to the hoses popping off when I used them again the next day. It was also down to the ridiculous positioning of the reservoir port on the lever: very awkwardly placed on the side of the lever - the hose plus bag was almost impossible to position correctly. With hindsight I probably needed to take the lever off and position it at 90 degrees in order to get the reservoir port. Here's what I mean:
I have actually thought about switching my back and rear brakes so it is more common with a motorcycle setup and front brake being on right side. I was learning how to ride a motorcycle last year and was constantly having to remind myself while riding "don't jam the right hand brake" like in cycling for control and stopping. I actually caused myself a pretty serious injury last year because of not being use to this and jamming that right hand brake thinking it is rear brakes at very slow speed going into a turn. Not really sure how people who are both avid bicyclist and motorcyclists ever fully get use to that psychologically. I am not sure if retraining my brain for such a thing after a lifetime of having it one way on my bicycle is worth the effort or not at this point or if I will ever really be back on a motorcycle again to justify the retraining my brain.
Last edited by COBikeLover; 07-03-18 at 07:21 PM.
07-03-18, 08:05 PM
#24

Non omnino gravis

I just did my first ever bicycle hydraulic brake bleed (only having bled TRP Hy/Rd calipers previously) and it was far easier than I had expected. Two syringes, they threaded right into the ports on the lever and the caliper, got it right on the first try with virtually no spillage. The biggest surprise was how little fluid is actually in the system-- front and rear combined for maybe 30mL. This is with road levers, so I have no idea what the size of the master cylinder is relative to an MTB setup.
__________________


