


Question about repairing Shimano RSX 7-speed STI shifters
 01-22-16, 10:03 PM
#1
Senior Member
Thread Starter

Join Date: Jul 2009
Location: Boston, MA
Posts: 1,541
Bikes: Bianchi Volpe, ANT 3-speed roadster, New Albion Privateer singlespeed, Raleigh One Way singlespeed, Raleigh Professional "retro roadie" rebuild, 198? Fuji(?) franken-5-speed, 1937 Raleigh Tourist, 1952 Raleigh Sports, 1966 Raleigh Sports step-through
Mentioned: 21 Post(s)
Tagged: 0 Thread(s)
Quoted: 248 Post(s)
Liked 27 Times
in
18 Posts
Question about repairing Shimano RSX 7-speed STI shifters
Not sure if this is more appropriate here or in the Mechanics subforum, but I'm trying to resurrect a pair of RSX 7-speed shifters that a friend gave me. The left-hand one was pretty easy to make work, but the right-hand one has been fighting with me. I've cleaned all the crap out of it and lubed it with T9, and even had it soaking overnight in a mix of GT85 and PB Blaster, but there's still one pawl that doesn't like to move. Let me rephrase that - it'll move if you make it move, but it requires a lot of effort to overcome the the spring that holds it in place. I'm not sure what else I can do...it seems like the spring is actually too tight! One would think that something this old, which has been sitting around for several years, would be overly loose, if anything.
This is the pawl in question (EDIT: That's odd...I drew arrows on the pictures, but they don't seem to be showing up for me. In any case, it's the lower one, with the spring pushing on it) :

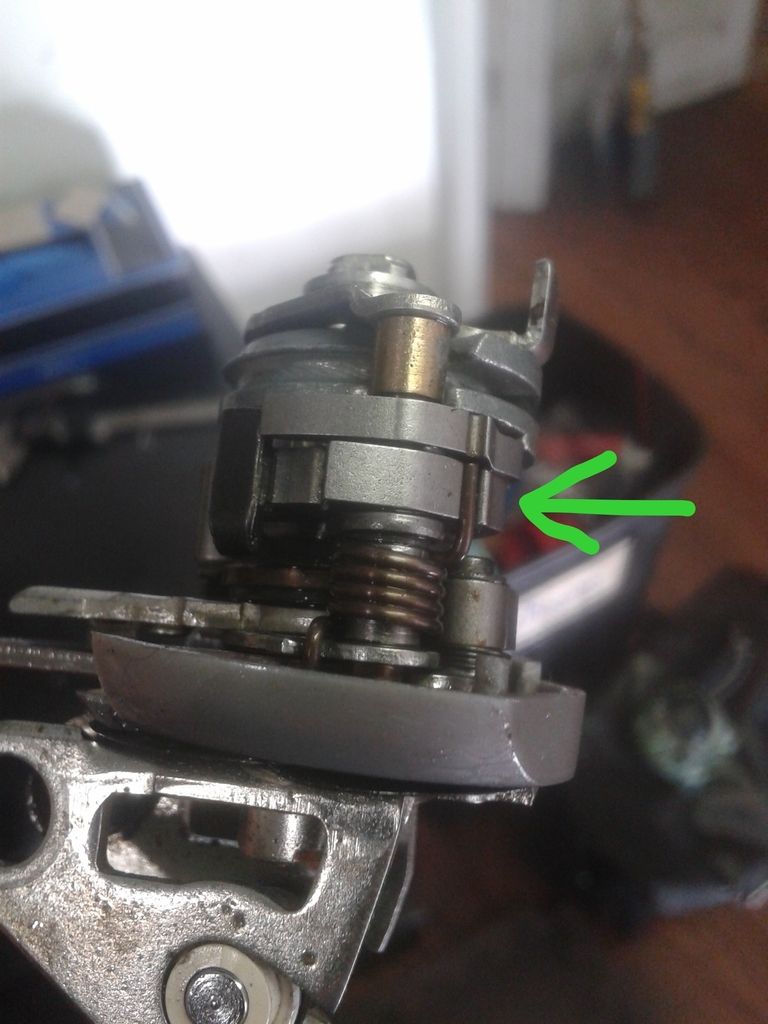
This is the pawl in question (EDIT: That's odd...I drew arrows on the pictures, but they don't seem to be showing up for me. In any case, it's the lower one, with the spring pushing on it) :
Last edited by agmetal; 01-22-16 at 10:06 PM.
 01-23-16, 04:53 AM
#2

Senior Member
Join Date: Aug 2007
Location: Evanston, IL
Posts: 5,171
Bikes: many
Mentioned: 65 Post(s)
Tagged: 0 Thread(s)
Quoted: 1471 Post(s)
Liked 1,438 Times
in
790 Posts
Oddly enough, I have a set on eBay right now that a friend gave me. (They gunked up so he replaced them. I had no use for them.) I did nothing more than flush them with a lot of WD-40, but in the process of searching for background information, discovered several YouTube videos on rebuilding these beasties. Search Google for "rebuild shimano sti shifter". Perhaps a complete teardown is in order.
01-23-16, 06:01 AM
#3

Senior Member

You have to take the bind off of the pawls, and then work them on the pivot sometimes dozens of times. It will eventually free up, but will have to be freed up again if you don't ride at least once a week(I am joking, it's more like once a month). They LOVE to restick though, that much is certain. The only set I wasn't able to revive, sat unused after being underwater during Rita. Salt kills..,,,,BD
A set of these is invaluable too.
https://www.waresdirect.com/products...FU9hfgod1VcG5w
A set of these is invaluable too.
https://www.waresdirect.com/products...FU9hfgod1VcG5w
01-23-16, 06:15 AM
#4
Senior Member
Join Date: Jul 2008
Location: Minas Ithil
Posts: 9,173
Mentioned: 66 Post(s)
Tagged: 0 Thread(s)
Quoted: 2432 Post(s)
Liked 641 Times
in
398 Posts
I have some 600 shifters I went through that are probably the exact same. It took a long ride or two before it freed up and started shifting good. After that I had no issues with it.
01-23-16, 06:30 AM
#5
Junior Member

Join Date: May 2012
Location: Boston
Posts: 156
Bikes: More than the boss realizes...
Mentioned: 0 Post(s)
Tagged: 0 Thread(s)
Quoted: 4 Post(s)
Likes: 0
Liked 0 Times
in
0 Posts
You have to take the bind off of the pawls, and then work them on the pivot sometimes dozens of times. It will eventually free up, but will have to be freed up again if you don't ride at least once a week(I am joking, it's more like once a month). They LOVE to restick though, that much is certain. The only set I wasn't able to revive, sat unused after being underwater during Rita. Salt kills..,,,,BD
A set of these is invaluable too.
https://www.waresdirect.com/products...FU9hfgod1VcG5w
A set of these is invaluable too.
https://www.waresdirect.com/products...FU9hfgod1VcG5w
I ran into this problem on a set last year. Sometimes you can free it up by working it back and forth, sometimes you need to remove the circlip, move the pawl up the shaft a bit, put a drop of oil there and button it all back up.
Doing this all in a perfectly clean white-painted room is also helpful as no doubt that circlip will fly off the shaft and seek the deepest, darkest recesses of your work area.
Finicky work, but oh my the satisfaction.
01-23-16, 01:10 PM
#6
Senior Member
Join Date: Jan 2014
Location: PNW
Posts: 1,543
Bikes: One of everything and three of everything French
Mentioned: 51 Post(s)
Tagged: 0 Thread(s)
Quoted: 469 Post(s)
Liked 349 Times
in
223 Posts
I have un-stuck two sets of those exact shifters. I found it necessary to immerse the mechanism in a solvent tank overnight and scrub with a fine brush. For me that was the key- get them good and clean to point that they move freely before applying new lubricant. Be careful scrubbing around the smaller spring- I got a little carried away with the brush and managed to dislodge the end of the spring of one shifter.
I have not tried PB Blaster on shifters so I can't say if solvent works better or not. But it's something you could try. Good luck.
I have not tried PB Blaster on shifters so I can't say if solvent works better or not. But it's something you could try. Good luck.
__________________
I.C.
I.C.
01-23-16, 02:00 PM
#7
Member
Join Date: Dec 2015
Location: Southeast Tennessee
Posts: 42
Bikes: Too many
Mentioned: 0 Post(s)
Tagged: 0 Thread(s)
Quoted: 0 Post(s)
Likes: 0
Liked 0 Times
in
0 Posts
I too have a set of 600s. They're on my 86 Paramount, which I seldom ride. They do restick themselves together after a while. I use Pro Gold chain lube, cleans and lubricates.
01-23-16, 10:33 PM
#8
Ride, Wrench, Swap, Race

Join Date: Jan 2010
Location: Northern California
Posts: 9,214
Bikes: Cheltenham-Pedersen racer, Boulder F/S Paris-Roubaix, Varsity racer, '52 Christophe, '62 Continental, '92 Merckx, '75 Limongi, '76 Presto, '72 Gitane SC, '71 Schwinn SS, etc.
Mentioned: 132 Post(s)
Tagged: 0 Thread(s)
Quoted: 1573 Post(s)
Liked 1,314 Times
in
874 Posts
This is a common problem, exactly as the OP describes, that affects both Shimano's Road and MTB shifters.
Since the innards are already exposed in the OP's case, the relatively permanent fix is easy.
With light oil applied at the ends of the pawl's pivot bore, use a tiny screwdriver, really tiny, and make the pawl slide in one direction on the shaft, such that a just-visible gap will appear at one end of the pawl pivot bore.
Apply an additional tiny drop of oil to where the gap appears, allow a few moments for the oil to penetrate, then use the screwdriver to slide and hold the pawl in the opposite direction along it's pivot shaft.
Keep sliding the pawl back and forth and applying oil to the gaps that appear, and in a minute or two the pawl should be completely freed up with no tendency to re-gum for years.
I did a particularly stubborn pair of 1991 MTB Rapidfire shifters this morning, the left one having three(!) pawls and the right one having two. These things were pretty much "glued" if you know what I mean, but my little squeeze bottle of motor oil (with 20% mineral spirits mixed in) got all of the pawls "snapping" in short order. I did have to remove one screw and the cables and cable adjusters to remove the plastic shielding, but was able to leave both levers on the handlebar and just rotated them into a convenient upside-down position to do all the oiling and prodding.
In the case of road STI levers with covers still blocking access to the assembled shift mechanism, I usually flood the insides with foaming Liquid Wrench Lubricating Oil, and when that doesn't work I remove the hoods and dunk the complete levers in motor oil that is heated to 170F for two hours, then remove while hot (double gloves) and work the lever pawls via the levers before whirling the oil out of the hot levers outside at the end of a trucker's bungee cord. A final light spray-off with WD40 and a terrycloth massage leaves the levers ready for reinstallation of the hoods and onto the bike.
Last edited by dddd; 01-23-16 at 10:38 PM.
01-24-16, 01:39 AM
#9
Senior Member
Thread Starter
Join Date: Jul 2009
Location: Boston, MA
Posts: 1,541
Bikes: Bianchi Volpe, ANT 3-speed roadster, New Albion Privateer singlespeed, Raleigh One Way singlespeed, Raleigh Professional "retro roadie" rebuild, 198? Fuji(?) franken-5-speed, 1937 Raleigh Tourist, 1952 Raleigh Sports, 1966 Raleigh Sports step-through
Mentioned: 21 Post(s)
Tagged: 0 Thread(s)
Quoted: 248 Post(s)
Liked 27 Times
in
18 Posts
This is a common problem, exactly as the OP describes, that affects both Shimano's Road and MTB shifters.
Since the innards are already exposed in the OP's case, the relatively permanent fix is easy.
With light oil applied at the ends of the pawl's pivot bore, use a tiny screwdriver, really tiny, and make the pawl slide in one direction on the shaft, such that a just-visible gap will appear at one end of the pawl pivot bore.
Apply an additional tiny drop of oil to where the gap appears, allow a few moments for the oil to penetrate, then use the screwdriver to slide and hold the pawl in the opposite direction along it's pivot shaft.
Keep sliding the pawl back and forth and applying oil to the gaps that appear, and in a minute or two the pawl should be completely freed up with no tendency to re-gum for years.
I did a particularly stubborn pair of 1991 MTB Rapidfire shifters this morning, the left one having three(!) pawls and the right one having two. These things were pretty much "glued" if you know what I mean, but my little squeeze bottle of motor oil (with 20% mineral spirits mixed in) got all of the pawls "snapping" in short order. I did have to remove one screw and the cables and cable adjusters to remove the plastic shielding, but was able to leave both levers on the handlebar and just rotated them into a convenient upside-down position to do all the oiling and prodding.
In the case of road STI levers with covers still blocking access to the assembled shift mechanism, I usually flood the insides with foaming Liquid Wrench Lubricating Oil, and when that doesn't work I remove the hoods and dunk the complete levers in motor oil that is heated to 170F for two hours, then remove while hot (double gloves) and work the lever pawls via the levers before whirling the oil out of the hot levers outside at the end of a trucker's bungee cord. A final light spray-off with WD40 and a terrycloth massage leaves the levers ready for reinstallation of the hoods and onto the bike.
Since the innards are already exposed in the OP's case, the relatively permanent fix is easy.
With light oil applied at the ends of the pawl's pivot bore, use a tiny screwdriver, really tiny, and make the pawl slide in one direction on the shaft, such that a just-visible gap will appear at one end of the pawl pivot bore.
Apply an additional tiny drop of oil to where the gap appears, allow a few moments for the oil to penetrate, then use the screwdriver to slide and hold the pawl in the opposite direction along it's pivot shaft.
Keep sliding the pawl back and forth and applying oil to the gaps that appear, and in a minute or two the pawl should be completely freed up with no tendency to re-gum for years.
I did a particularly stubborn pair of 1991 MTB Rapidfire shifters this morning, the left one having three(!) pawls and the right one having two. These things were pretty much "glued" if you know what I mean, but my little squeeze bottle of motor oil (with 20% mineral spirits mixed in) got all of the pawls "snapping" in short order. I did have to remove one screw and the cables and cable adjusters to remove the plastic shielding, but was able to leave both levers on the handlebar and just rotated them into a convenient upside-down position to do all the oiling and prodding.
In the case of road STI levers with covers still blocking access to the assembled shift mechanism, I usually flood the insides with foaming Liquid Wrench Lubricating Oil, and when that doesn't work I remove the hoods and dunk the complete levers in motor oil that is heated to 170F for two hours, then remove while hot (double gloves) and work the lever pawls via the levers before whirling the oil out of the hot levers outside at the end of a trucker's bungee cord. A final light spray-off with WD40 and a terrycloth massage leaves the levers ready for reinstallation of the hoods and onto the bike.
01-24-16, 03:37 AM
#10
Junior Member
I've found when trying to unstick these things, in addition to a good lube/flush, it helps to have a shifter cable threaded into them also. This way you can pull on it while you operate the lever to simulate the forces they would normally be trying to work against. I don't know if this is just my experience or if it works for others too, but I have gotten several old, sticky Shimano shifters to work this way.
01-24-16, 10:32 AM
#11
Ride, Wrench, Swap, Race
Join Date: Jan 2010
Location: Northern California
Posts: 9,214
Bikes: Cheltenham-Pedersen racer, Boulder F/S Paris-Roubaix, Varsity racer, '52 Christophe, '62 Continental, '92 Merckx, '75 Limongi, '76 Presto, '72 Gitane SC, '71 Schwinn SS, etc.
Mentioned: 132 Post(s)
Tagged: 0 Thread(s)
Quoted: 1573 Post(s)
Liked 1,314 Times
in
874 Posts
I've found when trying to unstick these things, in addition to a good lube/flush, it helps to have a shifter cable threaded into them also. This way you can pull on it while you operate the lever to simulate the forces they would normally be trying to work against. I don't know if this is just my experience or if it works for others too, but I have gotten several old, sticky Shimano shifters to work this way.
In many cases, you pretty much have to have the cable tension applied to get the spool itself moving, and it's a really good idea to be sure that the the spool isn't rotating against any gummy resistance that could become worse, especially it seems with the MTB shifters. The spool assembly is somewhat like a stack of plates, and there needs to be a good distribution of light lubrication to keep them turning freely.
The force applied to the pawls by the cable during shifting, against the force of cable tension, effects a good, final working-in of the oil applied previously, though a gummed pawl that has been oiled (but not fully freed up with hot oil soak and/or being pushed around with a screwdriver) often shows a return of sluggish movement when colder weather returns.
One more thing that seems to more-fully displace gummy grease from the pawl pivots is to grip the pawl with needle-nose pliers and gently tilt it very slightly off-axis, back-and-forth as the oil creeps in at both ends. Once the oil gets through the full length of the pivot, you'll notice how snappy the pawl moves in response to it's meager spring force.
Note that the pawl spring, where it hooks around the pawl, is vulnerable to careless application of force with tools, so best to clear any grease off the obstructs your view of where the nearly-invisible spring is hooked. I had to repair the end of one of these springs once, and it wasn't easy.
The all-too-common blasting of the internals with solvent sprays like WD40 has a tendency to restore free motion quickly, but with pawl sticking returning when the solvent dries out and the grease re-thickens. A more repeated application of the spray with repetitive working of the levers can make for a longer-lasting service, but it takes a lot of effort to get the grease flushed out of the annular spaces along the pawl pivot bores.
But since spray-outs of the shifters done in-place are such common practice, I will advise that the bike should be pointing at least 30 degrees downhill when this is done, so that, with care, lubricant might be kept from creeping in under the rubber lever hoods, which is a bit of a disaster once you go to ride the bike.
Note also that spray-outs of the installed shifters usually floods the upper cable housings with contaminated lubricant, which may affect one's cable servicing requirements and/or cloud the viewing window of optical shift-position indicators.
01-27-16, 07:52 PM
#12
Senior Member
Thread Starter
Join Date: Jul 2009
Location: Boston, MA
Posts: 1,541
Bikes: Bianchi Volpe, ANT 3-speed roadster, New Albion Privateer singlespeed, Raleigh One Way singlespeed, Raleigh Professional "retro roadie" rebuild, 198? Fuji(?) franken-5-speed, 1937 Raleigh Tourist, 1952 Raleigh Sports, 1966 Raleigh Sports step-through
Mentioned: 21 Post(s)
Tagged: 0 Thread(s)
Quoted: 248 Post(s)
Liked 27 Times
in
18 Posts
@dddd - I tried your suggestion, and it seems to've helped, although it wasn't quite as effective or immediate as I'd hoped. I think it's good enough, though...certainly much better than it was.
01-27-16, 10:54 PM
#13
Senior Member

Join Date: Nov 2011
Location: Port Angeles, WA
Posts: 7,924
Bikes: A green one, "Ragleigh," or something.
Mentioned: 194 Post(s)
Tagged: 0 Thread(s)
Quoted: 1628 Post(s)
Liked 635 Times
in
357 Posts
I've got a 3x7 RSX brifters question (at least it was sold to me as a 3x7): the left 3x shifter seems to be working consistently, "click click," but it doesn't move the FD very far on each click. I have to click all the way (two clicks) just to move up or down one chainring. Is this likely
-partly gummed up
-in need of a different model FD
-actually a 2x shifter
or maybe something else?
-partly gummed up
-in need of a different model FD
-actually a 2x shifter
or maybe something else?
__________________
● 1971 Grandis SL ● 1972 Lambert Grand Prix frankenbike ● 1972 Raleigh Super Course fixie ● 1973 Nishiki Semi-Pro ● 1979 Motobecane Grand Jubile ●1980 Apollo "Legnano" ● 1984 Peugeot Vagabond ● 1985 Shogun Prairie Breaker ● 1986 Merckx Super Corsa ● 1987 Schwinn Tempo ● 1988 Schwinn Voyageur ● 1989 Bottechia Team ADR replica ● 1990 Cannondale ST600 ● 1993 Technium RT600 ● 1996 Kona Lava Dome ●
● 1971 Grandis SL ● 1972 Lambert Grand Prix frankenbike ● 1972 Raleigh Super Course fixie ● 1973 Nishiki Semi-Pro ● 1979 Motobecane Grand Jubile ●1980 Apollo "Legnano" ● 1984 Peugeot Vagabond ● 1985 Shogun Prairie Breaker ● 1986 Merckx Super Corsa ● 1987 Schwinn Tempo ● 1988 Schwinn Voyageur ● 1989 Bottechia Team ADR replica ● 1990 Cannondale ST600 ● 1993 Technium RT600 ● 1996 Kona Lava Dome ●
 01-28-16, 01:58 AM
#14
Junior Member
Two clicks (three positions including 'home') means a double shifter, three clicks (four positions) makes a triple shifter. The extra click on the double is a trim setting, to stop the chain rubbing on the FD when you are shifting across on the cassette.
01-28-16, 04:41 AM
#15
Senior Member
Join Date: Aug 2007
Location: Evanston, IL
Posts: 5,171
Bikes: many
Mentioned: 65 Post(s)
Tagged: 0 Thread(s)
Quoted: 1471 Post(s)
Liked 1,438 Times
in
790 Posts
It's always amazed me that for as sophisticated and accurate as shifting the rear derailleur has become, shifting the front derailleur remains a bit of a kludge. Witness the "trim click". (My 9s Ultegra front brifter had the same thing, so I don't think it is a function of how high up the product line the RSX group was.)
SunTour had a clever auto-trimming front shifter back in the 70s. Of course it required the front and rear shifters to be part of an integrated whole, so the downtube was the logical place for them.
It's not clear to me that indexed shifting up front was really that much of an advance (in back, yes).
01-28-16, 06:43 AM
#17
Banned.
Join Date: Dec 2007
Posts: 27,199
Mentioned: 34 Post(s)
Tagged: 1 Thread(s)
Quoted: 378 Post(s)
Liked 1,414 Times
in
913 Posts
I've got a 3x7 RSX brifters question (at least it was sold to me as a 3x7): the left 3x shifter seems to be working consistently, "click click," but it doesn't move the FD very far on each click. I have to click all the way (two clicks) just to move up or down one chainring. Is this likely
-partly gummed up
-in need of a different model FD
-actually a 2x shifter
or maybe something else?
-partly gummed up
-in need of a different model FD
-actually a 2x shifter
or maybe something else?
It's easy to do, since any bump on the lever while you're moving around can easily move the big lever.
1-pull the cable, zero out the shifter and then re-install it.
2-if this does not work, then it could be the shifter gunked up, a lot of the L shifters don't get the use they need to stay shifty.
3-sometimes, the FD limit screws tend to overlap each other. back both of them out with the chain off and visually set them, try again.
01-28-16, 10:52 AM
#18
Ride, Wrench, Swap, Race
Join Date: Jan 2010
Location: Northern California
Posts: 9,214
Bikes: Cheltenham-Pedersen racer, Boulder F/S Paris-Roubaix, Varsity racer, '52 Christophe, '62 Continental, '92 Merckx, '75 Limongi, '76 Presto, '72 Gitane SC, '71 Schwinn SS, etc.
Mentioned: 132 Post(s)
Tagged: 0 Thread(s)
Quoted: 1573 Post(s)
Liked 1,314 Times
in
874 Posts
[QUOTE=Lascauxcaveman;18492466]I've got a 3x7 RSX brifters question (at least it was sold to me as a 3x7): the left 3x shifter seems to be working consistently, "click click," but it doesn't move the FD very far on each click. I have to click all the way (two clicks) just to move up or down one chainring. Is this likely
It looks like the software is cutting off your quote AND not closing your quote as it should, but here is my reply:
Firstly sounds like the cable is far too loose, such that the first click may only be taking up cable slack(?).
Secondly, if you roll the rubber hood forward, the lever part number is visible, usually the triple shifter part number ends with a "3".
Like RobbieTunes mentioned, "zeroing out" the lever (stabbing the small lever until all cable is released) and then tensioning the cable to just remove all slack should correct any cable looseness, but again as RobbieTunes mentioned, the limit screws need to be in the ballpark first, and that part requires some degree of familiarity with front derailer setup.
Hi limit screw on the oddball, "top swing" RSX front derailer is toward the LEFT side of the bike(!). Should allow a smidgeon of clearance between the chain and outer cage plate whe the chain is on the big chainring and smallest cog.
Lo limit screw of the RSX front derailer is on the RIGHT side of the bike, and should allow a smidgeon of clearance between the chain and inner cage plate when the chain is on the small chainring and largest cog.
Lo and Hi limits are how far that the derailer can move through it's motion range as adjusted. This regardless of what the shifter and cable are adjusted to do, but you can experiment with cable tension and move the levers to reach both limits so as to move the derailer and establish the limit screw adjustments.
Last edited by dddd; 01-28-16 at 10:56 AM.
01-28-16, 11:07 AM
#19
Ride, Wrench, Swap, Race
Join Date: Jan 2010
Location: Northern California
Posts: 9,214
Bikes: Cheltenham-Pedersen racer, Boulder F/S Paris-Roubaix, Varsity racer, '52 Christophe, '62 Continental, '92 Merckx, '75 Limongi, '76 Presto, '72 Gitane SC, '71 Schwinn SS, etc.
Mentioned: 132 Post(s)
Tagged: 0 Thread(s)
Quoted: 1573 Post(s)
Liked 1,314 Times
in
874 Posts
@dddd - I tried your suggestion, and it seems to've helped, although it wasn't quite as effective or immediate as I'd hoped. I think it's good enough, though...certainly much better than it was.
Re-introducing oil at each end of the pawl pivot pin as the oil and grease become mixed (oil thickens) will speed up the penetration along the pawl pivot bore, so I usually re-apply a drop of oil there three or four times until the pawl is absolutely snappy.
01-28-16, 05:24 PM
#20
Senior Member
Thread Starter
Join Date: Jul 2009
Location: Boston, MA
Posts: 1,541
Bikes: Bianchi Volpe, ANT 3-speed roadster, New Albion Privateer singlespeed, Raleigh One Way singlespeed, Raleigh Professional "retro roadie" rebuild, 198? Fuji(?) franken-5-speed, 1937 Raleigh Tourist, 1952 Raleigh Sports, 1966 Raleigh Sports step-through
Mentioned: 21 Post(s)
Tagged: 0 Thread(s)
Quoted: 248 Post(s)
Liked 27 Times
in
18 Posts
You're right, it still takes some repetition to fully free up the pawl. Some assemblies have more end-play than others, so effectiveness varies when sliding the pawl along it's pivot pin.
Re-introducing oil at each end of the pawl pivot pin as the oil and grease become mixed (oil thickens) will speed up the penetration along the pawl pivot bore, so I usually re-apply a drop of oil there three or four times until the pawl is absolutely snappy.
Re-introducing oil at each end of the pawl pivot pin as the oil and grease become mixed (oil thickens) will speed up the penetration along the pawl pivot bore, so I usually re-apply a drop of oil there three or four times until the pawl is absolutely snappy.

