


Polishing alloy - getting a satin finish
 03-08-09, 12:19 PM
#1
Senior Member
Thread Starter
Join Date: Jan 2007
Location: Ontario
Posts: 2,673
Mentioned: 16 Post(s)
Tagged: 0 Thread(s)
Quoted: 486 Post(s)
Liked 661 Times
in
351 Posts
Polishing alloy - getting a satin finish
Thought I'd get the collective wisdom from this crowd on how to replicate the satiny grey/silver alloy like it came from the factory.
The situation I have is this: I have a set of bars where the center (exposed) section has the zig-zag scratches on one side from being taken out of a stem (won't say how they got there ). I can easily polish out the scratches using finer and finer grit sandpaper and then the normal aluminum polishes, but what I get is that highly gleaming, almost chrome look instead of the original satin look.
Any suggestions or do I just highly polish the unmarked side to match?
This has been a question I have had for years, having polished many a motorcycle part...never did figure it out so thought it was time to ask!
Mark
The situation I have is this: I have a set of bars where the center (exposed) section has the zig-zag scratches on one side from being taken out of a stem (won't say how they got there
). I can easily polish out the scratches using finer and finer grit sandpaper and then the normal aluminum polishes, but what I get is that highly gleaming, almost chrome look instead of the original satin look.Any suggestions or do I just highly polish the unmarked side to match?
This has been a question I have had for years, having polished many a motorcycle part...never did figure it out so thought it was time to ask!
Mark
 03-08-09, 12:24 PM
#2
Great State of Varmint

Join Date: Sep 2008
Location: Dante's Third Ring
Posts: 7,476
Mentioned: 0 Post(s)
Tagged: 0 Thread(s)
Quoted: 2 Post(s)
Likes: 0
Liked 15 Times
in
15 Posts
The best metal-polish I've found is Simichrome Polish. It's from Germany and it's serious stuff. Does a beautiful job of restoring old components to looking like they just came from the factory. If the original finish is still there, it should find it. Worth a try - or give it to someone else. Google will find a source.
Good luck!
Good luck!
03-08-09, 12:33 PM
#4
Spin Forest! Spin!

Join Date: Sep 2007
Location: Arrid Zone-a
Posts: 5,956
Bikes: I used to have many. And I Will again.
Mentioned: 2 Post(s)
Tagged: 0 Thread(s)
Quoted: 7 Post(s)
Likes: 0
Liked 11 Times
in
10 Posts
Hmmm, most satin finishes are anodizing. Polishes won't provide a satin look. I think a coarse sand paper of 600 grit to 1000 grit is the closest I've come to a 'satin' finish. Simichrome will make it luster like a chrome.
Likes For WNG:
03-08-09, 12:58 PM
#5

Senior Member

Join Date: Mar 2005
Location: Pinole, CA, USA
Posts: 17,392
Mentioned: 24 Post(s)
Tagged: 0 Thread(s)
Quoted: 443 Post(s)
Likes: 0
Liked 28 Times
in
26 Posts
I actually read your post. ")
I wanted a satin finish on these aluminum fenders because I didn't want them to look like chrome. I just rubbed them lightly with 0000 steel wool and then waxed them. The wax prevents fingerprinting.

I wanted a satin finish on these aluminum fenders because I didn't want them to look like chrome. I just rubbed them lightly with 0000 steel wool and then waxed them. The wax prevents fingerprinting.
Last edited by Grand Bois; 03-08-09 at 01:02 PM.
Likes For Grand Bois:
03-08-09, 01:17 PM
#6
Senior Member
Thread Starter
Join Date: Jan 2007
Location: Ontario
Posts: 2,673
Mentioned: 16 Post(s)
Tagged: 0 Thread(s)
Quoted: 486 Post(s)
Liked 661 Times
in
351 Posts
Thanks all - appreciate the advice. I've got several favourite polishes (simichrome is one, nev-r-dull another, alumi-nu is the third), so that isn't the real issue. Dirtdrop confirmed what I thought - use some very fine steel wool to simulate the satin look. (Love the Carlton....just gorgeous....)
I'll see what I can do....I needed to sand with fine grit paper to dull the scratches, so now I'll try the wool and see what happens....at worst, I'll either leave it as is (most people probably wouldn't notice) or polish the whole darn thing to a consistent finish....
Thanks again!
Mark
I'll see what I can do....I needed to sand with fine grit paper to dull the scratches, so now I'll try the wool and see what happens....at worst, I'll either leave it as is (most people probably wouldn't notice) or polish the whole darn thing to a consistent finish....
Thanks again!
Mark
03-08-09, 02:58 PM
#7
Disraeli Gears

What dirtdrop neglected to tell you is that if your bars are anodized, and you've gotten scratches out with abrasion, then you'll find it very difficult to match de-anodized surface with those that are still anodized. The fix for this is to strip the anodizing, so that everything's raw aluminum, and polish from there. This is covered in many threads here -- do a search for Easy Off.
03-08-09, 03:05 PM
#8
Bottecchia fan
Join Date: Aug 2003
Location: Colorado Springs, CO
Posts: 3,520
Bikes: 1959 Bottecchia Milano-Sanremo (frame), 1966 Bottecchia Professional (frame), 1971 Bottecchia Professional (frame), 1973 Bottecchia Gran Turismo, 1974 Bottecchia Special, 1977 Bottecchia Special (frame), 1974 Peugeot UO-8
Mentioned: 2 Post(s)
Tagged: 0 Thread(s)
Quoted: 33 Post(s)
Likes: 0
Liked 12 Times
in
9 Posts
+1 except I used brass wool.
__________________
1959 Bottecchia Milano-Sanremo(frame), 1966 Bottecchia Professional (frame), 1971 Bottecchia Professional (frame),
1973 Bottecchia Gran Turismo, 1974 Bottecchia Special, 1977 Bottecchia Special (frame),
1974 Peugeot UO-8, 1988 Panasonic PT-3500, 2002 Bianchi Veloce, 2004 Bianchi Pista
1959 Bottecchia Milano-Sanremo(frame), 1966 Bottecchia Professional (frame), 1971 Bottecchia Professional (frame),
1973 Bottecchia Gran Turismo, 1974 Bottecchia Special, 1977 Bottecchia Special (frame),
1974 Peugeot UO-8, 1988 Panasonic PT-3500, 2002 Bianchi Veloce, 2004 Bianchi Pista
03-08-09, 05:50 PM
#9
Stop reading my posts!

Join Date: Sep 2004
Posts: 12,622
Mentioned: 90 Post(s)
Tagged: 0 Thread(s)
Quoted: 1456 Post(s)
Liked 1,085 Times
in
805 Posts
brass, bronze or steel, you'll get something "close" to a satin finish but any time you are achieving it with hand rubbing there is a "grain" to the scratches. The best satin look I ever got was to take a piece straight from bead blasting and wax it with pure carnuba, but you really have to avoid touching it with ungloved fingers until waxed and really have to keep up the wax or it will corrode.
Last edited by unworthy1; 03-09-09 at 11:25 PM.
03-08-09, 07:27 PM
#10
Bottecchia fan
Join Date: Aug 2003
Location: Colorado Springs, CO
Posts: 3,520
Bikes: 1959 Bottecchia Milano-Sanremo (frame), 1966 Bottecchia Professional (frame), 1971 Bottecchia Professional (frame), 1973 Bottecchia Gran Turismo, 1974 Bottecchia Special, 1977 Bottecchia Special (frame), 1974 Peugeot UO-8
Mentioned: 2 Post(s)
Tagged: 0 Thread(s)
Quoted: 33 Post(s)
Likes: 0
Liked 12 Times
in
9 Posts
bass or steel, you'll get something "close" to a satin finish but any time you are achieving it with hand rubbing there is a "grain" to the scratches. The best satin look I ever got was to take a piece straight from bead blasting and wax it with pure carnuba, but you really have to avoid touching it with ungloved fingers until waxed and really have to keep up the wax or it will corrode.
__________________
1959 Bottecchia Milano-Sanremo(frame), 1966 Bottecchia Professional (frame), 1971 Bottecchia Professional (frame),
1973 Bottecchia Gran Turismo, 1974 Bottecchia Special, 1977 Bottecchia Special (frame),
1974 Peugeot UO-8, 1988 Panasonic PT-3500, 2002 Bianchi Veloce, 2004 Bianchi Pista
1959 Bottecchia Milano-Sanremo(frame), 1966 Bottecchia Professional (frame), 1971 Bottecchia Professional (frame),
1973 Bottecchia Gran Turismo, 1974 Bottecchia Special, 1977 Bottecchia Special (frame),
1974 Peugeot UO-8, 1988 Panasonic PT-3500, 2002 Bianchi Veloce, 2004 Bianchi Pista
03-08-09, 09:08 PM
#11
Senior Member

Join Date: Nov 2008
Location: New York Metro Area
Posts: 3,868
Bikes: '02 Litespeed, '99 Bianchi Alfana. '91 Fuji Saratoga, '84 Peugeot Canyon Express, '82 Moto GR, '81 Fuji America, '81 Fuji Royale; '78 Bridgestone Diamond Touring, '76 Fuji America, plus many more!
Mentioned: 6 Post(s)
Tagged: 0 Thread(s)
Quoted: 182 Post(s)
Liked 226 Times
in
129 Posts
Just started working on a bike today. Cleaned everything down first with Fantastik cleaner. The handle bar stem looked hopeless, so I got a little "open-minded" in my refurbishing technique. Used very diluted Turtle Wax rubbing compound ($1.99 at Sears) on a rag, followed by chrome polish and then a couple of applications of Turtle Wax paste car wax. The Weinmann rims cleaned up with chrome polish, followed by an application of chrome polish and 2 application of car wax. I a also used the rubbing compound to remove the remains of disintegrated frame decals. Big improvement in the bike's appearance. This was a project bike I took on for fun, and not a prized keeper.
03-09-09, 06:55 AM
#12
Senior Member
Join Date: Sep 2008
Posts: 98
Bikes: 1987 Marinoni ; 1994 Miyata 621; 1973 Raleigh Superbe
Mentioned: 0 Post(s)
Tagged: 0 Thread(s)
Quoted: 0 Post(s)
Likes: 0
Liked 0 Times
in
0 Posts
you can get a nice satin finish by applying your favourite polish with some scotch brites or steelwool. you'll need to experiment with the "grit" in order to match the other side, but it should be possible.
Allan Pollock
Allan Pollock
03-09-09, 09:04 AM
#13
Stop reading my posts!
Join Date: Sep 2004
Posts: 12,622
Mentioned: 90 Post(s)
Tagged: 0 Thread(s)
Quoted: 1456 Post(s)
Liked 1,085 Times
in
805 Posts
there are home anodizing kits but reports I hear are the results are less than professional-looking. I wonder if the "pearl" anodizing we are thinking of involves some additive in the bath or is just clear anodizing over a blasted surface...inquiring minds need to know.
03-09-09, 06:56 PM
#14
like we used to say
I would go with scotchbrite. Steel wool will leave small particles of steel embedded in the surface of the soft aluminum, which can then rust and leave stains or at the least darken the aluminum. I like scotchbrite and simichrome together.
03-09-09, 07:27 PM
#15
Senior Member
Join Date: Mar 2005
Location: Pinole, CA, USA
Posts: 17,392
Mentioned: 24 Post(s)
Tagged: 0 Thread(s)
Quoted: 443 Post(s)
Likes: 0
Liked 28 Times
in
26 Posts
I always use steel wool when polishing aluminum and I've never seen any indication that there is any truth to that.
03-10-09, 05:05 PM
#16
Banned
Join Date: Jan 2007
Posts: 5,258
Mentioned: 0 Post(s)
Tagged: 0 Thread(s)
Quoted: 0 Post(s)
Likes: 0
Liked 10 Times
in
6 Posts
This thread made me curious, so I tried something I hadn't done before.
I had a Cinelli stem that was a mess, and awhile ago I did the EZ-Off stripping of the anodizing, then polished it on the trusty buffing wheel. It was a bit 'too shiny' for my tastes, so it went back into the parts bin.

I decided to try to make a satin finish out of it, so I got out the sandpaper. I started with 320, then went to 400.

The results were going in the right direction, but not what I would put on a bike. So I went to 800 and 1000 grit. Much better.

I finished it off with a couple of treatments of Mother's, followed by som good old Johnson Paste Wax to protect it. It came out good enough to use, and an acceptable satin finish, though it's a bit hard to photograph well.


I had a Cinelli stem that was a mess, and awhile ago I did the EZ-Off stripping of the anodizing, then polished it on the trusty buffing wheel. It was a bit 'too shiny' for my tastes, so it went back into the parts bin.
I decided to try to make a satin finish out of it, so I got out the sandpaper. I started with 320, then went to 400.
The results were going in the right direction, but not what I would put on a bike. So I went to 800 and 1000 grit. Much better.
I finished it off with a couple of treatments of Mother's, followed by som good old Johnson Paste Wax to protect it. It came out good enough to use, and an acceptable satin finish, though it's a bit hard to photograph well.
Last edited by Old Fat Guy; 03-10-09 at 05:12 PM.
03-10-09, 06:41 PM
#17
Senior Member
Thread Starter
Join Date: Jan 2007
Location: Ontario
Posts: 2,673
Mentioned: 16 Post(s)
Tagged: 0 Thread(s)
Quoted: 486 Post(s)
Liked 661 Times
in
351 Posts
OFG: the finish you got is what I am looking for (and the one you started with is the one I am trying to avoid)....thanks for the photos and advice.
Mark
Mark
03-10-09, 08:18 PM
#18
Banned
Join Date: Jan 2007
Posts: 5,258
Mentioned: 0 Post(s)
Tagged: 0 Thread(s)
Quoted: 0 Post(s)
Likes: 0
Liked 10 Times
in
6 Posts
My advice is to strip it with EZ-Off, and start with a 320 grit, and slowly work up to the effect you are looking for. For me it came at 1000 grit.
I sanded in one direction, front to back, so that the sanding lines ran along the top of the stem, and wrapped around the vertical part. I went lightly with the sandpaper, and used some Mother's between grades to judge what the final look would be.
It took maybe a half an hour, starting with an already stripped and polished stem.
I put a few coats of wax on after I finished. This stem will stay in AZ, so corrosion is not an issue. If I was in CA or FL I would consider spraying a clear coat on it to seal it. I have no clue if that would adhere, or even work. Wax is good in my locale.
Thanks for arousing my curiosity, I am VERY pleased with the outcome.
10-25-23, 11:14 AM
#19

Senior Member

bumping this thread up. I'm restoring some Gran Compe brake levers and a Sugino Mighty crankset that have all been pantographed with Zunow logos. I removed all the scratches and buffed them to a mirror polish on a bench machine, but that finish isn't really what I'm going for. Will experiment with Simichrome and a red 3M pad next.
__________________
Check out www.djcatnap.com for articles on vintage Japanese & French bicycle restorations, components and history.
Check out www.djcatnap.com for articles on vintage Japanese & French bicycle restorations, components and history.
10-25-23, 12:07 PM
#20
blahblahblah chrome moly

Join Date: Apr 2009
Location: Seattle
Posts: 2,043
Mentioned: 94 Post(s)
Tagged: 0 Thread(s)
Quoted: 1208 Post(s)
Liked 2,656 Times
in
1,105 Posts
bumping this thread up. I'm restoring some Gran Compe brake levers and a Sugino Mighty crankset that have all been pantographed with Zunow logos. I removed all the scratches and buffed them to a mirror polish on a bench machine, but that finish isn't really what I'm going for. Will experiment with Simichrome and a red 3M pad next.
In recent years I've used an aggressive aluminum cleaner/brightener I got from Amazon. It works great but beware, it's really fast, like seconds to get to the finish you want. Probably should be diluted some before use. Use personal protective gear, face shield and rubber gloves recommended as a minimum. Wash it off the part with warm water ASAP to stop the etch from continuing. Oh and make sure any traces of polishing compound are washed off before doing the etch, or the compound will act as a resist, and you'll have areas that didn't get etched.
Here's a seatpost I polished then etched. It's a finish that's definitely better than new, but it looks somewhat consistent with the patina present on the other Al parts on the bike.
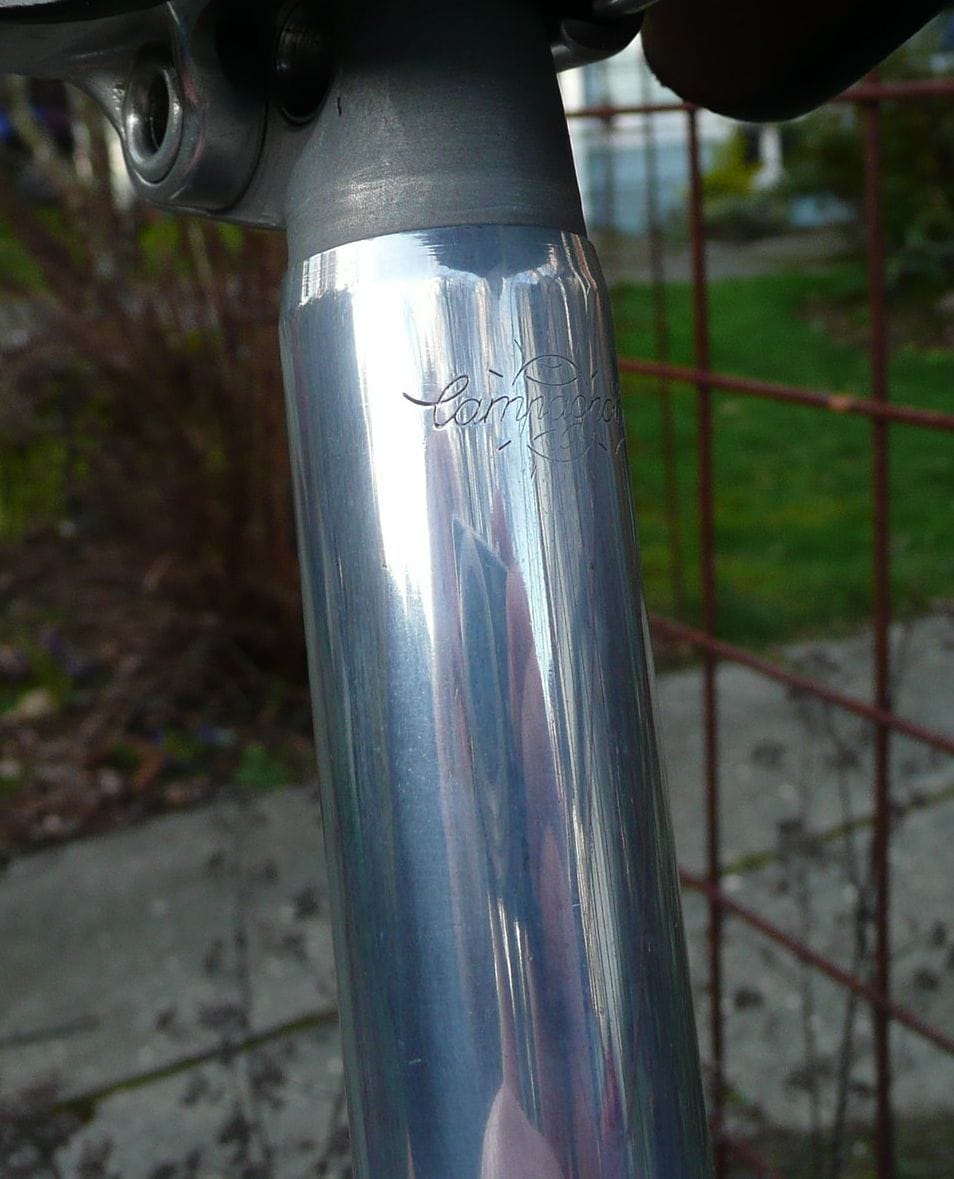
This bike has a Nitto Pearl stem, and the post looks similar to the pearl ano on the Nitto. The post being un-anodized, it will tarnish over time, but only slowly. High polish slows down the corrosion process. And unless you live by the sea, the added patina over time doesn't look bad.
-Mark B

Likes For bulgie:
10-25-23, 01:49 PM
#22
Senior Member
Thread Starter
Join Date: Jan 2007
Location: Ontario
Posts: 2,673
Mentioned: 16 Post(s)
Tagged: 0 Thread(s)
Quoted: 486 Post(s)
Liked 661 Times
in
351 Posts
BTinNYC : I�ll try that next time; I did get the result I was originally looking for by going to 2000 grit - it looked perfect. At that stage you have to be careful with paste polishes as they quickly take that back to a mirror finish!
Likes For markk900:
10-25-23, 04:07 PM
#23
Senior Member
Join Date: Mar 2021
Location: Beaverton, OR
Posts: 1,449
Bikes: You had me at rusty and Italian!!
Mentioned: 31 Post(s)
Tagged: 0 Thread(s)
Quoted: 573 Post(s)
Liked 1,067 Times
in
556 Posts
I was recently messing around with my son�s AL BMX frame. Paint has been stripped and I am getting a finish I like with a gray Scotchbrite pad.
10-25-23, 05:24 PM
#24
Senior Member
Join Date: May 2019
Location: Bloomington, IN
Posts: 2,985
Bikes: Paramount, Faggin, Ochsner, Ciocc, Basso
Mentioned: 119 Post(s)
Tagged: 0 Thread(s)
Quoted: 1321 Post(s)
Liked 1,959 Times
in
1,164 Posts
In the golf world we use a grey Scotchbrite wheel for creating a satin finish. There are many metal moving items available including Trizac belts, 3M belts of different colors, all with differing finish options. I would suggest the 3m grey Scotchbrite in pad form to get to a satin finish. Smiles, MH
Last edited by Mad Honk; 10-25-23 at 07:48 PM.
Likes For Mad Honk:
10-26-23, 10:49 AM
#25
Junior Member
Join Date: Oct 2006
Location: Petaluma, CA
Posts: 125
Bikes: too many
Mentioned: 6 Post(s)
Tagged: 0 Thread(s)
Quoted: 43 Post(s)
Liked 82 Times
in
34 Posts
I vaguely recall someone here mentioning bringing to a mirror polish and then dip or soak in brake cleaning fluid to knock back the shine.
I haven't tried this myself, so can't promise that it will work. Worth a try...
I haven't tried this myself, so can't promise that it will work. Worth a try...