


Huffy + Campagnolo Super Record = The Ultimate C&V Sacrilege build
 05-17-23, 07:23 AM
#1376

Freewheel Medic

Join Date: Oct 2005
Location: An Island on the Coast of GA!
Posts: 12,886
Bikes: Snazzy* Schwinns, Classy Cannondales & a Super Pro Aero Lotus (* Ed.)
Mentioned: 140 Post(s)
Tagged: 0 Thread(s)
Quoted: 1453 Post(s)
Liked 2,197 Times
in
963 Posts

__________________
Bob
Enjoying the GA coast all year long!
Thanks for visiting my website: www.freewheelspa.com
Bob
Enjoying the GA coast all year long!
Thanks for visiting my website: www.freewheelspa.com

Likes For pastorbobnlnh:
05-17-23, 08:02 AM
#1377
Senior Member
Join Date: Dec 2020
Location: Wake Forest, NC
Posts: 5,795
Bikes: 1989 Cinelli Supercorsa
Mentioned: 11 Post(s)
Tagged: 0 Thread(s)
Quoted: 3514 Post(s)
Liked 2,927 Times
in
1,776 Posts
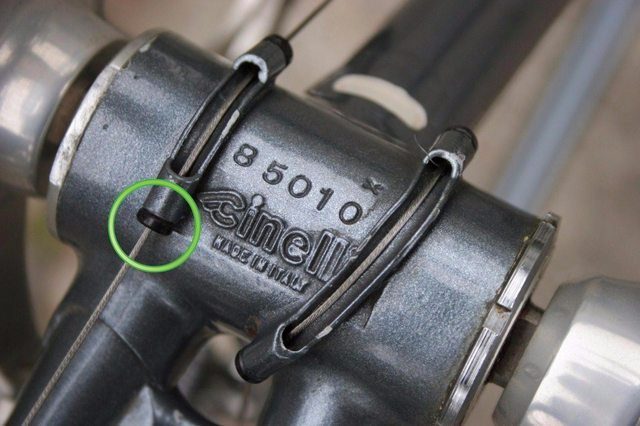
There usually is. How about welding a couple guides to the bottom of the BB, on either side of the "H?" Run some teflon tubing from the inside of some brake/shifter housing to smooth things out.
Could be made from some small-diameter cut-down tubing, like below. I found this image here. Pay no attention to the green circle. I mean, if it's OK to obliterate the last "i" In Cinelli...

Could be made from some small-diameter cut-down tubing, like below. I found this image here. Pay no attention to the green circle. I mean, if it's OK to obliterate the last "i" In Cinelli...
Last edited by smd4; 05-17-23 at 10:48 AM.
Likes For smd4:
05-17-23, 10:40 AM
#1378
www.theheadbadge.com

Join Date: Sep 2005
Location: Southern Florida
Posts: 28,514
Bikes: https://www.theheadbadge.com
Mentioned: 124 Post(s)
Tagged: 0 Thread(s)
Quoted: 2422 Post(s)
Liked 4,396 Times
in
2,093 Posts


Likes For cudak888:
05-17-23, 12:58 PM
#1379
Senior Member
Join Date: Mar 2021
Location: SoCal
Posts: 2,308
Bikes: Cuevas Custom, Cimmaron, 1988 "Pinalized Rockma", 1984 Trek 510, Moulton custom touring, Raleigh Competition GS, Bridgestone Mb-2 & 3, 1980's Peugeot - US, City, & Canyon Express (6)
Mentioned: 26 Post(s)
Tagged: 0 Thread(s)
Quoted: 1105 Post(s)
Liked 3,768 Times
in
1,846 Posts
Likes For SoCaled:
05-17-23, 01:18 PM
#1380
Ride, Wrench, Swap, Race

Join Date: Jan 2010
Location: Northern California
Posts: 9,194
Bikes: Cheltenham-Pedersen racer, Boulder F/S Paris-Roubaix, Varsity racer, '52 Christophe, '62 Continental, '92 Merckx, '75 Limongi, '76 Presto, '72 Gitane SC, '71 Schwinn SS, etc.
Mentioned: 132 Post(s)
Tagged: 0 Thread(s)
Quoted: 1565 Post(s)
Liked 1,296 Times
in
866 Posts
It made for a big unsightly deviation in the cable path (which normally follows parallel to the DT) because of the huge OD of the bb shell.
The correct fix imo is to use thin plastic sleeve along the cable's path through the guide, and following the cable well up toward the FD, preventing rub on the ST.
You can cap off the upward-pointing ends of the sleeve using shrink tubing so as to exclude dirt/water entry, same as I did in the early mtb days with all of the open housing segments waiting to fill up with dirt. My shrink tubing "umbrellas" moved with the cable, sliding over the smaller diameter cable sleeves. My cables performed far better (and for longer) than most, especially when SRAM/Gripshift cable grease was used!
Likes For dddd:
05-17-23, 05:55 PM
#1381
Senior Member
Join Date: May 2019
Location: Bloomington, IN
Posts: 2,951
Bikes: Paramount, Faggin, Ochsner, Ciocc, Basso
Mentioned: 117 Post(s)
Tagged: 0 Thread(s)
Quoted: 1304 Post(s)
Liked 1,912 Times
in
1,142 Posts
pastorbob, et al,
As the newly appointed Inspector I have been holding out on AMCO in my quest to undetectably add weight to the Huffy, while its owner isn't looking. The tungsten bottom bracket adaptor should have added almost a pound that he didn't notice. Heh, Heh, Heh!
and now comes yet another un-needed but desirable bit that AMCO won't be able to resist...
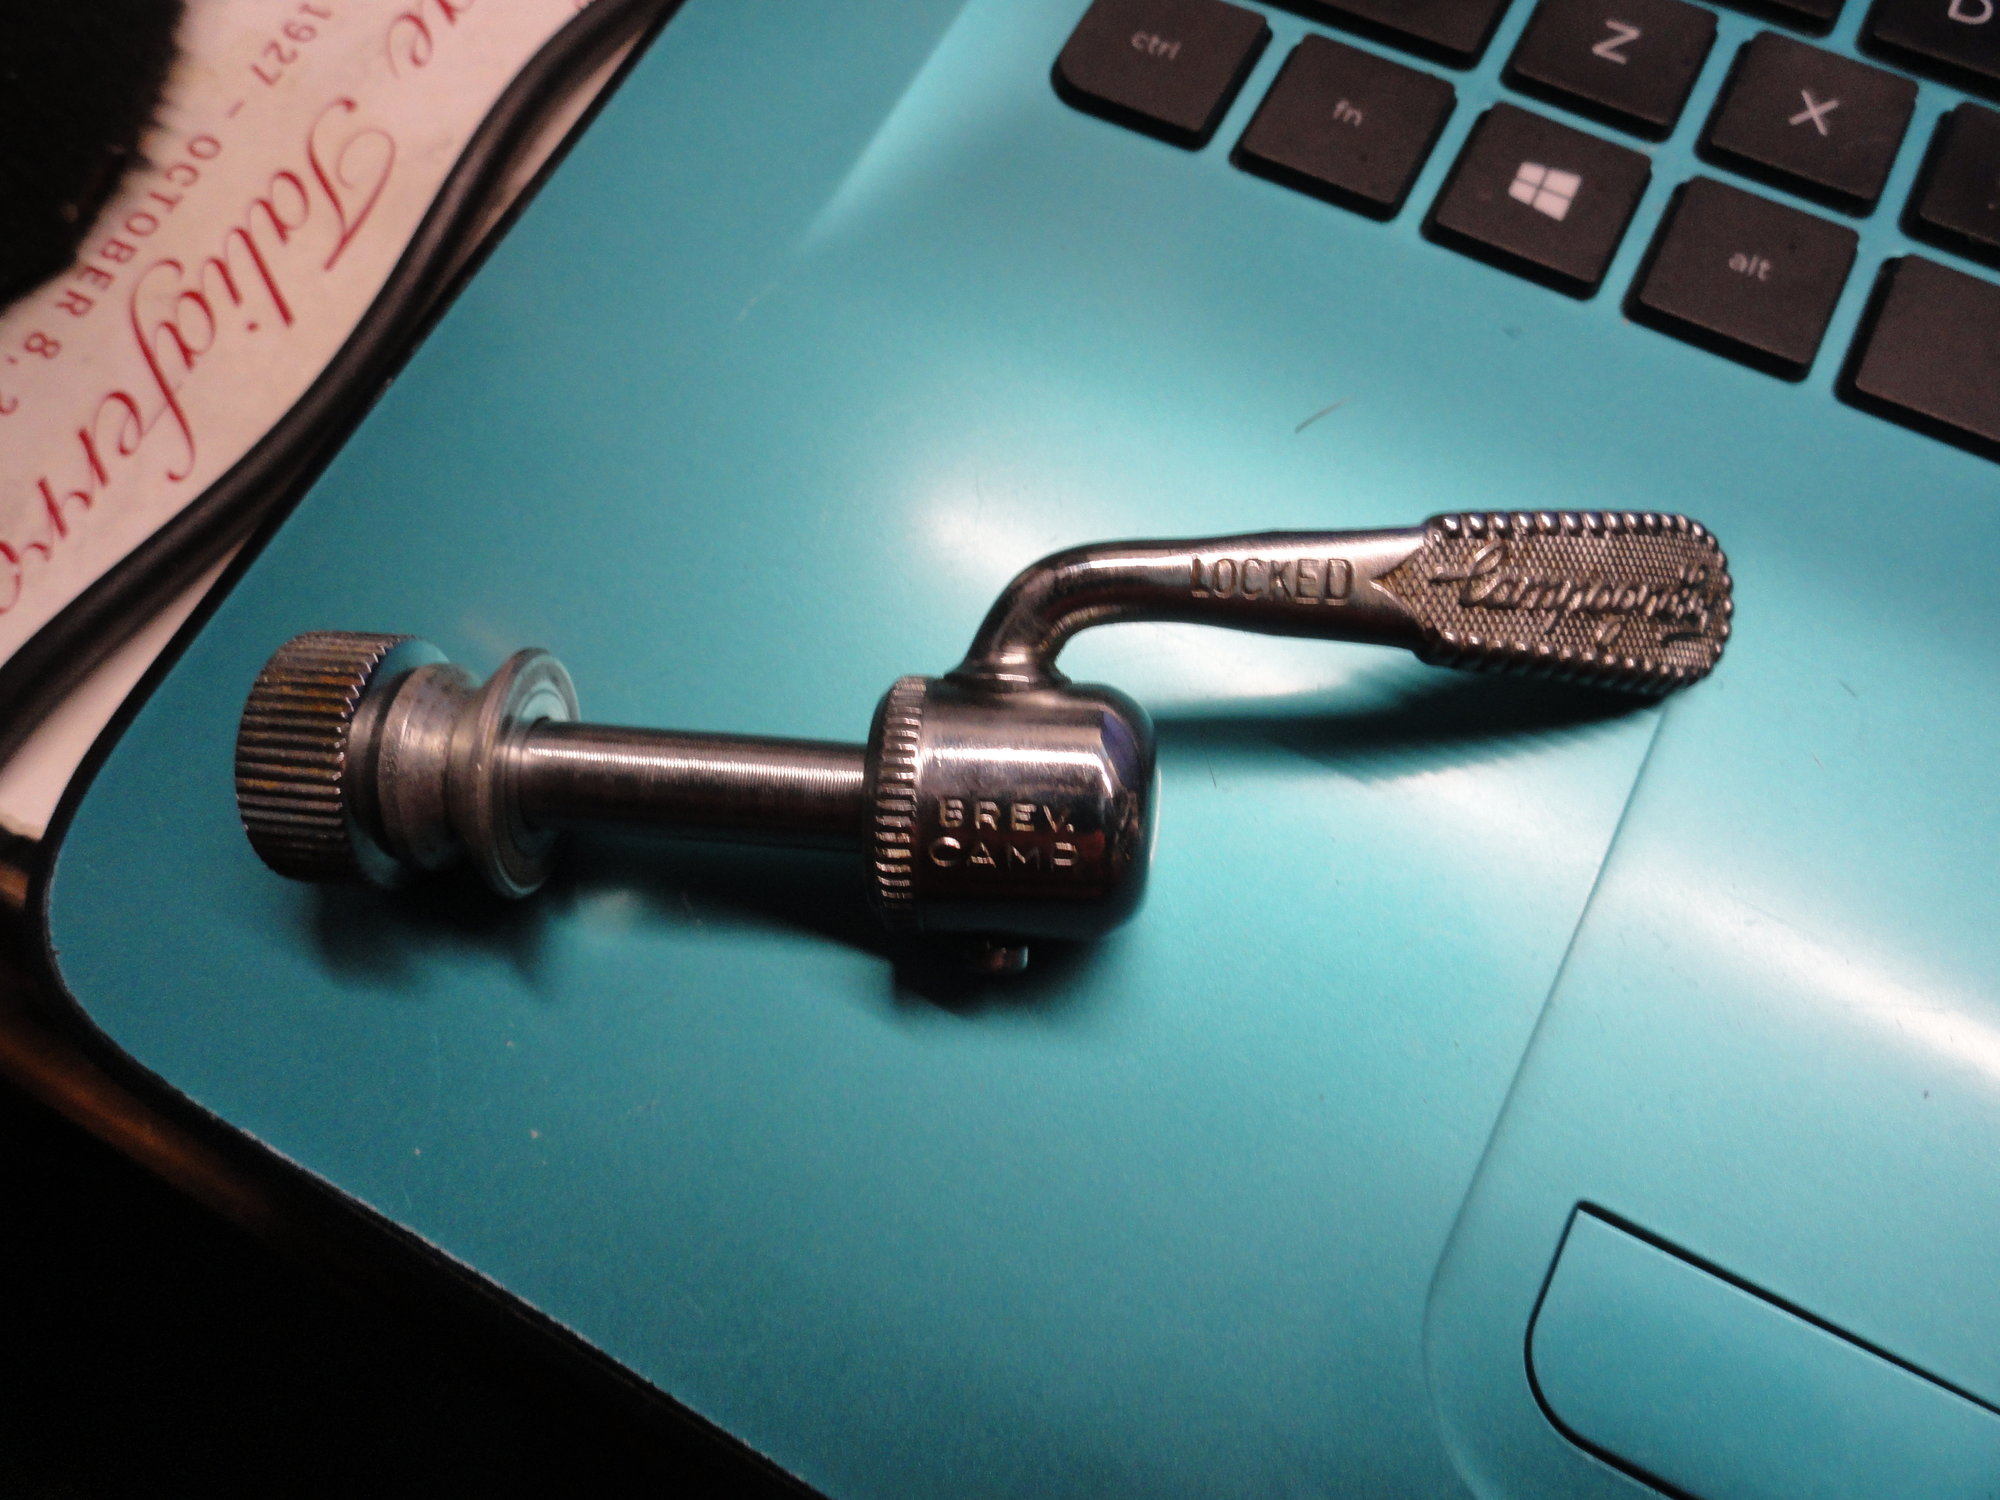
This very cool Campagnolo seat post quick release that adds even more weight to the build while he is not noticing.
Smiles, Inspector Honk
As the newly appointed Inspector I have been holding out on AMCO in my quest to undetectably add weight to the Huffy, while its owner isn't looking. The tungsten bottom bracket adaptor should have added almost a pound that he didn't notice. Heh, Heh, Heh!
and now comes yet another un-needed but desirable bit that AMCO won't be able to resist...
This very cool Campagnolo seat post quick release that adds even more weight to the build while he is not noticing.
Smiles, Inspector Honk
Last edited by Mad Honk; 05-17-23 at 08:37 PM.
Likes For Mad Honk:
05-17-23, 06:27 PM
#1382
The Huffmeister
Thread Starter

Join Date: Jul 2008
Location: The Le Grande HQ
Posts: 2,741
Bikes: '79 Trek 938, '86 Jim Merz Allez SE, '90 Miyata 1000, '68 PX-10, '80 PXN-10, '73 Super Course, '87 Guerciotti, '83 Trek 600, '80 Huffy Le Grande
Mentioned: 45 Post(s)
Tagged: 0 Thread(s)
Quoted: 1227 Post(s)
Liked 3,561 Times
in
1,412 Posts
__________________
There were 135 Confentes, but only one...Huffente!

There were 135 Confentes, but only one...Huffente!
Likes For AdventureManCO:
05-17-23, 07:26 PM
#1383
The Huffmeister
Thread Starter
Join Date: Jul 2008
Location: The Le Grande HQ
Posts: 2,741
Bikes: '79 Trek 938, '86 Jim Merz Allez SE, '90 Miyata 1000, '68 PX-10, '80 PXN-10, '73 Super Course, '87 Guerciotti, '83 Trek 600, '80 Huffy Le Grande
Mentioned: 45 Post(s)
Tagged: 0 Thread(s)
Quoted: 1227 Post(s)
Liked 3,561 Times
in
1,412 Posts
There usually is. How about welding a couple guides to the bottom of the BB, on either side of the "H?" Run some teflon tubing from the inside of some brake/shifter housing to smooth things out.
Could be made from some small-diameter cut-down tubing, like below. I found this image here. Pay no attention to the green circle. I mean, if it's OK to obliterate the last "i" In Cinelli...
Could be made from some small-diameter cut-down tubing, like below. I found this image here. Pay no attention to the green circle. I mean, if it's OK to obliterate the last "i" In Cinelli...
Covering up the logo like that!? The Huffy would never be so tasteless!
__________________
There were 135 Confentes, but only one...Huffente!
There were 135 Confentes, but only one...Huffente!
Likes For AdventureManCO:
05-17-23, 07:26 PM
#1384
The Huffmeister
Thread Starter
Join Date: Jul 2008
Location: The Le Grande HQ
Posts: 2,741
Bikes: '79 Trek 938, '86 Jim Merz Allez SE, '90 Miyata 1000, '68 PX-10, '80 PXN-10, '73 Super Course, '87 Guerciotti, '83 Trek 600, '80 Huffy Le Grande
Mentioned: 45 Post(s)
Tagged: 0 Thread(s)
Quoted: 1227 Post(s)
Liked 3,561 Times
in
1,412 Posts
An 'M' on one side and an 'H' on the other? And it could stand for 'Maybe Huffy?'

__________________
There were 135 Confentes, but only one...Huffente!
There were 135 Confentes, but only one...Huffente!
Likes For AdventureManCO:
05-17-23, 07:29 PM
#1385
Senior Member
Join Date: Dec 2020
Location: Wake Forest, NC
Posts: 5,795
Bikes: 1989 Cinelli Supercorsa
Mentioned: 11 Post(s)
Tagged: 0 Thread(s)
Quoted: 3514 Post(s)
Liked 2,927 Times
in
1,776 Posts
Likes For smd4:
05-17-23, 07:30 PM
#1386
Habitual User

Join Date: Jan 2020
Location: Altadena, CA
Posts: 7,997
Bikes: 2023 Niner RLT 9 RDO, 2018 Trek Procaliber 9.9 RSL, 2018 Storck Fascenario.3 Platinum, 2003 Time VX Special Pro, 2001 Colnago VIP, 1999 Trek 9900 singlespeed, 1977 Nishiki ONP
Mentioned: 5 Post(s)
Tagged: 0 Thread(s)
Quoted: 4957 Post(s)
Liked 8,099 Times
in
3,833 Posts
I vote for a couple of brazed-on noodles on top of the BB. Of course, this would mean repainting the BB for the 137th time.
__________________
"Swedish fish. They're protein shaped." - livedarklions
"Swedish fish. They're protein shaped." - livedarklions
Likes For Eric F:
05-17-23, 07:32 PM
#1387
The Huffmeister
Thread Starter
Join Date: Jul 2008
Location: The Le Grande HQ
Posts: 2,741
Bikes: '79 Trek 938, '86 Jim Merz Allez SE, '90 Miyata 1000, '68 PX-10, '80 PXN-10, '73 Super Course, '87 Guerciotti, '83 Trek 600, '80 Huffy Le Grande
Mentioned: 45 Post(s)
Tagged: 0 Thread(s)
Quoted: 1227 Post(s)
Liked 3,561 Times
in
1,412 Posts
I routed the left shift wire under the Ashtabula bb shell on my Varsity because the cable housing stop was broken/missing from the DT.
It made for a big unsightly deviation in the cable path (which normally follows parallel to the DT) because of the huge OD of the bb shell.
The correct fix imo is to use thin plastic sleeve along the cable's path through the guide, and following the cable well up toward the FD, preventing rub on the ST.
You can cap off the upward-pointing ends of the sleeve using shrink tubing so as to exclude dirt/water entry, same as I did in the early mtb days with all of the open housing segments waiting to fill up with dirt. My shrink tubing "umbrellas" moved with the cable, sliding over the smaller diameter cable sleeves. My cables performed far better (and for longer) than most, especially when SRAM/Gripshift cable grease was used!
Ahh, this post wins the debate! You make a reeeeeaally good point about the cable lines with going under the BB shell. No getting around that at all.
Top it is. But I may just rock what I got for now, until I can engineer a good solution. I want it to look dope. I've got some ideas, but I need to spend a little more time on it. I think I will try the 'extended noodle' idea for now, but either braze on a top guide right on the top of the BB shell, or something else.
Huret made that cool clamp that went around both the down tube and the seat tube - I just have no idea if it would actually work for the Huffnago seeing as how the size of the BB shell throws everything out of whack. Hmmmm...
Well, I'll just avoid/denial for now on that, and instead work on the RD hanger. Oh, and I think I need to redo the seatpost. At least part of it. It's nearly 2 inches too high! More on that...maybe tonight. Maybe/
For sure...the fork saga and boy oh boy was it ever one.
__________________
There were 135 Confentes, but only one...Huffente!
There were 135 Confentes, but only one...Huffente!
Likes For AdventureManCO:
05-17-23, 07:33 PM
#1388
The Huffmeister
Thread Starter
Join Date: Jul 2008
Location: The Le Grande HQ
Posts: 2,741
Bikes: '79 Trek 938, '86 Jim Merz Allez SE, '90 Miyata 1000, '68 PX-10, '80 PXN-10, '73 Super Course, '87 Guerciotti, '83 Trek 600, '80 Huffy Le Grande
Mentioned: 45 Post(s)
Tagged: 0 Thread(s)
Quoted: 1227 Post(s)
Liked 3,561 Times
in
1,412 Posts
Likes For AdventureManCO:
05-17-23, 07:39 PM
#1389
Senior Member
Join Date: Dec 2020
Location: Wake Forest, NC
Posts: 5,795
Bikes: 1989 Cinelli Supercorsa
Mentioned: 11 Post(s)
Tagged: 0 Thread(s)
Quoted: 3514 Post(s)
Liked 2,927 Times
in
1,776 Posts
Likes For smd4:
05-17-23, 07:41 PM
#1390
The Huffmeister
Thread Starter
Join Date: Jul 2008
Location: The Le Grande HQ
Posts: 2,741
Bikes: '79 Trek 938, '86 Jim Merz Allez SE, '90 Miyata 1000, '68 PX-10, '80 PXN-10, '73 Super Course, '87 Guerciotti, '83 Trek 600, '80 Huffy Le Grande
Mentioned: 45 Post(s)
Tagged: 0 Thread(s)
Quoted: 1227 Post(s)
Liked 3,561 Times
in
1,412 Posts
Yes, that idea did come up in a recent phone conversation I had. They way it was suggested to me was also similar - 'So, why don't you just torch it and repaint? I mean, you've already done it what 4 times? Wouldn't really be a big deal'
I guess he is right, and I found another one of those white spray cans lol
But I have an idea brewing that will accomplish the same thing, but won't involve more brazing. What it WILL involve is more bottom bracket pictures...

Since we are nearing critical mass on that particular front, I do need to alert @Mad Honk and @cudak888 because I might need a timeout.
__________________
There were 135 Confentes, but only one...Huffente!
There were 135 Confentes, but only one...Huffente!
05-17-23, 07:45 PM
#1391
Habitual User
Join Date: Jan 2020
Location: Altadena, CA
Posts: 7,997
Bikes: 2023 Niner RLT 9 RDO, 2018 Trek Procaliber 9.9 RSL, 2018 Storck Fascenario.3 Platinum, 2003 Time VX Special Pro, 2001 Colnago VIP, 1999 Trek 9900 singlespeed, 1977 Nishiki ONP
Mentioned: 5 Post(s)
Tagged: 0 Thread(s)
Quoted: 4957 Post(s)
Liked 8,099 Times
in
3,833 Posts
I have the Huret clamp on my �77 Nishiki. I think the engorged girth of the Huffster�s BB would make it a no-go.
__________________
"Swedish fish. They're protein shaped." - livedarklions
"Swedish fish. They're protein shaped." - livedarklions
05-17-23, 07:47 PM
#1392
The Huffmeister
Thread Starter
Join Date: Jul 2008
Location: The Le Grande HQ
Posts: 2,741
Bikes: '79 Trek 938, '86 Jim Merz Allez SE, '90 Miyata 1000, '68 PX-10, '80 PXN-10, '73 Super Course, '87 Guerciotti, '83 Trek 600, '80 Huffy Le Grande
Mentioned: 45 Post(s)
Tagged: 0 Thread(s)
Quoted: 1227 Post(s)
Liked 3,561 Times
in
1,412 Posts
pastorbob, et al,
As the newly appointed inspector I have been holding out on AMCO in my quest to undetectably add weight to the Huffy, while its owner isn't looking. The tungsten bottom bracket adaptor should have added almost a pound that he didn't notice. Heh, Heh, Heh!
and now comes yet another un-needed but desirable bit that AMCO won't be able to resist...
This very cool Campagnolo seat post quick release that adds even more weight to the build while he is not noticing.
Smiles, Inspector Honk
Nooooooooooooooooooooo not more WEIGHT!!!
We've already been on the slim fast diet and you just keep throwing candy bars at her!!! lol That thing looks pretty cool. And tempting. Like the Twix bar of the Campy world!
And like a girl fresh from a breakup watching soaps and having someone hand her an open ice cream container, she ain't gonna say 'no'

Oh, and I know about the tungsten when when I shaved off about 1/3 of those adapter cups and ran into it!
__________________
There were 135 Confentes, but only one...Huffente!
There were 135 Confentes, but only one...Huffente!
05-17-23, 07:49 PM
#1393
The Huffmeister
Thread Starter
Join Date: Jul 2008
Location: The Le Grande HQ
Posts: 2,741
Bikes: '79 Trek 938, '86 Jim Merz Allez SE, '90 Miyata 1000, '68 PX-10, '80 PXN-10, '73 Super Course, '87 Guerciotti, '83 Trek 600, '80 Huffy Le Grande
Mentioned: 45 Post(s)
Tagged: 0 Thread(s)
Quoted: 1227 Post(s)
Liked 3,561 Times
in
1,412 Posts
Likes For AdventureManCO:
05-17-23, 08:11 PM
#1394
Habitual User
Join Date: Jan 2020
Location: Altadena, CA
Posts: 7,997
Bikes: 2023 Niner RLT 9 RDO, 2018 Trek Procaliber 9.9 RSL, 2018 Storck Fascenario.3 Platinum, 2003 Time VX Special Pro, 2001 Colnago VIP, 1999 Trek 9900 singlespeed, 1977 Nishiki ONP
Mentioned: 5 Post(s)
Tagged: 0 Thread(s)
Quoted: 4957 Post(s)
Liked 8,099 Times
in
3,833 Posts
Likes For Eric F:
05-17-23, 08:17 PM
#1395
Senior Member
Join Date: May 2019
Location: Bloomington, IN
Posts: 2,951
Bikes: Paramount, Faggin, Ochsner, Ciocc, Basso
Mentioned: 117 Post(s)
Tagged: 0 Thread(s)
Quoted: 1304 Post(s)
Liked 1,912 Times
in
1,142 Posts
Likes For Mad Honk:
05-17-23, 08:30 PM
#1396
Senior Member
Join Date: May 2019
Location: Bloomington, IN
Posts: 2,951
Bikes: Paramount, Faggin, Ochsner, Ciocc, Basso
Mentioned: 117 Post(s)
Tagged: 0 Thread(s)
Quoted: 1304 Post(s)
Liked 1,912 Times
in
1,142 Posts
Likes For Mad Honk:
05-17-23, 10:10 PM
#1397
The Huffmeister
Thread Starter
Join Date: Jul 2008
Location: The Le Grande HQ
Posts: 2,741
Bikes: '79 Trek 938, '86 Jim Merz Allez SE, '90 Miyata 1000, '68 PX-10, '80 PXN-10, '73 Super Course, '87 Guerciotti, '83 Trek 600, '80 Huffy Le Grande
Mentioned: 45 Post(s)
Tagged: 0 Thread(s)
Quoted: 1227 Post(s)
Liked 3,561 Times
in
1,412 Posts
Alright foks, by now I know what you want: gratuitous violence toward either the Huffy or me, in the form of uselessly torturing myself through pointlessly complex modifications to a bike that never should have been in the running, wasting my precious and valuable time (and yours, by extension). This time around you'll get both. I think the bike knows whats going on here, and is laughing at me.
Welcome to the Fork Saga.
When it is over, you will breathe a sign of relief, not for me but for yourself, as you delightfully remember that you are not me, and you can simply enjoy the carnage from afar, without having to be wounded, neither physically, emotionally, nor mentally. I know this, and it is why I try to drag you down with me as much as I possible can. By the end of the saga, you're gonna like the way you feel about yourself, I guarantee it.

First thing up was the fork crown race. Simple enough...
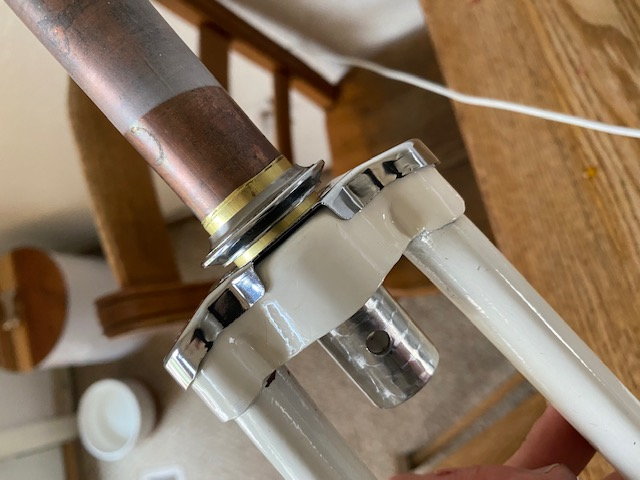
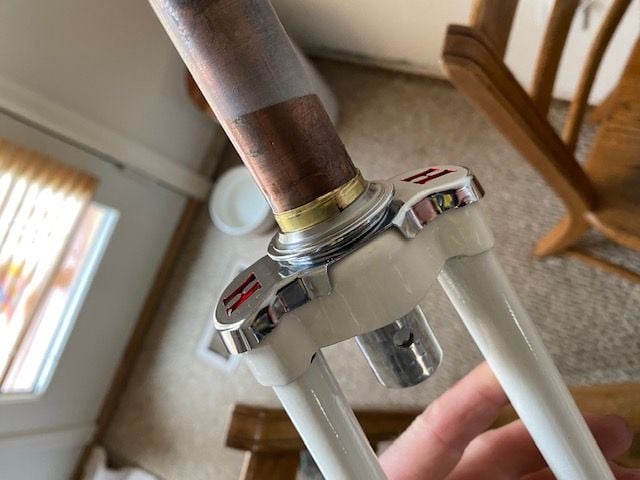
A good press fit, with about 1 1/2 wraps of the brass shim strip. Locked in w/ a little cryanoacrylate.
Too simple, in fact. It was going too easy. I should have known. But I'm gonna take what I can get with this bike, so of course I'm oblivious to what's to come.
Even the power of the sandals couldn't save me this day...
Welcome to the Fork Saga.
When it is over, you will breathe a sign of relief, not for me but for yourself, as you delightfully remember that you are not me, and you can simply enjoy the carnage from afar, without having to be wounded, neither physically, emotionally, nor mentally. I know this, and it is why I try to drag you down with me as much as I possible can. By the end of the saga, you're gonna like the way you feel about yourself, I guarantee it.
First thing up was the fork crown race. Simple enough...
A good press fit, with about 1 1/2 wraps of the brass shim strip. Locked in w/ a little cryanoacrylate.
Too simple, in fact. It was going too easy. I should have known. But I'm gonna take what I can get with this bike, so of course I'm oblivious to what's to come.
Even the power of the sandals couldn't save me this day...
__________________
There were 135 Confentes, but only one...Huffente!
There were 135 Confentes, but only one...Huffente!
Last edited by AdventureManCO; 05-17-23 at 11:31 PM.
Likes For AdventureManCO:
05-17-23, 10:40 PM
#1398
The Huffmeister
Thread Starter
Join Date: Jul 2008
Location: The Le Grande HQ
Posts: 2,741
Bikes: '79 Trek 938, '86 Jim Merz Allez SE, '90 Miyata 1000, '68 PX-10, '80 PXN-10, '73 Super Course, '87 Guerciotti, '83 Trek 600, '80 Huffy Le Grande
Mentioned: 45 Post(s)
Tagged: 0 Thread(s)
Quoted: 1227 Post(s)
Liked 3,561 Times
in
1,412 Posts
Goals:
Install crown race - check
Clean headset parts
Install headset adapter cups
Install headset cups
Grease and put it all togther
Feel directionless and apathetic at the mere completion of the next major stage of the build
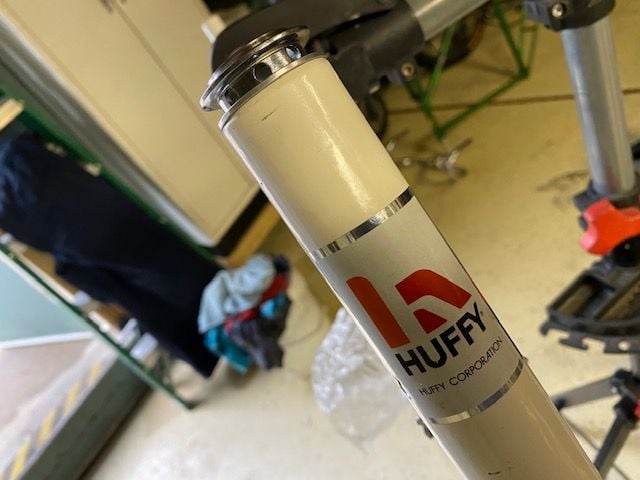
Now that the fork was sorted, it was time to turn out attention to the next major obstacle - the headset cups.
Now, I'm not dumb (well, yes I am, for building this clown show of a bike) and I remember the major brain damage that the bottom bracket was, simply due to tolerances. So I'm going to make double sure that I'm ON IT w/ the measurements to make this headset install go PERFECT.
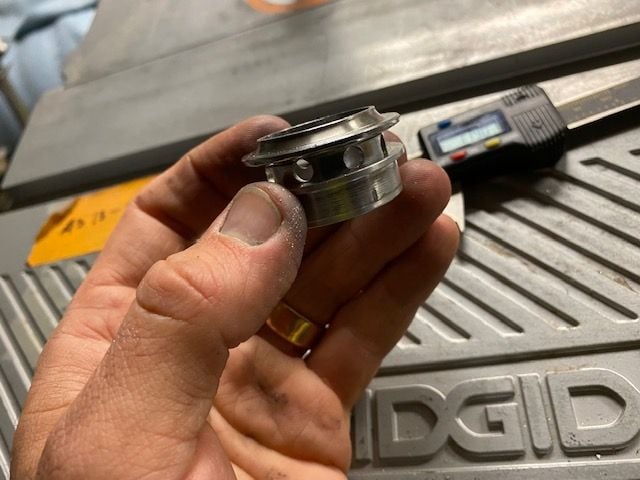
Thanks to Macguyver909 , the headset cups go in w/ zero issues -
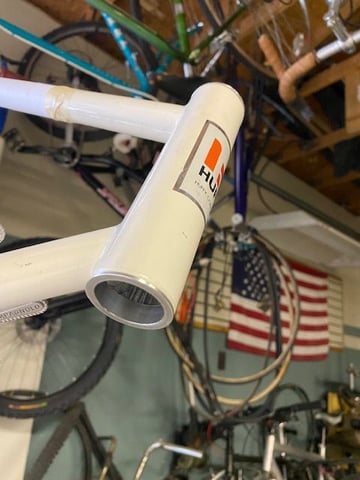
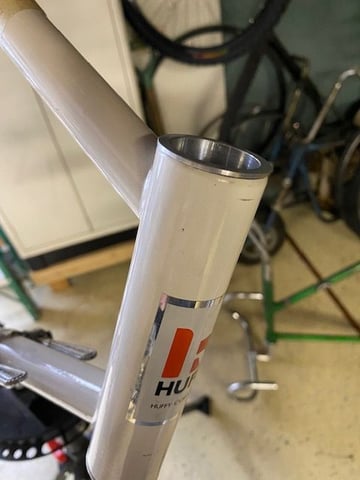
Next up is cleaning this bad boy -
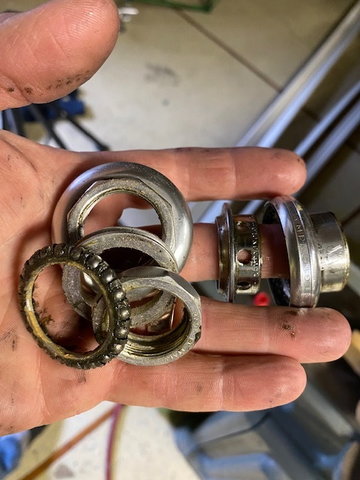
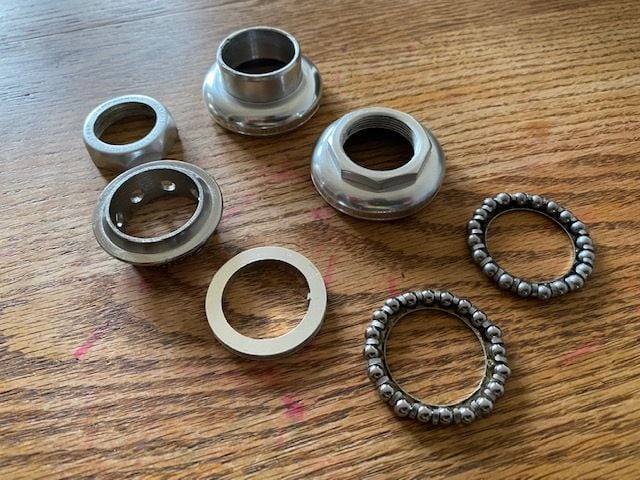
Now, I would say that I have a bit of a 'normie' view on Campagnolo aka 'What's the big deal?' or 'Wait, it's how much for that old, worn out, rusty, HEAVY steel whatchamawhatever?'
But, the headset is nice. It is very smooth, I was pretty impressed with it. Except the crown race - that thing is a lead weight.
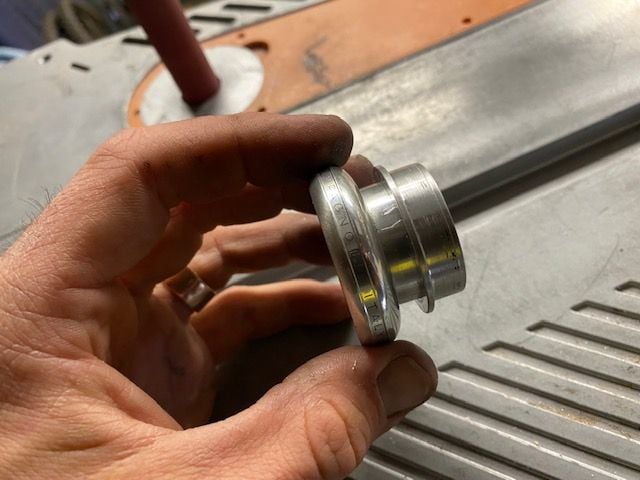
Now come the fun part - headset cups. Whoohoo!
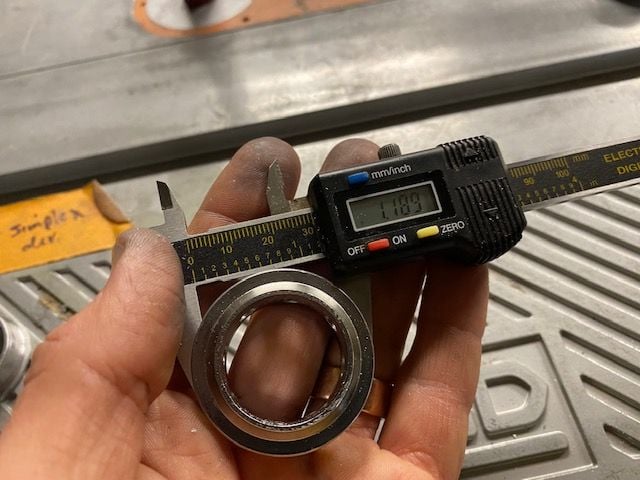
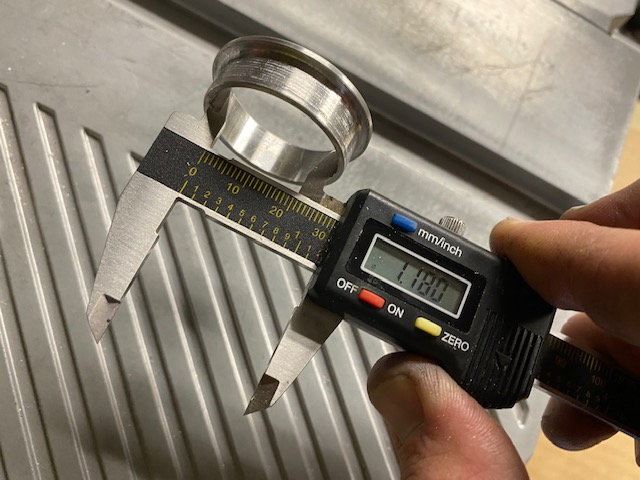
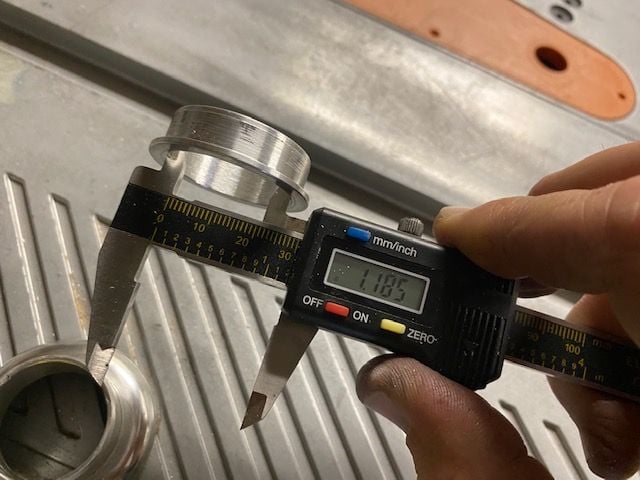
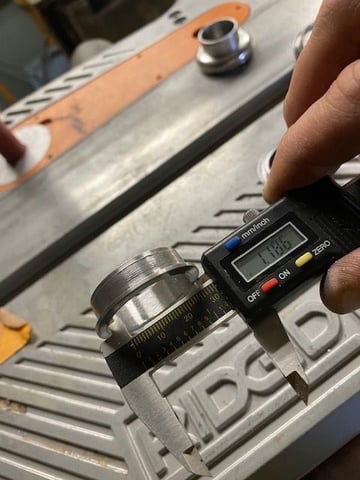
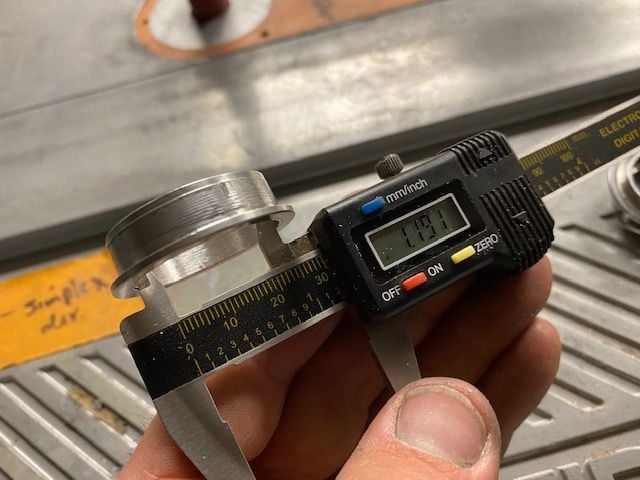
Now, as mentioned previously, we really want to take things slow and make sure that we don't have a repeat failure on the headtube, because that would be, as they say, 'less than ideal'. And there is a lovely seam running down that headtube that I'm sure would just laugh in my face if I split it open. So, let's take some measurements, shall we?
Huh. Hmmm, yeah, about that. Isn't the one, that one, yeah? Supposed to be uh, smaller, and the, the one, the other one, um, supposed to, yeah, know, um, larger?

Oh boy. Now we get to have some fun.
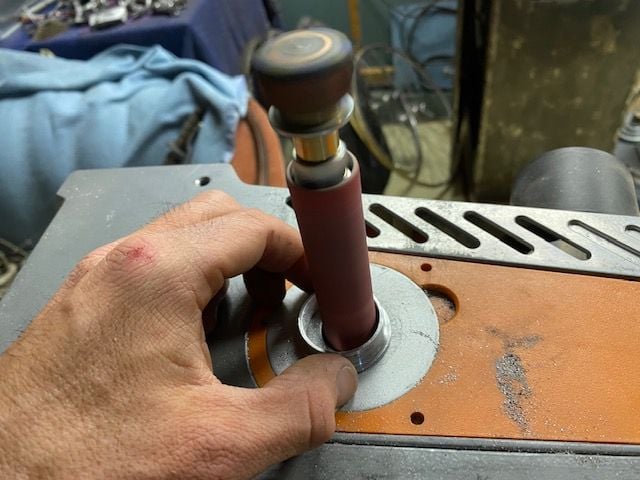
Fortunately, my handy dandy oscillating spindle sander, that was never really meant to turn Huffys into Huffnagos is put into action.
Install crown race - check
Clean headset parts
Install headset adapter cups
Install headset cups
Grease and put it all togther
Feel directionless and apathetic at the mere completion of the next major stage of the build
Now that the fork was sorted, it was time to turn out attention to the next major obstacle - the headset cups.
Now, I'm not dumb (well, yes I am, for building this clown show of a bike) and I remember the major brain damage that the bottom bracket was, simply due to tolerances. So I'm going to make double sure that I'm ON IT w/ the measurements to make this headset install go PERFECT.
Thanks to Macguyver909 , the headset cups go in w/ zero issues -
Next up is cleaning this bad boy -
Now, I would say that I have a bit of a 'normie' view on Campagnolo aka 'What's the big deal?' or 'Wait, it's how much for that old, worn out, rusty, HEAVY steel whatchamawhatever?'
But, the headset is nice. It is very smooth, I was pretty impressed with it. Except the crown race - that thing is a lead weight.
Now come the fun part - headset cups. Whoohoo!
Now, as mentioned previously, we really want to take things slow and make sure that we don't have a repeat failure on the headtube, because that would be, as they say, 'less than ideal'. And there is a lovely seam running down that headtube that I'm sure would just laugh in my face if I split it open. So, let's take some measurements, shall we?
Huh. Hmmm, yeah, about that. Isn't the one, that one, yeah? Supposed to be uh, smaller, and the, the one, the other one, um, supposed to, yeah, know, um, larger?
Oh boy. Now we get to have some fun.
Fortunately, my handy dandy oscillating spindle sander, that was never really meant to turn Huffys into Huffnagos is put into action.
__________________
There were 135 Confentes, but only one...Huffente!
There were 135 Confentes, but only one...Huffente!
Last edited by AdventureManCO; 05-17-23 at 11:31 PM.
Likes For AdventureManCO:
05-17-23, 10:46 PM
#1399
The Huffmeister
Thread Starter
Join Date: Jul 2008
Location: The Le Grande HQ
Posts: 2,741
Bikes: '79 Trek 938, '86 Jim Merz Allez SE, '90 Miyata 1000, '68 PX-10, '80 PXN-10, '73 Super Course, '87 Guerciotti, '83 Trek 600, '80 Huffy Le Grande
Mentioned: 45 Post(s)
Tagged: 0 Thread(s)
Quoted: 1227 Post(s)
Liked 3,561 Times
in
1,412 Posts
Install crown race - check
Clean headset parts - check
Install headset adapter cups - check
Install headset cups
Grease and put it all togther
Feel directionless and apathetic at the mere completion of the next major stage of the build
So, I pull the cups, and realize that I better take things a bit slow so that we don't crack anything else.
__________________
There were 135 Confentes, but only one...Huffente!
There were 135 Confentes, but only one...Huffente!
Last edited by AdventureManCO; 05-17-23 at 11:33 PM.
Likes For AdventureManCO:
05-17-23, 10:55 PM
#1400
The Huffmeister
Thread Starter
Join Date: Jul 2008
Location: The Le Grande HQ
Posts: 2,741
Bikes: '79 Trek 938, '86 Jim Merz Allez SE, '90 Miyata 1000, '68 PX-10, '80 PXN-10, '73 Super Course, '87 Guerciotti, '83 Trek 600, '80 Huffy Le Grande
Mentioned: 45 Post(s)
Tagged: 0 Thread(s)
Quoted: 1227 Post(s)
Liked 3,561 Times
in
1,412 Posts
Install crown race - check
Clean headset parts - check
Install headset adapter cups - check
Pull headset adapter cups back out - check
Install headset cups
Grease and put it all togther
Feel directionless and apathetic at the mere completion of the next major stage of the build
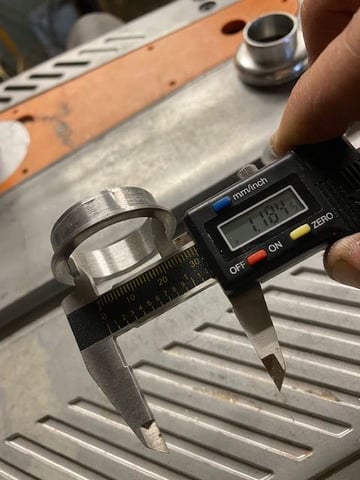
Then I do the same to the lower adapter -

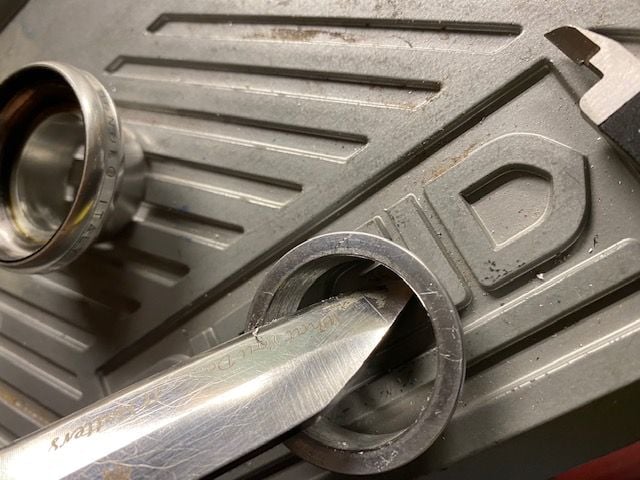
Using my knife to put a small relief chamfer on the ID edge
Worked good
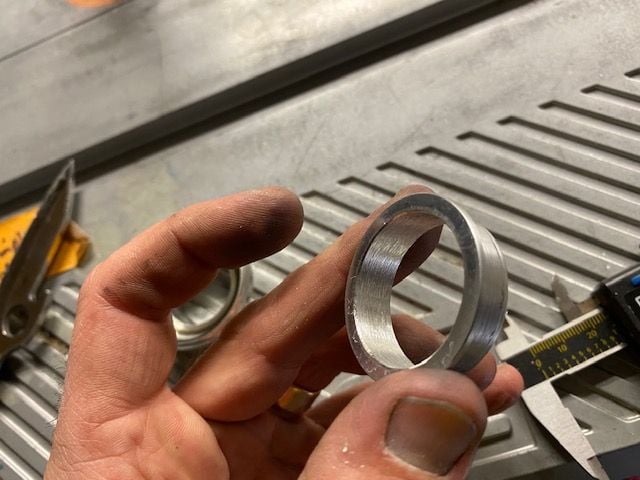
Alright! Got both adapters done, and installed! So let me take one final measurement...
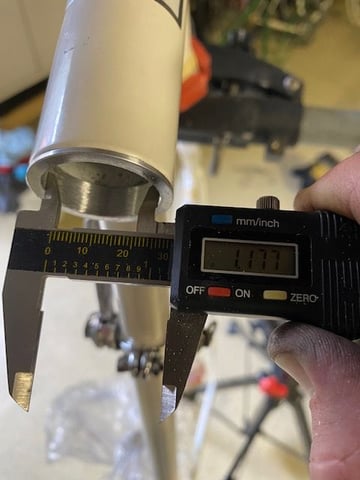
Huh?

Ahhh, one of the many joys of matter. It shrinks if compressed, and also conforms to shape of its surroundings. Let's just say that the Huffy headtube was, 'less than ideally round', or maybe 'perfectly round, only just not quite'.
Clean headset parts - check
Install headset adapter cups - check
Pull headset adapter cups back out - check
Install headset cups
Grease and put it all togther
Feel directionless and apathetic at the mere completion of the next major stage of the build
Then I do the same to the lower adapter -
Using my knife to put a small relief chamfer on the ID edge
Worked good
Alright! Got both adapters done, and installed! So let me take one final measurement...
Huh?
Ahhh, one of the many joys of matter. It shrinks if compressed, and also conforms to shape of its surroundings. Let's just say that the Huffy headtube was, 'less than ideally round', or maybe 'perfectly round, only just not quite'.
__________________
There were 135 Confentes, but only one...Huffente!
There were 135 Confentes, but only one...Huffente!
Last edited by AdventureManCO; 05-18-23 at 12:08 AM.
Likes For AdventureManCO: