


Hints and tricks thread
 02-16-11, 10:32 AM
#301
Cottered Crank

Join Date: Aug 2010
Location: Chicago
Posts: 3,401
Bikes: 1954 Raleigh Sports 1974 Raleigh Competition 1969 Raleigh Twenty 1964 Raleigh LTD-3
Mentioned: 0 Post(s)
Tagged: 0 Thread(s)
Quoted: 8 Post(s)
Likes: 0
Liked 13 Times
in
8 Posts
Or suck it up and put gears on your bike like a grown up.
 02-16-11, 10:41 AM
#302
Member
Join Date: Dec 2009
Posts: 41
Mentioned: 0 Post(s)
Tagged: 0 Thread(s)
Quoted: 0 Post(s)
Likes: 0
Liked 0 Times
in
0 Posts
 02-22-11, 07:57 AM
#305
Senior Member
Join Date: Oct 2008
Location: the original jersey
Posts: 285
Bikes: lowracer, highracer, moving bottom bracket, 2 tall bikesl
Mentioned: 0 Post(s)
Tagged: 0 Thread(s)
Quoted: 1 Post(s)
Likes: 0
Liked 0 Times
in
0 Posts
i use it everywhere, seat stays, forks, helmet, gloves.....
i bought some black tape, which reflects white, dont see it during day, but great at night !
02-22-11, 08:41 AM
#306
Cottered Crank
Join Date: Aug 2010
Location: Chicago
Posts: 3,401
Bikes: 1954 Raleigh Sports 1974 Raleigh Competition 1969 Raleigh Twenty 1964 Raleigh LTD-3
Mentioned: 0 Post(s)
Tagged: 0 Thread(s)
Quoted: 8 Post(s)
Likes: 0
Liked 13 Times
in
8 Posts
i use a red reflective tape, (unknown ), works equally as good as a reflector, i use it on all my bikes, and some 3M white, as you might see on strips on reflective jackets.
i use it everywhere, seat stays, forks, helmet, gloves.....
i bought some black tape, which reflects white, dont see it during day, but great at night !
i use it everywhere, seat stays, forks, helmet, gloves.....
i bought some black tape, which reflects white, dont see it during day, but great at night !
I use the stuff everywhere. I've got it on my Ross which does a pretty good job reflecting light as you can see in this picture.
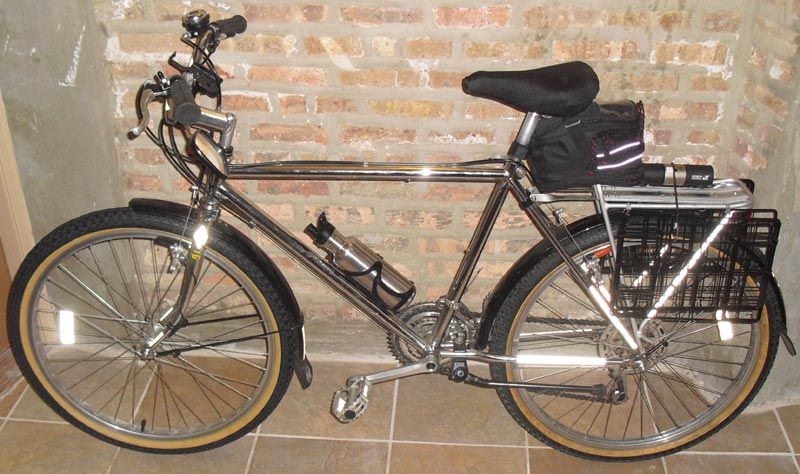
Oh, and j-quix -that's a Sturmey-Archer 3-speed INTERNALLY-geared hub on that '54 Raleigh Sports. Not a fixed or freewheel single-speed...
03-01-11, 06:28 AM
#307
Junior Member
Join Date: Apr 2008
Posts: 8
Mentioned: 0 Post(s)
Tagged: 0 Thread(s)
Quoted: 0 Post(s)
Likes: 0
Liked 0 Times
in
0 Posts
Easy Way to Remove a Stuck, Tight or Seized Cycle Pedal
I've read quite a few posts regarding the removal of a tight pedal. If you have access to a repair stand, this simple method works really well to remove the pedal without bloody fingers, mallets, blow torches or any lubricants.
Turn the bike upside down and lock the crank arm in the repair stand. The pedal and crank arm are now completely immobilized in the vise of the repair stand. Depending on the pedal, use a 15mm wrench or hex wrench (and perhaps a pipe for additional leverage) and even the tightest pedal will come off. Once off, grease up the new pedal and tighten while in the vise.
There is normally enough leverage to remove the other pedal without locking up the other crank arm. See the photo attached.
03-01-11, 03:05 PM
#308

Old fart

Join Date: Nov 2004
Location: Appleton WI
Posts: 24,792
Bikes: Several, mostly not name brands.
Mentioned: 153 Post(s)
Tagged: 0 Thread(s)
Quoted: 3591 Post(s)
Liked 3,401 Times
in
1,935 Posts
I've read quite a few posts regarding the removal of a tight pedal. If you have access to a repair stand, this simple method works really well to remove the pedal without bloody fingers, mallets, blow torches or any lubricants.
Turn the bike upside down and lock the crank arm in the repair stand. The pedal and crank arm are now completely immobilized in the vise of the repair stand. Depending on the pedal, use a 15mm wrench or hex wrench (and perhaps a pipe for additional leverage) and even the tightest pedal will come off. Once off, grease up the new pedal and tighten while in the vise.
There is normally enough leverage to remove the other pedal without locking up the other crank arm. See the photo attached.
03-07-11, 10:03 AM
#309
Senior Member

Join Date: Dec 2009
Location: Houston, TX
Posts: 28,682
Bikes: 1990 Romic Reynolds 531 custom build, Merlin Works CR Ti custom build, super light Workswell 066 custom build
Mentioned: 109 Post(s)
Tagged: 1 Thread(s)
Quoted: 6556 Post(s)
Likes: 0
Liked 58 Times
in
36 Posts
In extreme cases I am sure these techniques would come in very handy. I find most times resorting to a vise type device isn't necessary. In my experience the force generated across one hand is all that is necessary. It is amazing how much force you can exert between you palm and fingers, as much or more than with your arms in many cases. So if you arrange the pedal wrench so that it is about 30 degrees (more or less) to the "tight" side of the crank arm (how many degress depends on how big your hands are) and grasp both the wrench and crank arm in the same hand or even both hands, you can usually squeeze the wrench toward the crank arm and loosen it even in very stuck situations just by "closing" your hand. Easier of course on the non-drive side where the chain rings don't get in the way. But this does work on both sides. Good luck.
03-15-11, 10:29 AM
#310
Senior Member
Join Date: Sep 2010
Location: Northwest Arkansas
Posts: 157
Bikes: Cannondale SR, Cannondale Rush 5, Cannondale Caffeine (gf's), Scott Genius LT, Zullo Special, GT Talera, and some other odds and ends
Mentioned: 0 Post(s)
Tagged: 0 Thread(s)
Quoted: 0 Post(s)
Likes: 0
Liked 0 Times
in
0 Posts
Ever have a seat post stuck in a particularly desirable frame? As such that your afraid to damage the frame? Remove the seat and bracketry from the seat post and turn the bike upside down (I always do this with the bike nearly totally disassembled) and clamp the top of the seat post in a large table mounted vice. Grab the head tube and the chain and seat stays firmly and rotate the bike frame around the seat post. This has never failed for me and I have saved all my old frames from being stuck with a permanent seat post.
Do your clamp style brakes drag or do you have trouble centering the pads? Firstly make sure that your wheel is true with no hops or other damage. Loosen the nut or bolt that holds the brake to the frame enough that the pivot point can rotate in the frame. Tightly apply the brakes and then tighten the mounting nut or bolt. Release and your brake should be perfectly centered in relation to the wheel. It may take a few tries.
After that apply the brake and one at a time, loosen the pad, align it to the wheel and tighten it. Check your cables for the proper tension and your brakes should work like never before.
Something that always helps me, whenever installing new cables or resetting derailleurs or brakes, I always set the adjustment barrels to mid travel. It makes for the quickest way to adjust components negatively or positively.
If you have bought a new set of wheels or had a new set built you should have the spokes checked after the first several rides. Keeping the wheel trued while the spokes and spokes ends stretch and settle will keep the rim itself in great shape and allow it to last longer. It also makes it stronger. I check my wheels often, to the tune of once or twice every two weeks. I follow this little trick and after my wheels are settled in they stay straight usually for the whole season or longer, which is saying something for how rough the roads are here.
03-15-11, 08:11 PM
#311
Senior Member
Join Date: Feb 2011
Location: St. Cloud, MN
Posts: 592
Bikes: Soma Double Cross DC, Salsa Vaya, Redline D440, '87 Schwinn Super Sport
Mentioned: 0 Post(s)
Tagged: 0 Thread(s)
Quoted: 0 Post(s)
Likes: 0
Liked 0 Times
in
0 Posts
Fenders on disc equipped bike
I never liked the bugared up look of bending fender stays around the caliper and I don't have mid blade mounts. I mounted the right side normally and the left side I put a small L bracket (corner brace from the hardware store) on the bottom disc mount then bolted the fender stay to that. It looks great and I feel damn smart
04-08-11, 04:18 PM
#312
Buddy

Join Date: Aug 2007
Location: Toronto
Posts: 684
Bikes: 80s Gardin. Green fixed-gear. POS mountain bike.
Mentioned: 0 Post(s)
Tagged: 0 Thread(s)
Quoted: 5 Post(s)
Likes: 0
Liked 0 Times
in
0 Posts
When you're stopping by after work to pick up a greasy part someone is selling on craigslist, bring a garbage bag to put it is so you don't ruin one of your two good pairs of work pants while you're absent-mindedly riding the subway home.
04-23-11, 05:00 AM
#313
Vegan on a bicycle

if an adjustment will "only take a minute" don't do it on your way somewhere, unless it really needs to be done immediately.
04-25-11, 10:23 PM
#314
Newbie
Join Date: Apr 2011
Posts: 1
Mentioned: 0 Post(s)
Tagged: 0 Thread(s)
Quoted: 0 Post(s)
Likes: 0
Liked 0 Times
in
0 Posts
I just joined the forum having had real problem replacing a broken shifter cable on a Shimano Tiagra shifter. After following the post in this forum, cant find it now, I realise there are others who had same problem. My solution was grab the little bit at the broken end if it can be teased out the w top of the shifter, apply pressure and keep upshifting as if going for smallest cog. Sounds simpler than it is but anyway resist the temptation to pusth the big downshift lever (on my bike anyway) and persevere. Eventually the little knob will appear and the new cable can be fed stright in. For all I know everyone knows this but hope it helps someone out of a jam.
05-28-11, 01:54 AM
#315
Vegan on a bicycle
if a headlight or taillight is too tight when sliding on/off the mounting bracket, rub a wax candle on the exposed surfaces. it doesn't take much.
i just did this with a blaze-2W headlight that refused to go on or off the bracket without twisting the bracket on the handlebars... and it was hard to tell when it was locked into the bracket... now it's super-smooth on and off, and gives nice tactile feedback when it locks in place.
i just did this with a blaze-2W headlight that refused to go on or off the bracket without twisting the bracket on the handlebars... and it was hard to tell when it was locked into the bracket... now it's super-smooth on and off, and gives nice tactile feedback when it locks in place.
06-02-11, 07:47 AM
#316
Senior Member
Join Date: Apr 2011
Location: Coastal Maine
Posts: 130
Bikes: 1936 Raleigh Golden Arrow; Kona Honzo
Mentioned: 0 Post(s)
Tagged: 0 Thread(s)
Quoted: 0 Post(s)
Likes: 0
Liked 0 Times
in
0 Posts
I've read quite a few posts regarding the removal of a tight pedal. If you have access to a repair stand, this simple method works really well to remove the pedal without bloody fingers, mallets, blow torches or any lubricants.
Turn the bike upside down and lock the crank arm in the repair stand. The pedal and crank arm are now completely immobilized in the vise of the repair stand. Depending on the pedal, use a 15mm wrench or hex wrench (and perhaps a pipe for additional leverage) and even the tightest pedal will come off. Once off, grease up the new pedal and tighten while in the vise.
There is normally enough leverage to remove the other pedal without locking up the other crank arm. See the photo attached.
Turn the bike upside down and lock the crank arm in the repair stand. The pedal and crank arm are now completely immobilized in the vise of the repair stand. Depending on the pedal, use a 15mm wrench or hex wrench (and perhaps a pipe for additional leverage) and even the tightest pedal will come off. Once off, grease up the new pedal and tighten while in the vise.
There is normally enough leverage to remove the other pedal without locking up the other crank arm. See the photo attached.
YES!!! This works. Thank you very much, I put a two foot pipe on my pedal wrench and the pedal came out, along with about half the threads! (no fault of the technique) Excellent technique! Grease your threads folks!!!
Cheers, Carl
06-02-11, 09:17 AM
#317
Lover of Old Chrome Moly

Join Date: May 2011
Location: NW Minnesota
Posts: 2,949
Mentioned: 3 Post(s)
Tagged: 0 Thread(s)
Quoted: 143 Post(s)
Likes: 0
Liked 23 Times
in
17 Posts
Shake n Bake your inner tubes. Well, OK, don't bake them but put them in a gallon ziplock bag with a small amount of talc, seal the bag and give it a good shake in several directions. Carefully pull the tube out of the bag tapping the excess talc back into the bag as you go. Viola, a perfectly powdered tube ready for installation with no mess, no dust in the air, on the floor, or on you. Wastes a lot less talc than trying to powder the tube by hand and you can save the talc in the bag for another tube.
06-02-11, 02:39 PM
#318
Cottered Crank
Join Date: Aug 2010
Location: Chicago
Posts: 3,401
Bikes: 1954 Raleigh Sports 1974 Raleigh Competition 1969 Raleigh Twenty 1964 Raleigh LTD-3
Mentioned: 0 Post(s)
Tagged: 0 Thread(s)
Quoted: 8 Post(s)
Likes: 0
Liked 13 Times
in
8 Posts
Shake n Bake your inner tubes. Well, OK, don't bake them but put them in a gallon ziplock bag with a small amount of talc, seal the bag and give it a good shake in several directions. Carefully pull the tube out of the bag tapping the excess talc back into the bag as you go. Viola, a perfectly powdered tube ready for installation with no mess, no dust in the air, on the floor, or on you. Wastes a lot less talc than trying to powder the tube by hand and you can save the talc in the bag for another tube.
06-02-11, 10:43 PM
#319
Senior Member

Join Date: Sep 2006
Location: Napa Valley, CA
Posts: 908
Bikes: Wife says I have too many :-)
Mentioned: 2 Post(s)
Tagged: 0 Thread(s)
Quoted: 327 Post(s)
Liked 250 Times
in
158 Posts
Shake to the right shake to the left..
This is a great tip. I always looked like the Pillsbury Doughboy after talcing my
tubes. I find it works the best when I dance the Hokey Pokey when
shaking the bag. :-)
tubes. I find it works the best when I dance the Hokey Pokey when
shaking the bag. :-)
06-03-11, 03:58 AM
#320
Vegan on a bicycle
i've never powdered my tubes, and i don't get what the big deal is. according to some, a layer of talc between the tube and tire will help air escape if the tube is punctured... it could turn a slow leak into a fast leak. a few months ago a tiny shard of glass worked through my marathon/kevlar front tire, and i was able to make it home after pumping up the tire before i got on the bike, and pumping again about halfway home. if that was a fast leak, i would have torn up a second tube on the way home because the glass was well hidden in the tire.
06-03-11, 06:03 AM
#321
Lover of Old Chrome Moly
Join Date: May 2011
Location: NW Minnesota
Posts: 2,949
Mentioned: 3 Post(s)
Tagged: 0 Thread(s)
Quoted: 143 Post(s)
Likes: 0
Liked 23 Times
in
17 Posts
I've installed tubes both with and without talc. While I very much doubt that talcing the tube will make a significant difference in air leaks, it does decrease friction when installing the tube allowing easier positioning and IMHO reducing the chance of a pinch. If I don't have talc handy, I have no problem with putting on a tube without it.
06-03-11, 07:42 AM
#322
aka Tom Reingold

Join Date: Jan 2009
Location: New York, NY, and High Falls, NY, USA
Posts: 40,508
Bikes: 1962 Rudge Sports, 1971 Raleigh Super Course, 1971 Raleigh Pro Track, 1974 Raleigh International, 1975 Viscount Fixie, 1982 McLean, 1996 Lemond (Ti), 2002 Burley Zydeco tandem
Mentioned: 511 Post(s)
Tagged: 0 Thread(s)
Quoted: 7353 Post(s)
Liked 2,480 Times
in
1,439 Posts
My understanding is that talc us an urban myth. It's a benign byproduct of the manufacturing, and at some point, cyclists thought that it's an improvement. I've never used it. Would I have fewer pinches if I used it? Well, that would be hard to measure, wouldn't it? I'd need to sample a whole lot of tube changes, with and without talc, and take a tally. In theory, if I know what I'm doing, I would never pinch a tube while installing it.
__________________
Tom Reingold, tom@noglider.com
New York City and High Falls, NY
Blogs: The Experienced Cyclist; noglider's ride blog
�When man invented the bicycle he reached the peak of his attainments.� � Elizabeth West, US author
Please email me rather than PM'ing me. Thanks.
Tom Reingold, tom@noglider.com
New York City and High Falls, NY
Blogs: The Experienced Cyclist; noglider's ride blog
�When man invented the bicycle he reached the peak of his attainments.� � Elizabeth West, US author
Please email me rather than PM'ing me. Thanks.
06-04-11, 08:22 PM
#323
Senior Member
Join Date: Sep 2006
Location: Napa Valley, CA
Posts: 908
Bikes: Wife says I have too many :-)
Mentioned: 2 Post(s)
Tagged: 0 Thread(s)
Quoted: 327 Post(s)
Liked 250 Times
in
158 Posts
So your understanding is based upon never using talc. :-)
Maybe you should take note of those that have used it and realized its benefits,
or better yet try it !
frogman
Maybe you should take note of those that have used it and realized its benefits,
or better yet try it !
frogman
06-04-11, 08:53 PM
#324
aka Tom Reingold
Join Date: Jan 2009
Location: New York, NY, and High Falls, NY, USA
Posts: 40,508
Bikes: 1962 Rudge Sports, 1971 Raleigh Super Course, 1971 Raleigh Pro Track, 1974 Raleigh International, 1975 Viscount Fixie, 1982 McLean, 1996 Lemond (Ti), 2002 Burley Zydeco tandem
Mentioned: 511 Post(s)
Tagged: 0 Thread(s)
Quoted: 7353 Post(s)
Liked 2,480 Times
in
1,439 Posts
How do you suggest I try it? I could put it in my tires, but what change should I look for?
__________________
Tom Reingold, tom@noglider.com
New York City and High Falls, NY
Blogs: The Experienced Cyclist; noglider's ride blog
�When man invented the bicycle he reached the peak of his attainments.� � Elizabeth West, US author
Please email me rather than PM'ing me. Thanks.
Tom Reingold, tom@noglider.com
New York City and High Falls, NY
Blogs: The Experienced Cyclist; noglider's ride blog
�When man invented the bicycle he reached the peak of his attainments.� � Elizabeth West, US author
Please email me rather than PM'ing me. Thanks.
06-04-11, 11:48 PM
#325
Senior Member
Join Date: Sep 2006
Location: Napa Valley, CA
Posts: 908
Bikes: Wife says I have too many :-)
Mentioned: 2 Post(s)
Tagged: 0 Thread(s)
Quoted: 327 Post(s)
Liked 250 Times
in
158 Posts
Consider it as a lubrication for tubes. The tube installs easier because of the reduced friction from the tube sliding inside the tire. It minimizes folds and pinches as the tube is inflated and subsequent flats later. I find I can usually install a tire/tube easier, faster, and without tools when using talc. The final part of the tube install by rolling the last section of tire bead over the edge of the rim is not possible by my 67 year old hands without the aid of "tube lube" :-)
I have worked as a wrench at three bike shops and it was standard practice to use "tube lube". Back in the day as a diver in the Navy we used cornstarch before sliding in our wetsuits, just like installing a tube, make sure everything is dry and apply the powder.
I was reading my previous post and thought it sounded a little sarcastic Tom, didn't mean it to be...........
I just finished building two new wheels and am anxious to complete and try out my latest bike build up. (If it quits raining) (I thought June was the start of summer :-)