Freehub not Engaging under load. no Drive.
 04-14-24, 12:45 PM
#1
Senior Member
Thread Starter
Join Date: May 2008
Location: Toronto, Canada
Posts: 909
Bikes: (shortlist) Cyclops, Marinoni, Mariposa, Air Firday, Pocket Rocket Pro, NWT, SLX Fuso, Claude Pottie (France) x3, Masi Team 3v, Lemond Zurich, Bianchi OS
Mentioned: 2 Post(s)
Tagged: 0 Thread(s)
Quoted: 176 Post(s)
Liked 37 Times
in
30 Posts
Freehub not Engaging under load. no Drive.
my GoTo local bike diagnostician is closed today so I am going to toss another problem up here I'm afraid.
I am rehabbing a cheap 8S City bike that has been left out in the elements it seems.
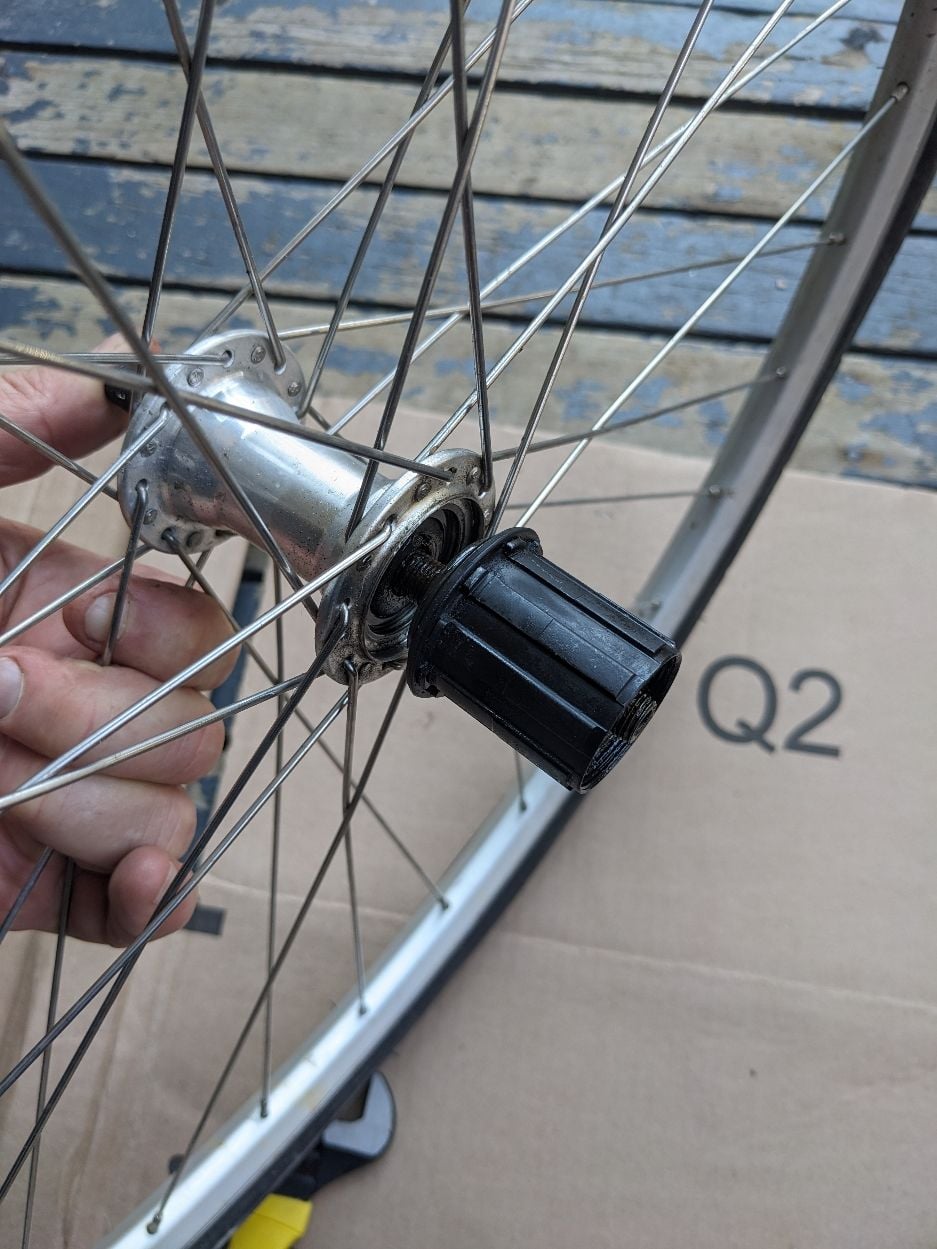
the wheels are cheap but decent and clean BUT the rear Freehub is not engaging under load
the pawls click nicely when freewheeling but it just slips when under load.
I have soaked and lubed the FH body as best I could.
what could be going on here? (I am not even sure now that I think about it where the "Grab" comes from when a FH is under load.)
is this just a Toss and Replace situation?
peter
I am rehabbing a cheap 8S City bike that has been left out in the elements it seems.
the wheels are cheap but decent and clean BUT the rear Freehub is not engaging under load
the pawls click nicely when freewheeling but it just slips when under load.
I have soaked and lubed the FH body as best I could.
what could be going on here? (I am not even sure now that I think about it where the "Grab" comes from when a FH is under load.)
is this just a Toss and Replace situation?
peter
 04-14-24, 12:52 PM
#2
Senior Member
Join Date: Jun 2002
Location: Montreal, Quebec
Posts: 5,993
Mentioned: 16 Post(s)
Tagged: 0 Thread(s)
Quoted: 1848 Post(s)
Liked 1,723 Times
in
997 Posts
Looks to me as if the free hub threads into the hub shell. If those threads are stripped, the hub is toast
Last edited by alcjphil; 04-14-24 at 05:16 PM.
Likes For alcjphil:
04-14-24, 02:21 PM
#3
Senior Member
Thread Starter
Join Date: May 2008
Location: Toronto, Canada
Posts: 909
Bikes: (shortlist) Cyclops, Marinoni, Mariposa, Air Firday, Pocket Rocket Pro, NWT, SLX Fuso, Claude Pottie (France) x3, Masi Team 3v, Lemond Zurich, Bianchi OS
Mentioned: 2 Post(s)
Tagged: 0 Thread(s)
Quoted: 176 Post(s)
Liked 37 Times
in
30 Posts
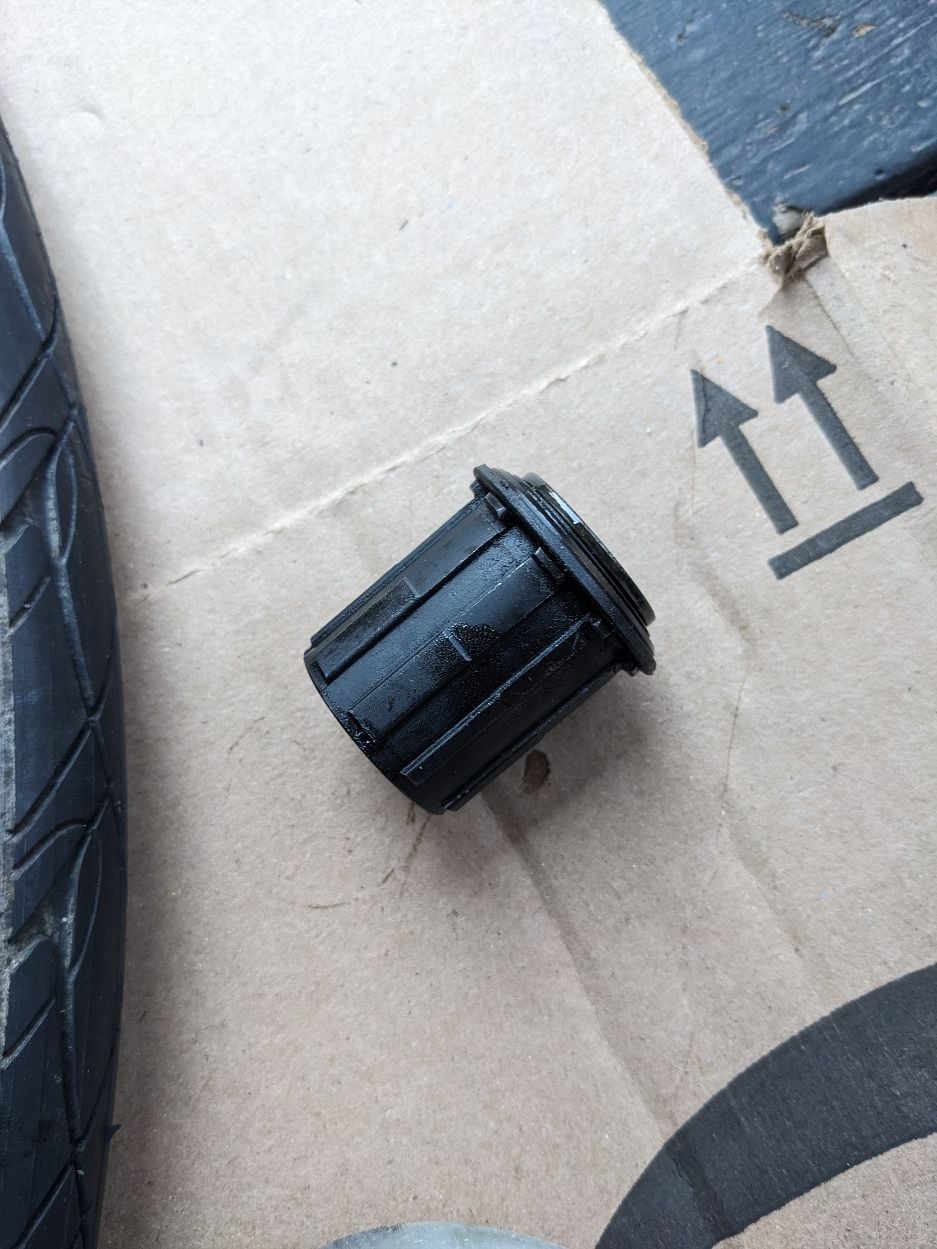
yes. on closer inspection (with some local expert eyes) I'm told the part of the FH that attaches to the hub has snapped off. hence the no Grab.
sorry to bother you all.
sorry to bother you all.
Likes For pstock:
04-14-24, 04:02 PM
#5

Senior Member
Join Date: Feb 2012
Location: Rochester, NY
Posts: 18,153
Bikes: Stewart S&S coupled sport tourer, Stewart Sunday light, Stewart Commuting, Stewart Touring, Co Motion Tandem, Stewart 3-Spd, Stewart Track, Fuji Finest, Mongoose Tomac ATB, GT Bravado ATB, JCP Folder, Stewart 650B ATB
Mentioned: 0 Post(s)
Tagged: 0 Thread(s)
Quoted: 4235 Post(s)
Liked 3,957 Times
in
2,356 Posts
The two usual methods to secure loose balled (as in no cartridge bearings) FHB to the hub shell is with a hollow bolt that is removed from the LH hub side or having a FHB with s threaded stud (again hollow for the axle to pass through). If the later and that stub broke off it should be easy to view the raw fracture face on both, the still in the shell stud and the FHB back side.
Now finding a replacement will be the challenge. Were this mine I might call it a day, save the axle parts and tossed the rest then find a replacement wheel. Or find a used hub and relace that into the current rim. Andy
I forgot to add that I'd love to see how the Al shell and steel body get welded together
__________________
AndrewRStewart
AndrewRStewart
04-14-24, 04:39 PM
#6
Senior Member

Join Date: Feb 2022
Location: GMT-5
Posts: 972
Mentioned: 1 Post(s)
Tagged: 0 Thread(s)
Quoted: 568 Post(s)
Liked 424 Times
in
280 Posts
Pull the axle and bearings out, plenty of room from the inside.
You can even grind slits into the hub just to access the contact points from the outside.
Like doing a dental amalgam that's in-between the teeth. You gotta drill top-down good enamel to get to the cavity.
You can even grind slits into the hub just to access the contact points from the outside.
Like doing a dental amalgam that's in-between the teeth. You gotta drill top-down good enamel to get to the cavity.
04-14-24, 06:03 PM
#7
Senior Member
Join Date: Apr 2009
Location: New Rochelle, NY
Posts: 38,998
Bikes: too many bikes from 1967 10s (5x2)Frejus to a Sumitomo Ti/Chorus aluminum 10s (10x2), plus one non-susp mtn bike I use as my commuter
Mentioned: 141 Post(s)
Tagged: 1 Thread(s)
Quoted: 5931 Post(s)
Liked 2,825 Times
in
1,579 Posts
I define 2 classes of freehub body
The Shimano type affixed to the hub. the clutch entirely within, and those like Campy, with the clutch between the body and hub shell.
I consider the Shimano style as unserviceable other than the soak and pray method. Those with clutches between body and shell are different and sometimes can be serviced with replacement springs or other parts.
04-15-24, 11:14 PM
#9
Senior Member
Sounds like the fixing bolt that holds the freehub to the hub may have loosened, causing bending loads. But could have just failed due to bending loads without loosening. If you can remove the part on the hub side (should be a close slip fit, not press fit), you should be able to simply replace the freehub, 8s shimano style (and widely available generic) are pretty cheap. Key is to make sure you get the exact correct style of freehub body, the interface with hub varies.
 04-16-24, 12:03 AM
#10
Really Old Senior Member

 04-16-24, 12:36 AM
#11
Senior Member
04-16-24, 04:46 AM
#13
Senior Member
Join Date: Apr 2009
Location: New Rochelle, NY
Posts: 38,998
Bikes: too many bikes from 1967 10s (5x2)Frejus to a Sumitomo Ti/Chorus aluminum 10s (10x2), plus one non-susp mtn bike I use as my commuter
Mentioned: 141 Post(s)
Tagged: 1 Thread(s)
Quoted: 5931 Post(s)
Liked 2,825 Times
in
1,579 Posts
Note: a decent amount of torque will be needed, so the EZ out goes into a vise, and you turn the wheel.
04-16-24, 05:47 AM
#14
Senior Member
Thread Starter
Join Date: May 2008
Location: Toronto, Canada
Posts: 909
Bikes: (shortlist) Cyclops, Marinoni, Mariposa, Air Firday, Pocket Rocket Pro, NWT, SLX Fuso, Claude Pottie (France) x3, Masi Team 3v, Lemond Zurich, Bianchi OS
Mentioned: 2 Post(s)
Tagged: 0 Thread(s)
Quoted: 176 Post(s)
Liked 37 Times
in
30 Posts
Yes, while all the instructions I read called for a 10mm it took a 12mm inserted from the NDS to extract the threaded stump (I expect this is a non-standard FH to need 12mm)
But At my local DIY Bike Repair Coop I went through their bin of about 30 salvaged FHs and while there were two which looked to be about the same design as my busted one (similar diameter and threaded stud) neither would thread into this hub.
Both when about 1x turn and then jammed, as if the thread pitch was different.
I have no idea where I would find a compatible replacement.
maybe I can replace the entire hub and rebuild the wheel? (I have been wanting to try my hand at wheel building)
04-16-24, 06:12 AM
#15
Senior Member
Since the rest of the wheel looks clean you could probably replace the hub and rebuild it in place, meaning you transfer the spokes from one hub to the other and follow the pattern, one spoke at a time. It would require a hub with the same spoke hole spacing to do this. Once all the spokes are transferred you tension it as you would with any other wheel. I did this once when I first built a rear wheel on the original 7sp hub, but then decided I really wanted a 10sp hub so I could run all 10 cogs. It went from one LX hub to the newer LX hub and they hadn't changed the spoke hole spacing. I had only used it a few times with the 7sp hub, the rim and spokes were otherwise new. It ran as a 9 of 10 cog cassette that way as only 9 cogs would fit although it was otherwise 10sp. This was almost 10 years ago and I still ride that wheel and it has never needed a retruing.
04-16-24, 08:32 PM
#16
Senior Member
Thank you.
Yes, while all the instructions I read called for a 10mm it took a 12mm inserted from the NDS to extract the threaded stump (I expect this is a non-standard FH to need 12mm)
But At my local DIY Bike Repair Coop I went through their bin of about 30 salvaged FHs and while there were two which looked to be about the same design as my busted one (similar diameter and threaded stud) neither would thread into this hub.
Both when about 1x turn and then jammed, as if the thread pitch was different.
I have no idea where I would find a compatible replacement.
maybe I can replace the entire hub and rebuild the wheel? (I have been wanting to try my hand at wheel building)
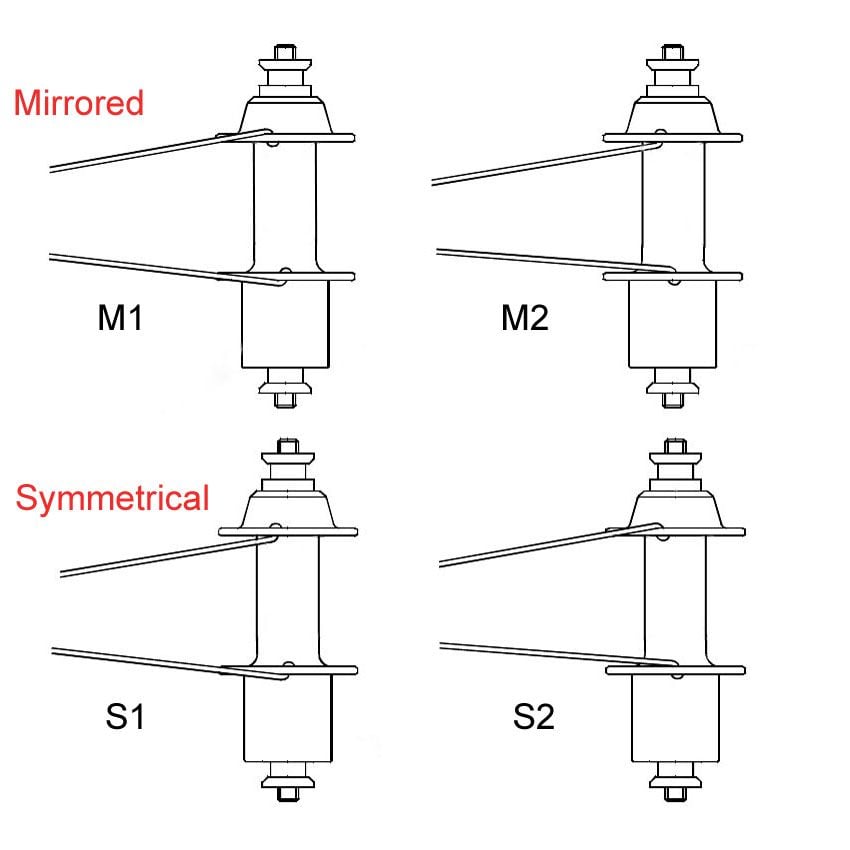
A suggestion is to change the head-in, head-out position from what you currently have on this wheel. See the diagram below. Your wheel has a symmetrical pattern (S1). Going to a mirrored pattern will make lacing easier. The directions on Sheldon's page will give you a M2 pattern, head-out for trailing (drive pulling) spokes. Sheldon's writeup discusses the head orientation towards the end. All patterns seems to work well for non-disk brake wheels, (subject to some controversy).