


Where on a Dura Ace 7800 (or 7803) front shifter is the downshift paddle internals?
 05-13-24, 06:00 AM
#1
Senior Member
Thread Starter
Join Date: Oct 2005
Location: SW Ohio
Posts: 3,696
Bikes: Puch Marco Polo, Saint Tropez, Masi Gran Criterium
Mentioned: 25 Post(s)
Tagged: 0 Thread(s)
Quoted: 1172 Post(s)
Liked 449 Times
in
321 Posts
Where on a Dura Ace 7800 (or 7803) front shifter is the downshift paddle internals?
On the underside mostly? You see on 2 different set-ups with used Dura Ace 10 speed 7800/7803 series brifters I have gummed up downshifting (dropping down to smaller chainrings).
This is on my 2x10 bike where I have sprayed PB Blaster liberally into the orifices and shifting up and down multiple times then following up with synthetic sewing machine oil. The upshifts are perfect and the downshifts get better while flooded with the PB Blaster and the oil, but then the original condition recurs. That condition is one where when you engage the downshift paddle, it might miss or fail to do anything at first. Then it will start to engage and once it engages the down shift will be a hard one with a hard feeling like the internal pawls are having to overcome a hardened buildup on some internal clutch or pawl (that I am unable to visualize since I am not disassembling anything other than removing the hood).
I have the same symptom on a clean looking triple 7803 brifter. Same symptom: down shifting from a bigger chainring (53 to 39, or 39 to 30) is the same story: gets “normal” when flooded with PB Blaster followed with oil, but later in short order is back to where you get no take up despite sweeping the paddle 3 or 5 times then it will work so you’re not stuck being unable to shift but certainly not inspiring confidence. With these brifters now being obsolete and thus “vintage” I realize that time is not on my side here.
if I knew better where to target my efforts to locate these specific downshift internals maybe I could do a focused rebuild on whatever the problem spot is or maybe use extra compressed air gun, PB Blaster and somehow get a little brass gun brush in there - that is, if I just knew the exact spot to scratch… please share your insight, thanks!
 05-13-24, 09:18 AM
#2

Senior Member
Join Date: Feb 2012
Location: Rochester, NY
Posts: 18,156
Bikes: Stewart S&S coupled sport tourer, Stewart Sunday light, Stewart Commuting, Stewart Touring, Co Motion Tandem, Stewart 3-Spd, Stewart Track, Fuji Finest, Mongoose Tomac ATB, GT Bravado ATB, JCP Folder, Stewart 650B ATB
Mentioned: 0 Post(s)
Tagged: 0 Thread(s)
Quoted: 4235 Post(s)
Liked 3,957 Times
in
2,356 Posts
Perhaps it is time for a real solvent soak and air blast. I usually remove the shift pod/blades unis from the body and soak it in a true solvent for a while, then cycle through the shifter's range and resoak in different index positions. Drain and blast out best possible in all the various cracks and gaps about the unit. I relube in two or three steps starting with a thin oil, then a medium weight oil and follow up with a thick (Phil Wood) oil. I'll air blast and cycle through the range multiple times for each application with the last being a second thick oil dripping in and let that sit on a paper towel for a while to drain off the un needed. When reassembling I'll lube the tiny set screw that traps the shift pod/blades unit pivot shaft in place. I also use a foot ball inflation needle slid over the pivot's spring to more easily keep that aligned while replacing the pod/blade unit and lining up the pivot's holes.
There are a few internal breakages that are not repairable or serviceable. But doing the best level cleaning and relubing is so easy that it is worth trying out. Andy
There are a few internal breakages that are not repairable or serviceable. But doing the best level cleaning and relubing is so easy that it is worth trying out. Andy
__________________
AndrewRStewart
AndrewRStewart
Likes For Andrew R Stewart:
05-13-24, 12:59 PM
#3
Senior Member
As mentioned above, a complete soak is probably the better option. But, if you don't want to go that route, spraying in a specific area may help.
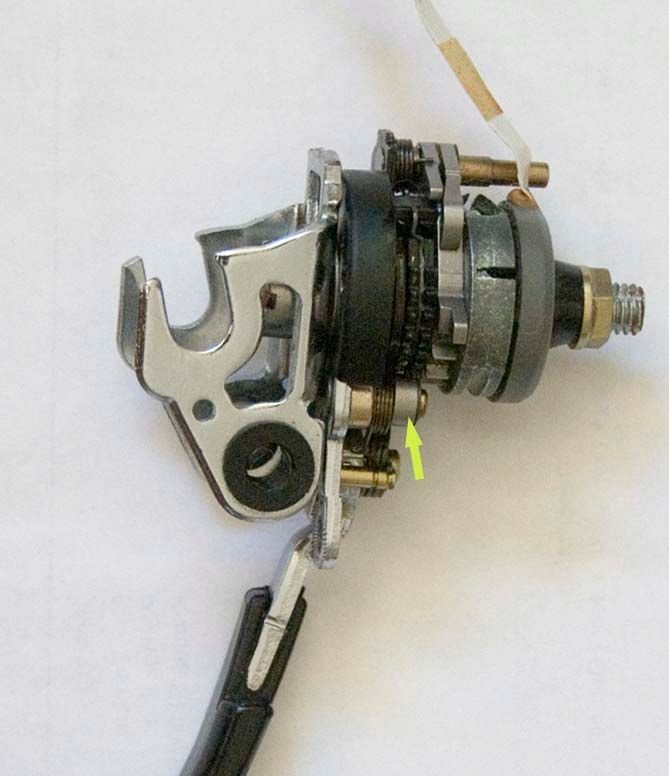
Below is a picture of the mechanism of a ST-6510 or 5510. This is 9 speed right brifter but the left has pawls in a similar location. The ST-7800 seem to have the same type of shift mechanism, (which is quite different from the ST-7700.
In the picture, the pawls that are released by the B (small) lever are the ones on the top. The pawl on the bottom, (yellow arrow) is activated with the A (brake) lever.
So, to target the pawls released by the B lever, you could try going through the cable installation hole or the cable exit hole, (where the shift cable housing ends). As you can see the upper pawls is rearwards of the cable take-spool.
The ST-7803 is probably similar, possibly with different pawls and ratchet wheel.

Likes For KCT1986:
