


KMC master link - is it me or is it KMC
 06-26-21, 06:12 PM
#1

Crawlin' up, flyin' down
Thread Starter

Join Date: Jan 2006
Location: Democratic Peoples' Republic of Berkeley
Posts: 5,658
Bikes: 1967 Paramount; 1982-ish Ron Cooper; 1978 Eisentraut "A"; two mid-1960s Cinelli Speciale Corsas; and others in various stages of non-rideability.
Mentioned: 40 Post(s)
Tagged: 0 Thread(s)
Quoted: 1027 Post(s)
Liked 2,531 Times
in
1,059 Posts
KMC master link - is it me or is it KMC
I am installing a new KMC 10sp chain, replacing an old KMC 10sp chain. The new master link simply will not click into place. It slides right into place off the chain, but resists all attempts to get it to do so on the chain. It's as if either the plates a critical fraction of a millimeter too thick or the pins are a critical fraction of a millimeter too short. I've tried everything I can think of and am at my wit's end (admittedly not a long journey).
Anyone else have this same issue? Better yet, anyone have a solution?
Thanks.
Anyone else have this same issue? Better yet, anyone have a solution?
Thanks.
__________________
"I'm in shape -- round is a shape." Andy Rooney
"I'm in shape -- round is a shape." Andy Rooney

Likes For trailangel:
06-26-21, 06:23 PM
#3
Senior Member
Join Date: Jan 2009
Location: San Diego, CA
Posts: 3,676
Mentioned: 10 Post(s)
Tagged: 0 Thread(s)
Quoted: 839 Post(s)
Liked 1,064 Times
in
747 Posts
First it should say "10S" on the quicklink. (not sure if that applies to all KMC 10speed QL's but the ones I've seen do) If you have the old link compare the widths and if you have the old link you can certainly use that on the new chain until you get a replacement. If you have some calipers try measuring the pin and assembled width of the link. Could just be a dud link which KMC would probably replace for free.
Likes For Crankycrank:
06-26-21, 07:11 PM
#4
Crawlin' up, flyin' down
Thread Starter
Join Date: Jan 2006
Location: Democratic Peoples' Republic of Berkeley
Posts: 5,658
Bikes: 1967 Paramount; 1982-ish Ron Cooper; 1978 Eisentraut "A"; two mid-1960s Cinelli Speciale Corsas; and others in various stages of non-rideability.
Mentioned: 40 Post(s)
Tagged: 0 Thread(s)
Quoted: 1027 Post(s)
Liked 2,531 Times
in
1,059 Posts
Likes For bikingshearer:
06-26-21, 07:18 PM
#5
Crawlin' up, flyin' down
Thread Starter
Join Date: Jan 2006
Location: Democratic Peoples' Republic of Berkeley
Posts: 5,658
Bikes: 1967 Paramount; 1982-ish Ron Cooper; 1978 Eisentraut "A"; two mid-1960s Cinelli Speciale Corsas; and others in various stages of non-rideability.
Mentioned: 40 Post(s)
Tagged: 0 Thread(s)
Quoted: 1027 Post(s)
Liked 2,531 Times
in
1,059 Posts
First it should say "10S" on the quicklink. (not sure if that applies to all KMC 10speed QL's but the ones I've seen do) If you have the old link compare the widths and if you have the old link you can certainly use that on the new chain until you get a replacement. If you have some calipers try measuring the pin and assembled width of the link. Could just be a dud link which KMC would probably replace for free.
And yes, the link says �10s� on it It better have, as it is what came in the sealed package with the chain.
")
It seems like KMC master links have gotten harder and harder to install over the years. The last few have been harder than I remember them being, but even the harder to install ones weren�t impossible like this one was, at least until I went cave man on it.
__________________
"I'm in shape -- round is a shape." Andy Rooney
"I'm in shape -- round is a shape." Andy Rooney
06-26-21, 07:22 PM
#6
Senior Member

Join Date: Feb 2017
Location: Northern Shenandoah Valley
Posts: 4,141
Bikes: More bikes than riders
Mentioned: 36 Post(s)
Tagged: 0 Thread(s)
Quoted: 1446 Post(s)
Liked 762 Times
in
570 Posts
I usually have a pretty easy time with them, but I had a newer KMC 9-speed master link that was difficult to use. I finally broke down and bought the pliers from my LBS and couldn't help but smile at how easy the job was with those pliers. It's one of those deals where the right tool for the job is relatively inexpensive and simple, and yet I've resisted buying it for years. It's a great addition to the tool box.
Likes For hokiefyd:
06-26-21, 07:35 PM
#8
Expired Member

Join Date: Jun 2007
Location: TN
Posts: 11,547
Mentioned: 37 Post(s)
Tagged: 0 Thread(s)
Quoted: 3674 Post(s)
Liked 5,441 Times
in
2,764 Posts
I too have found the 10 and 11 speed links more difficult to install. I use the tool at home but it's good to know some other solutions if on the road repair is needed.
06-26-21, 08:09 PM
#9
Senior Member
Join Date: Jan 2013
Posts: 2,682
Bikes: too many sparkly Italians, some sweet Americans and a couple interesting Japanese
Mentioned: 10 Post(s)
Tagged: 0 Thread(s)
Quoted: 569 Post(s)
Liked 587 Times
in
411 Posts
You might get a caliper out and measure, I always check a new package. Last ones were 11 speed, the KMC reuseable were all 5.709 to 5.711mm , the non-reuseable was all over 5.8+mm so pretty universal but SRAM varied from 5.609 to 5.630mm so might not be usable on some chains.
06-26-21, 09:39 PM
#10
Crawlin' up, flyin' down
Thread Starter
Join Date: Jan 2006
Location: Democratic Peoples' Republic of Berkeley
Posts: 5,658
Bikes: 1967 Paramount; 1982-ish Ron Cooper; 1978 Eisentraut "A"; two mid-1960s Cinelli Speciale Corsas; and others in various stages of non-rideability.
Mentioned: 40 Post(s)
Tagged: 0 Thread(s)
Quoted: 1027 Post(s)
Liked 2,531 Times
in
1,059 Posts
I usually have a pretty easy time with them, but I had a newer KMC 9-speed master link that was difficult to use. I finally broke down and bought the pliers from my LBS and couldn't help but smile at how easy the job was with those pliers. It's one of those deals where the right tool for the job is relatively inexpensive and simple, and yet I've resisted buying it for years. It's a great addition to the tool box.
__________________
"I'm in shape -- round is a shape." Andy Rooney
"I'm in shape -- round is a shape." Andy Rooney
06-27-21, 05:13 AM
#11
Expired Member
Join Date: Jun 2007
Location: TN
Posts: 11,547
Mentioned: 37 Post(s)
Tagged: 0 Thread(s)
Quoted: 3674 Post(s)
Liked 5,441 Times
in
2,764 Posts
06-27-21, 05:20 AM
#12
Expired Member
Join Date: Jun 2007
Location: TN
Posts: 11,547
Mentioned: 37 Post(s)
Tagged: 0 Thread(s)
Quoted: 3674 Post(s)
Liked 5,441 Times
in
2,764 Posts
 06-27-21, 07:13 AM
#13
Senior Member
Join Date: Jun 2020
Location: Maryland
Posts: 1,380
Bikes: 1982 Bianchi Sport SX, Rayleigh Tamland 1, Rans V-Rex recumbent, Fuji MTB, 80's Cannondale MTB with BBSHD ebike motor
Mentioned: 1 Post(s)
Tagged: 0 Thread(s)
Quoted: 668 Post(s)
Liked 529 Times
in
355 Posts
I've been on other bike forums where the collective wisdom is to always pinch the sides of quick link plates together with a pair of pliers when taking a quick link in or out. they all feel this lessens the wear on the mating surfaces making the quick link reusable.
Not sure if I'm a believer yet but I figure it can't hurt and do so as well. It does seem to make them slightly easier to install sometimes.
Not sure if I'm a believer yet but I figure it can't hurt and do so as well. It does seem to make them slightly easier to install sometimes.
 06-27-21, 07:49 AM
#15
Senior Member
Join Date: Oct 2013
Location: Mich
Posts: 7,395
Bikes: RSO E-tire dropper fixie brifter
Mentioned: 0 Post(s)
Tagged: 0 Thread(s)
Quoted: 6 Post(s)
Liked 2,979 Times
in
1,920 Posts
IME; Slam'N'Go is the method that has always worked. Never had one that partially engaged. It is key to position the chain with the least amount of offset when installed around the rear cog & around a crank gear while choosing the a high gear ratio. Example: 27r 34f seems common with a straight chainline
__________________
-Oh Hey!
-Oh Hey!
06-27-21, 09:53 AM
#17
Senior Member
I had one 10s KMC link that just would not work for me. I have the pliers and I tried the "slam the crank" method. It wouldn't work. I used a link from another new chain and it worked fine. I emailed KMC about it. They had me send them the link and they sent a new one to me. That one worked fine. Never found out what the issue was.
Likes For gearbasher:
06-27-21, 10:07 AM
#18
Full Member
Join Date: Oct 2019
Location: Foothills of West Central Maine
Posts: 410
Bikes: 2007 Motobecane Fantom Cross Expert, 2020 Motobecane Omni Strada Pro Disc (700c gravel bike), 2021 Motobecane Elite Adventure with Bafang 500W rear hub drive
Mentioned: 0 Post(s)
Tagged: 0 Thread(s)
Quoted: 174 Post(s)
Likes: 0
Liked 143 Times
in
94 Posts
I've found that you can install them without a tool, and the key is similar to above quote. Put chain on small/small cogs to minimize strain, make sure links are in position, and wiggle the opposite plates between thumb and index until you feel they are as close together as they're going to get. Then a gentle push on crank is enough to lock them.
06-27-21, 12:42 PM
#19
Senior Member

Join Date: Feb 2014
Location: Pasadena, CA
Posts: 4,848
Bikes: Schwinn Varsity
Mentioned: 22 Post(s)
Tagged: 0 Thread(s)
Quoted: 1931 Post(s)
Liked 742 Times
in
422 Posts
Doesn't matter what gear you are in.... just so you are not severely cross chained. You don't need to "Slam the Crank".. like I previously said (figure of speech)... there is so much leverage it pops into place easily.
I am not a Pro Bike Mechanic.. but I play one on the internet....and I thought everyone knew how to close the link.
I am not a Pro Bike Mechanic.. but I play one on the internet....and I thought everyone knew how to close the link.
06-27-21, 12:45 PM
#20
Recreational Road Cyclist
Join Date: Sep 2013
Location: MetroWest, Mass.
Posts: 548
Bikes: 1990 Peter Mooney road bike
Mentioned: 7 Post(s)
Tagged: 0 Thread(s)
Quoted: 257 Post(s)
Liked 252 Times
in
134 Posts
Look Ma, no tools!
you don't need a tool to remove or replace it.
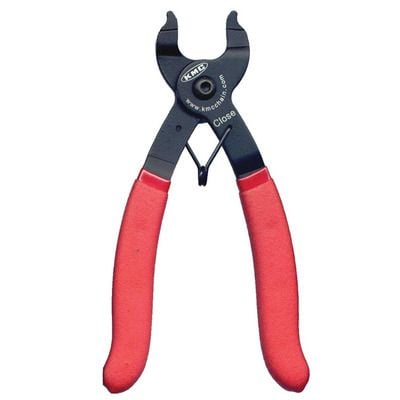
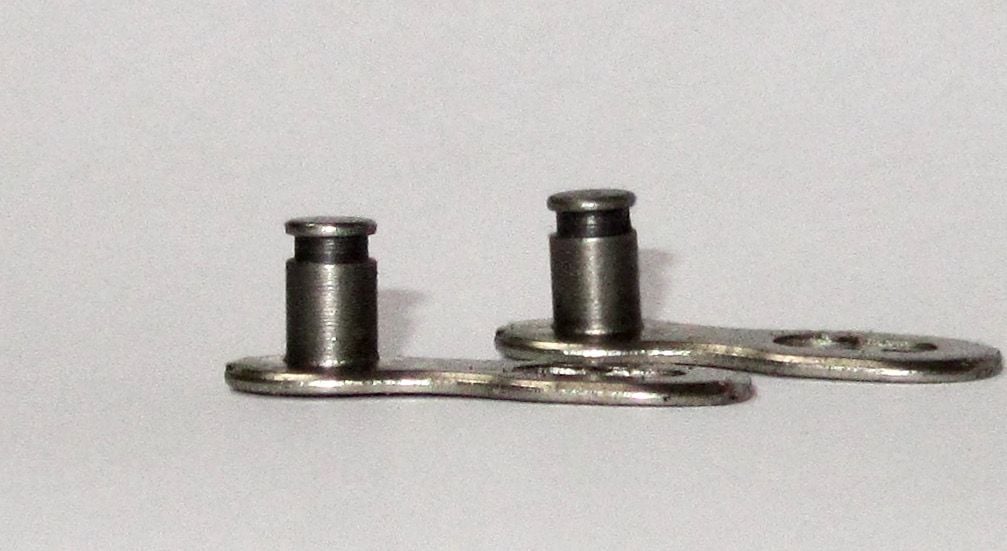
These links cost more than a KMC link, but you don't have to buy a tool. Here's a picture of a KMC link I received with a chain. No tool would make this one close!
 06-27-21, 12:58 PM
#21

Senior Member

Join Date: Jul 2006
Location: San Jose (Willow Glen) Ca
Posts: 9,847
Bikes: Kirk Custom JK Special, '84 Team Miyata,(dura ace old school) 80?? SR Semi-Pro 600 Arabesque
Mentioned: 106 Post(s)
Tagged: 0 Thread(s)
Quoted: 2338 Post(s)
Liked 2,827 Times
in
1,543 Posts
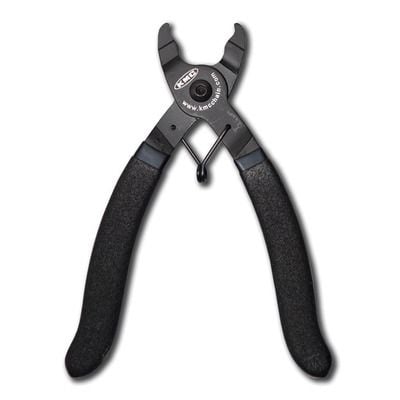
i consider the part tool (older one) one of the best tool investments i have made. it does work for removing, if a little awkward, I pull the handles apart to remove. shimano has really nice one where you cnange the pivot for install/remove
__________________
Life is too short not to ride the best bike you have, as much as you can
(looking for Torpado Super light frame/fork or for Raleigh International frame fork 58cm)
Life is too short not to ride the best bike you have, as much as you can
(looking for Torpado Super light frame/fork or for Raleigh International frame fork 58cm)
06-27-21, 01:41 PM
#22
Crawlin' up, flyin' down
Thread Starter
Join Date: Jan 2006
Location: Democratic Peoples' Republic of Berkeley
Posts: 5,658
Bikes: 1967 Paramount; 1982-ish Ron Cooper; 1978 Eisentraut "A"; two mid-1960s Cinelli Speciale Corsas; and others in various stages of non-rideability.
Mentioned: 40 Post(s)
Tagged: 0 Thread(s)
Quoted: 1027 Post(s)
Liked 2,531 Times
in
1,059 Posts
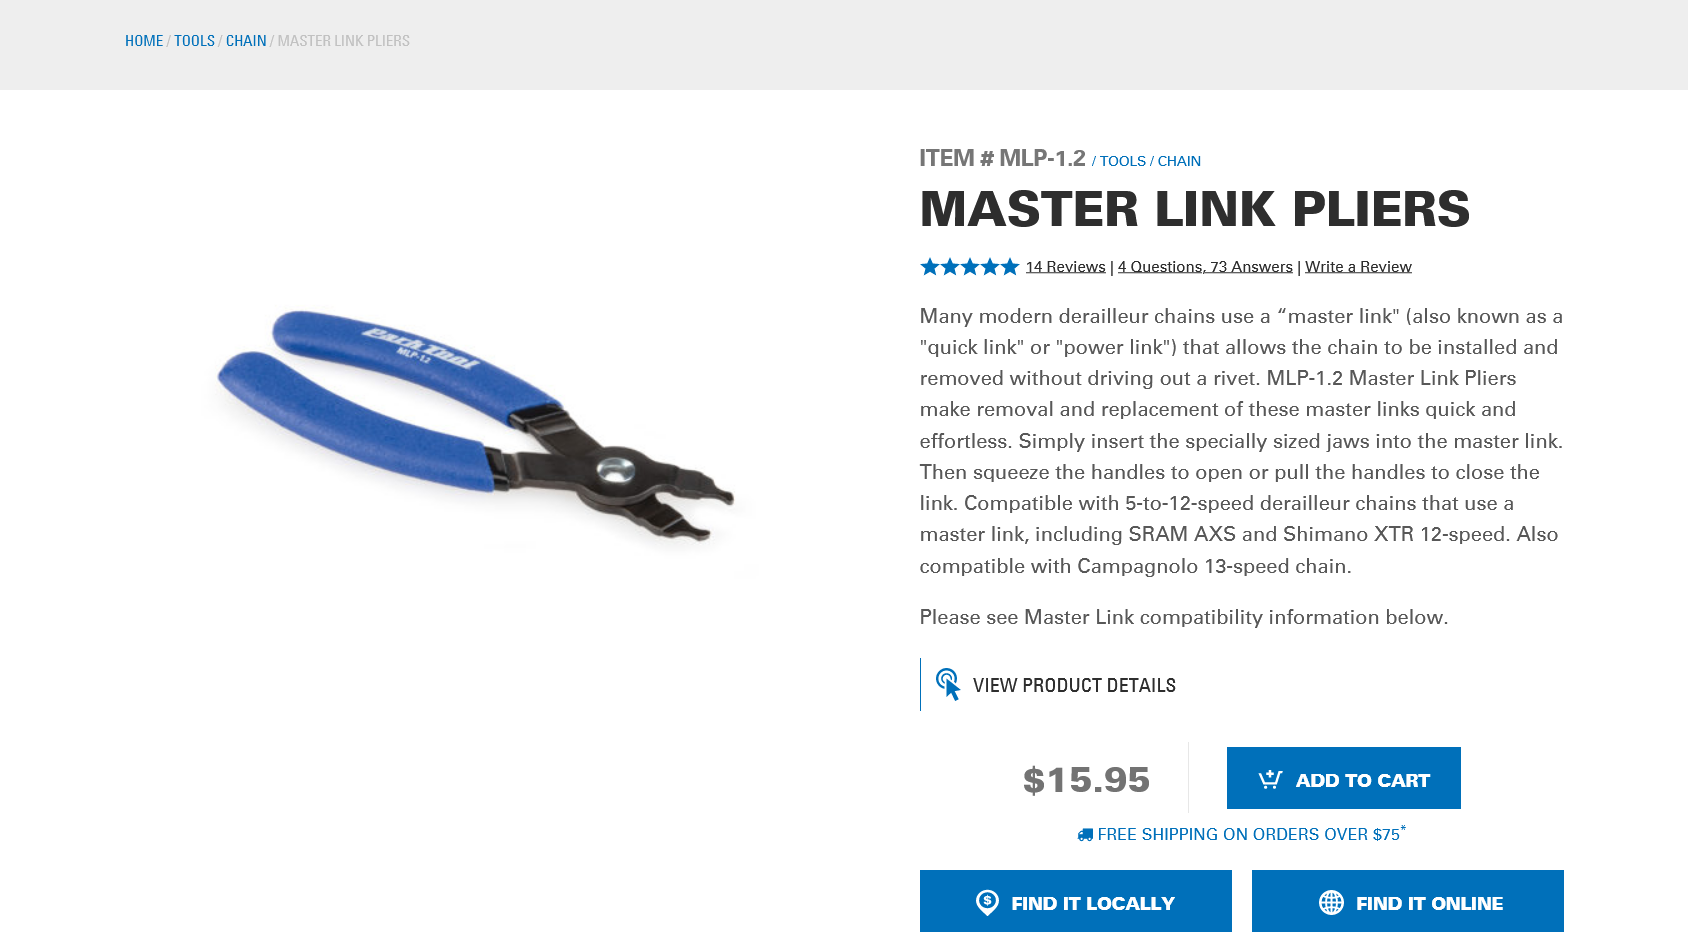
KMC makes separate opener and closer tools
Nobody has mentioned this yet, but if you use a Wippermann Connex master link,
you don't need a tool to remove or replace it.
Here's a demo.
These links cost more than a KMC link, but you don't have to buy a tool. Here's a picture of a KMC link I received with a chain. No tool would make this one close!
you don't need a tool to remove or replace it.
Here's a demo.
These links cost more than a KMC link, but you don't have to buy a tool. Here's a picture of a KMC link I received with a chain. No tool would make this one close!
I have v.1 of the Park tool. I will get either the Park v.1.2 . or the KMC remover tool to avoid future such fun and games.
Thanks to all. As usual, BF comes through.
__________________
"I'm in shape -- round is a shape." Andy Rooney
"I'm in shape -- round is a shape." Andy Rooney
06-27-21, 02:02 PM
#23
Senior Member
Join Date: Oct 2013
Location: Mich
Posts: 7,395
Bikes: RSO E-tire dropper fixie brifter
Mentioned: 0 Post(s)
Tagged: 0 Thread(s)
Quoted: 6 Post(s)
Liked 2,979 Times
in
1,920 Posts
06-27-21, 06:29 PM
#24
Senior Member
Join Date: May 2005
Location: SFBay
Posts: 2,334
Bikes: n, I would like n+1
Mentioned: 0 Post(s)
Tagged: 0 Thread(s)
Quoted: 127 Post(s)
Likes: 0
Liked 133 Times
in
108 Posts
Degreasing the link halves as well as the next link on each end of the chain sometimes helps a bit for install and removal. The side plates need to fit fully within the groove in the pins or they don't like to go in. I've seen some links where it does actually snap into place, but not recently. Often pinching the sides together and working them back and forth a few times (rotating the chain about the roller) helps with this as well.
In cases where a bit of persuasion is warranted and I don't have any pliers handy I simply hold the rear brake and bounce on a forward facing pedal to snap it in. No need to shock load anything, including my wrist and shoulder.
In cases where a bit of persuasion is warranted and I don't have any pliers handy I simply hold the rear brake and bounce on a forward facing pedal to snap it in. No need to shock load anything, including my wrist and shoulder.
