


View Poll Results: To Service or Not Service This Is The Question
If It Ain't Broke Don't Fix It


1
12.50%
Take Apart and Clean / Grease


7
87.50%
Voters: 8. You may not vote on this poll
What Tools Do I Need to service Bottom Bracket & Free Wheel
 09-03-23, 03:21 PM
#1
Newbie
Thread Starter
Join Date: Jun 2022
Posts: 56
Mentioned: 1 Post(s)
Tagged: 0 Thread(s)
Quoted: 34 Post(s)
Likes: 0
Liked 11 Times
in
10 Posts
What Tools Do I Need to service Bottom Bracket & Free Wheel
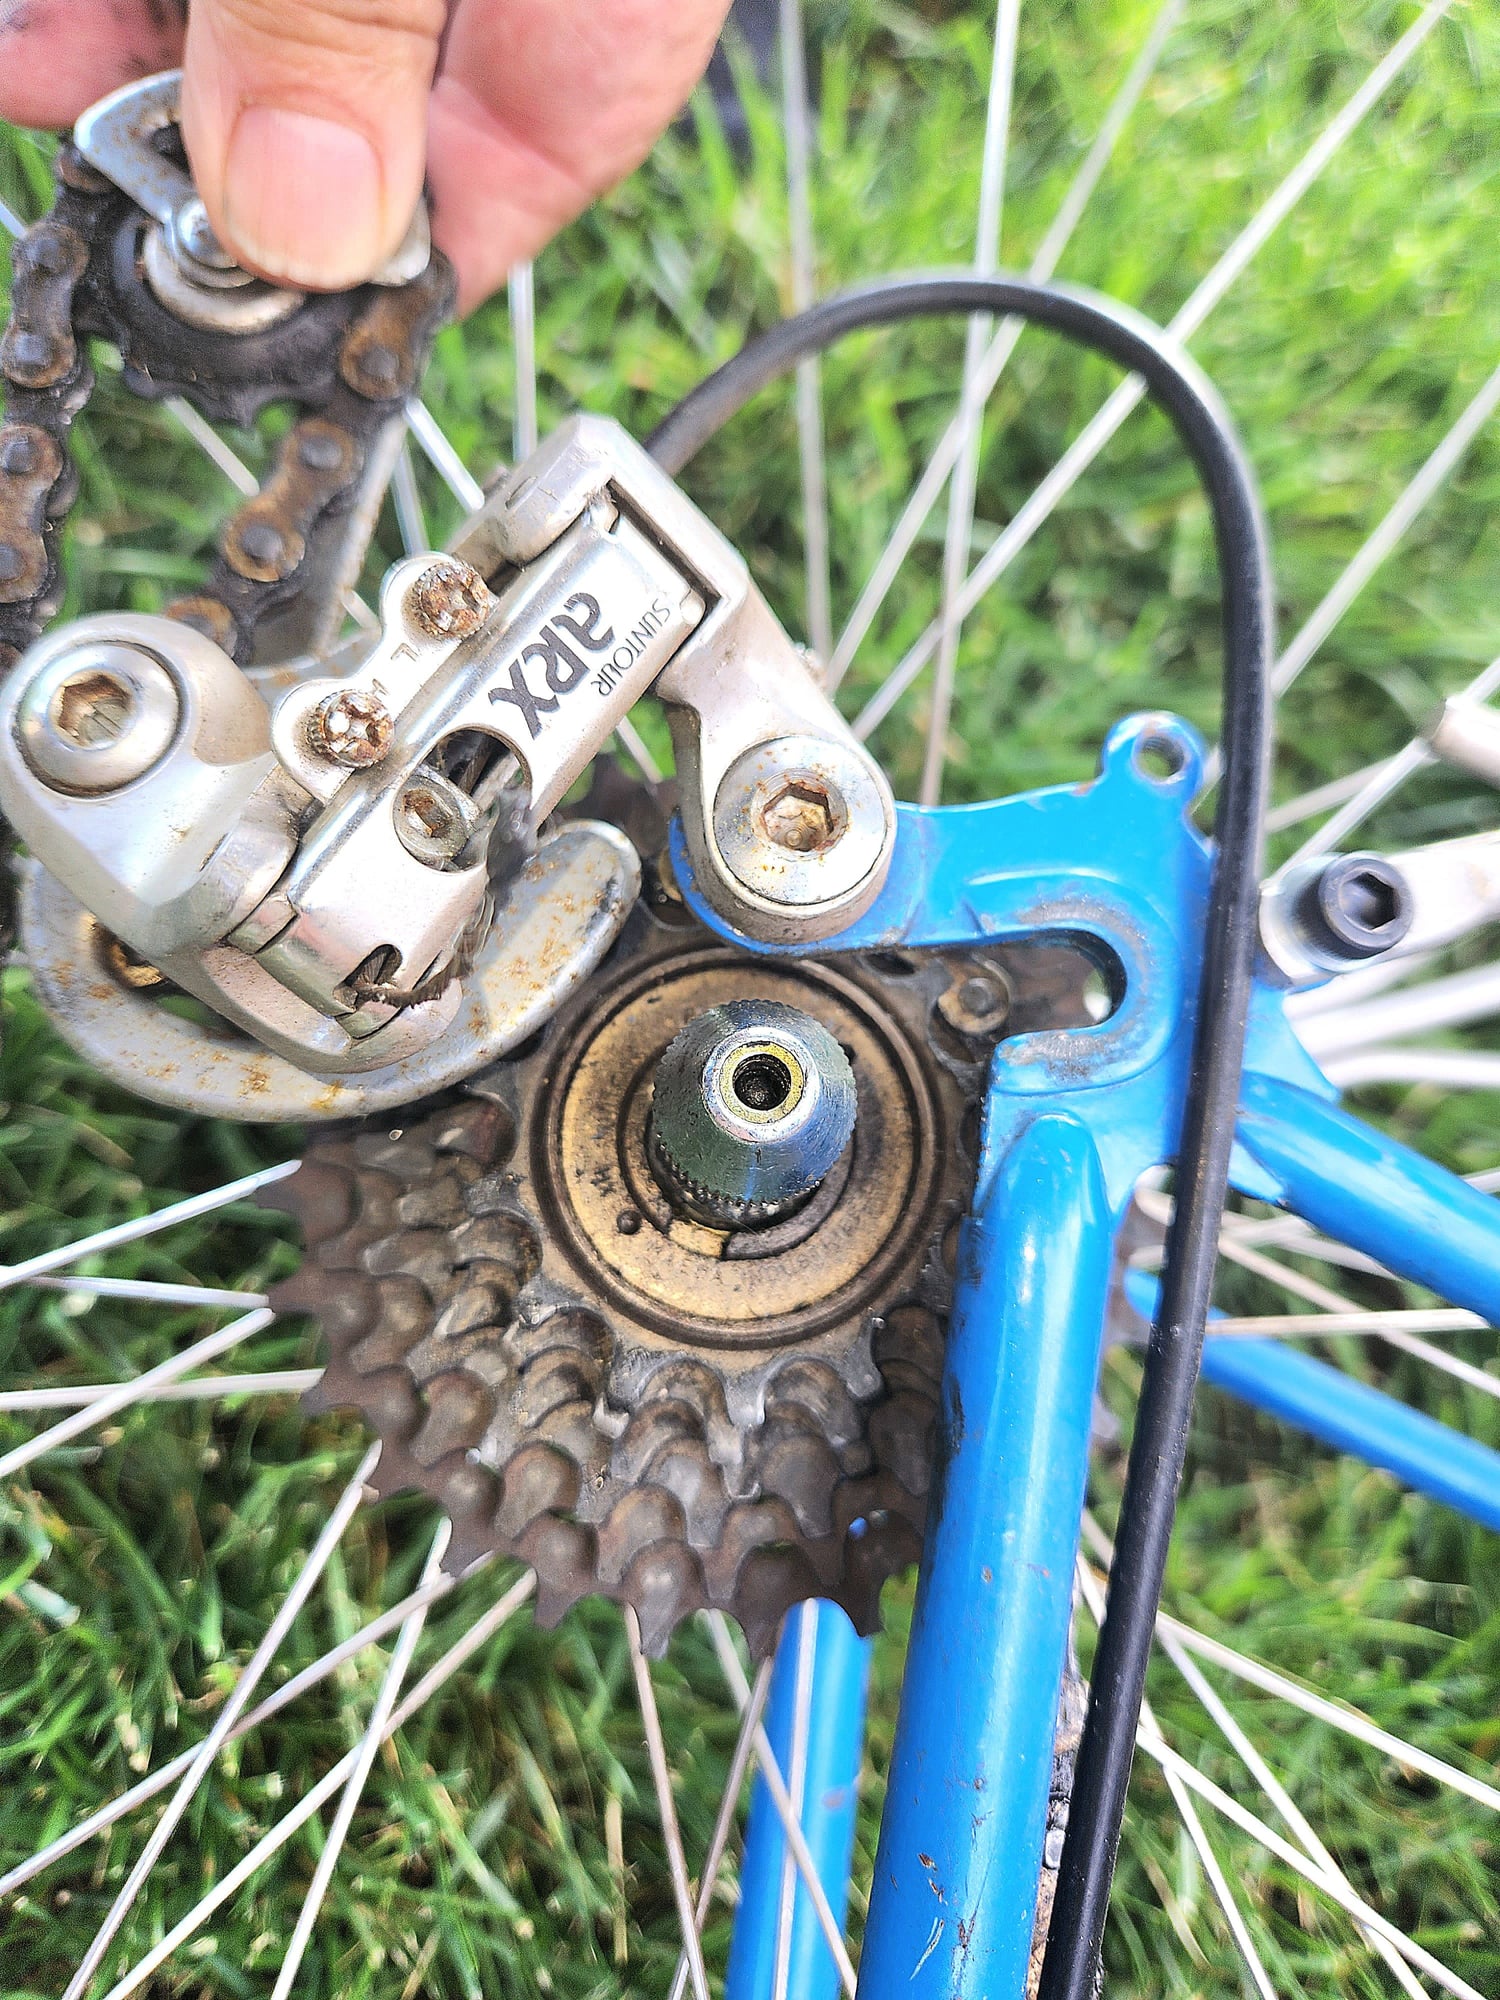
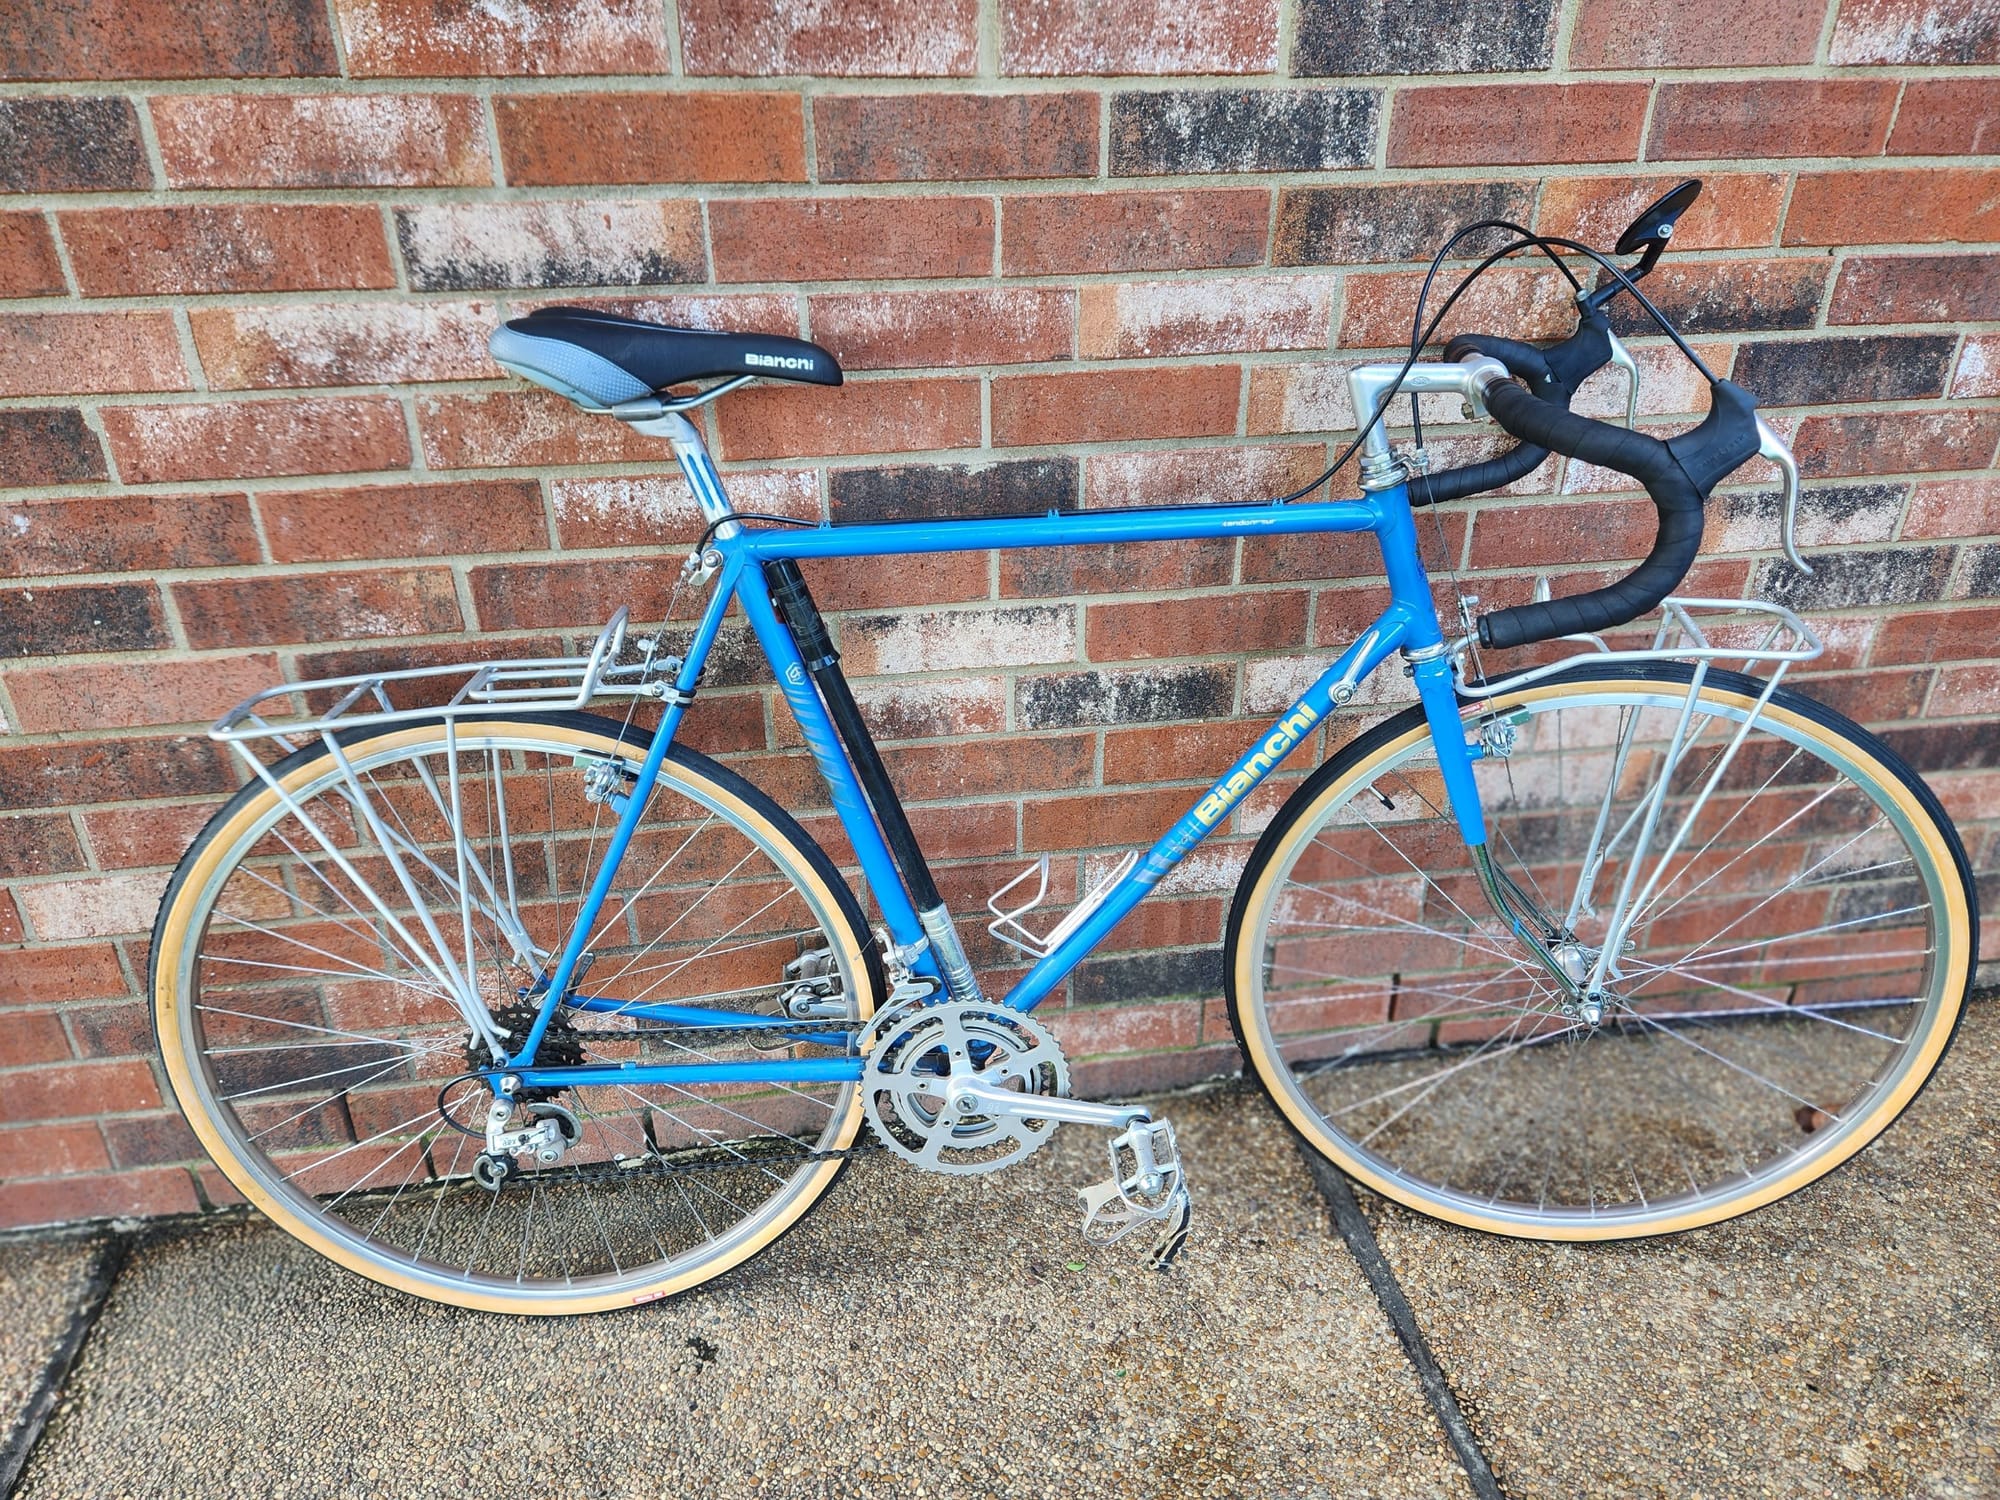
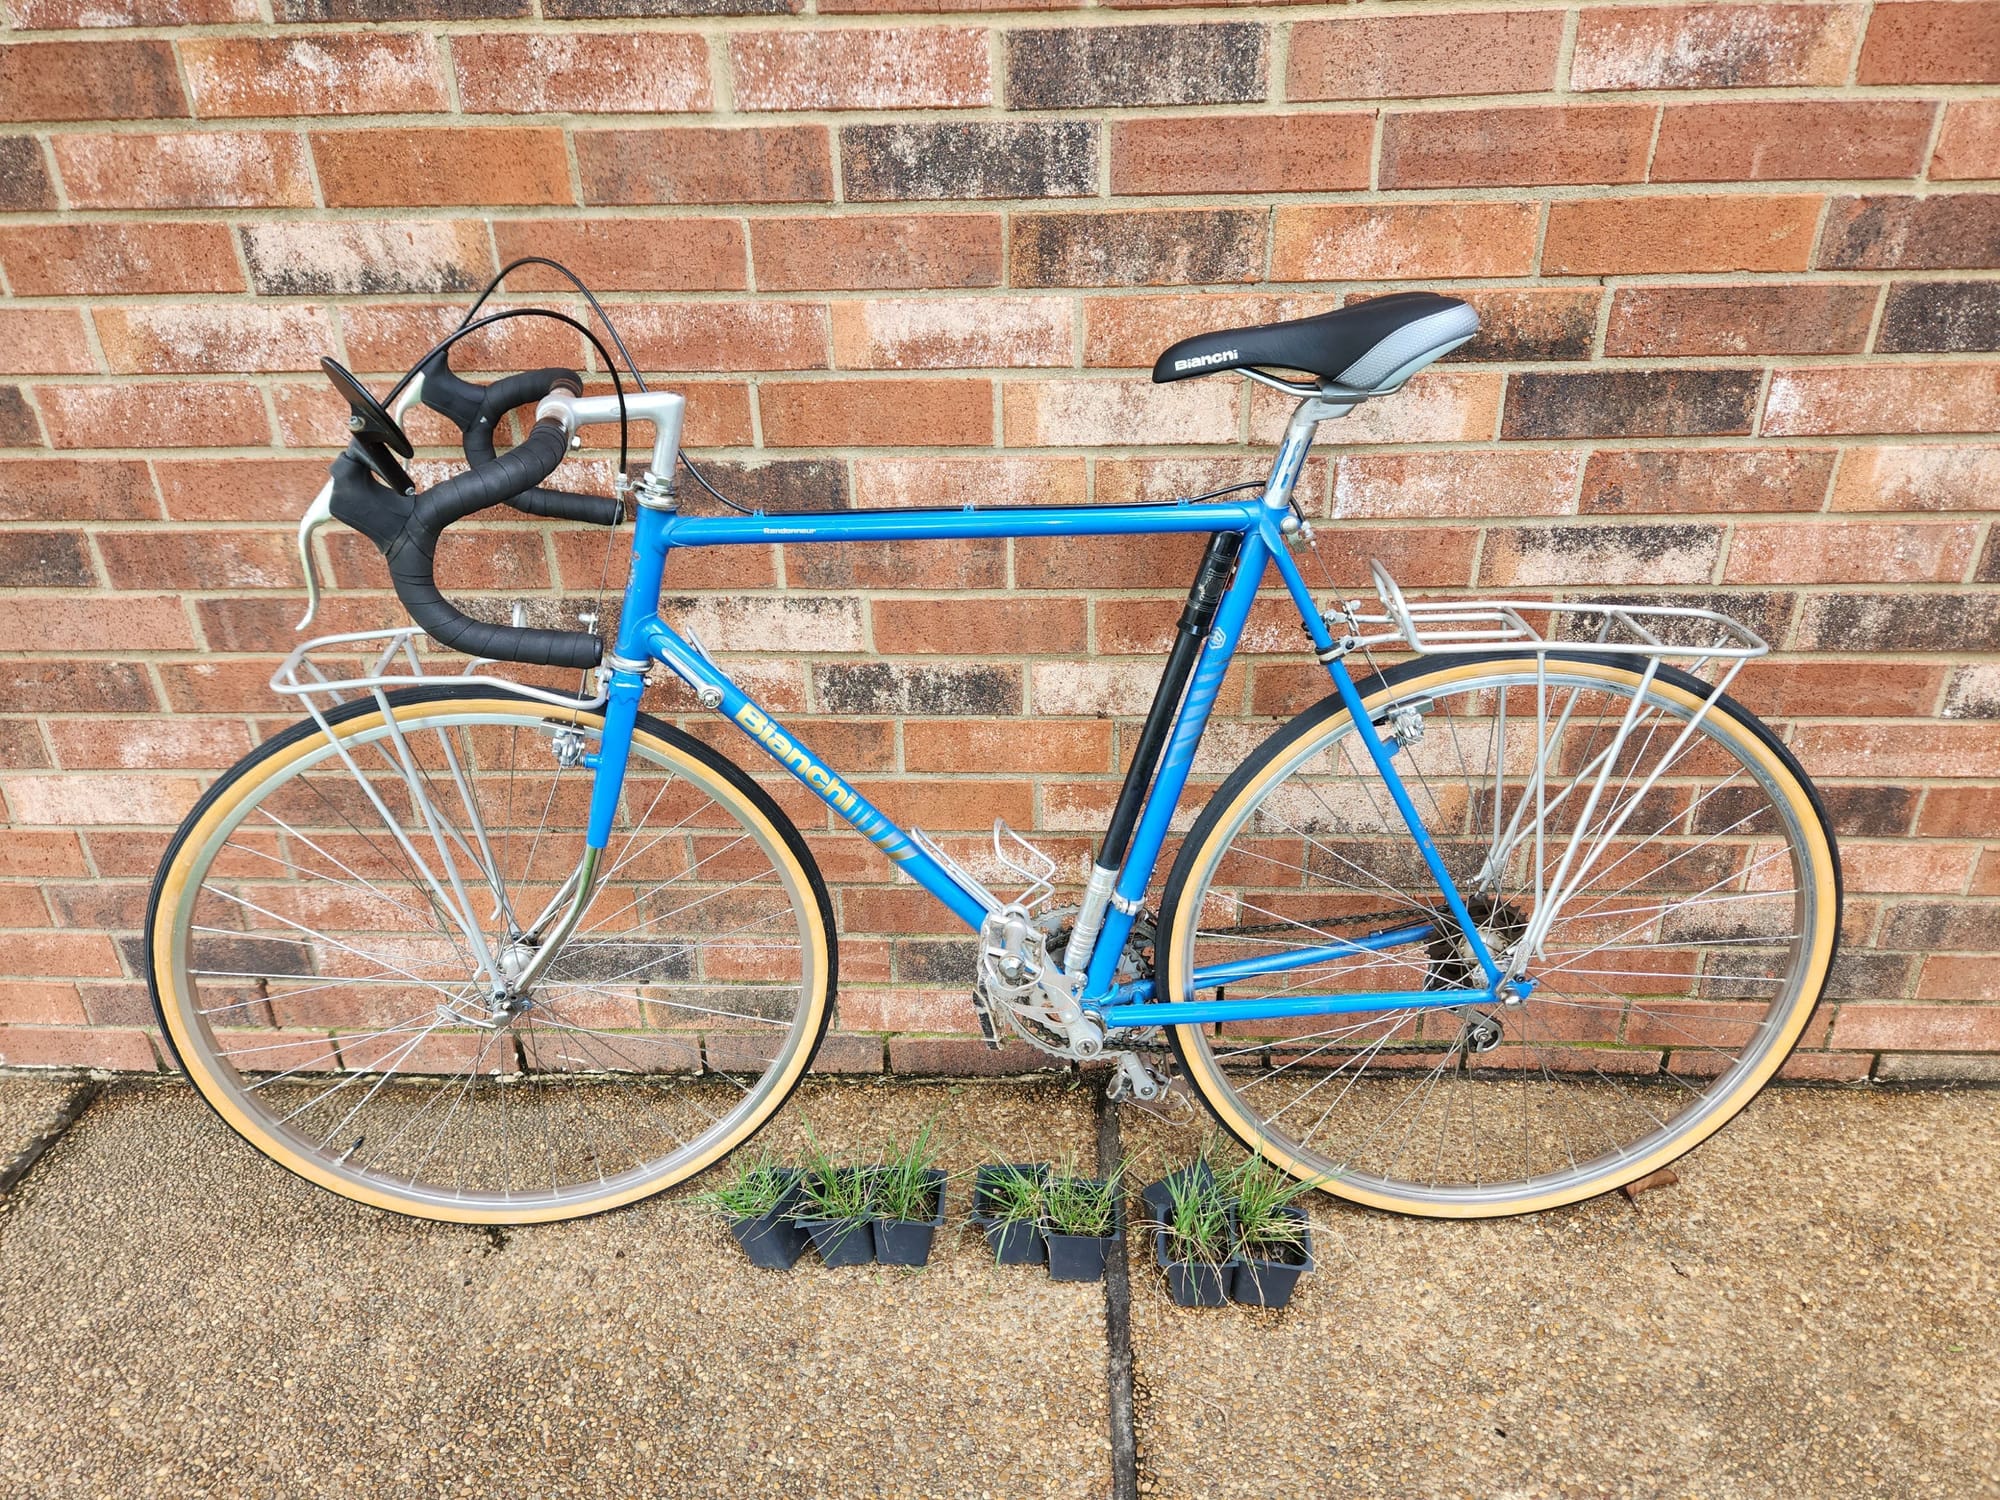
This is my 1983 Bianchi Randonneur I owned since new. I just restored it. What tools do I need to pull crank bottom bracket bearing to service bearings. Also reat Sprocket Free Wheel tools.
Related question. Do I need to do it. I just road it 28 miles today. Seems IK. However age, disuse last 29 yrs ( but road frequently first 10 years) makes me think cleaning, inspection, grease will do wonders. The fork bearings were dirty and dry. How do I know if it beeds this service w/o disassembly. SEE POLL
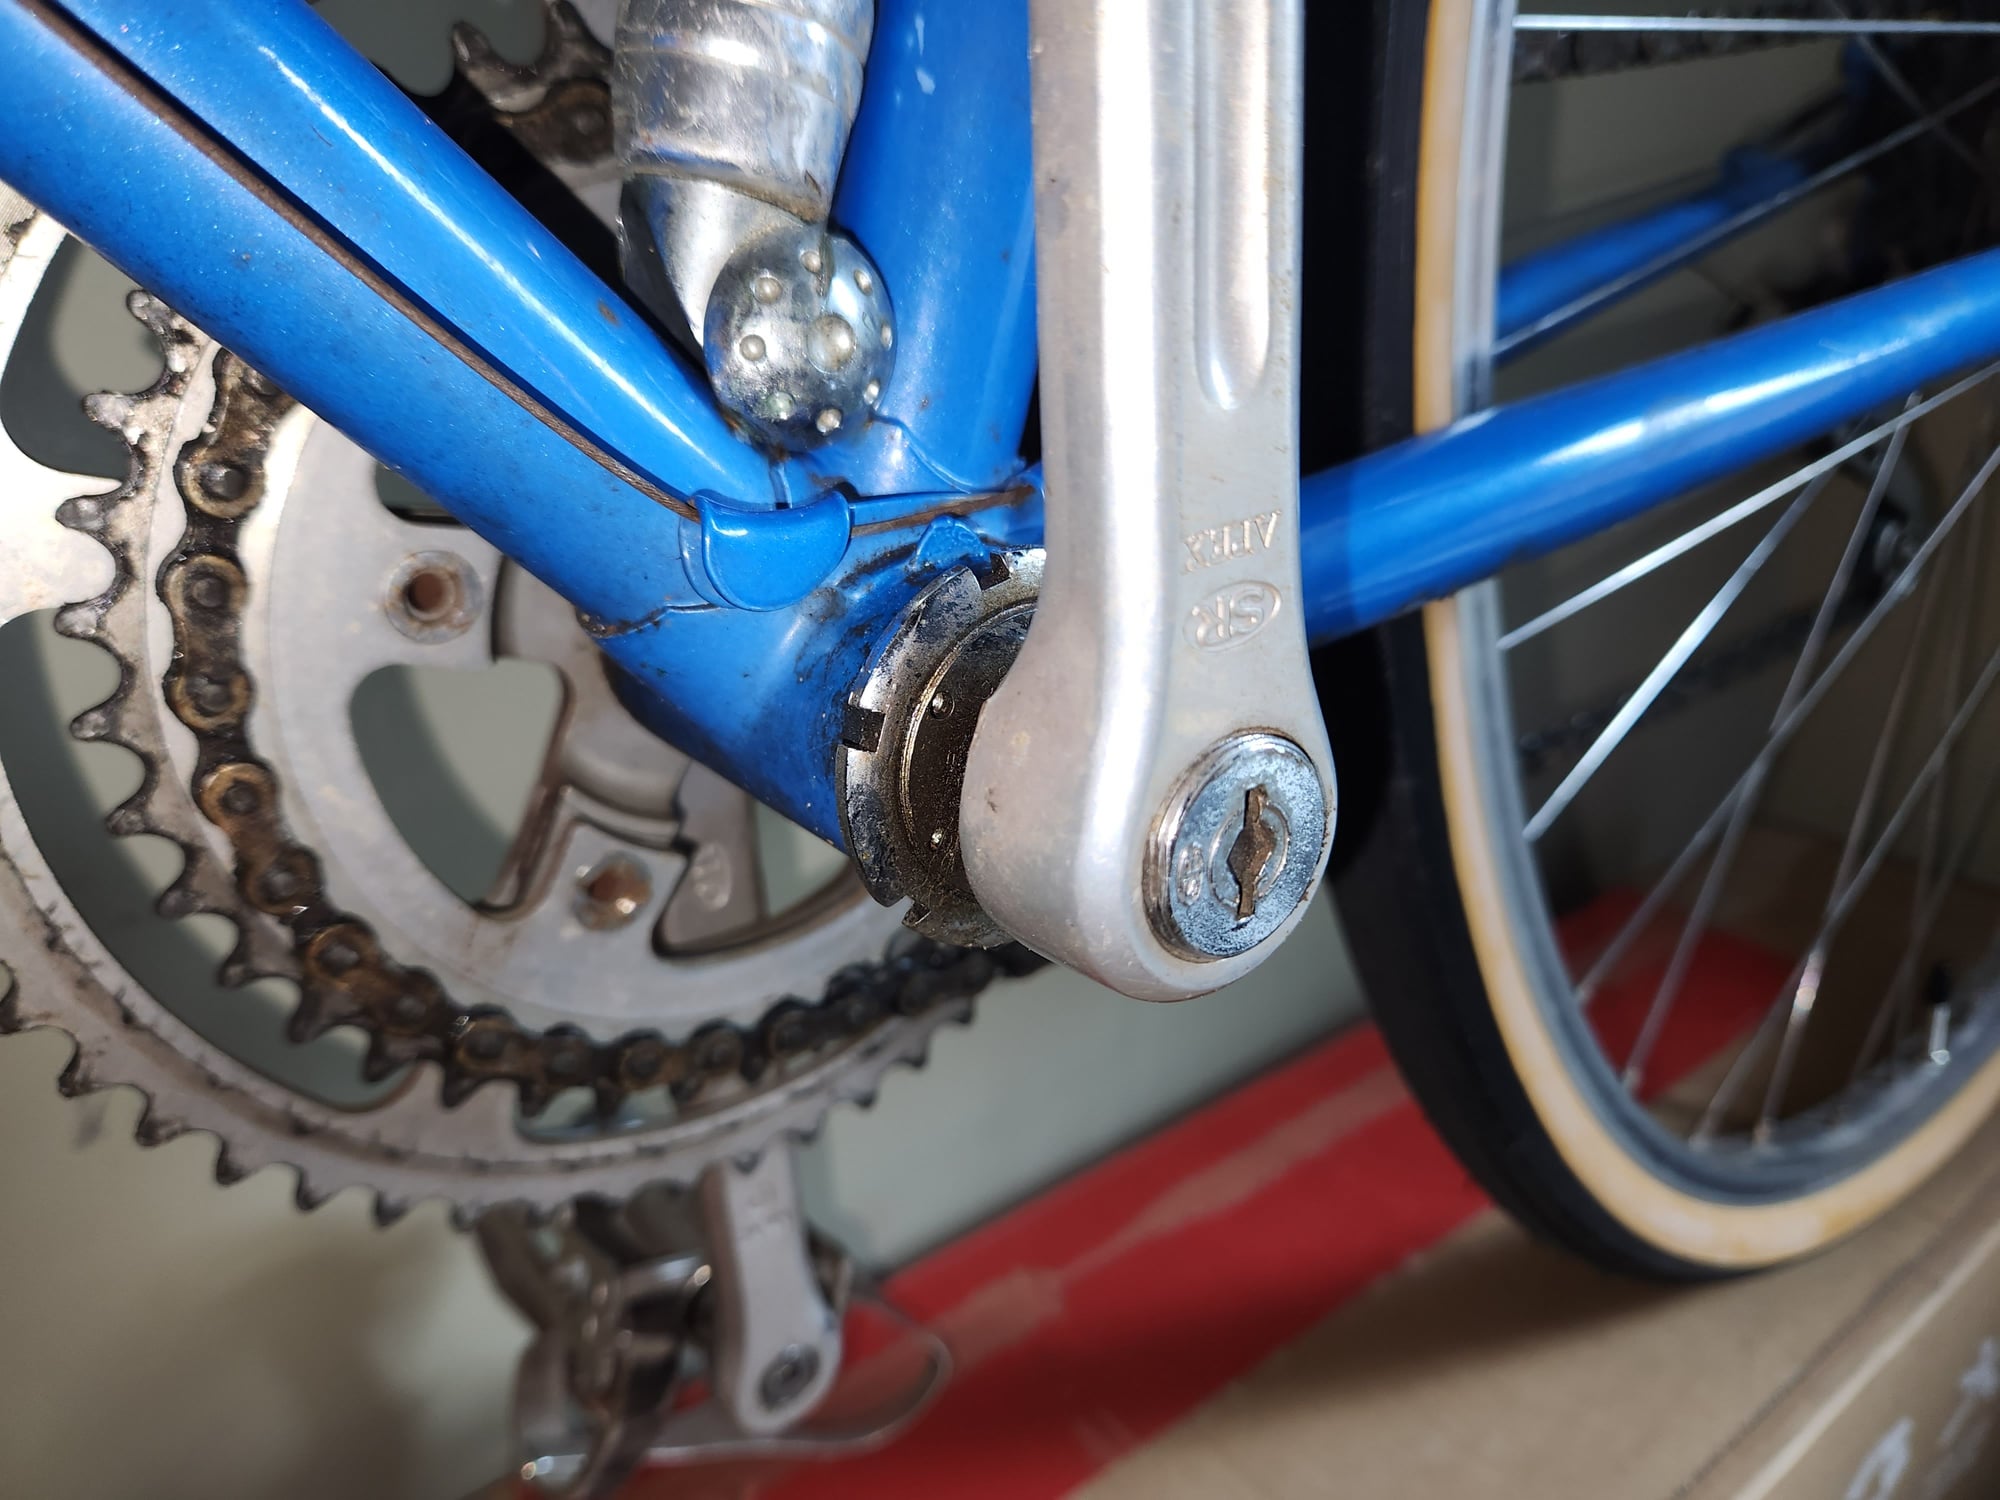
1983 Bianchi Randonneur Crank
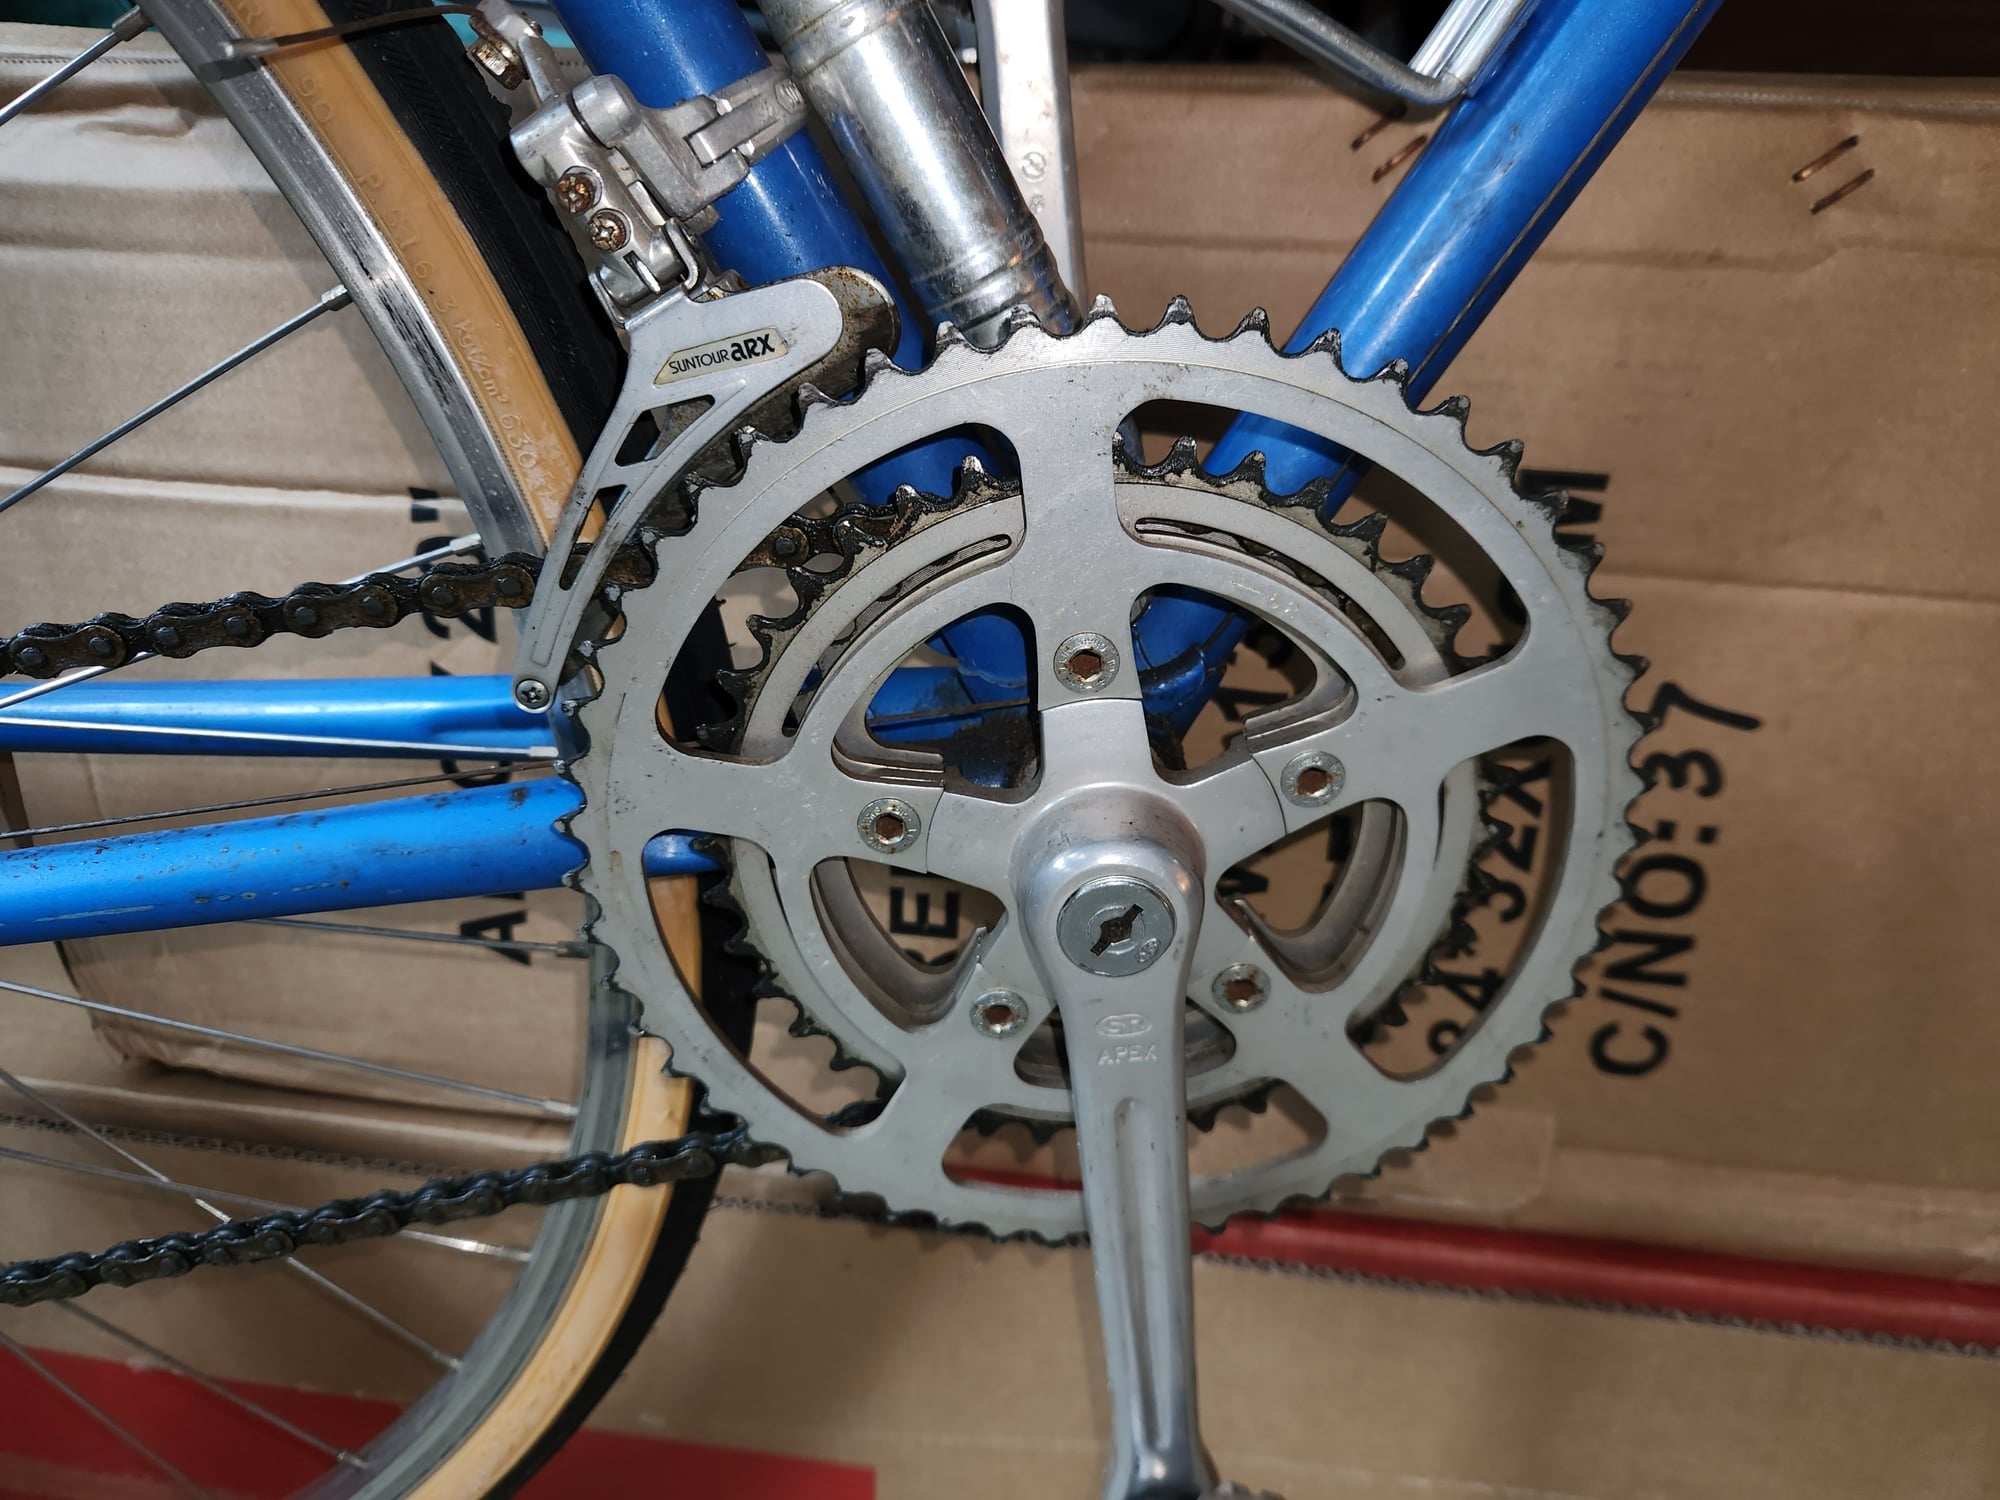
1983 Bianchi Randonneur Crank Sprocket

1983 Bianchi Randonneur Free Wheel
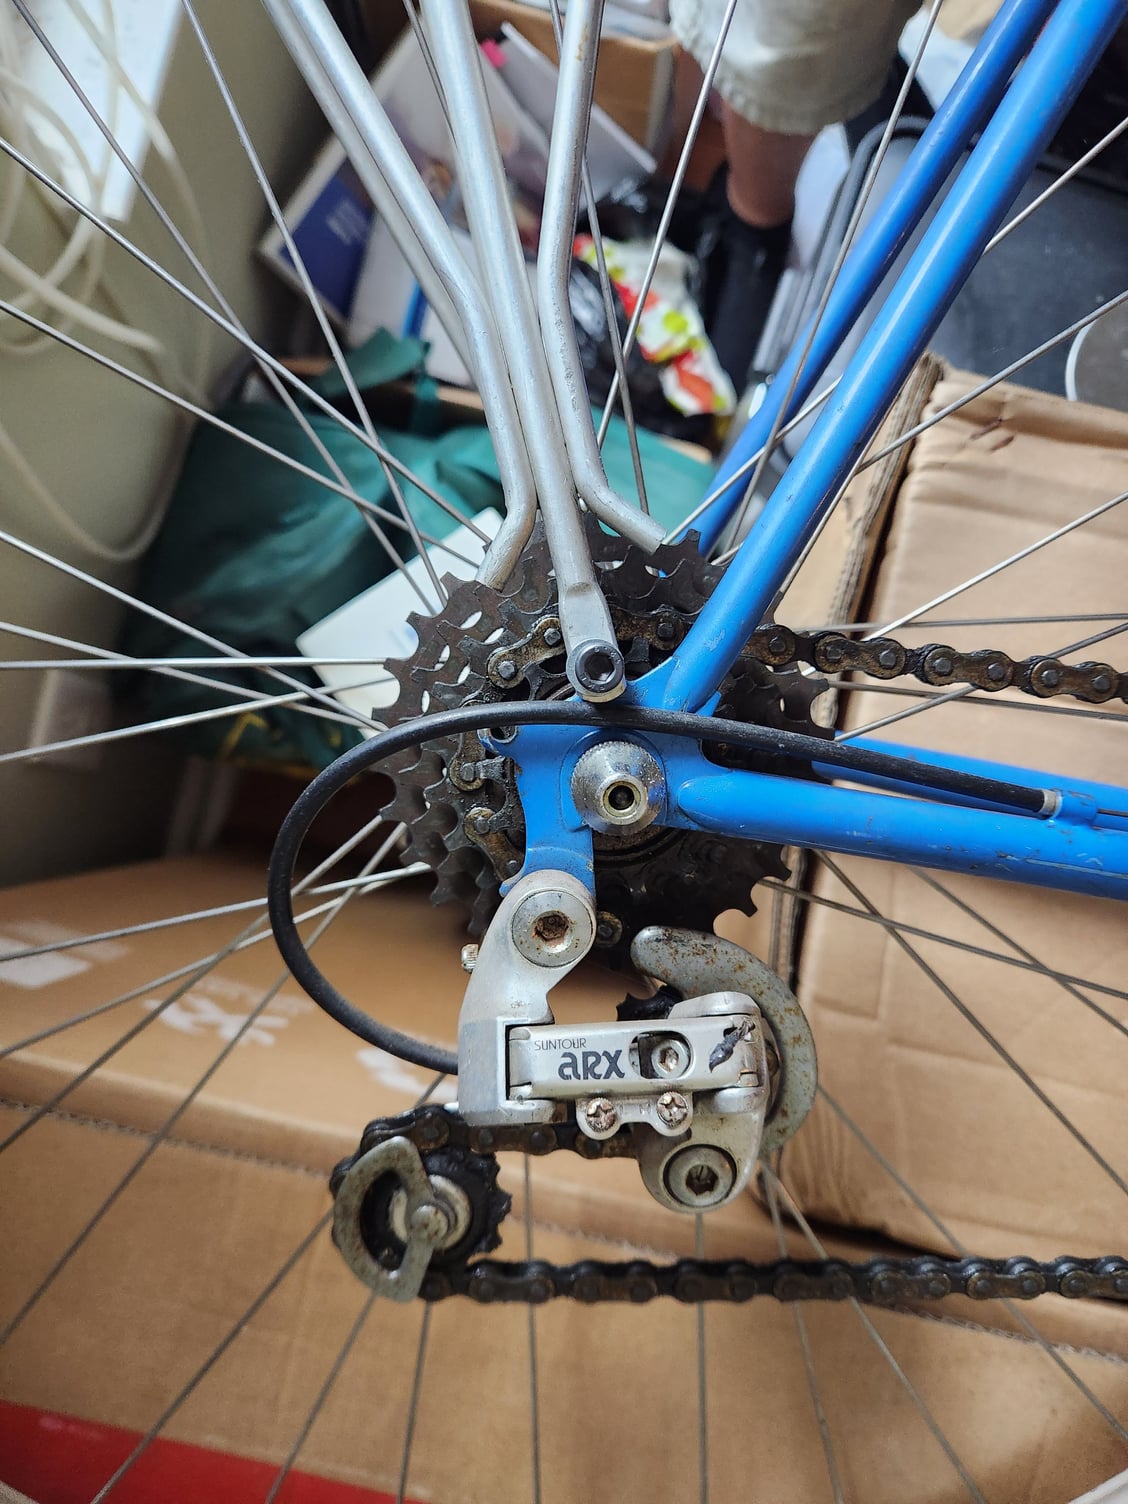
1983 Bianchi Randonneur Rear Sprocket Derailleur
Related question. Do I need to do it. I just road it 28 miles today. Seems IK. However age, disuse last 29 yrs ( but road frequently first 10 years) makes me think cleaning, inspection, grease will do wonders. The fork bearings were dirty and dry. How do I know if it beeds this service w/o disassembly. SEE POLL
1983 Bianchi Randonneur Crank
1983 Bianchi Randonneur Crank Sprocket
1983 Bianchi Randonneur Free Wheel
1983 Bianchi Randonneur Rear Sprocket Derailleur
 09-03-23, 03:25 PM
#2
Senior Member
A wide flat screwdriver to remove the crank dustcap;
A cotterless crank tool to get the crank arms off the spindle;
A lockring tool to remove the bottom bracket lockring;
and a pin spanner to remove the adjustable BB cup.
A cotterless crank tool to get the crank arms off the spindle;
A lockring tool to remove the bottom bracket lockring;
and a pin spanner to remove the adjustable BB cup.
Likes For bargainguy:
09-03-23, 03:30 PM
#3

WGB
Join Date: Jul 2017
Location: Niagara Region
Posts: 2,917
Bikes: Panasonic PT-4500
Mentioned: 46 Post(s)
Tagged: 0 Thread(s)
Quoted: 1800 Post(s)
Liked 2,334 Times
in
1,378 Posts
When you remove the rear wheel you can get the name of the brand for the freewheel. Either that or photo it with quick release skewer removed.
Every brand requires ifferent freewheel tools. Once we know what fw you have we'll point you to the right tool
Every brand requires ifferent freewheel tools. Once we know what fw you have we'll point you to the right tool
09-03-23, 03:52 PM
#4
se�or miembro

Join Date: Dec 2018
Location: Pac NW
Posts: 6,625
Bikes: '70s - '80s Campagnolo
Mentioned: 92 Post(s)
Tagged: 0 Thread(s)
Quoted: 3889 Post(s)
Liked 6,488 Times
in
3,211 Posts
09-03-23, 04:18 PM
#6
aged to perfection

Join Date: Jun 2009
Location: PacNW
Posts: 1,817
Bikes: Dinucci Allez 2.0, Richard Sachs, Alex Singer, Serotta, Masi GC, Raleigh Pro Mk.1, Hetchins, etc
Mentioned: 24 Post(s)
Tagged: 0 Thread(s)
Quoted: 839 Post(s)
Liked 1,258 Times
in
663 Posts
sure I have. the most charitable interpretation of the term.
some would call it a "conservation". Just a clean up.
See also "preservation class" Preservation Class Cars - Hagerty Media
it ain't me but it's up to the owner.
/markp
some would call it a "conservation". Just a clean up.
See also "preservation class" Preservation Class Cars - Hagerty Media
it ain't me but it's up to the owner.
/markp
09-03-23, 04:33 PM
#7
Senior Member
gmcjetpilot,
Remove the freewheel from the rear hub and soak it in solvent. Flush it with clean solvent after soaking. Let it sit in the sun until it is hot to dry it out.
Then, add oil thru the little gaps on both sides. Spin it as you add the oil. Spinning helps the oil spread rather than pool in one spot. Also, you will know when the oil has reached the ratchet mechanism, as it goes quiet when wet with oil.
DO NOT disassemble it under any circumstances.
Add a little anti-sieze or grease to the hub threads before screwing the freewheel back in place.
Add oil to the freewheel whenever it gets really loud.
Keep your chain oiled, too. A little bit every 100 miles or so. When you can hear it, it is dry.
TOOLS NEEDED -
freewheel removal tool
Large wrench (bigger is better) :-)
Last edited by Bad Lag; 09-03-23 at 04:36 PM.
09-03-23, 04:39 PM
#8
Senior Member
gmcjetpilot,
I'd say service the bottom bracket as the grease is likely shot (dried out).
It takes a few tools to do so and I'd say either invest in the tools (and the skills) or buy a sealed bearing bottom bracket and have a local shop install it (my recommended approach).
There are several different ways to do this, each requiring a slightly different tool set.
If you want help, please ask.
TOOLS (for one method) -
Crank bolt wrench/socket (thinner wall than normal)
Crank arm puller
Lock ring pliers/spanner
Pin wrench for adjustable cup
Last edited by Bad Lag; 09-04-23 at 10:57 AM.
09-03-23, 04:48 PM
#9
Old fart
Join Date: Nov 2004
Location: Appleton WI
Posts: 24,790
Bikes: Several, mostly not name brands.
Mentioned: 153 Post(s)
Tagged: 0 Thread(s)
Quoted: 3590 Post(s)
Liked 3,401 Times
in
1,935 Posts
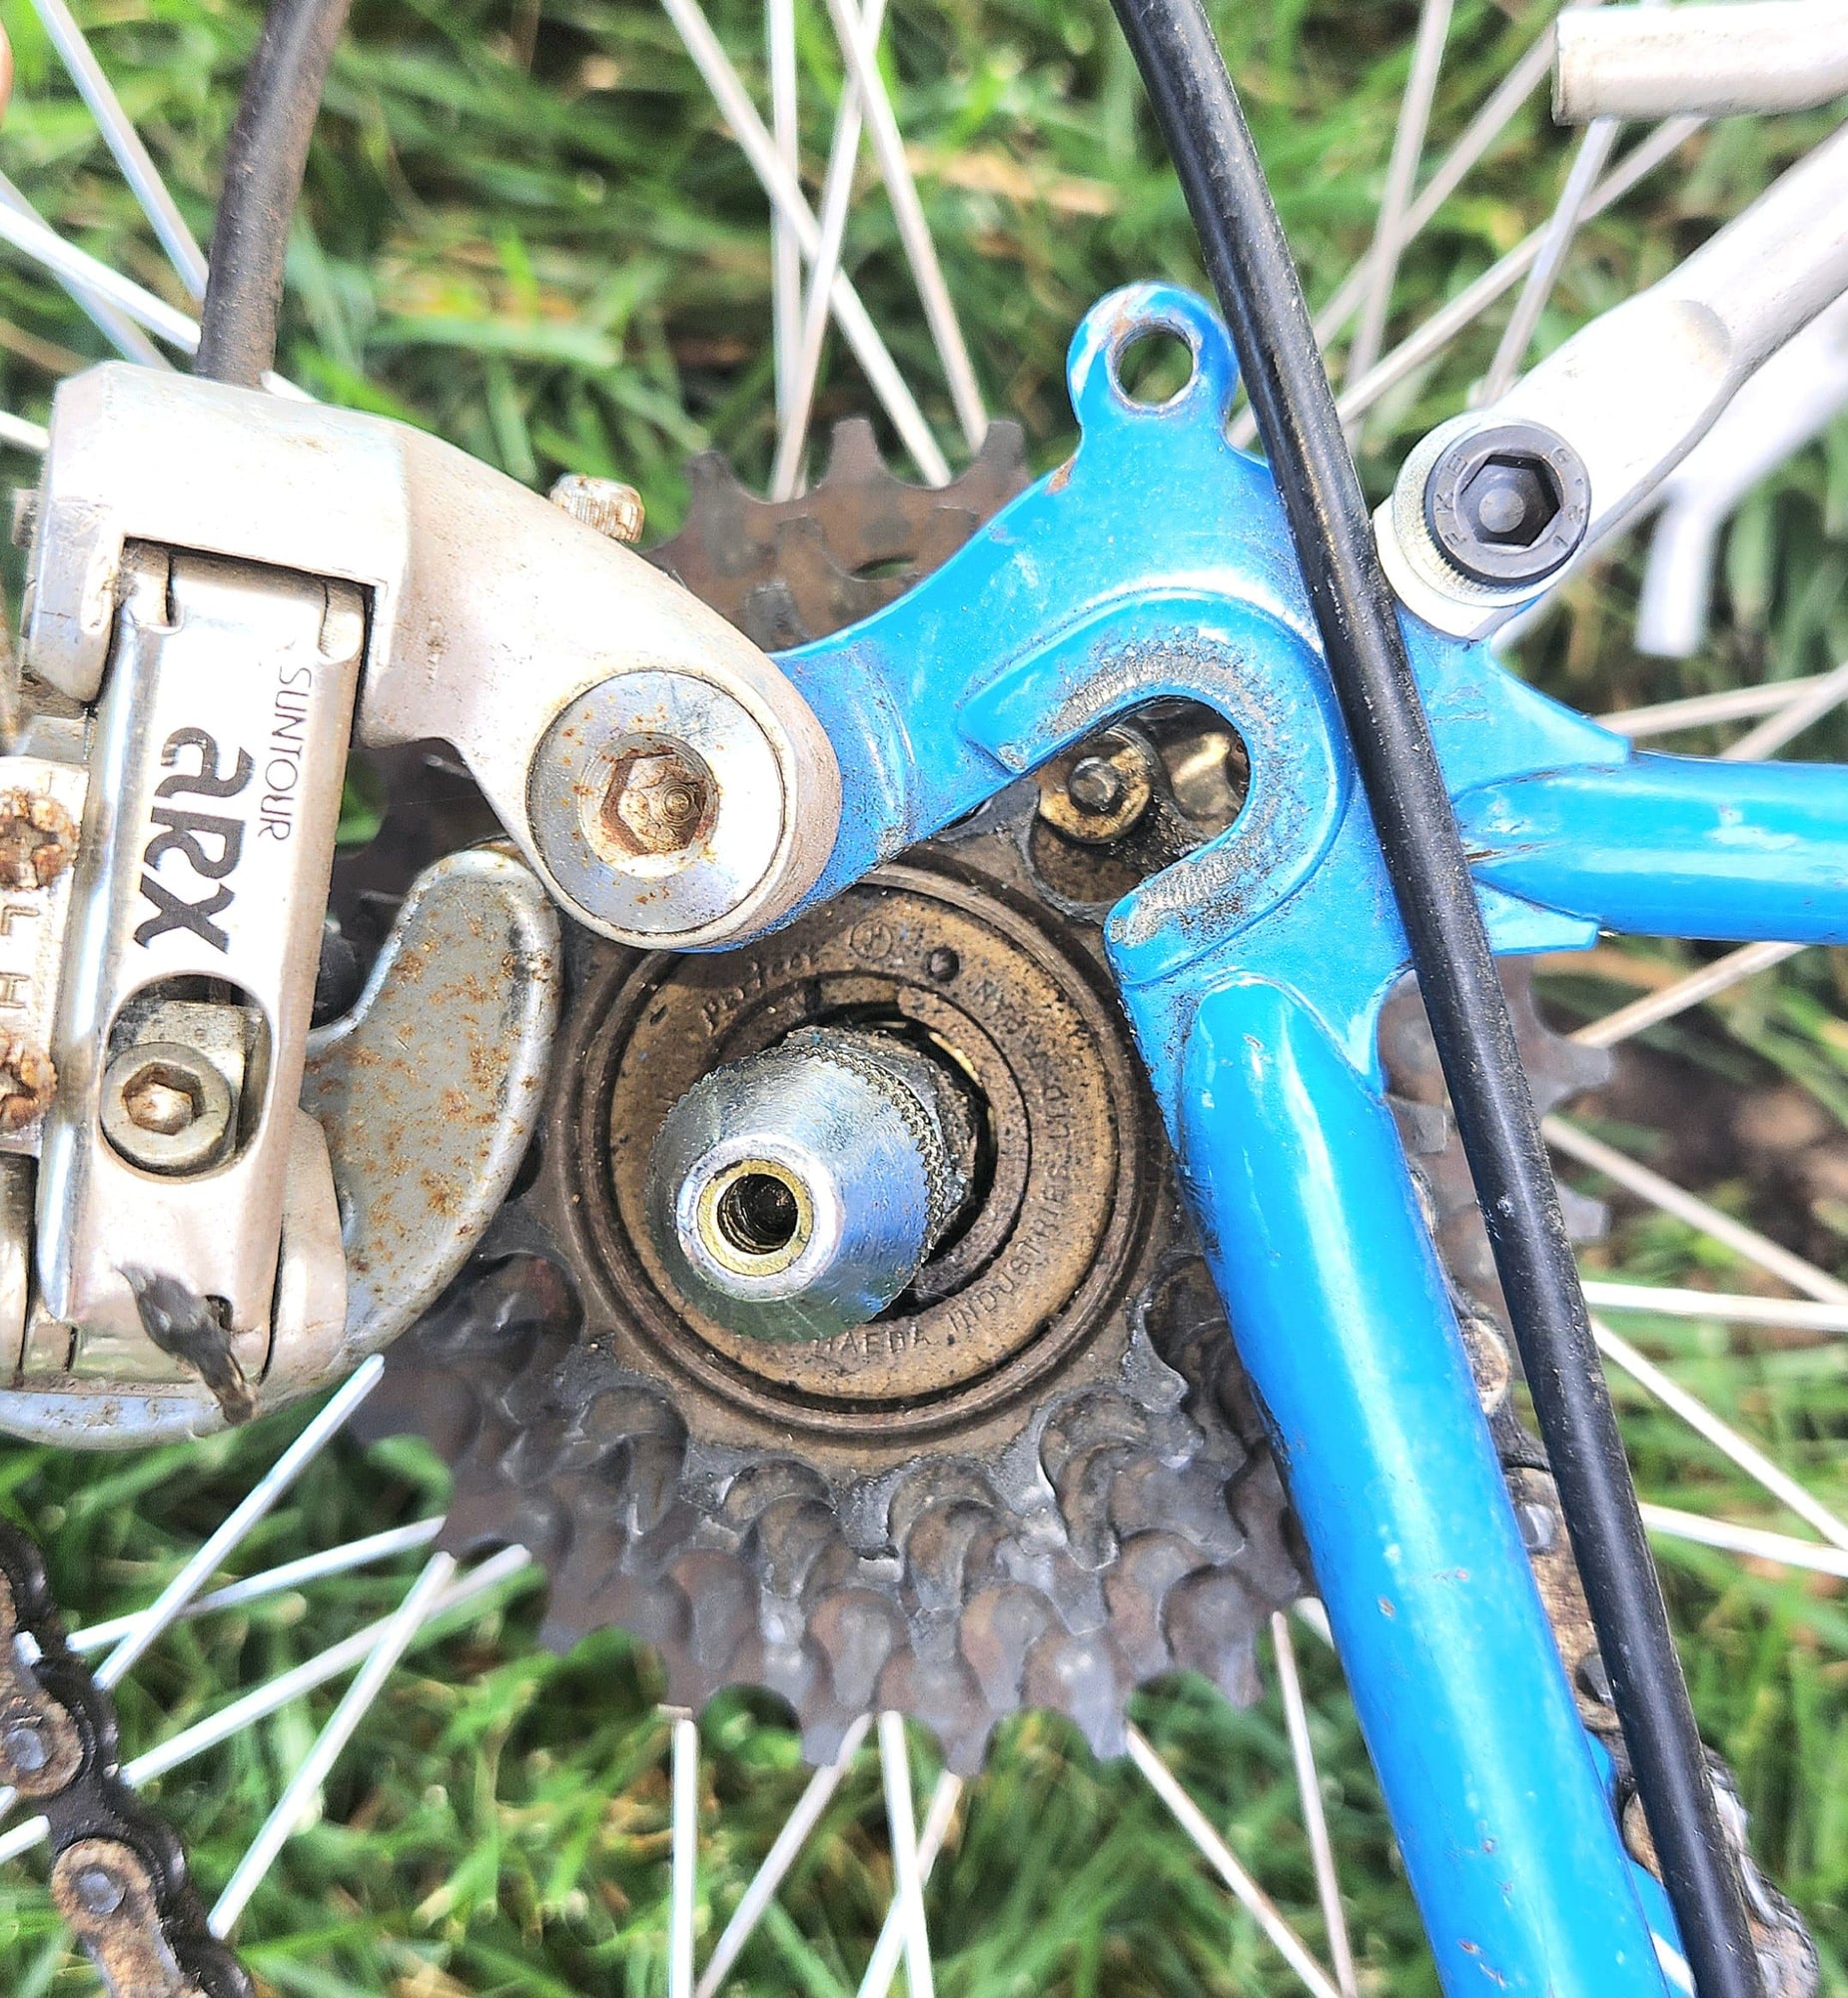
For that, we need to know the brand and model of the freewheel itself. If the SunTour derailleurs are original, chances are that the freewheel is also SunTour, and tools for those are readily available. Take the wheel out of the frame and get a close look at the faceplate on the freewheel to see who made it and what tool will work to remove it.
09-03-23, 05:22 PM
#10
Senior Member
09-03-23, 05:38 PM
#11
Just Pedaling

Join Date: Oct 2021
Location: US West Coast
Posts: 1,014
Bikes: YEP!
Mentioned: 0 Post(s)
Tagged: 0 Thread(s)
Quoted: 334 Post(s)
Liked 522 Times
in
348 Posts
gmcjetpilot,
Remove the freewheel from the rear hub and soak it in solvent. Flush it with clean solvent after soaking. Let it sit in the sun until it is hot to dry it out.
Then, add oil thru the little gaps on both sides. Spin it as you add the oil. Spinning helps the oil spread rather than pool in one spot. Also, you will know when the oil has reached the ratchet mechanism, as it goes quiet when wet with oil.
DO NOT disassemble it under any circumstances.
Add a little anti-sieze or grease to the hub threads before screwing the freewheel back in place.
Add oil to the freewheel whenever it gets really loud.
Keep your chain oiled, too. A little bit every 100 miles or so. When you can hear it, it is dry.
TOOLS NEEDED -
freewheel removal tool
Large wrench (bigger is better) :-)
 09-03-23, 05:39 PM
#12

Senior Member
Join Date: Dec 2005
Posts: 17,159
Mentioned: 481 Post(s)
Tagged: 0 Thread(s)
Quoted: 3811 Post(s)
Liked 6,713 Times
in
2,613 Posts
I like a good restorative shvitz now and again.
Likes For nlerner:
09-03-23, 10:30 PM
#13
Senior Member
Unless it has wobble play in it. Then spend the 20 bucks to replace or open that baby up and throw in some new ball bearings. They're are 2 rows of them and they are really small. You do not use grease on them. Good 30W oil is fine. The only time they see use is when you're not pedaling (coasting). Good luck and enjoy,
Still, you could be right but start with cleaning and re-oiling and go from there.
09-04-23, 06:25 AM
#14
Freewheel Medic

Join Date: Oct 2005
Location: An Island on the Coast of GA!
Posts: 12,885
Bikes: Snazzy* Schwinns, Classy Cannondales & a Super Pro Aero Lotus (* Ed.)
Mentioned: 140 Post(s)
Tagged: 0 Thread(s)
Quoted: 1453 Post(s)
Liked 2,196 Times
in
963 Posts
IMO, the freewheel service advice offered by Bad Lag and Spedfast is incomplete and only a short-term temporary solution.
I agree with JohndThompson that the freewheel is a Suntour. I'm confident that this is so by the bevel on the largest sprocket's teeth. I'll venture further that it is the "Perfect" model and uses the two-prong remover.
Looking at the overall condition and the fact that it is 40 years old, I'd encourage a complete overhaul and not just a flush and dribble. A full cleaning of the interior will reveal if there is corrosion on the surfaces, pawls, and bearings. The bearings on this model were not as high a grade as the ones in the ProCompe model and often need replacement. They are 1/8" in size.
New grease on the bearing races does wonders for the performance and the grease, especially synthetic grease, does an excellent job keeping future contaminates out of the internal portions. Oil cannot do this and leaks out the same way it was applied.
__________________
Bob
Enjoying the GA coast all year long!
Thanks for visiting my website: www.freewheelspa.com
Bob
Enjoying the GA coast all year long!
Thanks for visiting my website: www.freewheelspa.com
Likes For pastorbobnlnh:
09-04-23, 06:45 AM
#15
Senior Member
Join Date: Jun 2019
Posts: 939
Mentioned: 1 Post(s)
Tagged: 0 Thread(s)
Quoted: 539 Post(s)
Liked 466 Times
in
259 Posts
I would replace chain and cables and clean as well as do the BB, freewheel and hubs.
09-04-23, 10:50 AM
#16
Senior Member
The hubs look to be sealed bearing units. Other than cosmetic cleaning, no internal maintenance is required.
Guy comes looking for maintenance advice and gets criticized over whether his cleaning efforts met someone else's criteria for "restored".
While I am sure pastorbobnlnh is correct about a deep cleaning of the freewheel, I just don't think it is essential or advisable for a newbie to do that particular operation,... yet.
Last edited by Bad Lag; 09-04-23 at 10:53 AM.
09-04-23, 11:15 AM
#17
se�or miembro
Join Date: Dec 2018
Location: Pac NW
Posts: 6,625
Bikes: '70s - '80s Campagnolo
Mentioned: 92 Post(s)
Tagged: 0 Thread(s)
Quoted: 3889 Post(s)
Liked 6,488 Times
in
3,211 Posts

Likes For SurferRosa:
09-04-23, 12:53 PM
#18
Senior Member
I went to the Park Tools web site and priced out the tools needed to service the bottom bracket. It worked out to be about $69, which is surprisingly low.
Freewheel removal tools are $10, assuming you already have a large enough wrench to unscrew the freewheel.
So, for under ~$100 including tax and shipping, you can have all the tools to do these two jobs.
Freewheel removal tools are $10, assuming you already have a large enough wrench to unscrew the freewheel.
So, for under ~$100 including tax and shipping, you can have all the tools to do these two jobs.
09-04-23, 01:17 PM
#19
se�or miembro
Join Date: Dec 2018
Location: Pac NW
Posts: 6,625
Bikes: '70s - '80s Campagnolo
Mentioned: 92 Post(s)
Tagged: 0 Thread(s)
Quoted: 3889 Post(s)
Liked 6,488 Times
in
3,211 Posts
Appears this the third started thread by the op asking for bb and hub tools for this bike. Seems he received a lot of good info already in the first two.
https://www.bikeforums.net/classic-v...ity-check.html
https://www.bikeforums.net/bicycle-m...les-chain.html
https://www.bikeforums.net/classic-v...ity-check.html
https://www.bikeforums.net/bicycle-m...les-chain.html
09-04-23, 01:37 PM
#20
Senior Member
Join Date: Dec 2005
Posts: 17,159
Mentioned: 481 Post(s)
Tagged: 0 Thread(s)
Quoted: 3811 Post(s)
Liked 6,713 Times
in
2,613 Posts
Appears this the third started thread by the op asking for bb and hub tools for this bike. Seems he received a lot of good info already in the first two.
https://www.bikeforums.net/classic-v...ity-check.html
https://www.bikeforums.net/bicycle-m...les-chain.html
https://www.bikeforums.net/classic-v...ity-check.html
https://www.bikeforums.net/bicycle-m...les-chain.html
Likes For nlerner:
 09-04-23, 04:16 PM
#22
Banned.
https://www.parktool.com/en-us/produ...l-remover-fr-2
Soak it in PBBlaster or Kroil for a good long time. Leverage is your friend.
Soak it in PBBlaster or Kroil for a good long time. Leverage is your friend.
09-04-23, 04:52 PM
#23
Newbie
Thread Starter
Join Date: Jun 2022
Posts: 56
Mentioned: 1 Post(s)
Tagged: 0 Thread(s)
Quoted: 34 Post(s)
Likes: 0
Liked 11 Times
in
10 Posts
res�to�ra�tion
/ˌrestəˈrāSH(ə)n/
1) the action of returning something to a former owner, place, or condition.
Your comment is laughable and pedantic.. Yoda say? Helpful,not he is..... Ha ha. It was more than cosmetic. Serviced or replacement of everything that was needed. The.key word NEEDED. I even had a new fork fabricated (long story)., My bike since new 1983, it was in storage 20 years and not ridable. I road it yesterday 20 miles. Amazing. A lot of my time and money. I am calling it restoration because I speak English. My story and sticking to it. Bianchi recalled the fork on the early Bianchi Randonneur's in 2000.
https://www.cpsc.gov/Recalls/1990/bi...20the%20riders.
To Bianchi's credit compensated me slightly, but I had to send fork back. I could have kept it. May be I should have.. I could have scrapped it but decided not to. Glad I did restore it. I sourced a fork that was close (not easy or cheap). I had an amazing local bike frame maker modify it to match the Bianchi Randonneur configuration (cantilever brakes, dual lugs for fender and/or rack). More than cosmetic and very proud of my work, including paint matching of forks which were all chrome. I may find some Bianchi stickers for fork to match original. Yes restoration and more than cosmetic. As far as free wheel and bottom bracket/crank they seem OK, but as I said I still want to service it. There is no LAW that says this work is required to call a bike restored. I have some hardware that needs re-plating, polishing, painting. .For now I am going to ride it and enjoy it. Regardless the bike rides like it is 1983...
https://www.bikeforums.net/classic-v...y-check-2.html
Last edited by gmcjetpilot; 09-04-23 at 05:18 PM.
Likes For gmcjetpilot:
09-04-23, 06:28 PM
#24
Just Pedaling
Join Date: Oct 2021
Location: US West Coast
Posts: 1,014
Bikes: YEP!
Mentioned: 0 Post(s)
Tagged: 0 Thread(s)
Quoted: 334 Post(s)
Liked 522 Times
in
348 Posts
I'd call it a work in progress, but really glad you're enjoying it and riding it. That is what it's all about.
09-04-23, 10:20 PM
#25
Newbie
Thread Starter
Join Date: Jun 2022
Posts: 56
Mentioned: 1 Post(s)
Tagged: 0 Thread(s)
Quoted: 34 Post(s)
Likes: 0
Liked 11 Times
in
10 Posts
In this C&V community, a full overhaul of all bearing components is required for either a refurbish or restoration. It's fine if you don't know that, but those are the terms we use, so we're all on the same page.
A restoration would also include an original Bianchi fork. I'm sorry you went to the trouble of replacing the fork. If the forum led you in that direction, they made a mistake. But I'm very glad you sorted at least what you thought you needed to sort, and I'm glad you're happy with the bicycle.
A restoration would also include an original Bianchi fork. I'm sorry you went to the trouble of replacing the fork. If the forum led you in that direction, they made a mistake. But I'm very glad you sorted at least what you thought you needed to sort, and I'm glad you're happy with the bicycle.
I could bring it to one of 4 bike shops and have it done for $100+tax. However I like restoring things and I'm good at it. I also have a nice shop with every tool you can imagine. However I'm thin on specialized bike tools. I need an excuse to buy more tools. I want to learn how to service these components. YouTube has plentiful help. It really is up to me what I do. i just asked for tool suggestions. It's just a bike not "rocket surgery or brain engineering". Ha ha. I could likely do the job with tools I have or improvise some. However I like having proper tools.
o So it's not 100% original and that is also problem for you? .Ha ha. You are quite the authoritarian. This is for fun. Sorry. Don't care. Like cars and motorcycles I restored, some near100% original but with tasteful upgrades or modifications. NOTHING IS ORIGINAL once you restore it. You want original you do nothing to it, warts and all. The seat is not original and I will replace the cables in near future with suitable replacement. Not original.. Other restorations I did were very modified. They were restored better than original in many cases. The term is RESTO MOD. Sorry to trigger you by calling it a restoration. I Love it ❤️. That is all that matters.
Fork? I did not want to risk fork failure doing 20 mph. Mine was out of the serial numbers from bikes made in 1983 to 1984 affected. Its possible it was fine. Again Bianchi took good care of me. They have a life time warranty! You are not comprehending the fact this is my bike since new 40 years ago. BTW this is not the only bike I've owned since, past or present. I had half dozen b but sold 2 recently.. I maintain them all.
Then you apologize "forum lead you in that direction". Ha ha.. I make my own decisions and researched it. I'm sure I know more about Bianchi Randonneur forks than you. I'm no bike expert like you, but I'm not new to bikes and know math, physics and science. It is restored, done, rides like a dream, no regrets and LOVE IT. Nothing you say can change my joy. It works beautifully even with new MOD fork. Value lost? Don't care. If it was 1000% original pristine yes it would be worth more. I have a Rolex Explorer II I bought new in 1993. I am thinking of selling it. I lost the original box and paper work. Even though it is worth 3 to 4 times what I paid for it, it's worth less due to not having the box and ppw.
The chance of finding just a Randonneur fork, this size, out of production for 30 yrs. slim to nil. They apparently had some to support the recall 23 yrs ago. I talked to Bianchi USA manager of warranty and there has been no stock for decades. Buy a whole vintage Randonneur? I saw them. They were in poor condition, not original, missing parts and $400-$700 asking. Mine is in good condition, and have about $300 into new tires, tubes, brakes, handlebar wrap and lever covers, misc. The $300 is including $140 into the fork. I kniw the frame maker and he gave me a good price. Mod of the steerer I did. I have machine shop tools. I loved working on it. I work on cars, motorcycles, airplanes, restore tube electronics.... I'm kind of handy RESTORING things. That is what I do restore restore and more restoration. No one ever told me what I did was not a restoration until now. Ha ha.
I just need tool suggestion not life advice or nit picking words or patronizing feeling sorry for me. What is your deal? I could care less about original. I made that decision. It's time for me to enjoy my bike again and ride it. My time in the saddle yesterday peddling on the miles of smiles confirms my choice. It rides better than any street bike I ever owned. BTW Bianchi took care of me.. I am way ahead. So chill.
Please stop ✋️ replying if you don't have a relevant comment about tools and service please. To those that did help me thank you!!!!!
Last edited by gmcjetpilot; 09-05-23 at 07:09 AM.