


Restoring a stainless 1982 Hon (Dahon) Convertible
 06-02-19, 03:07 PM
#1
Newbie
Thread Starter
Restoring a stainless 1982 Hon (Dahon) Convertible
Last year I picked up an early-model stainless steel Hon Convertible. I'm now in the process of cleaning it up and restoring it and wanted to share the process with anyone who's interested.
This bike is likely a 1982 model. I'm guessing a little, as I believe that's the first official model year, and the Suntour three-speed hub bears a date stamp of 81 6. The bike's serial number starts with a B.
The bike was listed on the local Craigslist at an attractive price. Here's the original ad, cleaned up for the sake of discretion, along with full-size pictures from the seller's listing. Dig that noseless seat - not just noseless, but mounted backward.


For some reason, the last photo was upside down in the seller's ad...
I was not looking for a folder, but the price was low enough to justify a project, and the bike was close enough to my workplace that I was able to drive over on my lunch break and take a look. It looked pretty clean, but in need of some attention, and I decided it might make a fun project and might earn me a little pocket money in the process.
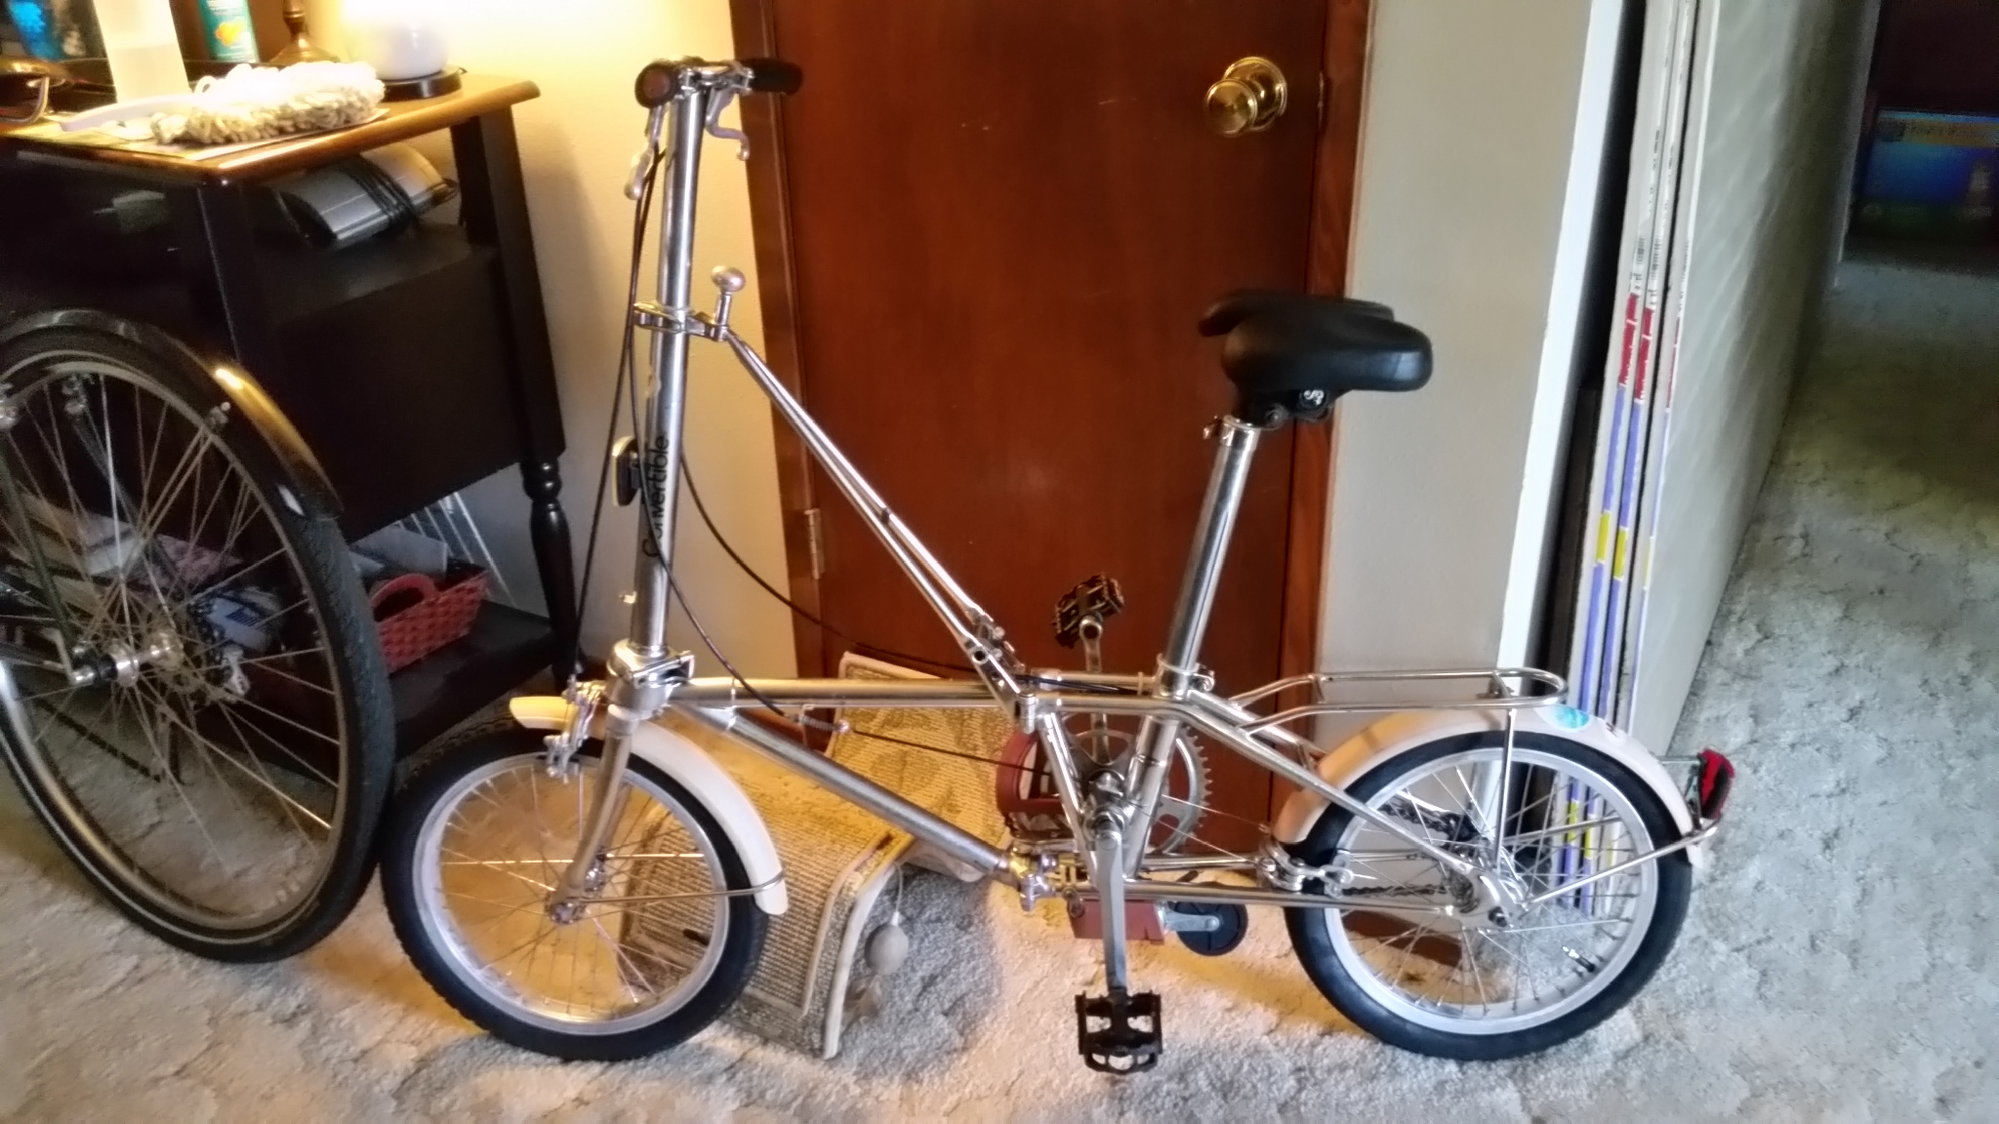
Here's another "before" shot, parked safely in the living room, behind my Bianchi. No real work has taken place, but at least the seat is now facing the correct direction.
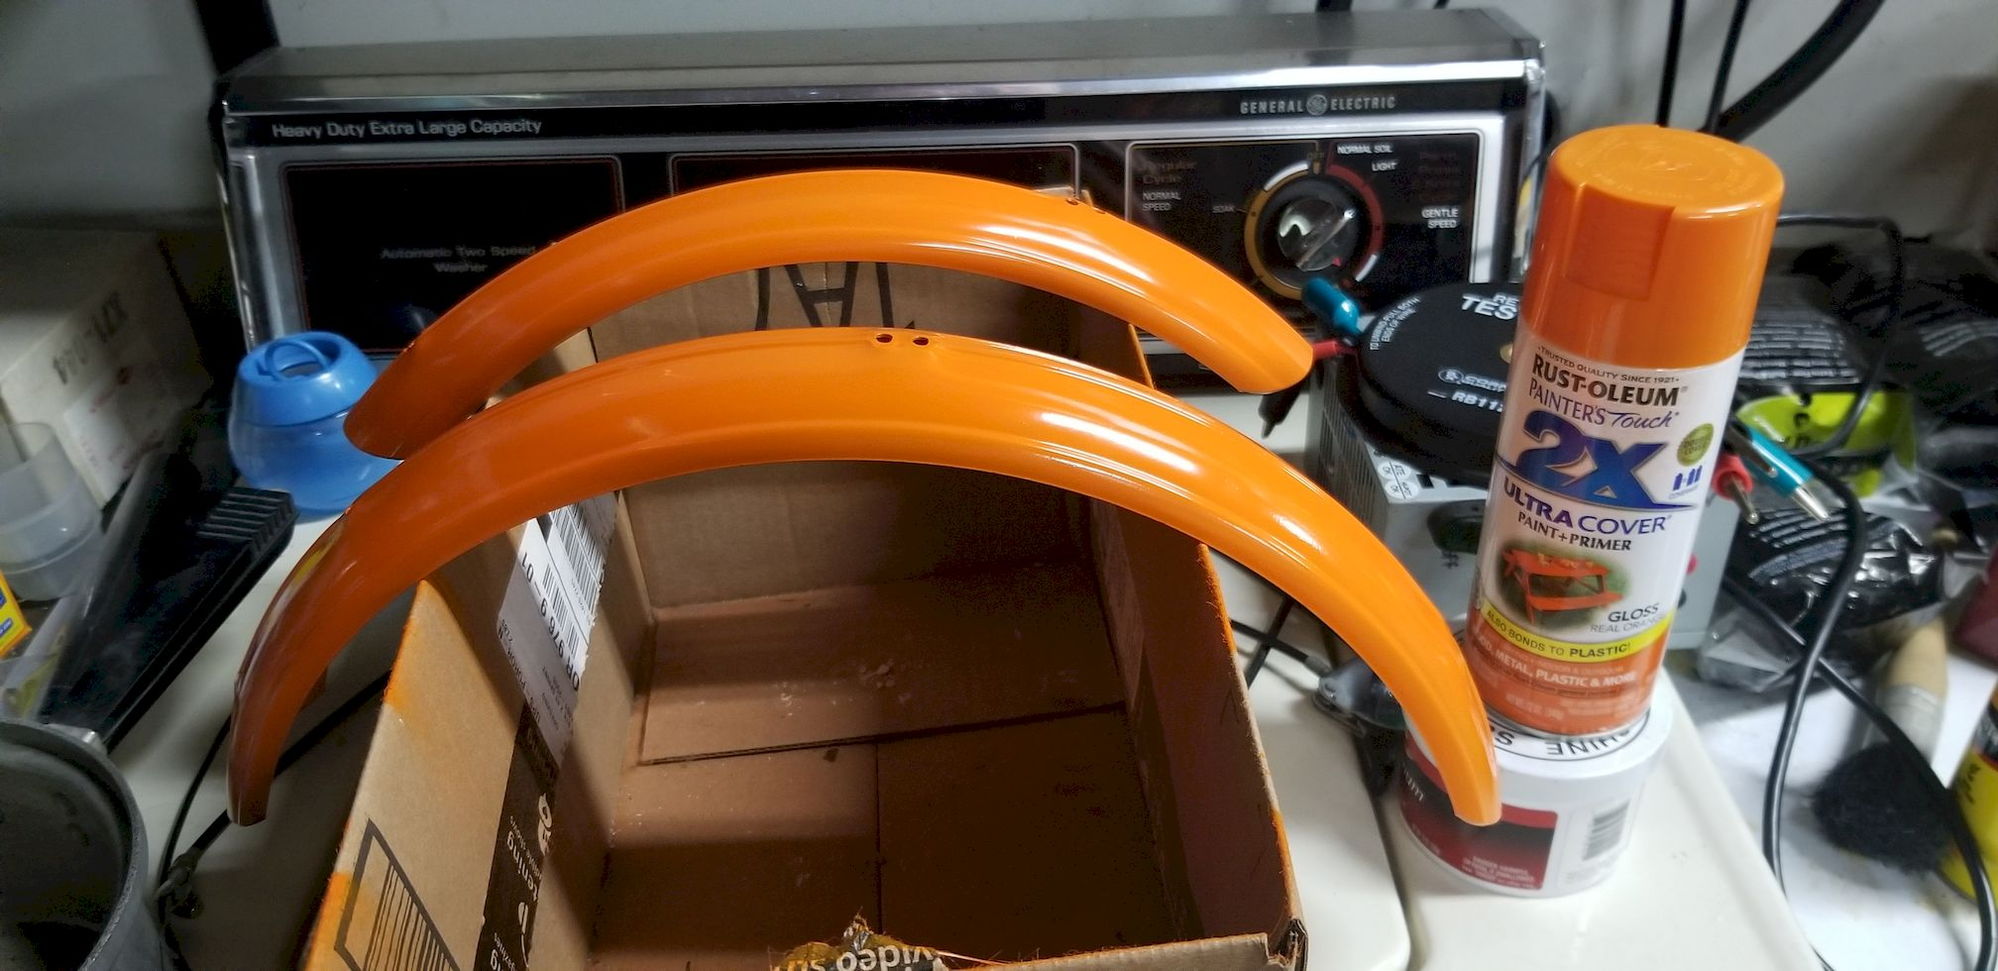
Last month the work began in earnest. One of the first steps was to get some color back into the plastic parts. Here's a before and after on the fenders. I first tried Krylon Fusion, labeled as "Pumpkin (Safety) Orange"; the cap was brilliant, exactly the orange you can see in spots that were covered by decals, but the paint came out very earthy, nearly brown. Once the Krylon had cured, I tried the paint seen in the second photo. It's not quite as red as the original color, but it looks pretty sharp to me.
Here are the fenders before and after paint. The landing gear block and chain guard got the same treatment. They were originally closer to a pinkish red color, but I'm assuming they would have matched the fenders if the materials had allowed it.

The noseless seat went in the trash. It has been replaced with this thrift store find for the time being.

The cottered crank wasn't too appealing. It is entirely conventional, but all the photos I've seen show a folding crank on the right side of these bikes, which suggests that this crank isn't original to the bike anyway. I found this three-piece square-taper crankset at the co-op. It had a steel double chainring setup with aluminum cranks. The inner chainring was removed. The big ring is the correct size (52 tooth) and the cranks are 165 mm, same as the cranks on the bike.
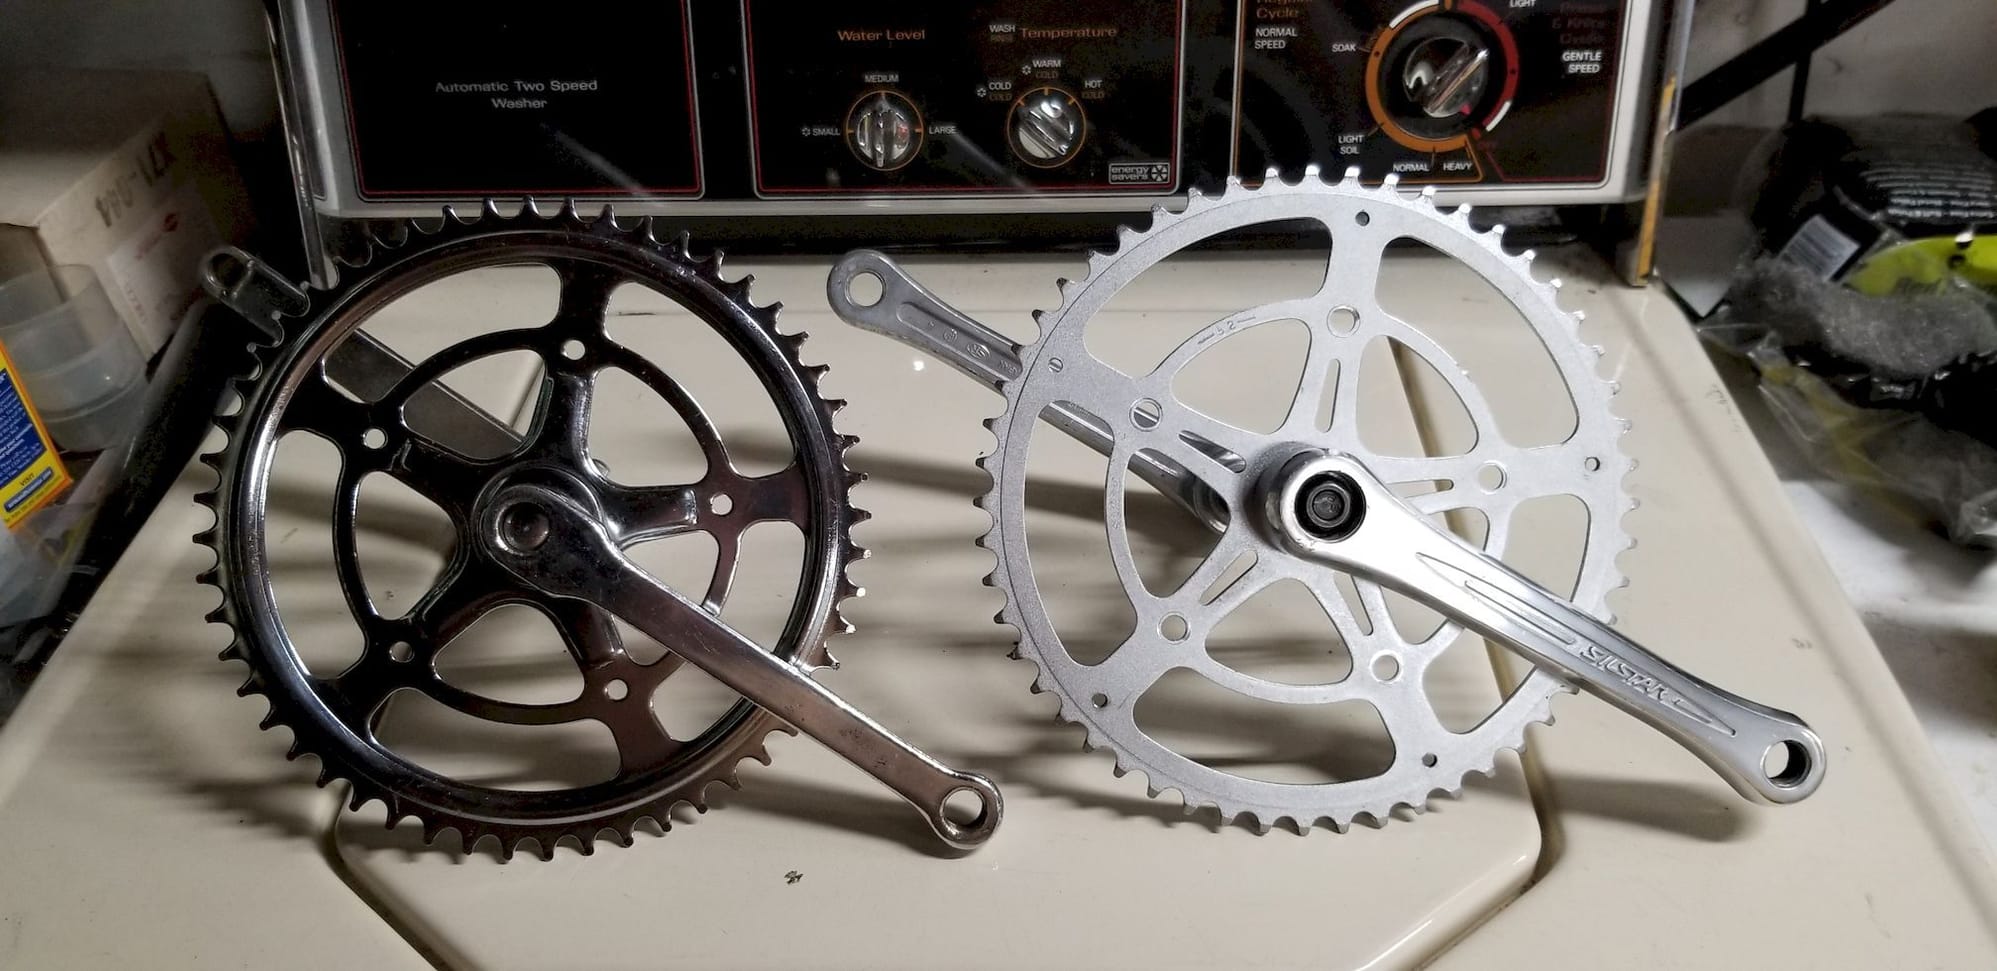
For anyone interested, the bike has a 65mm bottom bracket, not 68mm. I am using a 3S crank spindle and the original loose ball bearing bottom bracket. A 5mm spacer made from 1-1/2" OD, 16-gauge, 304 stainless steel tubing was used on the right side of the bike to get the chainring away from the frame and bring the crank arms closer to a centered position relative to the frame. The bottom bracket was thoroughly cleaned and lubricated with lots of Lucas Red 'n Tacky grease. It's automotive stuff - feel free to wring your hands in despair at my failure to use boutique bicycle-specific products costing more than a Hawaiian vacation - but it should be effective, and will hopefully hold up against washout better than lighter products.
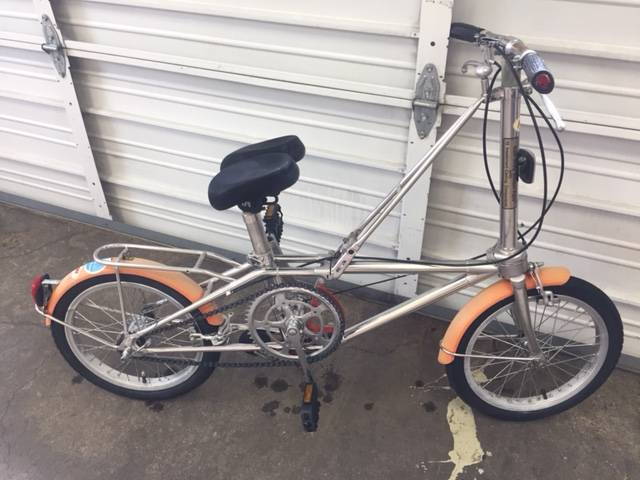
The frame, being all stainless steel, did not require any painting. It got a good going-over with good old Mother's Mag and Aluminum Polish. Some of the tubing was a little hazy, so a little extra rubbing was required, but it came out pretty good. Here's the newly polished frame with the crankset, inner chain guard, and landing gear installed.

This bike is likely a 1982 model. I'm guessing a little, as I believe that's the first official model year, and the Suntour three-speed hub bears a date stamp of 81 6. The bike's serial number starts with a B.
The bike was listed on the local Craigslist at an attractive price. Here's the original ad, cleaned up for the sake of discretion, along with full-size pictures from the seller's listing. Dig that noseless seat - not just noseless, but mounted backward.
For some reason, the last photo was upside down in the seller's ad...
I was not looking for a folder, but the price was low enough to justify a project, and the bike was close enough to my workplace that I was able to drive over on my lunch break and take a look. It looked pretty clean, but in need of some attention, and I decided it might make a fun project and might earn me a little pocket money in the process.
Here's another "before" shot, parked safely in the living room, behind my Bianchi. No real work has taken place, but at least the seat is now facing the correct direction.
Last month the work began in earnest. One of the first steps was to get some color back into the plastic parts. Here's a before and after on the fenders. I first tried Krylon Fusion, labeled as "Pumpkin (Safety) Orange"; the cap was brilliant, exactly the orange you can see in spots that were covered by decals, but the paint came out very earthy, nearly brown. Once the Krylon had cured, I tried the paint seen in the second photo. It's not quite as red as the original color, but it looks pretty sharp to me.
Here are the fenders before and after paint. The landing gear block and chain guard got the same treatment. They were originally closer to a pinkish red color, but I'm assuming they would have matched the fenders if the materials had allowed it.
The noseless seat went in the trash. It has been replaced with this thrift store find for the time being.
The cottered crank wasn't too appealing. It is entirely conventional, but all the photos I've seen show a folding crank on the right side of these bikes, which suggests that this crank isn't original to the bike anyway. I found this three-piece square-taper crankset at the co-op. It had a steel double chainring setup with aluminum cranks. The inner chainring was removed. The big ring is the correct size (52 tooth) and the cranks are 165 mm, same as the cranks on the bike.
For anyone interested, the bike has a 65mm bottom bracket, not 68mm. I am using a 3S crank spindle and the original loose ball bearing bottom bracket. A 5mm spacer made from 1-1/2" OD, 16-gauge, 304 stainless steel tubing was used on the right side of the bike to get the chainring away from the frame and bring the crank arms closer to a centered position relative to the frame. The bottom bracket was thoroughly cleaned and lubricated with lots of Lucas Red 'n Tacky grease. It's automotive stuff - feel free to wring your hands in despair at my failure to use boutique bicycle-specific products costing more than a Hawaiian vacation - but it should be effective, and will hopefully hold up against washout better than lighter products.
The frame, being all stainless steel, did not require any painting. It got a good going-over with good old Mother's Mag and Aluminum Polish. Some of the tubing was a little hazy, so a little extra rubbing was required, but it came out pretty good. Here's the newly polished frame with the crankset, inner chain guard, and landing gear installed.
Last edited by DarkMonohue; 06-02-19 at 09:06 PM. Reason: Spelling
 06-02-19, 03:11 PM
#2
Newbie
Thread Starter
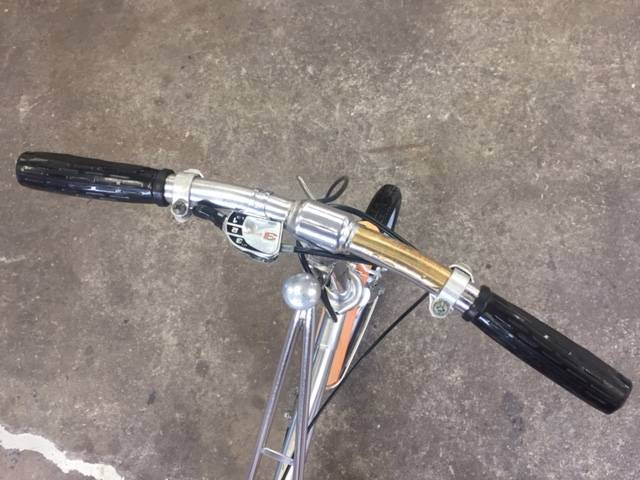
The last thing to talk about for now is the nylon bushings used at the seat post and handlebar stem. These bushings allow the two-piece seat post to collapse into the seat tube of the frame, and the handlebar/stem combo to collapse into the ... what would you call it? Head tube, maybe? Anyway, the bushings are meant to stay in place in their respective female tubes, and allow the piece inside them to slide to the desired position until clamped in place. The original bushings have shrunken a bit over the last 37 years and now want to stick to the tube inside them rather than allowing it to slide. Unfortunately, they are apparently not available new, so a coworker and I are attempting to reverse-engineer and recreate them. I modeled them in Sketchup, exported the 3D models as .stl files, and he used his 3D printer to produce these prototypes in PETG. PETG is entirely unsuitable for the part, but it lets us check fit and make adjustments to the dimensions before we start printing the real thing in nylon.
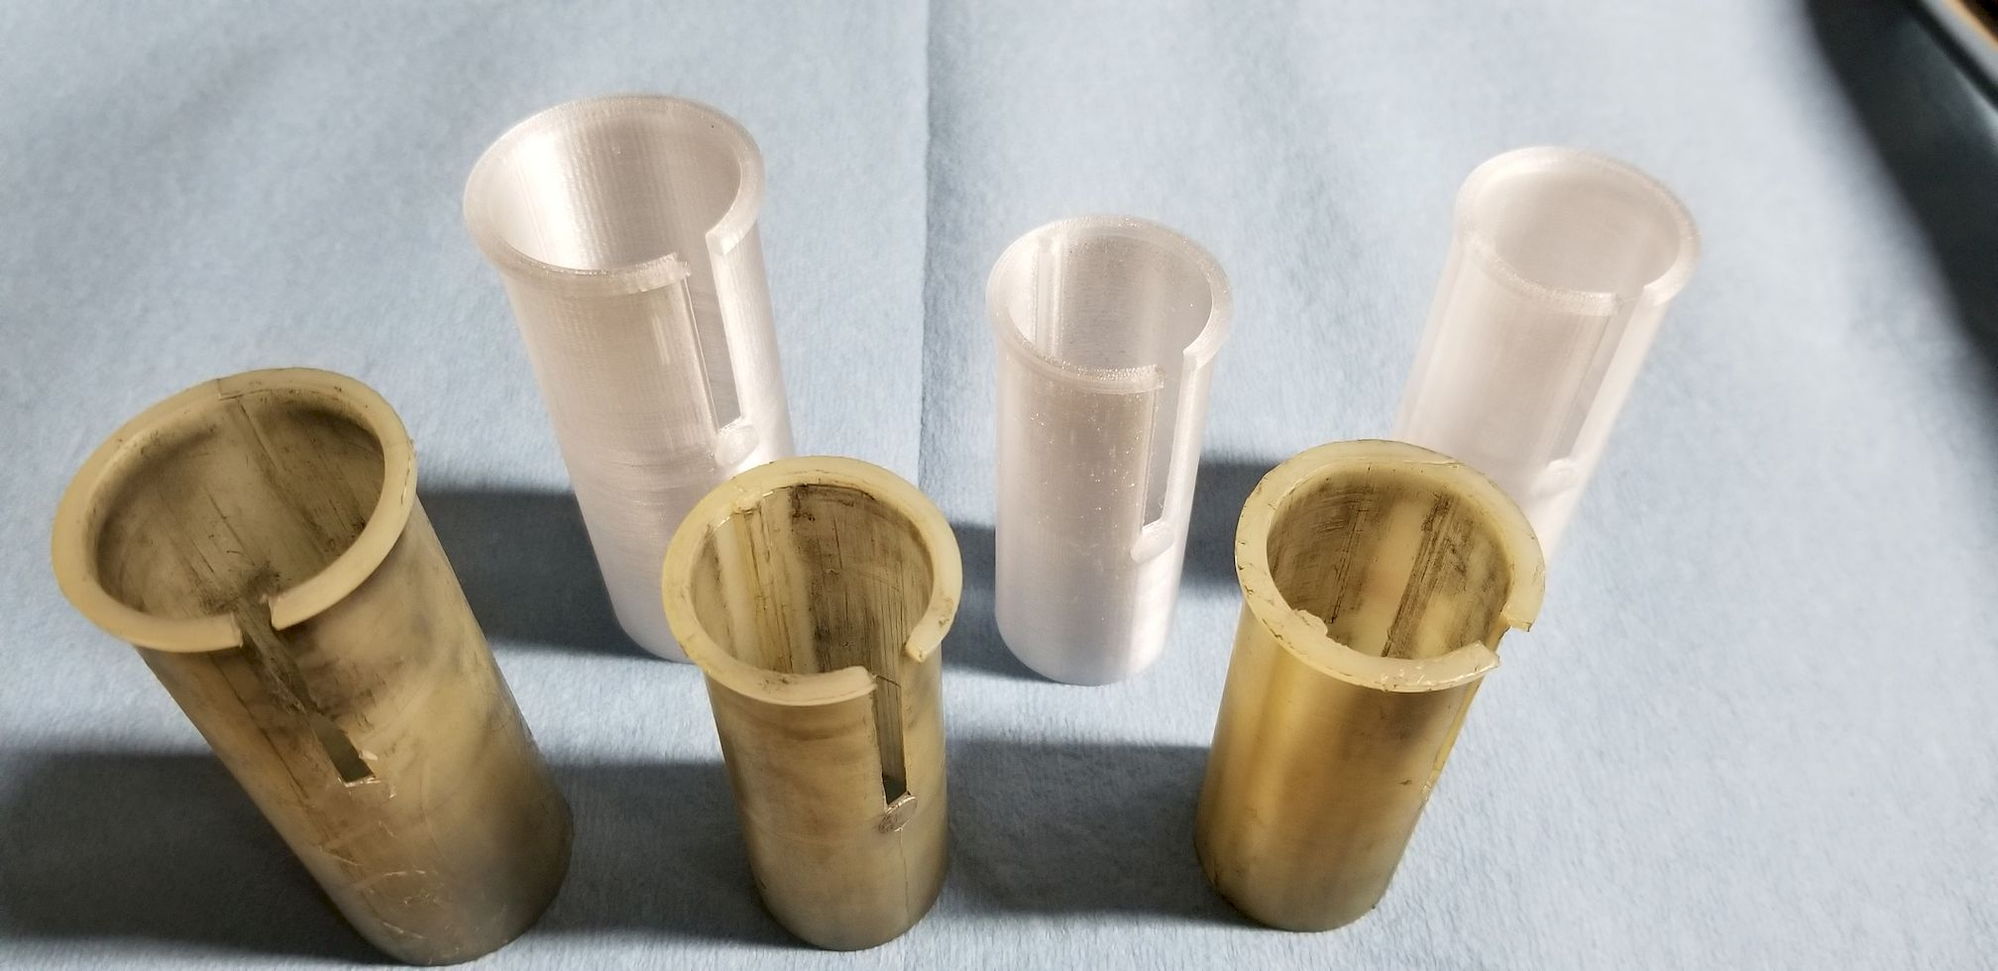
You can also see that the new parts have a round nubbin that fits into a corresponding hole in the tube in which the bushing lives. This locks the bushing in place. The nubbin was so far gone from the original bushings that I almost didn't notice that they were supposed to be there.
That's all I have for now, but I'll add more as things develop. Right now I am trying to figure out what to do about the rims. They're aluminum, but the anodized finish is badly clouded. I am tempted to strip the anodizing and brush the bare aluminum to a smoother, more even finish.
Comments, questions, and corrections are welcome. I'm far from an expert on these but am happy to answer any questions. Thanks for sharing this build with me.
Likes For DarkMonohue:
06-03-19, 10:41 AM
#3
Senior Member

That's very nice. Thanks for sharing!
06-03-19, 08:30 PM
#4
Senior Member

Congratulations!!! So cool that you have one with the orange fenders. My stainless Dahon is my favourite bike and I ride it everywhere, including multiple centuries. For me a Brooks saddle, repacking all bearings and new tires transformed the ride. I also changed the crank to a hollow cromoly one. Everyone who rides my bike loves it. I built my brother a Columbus Bianchi which he rides, but when he tried the Dahon I couldn�t get him off of it. He said it was just so much fun, which pretty much sums these bikes up. Happy riding!🙂
03-16-23, 11:48 PM
#6
Newbie
Thread Starter
Thanks for the bump. No, I sure didn't. It stalled out just about where you see it. I have a bagful of excuses. Probably the biggest is that we had a kid a couple of months after the last post, and raising a kid with quite literally nobody to help out (no family in the area, no church, tiny and sporadic social circle, etc.) is sort of time consuming. The fact that just about everything was shut down for a couple of those years anyway didn't help. That combination sucked the momentum out of all kinds of things. Frankly, the past few years have been pretty rough going.
There were other obstacles. The bushings we printed didn't really work out, and I never identified a good solution. I also never got past analysis paralysis on issues like the chalky oxidation on the rims and the slop in the three-speed hub. To top it off, my only real source of encouragement, a bike-crazy coworker, took a job elsewhere. So the bike sits unfinished, more or less where I left it, just dustier. Every time I look at it I remind myself that I really ought to do something with it. Someday, I guess.
In all the time I have not been working on the folder, I did at least manage to complete a pretty decent cleanup on a balance bike for the kid, so maybe that'll help make up for my lack of traction on the Hon:
2016 Giant Pre cosmetic restoration project

Thread
Thread Starter
Forum
Replies
Last Post
Gavush
Classic & Vintage
10
10-09-12 04:57 AM
TomTheBikeDude
Classic & Vintage
36
07-26-10 12:46 PM
Oldpeddaller
Classic & Vintage
17
12-08-09 05:44 PM
