


Chain gets stuck between cog and chainstay
 07-01-21, 08:42 PM
#1
Full Member
Thread Starter
Join Date: Oct 2018
Posts: 378
Bikes: 1994 Cadex CFR3, 2006 Scott CR1 SL, Rossin aero, Bertrand GB 2000, Spec Allez Pro
Mentioned: 4 Post(s)
Tagged: 0 Thread(s)
Quoted: 134 Post(s)
Liked 68 Times
in
52 Posts
Chain gets stuck between cog and chainstay
I am currently working on a vintage Trek 2300 (the neon yellow CF one). It's a 7 speed so it has a 126mm rear spacing. The freehub on the rear wheel (Mavic MA 40 with a Shimano 600 hub) was dead -- or at least I've got to find a way to repair it as it is currently spinning both ways -- so I've swapped it for another one that I had lying around. Both are 31mm.
While dissassembling the whole thing I've had trouble removing the axle as the cones and spacers were "seized". I've finally managed to remove them on both sides but I forgot (doh!) to measure the axle on each side. I've reassembled the wheel trying to get an equal number of threads on each side, but now when I put it back in the frame something is clearly wrong. The locknut on the DS barely gets out of the cassette body and so the cassette almost touches directly the chainstay. There clearly isn't enough space for the chain. When it goes on the smaller cog it simply gets stuck between the stay and the cog. It seems like an extra spacer could fix the issue (there already is a 1.3mm spacer on the DS) but I'd like to understand the cause of the issue.
I might have made a mistake somewhere as I'm not totally used to this kind of procedure. Any idea? Thanks a lot!
 07-01-21, 09:15 PM
#2

Senior Member

Join Date: May 2010
Location: Bastrop Texas
Posts: 4,479
Bikes: Univega, Peu P6, Peu PR-10, Ted Williams, Peu UO-8, Peu UO-18 Mixte, Peu Dolomites
Mentioned: 13 Post(s)
Tagged: 0 Thread(s)
Quoted: 966 Post(s)
Liked 1,629 Times
in
1,045 Posts
I am having trouble following ya... Can ya take a pic of the parts laid out in a line?
__________________
 No matter where you're at... There you are... Δf:=f(1/2)-f(-1/2)
No matter where you're at... There you are... Δf:=f(1/2)-f(-1/2)
07-01-21, 09:35 PM
#3
Senior Member

Join Date: Feb 2015
Location: Mission Viejo
Posts: 5,806
Bikes: 1986 Cannondale SR400 (Flat bar commuter), 1988 Cannondale Criterium XTR, 1992 Serotta T-Max, 1995 Trek 970
Mentioned: 20 Post(s)
Tagged: 0 Thread(s)
Quoted: 1944 Post(s)
Liked 2,164 Times
in
1,323 Posts
Generally on Shimano freehubs there’s about 6mm or 7mm between the edge of the freehub body and the outside of the locknut. I’ve done a lot of freehub mix-n-match in the last year.
On the drive side there is typically the cone, seal on a metal spacer 1.5mm, a washer and the locknut. Usually there are no other spacers. Washers range from 1mm to 2mm thick and locknut from 3.5mm to 5mm thick.
For a 7 speed you have to be missing something.
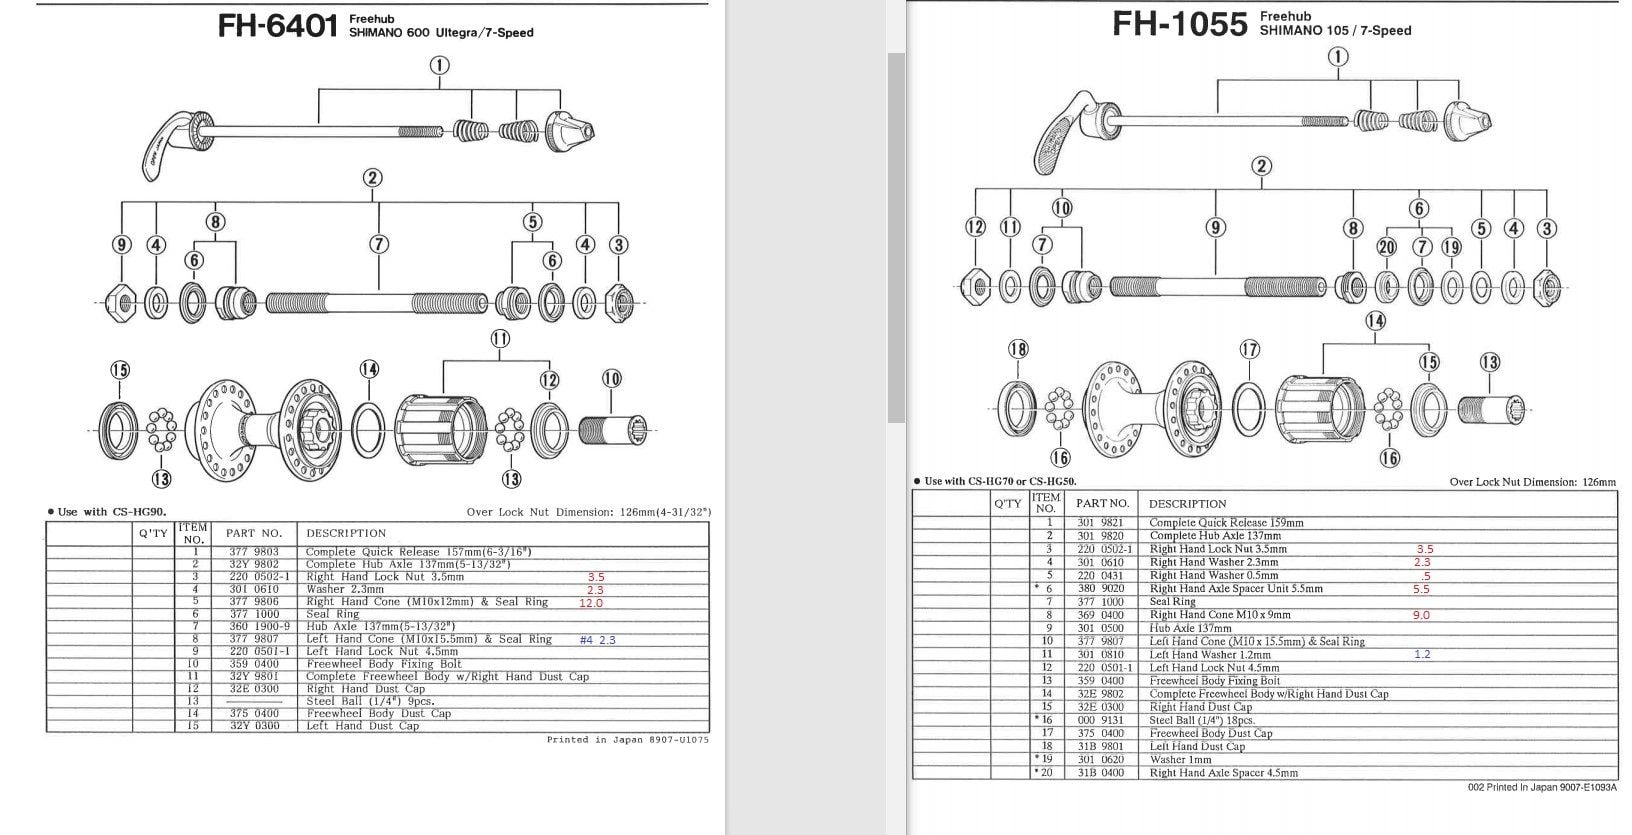
You can Google the hub and get an exploded view and parts list that sometimes gives widths of spacers, etc.
John
Edit added: The ball bearings are 1/4”.
More: If it is a freewheel, you definitely need spacers, between the seal and the locknut, on the drive side
On the drive side there is typically the cone, seal on a metal spacer 1.5mm, a washer and the locknut. Usually there are no other spacers. Washers range from 1mm to 2mm thick and locknut from 3.5mm to 5mm thick.
For a 7 speed you have to be missing something.
You can Google the hub and get an exploded view and parts list that sometimes gives widths of spacers, etc.
John
Edit added: The ball bearings are 1/4”.
More: If it is a freewheel, you definitely need spacers, between the seal and the locknut, on the drive side
Last edited by 70sSanO; 07-01-21 at 09:42 PM.
Likes For alo:
07-02-21, 12:50 AM
#5
Junior Member
Join Date: Jul 2017
Location: Sonoma
Posts: 17
Bikes: Custom Ti Gravel Self built Force AXS 1 X 12, Allied Cycle Works All Disc Force AXS DT Swiss 1400 Spine, Santa Cruz CC XTR
Mentioned: 0 Post(s)
Tagged: 0 Thread(s)
Quoted: 6 Post(s)
Likes: 0
Liked 2 Times
in
2 Posts
To make it simple, you need about 5mm front locknut to end of axle on each side so that the wheel sits in the drop outs correctly. So set your Drive Side first since you will adjust front the NDS. You will know right away if the set up is correct because you will need the axle to be extending further than the freewheel body. The figure out the NDS spacers and nut.
07-02-21, 01:38 AM
#6
Senior Member
If you changed the freehub body, there could be a slight difference in how deep into the freehub the bearing cup sits. If the cup is deeper within the body, even if the cone, spacer w/seal, washers, locknut are the same as before, the distance from the tend of the freehub body and locknut/frame will be reduced. The total over locknut distance (OLD) will also change slightly.
Does it seem that the OLD seem narrower? Does it seem that the dishing of the rim has changed?
If the frame allows, add a thin washer to the drive side under the locknut. If there isn't room for an additional washer, check to see if the locknut on each side is the same width. Many older Shimano hubs use a 3.5mm on the drive side and 4.5mm on the NDS. If this is the case, swap the positions to increase the DS.
07-02-21, 09:55 AM
#7
Senior Member
Join Date: Feb 2015
Location: Mission Viejo
Posts: 5,806
Bikes: 1986 Cannondale SR400 (Flat bar commuter), 1988 Cannondale Criterium XTR, 1992 Serotta T-Max, 1995 Trek 970
Mentioned: 20 Post(s)
Tagged: 0 Thread(s)
Quoted: 1944 Post(s)
Liked 2,164 Times
in
1,323 Posts
I am currently working on a vintage Trek 2300 (the neon yellow CF one). It's a 7 speed so it has a 126mm rear spacing. The freehub on the rear wheel (Mavic MA 40 with a Shimano 600 hub) was dead -- or at least I've got to find a way to repair it as it is currently spinning both ways -- so I've swapped it for another one that I had lying around. Both are 31mm.
Shimano made, in very general terms, two types of shoulders on their freehub bodies, one is a thin shoulder for shallow recessed hubs, and the other is a thick shoulder for deep recessed hubs. The splines are the same. This is just a general statement and there are a few differences and some nuances. Shimano's 600 FH-64xx uses a thin shoulder.
This should not impact the locknut to the freehub body edge, but it will just make the overall assembly wider and make it impossible to get back to 126mm since those extra mm's have to go somewhere.
Apart from that, I'm guessing that the DS cone from your 600 hub is not as thick as the one designed for the replacement freehub body. Wheels mfg (https://wheelsmfg.com/products/hub-parts/all-cones.html) gives a great illustration of this. If that is the case, then a spacer might solve everything.
The one other part of all of this is that in the late 80's/early 90's mfgs started to make their dropouts 128mm to accomodate either a 126mm or 130mm OLD. There is a good chance your Trek 2300 will accept a 128 or wider freehub. The one caveat is the axle for a 126mm OLD freehub is 137mm, with 5.5mm on each side beyond the locknut. As the OLD increases, that amount decreases. I have no problem with 5mm and some will say 4.5mm will work, but there will be a point at which you should get a wider axle, (141mm for a 130mm OLD), and grind/file it down so it won't interfere with the quick release.
John
Last edited by 70sSanO; 07-02-21 at 10:01 AM.
07-02-21, 10:09 AM
#8
Senior Member

Join Date: Nov 2014
Location: Eugene, Oregon, USA
Posts: 27,547
Mentioned: 217 Post(s)
Tagged: 0 Thread(s)
Quoted: 18376 Post(s)
Liked 4,511 Times
in
3,353 Posts
If your wheel was previously setup properly, the rim should end up exactly centered between the lock nuts. You can buy a "Dishing Tool" to measure. If you have vertical rear dropouts, or rear dropouts with adjusters, you can get a good estimate by putting the wheel in one way, then flipping it around backwards and checking again.
Depending on the hub, at 126mm, you often have zero spacers, or simply a washer on the left side. Over years of upgrades, I've often moved all the spacers from the left to the right. One should redish, but one may be OK if the change is minimal.
Depending on the hub, at 126mm, you often have zero spacers, or simply a washer on the left side. Over years of upgrades, I've often moved all the spacers from the left to the right. One should redish, but one may be OK if the change is minimal.
 07-05-21, 08:11 PM
#9
Full Member
Thread Starter
Join Date: Oct 2018
Posts: 378
Bikes: 1994 Cadex CFR3, 2006 Scott CR1 SL, Rossin aero, Bertrand GB 2000, Spec Allez Pro
Mentioned: 4 Post(s)
Tagged: 0 Thread(s)
Quoted: 134 Post(s)
Liked 68 Times
in
52 Posts
Sorry for the delay, I was out on the roads!
It is a cassette. And I have the setup you mention. Doesn't seem to me like anything is missing from the original parts (although I might be wrong) so I'm thinking it's either something I'm not doing right or a problem due to the swap. I should probably mention that the "new" freehub was taken on a set of wheels with 105SC hubs.
Tried to restart the process with ~6-7mm to balance both sides. They're pretty much equal. But as you can see on the pictures below the locknut doesn't get that much out of the freehub body.
Looking at both freehubs they look identical. I'm having trouble measuring the precise depth of the body but from what I can actually measure it looks pretty identical.
I could try playing with the spacers or adding another spacer but it could still be a beginners mistake that I'm not seeing here. I'm really not used to play with wheels. As this is a side project I'm in no hurry and just want to learn.
Here are a few shots:


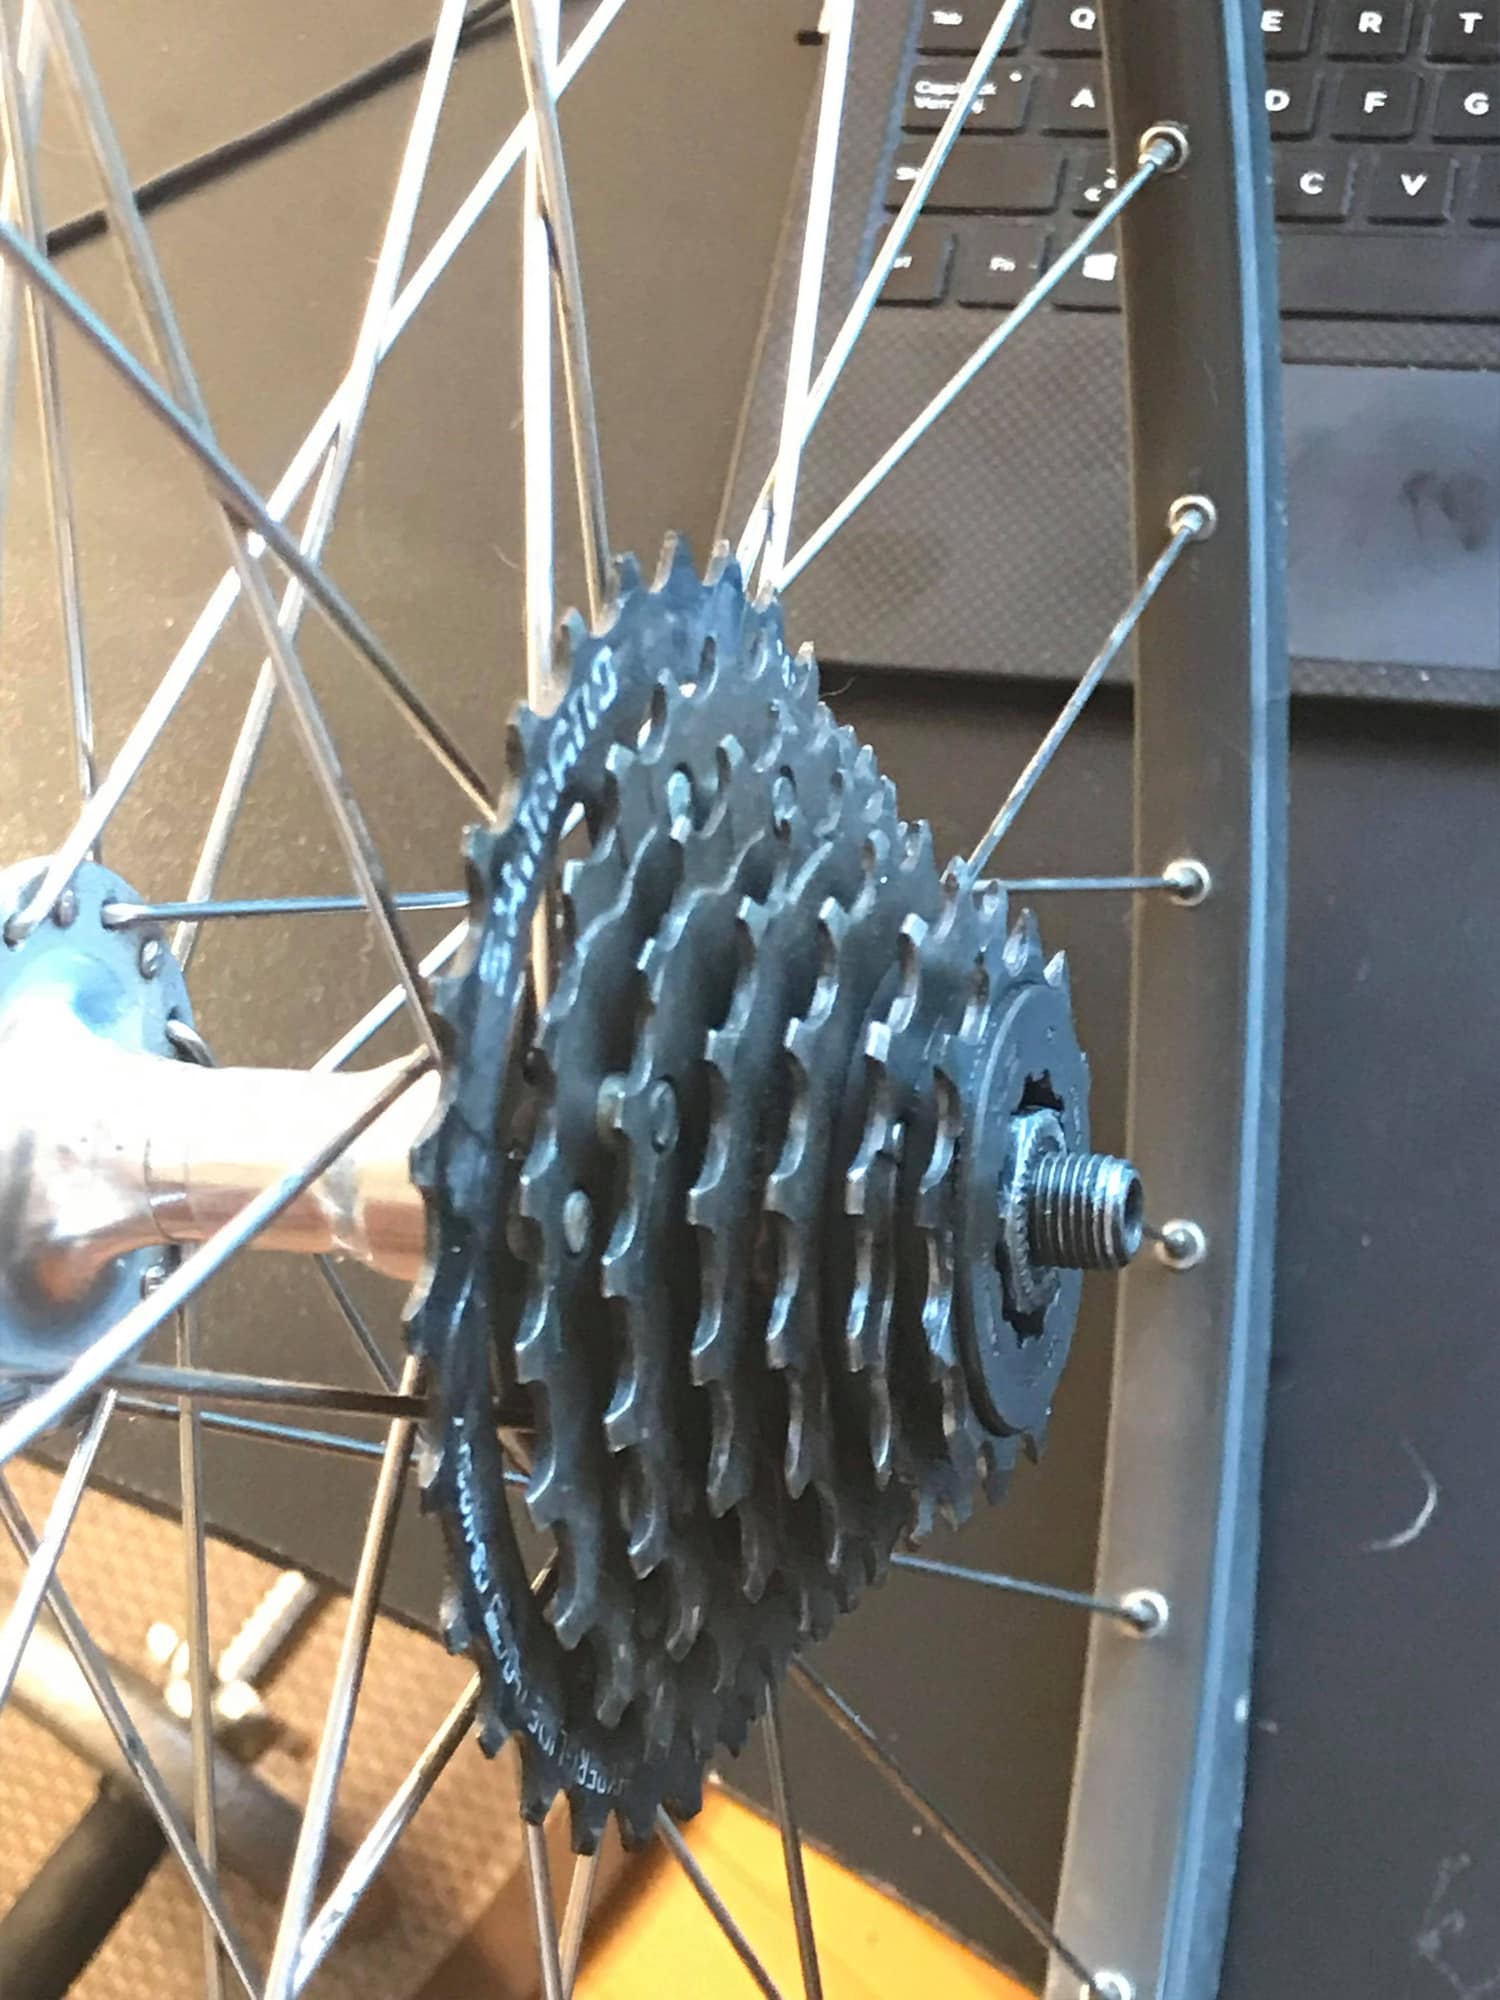
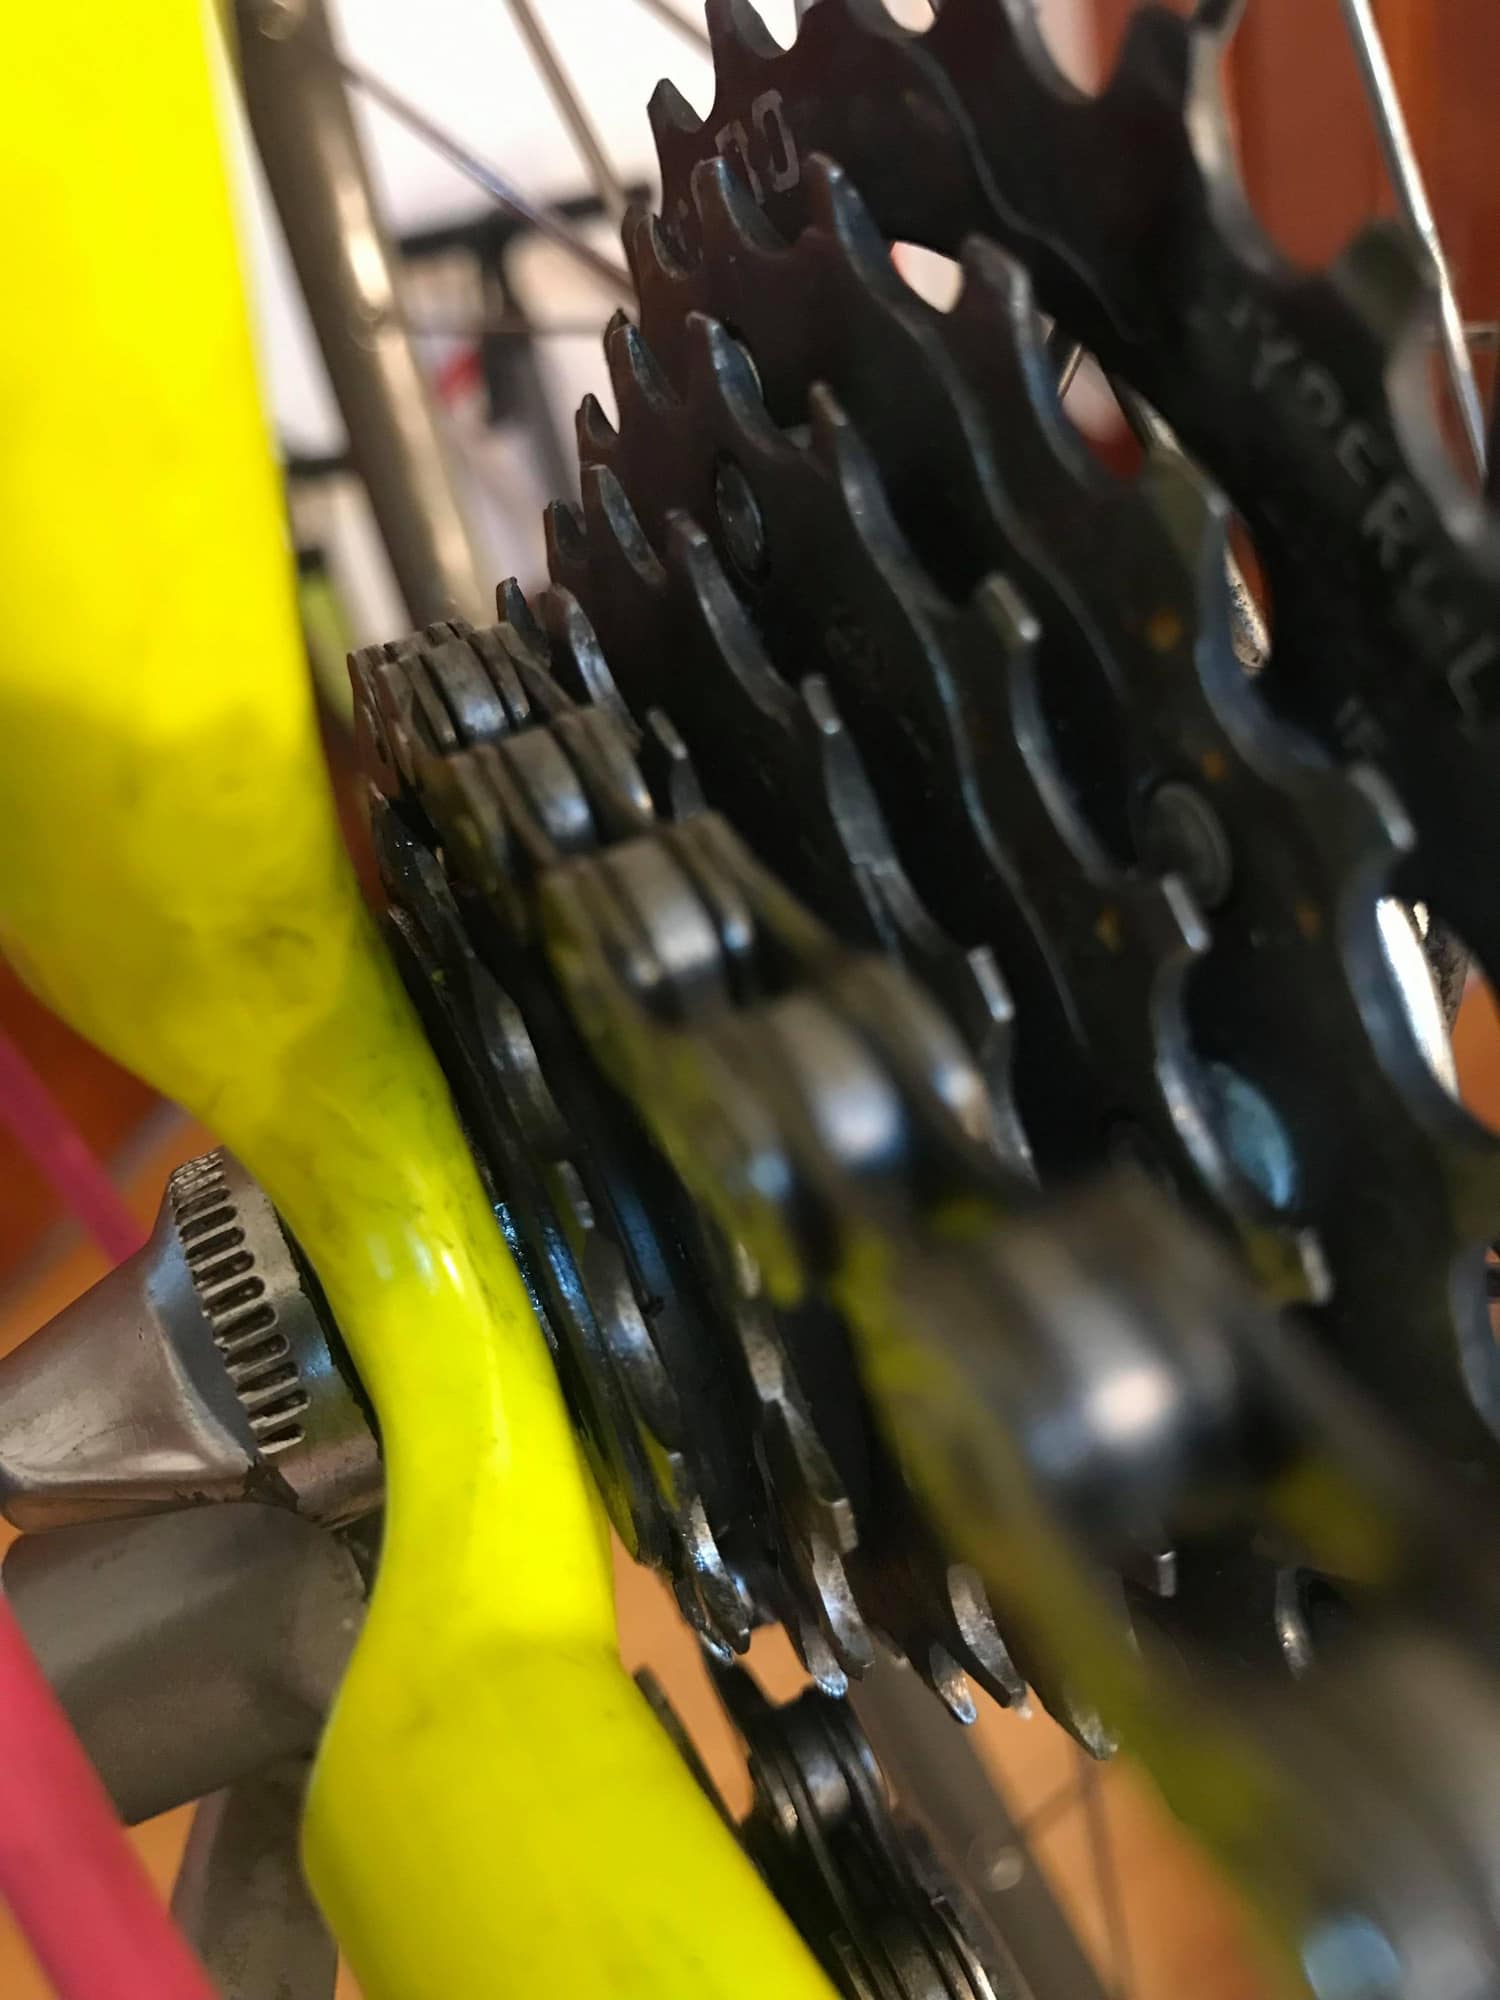
You can clearly see on this last picture that the gap between the last cog and the dropout is wrong.
On the drive side there is typically the cone, seal on a metal spacer 1.5mm, a washer and the locknut. Usually there are no other spacers. Washers range from 1mm to 2mm thick and locknut from 3.5mm to 5mm thick.
More: If it is a freewheel, you definitely need spacers, between the seal and the locknut, on the drive side
More: If it is a freewheel, you definitely need spacers, between the seal and the locknut, on the drive side
To make it simple, you need about 5mm front locknut to end of axle on each side so that the wheel sits in the drop outs correctly. So set your Drive Side first since you will adjust front the NDS. You will know right away if the set up is correct because you will need the axle to be extending further than the freewheel body. The figure out the NDS spacers and nut.
If you changed the freehub body, there could be a slight difference in how deep into the freehub the bearing cup sits. If the cup is deeper within the body, even if the cone, spacer w/seal, washers, locknut are the same as before, the distance from the tend of the freehub body and locknut/frame will be reduced. The total over locknut distance (OLD) will also change slightly.
Does it seem that the OLD seem narrower? Does it seem that the dishing of the rim has changed?
If the frame allows, add a thin washer to the drive side under the locknut. If there isn't room for an additional washer, check to see if the locknut on each side is the same width. Many older Shimano hubs use a 3.5mm on the drive side and 4.5mm on the NDS. If this is the case, swap the positions to increase the DS.
Does it seem that the OLD seem narrower? Does it seem that the dishing of the rim has changed?
If the frame allows, add a thin washer to the drive side under the locknut. If there isn't room for an additional washer, check to see if the locknut on each side is the same width. Many older Shimano hubs use a 3.5mm on the drive side and 4.5mm on the NDS. If this is the case, swap the positions to increase the DS.
I could try playing with the spacers or adding another spacer but it could still be a beginners mistake that I'm not seeing here. I'm really not used to play with wheels. As this is a side project I'm in no hurry and just want to learn.
Here are a few shots:
You can clearly see on this last picture that the gap between the last cog and the dropout is wrong.
07-05-21, 09:06 PM
#10
Senior Member
Join Date: Feb 2015
Location: Mission Viejo
Posts: 5,806
Bikes: 1986 Cannondale SR400 (Flat bar commuter), 1988 Cannondale Criterium XTR, 1992 Serotta T-Max, 1995 Trek 970
Mentioned: 20 Post(s)
Tagged: 0 Thread(s)
Quoted: 1944 Post(s)
Liked 2,164 Times
in
1,323 Posts
It looks like you have a ton of thread showing on the DS and NDS. I bet the OLD isn't 126mm wide.
Here is a 105 1056 7 speed I have...
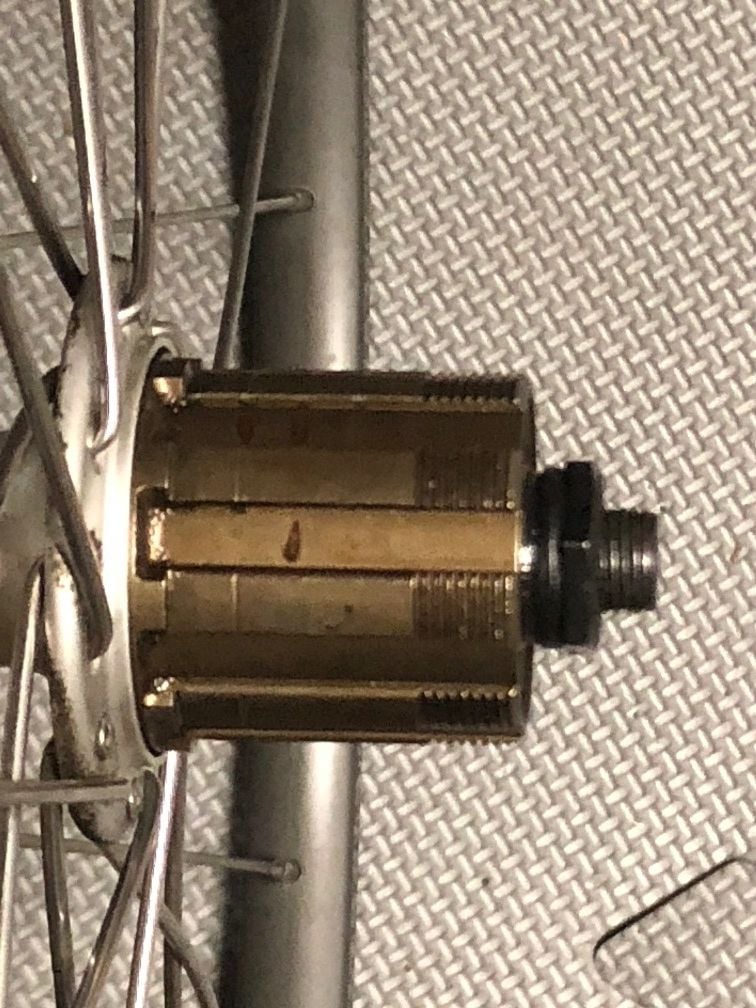
I'm guessing whatever cone you are using is sitting too deep. The NDS on my hub looks the same as yours.
If everything is turning smooth, I'd add washers to the DS, center the axle and check the dish.
John
Here is a 105 1056 7 speed I have...
I'm guessing whatever cone you are using is sitting too deep. The NDS on my hub looks the same as yours.
If everything is turning smooth, I'd add washers to the DS, center the axle and check the dish.
John
07-05-21, 09:27 PM
#11
Full Member
Thread Starter
Join Date: Oct 2018
Posts: 378
Bikes: 1994 Cadex CFR3, 2006 Scott CR1 SL, Rossin aero, Bertrand GB 2000, Spec Allez Pro
Mentioned: 4 Post(s)
Tagged: 0 Thread(s)
Quoted: 134 Post(s)
Liked 68 Times
in
52 Posts
It looks like you have a ton of thread showing on the DS and NDS. I bet the OLD isn't 126mm wide.
I'm guessing whatever cone you are using is sitting too deep. The NDS on my hub looks the same as yours.
If everything is turning smooth, I'd add washers to the DS, center the axle and check the dish.
John
I'm guessing whatever cone you are using is sitting too deep. The NDS on my hub looks the same as yours.
If everything is turning smooth, I'd add washers to the DS, center the axle and check the dish.
John
07-06-21, 09:41 AM
#12
Senior Member
Join Date: Feb 2015
Location: Mission Viejo
Posts: 5,806
Bikes: 1986 Cannondale SR400 (Flat bar commuter), 1988 Cannondale Criterium XTR, 1992 Serotta T-Max, 1995 Trek 970
Mentioned: 20 Post(s)
Tagged: 0 Thread(s)
Quoted: 1944 Post(s)
Liked 2,164 Times
in
1,323 Posts
Provided everything turns smoothly with the bearings running on bearing surface, the only other thing is the rubber dust seal.
Where you add washers/spacers should ensure the seal runs against the dust cap and not behind it.
Yours is an odd situation, but I think the cone width, including a seal groove vs. separate seal grooved spacer, might be the culprit.
John
Edit added: There is a possibility you flipped the DS and NDS cones. Thankfully, I’ve not experienced that one so I don’t know the impact.
Last edited by 70sSanO; 07-06-21 at 09:44 AM.
07-06-21, 09:26 PM
#13
Senior Member
See the attached of a pair of hubs of the estimated vintage of yours.
Note the differences in the spacer on each, both right and left side. Since both are 126 OLD, there must be some differences in the location of the bearing cups. Don't know if each was designed to place the freehub end in the exact same position relative to the dropout, but they should be close.
Since your unit is only at 121mm, adding spacers/swapping locknuts are your easiest option. Adding to each side, while keeping the right side as close as possible to the dropout will keep the dish to a minimum, giving you better dishing and hopefully keeping the rim centered.
Likes For KCT1986:
07-07-21, 12:56 PM
#14
Full Member
Thread Starter
Join Date: Oct 2018
Posts: 378
Bikes: 1994 Cadex CFR3, 2006 Scott CR1 SL, Rossin aero, Bertrand GB 2000, Spec Allez Pro
Mentioned: 4 Post(s)
Tagged: 0 Thread(s)
Quoted: 134 Post(s)
Liked 68 Times
in
52 Posts
This seems to be the final answer yes! I ended up swapping the whole axle with the spacers and locknuts and it now seems to work just right. So the freehubs, in spite of lookin exactly the same, must have slightly different cups.
07-07-21, 02:28 PM
#15
Really Old Senior Member

Keep the DS parts with the specific FH body they came with. That keeps everything in the correct relationship with the DS drop out.
07-07-21, 03:14 PM
#16
Senior Member
Join Date: Feb 2015
Location: Mission Viejo
Posts: 5,806
Bikes: 1986 Cannondale SR400 (Flat bar commuter), 1988 Cannondale Criterium XTR, 1992 Serotta T-Max, 1995 Trek 970
Mentioned: 20 Post(s)
Tagged: 0 Thread(s)
Quoted: 1944 Post(s)
Liked 2,164 Times
in
1,323 Posts
I’m a previous post I suggested looking at cones from Wheels Mfg to get an idea how they vary on thickness; with pics. While some DS cones are for 126mm and others 130mm, they show dimensions that vary between 9mm to 16mm depending on the application.
In many cases the OD and ID are virtually the same. And the length of the actual bearing section are also very close.
This is probably your solution. Since 7 speed freehub bodies span a lot of years, and the quality drops as times goes one, you’ll need to find a cone that fits the replacement freehub body. Or get a spacer that will get you there. If the cone works, you just need to get the dust seal in the right spot.
John
Edit added: Some cones include the dust seal, but usually they are wider. However with a mix-n-match it is possible that the seal won’t line up with the dust cover and you can’t make it work.
Oh yeah… Shimano changed the diameters of the dust cover and seal over the years just to throw another curve.
Last edited by 70sSanO; 07-07-21 at 04:03 PM.
