


Schwinn Network 3.0 Ridiculous Build Thread....
 04-23-23, 06:29 AM
#51
Expired Member

Join Date: Jun 2007
Location: TN
Posts: 11,547
Mentioned: 37 Post(s)
Tagged: 0 Thread(s)
Quoted: 3674 Post(s)
Liked 5,441 Times
in
2,764 Posts
You could research cable pull, as opposed to trial and error. Maybe save some time and $. Just saying.... 
 04-23-23, 06:54 AM
#52
Full Member
Join Date: Dec 2020
Posts: 288
Bikes: Bianchi Nyala, Bianchi Volpe, Bianchi Campione D'Italia, Trek 640, Luxus folding bike, Schwinn Speedster, Bianchi Torino, KHS Aero Sport, probably something else around here somewhere
Mentioned: 1 Post(s)
Tagged: 0 Thread(s)
Quoted: 117 Post(s)
Liked 198 Times
in
100 Posts
Also, while we�re just saying, maybe the OP could refrain from name calling in every other post. You�re new here, so how about trying to make it a better place instead of worse?
Likes For denaffen:
04-23-23, 09:42 AM
#53
Senior Member
Join Date: Dec 2020
Location: Wake Forest, NC
Posts: 5,795
Bikes: 1989 Cinelli Supercorsa
Mentioned: 11 Post(s)
Tagged: 0 Thread(s)
Quoted: 3514 Post(s)
Liked 2,927 Times
in
1,776 Posts
Those are probably just restrained responses to folks who�ve suggested his project will lead to the extinction of humanity.
04-23-23, 10:08 AM
#54

Senior Member

Join Date: Aug 2009
Posts: 2,395
Mentioned: 14 Post(s)
Tagged: 0 Thread(s)
Quoted: 1562 Post(s)
Liked 1,734 Times
in
974 Posts
while everything else you put on this frame can easily be taken off and sold, or transferred to a better frame, this welded on disc conversion is an expensive thing that cannot be taken off of the worthless frame.
Likes For icemilkcoffee:
04-23-23, 11:00 AM
#55
Clark W. Griswold
Join Date: Mar 2014
Location: ,location, location
Posts: 13,535
Bikes: Foundry Chilkoot Ti W/Ultegra Di2, Salsa Timberjack Ti, Cinelli Mash Work RandoCross Fun Time Machine, 1x9 XT Parts Hybrid, Co-Motion Cascadia, Specialized Langster, Phil Wood Apple VeloXS Frame (w/DA 7400), R+M Supercharger2 Rohloff, Habanero Ti 26
Mentioned: 54 Post(s)
Tagged: 0 Thread(s)
Quoted: 4358 Post(s)
Liked 3,998 Times
in
2,668 Posts
A frame is just what it is made of and its measurements. What it was intended for does not mean it isn't stout enough to handle something else. Pressures put on a frame by disc brakes vs rim brakes are not like The Incredible Hulk vs PeeWee Herman. Your thoughts are based on findings with no validity. Show me an example where someone converted to disc brakes from rim brakes and the frame failed. You cannot because it is impossible. Just some English dude's speculation without any scientific fact. The pressure put on the frame from ANY type of bicycle brake is on the bracket and is verticle in nature which is elevated by the frame. Any pressure that would break the bracket or brake caliper would have to be enormous in pressure and would break the caliper well before breaking the frame or bracket. I don't know where you heard this nonsense from but basic physics doesn't apply.
EDIT: My conversion bracket that I will try could slip which would cause issues
EDIT: My conversion bracket that I will try could slip which would cause issues
In terms of braking, here is a little thing from Davy Levy of Ti Cycles who has been building bike parts and frames in addition to automotive engineering and probably a whole host of other metal work. This is how he a professional frame builder would add a disc brake tab, keeping not there is a bracing tube and I would say likely he wouldn't recommend it on certain bikes like aluminum due to the effect it will have on the temper of the material and the need to re-treat it afterwards.
Your bracket will either do damage to the tube or slip or both.
Also I am not English, part Scottish and maybe some Irish and also Jewish and never said I was a dude, just to be clear.
04-23-23, 11:09 AM
#56
I am potato.

Join Date: Jun 2015
Location: Pacific Northwest
Posts: 3,116
Bikes: Only precision built, custom high performance elitist machines of the highest caliber. 🍆
Mentioned: 29 Post(s)
Tagged: 0 Thread(s)
Quoted: 1790 Post(s)
Liked 1,631 Times
in
934 Posts
What I think is going on here is the approach & motivations rub some people the wrong way. A frame is a frame is a frame. It is little more than scaffolding to hang parts on. Given modern manufacturing, it's pretty darn hard to find something so low quality that it'd either be dangerous or wouldn't work. This frame in terms of stiffness, lightness, and execution made any time in the last year or 10 would be the province of artisan craftsmen 40 years ago if the manufacturing & methods even existed...& now it's considered common, low class, not even worthy of respect.
Op don't buy into the hype. You don't need Ultegra or Dura-Ace to have a quality bike or a fine cycling experience. In fact, depending on your use case, fancy components with a recognizably high end label might be a liability. Few people own Lamborghini's. Even fewer Lamborghini owners use them to go grocery shopping or commuting. A Camry is good enough for most uses.
Tailoring a bike to it's intended use is part & parcel of what it means to customizing a bike. You are tailoring a bike to obtain the greatest value possible, not the cheapest price possible. Good. Is Acera the best possible derailleur available? No. Will it hold adjustment better & last longer than a Tourney? Absolutely. The single digit number of dollars in difference will pay for itself the first bike shop tuneup avoided...& you'll know how to do the work. That's what you are buying here. Not parts; Know how. I think that's what some other posters are missing.
Carry on with your Camry build. The knowledge gained will be priceless.
Likes For base2:
04-23-23, 07:08 PM
#57
Clark W. Griswold
Join Date: Mar 2014
Location: ,location, location
Posts: 13,535
Bikes: Foundry Chilkoot Ti W/Ultegra Di2, Salsa Timberjack Ti, Cinelli Mash Work RandoCross Fun Time Machine, 1x9 XT Parts Hybrid, Co-Motion Cascadia, Specialized Langster, Phil Wood Apple VeloXS Frame (w/DA 7400), R+M Supercharger2 Rohloff, Habanero Ti 26
Mentioned: 54 Post(s)
Tagged: 0 Thread(s)
Quoted: 4358 Post(s)
Liked 3,998 Times
in
2,668 Posts
 04-24-23, 06:16 AM
#58
Senior Member
Join Date: Jun 2005
Location: Kentucky
Posts: 2,601
Bikes: 06 Lemond Reno, 98 GT Timberline mtn.bike
Mentioned: 8 Post(s)
Tagged: 0 Thread(s)
Quoted: 427 Post(s)
Liked 700 Times
in
436 Posts
As others have mentioned, don't try welding anything to the frame. I have an old (98) mountain bike with a good set of v-brakes and levers, with Kool Stop salmon brake pads, and can lock up the wheel with one finger on the lever. Hydraulic brakes are nice, but unless you ride often in rainy conditions, you will find good v's will be fine.
Last edited by freeranger; 04-24-23 at 08:47 AM.
04-24-23, 01:25 PM
#59
Junior Member
Thread Starter
Join Date: Apr 2023
Location: 33.85485, -78.53622
Posts: 99
Bikes: A Janky Schwinn
Mentioned: 0 Post(s)
Tagged: 0 Thread(s)
Quoted: 59 Post(s)
Likes: 0
Liked 17 Times
in
14 Posts
Not too much progress. I removed the bottom bracket. I should have more parts by Wednesday. I may put the new forks on today as well as the bolt-on rear disc caliper bracket.
Last edited by aaronM46; 04-24-23 at 03:10 PM.
Likes For aaronM46:
04-24-23, 04:19 PM
#60

Senior Member

Join Date: Jul 2006
Location: San Jose (Willow Glen) Ca
Posts: 9,847
Bikes: Kirk Custom JK Special, '84 Team Miyata,(dura ace old school) 80?? SR Semi-Pro 600 Arabesque
Mentioned: 106 Post(s)
Tagged: 0 Thread(s)
Quoted: 2338 Post(s)
Liked 2,827 Times
in
1,543 Posts
OP's money so OP's choice if he wants to put lipstick on this pig.
IMHO the whole thing is half a$$ when talking about frames and welding and certainly does not have the cool factor of the huffy colnago mashup https://www.bikeforums.net/classic-v...ege-build.html
OP was clear he was doing this for fun and had no huge expectations.... so 100% Kudos to him for that
I just hope no non experienced person reads this and thinks it is a good idea or good value
What gets me is the idea that a frame is a frame, when the frame is the foundation for everything you can put low end parts on a high end frame and still have a bike that rides and handles well, but you can't put high end parts on a low end frame and get better handling and ride.
just because a frame looks like a high end doesn't mean it is a high end frame.
Cheap frames are that because of lower quality, welding, materails, quality control, design etc
welding aluminum does take experience and knowledge of what type of aluminum is involved
__________________
Life is too short not to ride the best bike you have, as much as you can
(looking for Torpado Super light frame/fork or for Raleigh International frame fork 58cm)
Life is too short not to ride the best bike you have, as much as you can
(looking for Torpado Super light frame/fork or for Raleigh International frame fork 58cm)
Likes For squirtdad:
04-24-23, 05:04 PM
#61
Senior Member

Join Date: Jul 2015
Location: NW Oregon
Posts: 2,975
Bikes: !982 Trek 930R Custom, Diamondback ascent with SERIOUS updates, Fuji Team Pro CF and a '09 Comencal Meta 5.5
Mentioned: 15 Post(s)
Tagged: 1 Thread(s)
Quoted: 1299 Post(s)
Liked 739 Times
in
534 Posts
I've seen more broken Yetis and Konas than Schwinn frames... And several Trek and Fuji frames have had some breakage too... not one broken "low end" schwinn.. i live a fairly short ride from a downhill insanity park...... the old skycomish MTB frames have almost all snapped at the BB/Chain stay junction.... i'm presently working on a Biscayne bike.. the donator said it was "A Low-End" bike... it has Shimano Deerhead parts and a set of Nitto Bull Moose bars.. the frame is fairly light Cro-mo.. the hubs are Shimano Exage and smooth with their new grease....... sometimes our experiences tell us one thing, and other's opinions tell us something completely different..... Now.. if Arron builds this frame up with decent pieces and then later finds a nice frame with Disc brake mounts .. guess what Arron will be doing with his new skills....building wheels and swapping parts.
when i saw how far arron had torn the schwinn down without a question on HOW to get to that point, i learned much respect for him. you should too.
My first MTB build was a Trek 720..that needed EVERYTHING done... i bought more tools than parts, and i bought a LOT of Parts! I still have the tools, except for the cone wrenches i've Worn Out and Replaced, and one 13mm that i snapped working on a walmart mongoose front hub.....park replaced that one... i don't warranty things i wear out.
stop dissing and start reminiscing, veggie. I really like pearl white...
PS.. he's using it mostly on roads, so no big loads.. it will work great when he's done.
PPS.. Snobby Thieves will turn their thieving noses up at a "SCHWINN !" so it's less likely to get jacked...
Last edited by maddog34; 04-24-23 at 05:10 PM.
Likes For maddog34:
04-24-23, 05:14 PM
#62
Senior Member
Join Date: Jul 2015
Location: NW Oregon
Posts: 2,975
Bikes: !982 Trek 930R Custom, Diamondback ascent with SERIOUS updates, Fuji Team Pro CF and a '09 Comencal Meta 5.5
Mentioned: 15 Post(s)
Tagged: 1 Thread(s)
Quoted: 1299 Post(s)
Liked 739 Times
in
534 Posts
OP's money so OP's choice if he wants to put lipstick on this pig.
IMHO the whole thing is half a$$ when talking about frames and welding and certainly does not have the cool factor of the huffy colnago mashup https://www.bikeforums.net/classic-v...ege-build.html
OP was clear he was doing this for fun and had no huge expectations.... so 100% Kudos to him for that
I just hope no non experienced person reads this and thinks it is a good idea or good value
What gets me is the idea that a frame is a frame, when the frame is the foundation for everything you can put low end parts on a high end frame and still have a bike that rides and handles well, but you can't put high end parts on a low end frame and get better handling and ride.
just because a frame looks like a high end doesn't mean it is a high end frame.
Cheap frames are that because of lower quality, welding, materails, quality control, design etc
welding aluminum does take experience and knowledge of what type of aluminum is involved
IMHO the whole thing is half a$$ when talking about frames and welding and certainly does not have the cool factor of the huffy colnago mashup https://www.bikeforums.net/classic-v...ege-build.html
OP was clear he was doing this for fun and had no huge expectations.... so 100% Kudos to him for that
I just hope no non experienced person reads this and thinks it is a good idea or good value
What gets me is the idea that a frame is a frame, when the frame is the foundation for everything you can put low end parts on a high end frame and still have a bike that rides and handles well, but you can't put high end parts on a low end frame and get better handling and ride.
just because a frame looks like a high end doesn't mean it is a high end frame.
Cheap frames are that because of lower quality, welding, materails, quality control, design etc
welding aluminum does take experience and knowledge of what type of aluminum is involved
and i just built up a Schwinn Mesa gsd with Mavic wheels, XT Ders., a Manitou Scarab fork and hydraulic disc brakes... it's super fun!
Last edited by maddog34; 04-24-23 at 05:17 PM.
04-24-23, 05:21 PM
#63
Expired Member
Join Date: Jun 2007
Location: TN
Posts: 11,547
Mentioned: 37 Post(s)
Tagged: 0 Thread(s)
Quoted: 3674 Post(s)
Liked 5,441 Times
in
2,764 Posts
OP did say in the thread title that the build is ridiculous.
04-24-23, 06:03 PM
#64
Junior Member
Thread Starter
Join Date: Apr 2023
Location: 33.85485, -78.53622
Posts: 99
Bikes: A Janky Schwinn
Mentioned: 0 Post(s)
Tagged: 0 Thread(s)
Quoted: 59 Post(s)
Likes: 0
Liked 17 Times
in
14 Posts
It's nice to see some people supporting me even if you think it's dumb. I like that you get where I am coming from. Whatever, I won't be here in 50 years and when I die at least I can tell myself I didn't sit on my butt. Thank You!
A lot of people say they DGAF! For me, that is an 'A' and not an 'All'. I do GAF about a lot of things but when it comes to people telling me no, don't do that, you are stupid, I am better, just follow what other people did, etc. then yes, IDGAF! I will prove you wrong or prove myself wrong. Do you want to just slow down to idle and live out life as you are right now to prolong what you have or slam your foot down and see what fire lives inside of you? "Your life is only a grain of sand, at least make it shiny!" ARV 2023
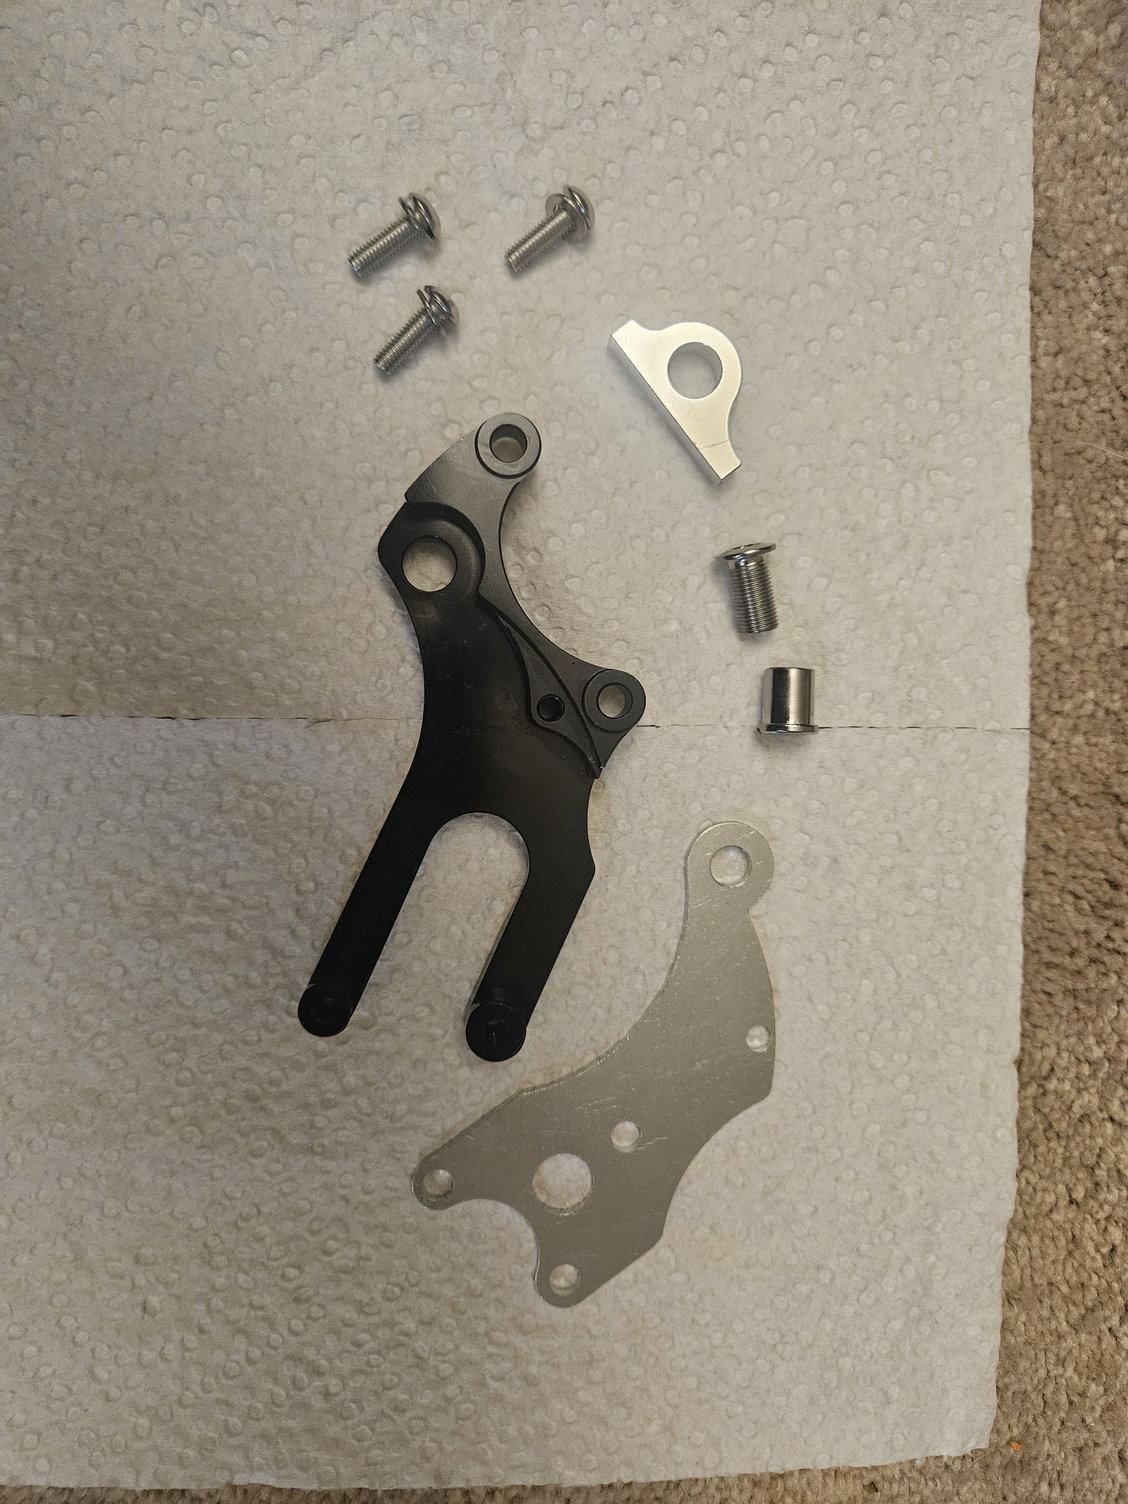
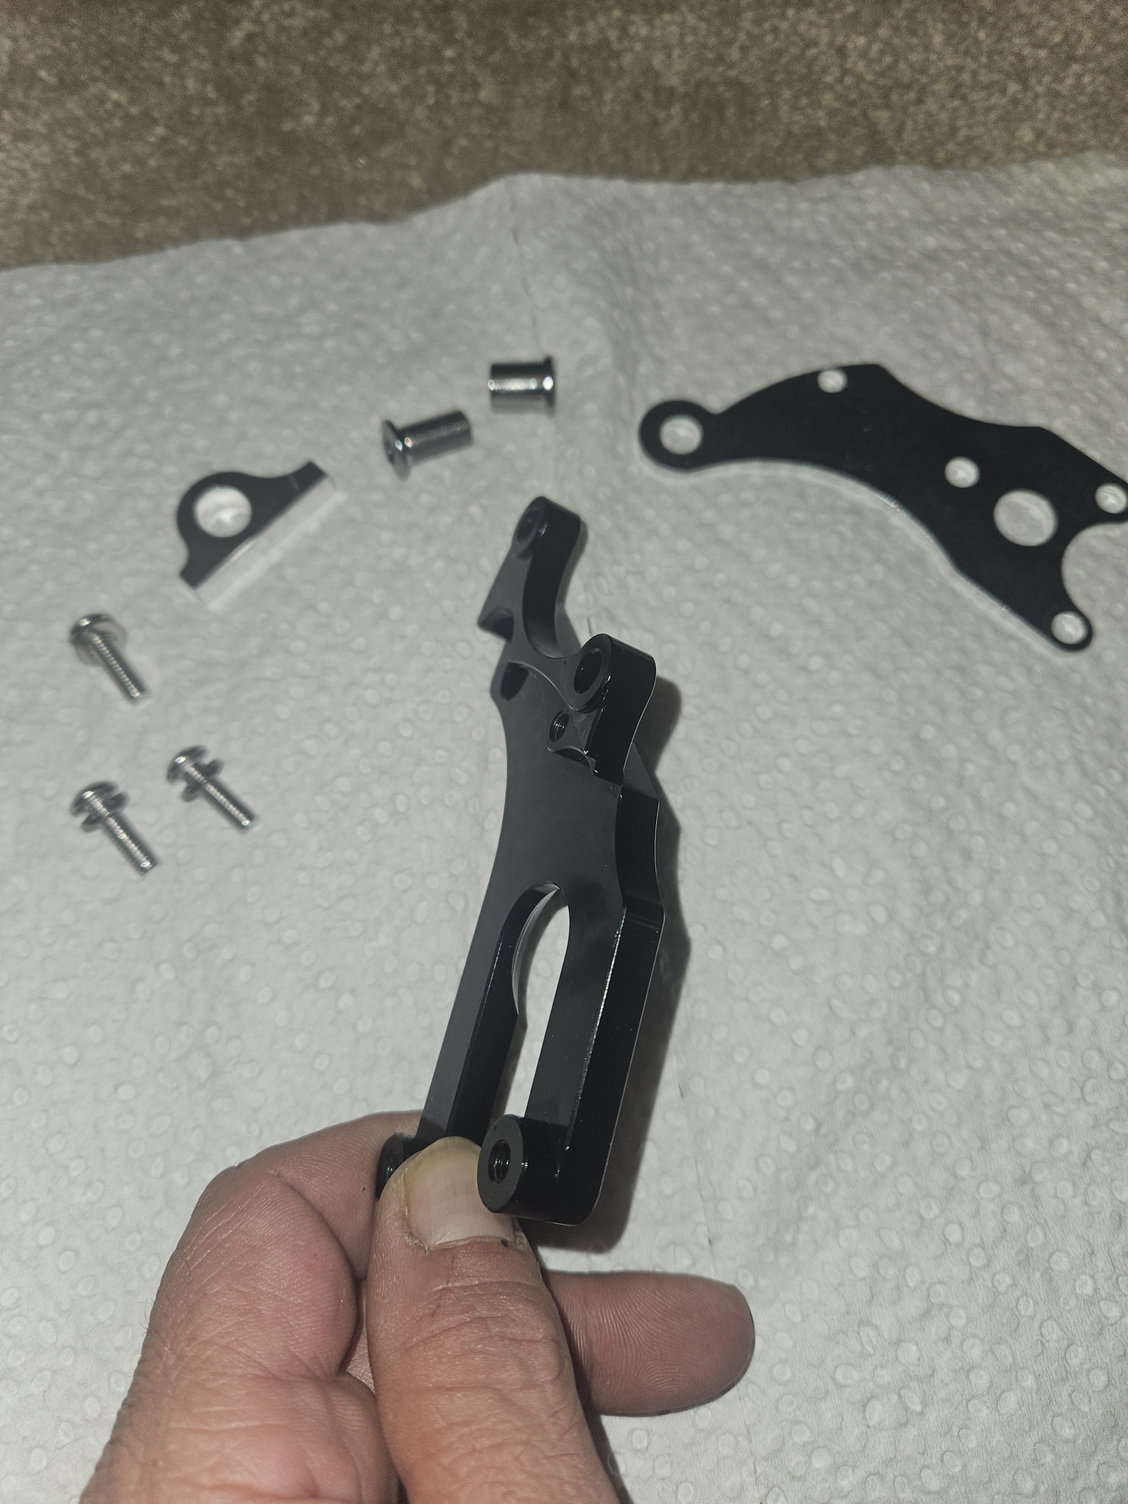
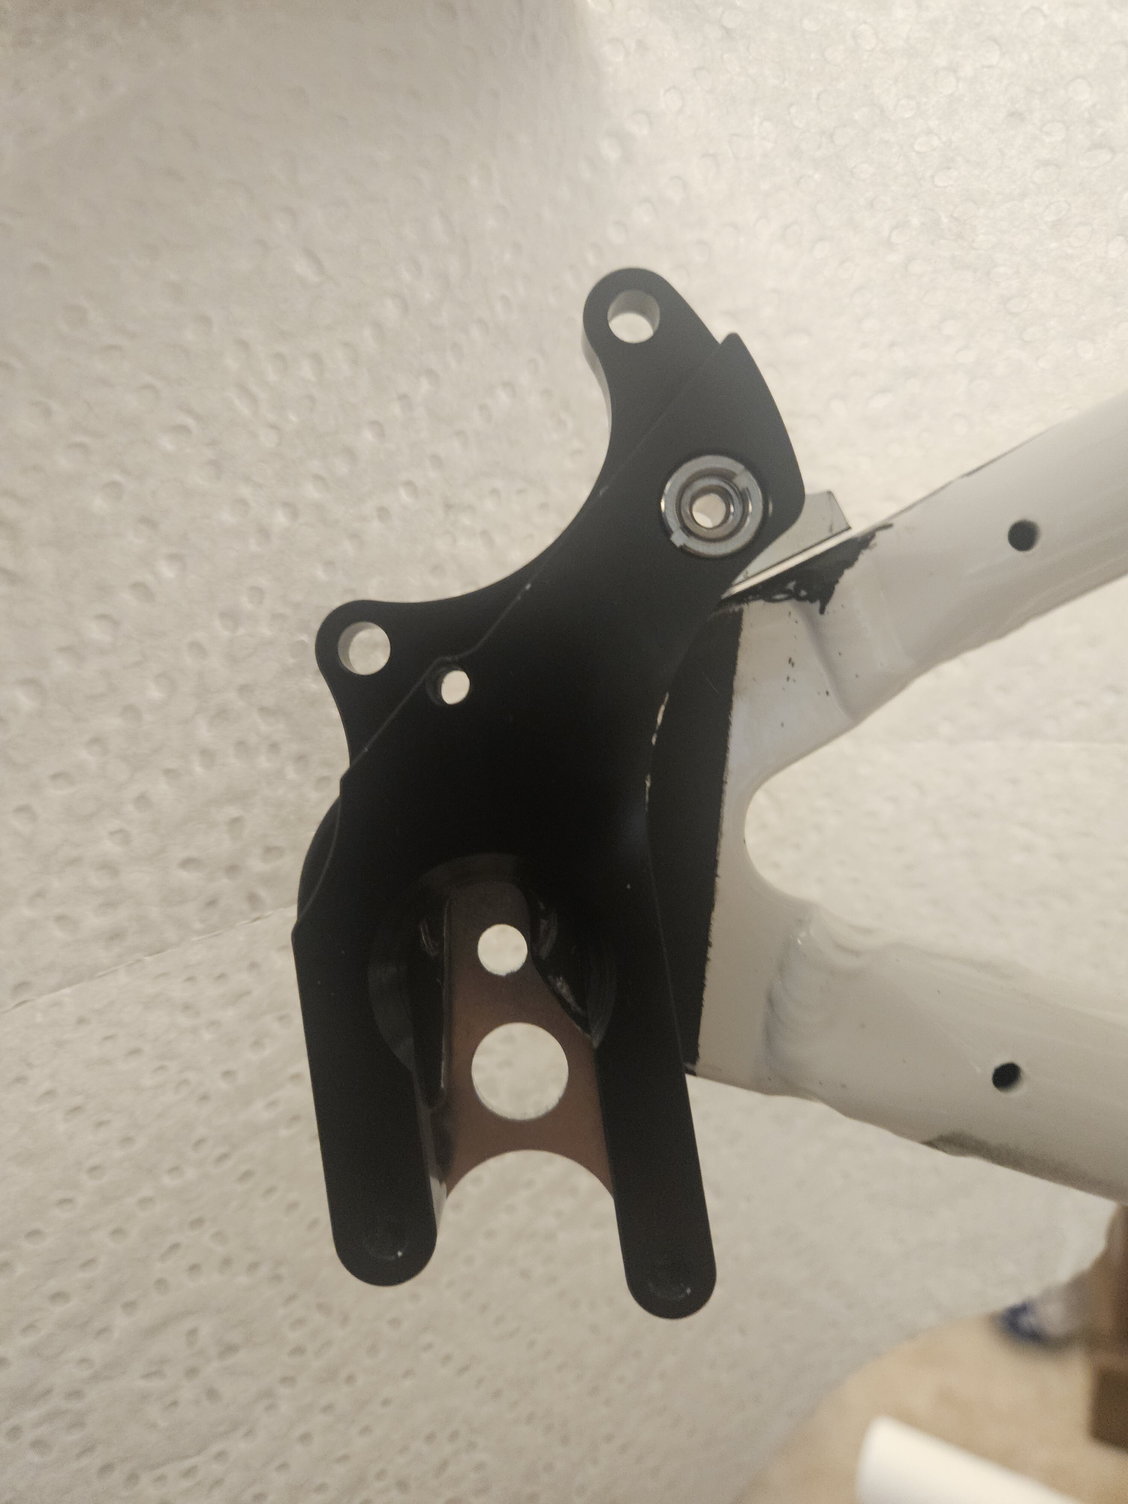
So, as I mentioned I ground a tab off the frame to make the bolt-on rear caliper bracket work. Here are some pics of that bracket. The last pic is of the bracket on the frame but not adjusted into position yet. I need the caliper first to align it with the disc. Once everything is done I will sand and spray the frame, so I am not being picky about overspray right now.
A lot of people say they DGAF! For me, that is an 'A' and not an 'All'. I do GAF about a lot of things but when it comes to people telling me no, don't do that, you are stupid, I am better, just follow what other people did, etc. then yes, IDGAF! I will prove you wrong or prove myself wrong. Do you want to just slow down to idle and live out life as you are right now to prolong what you have or slam your foot down and see what fire lives inside of you? "Your life is only a grain of sand, at least make it shiny!" ARV 2023
So, as I mentioned I ground a tab off the frame to make the bolt-on rear caliper bracket work. Here are some pics of that bracket. The last pic is of the bracket on the frame but not adjusted into position yet. I need the caliper first to align it with the disc. Once everything is done I will sand and spray the frame, so I am not being picky about overspray right now.
Last edited by aaronM46; 04-24-23 at 06:24 PM.
04-24-23, 07:30 PM
#65
Junior Member
Thread Starter
Join Date: Apr 2023
Location: 33.85485, -78.53622
Posts: 99
Bikes: A Janky Schwinn
Mentioned: 0 Post(s)
Tagged: 0 Thread(s)
Quoted: 59 Post(s)
Likes: 0
Liked 17 Times
in
14 Posts
I assembled the rear wheel. I installed the cassette and added the tire and tube. So much lighter and you can really feel the difference in the parts even though they aren't Comploliganiruasatoria. I cranked it down until it bled instead of using the torque spec imprinted on the lock ring.

Last edited by aaronM46; 04-24-23 at 07:33 PM.
Likes For aaronM46:
04-24-23, 07:36 PM
#66
cowboy, steel horse, etc

Join Date: Sep 2008
Location: The hot spot.
Posts: 44,855
Bikes: everywhere
Mentioned: 72 Post(s)
Tagged: 1 Thread(s)
Quoted: 12781 Post(s)
Liked 7,695 Times
in
4,084 Posts

 04-24-23, 11:40 PM
#67
Junior Member
Thread Starter
Join Date: Apr 2023
Location: 33.85485, -78.53622
Posts: 99
Bikes: A Janky Schwinn
Mentioned: 0 Post(s)
Tagged: 0 Thread(s)
Quoted: 59 Post(s)
Likes: 0
Liked 17 Times
in
14 Posts
Not hung up at all. All in good fun. I don't care. That company possibly does or did make great bike parts I will never experience. I would love to experience them but it isn't important. Ultimately it comes down to what YOU want. If you want that then get it. Don't try to tell me that my Schwinn build compares to that and that I am dumb because it isn't as good. If you believe that you are better than me then I will gladly agree with you.
04-27-23, 03:46 PM
#68
Junior Member
Thread Starter
Join Date: Apr 2023
Location: 33.85485, -78.53622
Posts: 99
Bikes: A Janky Schwinn
Mentioned: 0 Post(s)
Tagged: 0 Thread(s)
Quoted: 59 Post(s)
Likes: 0
Liked 17 Times
in
14 Posts
I have made quite a bit more progress. I will take some pictures and post them later, but first I have a question.
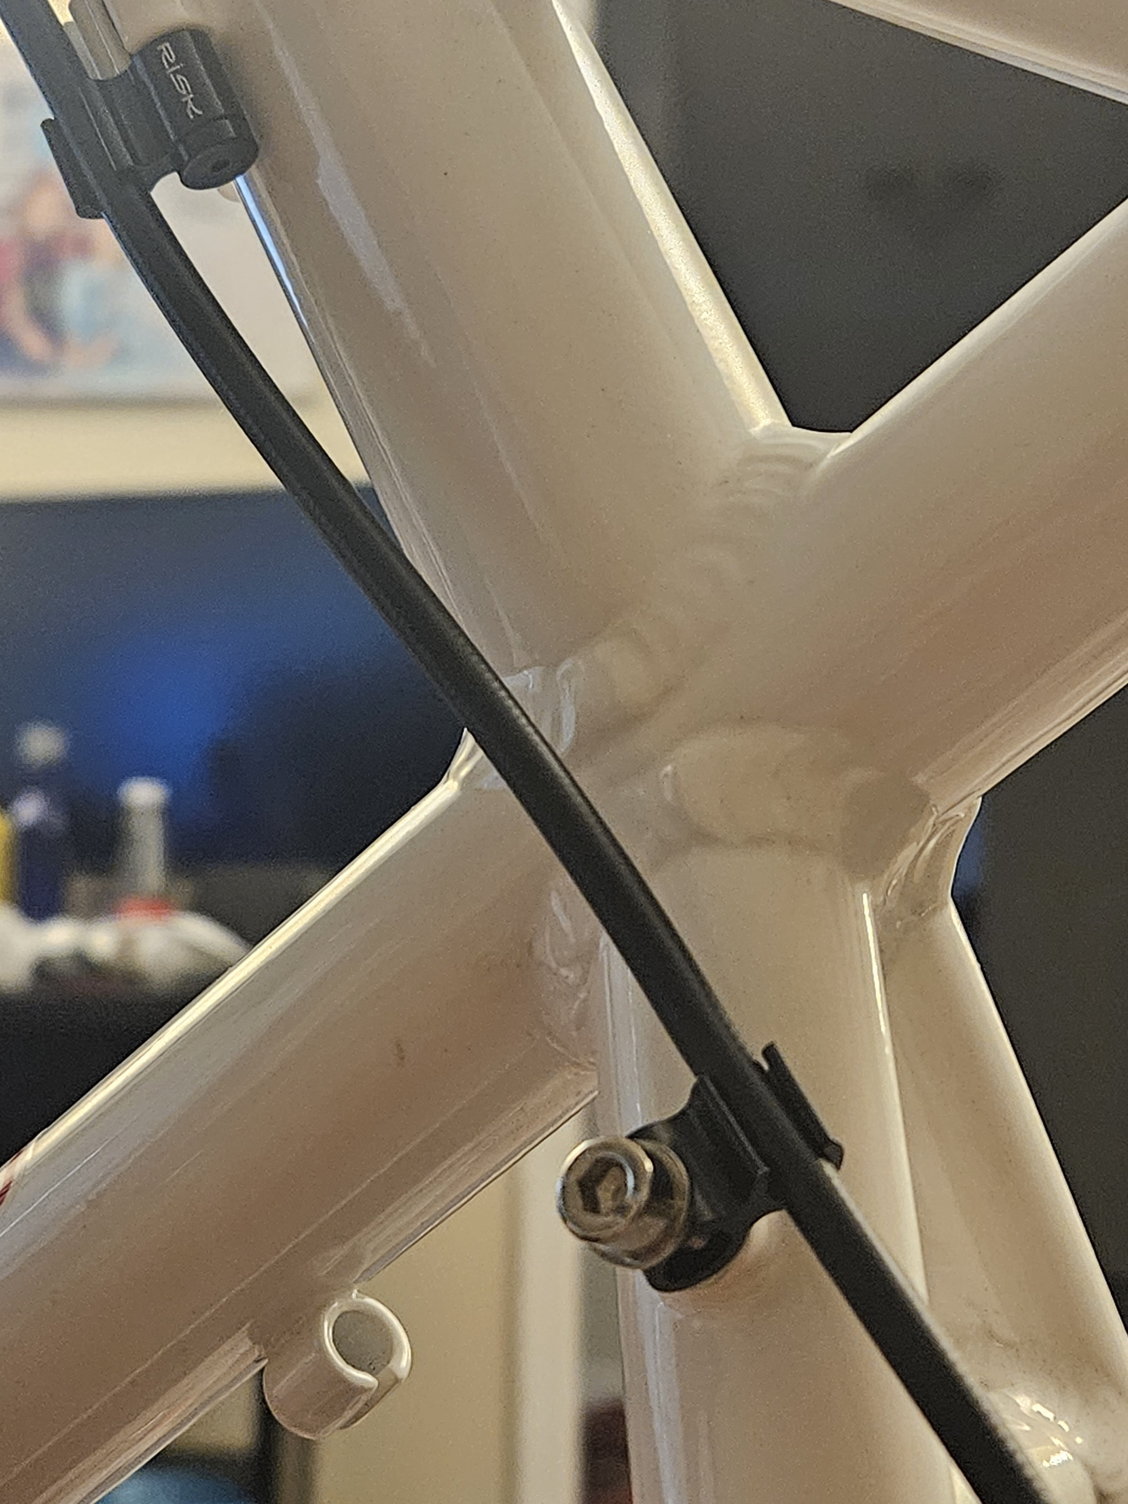
I am looking for a hydraulic line clip that screws on. In the first picture, you will see the Allen bolt where I would like to attach such a clip. It takes a 4mm Allen bit and the bolt is 4.8mm in diameter. Currently, I have what you see in the second picture which are great but I want something for that Allen bolt. In the second and third pictures what you see are adapters to use on cable route clips to convert them for hydraulic lines. Use Loctite on them as the small Allen screw loosens easily.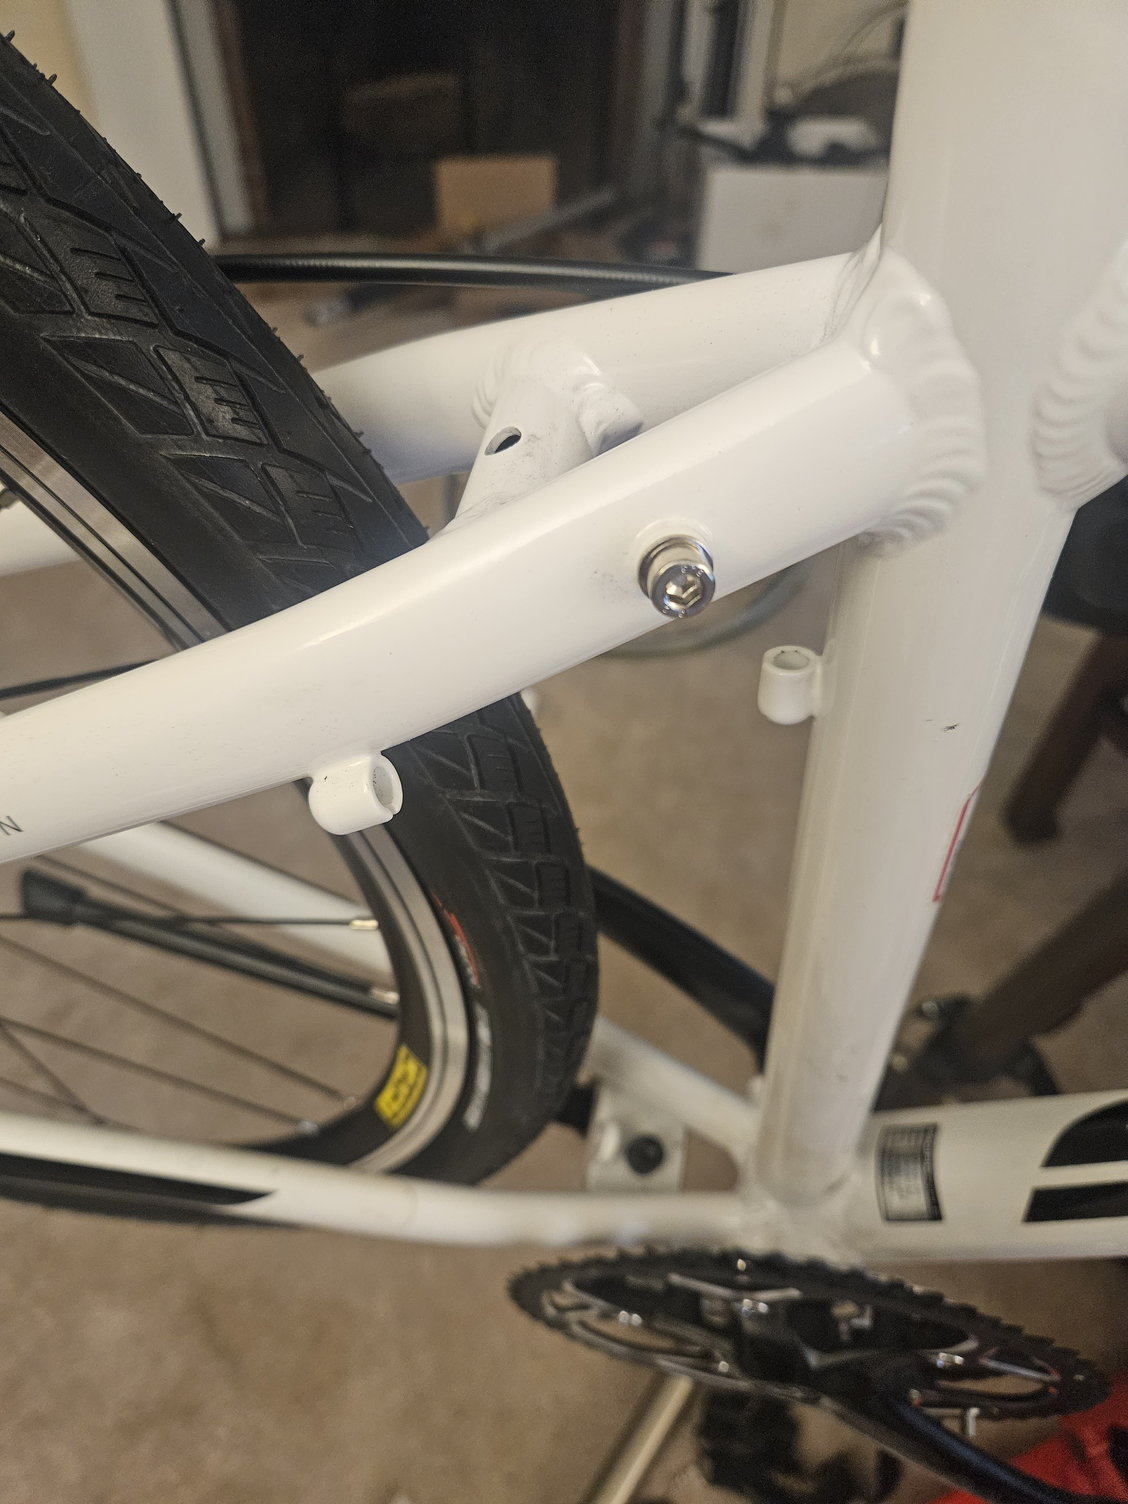
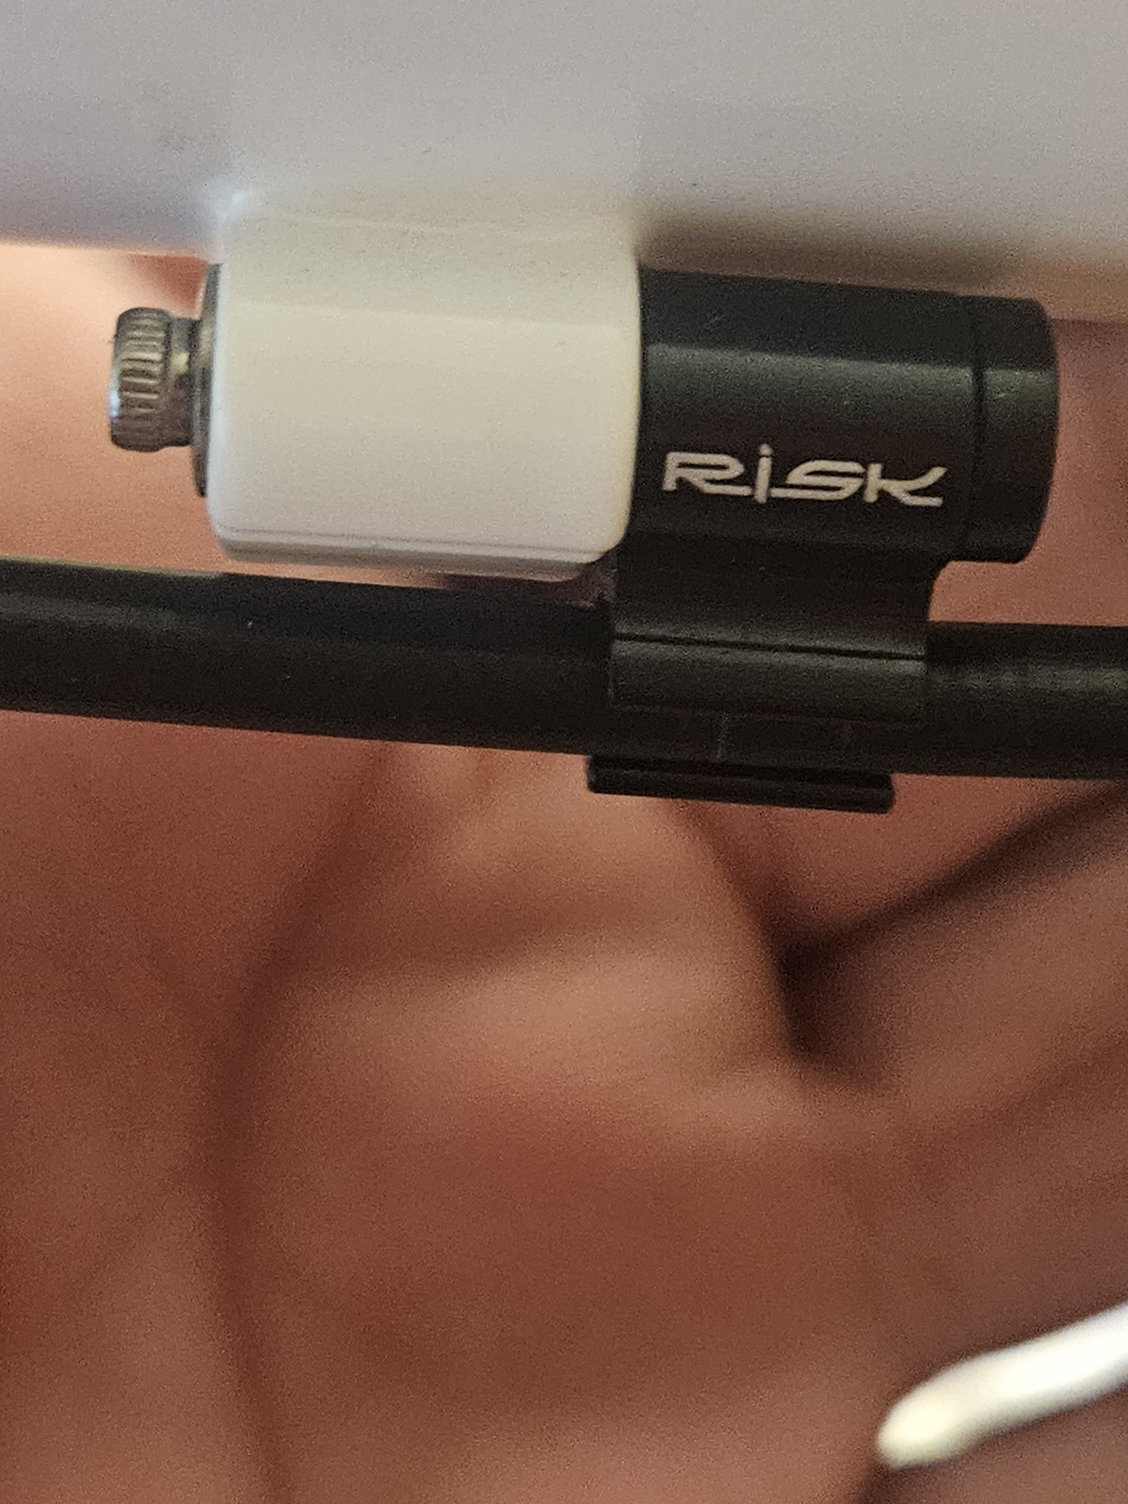
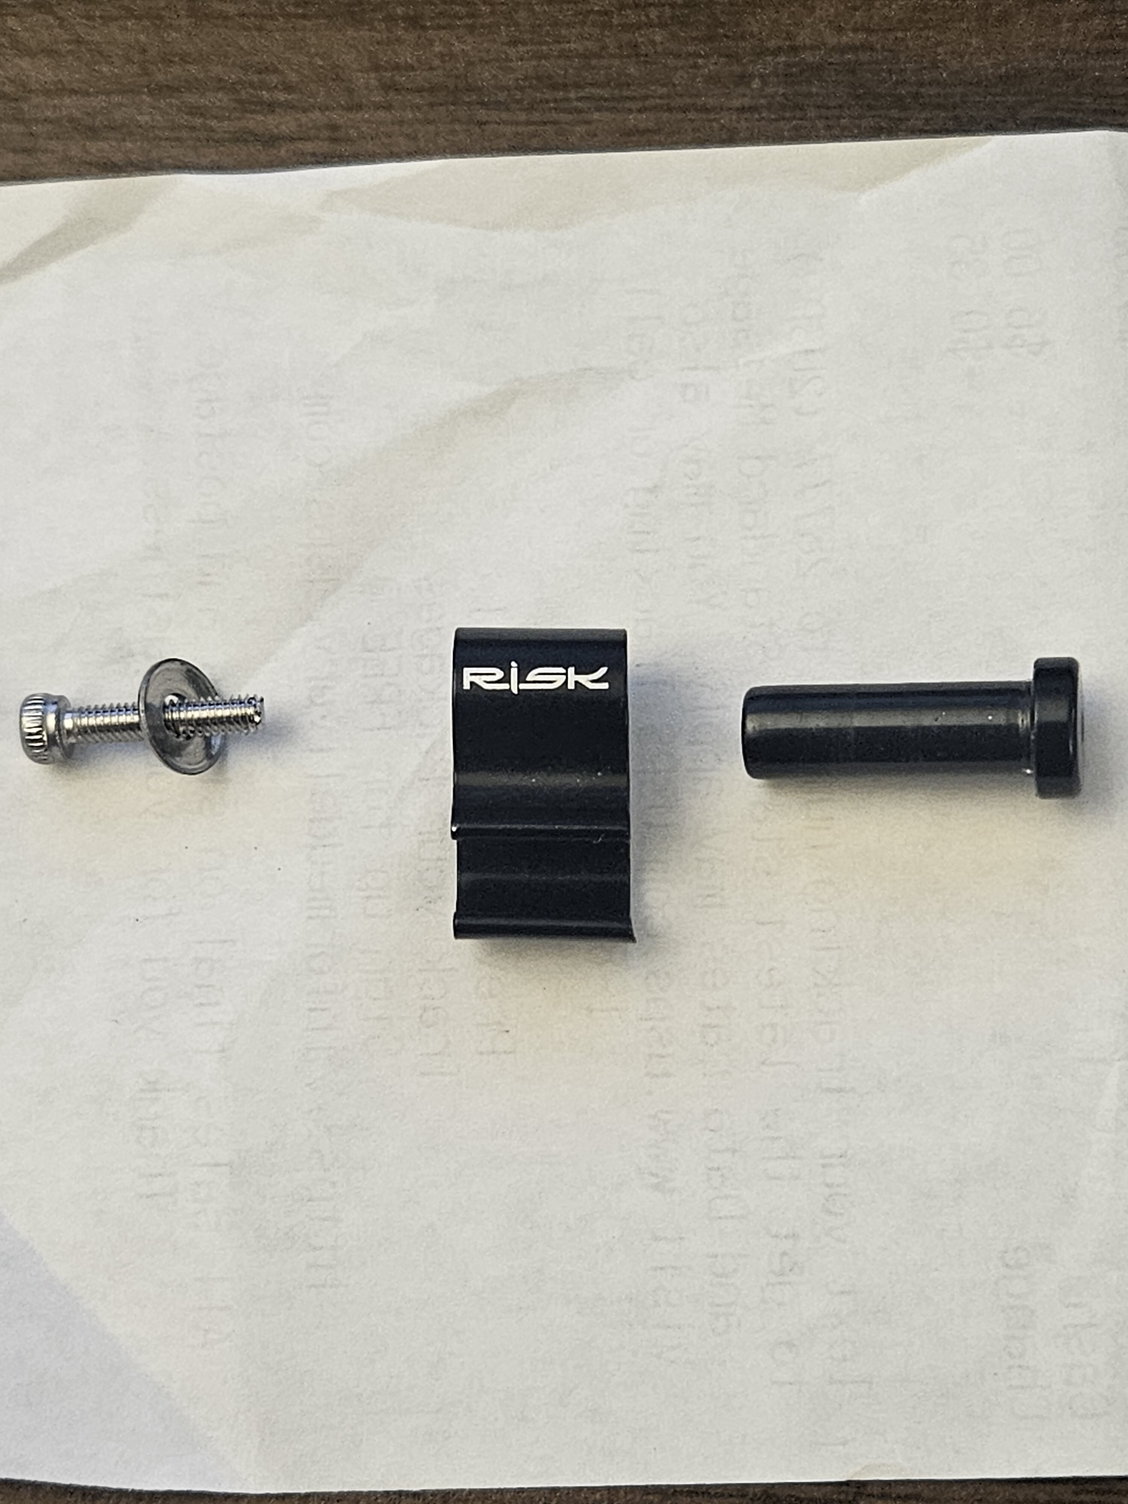
I am looking for a hydraulic line clip that screws on. In the first picture, you will see the Allen bolt where I would like to attach such a clip. It takes a 4mm Allen bit and the bolt is 4.8mm in diameter. Currently, I have what you see in the second picture which are great but I want something for that Allen bolt. In the second and third pictures what you see are adapters to use on cable route clips to convert them for hydraulic lines. Use Loctite on them as the small Allen screw loosens easily.
04-27-23, 04:23 PM
#69
Junior Member
Thread Starter
Join Date: Apr 2023
Location: 33.85485, -78.53622
Posts: 99
Bikes: A Janky Schwinn
Mentioned: 0 Post(s)
Tagged: 0 Thread(s)
Quoted: 59 Post(s)
Likes: 0
Liked 17 Times
in
14 Posts
Never mind on the hose clip. I just made my own out of one of the other style clips I had.
04-27-23, 08:12 PM
#70
Junior Member
Thread Starter
Join Date: Apr 2023
Location: 33.85485, -78.53622
Posts: 99
Bikes: A Janky Schwinn
Mentioned: 0 Post(s)
Tagged: 0 Thread(s)
Quoted: 59 Post(s)
Likes: 0
Liked 17 Times
in
14 Posts
I spent a lot of time on this so I won't be posting pics tonight. This is a GIANT amount of information that I have compiled. Please pardon any grammatical mistakes. I have done my best over the past few hours. There may be changes in what I have already posted due to actual changes. This is basically EVERYTHING up to date. My specs sheet is going to be at the end of this post. My specs were taken with a micrometer so may not match actual part specs but are accurate for my individual components. My spec list is quite ugly but makes sense to me. I invite any questions.Synopsis of everything thus far
I am putting this together to review parts, completed items, initial thoughts, and measurements. Some portions may include a combination of these aspects and may not be listed in any particular order. I am doing my best on accuracy. Please reply if you find any issues with my build or components that are helpful.
Base = stripped Schwinn Network 3.0 with inferior and broken components.
1. 'Section One' is a parts list. Possibly updated from my initial post:
a. Bottom bracket = Shimano BB-UN300x68mm
b. Chain = SHIMANO CN-HG53 9-Speed Bicycle Chain
c. Headset = Chinese Amazon EC34/28.6
d. Tubes = Presta Valve 700cx38c – Originally purchased Schrader valve tubes which didn’t fit my new wheels so I had to go with the Presta Tubes.
e. Wheels = Croft Comp 29er / 700c wheels – disc mount – Presta Valve
f. Hand Grips - Corki grips – double lock
g. Tires = Fincci 700x38c
h. Headset spacers = Sumind Carbon Fiber Headset Spacers
i. Brakes = Zoom Hydraulic Disc Brakes
j. Right shifter = SHIMANO Altus SL-M2010-9R 9-Speed Right Rapidfire Plus Shifter
k. Left shifter = SHIMANO Altus SL-M2010-L 3-Speed RapidFire Plus Shifting Lever
l. Front Derailleur = SHIMANO FDM313X6 front derailleur
m. Rear Derailleur = Shimano 3500 9 Speed
n. Farbetter cable guides – these insert into standard cable guides to hold hydro brake hoses.
2. ‘Section Two’ consists of tools I have purchased (I own any other tools necessary):
a. Bike Headset Cup Installation Tool and Bicycle Headset Cup Removal Tool
b. Bicycle Fork Star Nut Installer
c. 36mm Bottom Bracket wrench
d. Bike Cassette Removal Tool with Chain Whip and Auxiliary Wrench Bicycle Sprocket Removal Tool
e. Bike Crank Extractor/Arm Remover and Bottom Bracket Remover with 16mm Spanner/Wrench
3. ‘Section Three’ are items completed thus far with part details and other details:
a. Bottom bracket has been replaced with a Shimano BB-UN300x68mm. Greased threads with light marine-grade grease. Torque = 40 ft/lb
b. Cassette has been installed. Shimano Sora HG50 9 Speed Cassette – I very lightly greased the hub with light marine-grade grease. No grease on the sprockets at this time. Torque = 25 ft/lb on the lock ring
c. Rear disc installed on the new rear wheel. Very lightly greased mounting surface with light marine-grade grease to prevent possible dissimilar metal corrosion. Bolts factory pre-coated with blue thread lock compound. Torque = 55 in/lb.
d. Front disc installed on the new front wheel. Very lightly greased mounting surface with light marine grade grease to prevent possible dissimilar metal corrosion. Bolts factory pre-coated with blue thread lock compound. Torque = 55 in/lb
e. Rear disc bracket was installed after grinding a tab off on the frame. I think the tab was for a luggage rack. This was necessary for the bolt-on caliper conversion bracket to fit flush. Grinding was done slowly with ample time and physical spacing to allow for proper cooling. Bolts factory pre-coated with blue thread lock compound. Rear disc bracket torque = 75 in/lb (both brackets were torqued to the same spec as this required a conversion bracket from vertical to horizontal)
f. Rear caliper is installed and aligned while the wheel was installed. No rubbing once aligned. Refer to 'E' for torque settings.
g. Front disc installed on the front wheel. Very lightly greased mounting surface with light marine grade grease to prevent possible dissimilar metal corrosion. Bolt pre-coated with blue thread lock compound. Torque = 55 in/lb
h. Rear tube and tire installed. PSI=55
i. Rear derailleur installed. Torque = 75 in/lb – no adjustments made
j. Pedals installed to crank arms. Torque = 28 ft/lb
k. Custom brake hose bracket = Modified a ‘Farbetter Cable Guide’ – Drilled a hole to convert to 90 degrees to hold rear brake hose away from the frame.
l. Installed ‘Farbetter Cable Guides’ to convert standard wire mounts to ‘hose’ mounts.
2. Section Two are initial thoughts in alphabetical relation to Section One 1.
a. The new bottom bracket is a super smooth feeling. The original crappy bearings were grinding. Original was not a cartridge.
b. No comment on the chain because I do not have it yet.
c. No comment on the headset because I do not have it yet.
d. The tubes seem to be very nice but I really can’t comment as I have not used them. They do hold air.
e. The wheels are very nice. They are much lighter than what I had and the bearings are super smooth and quiet. They seem to be very true. My only issue is that the description on Amazon had no mention of them being Presta valve wheels. The spindles seem to be very well built. I think these wheels may be very underrated but I am no expert. Time will tell and I will certainly update on their longevity and performance.
f. I have no opinion on these grips yet as they have not been installed or used.
g. These tires are foldable and seem to be very nice tires. I have not used them and only use will tell about their longevity. I will however report back on their performance once I am able to use them.
h. These spacers are only headset spacers. They are carbon fiber. They won’t be of any advantage so I won’t mention them again unless they fail for some absurd reason.
i. These brakes are really cheap hydraulic disc brakes. So far the discs are 100% true and the calipers work and grip tightly. I have only tested the rear caliper thus far. More opinions on these will come later.
j. No opinion yet as this has yet to be installed.
k. No opinion yet as this has yet to be installed.
l. I have some use with this item. It worked well before on a 7-speed and has shown that it may work on a 9 speed. I do not guarantee this until I have installed it with the new 3x9 drivetrain. On the 7-speed it had a very large amount of adjustment so I am just going with this to try it.
m. I have not used this. I have installed it but I am waiting on a chain to see.
n. These are freakin’ awesome for adding a hydraulic hose to a standard cable holder. Just use Loctite Blue on the small Allen bolts.
My actual measurement specs - be kind (Very accurate in measurements but rough to read and not necessarily how standard parts are purchased):
Bottom bracket:
36mm diameter
68.5mm width
Rear:
135mm wheel frame spacing
700x38c tire 28x1 5/8x1
Headset Model = EC34/28.6
headset tube:
130mm long
34mm diameter at cups
headset crown race = 30mm ID
fork:
tube = 220mm
top = 28.6mm
bottom = 30mm
shaft length = 220mm
Upper headset type:
pressfit
Upper frame internal diameter:
34mm
Fork steerer top outside diameter:
28.6mm
Lower headset type:
pressfit
Lower frame internal diameter:
34mm
Fork steerer bottom outside diameter:
30mm
04-27-23, 08:44 PM
#71
Junior Member
Thread Starter
Join Date: Apr 2023
Location: 33.85485, -78.53622
Posts: 99
Bikes: A Janky Schwinn
Mentioned: 0 Post(s)
Tagged: 0 Thread(s)
Quoted: 59 Post(s)
Likes: 0
Liked 17 Times
in
14 Posts
Presta tubes are not my favorite due to needing the adapter to fill them with a standard schrader inflater. One more tool to carry if I were doing long distance riding.
04-27-23, 08:52 PM
#72
Junior Member
Thread Starter
Join Date: Apr 2023
Location: 33.85485, -78.53622
Posts: 99
Bikes: A Janky Schwinn
Mentioned: 0 Post(s)
Tagged: 0 Thread(s)
Quoted: 59 Post(s)
Likes: 0
Liked 17 Times
in
14 Posts
I didn't mention earlier that I decided to replace the headset. The bearings were garbage and of the poorest quality. I removed the cups to get an accurate measurement. Of course, I didn't use a screwdriver. I didn't do that with the old crown race to get an accurate measurement either. That would be against the Italian method.
Anyway, I took accurate measurements with a micrometer and found out what I needed. More will be posted on the quality of that non-$3000 headset at a later time.
EDIT: Keep in mind I am an expert at removing things that never want to be removed without damaging anything and without using heat (maybe not?). I was able to remove the cups and the crown race without making a scratch or warping anything, maybe. DO not try anything I ever mention. If you insist then use a thin wall pipe that you can split and slot to remove the cups. Look up an actual tool to see what you need to make (OR a screwdriver and a mallet with a gentle hand). The crown race tool requires some brass, a grinder, fender washers, threaded rods, washers, and nuts (OR just a flathead screwdriver and a mallet and a gentle hand). OR just buy the proper and expensive tools as you should? I just don't want to be responsible for you messing up but dang, you can do this with a rubber mallet and a flathead screwdriver if you are very careful. The trick is to tap in opposite directions. On a clock start at 12 then 6 then 9 then 3 and alternate slowly making sure you aren't slipping or hitting the inside. You can have both headset cups out in 5 minutes if you are careful.
Getting the crown race off is a different thing. You will most likely mess up the paint and aluminum on your own. Having the hundred-dollar puller will save the aluminum on your fork. If you want that crown race and you don't care about your fork then just work it off with a flathead screwdriver and a small sledgehammer. The fork will get messed up long before the crown race. If you are re-using the fork then take it to a bike shop to have them remove it and put your new one on properly.
The bike shop will give you heck about what you are doing and what headset you need. They will tell you that there 80 bazillion of them and that they need your frame and everything to determine what you need. TOTAL BS! If you have a cheap micrometer or can even eyeball a tape measure you can determine on your own what you need. There are a couple of different types. Once you know the type then there are only a few sizes. Then you choose which one you want. Message me if you want to discuss details on this.
If you break it don't blame me.
Thanks
Last edited by aaronM46; 04-27-23 at 09:25 PM.
04-27-23, 09:18 PM
#73
cowboy, steel horse, etc
Join Date: Sep 2008
Location: The hot spot.
Posts: 44,855
Bikes: everywhere
Mentioned: 72 Post(s)
Tagged: 1 Thread(s)
Quoted: 12781 Post(s)
Liked 7,695 Times
in
4,084 Posts
I just bring my own pump on long distance rides, as I'm sometimes 50+ miles from the nearest schrader or presta inflator.
04-27-23, 09:39 PM
#74
Junior Member
Thread Starter
Join Date: Apr 2023
Location: 33.85485, -78.53622
Posts: 99
Bikes: A Janky Schwinn
Mentioned: 0 Post(s)
Tagged: 0 Thread(s)
Quoted: 59 Post(s)
Likes: 0
Liked 17 Times
in
14 Posts
I don't care at this point but I may someday when I am riding a lot further. I can drill and clean the Presta rim for Schrader or possibly run Presta in the newly drilled Schrader rim.
EDIT: After a bit of research the only downside of using a Presta in a Schader hole is the possibility of the tube coming into the opening of the larger Schrader valve. This leads me to a new question. My wheels are double-walled. The inner wall is large enough for a Schader valve. The outer wall has a Presta-sized hole. Is there ANY chance the tube would actually move out of the inner wall to the outer wall causing an issue?
Last edited by aaronM46; 04-27-23 at 09:45 PM.
04-27-23, 09:43 PM
#75
cowboy, steel horse, etc
Join Date: Sep 2008
Location: The hot spot.
Posts: 44,855
Bikes: everywhere
Mentioned: 72 Post(s)
Tagged: 1 Thread(s)
Quoted: 12781 Post(s)
Liked 7,695 Times
in
4,084 Posts
SO, I screwed up. Being a novice I didn't know what a Presta valve was. So my original Schrader valve tube valve didn't fit in my new wheel. I thought the rims were wrong. My stupidity. I drilled it out to the exact specs for a Schrader valve, cleaned up the hole, painted it, and fitted the Schrader tube and new tire. After that, I realized my ignorance. Now I have one wheel for Schrader and one Presta. Maybe a Presta will work in a Schrader rim? Is there an advantage with Presta?
I don't care at this point but I may someday when I am riding a lot further. I can drill and clean the Presta rim for Schrader or possibly run Presta in the newly drilled Schrader rim.
I don't care at this point but I may someday when I am riding a lot further. I can drill and clean the Presta rim for Schrader or possibly run Presta in the newly drilled Schrader rim.
But if you usually air up at gas stations and whatnot, you may want to just drill out the other rim and run Schrader on both.