


Stubborn quill stem
 06-26-21, 08:19 PM
#1
Newbie
Thread Starter
Stubborn quill stem
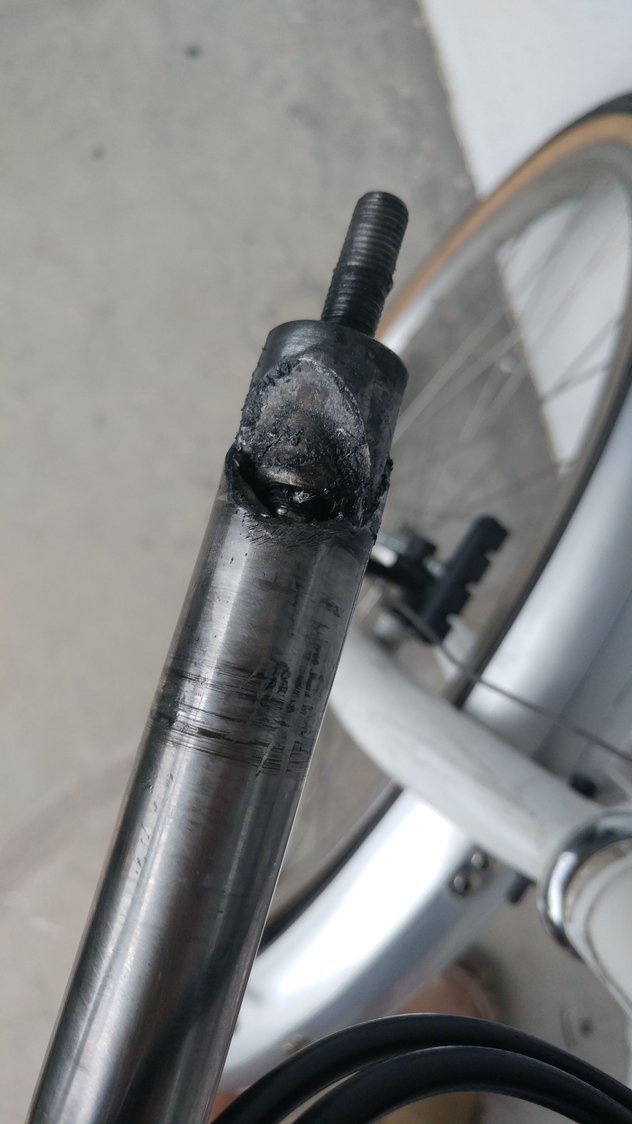
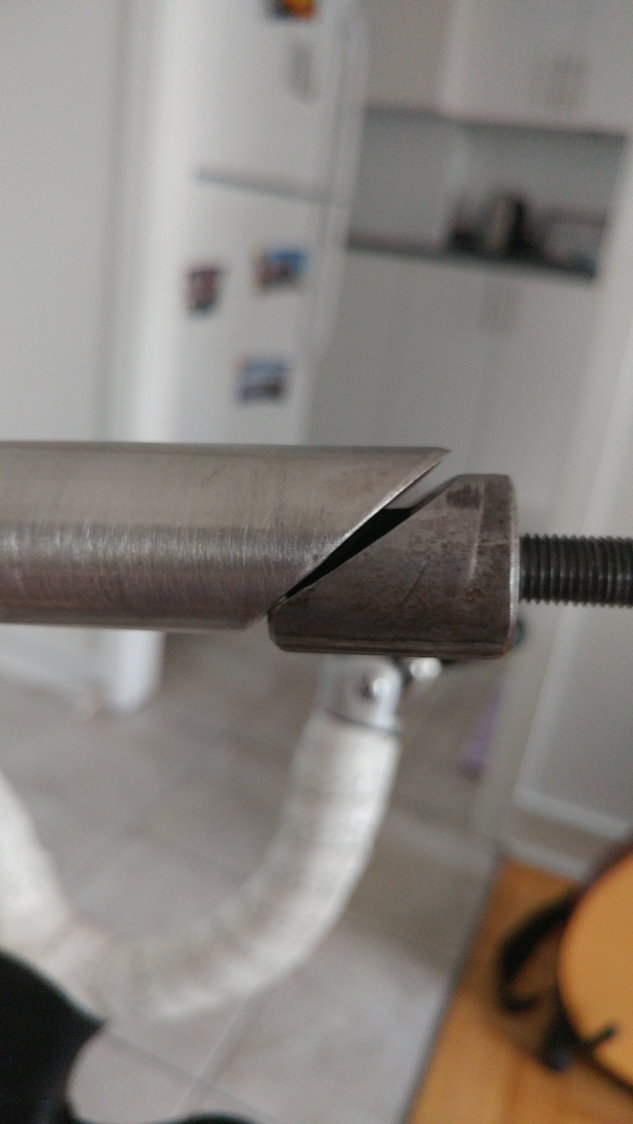
Hey all, the quill stem on my bike is extremely difficult to move up or down and remove from the fork. I thought maybe it was seized but when I finally got the bolt loosened (though it still doesn't turn easily) I was able to wiggle out the stem after probably almost an hour of work and some chain lube. The stem would twist back and forth but moving it up and down was an extremely slow process and impossible without the wiggling. Here are some photos. Does this look normal to you? I'm new to bike mechanics and it doesn't look how I thought it would. It also doesn't slide back into the fork, though I haven't tried too hard yet. What could the problem be and what should I do next? Thanks.
 06-26-21, 08:29 PM
#2
Senior Member
Join Date: Mar 2007
Location: SF Bay Area, East bay
Posts: 7,659
Bikes: Miyata 618 GT, Marinoni, Kestral 200 2002 Trek 5200, KHS Flite, Koga Miyata, Schwinn Spitfire 5, Mondia Special, Univega Alpina, Miyata team Ti, Santa Cruz Highball
Mentioned: 53 Post(s)
Tagged: 0 Thread(s)
Quoted: 1609 Post(s)
Liked 2,590 Times
in
1,224 Posts
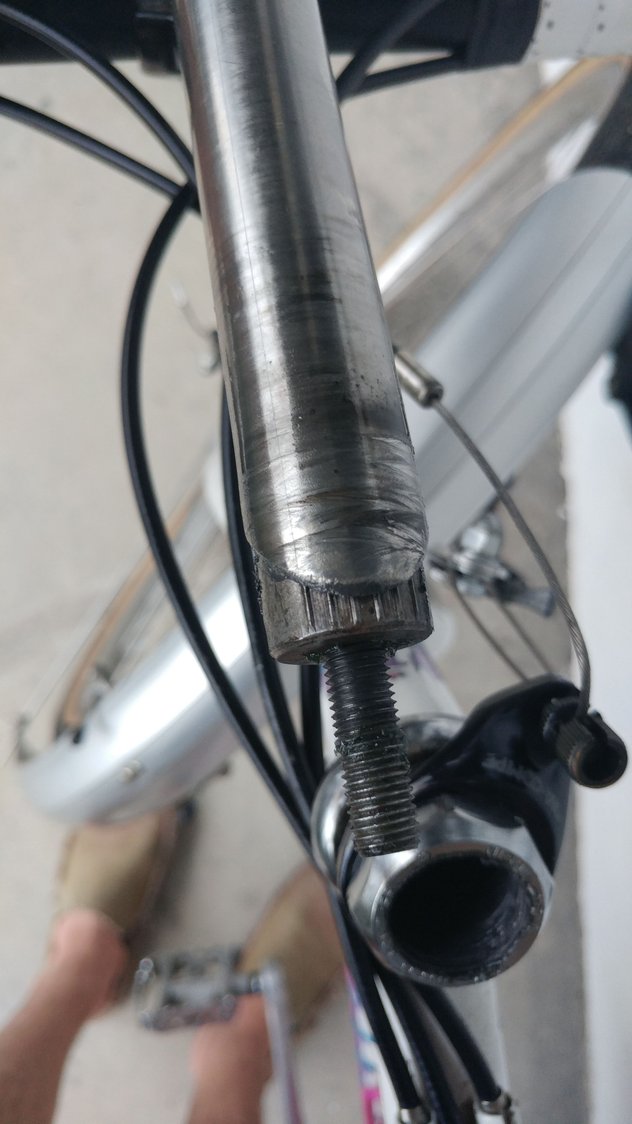
I'm wondering if it was over tightened and that flared the stem at the bottom.
06-26-21, 08:44 PM
#3

Happy With My Bikes

Join Date: Sep 2020
Location: Oklahoma
Posts: 2,186
Bikes: Hi-Ten bike boomers, a Trek Domane and some projects
Mentioned: 2 Post(s)
Tagged: 0 Thread(s)
Quoted: 884 Post(s)
Liked 2,307 Times
in
1,117 Posts
It looks like you may not have loosened the bolt enough as the wedge still appears to be engaged with the stem. You should usually be able to loosen the bolt until it starts to extend out of the stem and then rap it with a soft mallet or block of wood and that should loosen it enough for removal.
__________________
"It is the unknown around the corner that turns my wheels." -- Heinz St�cke
"It is the unknown around the corner that turns my wheels." -- Heinz St�cke
06-26-21, 08:57 PM
#4
Senior Member
The top part of the wedge shape on the stem is broken or chipped badly. The bottom of the stem should have wedge shape that is similar to the wedge on the expander nut. Totally unscrew the bolt and you'll see what the wedge shape looks like.
Tightening the bolt should cause the 2 wedge shapes to slide against each other and expand to lock against the steerer tubes inside.
Tightening the bolt should cause the 2 wedge shapes to slide against each other and expand to lock against the steerer tubes inside.
Likes For KCT1986:

Likes For KCT1986:
06-27-21, 01:35 AM
#6
se�or miembro

Join Date: Dec 2018
Location: Pac NW
Posts: 6,626
Bikes: '70s - '80s Campagnolo
Mentioned: 92 Post(s)
Tagged: 0 Thread(s)
Quoted: 3888 Post(s)
Liked 6,485 Times
in
3,209 Posts
The wedge is in backwards. Post 5 shows how the wedge should be oriented on the bolt at the bottom of the stem. Also, the first pic in the op makes it appear as if the bottom of the stem is damaged.
Likes For SurferRosa:
06-27-21, 07:28 AM
#7
Senior Member
Join Date: Jun 2020
Location: Maryland
Posts: 1,380
Bikes: 1982 Bianchi Sport SX, Rayleigh Tamland 1, Rans V-Rex recumbent, Fuji MTB, 80's Cannondale MTB with BBSHD ebike motor
Mentioned: 1 Post(s)
Tagged: 0 Thread(s)
Quoted: 668 Post(s)
Liked 529 Times
in
355 Posts
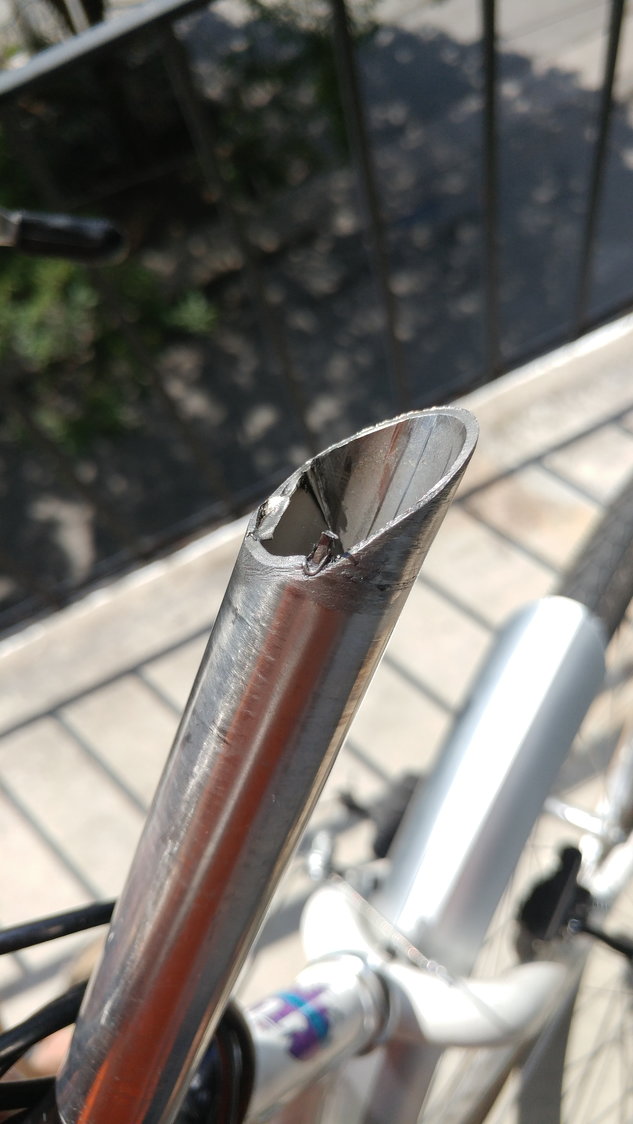
SurferRosa nailed it. Clean it up and check for gouges before trying to reuse. If that one gouge is real bottom of the stem will need to be repaired. If there is sufficient length cut a quarter inch off the bottom of the stem then taper all the sharp edges with fine grit sand paper.
06-27-21, 09:51 AM
#8
Newbie
Thread Starter
SurferRosa nailed it. Clean it up and check for gouges before trying to reuse. If that one gouge is real bottom of the stem will need to be repaired. If there is sufficient length cut a quarter inch off the bottom of the stem then taper all the sharp edges with fine grit sand paper.
 06-27-21, 02:12 PM
#9
Senior Member
A bit more cleanup is needed. The wedge shaped portion of stem and the expander needs to be able to slide against each other when the bolt is tightened. This sliding pushes each part against the inside of the steerer tube and holds the stem in place.
06-27-21, 02:23 PM
#10
Junior Member
I think this stem can still be used. Just clean up the outer edges and the face where the wedge slides against the stem. It may be a bit of work because the stem is probably steel. If it's aluminum, it will be a bit easier. Be sure to use plenty of lube (I just use ordinary grease) when you reassemble.
06-28-21, 12:46 AM
#11
se�or miembro
Join Date: Dec 2018
Location: Pac NW
Posts: 6,626
Bikes: '70s - '80s Campagnolo
Mentioned: 92 Post(s)
Tagged: 0 Thread(s)
Quoted: 3888 Post(s)
Liked 6,485 Times
in
3,209 Posts
06-28-21, 06:10 AM
#12
SE Wis
Join Date: Apr 2005
Location: Milwaukee, WI
Posts: 10,515
Bikes: '68 Raleigh Sprite, '02 Raleigh C500, '84 Raleigh Gran Prix, '91 Trek 400, 2013 Novara Randonee, 1990 Trek 970
Mentioned: 40 Post(s)
Tagged: 0 Thread(s)
Quoted: 2747 Post(s)
Liked 3,395 Times
in
2,056 Posts
Looks like an alloy stem. Take it out to the concrete sidewalk and use that for the rough "sanding" then finish off with sandpaper/emery cloth for the final clean up.
 06-28-21, 09:30 AM
#15
Senior Member
Join Date: Mar 2007
Location: SF Bay Area, East bay
Posts: 7,659
Bikes: Miyata 618 GT, Marinoni, Kestral 200 2002 Trek 5200, KHS Flite, Koga Miyata, Schwinn Spitfire 5, Mondia Special, Univega Alpina, Miyata team Ti, Santa Cruz Highball
Mentioned: 53 Post(s)
Tagged: 0 Thread(s)
Quoted: 1609 Post(s)
Liked 2,590 Times
in
1,224 Posts
Probably need to cut off about a quarter inch at least to make it useable. Chop saw with abrasive blade or a grinder. Or just find a replacement and install correctly.
06-28-21, 10:02 AM
#16
Junior Member
I wouldn't say it's backwards - more like 180� out of place. PO installed it incorrectly.
 06-29-21, 04:47 PM
#18
Newbie
Thread Starter
Alright so I sanded it down with some 60 grit sandpaper but the wedge and stem end don't have the same angle. I put the bolt in the stem and the wedge on the end and tightened it up outside of the headtube to see what would happen and it works ok but it seems like it might twist around and go backwards again like it was in my original post if I'm not careful. Also, the stem itself barely fits in the head tube. I did some sanding around it to thin it out but I still have to apply some pressure and wiggle it to fit it in despite the stem measuring ~21 mm and the head tube ~22.2 mm (with a tape measure, I don't have caliper's). Is this worth saving or should I just get a new stem? Thanks everyone for your responses, much appreciated!
06-29-21, 06:54 PM
#19
Senior Member
Join Date: Jun 2020
Location: Maryland
Posts: 1,380
Bikes: 1982 Bianchi Sport SX, Rayleigh Tamland 1, Rans V-Rex recumbent, Fuji MTB, 80's Cannondale MTB with BBSHD ebike motor
Mentioned: 1 Post(s)
Tagged: 0 Thread(s)
Quoted: 668 Post(s)
Liked 529 Times
in
355 Posts
Looks pretty good. Shouldn't be hard to sand a little more and get the angles to match.
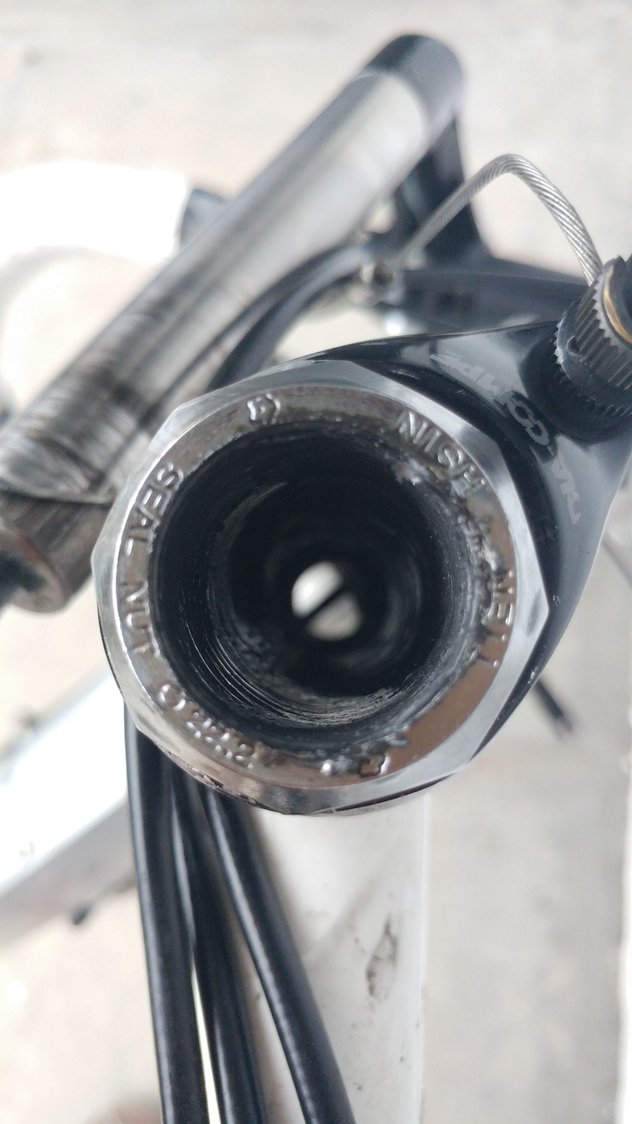
Are you greasing everything when you put it back together? Check your headset and make sure it isn't torn up from the last go around.
As long as the stem is seated well inside the headset your should be OK. I think the only way to get what you had would be to insert it incorrectly from the get go.
Are you greasing everything when you put it back together? Check your headset and make sure it isn't torn up from the last go around.
As long as the stem is seated well inside the headset your should be OK. I think the only way to get what you had would be to insert it incorrectly from the get go.
06-29-21, 07:57 PM
#20
Live not by lies.
Join Date: Nov 2020
Posts: 1,306
Bikes: BigBox bikes.
Mentioned: 3 Post(s)
Tagged: 0 Thread(s)
Quoted: 860 Post(s)
Liked 784 Times
in
582 Posts
This might not have helped in this situation, so take following instructions with a grain of salt.
Here�s what I do with quill stems.
1) Hose it all down with penetrating oil. Let sit for a couple days. Might even be worth it to flip bike upside down spray penetrating oil from other side. Charcoal lighter fluid makes a passable penetrating oil if you don�t have any.
2) Turn the bolt on top counterclockwise maybe 3 rotations. The bolt that goes through the wedge.
3) Strike that bolt down pretty hard and fast with a hammer.
4) Strike the quill stem down. Everything should now be freed up. If the quill stem is hard up against the bearing lock nut, maybe don�t strike it.
5) Grip front wheel with your legs and wiggle the handlebars back and forth while pulling them up. Should slide right out.
These steps won�t work if the previous owner messed things up, or if the aluminum stem corroded to the steel fork tube.
These steps work good for generically old rusty parts.
It should be like a 3 minute job.
06-30-21, 07:05 AM
#21
Senior Member
This might not have helped in this situation, so take following instructions with a grain of salt.
Here�s what I do with quill stems.
1) Hose it all down with penetrating oil. Let sit for a couple days. Might even be worth it to flip bike upside down spray penetrating oil from other side. Charcoal lighter fluid makes a passable penetrating oil if you don�t have any.
2) Turn the bolt on top counterclockwise maybe 3 rotations. The bolt that goes through the wedge.
3) Strike that bolt down pretty hard and fast with a hammer.
4) Strike the quill stem down. Everything should now be freed up. If the quill stem is hard up against the bearing lock nut, maybe don�t strike it.
5) Grip front wheel with your legs and wiggle the handlebars back and forth while pulling them up. Should slide right out.
These steps won�t work if the previous owner messed things up, or if the aluminum stem corroded to the steel fork tube.
These steps work good for generically old rusty parts.
It should be like a 3 minute job.
Here�s what I do with quill stems.
1) Hose it all down with penetrating oil. Let sit for a couple days. Might even be worth it to flip bike upside down spray penetrating oil from other side. Charcoal lighter fluid makes a passable penetrating oil if you don�t have any.
2) Turn the bolt on top counterclockwise maybe 3 rotations. The bolt that goes through the wedge.
3) Strike that bolt down pretty hard and fast with a hammer.
4) Strike the quill stem down. Everything should now be freed up. If the quill stem is hard up against the bearing lock nut, maybe don�t strike it.
5) Grip front wheel with your legs and wiggle the handlebars back and forth while pulling them up. Should slide right out.
These steps won�t work if the previous owner messed things up, or if the aluminum stem corroded to the steel fork tube.
These steps work good for generically old rusty parts.
It should be like a 3 minute job.
06-30-21, 07:40 AM
#22
Senior Member
The first and second pic in the OP seem to show that (in addition to the wedge being 180 degrees out of position) the wedge has been pulled into the stem quill and has flared it out a bit. I know it’s beyond the capabilities (tool wise) of the OP but I would definitely (as suggested in another reply) trim a bit of length from the quill to get rid of the flare and to correct the mating angle with the wedge.
The “field expedient” method of using a concrete sidewalk to remove some of the damage on the quill came immediately to mind for me too! SurferRosa’s suggestion (an iron file from HarborFreight) is a bit more elegant tho. Unfortunately, no HarborFreight stores in Canada (plus there it would be HarboUr Freight)! I believe the Canadian equivalent is Princess Auto
The “field expedient” method of using a concrete sidewalk to remove some of the damage on the quill came immediately to mind for me too! SurferRosa’s suggestion (an iron file from HarborFreight) is a bit more elegant tho. Unfortunately, no HarborFreight stores in Canada (plus there it would be HarboUr Freight)! I believe the Canadian equivalent is Princess Auto
Likes For sovende:
06-30-21, 10:18 AM
#23
2-Wheeled Fool

Join Date: Sep 2016
Location: New Hampshire
Posts: 2,346
Bikes: Surly Ogre, Brompton
Mentioned: 18 Post(s)
Tagged: 0 Thread(s)
Quoted: 1385 Post(s)
Liked 677 Times
in
457 Posts
Somewhat OT, but one thing I'd like to comment on is that a couple weeks ago, I removed a stubborn quill stem from an old school Marin MTB. It just didn't want to "act right" as I would remove it similar to what you've described above, but it just didn't want to come out. It took quite a lot of taping on the bolt to free it up, and only then was I able to remove it. Come to find out, the wedge on the end of the stem was made of aluminum! I've never seen that before. The wedge had corroded and welded itself to the inside of the steerer tube. I cleaned it out and greased everything up and it slid back in like butter. Weird though. That particular Marin model wasn't notable for being lightweight or particularly high-end, so why the effort to save weight on that particular component?
06-30-21, 12:50 PM
#24
Live not by lies.
Join Date: Nov 2020
Posts: 1,306
Bikes: BigBox bikes.
Mentioned: 3 Post(s)
Tagged: 0 Thread(s)
Quoted: 860 Post(s)
Liked 784 Times
in
582 Posts
Somewhat OT, but one thing I'd like to comment on is that a couple weeks ago, I removed a stubborn quill stem from an old school Marin MTB. It just didn't want to "act right" as I would remove it similar to what you've described above, but it just didn't want to come out. It took quite a lot of taping on the bolt to free it up, and only then was I able to remove it. Come to find out, the wedge on the end of the stem was made of aluminum! I've never seen that before. The wedge had corroded and welded itself to the inside of the steerer tube. I cleaned it out and greased everything up and it slid back in like butter. Weird though. That particular Marin model wasn't notable for being lightweight or particularly high-end, so why the effort to save weight on that particular component?
Likes For SkinGriz:
07-01-21, 11:28 AM
#25
Senior Member
Join Date: Mar 2008
Posts: 8,688
Mentioned: 46 Post(s)
Tagged: 0 Thread(s)
Quoted: 1074 Post(s)
Liked 295 Times
in
222 Posts
Considering the poorly fitting angle, and the excessive amount of threads showing I think you�re looking at a Frankenstem, assembled from parts of other stems. While it�s probabliy possible to make the parts fit, you may want to consider another stem.