


Getting into painting
 09-23-23, 10:57 AM
#1

Senior Member
Thread Starter
Getting into painting
Next year I want to try my hand at painting, I have a junky frame I can practice on. I figure for the first attempt I'll focus on technique; stripping the frame, prepping it, priming and wet sanding, and then a rattle can. This one would not be meant to be a durable finish, just a test run. Then I would do it again but using a two part epoxy paint.
For bike painters, what would be an adequate HVLP gun to use? Also any pointers on the brand of epoxy paint you like would be appreciated.
if there any one part paint you would consider suitable for frame painting?
For bike painters, what would be an adequate HVLP gun to use? Also any pointers on the brand of epoxy paint you like would be appreciated.
if there any one part paint you would consider suitable for frame painting?
 09-23-23, 11:08 AM
#2
Senior Member

Join Date: Aug 2015
Posts: 3,306
Mentioned: 39 Post(s)
Tagged: 0 Thread(s)
Quoted: 1143 Post(s)
Liked 1,758 Times
in
966 Posts
The last paint I did I used a Harbor Freight set that bought for $30-$40. I went to an auto paint distributor and bought some ppg product, I used epoxy primer on the Raleigh.
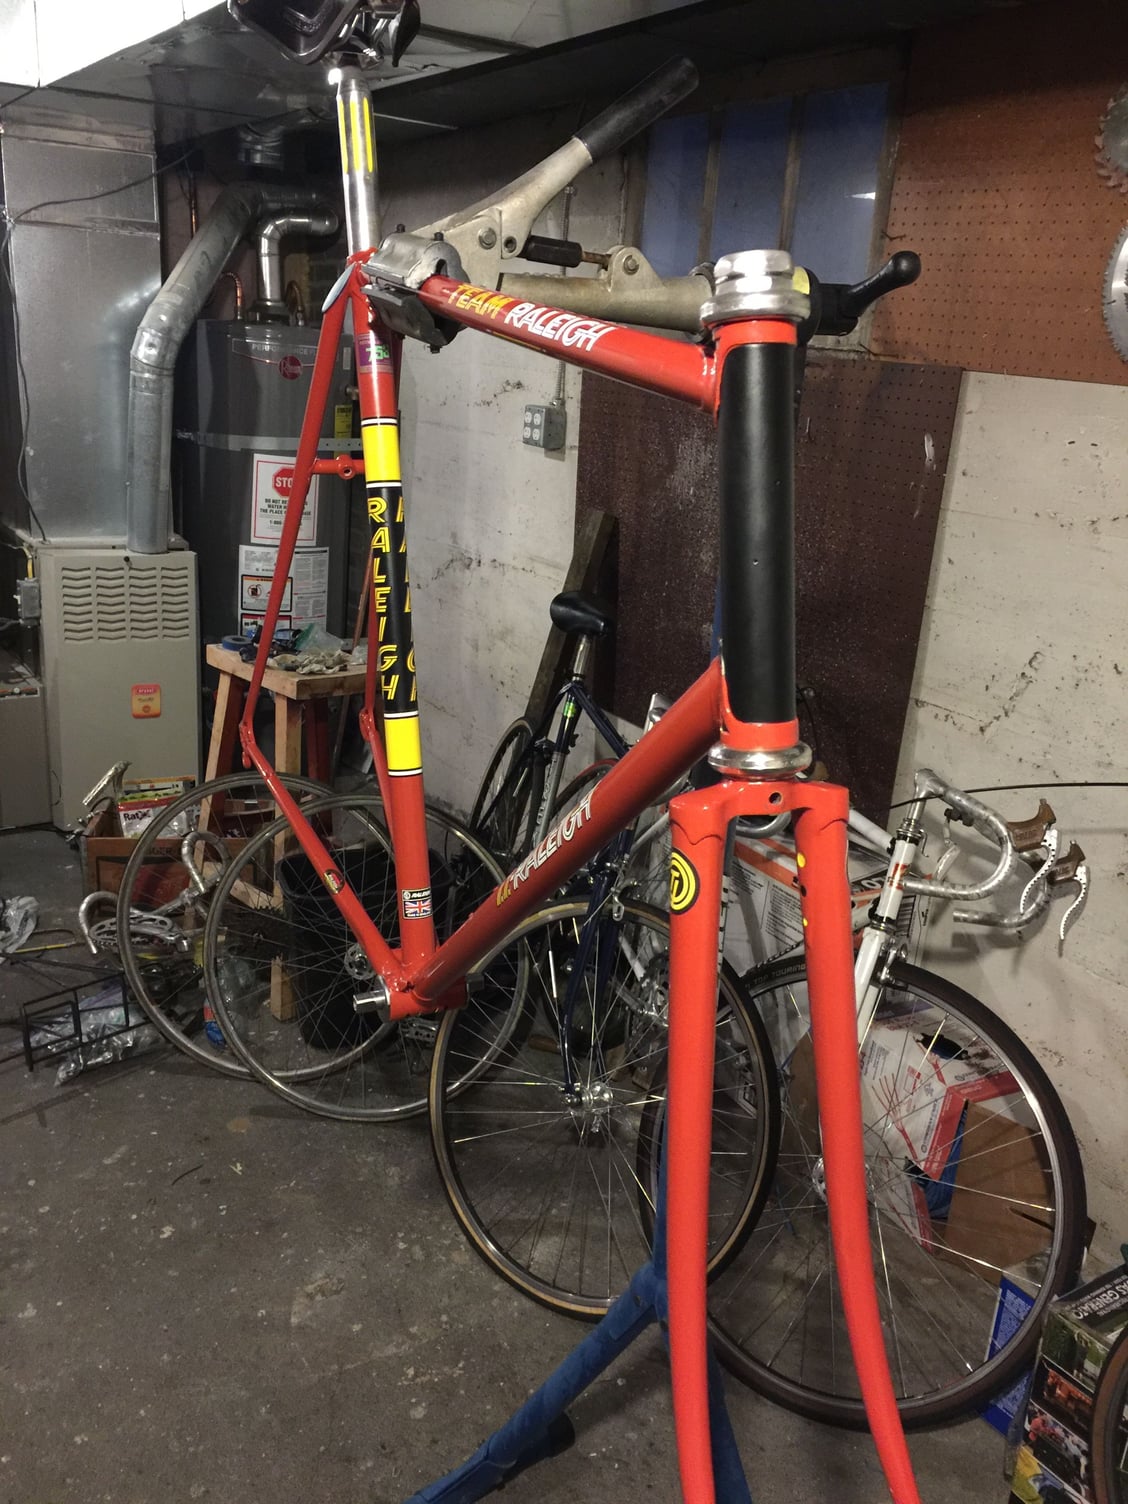
The black is epoxy as well.
The black is epoxy as well.
Likes For Mr. 66:
09-23-23, 12:29 PM
#3
Senior Member
Thread Starter
Nice job.
I take it the gun you got was a high volume low pressure gun? How did you like the flow compared to a decent quality rattle can?
I take it the gun you got was a high volume low pressure gun? How did you like the flow compared to a decent quality rattle can?
09-23-23, 01:53 PM
#4
I'm good to go!
Join Date: Jul 2017
Location: Mississippi
Posts: 15,009
Bikes: Tarmac Disc Comp Di2 - 2020
Mentioned: 51 Post(s)
Tagged: 0 Thread(s)
Quoted: 6202 Post(s)
Liked 4,816 Times
in
3,323 Posts
I use Harbor Freight HVLP guns. They work pretty good. At least the first few times. They are more pain to take apart to clean properly than my better and more expensive paint guns.
The big plus for Harbor Freight HVLP guns, is that if you are using two part paint, you can just throw away the gun and buy a new one. It'd cost more in solvents and your own time involved to clean the two part out. I've even just tossed them for times when I don't feel like cleaning. Especially since their guns are such a pain to clean.
Make sure you know what size nozzle you need to spray the paint you are going to use. That can make a big difference in a nice finish or not.
Edit.. I did just look and saw that HF's guns are a tad more now. 3 plus years ago was the last time I bought on and most all were in the single digit dollar range. But still, for epoxy or other two part urethane, I'd still get several of the cheapest and toss them instead of wasting time and solvent on cleaning.
Last edited by Iride01; 09-23-23 at 02:00 PM.
 09-23-23, 02:13 PM
#5
Junior Member

I just use regular Harbor Freight or other cheap air guns, not the HVLP. Prefer the gravity feed but the syphons work as well. Look out for bugs, they love to land on fresh paint! My go to is an old Craftsman siphon feed from the 60s that just keeps working. I rarely use any 2 part. Almost always old school oil based enamel which cleans up easily with mineral spirits.
Last edited by robobike316; 09-23-23 at 02:17 PM.
09-23-23, 06:45 PM
#6
Senior Member
Thread Starter
I just use regular Harbor Freight or other cheap air guns, not the HVLP. Prefer the gravity feed but the syphons work as well. Look out for bugs, they love to land on fresh paint! My go to is an old Craftsman siphon feed from the 60s that just keeps working. I rarely use any 2 part. Almost always old school oil based enamel which cleans up easily with mineral spirits.
09-24-23, 06:52 AM
#7
Senior Member
Join Date: Jan 2013
Posts: 2,683
Bikes: too many sparkly Italians, some sweet Americans and a couple interesting Japanese
Mentioned: 10 Post(s)
Tagged: 0 Thread(s)
Quoted: 569 Post(s)
Liked 590 Times
in
412 Posts
If you are looking for "strong" this quote should help you, I have seen Doug's built and painted frames and it is first class work:
doug fattic
As a pro builder and painter, I have all the equipment and paint to do the job right. Some of frame building class students have painted the frames they made in class with rattle can paint and done a very nice job. Spray.Max as I understand them is a company that can provide empty rattle cans to local automotive paint suppliers that can fill them with whatever type of auto paint is chosen. There are 2 things special about their cans. !st, are designed to work with epoxy type of paints (that hardens by chemical action when activator is used). They have a button in the bottom of the can that when pushed will mix in the activator. Of course once pushed the chemicals start to work and the time available to paint is limited before it hardens. 2nd, according to their advertising, their spray nozzles are superior for atomizing the paint spray.
All primers are not the same and the best primers to use are 2 part epoxy type of primers. This is because they serve as a barrier to letting moisture through to the base metal. One has to be careful when choosing because auto repainters put a premium on cost and speed and not quality. I use House of Color (spelled with a K instead of a C that autocorrect insists on changing). It comes in the 3 primary colors of red, blue and yellow as well as black and white. These primary colors are good enough to use as the color coat on your frame as long as you like their red, yellow and blue. These primary colors can be mixed to get many primer color variations. After the primer has cured, it should be sanded with 600 wet sandpaper. All sanding residue needs to be removed.
There are hundreds of color coats available that are put on next. Usually there needs to be about 3 coats applied. Then a two part clear (like the Spray.Max clear already mentioned) needs to be sprayed over the color before doing anything else. It is on top of this clear that decals or striping or a 2nd color is applied. More clear may have to go on top of these additional steps. I recommend at least 2 coats of intermediate clears and probably 3 if the clears need to be polished out later. Then the intermediate clears are wet sanded as preparation to do the final clears. I use 3M wet/dry 600 grit here as well. I sand it wet after cutting a single sheet of sandpaper into 1/16th pieces. I have a bread pan I use to keep dipping into to keep the paper wet and Bounty paper towels to keep wiping off the residue. I don't want to use too course (scratches can show through) or too fine (the top coats adhere better to a not-too-smooth surface) sandpaper.
It is extremely unlikely an amateur will get anywhere near as close to a grossly smooth paint job I can get with my expensive spray guns and years of experience. But it is possible to smooth out the orange peal or roughness or even runs by wet sanding with progressively fine sandpaper and afterwards using polishing compounds. What grit of sandpaper to start with depends on how smooth you got the final clears. Your last sanding will probably be with 2000 grit (depending on how fussy you want to get). For polishing, I use 3 kinds of Meguiars polish in succession. I start with Ultra-cut Compound #105, then I go to Medium-cut Cleaner #1. And finally I finish with Ultra-Finishing Polish #205. Yes the final sanding and polishing is a lot of work but it provides an outstanding pro quality finish. Even after using rattle can spray cans and less than perfect spray techniques. Just avoid sand throughs. Those are a pros nightmare.
It takes about a month of an epoxy clear to achieve its final hardness. I know because I leave the left over clears in disposable cups. The clear in the bottom of the cup slowly shrinks until it get to be about 2/3rds of its volume in about a month. The best clear that I've found is H of K USC01. All of us old pros used to use Imron 500S but the new H of K is clearer that appears to provide more depth.
Likes For easyupbug:
09-24-23, 07:23 AM
#8
...
Join Date: Oct 2021
Location: Whitestone and Rensselaerville, New York
Posts: 1,519
Bikes: Bicycles? Yup.
Mentioned: 8 Post(s)
Tagged: 0 Thread(s)
Quoted: 482 Post(s)
Liked 1,593 Times
in
739 Posts
Following Doug's quote above has delivered good results.
I enjoy the DIY painting process and outcome, but it's it's about $125 for the materials. SprayMax primer and clear are about $25/can, the custom color cans are $35-40. Paint stripper and abrasives are another $20. Spray-Max cans are usable for 48 hours after opening so I typically need 2 cans of clear to get 2 passes of wet sanding. An organic vapor cartridge respirator is about $40 - a requirement for the 2 part isocyanate SprayMax.
I've had good results using Dupli-color for the color coat. I do not like the slightly grainy texture of the Spray.Bike paint.
Stripping sucks but wrapping the goo-ed up area with saran wrap helps a lot. I tend to strip about 25% of the frame at a pass. Messy. Gooey. Messy.
09-24-23, 07:30 AM
#9
Senior Member
Join Date: Feb 2012
Location: Rochester, NY
Posts: 18,100
Bikes: Stewart S&S coupled sport tourer, Stewart Sunday light, Stewart Commuting, Stewart Touring, Co Motion Tandem, Stewart 3-Spd, Stewart Track, Fuji Finest, Mongoose Tomac ATB, GT Bravado ATB, JCP Folder, Stewart 650B ATB
Mentioned: 0 Post(s)
Tagged: 0 Thread(s)
Quoted: 4212 Post(s)
Liked 3,883 Times
in
2,318 Posts
I look forward to reading this OP's take on painting in a couple of years, after they do a few paint jobs...
They are at the beginning of a huge education. One thing I do suggest right away is to establish a relationship with a local paint supply shop. Buy as much of the needed supplies from them if possible, as they will be the first go to when a problem arises and can be a good source for info and advise. Andy
They are at the beginning of a huge education. One thing I do suggest right away is to establish a relationship with a local paint supply shop. Buy as much of the needed supplies from them if possible, as they will be the first go to when a problem arises and can be a good source for info and advise. Andy
__________________
AndrewRStewart
AndrewRStewart
09-24-23, 10:04 AM
#11
Senior Member

Join Date: Apr 2007
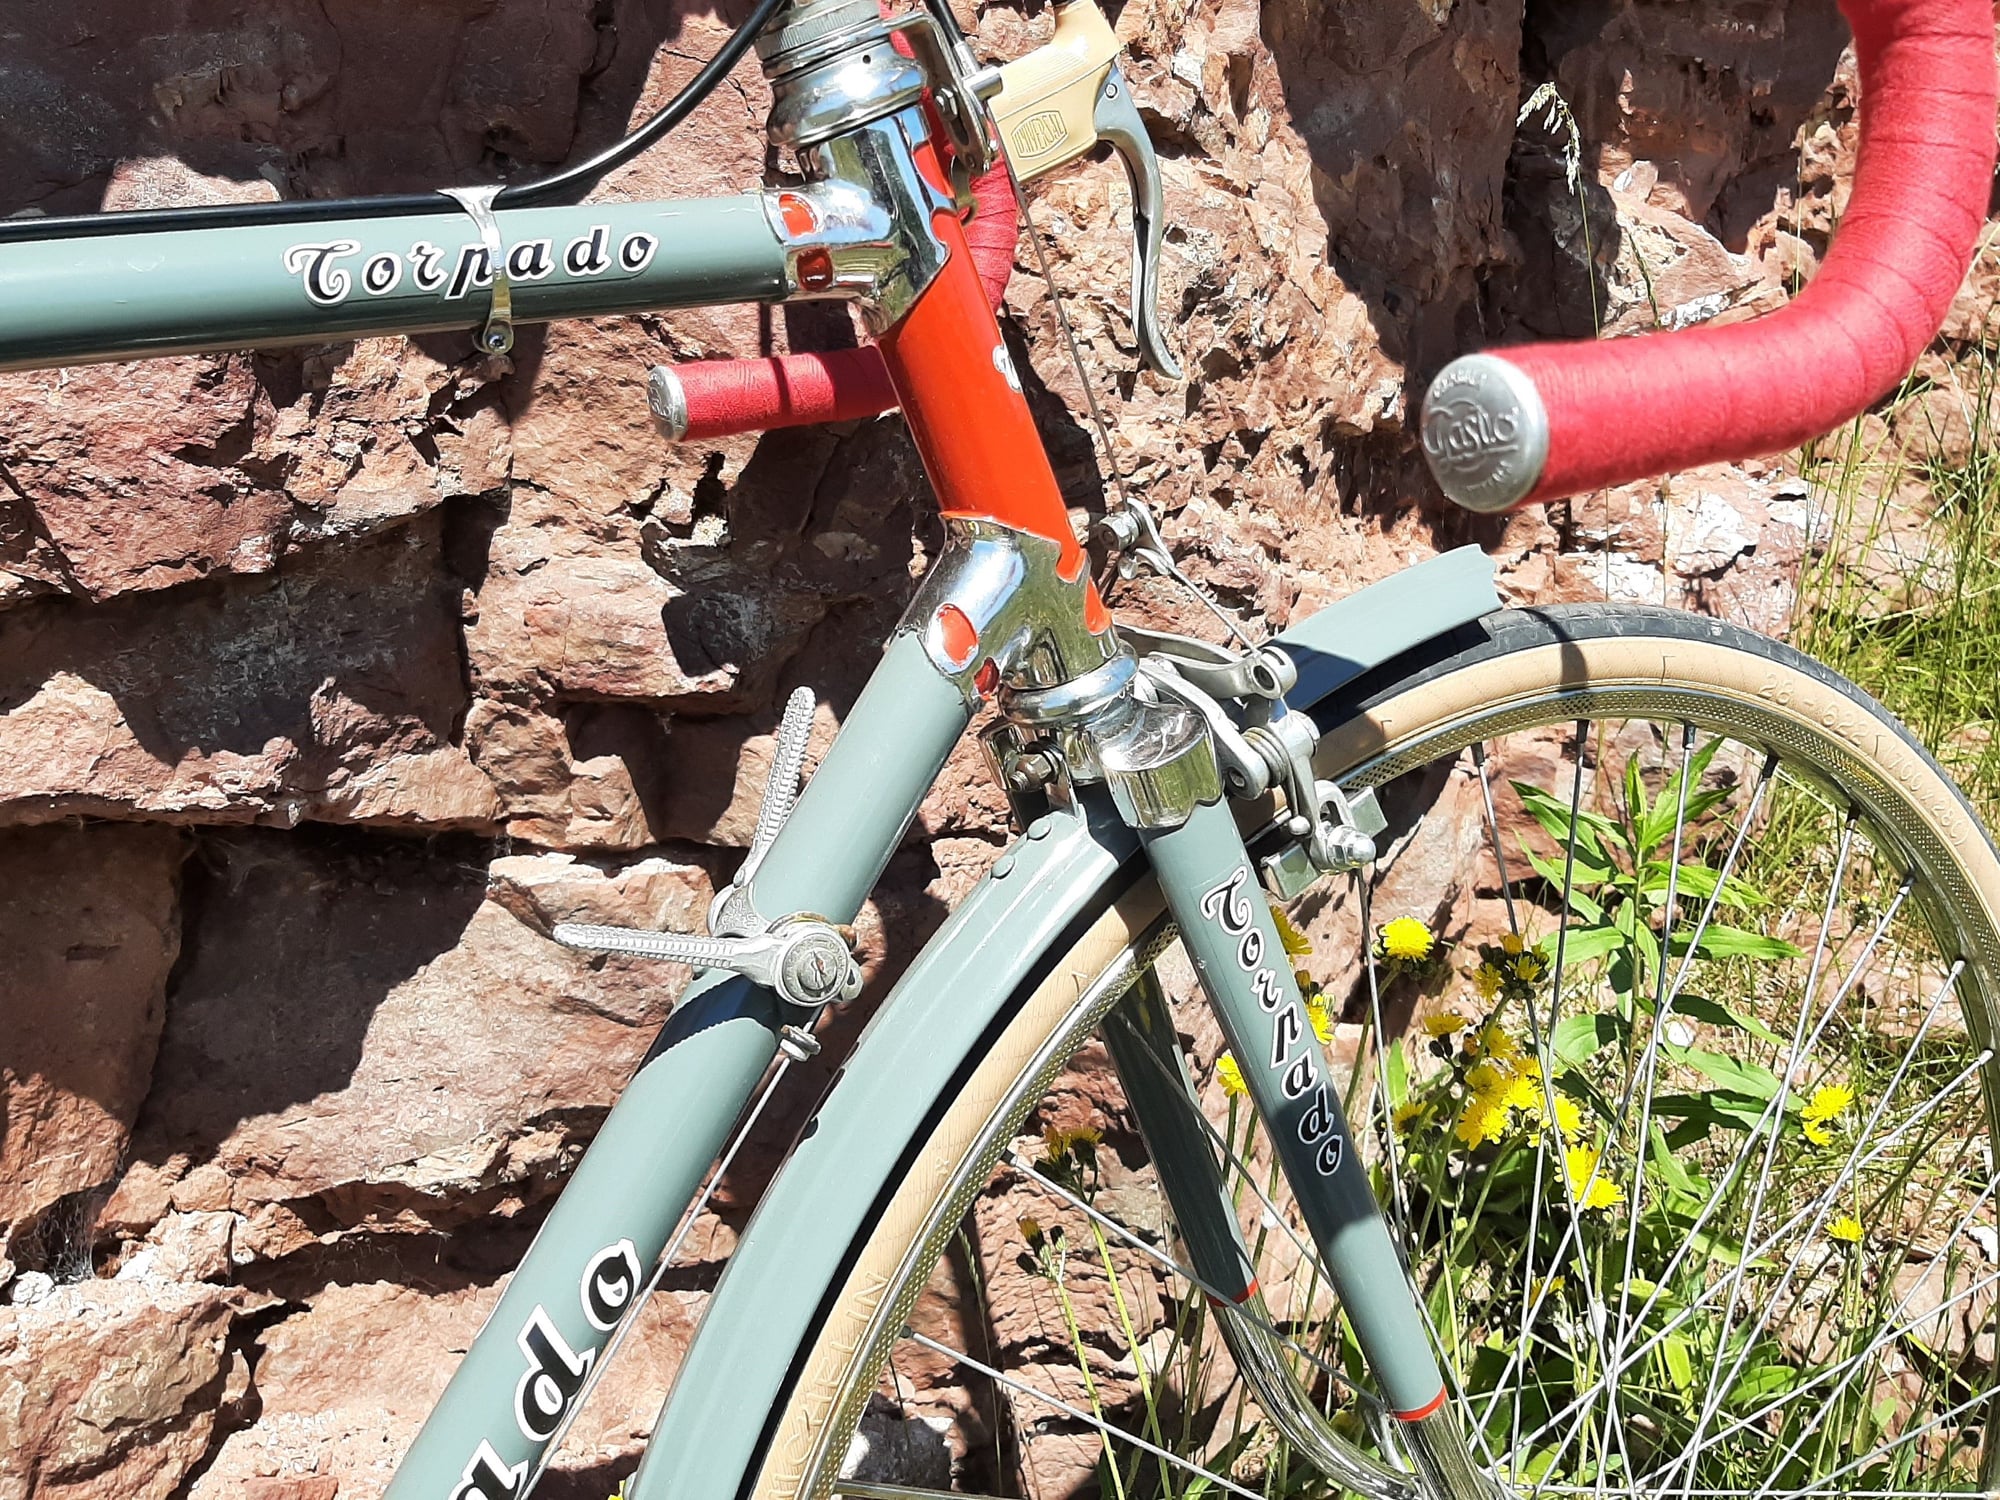
Location: Thunder Bay, Ontario, Canada - burrrrr!
Posts: 11,674
Bikes: 1958 Rabeneick 120D, 1968 Legnano Gran Premio, 196? Torpado Professional, 2000 Marinoni Piuma
Mentioned: 210 Post(s)
Tagged: 0 Thread(s)
Quoted: 1372 Post(s)
Likes: 0
Liked 1,752 Times
in
939 Posts
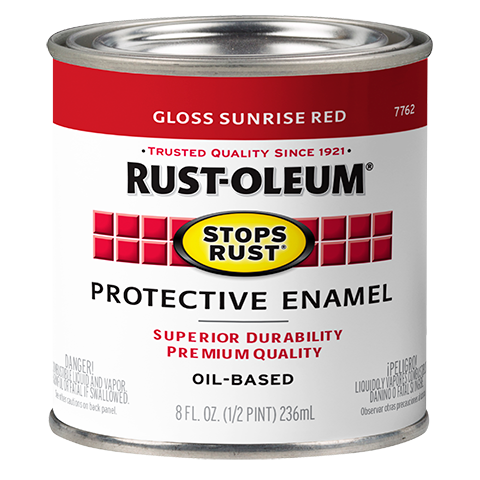
For me, a can or two of Rustoleum and a 1" paint brush and this is good enough for me...
And, for what it is worth, I can, with my wife's reluctant approval, paint a bike frame in the kitchen with very little mess and, needless to say, no over-spray.
And, for what it is worth, I can, with my wife's reluctant approval, paint a bike frame in the kitchen with very little mess and, needless to say, no over-spray.
__________________
"98% of the bikes I buy are projects".
"98% of the bikes I buy are projects".
Likes For randyjawa:
09-24-23, 11:22 AM
#12
Senior Member
Thread Starter
If you are looking for "strong" this quote should help you, I have seen Doug's built and painted frames and it is first class work:
doug fattic
As a pro builder and painter, I have all the equipment and paint to do the job right. Some of frame building class students have painted the frames they made in class with rattle can paint and done a very nice job. Spray.Max as I understand them is a company that can provide empty rattle cans to local automotive paint suppliers that can fill them with whatever type of auto paint is chosen. There are 2 things special about their cans. !st, are designed to work with epoxy type of paints (that hardens by chemical action when activator is used). They have a button in the bottom of the can that when pushed will mix in the activator. Of course once pushed the chemicals start to work and the time available to paint is limited before it hardens. 2nd, according to their advertising, their spray nozzles are superior for atomizing the paint spray.
All primers are not the same and the best primers to use are 2 part epoxy type of primers. This is because they serve as a barrier to letting moisture through to the base metal. One has to be careful when choosing because auto repainters put a premium on cost and speed and not quality. I use House of Color (spelled with a K instead of a C that autocorrect insists on changing). It comes in the 3 primary colors of red, blue and yellow as well as black and white. These primary colors are good enough to use as the color coat on your frame as long as you like their red, yellow and blue. These primary colors can be mixed to get many primer color variations. After the primer has cured, it should be sanded with 600 wet sandpaper. All sanding residue needs to be removed.
There are hundreds of color coats available that are put on next. Usually there needs to be about 3 coats applied. Then a two part clear (like the Spray.Max clear already mentioned) needs to be sprayed over the color before doing anything else. It is on top of this clear that decals or striping or a 2nd color is applied. More clear may have to go on top of these additional steps. I recommend at least 2 coats of intermediate clears and probably 3 if the clears need to be polished out later. Then the intermediate clears are wet sanded as preparation to do the final clears. I use 3M wet/dry 600 grit here as well. I sand it wet after cutting a single sheet of sandpaper into 1/16th pieces. I have a bread pan I use to keep dipping into to keep the paper wet and Bounty paper towels to keep wiping off the residue. I don't want to use too course (scratches can show through) or too fine (the top coats adhere better to a not-too-smooth surface) sandpaper.
It is extremely unlikely an amateur will get anywhere near as close to a grossly smooth paint job I can get with my expensive spray guns and years of experience. But it is possible to smooth out the orange peal or roughness or even runs by wet sanding with progressively fine sandpaper and afterwards using polishing compounds. What grit of sandpaper to start with depends on how smooth you got the final clears. Your last sanding will probably be with 2000 grit (depending on how fussy you want to get). For polishing, I use 3 kinds of Meguiars polish in succession. I start with Ultra-cut Compound #105, then I go to Medium-cut Cleaner #1. And finally I finish with Ultra-Finishing Polish #205. Yes the final sanding and polishing is a lot of work but it provides an outstanding pro quality finish. Even after using rattle can spray cans and less than perfect spray techniques. Just avoid sand throughs. Those are a pros nightmare.
It takes about a month of an epoxy clear to achieve its final hardness. I know because I leave the left over clears in disposable cups. The clear in the bottom of the cup slowly shrinks until it get to be about 2/3rds of its volume in about a month. The best clear that I've found is H of K USC01. All of us old pros used to use Imron 500S but the new H of K is clearer that appears to provide more depth.
doug fattic
As a pro builder and painter, I have all the equipment and paint to do the job right. Some of frame building class students have painted the frames they made in class with rattle can paint and done a very nice job. Spray.Max as I understand them is a company that can provide empty rattle cans to local automotive paint suppliers that can fill them with whatever type of auto paint is chosen. There are 2 things special about their cans. !st, are designed to work with epoxy type of paints (that hardens by chemical action when activator is used). They have a button in the bottom of the can that when pushed will mix in the activator. Of course once pushed the chemicals start to work and the time available to paint is limited before it hardens. 2nd, according to their advertising, their spray nozzles are superior for atomizing the paint spray.
All primers are not the same and the best primers to use are 2 part epoxy type of primers. This is because they serve as a barrier to letting moisture through to the base metal. One has to be careful when choosing because auto repainters put a premium on cost and speed and not quality. I use House of Color (spelled with a K instead of a C that autocorrect insists on changing). It comes in the 3 primary colors of red, blue and yellow as well as black and white. These primary colors are good enough to use as the color coat on your frame as long as you like their red, yellow and blue. These primary colors can be mixed to get many primer color variations. After the primer has cured, it should be sanded with 600 wet sandpaper. All sanding residue needs to be removed.
There are hundreds of color coats available that are put on next. Usually there needs to be about 3 coats applied. Then a two part clear (like the Spray.Max clear already mentioned) needs to be sprayed over the color before doing anything else. It is on top of this clear that decals or striping or a 2nd color is applied. More clear may have to go on top of these additional steps. I recommend at least 2 coats of intermediate clears and probably 3 if the clears need to be polished out later. Then the intermediate clears are wet sanded as preparation to do the final clears. I use 3M wet/dry 600 grit here as well. I sand it wet after cutting a single sheet of sandpaper into 1/16th pieces. I have a bread pan I use to keep dipping into to keep the paper wet and Bounty paper towels to keep wiping off the residue. I don't want to use too course (scratches can show through) or too fine (the top coats adhere better to a not-too-smooth surface) sandpaper.
It is extremely unlikely an amateur will get anywhere near as close to a grossly smooth paint job I can get with my expensive spray guns and years of experience. But it is possible to smooth out the orange peal or roughness or even runs by wet sanding with progressively fine sandpaper and afterwards using polishing compounds. What grit of sandpaper to start with depends on how smooth you got the final clears. Your last sanding will probably be with 2000 grit (depending on how fussy you want to get). For polishing, I use 3 kinds of Meguiars polish in succession. I start with Ultra-cut Compound #105, then I go to Medium-cut Cleaner #1. And finally I finish with Ultra-Finishing Polish #205. Yes the final sanding and polishing is a lot of work but it provides an outstanding pro quality finish. Even after using rattle can spray cans and less than perfect spray techniques. Just avoid sand throughs. Those are a pros nightmare.
It takes about a month of an epoxy clear to achieve its final hardness. I know because I leave the left over clears in disposable cups. The clear in the bottom of the cup slowly shrinks until it get to be about 2/3rds of its volume in about a month. The best clear that I've found is H of K USC01. All of us old pros used to use Imron 500S but the new H of K is clearer that appears to provide more depth.
Is there one like it for a factory finish? While I would certainly like to build up my skill up to that I'm better off learning to walk before I learn to run. If I can accomplish a factory finish on my second try at my test frame then I'll be set to try the full monty described above.
09-25-23, 08:29 AM
#13
Junior Member
Regarding the durability issue of rattle can or sprayed enamel. My opinion is that it is quite reasonably tough once it is cured. That takes a long time and is the tremendous benefit of the 2 part system. Traditional enamel jobs were stuck in an oven to cure, which the shade tree painter won't be able to do. You can just let it cure for a couple months, stick it in a hot car for awhile, or make a heat box. I just stick anything that will fit right in the oven for an hour at 200 degrees, never tell your wife that you did this!
I've got 2 frames that will be sprayed with oil based enamel and since it is late in the season they will just be left to cure all winter and built up in spring.
I'm not saying this is "better" than 2 part modern automotive paints or powder coating, but it is really cheap for equipment and materials and quite hard when cured.
09-27-23, 09:47 PM
#14
Full Member
A lesson not mentioned above that I recently relearned: not all paints and primers are compatible. Double and triple check if possible before buying and again before pouring anything, and always paint test panels before spraying anything you care about. I neglected the first part of that recently, but did catch my error when I sprayed test panels and the color coat peeled-off the primer like paint stripper would. That despite both the primer and paint being "automotive", and compatible-in-theory and according to their respective data sheets. Had the same problem on a project a couple years ago, when a Glidden clear coat dissolved a base coat completely.
Test everything before application.
For a beginner, this $99 kit with both an HVLP and high-pressure gun will set you up, and you can try both guns for educational purposes. They are not professional guns, but it won't matter for you until you have more experience. The painter is a much bigger factor than the tool.
Finally, paint in cans is way cheaper and higher-quality than spray-paint. The aforementioned kit will pay for itself in no time, and there are even cheaper ways to go if necessary -- I picked up 3 perfectly usable siphon-feed guns second hand for, IIRC, $30 years ago, and they included spare parts that I still haven't used up. I used to buy rattle-cans, and even painted a frame with them once, but never again -- the quality control is minimal, and there's no way to mix batches, which is a problem if one can isn't sufficient. If you want to paint one bike, and only one bike ever, sure, buy a rattle can, but if you want more than that, acquire the proper tools.
Likes For TC1:
09-28-23, 08:08 AM
#15
Senior Member
Join Date: Aug 2015
Posts: 3,306
Mentioned: 39 Post(s)
Tagged: 0 Thread(s)
Quoted: 1143 Post(s)
Liked 1,758 Times
in
966 Posts
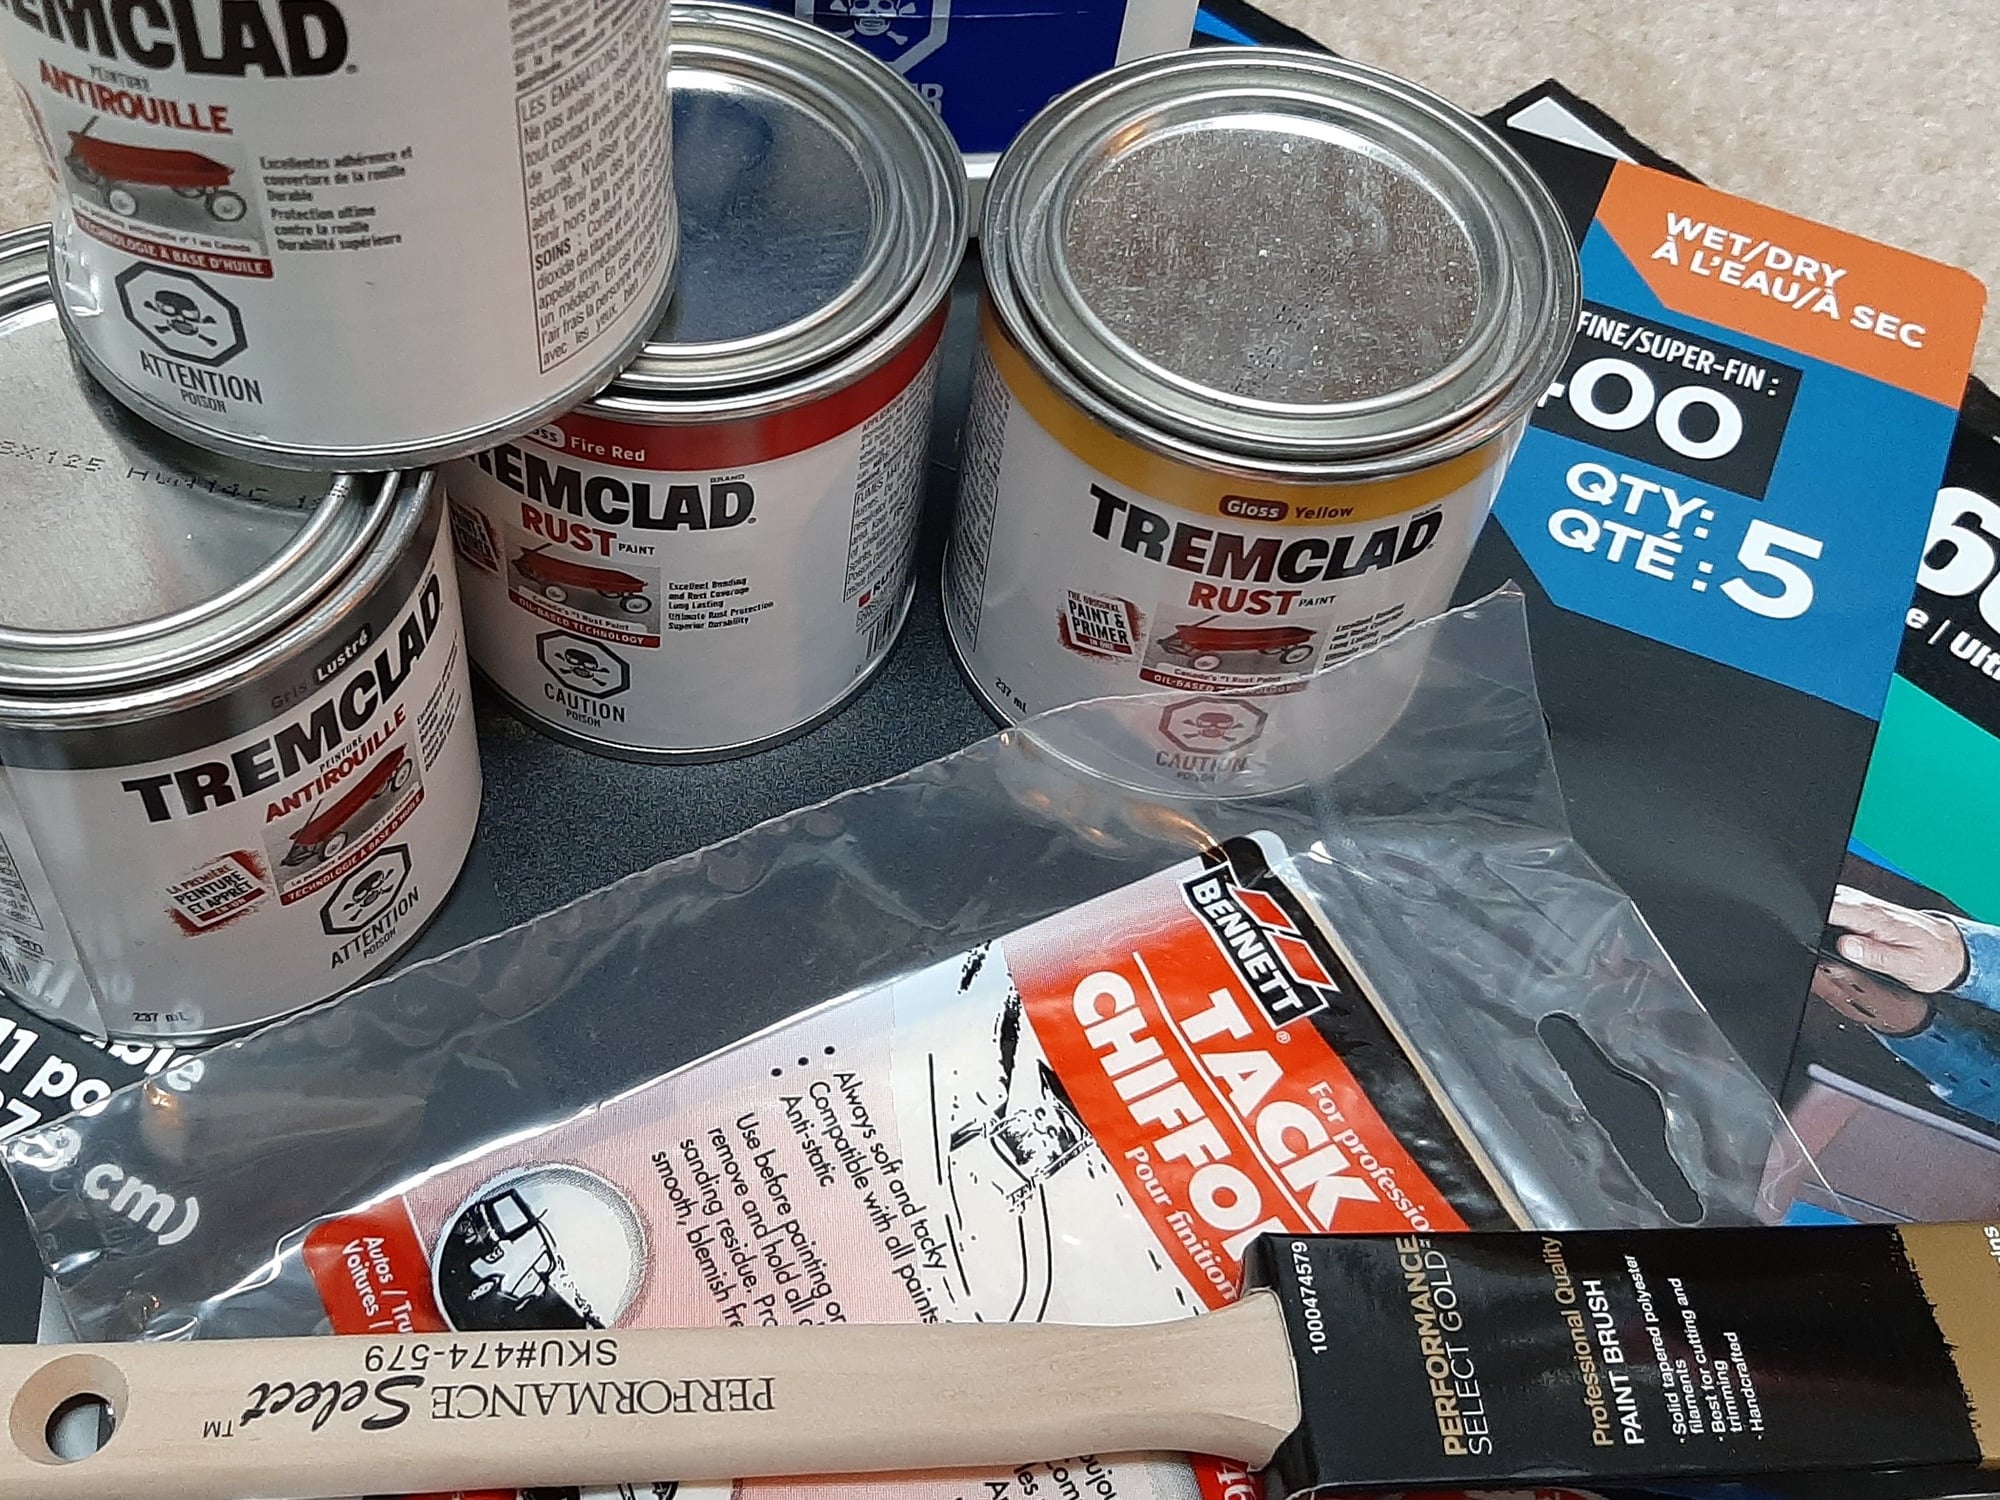
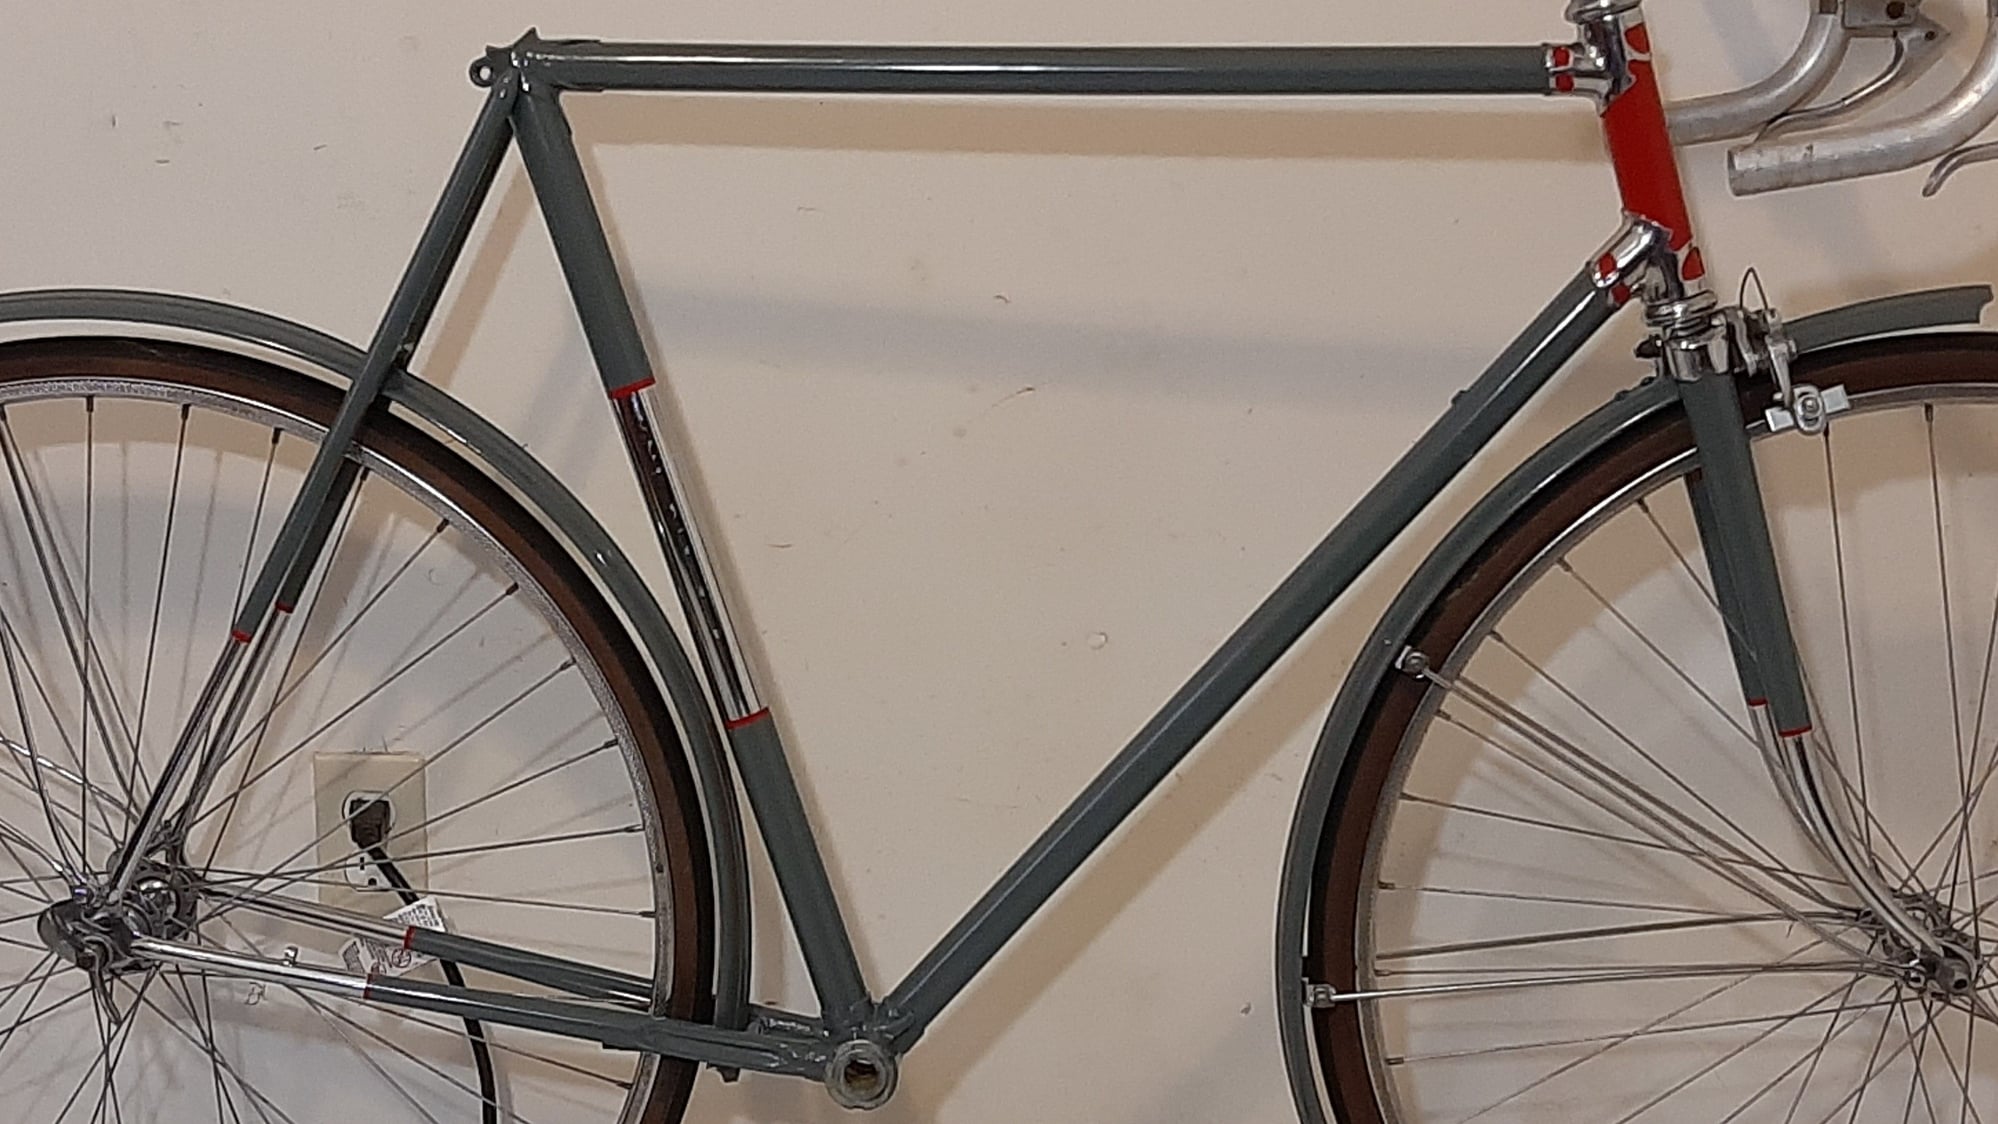
I did do a paint job of all auto parts store Duplicolor with an old siphon feed craftsman. I won't do that again. First I think primer was not the best, an etching primer would have been better. It came out chippy. Here is the Basso Gap 1984.
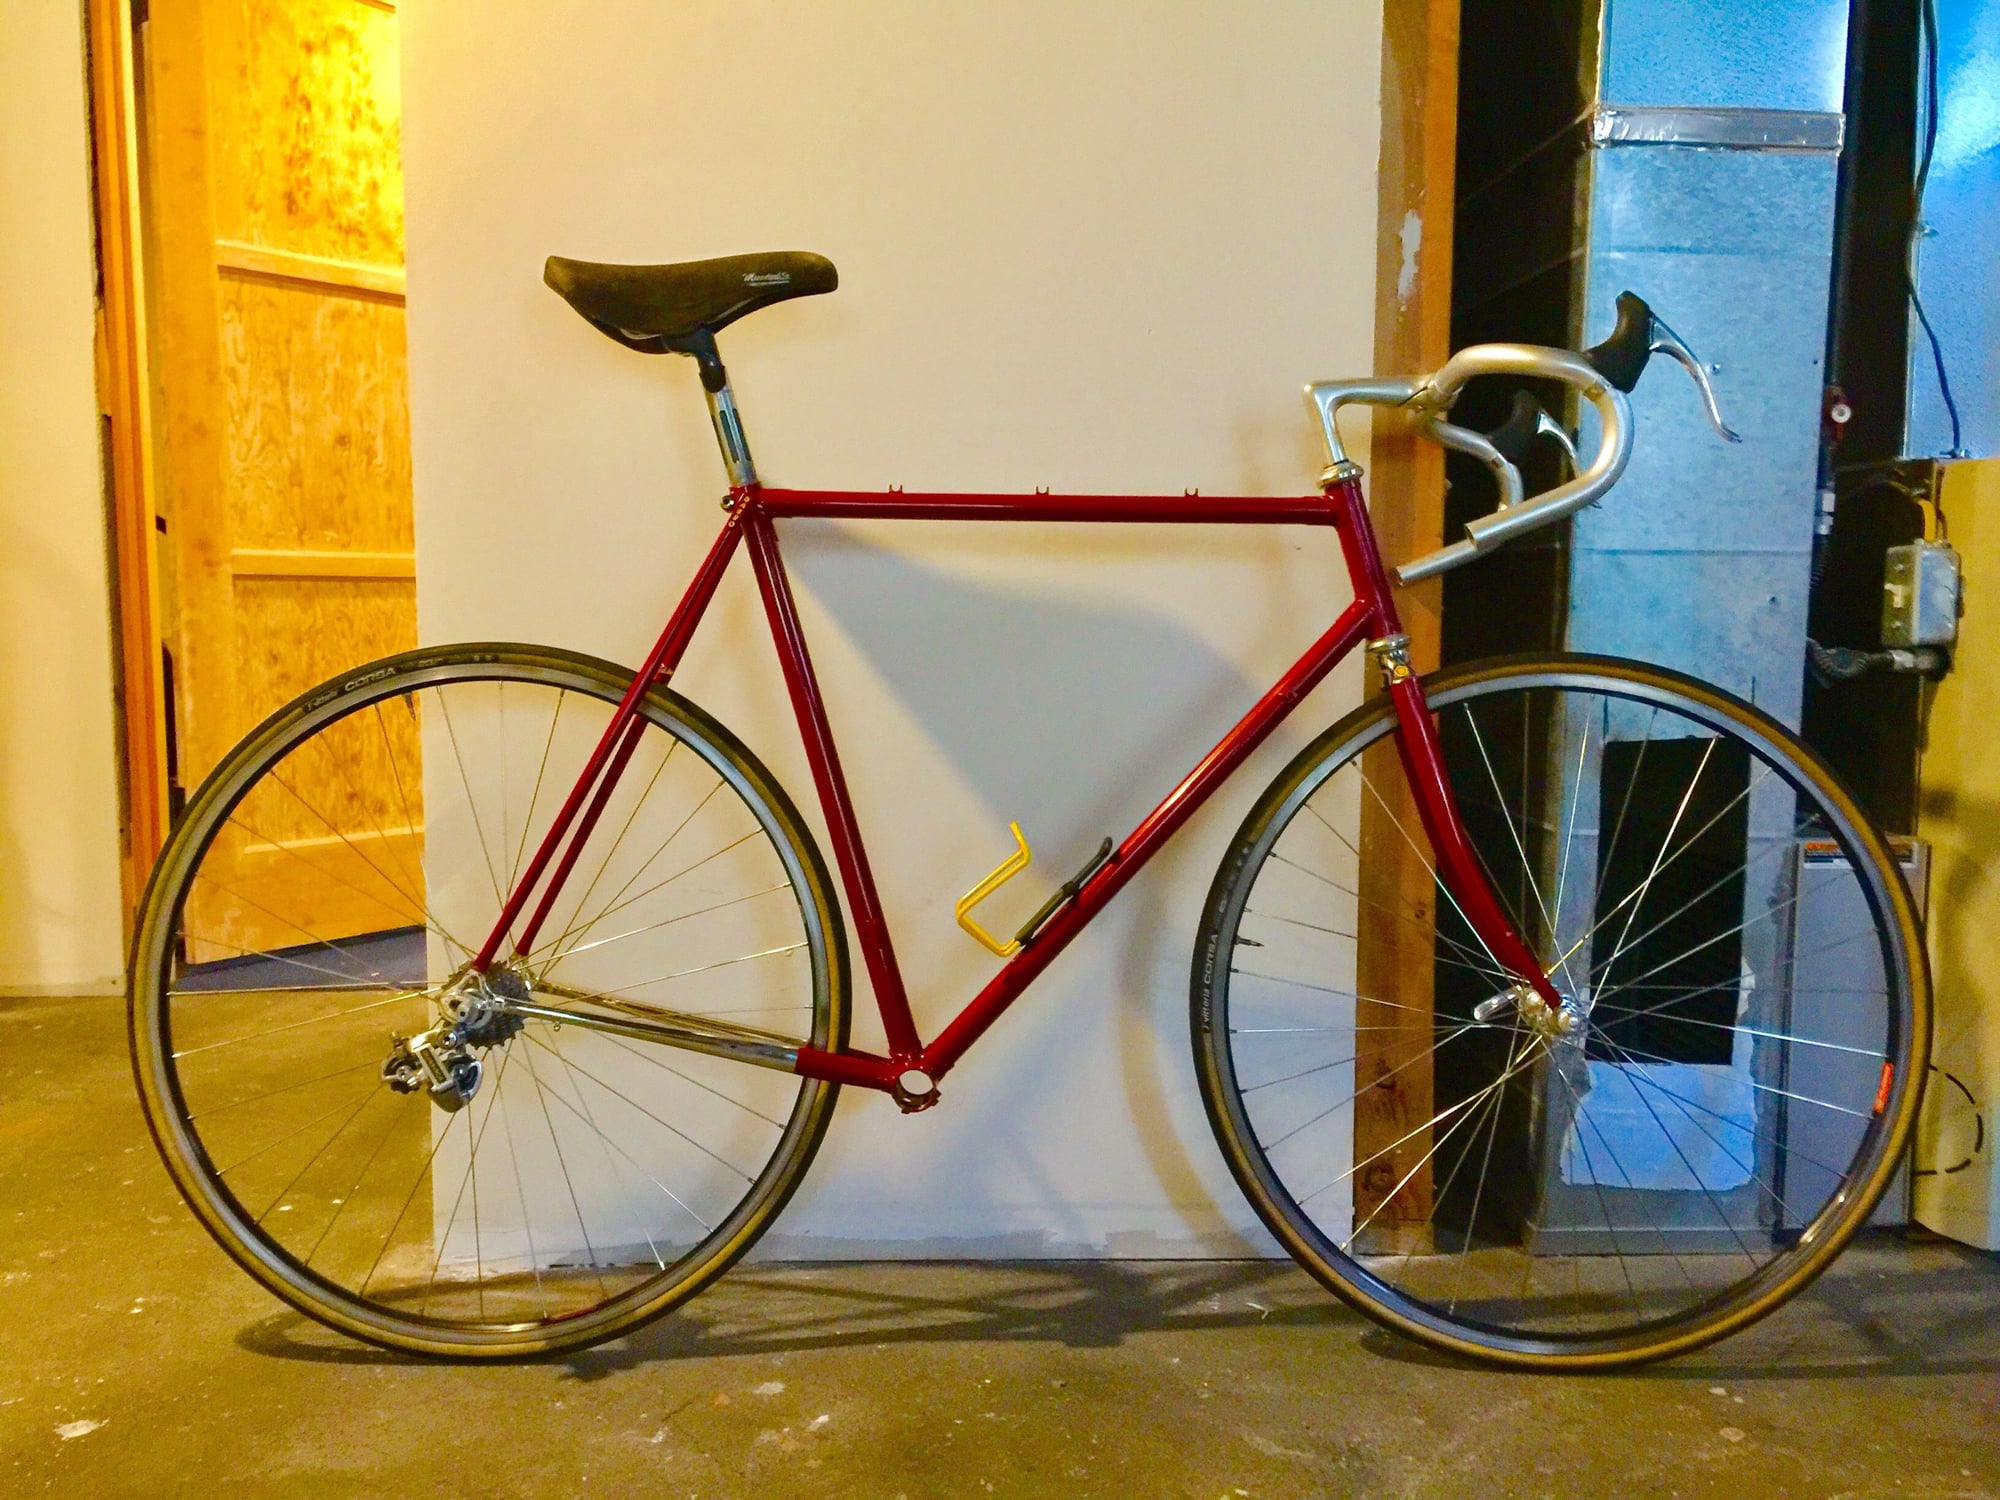 The gun work great, but the product well it looks great.
The gun work great, but the product well it looks great.
09-28-23, 11:51 AM
#16
Senior Member
How did you get this to lay out so nicely with a paint brush?
09-28-23, 01:01 PM
#17
Senior Member
Join Date: Jan 2013
Posts: 2,683
Bikes: too many sparkly Italians, some sweet Americans and a couple interesting Japanese
Mentioned: 10 Post(s)
Tagged: 0 Thread(s)
Quoted: 569 Post(s)
Liked 590 Times
in
412 Posts
He kindly tells you on his web site, search https://cycle.haus/mytenspeeds/
09-28-23, 01:09 PM
#18
Senior Member
He kindly tells you on his web site, search https://cycle.haus/mytenspeeds/
