What are the top 5 mechanical problems that you are likely to face while on tour ?
 03-12-24, 07:51 AM
#26
Senior Member
Join Date: Dec 2010
Location: northern Deep South
Posts: 8,904
Bikes: Fuji Touring, Novara Randonee
Mentioned: 36 Post(s)
Tagged: 0 Thread(s)
Quoted: 2604 Post(s)
Liked 1,933 Times
in
1,213 Posts
I don't like loctite. This is because, on my rear rack, long bolt (rack designed for discs, which I don't have) so more bending moment on bolt, it sheared off at the frame after 7 years. I was lucky, the threaded shaft was loose enough I could back it out with a dental tool. With loctite, that would have been impossible, even heating it up to soften the thread locker.
And really, claiming that 2 years' experience is enough to demonstrate that you solved a problem that took 7 years to fail really isn't very convincing.
As Tourist says, use the blue Loctite.
 03-12-24, 10:26 AM
#28
ignominious poltroon

Join Date: Jan 2022
Posts: 4,047
Mentioned: 3 Post(s)
Tagged: 0 Thread(s)
Quoted: 2241 Post(s)
Liked 3,443 Times
in
1,802 Posts
On my longest tour, the (old type) headset top nut loosened up a little bit. Notably, that was the ONLY issue.
Normally, I would say tire punctures/disintegration is the most frequent issue.
I try to start out with new or freshly serviced components and drive train, so I don't have as many surprises.
I think my first (or nearly first) tour involved some derailleur spaghetti.
I am at the age now where I am far more worried about the components on my body breaking than on my bike. I can pretty much fix anything on my bikes, given the tools and parts.
Last edited by Polaris OBark; 03-12-24 at 10:29 AM.
03-12-24, 11:43 AM
#29
Senior Member
Join Date: Dec 2010
Location: northern Deep South
Posts: 8,904
Bikes: Fuji Touring, Novara Randonee
Mentioned: 36 Post(s)
Tagged: 0 Thread(s)
Quoted: 2604 Post(s)
Liked 1,933 Times
in
1,213 Posts

Likes For pdlamb:
03-12-24, 11:46 AM
#30
Senior Member

Join Date: Dec 2005
Location: Cape Vincent, NY
Posts: 1,392
Bikes: Specialized Tarmac Expert, 2002 TREK 520, Schwinn Mesa WINTER BIKE, Huffy Rock Creek 29er, 1970s-era Ross ten speed. All my bikes are highly modified(except the Tarmac) yet functional, and generally look beat to ****. .
Mentioned: 1 Post(s)
Tagged: 0 Thread(s)
Quoted: 68 Post(s)
Liked 88 Times
in
51 Posts
That's an interesting point. I've had to replace chains, cassettes, a rear wheel, a seat with a broken rail, brake pads, etc. But I've probably had more problems with zippers while on tour than anything else. Tents, clothing, panniers, etc. Everything has zippers and they always seem to give me trouble.
03-12-24, 08:48 PM
#31
Senior Member
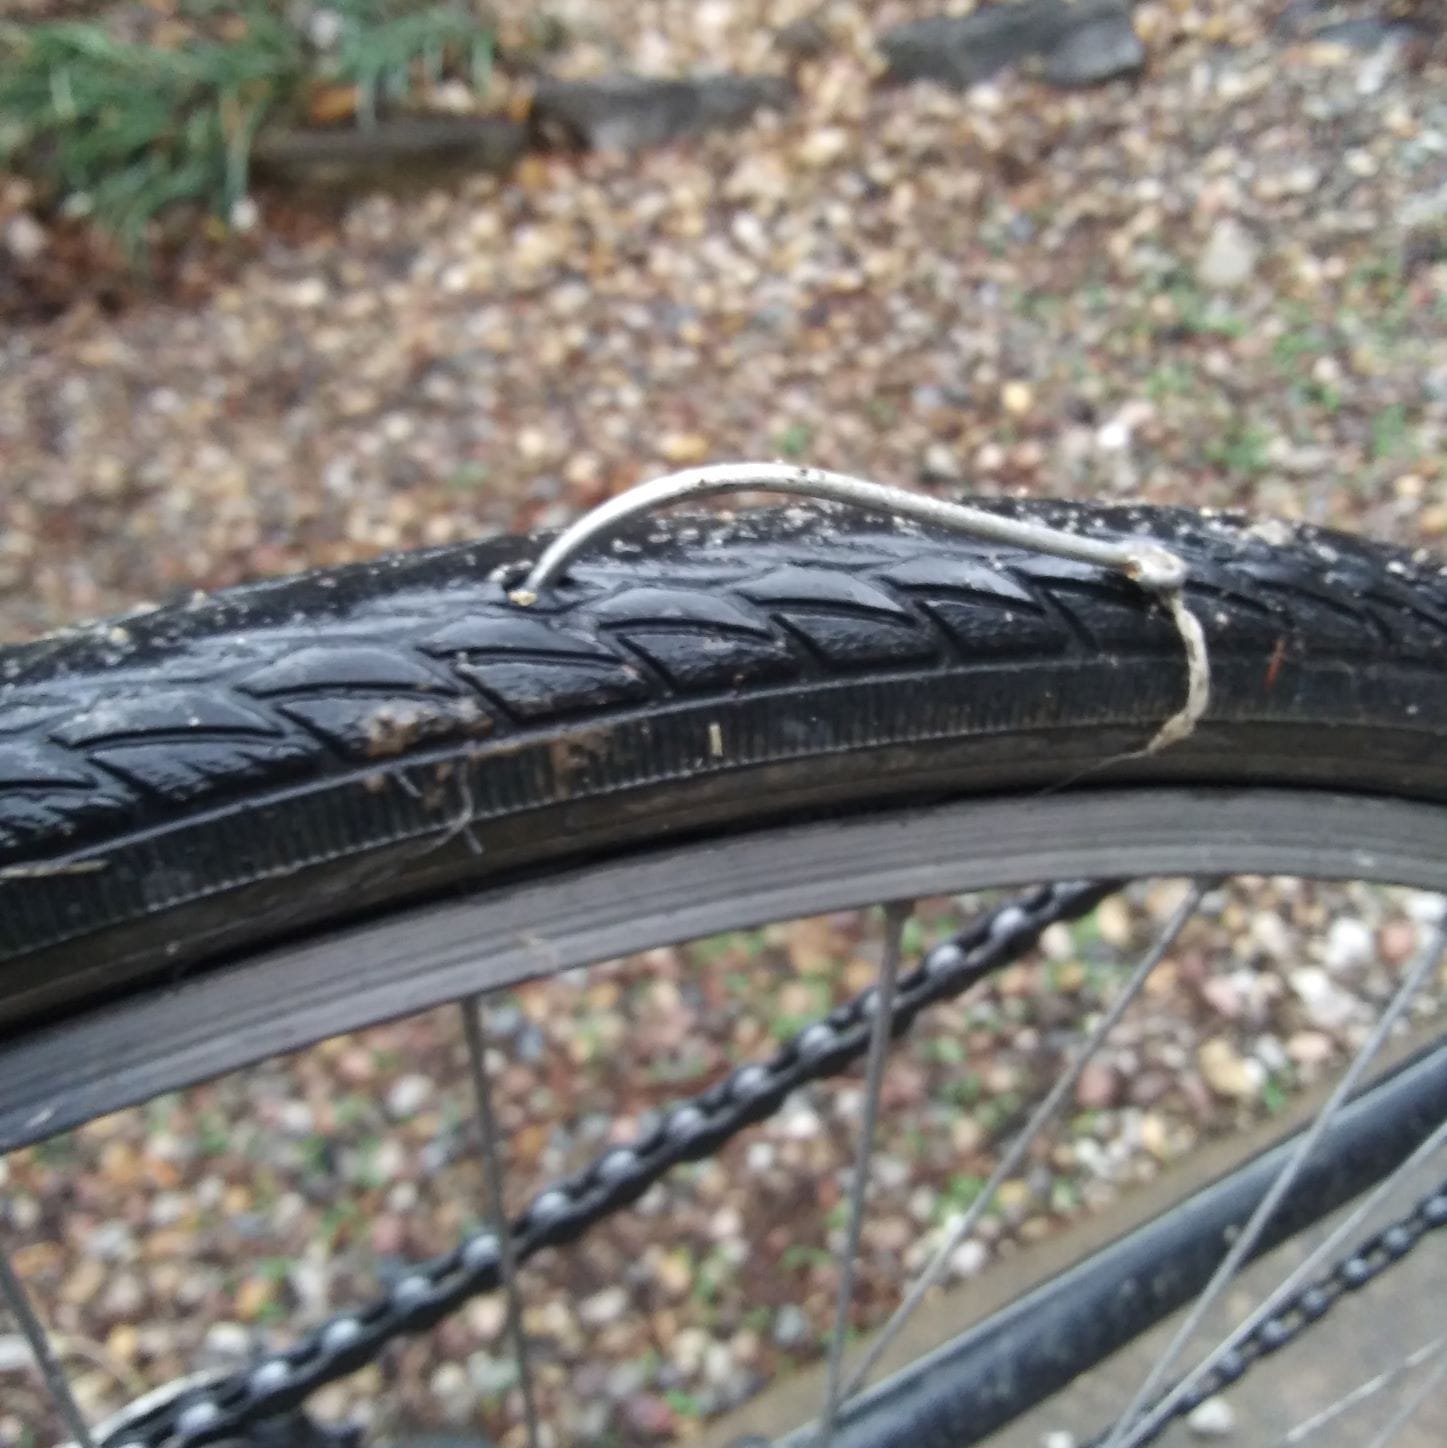
I'm going to geek out for a bit. Assuming the picture above is the joint that failed, there's probably a design flaw in the rack. You should be screwing the bolt all the way through the extrusion, so the bending moment is only between the end of the rack extrusion and the mounting point on the bike.
And really, claiming that 2 years' experience is enough to demonstrate that you solved a problem that took 7 years to fail really isn't very convincing.
As Tourist says, use the blue Loctite.
And really, claiming that 2 years' experience is enough to demonstrate that you solved a problem that took 7 years to fail really isn't very convincing.
As Tourist says, use the blue Loctite.
03-12-24, 10:26 PM
#32
Senior Member
The thread locker I use is removable, no problem in unscrewing a bolt.
This is what I bought last time I bought any, tiny bottle but it goes a long way.
https://www.truevalue.com/6-ml-remov...hread-locker-1
There are several brands, I have used several and they all work about the same as long as you get the blue which is color coded for removable.
On some bikes you can't put a bolt head on the inside so that the threaded end of the bolt extends outwards, the bolt head can interfere with the chain. But where you can, that is a good solution. I have done that on a few bikes where the rack mounting bolts are high enough above the axle that the bolt head will not interfere with the chain.
My first post in this thread was very clear that the thread locker I use is blue and removable.
I've had some issues with threadlocker, but usually at the extremes; A very small allen head on a setscrew, which strips, or very large diameter threads with a lot of surface area and mechanical advantage due to larger radius from turning center, and then it can be a bear to break free. If I can safely heat the device to the threadlocker softening temperature, then it's cake, comes off easy.
Last edited by Duragrouch; 03-12-24 at 10:35 PM.
03-13-24, 05:08 AM
#33
Senior Member
Join Date: Aug 2010
Location: Madison, WI
Posts: 11,211
Bikes: 1961 Ideor, 1966 Perfekt 3 Speed AB Hub, 1994 Bridgestone MB-6, 2006 Airnimal Joey, 2009 Thorn Sherpa, 2013 Thorn Nomad MkII, 2015 VO Pass Hunter, 2017 Lynskey Backroad, 2017 Raleigh Gran Prix, 1980s Bianchi Mixte on a trainer. Others are now gone.
Mentioned: 48 Post(s)
Tagged: 0 Thread(s)
Quoted: 3461 Post(s)
Liked 1,467 Times
in
1,144 Posts
No no, on my bike, all the bolt heads are to the outside. What you are seeing on the inside is a nut, locking the bolt (only possible by using a bit longer bolts). Also, putting the bolt head on the inside, assumes the rack has threaded holes, which it doesn't, it's a clearance hole, which means that to hold it, you must rely on a nut on the outside, and that is less threaded area so doesn't hold as well. Bolt from outside, thru clearance hole into threaded eyelet and torqued, then nut on the backside and torqued, has proven very sound for me.
I've had some issues with threadlocker, but usually at the extremes; A very small allen head on a setscrew, which strips, or very large diameter threads with a lot of surface area and mechanical advantage due to larger radius from turning center, and then it can be a bear to break free. If I can safely heat the device to the threadlocker softening temperature, then it's cake, comes off easy.
I've had some issues with threadlocker, but usually at the extremes; A very small allen head on a setscrew, which strips, or very large diameter threads with a lot of surface area and mechanical advantage due to larger radius from turning center, and then it can be a bear to break free. If I can safely heat the device to the threadlocker softening temperature, then it's cake, comes off easy.
The photo below shows what I meant by running the bolt from the inside outwards. On my light touring bike, the rack mounting points are very high up above the axle, the chain does not get anywhere close to the bolt. I mounted the fender stays on the inside of the frame (between the dropouts) with a long bolt, then once the fender stays were installed, I put the rack on those same bolts on the outside, using nylock nuts. Thus, the bolts are threaded into the frame, later nylock nuts added to the bolts for the rack.
I used a rack (Racktime Addit) that was designed for much lower mounting points, the design of the frame put that rack up absurdly high. Thus I used the lower fender mounting points for the rack. I also drilled new mounting holes in the rack that allowed it to be installed slightly lower. Those plates on the bottom of the rack are flat aluminum plate, was easy to add a few new holes to help lower the rack some, as long as I was careful to get the two holes in the exact spots needed so that the rack was still aligned properly.
 03-13-24, 11:21 PM
#34
Senior Member
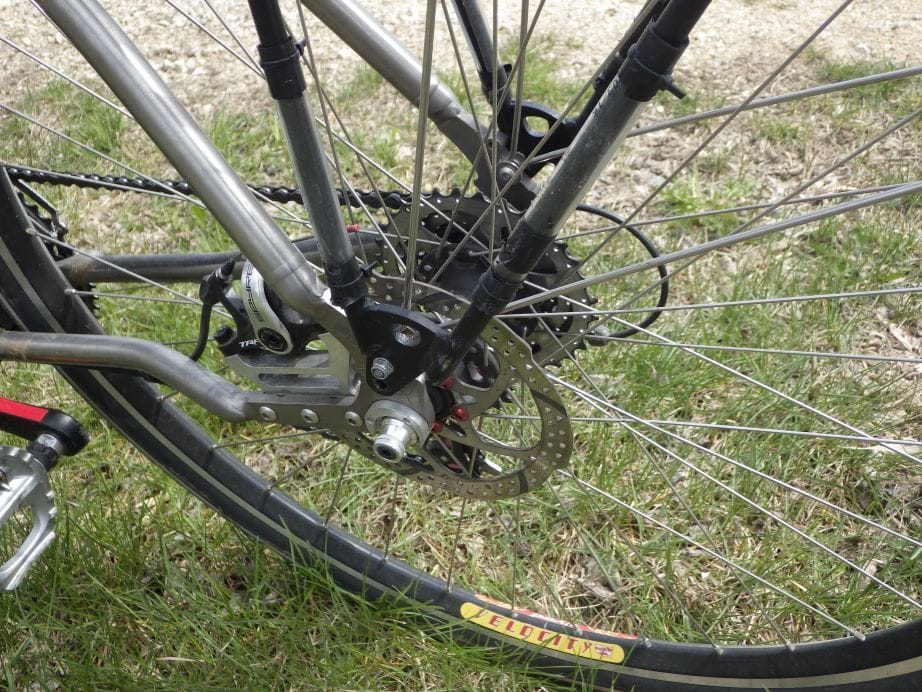
(above) That makes sense, nice setup. I'd say good to know for me as well, but the inside nut on the drive side barely clears the chain, so impossible to put a fender stay on the inside there. The aft eyelet might allow me putting one stay on the inside, with the other on the outside, would be a bit more elegant versus both stays on the outside, but not big load so could do the latter.
Bonus points for the frame having the rear brake caliper inside the triangle, so it pushes the axle up under braking, and not down like with an aft-mounted caliper. Especially important with QR axles like yours. It really bugs me that bikes are still being sold with aft calipers with QRs, front and rear. Should be thru axles or put the caliper in front of the axle (which Dahon has just demonstrated, with the Curl D9, can be accomplished in front without a special (reversed) caliper, by mounting the caliper to the front of the right fork blade and reversing the wheel to put the disc there as well).
Bonus points for the frame having the rear brake caliper inside the triangle, so it pushes the axle up under braking, and not down like with an aft-mounted caliper. Especially important with QR axles like yours. It really bugs me that bikes are still being sold with aft calipers with QRs, front and rear. Should be thru axles or put the caliper in front of the axle (which Dahon has just demonstrated, with the Curl D9, can be accomplished in front without a special (reversed) caliper, by mounting the caliper to the front of the right fork blade and reversing the wheel to put the disc there as well).
03-14-24, 06:28 AM
#35
Senior Member
Join Date: Aug 2010
Location: Madison, WI
Posts: 11,211
Bikes: 1961 Ideor, 1966 Perfekt 3 Speed AB Hub, 1994 Bridgestone MB-6, 2006 Airnimal Joey, 2009 Thorn Sherpa, 2013 Thorn Nomad MkII, 2015 VO Pass Hunter, 2017 Lynskey Backroad, 2017 Raleigh Gran Prix, 1980s Bianchi Mixte on a trainer. Others are now gone.
Mentioned: 48 Post(s)
Tagged: 0 Thread(s)
Quoted: 3461 Post(s)
Liked 1,467 Times
in
1,144 Posts
(above) ...
Bonus points for the frame having the rear brake caliper inside the triangle, so it pushes the axle up under braking, and not down like with an aft-mounted caliper. Especially important with QR axles like yours. It really bugs me that bikes are still being sold with aft calipers with QRs, front and rear. Should be thru axles or put the caliper in front of the axle (which Dahon has just demonstrated, with the Curl D9, can be accomplished in front without a special (reversed) caliper, by mounting the caliper to the front of the right fork blade and reversing the wheel to put the disc there as well).
Bonus points for the frame having the rear brake caliper inside the triangle, so it pushes the axle up under braking, and not down like with an aft-mounted caliper. Especially important with QR axles like yours. It really bugs me that bikes are still being sold with aft calipers with QRs, front and rear. Should be thru axles or put the caliper in front of the axle (which Dahon has just demonstrated, with the Curl D9, can be accomplished in front without a special (reversed) caliper, by mounting the caliper to the front of the right fork blade and reversing the wheel to put the disc there as well).
And the frame was designed for either post mount which I have or flat mount disc brake unit. I bought the frame in 2017, flat mount was just coming out at the time. You can see three bolts hold the mount to the chain stay.
03-14-24, 06:30 AM
#36
Senior Member
That frame has removeable dropouts, I chose quick release instead of through axle, the frame was designed for either option.
And the frame was designed for either post mount which I have or flat mount disc brake unit. I bought the frame in 2017, flat mount was just coming out at the time. You can see three bolts hold the mount to the chain stay.
And the frame was designed for either post mount which I have or flat mount disc brake unit. I bought the frame in 2017, flat mount was just coming out at the time. You can see three bolts hold the mount to the chain stay.
03-25-24, 05:42 AM
#37
Junior Member
I just wrapped up a 10,520 mile perimeter tour of the US. Here's a list of parts replaced during that time to give you an idea.
Brakes - 3 sets. Going through the Adirondacks, Rockies, and Cascades will definitely eat them up, especially 14 mile descents.
Chain - 3 each. All the torque climbing really takes it's toll
Shifter cable - 1. Had issues from the start but glad I had a spare.
Bottom bracket - had to replace in Washington state. Went from a press fit to a Wheels MFG threaded. No issues after that.
If you're doing a lot of climbing, I did 326,000 feet on this tour, it's going to eat your drivetrain a lot faster.
Never had an issue with spokes or wheels. Was running Hunt carbon 650b's that are still as true today as the day they came out of the box. Fantastic wheels at great price.
After - replaced chainring, rear derailleur, bar tape, brakes needed bleeding, tires again, and all bearings repacked. Rear cassette might survive a few hundred more miles.
The secret is to invest in quality parts and components. Things always seem to break or fail the farthest possible distance from help, I got over three hundred goatheads in each tire when I was in the middle of the desert in New Mexico one day, dead in the water 50 miles from help. Know how to replace/repair everything yourself.
Funny thing was my seat broke. Bike tipped and slid down a tree, causing the wing on the right side to snap and fold upward. I run an Infinity seat mainly because I hate wearing padded shorts, always feel like I'm in a diaper and had horrible saddle sores no matter what saddle I used. This one, no padded shorts, no saddle sores, and super comfy. After my seat broke I had no choice but to ride until I could get a new one. I tore a hamstring and rode for 3 1/2 months with it before I finally got my new Infinity in Florida.
Likes For chief9245:
03-31-24, 03:27 PM
#38
Junior Member
Join Date: Apr 2005
Location: Oz
Posts: 153
Mentioned: 0 Post(s)
Tagged: 0 Thread(s)
Quoted: 9 Post(s)
Likes: 0
Liked 6 Times
in
3 Posts
On my across US tour I had more than 15 broken spokes, a couple of times more than 1 at a time (apparently there was a bad batch at some stage which must have been used for my wheel). The first time i didn't have a cassette tool and chain whip so had to limp to a bike shop. But on the plus side I became an expert at roadside wheel truing.