


Help - Do you know how to remove this bottom bracket?
 07-18-20, 07:42 PM
#1
Junior Member
Thread Starter
Join Date: Jul 2020
Posts: 12
Mentioned: 0 Post(s)
Tagged: 0 Thread(s)
Quoted: 1 Post(s)
Liked 0 Times
in
0 Posts
Help - Do you know how to remove this bottom bracket?
Hello! I’m rebuilding an old beach cruiser with my son and we ran into this bottom bracket that I have not been able to remove.
The box nut is 34mm wide and recessed making it all but impossible to get a wrench around. I ordered a 34-36mm C hook spanner but that turned out to be too small and prob just not the right tool. Then I ordered a super thin adjustable plumbing wrench that was wide enough but I could not get a good grip due to the nut being recessed.
Now the only thing I can imagine will turn is a 34mm double sided (recessed) wrench which is a huge tool and expensive.
Am I totally backwards on this? I welcome your input! Thank you!
 07-19-20, 06:08 AM
#2
Junior Member
Join Date: Jan 2013
Location: South central Kansas
Posts: 87
Bikes: Western Flyer, Schwinn, Rollfast, Gambles, J.C. Higgins, Waverley, Crescent, Hercules, Nishiki, Huffy, Mohawk, AMF, Electra, A ridable replica hi-wheel and a few others.
Mentioned: 1 Post(s)
Tagged: 0 Thread(s)
Quoted: 42 Post(s)
Liked 45 Times
in
19 Posts
Can you post a picture of the bottom bracket?
07-19-20, 04:12 PM
#4
Junior Member
Join Date: Jan 2013
Location: South central Kansas
Posts: 87
Bikes: Western Flyer, Schwinn, Rollfast, Gambles, J.C. Higgins, Waverley, Crescent, Hercules, Nishiki, Huffy, Mohawk, AMF, Electra, A ridable replica hi-wheel and a few others.
Mentioned: 1 Post(s)
Tagged: 0 Thread(s)
Quoted: 42 Post(s)
Liked 45 Times
in
19 Posts
Go into introductions and say "welcome" to a bunch of random new posts. 10 posts, done. Then post a close-up of the crank. We'll see if we can't come up with something to help.
Likes For Iron Horse:
07-20-20, 09:49 AM
#5
Member

When you can post a photo, the answer should be available from someone. I have had to deal with a few of those awkward bottom bracket assemblies myself.
The Old Peddler
The Old Peddler
07-31-20, 04:21 PM
#6
Junior Member
Thread Starter
Join Date: Jul 2020
Posts: 12
Mentioned: 0 Post(s)
Tagged: 0 Thread(s)
Quoted: 1 Post(s)
Liked 0 Times
in
0 Posts
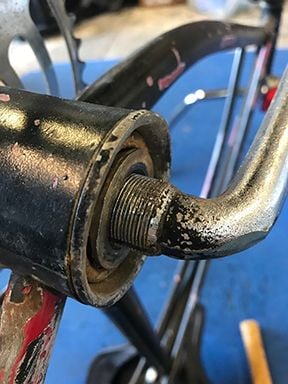
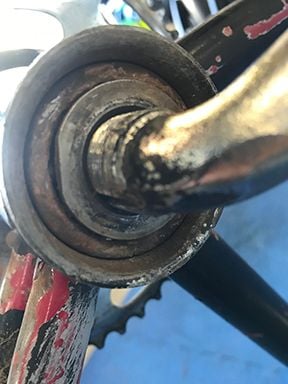
Ok. Sorry for the long delay! Please see pics below for this bottom bracket that I cannot remove. I just got a huge 34 mm spanner wrench in the mail that still didn't fit - just spun around it. Kind of at my wits end at this point. Please let me know if you have any advice for me! Thank you!
07-31-20, 06:14 PM
#7
Half way there

Join Date: Sep 2015
Location: North Carolina
Posts: 2,957
Bikes: Many, and the list changes frequently
Mentioned: 5 Post(s)
Tagged: 0 Thread(s)
Quoted: 986 Post(s)
Liked 880 Times
in
527 Posts
What you are looking at is the left side bearing cone. There should have been a keyed washer and lock nut on top of what you see. Did you remove these already? The threads on this side are left-handed meaning that to remove, you need to turn them clockwise. Bearing cones should not be cranked down tight and so should easily unscrew. The last couple I did unscrewed with just finger pressure. If yours is rusted or crudded up it may take a bit more effort. Squirt some penetrant onto the threads and wait a few hours, then grip the flats with a pair of pliers (or whatever else comes to mind) and turn clockwise. If that still doesn't work, I'd probably tap on the flats with a chisel and hammer (again clockwise!) until it breaks loose. You'll probably replace the bottom bracket anyway so hammer away. Just don't damage the threads on the crank.
Good luck.
Good luck.
Likes For Moe Zhoost:
08-01-20, 11:27 AM
#8
Junior Member
Thread Starter
Join Date: Jul 2020
Posts: 12
Mentioned: 0 Post(s)
Tagged: 0 Thread(s)
Quoted: 1 Post(s)
Liked 0 Times
in
0 Posts
Thank you! Yes, I already removed the washer and lock nut. Based on what you said, I'm sure the bearing cone is rusted in place and YES, I was trying to unscrew it counter clockwise. I'll take your advice and report back. Thank you again!
09-25-20, 08:38 PM
#9
Rhapsodic Laviathan

Most crank parts on that side of any bike is going to be right hand thread. Even pedals.
11-10-20, 09:12 PM
#10
Senior Member
Join Date: Jun 2013
Location: Yolo County, West Sacramento CA
Posts: 517
Bikes: Modified 26 inch frame Schwinn Varsity with 700c wheels and 10 speed cassette hub. Ryan Vanguard recumbent. 67cm 27"x1 1/4" Schwinn Sports Tourer from the 1980's. 1980's 68cm Nishiki Sebring with 700c aero wheels, 30 speeds, flat bar bicycle.
Mentioned: 12 Post(s)
Tagged: 0 Thread(s)
Quoted: 131 Post(s)
Liked 141 Times
in
102 Posts
The crank you are working on is an American one piece crank. The bearing cups that are in the frame are an easy interference fit. Once the crank is out of the frame you can remove the cups with a wood dowel and hammer. Just reach through the bottom bracket from the opposite side of the cup you are removing. Hold the dowel against the cup and hit the other end with the hammer. Work around in a circle until the cup comes out. The new cups can be installed with a rubber mallet. It doesn't take much to tap them in. The bearings and cups for one piece cranks are really inexpensive and they do wear out so don't hold back on replacing them if you see damage to the races or cones. Achieving the proper amount of tightness to the bearings when reassembling requires patience. The washer on the left hand thread side, opposite of the side with the sprocket, has a tang that fits into a slot on the crank. This keeps the washer from spinning as you tighten the lock nut. However there is lots of play in this system so finding that magic spot where the crank is not loose but still rotates freely can lead to learning new swear words. A right hand threaded cone holds the sprocket on so this crank will have both right and left handed threads. American one piece cranks are a wonderful invention and can be seen to this day on new bicycles. Good luck with your work.
10-11-21, 12:46 PM
#11
Senior Member
Old thread, but it looks like to me someone installed a right side (chain/ring) cone on the left side. The chainring side has those flats to enable you to tighten it securely against the chainring. The left side has indents on the outer face because they don't get tightened that hard and get locked down with the retaining nut.
10-12-21, 02:08 PM
#12

Full Member
Join Date: Jun 2021
Location: Des Moines, Iowa
Posts: 261
Bikes: A Blue One and 2 Green One's, then there's the Yellow one. And oh, yeah, a Black One. Did I mention the Red One?
Mentioned: 4 Post(s)
Tagged: 0 Thread(s)
Quoted: 75 Post(s)
Liked 195 Times
in
82 Posts
Old thread, but it looks like to me someone installed a right side (chain/ring) cone on the left side. The chainring side has those flats to enable you to tighten it securely against the chainring. The left side has indents on the outer face because they don't get tightened that hard and get locked down with the retaining nut.
If you remember... the cones on the one piece cranks are of a different thread. A sprocket cone is right handed and bigger round. The removing side is left handed and smaller.
Should be able to tap it a couple times with a hammer and screw driver and use fingers to loosen and unscrew it - TO THE RIGHT

