


Advice on Raleigh Cottered Cranks
 08-16-10, 08:41 AM
#1

SNARKY MEMBER
Thread Starter
Join Date: Jul 2005
Location: South Austin
Posts: 2,829
Mentioned: 0 Post(s)
Tagged: 0 Thread(s)
Quoted: 0 Post(s)
Likes: 0
Liked 2 Times
in
2 Posts
Advice on Raleigh Cottered Cranks
When I rebuilt my Raleigh Sports, I did everything except the bottom bracket. I can no longer avoid this onerous task, as it has developed an annoying squeak.
I attempted to remove the drive side cotter pin, following Sheldon's advice of 2 hard blows with a claw hammer. Since it is doubtful the pins had been removed in 40 years, this approach obviously failed. I am now going to have to drill it out.
Sheldon lists several alternatives to replacing the cotters. I really need to take it apart to get a better idea of the best approach. I am wondering what solutions other members have found. I have already modified the heck out of this bike, so keeping it original is not a concern. However, I have also sunk a lot of money in it. Any further investment will not ever be recouped.
 08-16-10, 08:55 AM
#2
guy on a bike
Join Date: Jun 2008
Location: AUSTIN TEXAS!!!
Posts: 499
Mentioned: 0 Post(s)
Tagged: 0 Thread(s)
Quoted: 0 Post(s)
Likes: 0
Liked 3 Times
in
3 Posts
The Peddler on Duval and 51st can re-tap the threads and you can switch to a modern sealed unit with square taper cranks - they charged me around $50-60 for the whole job and BB - I had a crankset
08-16-10, 09:28 AM
#3
My bikes became Vintage
 08-16-10, 09:42 AM
#4
Banned
Join Date: Jan 2007
Posts: 5,258
Mentioned: 0 Post(s)
Tagged: 0 Thread(s)
Quoted: 0 Post(s)
Likes: 0
Liked 10 Times
in
6 Posts
Did you bend the cotter pins? Most bike shops should be able to press them out for a couple of bucks, new pins (if needed) are a couple of bucks.
You can also use a mtn bike spindle in place of the cottered spindle and go to a three piece crank, reusing your original cups. I believe SB has more info on this approach.
You can also use a mtn bike spindle in place of the cottered spindle and go to a three piece crank, reusing your original cups. I believe SB has more info on this approach.
08-16-10, 09:44 AM
#5
SNARKY MEMBER
Thread Starter
Join Date: Jul 2005
Location: South Austin
Posts: 2,829
Mentioned: 0 Post(s)
Tagged: 0 Thread(s)
Quoted: 0 Post(s)
Likes: 0
Liked 2 Times
in
2 Posts
Thank you all. That was the exact kind of information I was looking for.
I followed Sheldon's advise, step by step to the point of the cotter breaking off.
I followed Sheldon's advise, step by step to the point of the cotter breaking off.
08-16-10, 09:45 AM
#6

PanGalacticGargleBlaster

Join Date: Apr 2009
Location: Smugglers Notch, Vermont
Posts: 7,531
Bikes: Upright and Recumbent....too many to list, mostly Vintage.
Mentioned: 0 Post(s)
Tagged: 0 Thread(s)
Quoted: 19 Post(s)
Likes: 0
Liked 6 Times
in
5 Posts
**edit** OFG beat me to it  +1 on replacing the spindle.
Tapping the threads is a good option so is simply replacing the spindle with a square taper one. You'll need a 73mm spindle... pull out the cottered one, pop in the new one, put on your new crankset.
+1 on replacing the spindle.Tapping the threads is a good option so is simply replacing the spindle with a square taper one. You'll need a 73mm spindle... pull out the cottered one, pop in the new one, put on your new crankset.
__________________
--Don't Panic.
--Don't Panic.
08-16-10, 10:18 AM
#7
SNARKY MEMBER
Thread Starter
Join Date: Jul 2005
Location: South Austin
Posts: 2,829
Mentioned: 0 Post(s)
Tagged: 0 Thread(s)
Quoted: 0 Post(s)
Likes: 0
Liked 2 Times
in
2 Posts
I have searched the internet for a 73mm spindle. Loose Screws has one but it is 125 mm long. This is way to long for my fixed gear.
08-16-10, 10:24 AM
#8
PanGalacticGargleBlaster
Join Date: Apr 2009
Location: Smugglers Notch, Vermont
Posts: 7,531
Bikes: Upright and Recumbent....too many to list, mostly Vintage.
Mentioned: 0 Post(s)
Tagged: 0 Thread(s)
Quoted: 19 Post(s)
Likes: 0
Liked 6 Times
in
5 Posts
I found mine in a similar length on Amazon.com. Flipped around the wrong way it may give good enough chainline.
__________________
--Don't Panic.
--Don't Panic.
08-16-10, 04:17 PM
#10
Extraordinary Magnitude

Join Date: Aug 2009
Location: Waukesha WI
Posts: 13,648
Bikes: 1978 Trek TX700; 1978/79 Trek 736; 1984 Specialized Stumpjumper Sport; 1984 Schwinn Voyageur SP; 1985 Trek 620; 1985 Trek 720; 1986 Trek 400 Elance; 1987 Schwinn High Sierra; 1990 Miyata 1000LT
Mentioned: 84 Post(s)
Tagged: 0 Thread(s)
Quoted: 2608 Post(s)
Liked 1,703 Times
in
937 Posts
It sounds like you've already got the cotter pins out-
I went through that a few months ago in this thread.
https://www.bikeforums.net/showthread.php?626894
I believe the applicable post is this-
And:
I went through that a few months ago in this thread.
https://www.bikeforums.net/showthread.php?626894
I believe the applicable post is this-
OK, now after trying unsuccessfully to use several "pin" type punches and the C clamp and socket- I went on to the #3 step on the Sheldon Brown site... Drill.
So I get my metal drill bit- and start drilling away. After a while I think my bit gave it up. So I tried another hole, then tried the pin punch & C clamp thing. Still won't stay up straight...
At this point, I'm mad. I grab the screwdriver rod, vise grips and hammer and thwap the **** out of it like 5 times and the pin falls out. Finally.
So the other side... I set the socket on there, put the C clamp on and start tightening... It takes a bit of doing and the pin just pops right out.
For those of you playing along at home- do not use a hammer. Use a simple C clamp and a 15-16mm socket around the end of the pin that comes out.
Now for my next magical trick...
the C clamp and 16mm socket. Use the fixed end of the clamp on the cotter head, and the spinny end of the clamp on the socket end.
__________________
*Recipient of the 2006 Time Magazine "Person Of The Year" Award*
Commence to jigglin� huh?!?!
"But hey, always love to hear from opinionated amateurs." -says some guy to Mr. Marshall.
Commence to jigglin� huh?!?!
"But hey, always love to hear from opinionated amateurs." -says some guy to Mr. Marshall.
08-17-10, 06:48 AM
#11
way too many bikes

Join Date: Aug 2010
Location: Melbourne, FL
Posts: 9
Bikes: 76 Raleigh mint 27, 72 Raleigh 27 fixed, Orbea Ashphalt, Jamis, Electra Rockabilly, (sold: Gary Fisher, Nashbar, Spinergy)
Mentioned: 0 Post(s)
Tagged: 0 Thread(s)
Quoted: 0 Post(s)
Likes: 0
Liked 0 Times
in
0 Posts
Use the press tool to install. To remove, soak with deep creep for 2 days (lightly tap it from time to time), put the nut back on, back it off a few turns, and hammer out with a shot peen hammer. no success, heat up just the pin with a small torch, hammer again. if you've passed that stage and mushroomed the thing I'd go to a bike store and pay the piper -- chalk it up as a lessen learned. don't be surprised if the store won't work on it - if it's bungled up too much.
Re install options:
1. 26 TPI threaded cups - Sheldon Brown. then use the right sized bottom bracket. switch to square or start drive. expensive option.
2. get new bearings for .05 each, repack with synth grease - what I did. Used a park took - cotter pin press. LBS had pins for $1.50 I had bought $20 pins online (I think ebay) before that and I ended up liking the $10/pin units much better and used the hand press with them too.
3. search for this new option that people use with success: thread-less bottom bracket. You need to measure the opening first. It compression expands to seal against whatever threads are there and I think it's aluminum so it doesn't destroy the threads. The only thing about it I don't like is the concept of removal and re-install -- how many times can you do it and how adjustable is it?
08-17-10, 08:40 AM
#12
Senior Member

Join Date: Jun 2010
Location: Buenos Aires, Argentina
Posts: 252
Mentioned: 0 Post(s)
Tagged: 0 Thread(s)
Quoted: 0 Post(s)
Likes: 0
Liked 0 Times
in
0 Posts
I've JUST finished removing some cottered cranks, with little effort and damage (using this method): https://www.youtube.com/watch?v=mybfNsm1XwM
Tried with the hammer/pipe "sheldon" method, result: I think one of the threaded ends is screwed.
Tried with the C-clamp/socket method, result: One broken C-clamp.
The vise/socket method worked almost effortlessly
Tried with the hammer/pipe "sheldon" method, result: I think one of the threaded ends is screwed.
Tried with the C-clamp/socket method, result: One broken C-clamp.
The vise/socket method worked almost effortlessly
08-17-10, 10:07 AM
#13

Senior Member

Join Date: Mar 2005
Location: Pinole, CA, USA
Posts: 17,392
Mentioned: 24 Post(s)
Tagged: 0 Thread(s)
Quoted: 443 Post(s)
Likes: 0
Liked 27 Times
in
25 Posts
I may be the only one, but I think that a Raleigh Sports should have a cottered crank and that a cotterless crank on a Sports just looks wrong.
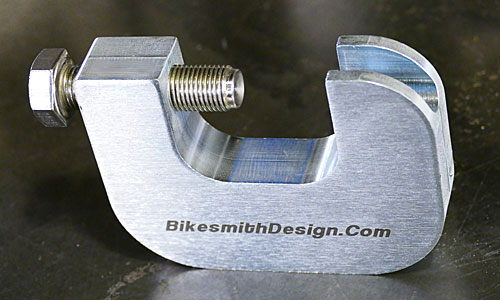
The press from Bikesmith Design is well worth the money. I have one and I don't have any bikes with cottered cranks at the moment.
The press from Bikesmith Design is well worth the money. I have one and I don't have any bikes with cottered cranks at the moment.
08-17-10, 10:21 AM
#14
multimodal commuter

Join Date: Nov 2006
Location: NJ, NYC, LI
Posts: 19,808
Bikes: 1940s Fothergill, 1959 Allegro Special, 1963? Claud Butler Olympic Sprint, Lambert 'Clubman', 1974 Fuji "the Ace", 1976 Holdsworth 650b conversion rando bike, 1983 Trek 720 tourer, 1984 Counterpoint Opus II, 1993 Basso Gap, 2010 Downtube 8h, and...
Mentioned: 584 Post(s)
Tagged: 0 Thread(s)
Quoted: 1908 Post(s)
Liked 574 Times
in
339 Posts
I may be the only one, but I think that a Raleigh Sports should have a cottered crank and that a cotterless crank on a Sports just looks wrong.
The press from Bikesmith Design is well worth the money. I have one and I don't have any bikes with cottered cranks at the moment.
The press from Bikesmith Design is well worth the money. I have one and I don't have any bikes with cottered cranks at the moment.
I've got by without the Bikesmith Design tool pretty well so far, using a small vise... but I mean to order one one of these days.
08-17-10, 01:58 PM
#16
guy on a bike
Join Date: Jun 2008
Location: AUSTIN TEXAS!!!
Posts: 499
Mentioned: 0 Post(s)
Tagged: 0 Thread(s)
Quoted: 0 Post(s)
Likes: 0
Liked 3 Times
in
3 Posts
I spend more time riding my bike than looking at it and the switch to a modern unit was a vast improvement in my case. Of course, my bike is just a Sprite.
08-17-10, 02:37 PM
#17
SNARKY MEMBER
Thread Starter
Join Date: Jul 2005
Location: South Austin
Posts: 2,829
Mentioned: 0 Post(s)
Tagged: 0 Thread(s)
Quoted: 0 Post(s)
Likes: 0
Liked 2 Times
in
2 Posts
How many millions of these almost indestructible bikes did they make. I don't think the world will notice mine is missing.
08-17-10, 04:19 PM
#18
My bikes became Vintage
08-18-10, 04:04 AM
#19
Senior Member

Join Date: Apr 2010
Location: vermont
Posts: 3,081
Bikes: Many
Mentioned: 8 Post(s)
Tagged: 0 Thread(s)
Quoted: 5 Post(s)
Likes: 0
Liked 10 Times
in
10 Posts
I just bought one of those cotter removers from Bikesmith. It would have cost more to produce it on my own machines.
08-18-10, 06:22 AM
#20
www.theheadbadge.com

Join Date: Sep 2005
Location: Southern Florida
Posts: 28,513
Bikes: https://www.theheadbadge.com
Mentioned: 124 Post(s)
Tagged: 0 Thread(s)
Quoted: 2422 Post(s)
Liked 4,396 Times
in
2,093 Posts
While you're at it, buy the best Raleigh cotter pins Mark has to offer when you buy the tool.
The cotters purchased by most shops today are of such horrid quality that you'll be banging your forehead against the wall as to why they flat out after 500 feet of riding. Doesn't matter whether you file them or not, buying the cheap cotters is the same as throwing your money away.
-Kurt
The cotters purchased by most shops today are of such horrid quality that you'll be banging your forehead against the wall as to why they flat out after 500 feet of riding. Doesn't matter whether you file them or not, buying the cheap cotters is the same as throwing your money away.
-Kurt
__________________


08-18-10, 09:38 AM
#21
PanGalacticGargleBlaster
Join Date: Apr 2009
Location: Smugglers Notch, Vermont
Posts: 7,531
Bikes: Upright and Recumbent....too many to list, mostly Vintage.
Mentioned: 0 Post(s)
Tagged: 0 Thread(s)
Quoted: 19 Post(s)
Likes: 0
Liked 6 Times
in
5 Posts
The cotters purchased by most shops today are of such horrid quality that you'll be banging your forehead against the wall as to why they flat out after 500 feet of riding. Doesn't matter whether you file them or not, buying the cheap cotters is the same as throwing your money away.
-Kurt
-Kurt
__________________
--Don't Panic.
--Don't Panic.
08-18-10, 09:44 AM
#22
SNARKY MEMBER
Thread Starter
Join Date: Jul 2005
Location: South Austin
Posts: 2,829
Mentioned: 0 Post(s)
Tagged: 0 Thread(s)
Quoted: 0 Post(s)
Likes: 0
Liked 2 Times
in
2 Posts
When I get through with this project (which may never happen) it is only going to faintly resemble an English 3 speed.
 08-18-10, 01:54 PM
#24
www.theheadbadge.com
Join Date: Sep 2005
Location: Southern Florida
Posts: 28,513
Bikes: https://www.theheadbadge.com
Mentioned: 124 Post(s)
Tagged: 0 Thread(s)
Quoted: 2422 Post(s)
Liked 4,396 Times
in
2,093 Posts
The result is always the same. I would have been better off flushing $5 down the toilet, or voting for Pat Buchanan in the 2000 election

-Kurt
P.S.: No political slant intended.
__________________
08-18-10, 02:53 PM
#25
Count Orlok Member
Well, I like the Heron Chainring and the cottered cranks. I ride my bike to work, too, I don't just look at it. But as the OP points out, there are thousands of Raleighs out there, he's already modified his, and it's actually getting ridden, so good for him.
I would use some pentrating lubricant on the cotters. If the threaded end is bent, you may be able to straighten it with a channel locks, or it may snap off. I used a punch and a hammer the last time that happened to me.
Update us on what you do to upgrade the bike.
I would use some pentrating lubricant on the cotters. If the threaded end is bent, you may be able to straighten it with a channel locks, or it may snap off. I used a punch and a hammer the last time that happened to me.
Update us on what you do to upgrade the bike.

