


DT-Swiss tubeless do I need more tape?
 05-04-23, 08:35 AM
#1

Newbie
Thread Starter
DT-Swiss tubeless do I need more tape?
Hello all
I'm getting ready to make my first trial into the world of tubeless biking with my set of "tubeless ready" DT Swiss PR1600 Spline wheels. I've the wheels with latex tubes for the past couple of years but have a gravel grinder event coming up that's famous for snake bite pinching and feel that now might be the time to go tubeless. In watching several Youtube videos I've received the impression that the hole makes in the tape rim strip ought to be very tight fitting for the valve stem. The hole that the wheels came with is anything but tight fitting to the stem DT provides. So I'm wondering it it might be prudent to add some tape over the stem whole and puncture that. What say you experienced tubeless folks? Thanks for any informed replies! Hugh
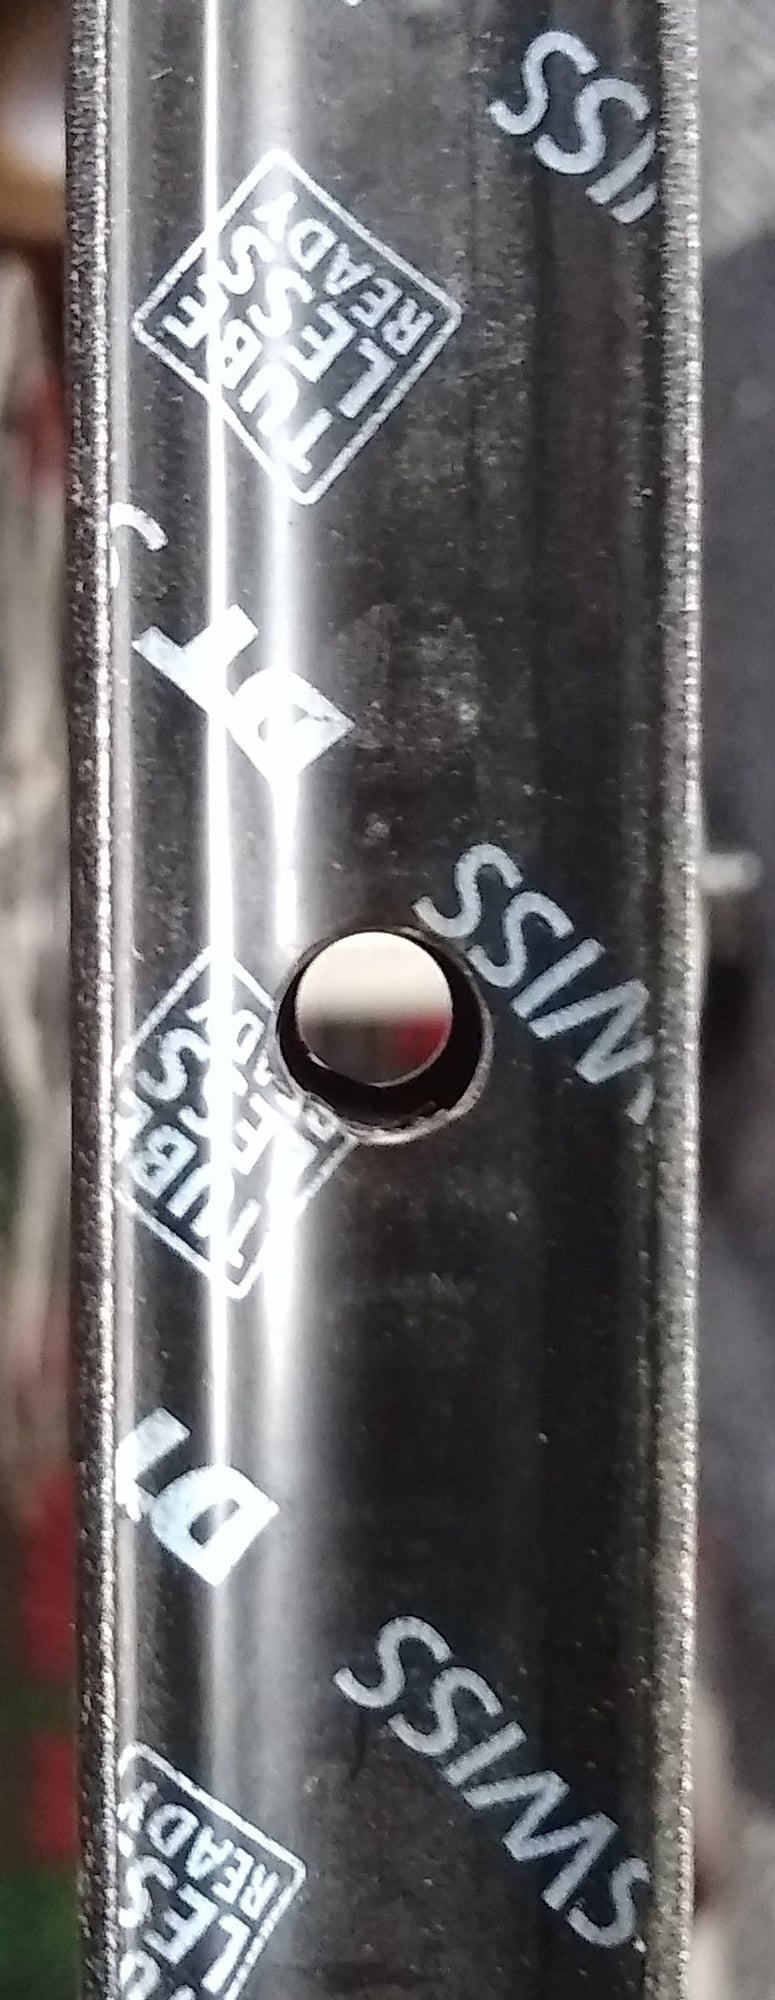
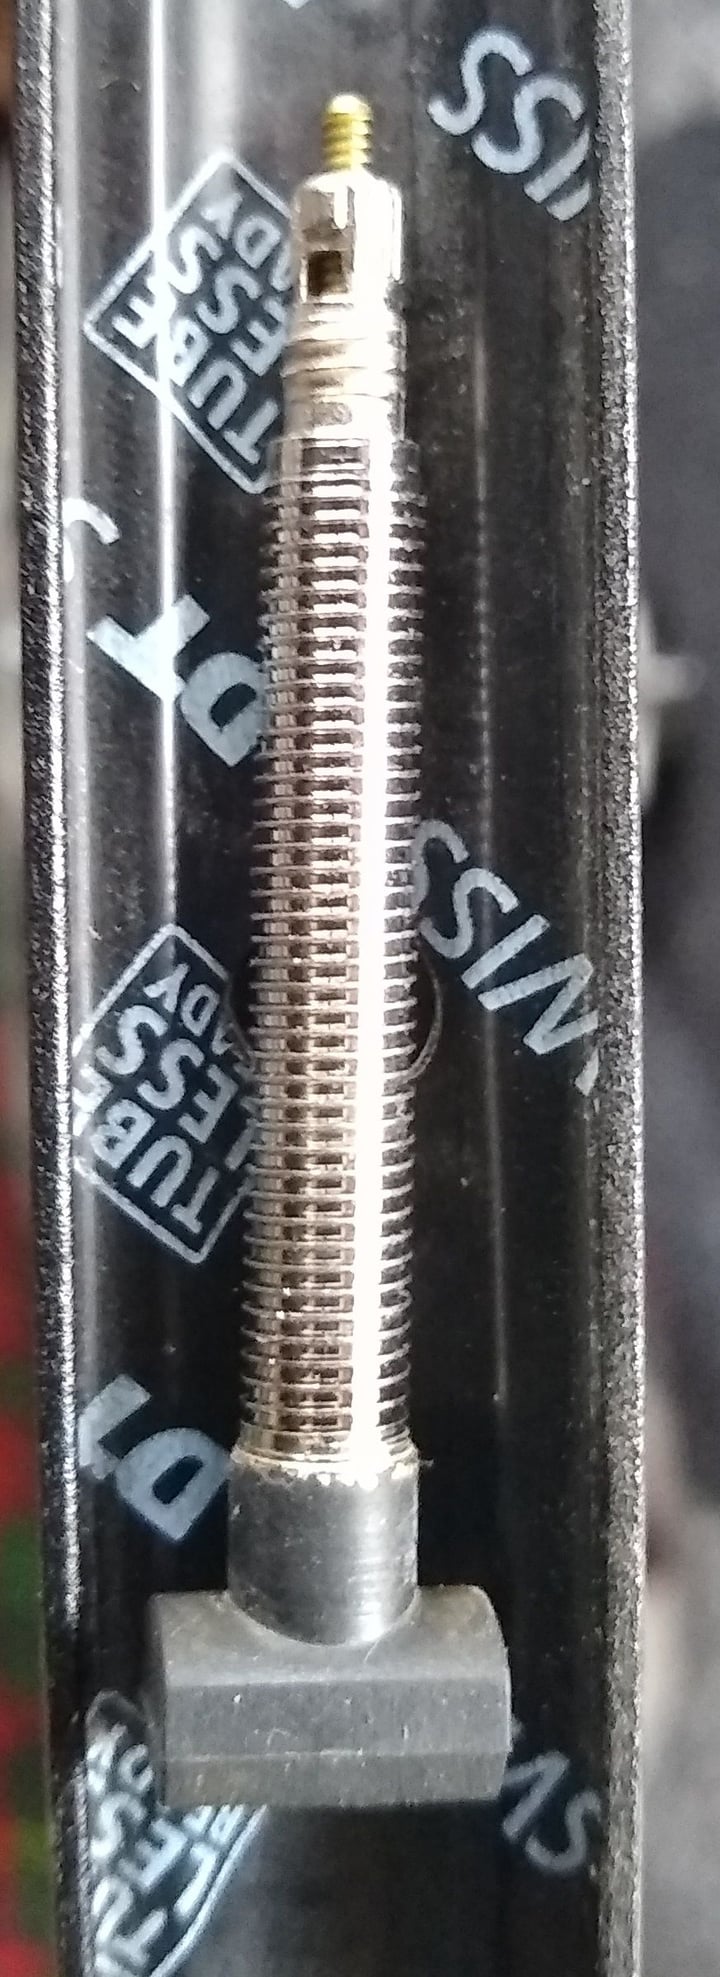
I'm getting ready to make my first trial into the world of tubeless biking with my set of "tubeless ready" DT Swiss PR1600 Spline wheels. I've the wheels with latex tubes for the past couple of years but have a gravel grinder event coming up that's famous for snake bite pinching and feel that now might be the time to go tubeless. In watching several Youtube videos I've received the impression that the hole makes in the tape rim strip ought to be very tight fitting for the valve stem. The hole that the wheels came with is anything but tight fitting to the stem DT provides. So I'm wondering it it might be prudent to add some tape over the stem whole and puncture that. What say you experienced tubeless folks? Thanks for any informed replies! Hugh
 05-04-23, 10:16 AM
#2
Senior Member
Join Date: Sep 2017
Posts: 7,887
Mentioned: 38 Post(s)
Tagged: 0 Thread(s)
Quoted: 6971 Post(s)
Liked 10,968 Times
in
4,692 Posts
The photo doesn't give me a clear view of the problem; are you saying that there is a gap between the rim and the tape at the hole? If so, consider that, when you tighten down the nut on the valve stem, everything will tighten up. In other words, I suggest that you give it a try as-is and see if it works.
05-04-23, 10:20 AM
#3
Senior Member

Join Date: Jun 2008
Location: Louisville, KY
Posts: 13,447
Mentioned: 33 Post(s)
Tagged: 0 Thread(s)
Quoted: 4236 Post(s)
Liked 2,949 Times
in
1,808 Posts
You do have the nut for the valve stem still, right?
__________________
Bikes: 1996 Eddy Merckx Titanium EX, 1989/90 Colnago Super(issimo?) Piu(?),1990 Concorde Aquila(hit by car while riding), others in build queue "when I get the time"
Bikes: 1996 Eddy Merckx Titanium EX, 1989/90 Colnago Super(issimo?) Piu(?),
05-04-23, 10:42 AM
#4
Newbie
Thread Starter
Yes I do. It includes an o-ring as well.
05-04-23, 10:46 AM
#5
Newbie
Thread Starter
The photo doesn't give me a clear view of the problem; are you saying that there is a gap between the rim and the tape at the hole? If so, consider that, when you tighten down the nut on the valve stem, everything will tighten up. In other words, I suggest that you give it a try as-is and see if it works.
Thanks for the reply,
Hugh
05-04-23, 04:48 PM
#6
Senior Member

Join Date: Jun 2021
Location: Australia
Posts: 824
Bikes: 2002 Trek 5200 (US POSTAL), 2020 Canyon Aeroad SL
Mentioned: 1 Post(s)
Tagged: 0 Thread(s)
Quoted: 313 Post(s)
Liked 682 Times
in
328 Posts
That looks perfectly fine to me. I would whack that valve in and get cracking.
If you are concerned it's not enough seal, you could always pop a short strip of electrical tape across the valve hole, then punch the valve through that.
If you are concerned it's not enough seal, you could always pop a short strip of electrical tape across the valve hole, then punch the valve through that.
05-04-23, 09:08 PM
#7
Senior Member
Join Date: Sep 2017
Posts: 7,887
Mentioned: 38 Post(s)
Tagged: 0 Thread(s)
Quoted: 6971 Post(s)
Liked 10,968 Times
in
4,692 Posts
I used to slice open a little hole, but read somewhere that that can lead to more ripping and hence air leakage. Now I heat up the end of a #2 Phillips screwdriver (with one of those long lighter/wand things) and then melt a hole through the tape.
Likes For Koyote:
05-05-23, 05:00 AM
#8


Randomhead
Join Date: Aug 2008
Location: Happy Valley, Pennsylvania
Posts: 24,399
Mentioned: 0 Post(s)
Tagged: 0 Thread(s)
Quoted: 4 Post(s)
Liked 3,699 Times
in
2,519 Posts
Stan's valves have a conical seal and would probably fill the hole a lot better than the valve in your picture. Adding tape might make some tires too tight
05-05-23, 12:00 PM
#10
Full Member
Join Date: Aug 2016
Posts: 316
Mentioned: 4 Post(s)
Tagged: 0 Thread(s)
Quoted: 83 Post(s)
Likes: 0
Liked 64 Times
in
48 Posts
Looks normal. Finger tighten the nut with no tools.You might need to remove it sometime on the road to insert a tube. TL tires and rims are dependable and it�s unlikely you�ll have any issues.
05-05-23, 01:23 PM
#11
Senior Member
The trick if it does leak is to hold the wheel so the valve is at 6 o'clock and bounce it off the ground a bunch to splash sealant onto the valve.
05-05-23, 01:44 PM
#12
Senior Member
Join Date: Oct 2005
Location: SW Ohio
Posts: 3,682
Bikes: Puch Marco Polo, Saint Tropez, Masi Gran Criterium
Mentioned: 25 Post(s)
Tagged: 0 Thread(s)
Quoted: 1163 Post(s)
Liked 442 Times
in
315 Posts
You say you ran latex tubes for about 2 years. From the photo, it appears that the tape is covering the interior of the rim pretty well. Is there 1 or 2 layers of tape on there now? If it were me, I would probably get rid of the current tape & start with 2 layers of the correct width of DT Swiss tubeless tape. It is very important to force out all air bubbles in the tape by using your finger or a nylon tire lever on the first tape layer & repeat the same very thorough tape application for the second layer.
if there is a void in the tape anywhere other than the valve you might find that the tire leaks a fair amount on the first try. Also, on first try if air is rushing out around the tubeless valve, don�t automatically conclude that the valve is the original source of the leak. Air can leak past the tape & in through a poorly taped spoke hole in the rim extrusion. The air has to exit somewhere out of the rim extrusion - the valve is one spot where lots of air can escape.
if there is a void in the tape anywhere other than the valve you might find that the tire leaks a fair amount on the first try. Also, on first try if air is rushing out around the tubeless valve, don�t automatically conclude that the valve is the original source of the leak. Air can leak past the tape & in through a poorly taped spoke hole in the rim extrusion. The air has to exit somewhere out of the rim extrusion - the valve is one spot where lots of air can escape.
 05-05-23, 03:53 PM
#13
Thread Killer
Join Date: Aug 2008
Location: Ann Arbor, MI
Posts: 12,448
Bikes: 15 Kinesis Racelight 4S, 76 Motebecane Gran Jubil�e, 17 Dedacciai Gladiatore2, 12 Breezer Venturi, 09 Dahon Mariner, 12 Mercier Nano, 95 DeKerf Team SL, 19 Tern Rally, 21 Breezer Doppler Cafe+, 19 T-Lab X3, 91 Serotta CII, 23 3T Strada
Mentioned: 30 Post(s)
Tagged: 0 Thread(s)
Quoted: 3147 Post(s)
Liked 1,711 Times
in
1,033 Posts
Absent any damage, the system is designed to work as-is. Try it and see if it does. If it doesn’t, futz with it then.
05-07-23, 06:13 PM
#14
Sunshine

Join Date: Aug 2014
Location: Des Moines, IA
Posts: 16,614
Bikes: '18 class built steel roadbike, '19 Fairlight Secan, '88 Schwinn Premis , Black Mountain Cycles Monstercross V4, '89 Novara Trionfo
Mentioned: 123 Post(s)
Tagged: 0 Thread(s)
Quoted: 10964 Post(s)
Liked 7,491 Times
in
4,189 Posts
Admittedly I slice the X like a couple times a year so it isn't exactly top of mind.
The small screw driver heated up is an interesting play.
05-07-23, 07:54 PM
#15
Senior Member
Join Date: Sep 2017
Posts: 7,887
Mentioned: 38 Post(s)
Tagged: 0 Thread(s)
Quoted: 6971 Post(s)
Liked 10,968 Times
in
4,692 Posts
Oh huh. Well that's something I haven't thought of. I've thought about how when I slice a little X in the **** that maybe it could expand eventually, but hadn't thought about how else to do it.
Admittedly I slice the X like a couple times a year so it isn't exactly top of mind.
The small screw driver heated up is an interesting play.
Admittedly I slice the X like a couple times a year so it isn't exactly top of mind.
The small screw driver heated up is an interesting play.
05-08-23, 10:58 AM
#16
Randomhead
Join Date: Aug 2008
Location: Happy Valley, Pennsylvania
Posts: 24,399
Mentioned: 0 Post(s)
Tagged: 0 Thread(s)
Quoted: 4 Post(s)
Liked 3,699 Times
in
2,519 Posts
The lbs uses a portable soldering iron. I might repurpose one of my unused soldering irons for this purpose.
It sure looks to me like the inner hole is bigger than normal and will probably seal better with a stan's style valve. Looks like the hole was rather clumsily enlarged. I could be wrong though. And valve stems are expensive.
It sure looks to me like the inner hole is bigger than normal and will probably seal better with a stan's style valve. Looks like the hole was rather clumsily enlarged. I could be wrong though. And valve stems are expensive.
Likes For unterhausen:
05-08-23, 04:23 PM
#17
Senior Member
Join Date: Sep 2017
Posts: 7,887
Mentioned: 38 Post(s)
Tagged: 0 Thread(s)
Quoted: 6971 Post(s)
Liked 10,968 Times
in
4,692 Posts
