


Rim & tire don't play nice together? Or...?
 10-17-17, 06:16 PM
#1
your god hates me
Thread Starter
Join Date: Apr 2006
Posts: 4,592
Bikes: 2016 Richard Sachs, 2010 Carl Strong, 2006 Cannondale Synapse
Mentioned: 10 Post(s)
Tagged: 0 Thread(s)
Quoted: 1254 Post(s)
Liked 1,291 Times
in
712 Posts
Rim & tire don't play nice together? Or...?
Me being the Wonderful Husband™ that I am, I bought the missus some handbuilt wheels by Joe Young for her birthday: DT Swiss 240S hubs and RR440 clincher rims. Mmm, nice! I've used a very similar combination on a couple of my bikes for years, been very happy.
But on her new wheels it is an absolute bee-yotch to get Conti GP4000SII clinchers on or off! It's not just her (or me), several other folks attempted to assist her with a roadside flat repair recently and were astonished at how difficult it was to get the tire back on the rim.
I use the same tires and don't recall ever having this much difficulty...but then again, mine are not RR440 rims (and if they ever were, they were not the most recent version).
Is this RR440 + GP4000SII a known bad rim/tire combination? ...or is this a freak one-off? If it is a known issue, can anyone recommend a 25c clincher that's more forgiving of delicate lady hands when it comes to mounting on RR440 rims?
Thanks.
 10-17-17, 06:24 PM
#2
Senior Member
Join Date: Jan 2010
Location: TC, MN
Posts: 39,520
Bikes: R3 Disc, Haanjo
Mentioned: 354 Post(s)
Tagged: 1 Thread(s)
Quoted: 20810 Post(s)
Liked 9,456 Times
in
4,672 Posts
Just taking a quick look at the cross-section, it looks like it might be tubeless/ready. If you make a concerted effort to keep the tire beads in the center channel of the rim bed as you work your way around, you'll have a much easier go of it. If you don't take care to do so, and the bead rides up on the rim bed shoulder, the last bit to go up and over will be incredibly tight.
Edited to add: also start opposite of the valve stem - it eats up real estate in the center channel of the rim bed and can be the difference between snug and ain't-gonna-happen.
Edited to add: also start opposite of the valve stem - it eats up real estate in the center channel of the rim bed and can be the difference between snug and ain't-gonna-happen.
Last edited by WhyFi; 10-17-17 at 06:35 PM.
10-17-17, 06:34 PM
#3

working on my sandal tan

Join Date: Aug 2011
Location: CID
Posts: 22,629
Bikes: 1991 Bianchi Eros, 1964 Armstrong, 1988 Diamondback Ascent, 1988 Bianchi Premio, 1987 Bianchi Sport SX, 1980s Raleigh mixte (hers), All-City Space Horse (hers)
Mentioned: 98 Post(s)
Tagged: 0 Thread(s)
Quoted: 3871 Post(s)
Liked 2,568 Times
in
1,579 Posts
10-17-17, 07:18 PM
#4
Senior Member
Join Date: Apr 2009
Location: New Rochelle, NY
Posts: 38,728
Bikes: too many bikes from 1967 10s (5x2)Frejus to a Sumitomo Ti/Chorus aluminum 10s (10x2), plus one non-susp mtn bike I use as my commuter
Mentioned: 140 Post(s)
Tagged: 1 Thread(s)
Quoted: 5793 Post(s)
Liked 2,593 Times
in
1,437 Posts
OK, I looked at the profile and have idea. If you follow the following closely you'll have your best shot at mounting with least effort.
To begin with, all tires should fit all rims with similar effort, because the dimensions have tight specs. The relish is that tires vary, as do rim profiles, so there are some tough fits.
The key is to get the smallest diameter at the center of the rim's well. This is critical because it's what determine the slack you'll end up at the end. Also keep in mind that tires are symmetrical right and left, so the best indication of what it'll be like to finish is how the first side went on.
So, start with the rim tape. You want it as thin as possible, and it must not be wide enough to reach onto the shoulders on either side.
Mount the first side, stuff the tube well up into the tire. Be sure to have it deep in the tire, because otherwise it'll be in your way. Now guide the 2nd side over the rim starting opposite the valve and working both sides to the valve as far as you can. STOP.
Go back and push the entire tire over to the far side so the first side is forced out and onto the seat, and the 2nd side is centered in the well. As you do so, push the slack forward toward the rim in both directions. Do this carefully, and do it twice to make sure you've gotten as much slack as possible and pushed all of it toward the valve. Now go back and work thone last few inches over the top.
I have two techniques for finishing, and may use both on the same tight tire.
Put both hands over the tire at the ends of the unmounted section, gram tight catching the tire under the pads at the base of the thumbs, and roll your hand up pushing the tire ahead.
Or put your thumbs where the tire is half on and half off at the ends of the section you need to move on. Push those spots on, then move in and repeat. When you can't go farther, stick a cone wrench between the tire and rim where it's mounted, and lever inward to help push the next bit over. Reminder, I don't suggest trying to reach under, catch the rim and lever the tire up. There's too much right of trapping and pinching the tube.
If stymied, go back to making slack by pushing the tire to the mile not forward. BTW, I didn't mention, but I start with some air in the rube to make it easier to handle. But that air works against you at end game, so bleed it when you're there.
Finish by pushing the valve to pull a any part of the tube you might have trapped at the end out and deeper. Then push the valve back down from the outsidera.
Finish by the same basics as always, inflating to 15psi and checking for good seating before going to full pressure.
GOOD LUCK
__________________
FB
Chain-L site
An ounce of diagnosis is worth a pound of cure.
Just because I'm tired of arguing, doesn't mean you're right.
�One accurate measurement is worth a thousand expert opinions� - Adm Grace Murray Hopper - USN
WARNING, I'm from New York. Thin skinned people should maintain safe distance.
FB
Chain-L site
An ounce of diagnosis is worth a pound of cure.
Just because I'm tired of arguing, doesn't mean you're right.
�One accurate measurement is worth a thousand expert opinions� - Adm Grace Murray Hopper - USN
WARNING, I'm from New York. Thin skinned people should maintain safe distance.
10-17-17, 07:32 PM
#5
Senior Member
Join Date: Jan 2010
Location: TC, MN
Posts: 39,520
Bikes: R3 Disc, Haanjo
Mentioned: 354 Post(s)
Tagged: 1 Thread(s)
Quoted: 20810 Post(s)
Liked 9,456 Times
in
4,672 Posts
This is wholly unnecessary and would likely just make matters more difficult. All road tubeless rim/tire combos have a very tight rim bed shoulder/bead interface, and getting the bead up on to the shoulder takes lube, a big shot of highly compressed air and many prayers to the tubeless deities - I know that the Conti's aren't tubeless, but they're still tight and trying to work it up there by hand would probably be tougher than getting the bead over the rim edge.
10-17-17, 08:03 PM
#6

don't try this at home.

Join Date: Jan 2006
Location: N. KY
Posts: 5,940
Mentioned: 10 Post(s)
Tagged: 0 Thread(s)
Quoted: 974 Post(s)
Liked 512 Times
in
352 Posts
That rim profile looks almost as shallow as my older Kinlin 30 rims. Those Kinlins had a very shallow center well.
With very thin rim tape, no tube installed, and just one tire bead down in the center, I couldn't slide the tire around the rim to line up the logo with the valve hole. That's tight!
From the informative Fairwheel reports:
Kinlin XR300, with the shallow center well:

DT RR440. Make sure the bead is down in the center, like FBinNY said.

~~~~~~~~~~~~~~~~~~~~~~~~~~~~~~~~~~~
Easy mounting
When I got my Kinlin wheels, I struggled to get the tire mounted. I had sore fingers and mangled levers. I wondered if I'd have to get some long steel bike shop levers to bring on a ride.
But I found a method that uses just one lever, and very little force. It's fast and easy.
See my 2010 howto thread here.
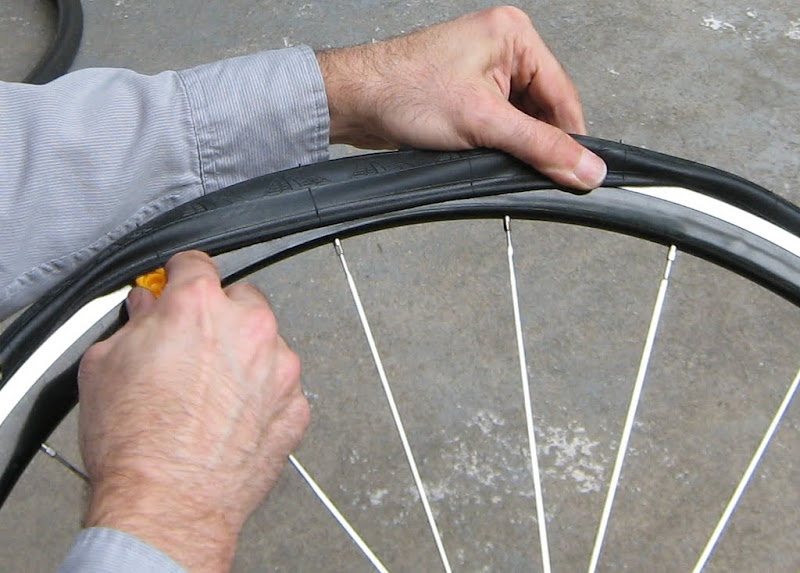
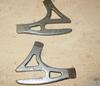
Here's my easy method. It requires tire levers with the correct profile. This doesn't work at all with the older Park levers that have a notch on the back side and a sharp pointed end.
The key is to lift less than an inch of bead at a time, then slide the lever over and repeat. (go around both sides after the tire is on, pushing the bead to the center to make sure there's no fold of tube caught under the bead.)
With very thin rim tape, no tube installed, and just one tire bead down in the center, I couldn't slide the tire around the rim to line up the logo with the valve hole. That's tight!
From the informative Fairwheel reports:
Kinlin XR300, with the shallow center well:
DT RR440. Make sure the bead is down in the center, like FBinNY said.
~~~~~~~~~~~~~~~~~~~~~~~~~~~~~~~~~~~
Easy mounting
When I got my Kinlin wheels, I struggled to get the tire mounted. I had sore fingers and mangled levers. I wondered if I'd have to get some long steel bike shop levers to bring on a ride.
But I found a method that uses just one lever, and very little force. It's fast and easy.
See my 2010 howto thread here.
Here's my easy method. It requires tire levers with the correct profile. This doesn't work at all with the older Park levers that have a notch on the back side and a sharp pointed end.
The key is to lift less than an inch of bead at a time, then slide the lever over and repeat. (go around both sides after the tire is on, pushing the bead to the center to make sure there's no fold of tube caught under the bead.)
Last edited by rm -rf; 10-17-17 at 08:15 PM.
 10-17-17, 08:16 PM
#7
Senior Member
Join Date: Apr 2009
Location: New Rochelle, NY
Posts: 38,728
Bikes: too many bikes from 1967 10s (5x2)Frejus to a Sumitomo Ti/Chorus aluminum 10s (10x2), plus one non-susp mtn bike I use as my commuter
Mentioned: 140 Post(s)
Tagged: 1 Thread(s)
Quoted: 5793 Post(s)
Liked 2,593 Times
in
1,437 Posts
This is wholly unnecessary and would likely just make matters more difficult. All road tubeless rim/tire combos have a very tight rim bed shoulder/bead interface, and getting the bead up on to the shoulder takes lube, a big shot of highly compressed air and many prayers to the tubeless deities - I know that the Conti's aren't tubeless, but they're still tight and trying to work it up there by hand would probably be tougher than getting the bead over the rim edge.
As they say the proof of the pudding is in the eating. The OP can try my method and see how it pans out. Other than some time lost, he won't be any worse off than now.
In any case pushing the gire over isn't hard, because he's not seating it all the way around. If there's enough slack to fit tires over a rim, there's certainly enough to push it up onto the seat. Getting the fat side over as far as possible, allows the 2nd side to move to the center of the rim where the diameter is smallest, which is the objective over this srdp.
As I said, it's not worth arguing, it'll either help, or it won't, and the OP won't know unless he tries.
__________________
FB
Chain-L site
An ounce of diagnosis is worth a pound of cure.
Just because I'm tired of arguing, doesn't mean you're right.
�One accurate measurement is worth a thousand expert opinions� - Adm Grace Murray Hopper - USN
WARNING, I'm from New York. Thin skinned people should maintain safe distance.
FB
Chain-L site
An ounce of diagnosis is worth a pound of cure.
Just because I'm tired of arguing, doesn't mean you're right.
�One accurate measurement is worth a thousand expert opinions� - Adm Grace Murray Hopper - USN
WARNING, I'm from New York. Thin skinned people should maintain safe distance.
Last edited by FBinNY; 10-17-17 at 08:49 PM.
10-17-17, 08:19 PM
#8
Senior Member

Join Date: Feb 2014
Location: Pasadena, CA
Posts: 4,848
Bikes: Schwinn Varsity
Mentioned: 22 Post(s)
Tagged: 0 Thread(s)
Quoted: 1931 Post(s)
Liked 742 Times
in
422 Posts
I have those 440 rims and 25mm Conti 4 seasons... hard to put on. Like FB says, thin rim tape. I used Stan's, 2 layers. Pinch the tire into center of rim.
I also carry Koolstop tire jack with the handle shortened when out riding.... so I don't look like a fool on the road
Be happy they are hard to mount.... when you go flat maybe they won't come off the rim before you have a chance to stop the bike.
That combo is not as hard to mount as my Ambrosio 19 Extra rims...... that's really @#$%'d
Last edited by trailangel; 10-17-17 at 08:24 PM.
10-17-17, 09:42 PM
#9
Senior Member
Join Date: Jan 2010
Location: TC, MN
Posts: 39,520
Bikes: R3 Disc, Haanjo
Mentioned: 354 Post(s)
Tagged: 1 Thread(s)
Quoted: 20810 Post(s)
Liked 9,456 Times
in
4,672 Posts
We don't need to argue.
As they say the proof of the pudding is in the eating. The OP can try my method and see how it pans out. Other than some time lost, he won't be any worse off than now.
In any case pushing the gire over isn't hard, because he's not seating it all the way around. If there's enough slack to fit tires over a rim, there's certainly enough to push it up onto the seat. Getting the fat side over as far as possible, allows the 2nd side to move to the center of the rim where the diameter is smallest, which is the objective over this srdp.
As I said, it's not worth arguing, it'll either help, or it won't, and the OP won't know unless he tries.
10-17-17, 09:58 PM
#10
Senior Member
Join Date: Apr 2009
Location: New Rochelle, NY
Posts: 38,728
Bikes: too many bikes from 1967 10s (5x2)Frejus to a Sumitomo Ti/Chorus aluminum 10s (10x2), plus one non-susp mtn bike I use as my commuter
Mentioned: 140 Post(s)
Tagged: 1 Thread(s)
Quoted: 5793 Post(s)
Liked 2,593 Times
in
1,437 Posts
I also think you're reading my instruction wrong. I don't say he's to seat the far side. Only push it across onto the seat most of the way around. You only get slack from something more than halfway. As you mount it the tire is sort of egg shaped, and the area neat the valve won't be in the well anyway.
The reality is that you and I are offering very similar advice. You're focused on a single aspect of my post, which I suspect you may be reading too much into. My point since simple you pushthe to the far side as much as possible, so the side he's working on can be in the center where the well is deepest.
However, it's up to the OP. I layed out a process that might help him. He can try it, or not. It's all the same to me, since I don't have the problem.
__________________
FB
Chain-L site
An ounce of diagnosis is worth a pound of cure.
Just because I'm tired of arguing, doesn't mean you're right.
�One accurate measurement is worth a thousand expert opinions� - Adm Grace Murray Hopper - USN
WARNING, I'm from New York. Thin skinned people should maintain safe distance.
FB
Chain-L site
An ounce of diagnosis is worth a pound of cure.
Just because I'm tired of arguing, doesn't mean you're right.
�One accurate measurement is worth a thousand expert opinions� - Adm Grace Murray Hopper - USN
WARNING, I'm from New York. Thin skinned people should maintain safe distance.
Last edited by FBinNY; 10-17-17 at 10:15 PM.
10-18-17, 06:57 AM
#11
Senior Member
Join Date: Jan 2010
Location: TC, MN
Posts: 39,520
Bikes: R3 Disc, Haanjo
Mentioned: 354 Post(s)
Tagged: 1 Thread(s)
Quoted: 20810 Post(s)
Liked 9,456 Times
in
4,672 Posts
Got it. Cool. Same page.
10-18-17, 07:32 AM
#12
Expired Member

Join Date: Jun 2007
Location: TN
Posts: 11,563
Mentioned: 41 Post(s)
Tagged: 0 Thread(s)
Quoted: 3683 Post(s)
Liked 5,447 Times
in
2,769 Posts
Regardless of technique, she may appreciate having a tire jack in her seat bag. VAR and Crank Bros have more compact alternatives to the Koolstop.
10-18-17, 09:17 AM
#13
Senior Member
There's no reason to be a ****** about it. His instructions were clearly to push the first bead out of the center channel enough that the side being put on next can occupy it. It doesn't mean the first side has to be pushed all the way up onto the shoulder and seated under the bead hook. So long as it's pushed up on the seat enough to make room in the center well that is enough. And his instructions would clearly have gotten someone to that point. Personally the way FB advised is pretty much what I do already when putting reluctant tires on like this, and it works. Not sure what the e-peen measuring contest here is all about.
10-18-17, 09:34 AM
#14
Senior Member
Join Date: Apr 2009
Location: New Rochelle, NY
Posts: 38,728
Bikes: too many bikes from 1967 10s (5x2)Frejus to a Sumitomo Ti/Chorus aluminum 10s (10x2), plus one non-susp mtn bike I use as my commuter
Mentioned: 140 Post(s)
Tagged: 1 Thread(s)
Quoted: 5793 Post(s)
Liked 2,593 Times
in
1,437 Posts
There's no reason to be a ****** about it. His instructions were clearly to push the first bead out of the center channel enough that the side being put on next can occupy it. It doesn't mean the first side has to be pushed all the way up onto the shoulder and seated under the bead hook. So long as it's pushed up on the seat enough to make room in the center well that is enough. And his instructions would clearly have gotten someone to that point. Personally the way FB advised is pretty much what I do already when putting reluctant tires on like this, and it works. Not sure what the e-peen measuring contest here is all about.
I said entire tire meaning both sides. He understood all the way around, and correctly argued that this was difficult on tubeless compatible rims. Not knowing he misread my intent, I responded as I did. But once we clarified the misunderstanding we were on the same page, and all is well.
In any case it's not a contest, it's about helping people past a problem. In fact, the exchange was welcome since I'm now aware of a potential misread and can be more careful in the explanation.
__________________
FB
Chain-L site
An ounce of diagnosis is worth a pound of cure.
Just because I'm tired of arguing, doesn't mean you're right.
�One accurate measurement is worth a thousand expert opinions� - Adm Grace Murray Hopper - USN
WARNING, I'm from New York. Thin skinned people should maintain safe distance.
FB
Chain-L site
An ounce of diagnosis is worth a pound of cure.
Just because I'm tired of arguing, doesn't mean you're right.
�One accurate measurement is worth a thousand expert opinions� - Adm Grace Murray Hopper - USN
WARNING, I'm from New York. Thin skinned people should maintain safe distance.
10-18-17, 01:07 PM
#15
Old fart
Join Date: Nov 2004
Location: Appleton WI
Posts: 24,792
Bikes: Several, mostly not name brands.
Mentioned: 153 Post(s)
Tagged: 0 Thread(s)
Quoted: 3591 Post(s)
Liked 3,401 Times
in
1,935 Posts
+1 on the bead jack. If you use a tire lever to mount the tire, you risk puncturing the tube. The bead jack avoids this problem. They're a great assistive device for people like me who have arthritis in their hands or otherwise have weaker grip strength.
10-18-17, 05:44 PM
#16
Senior Member
Join Date: Jan 2010
Location: TC, MN
Posts: 39,520
Bikes: R3 Disc, Haanjo
Mentioned: 354 Post(s)
Tagged: 1 Thread(s)
Quoted: 20810 Post(s)
Liked 9,456 Times
in
4,672 Posts
So the question that hasn't been asked yet: now that you know that you've got tubeless-ready rims, why not just go tubeless? You're already dealing with half the hassle (tight rim/tire interface) so the only other hurdle is getting them inflated/seated (injecting sealant is trivial). Tubeless doesn't prevent all flats, but it should cut down a lot of them (it has for me).
10-18-17, 06:30 PM
#17
Senior Member
So the question that hasn't been asked yet: now that you know that you've got tubeless-ready rims, why not just go tubeless? You're already dealing with half the hassle (tight rim/tire interface) so the only other hurdle is getting them inflated/seated (injecting sealant is trivial). Tubeless doesn't prevent all flats, but it should cut down a lot of them (it has for me).
I'm not prepared right now to do all the regular tire maintenance that would be required for me to ride tubeless road. Simply pouring in more sealant every few weeks isn't the answer, because to replace lost liquids you're also adding more solids, and that builds up in there.
10-18-17, 07:52 PM
#18
Senior Member
Join Date: Jan 2010
Location: TC, MN
Posts: 39,520
Bikes: R3 Disc, Haanjo
Mentioned: 354 Post(s)
Tagged: 1 Thread(s)
Quoted: 20810 Post(s)
Liked 9,456 Times
in
4,672 Posts
I've done tubeless road before, and I'm not doing it right now, and the primary reason is that where I live it's hot as hell during the summer, and the sealant dries up very quickly. While you can just add more, at some point if you don't pull the tire off an thoroughly clean it all out and put it back together with fresh sealant what you end up with inside is a goopy mess. I should show you a photo of the Schwalbe One tubeless tires I pulled off a pair of rims that sat in the garage for a while between being ridden. The tires themselves were essentially ruined in the process, and I had to replace the rim tape (Stans) and spend a good 2-3 hours scraping/rolling/peeling all the dried up latex snot from all over the inside of the rim.
I'm not prepared right now to do all the regular tire maintenance that would be required for me to ride tubeless road. Simply pouring in more sealant every few weeks isn't the answer, because to replace lost liquids you're also adding more solids, and that builds up in there.
I'm not prepared right now to do all the regular tire maintenance that would be required for me to ride tubeless road. Simply pouring in more sealant every few weeks isn't the answer, because to replace lost liquids you're also adding more solids, and that builds up in there.
10-18-17, 09:50 PM
#19
Senior Member
I've used both Stan's and the Orange stuff. All the sealants are going to evaporate over time, and need replenishment, but simple replenishment alone isn't the answer unless you ride so much that you're wearing out a tire in just a couple of months. If you're changing tires that often then sure, get the tire on, put sealant in, maybe top off the sealant once, and by the time you're changing the tire it's still mostly liquid and not that hard to clean up. If your tires last long enough, though, or if your riding declines during the hot summer months here, the sealant is still evaporating the whole time, and simply adding more and more doesn't solve the problem that it's still in there drying up and sticking all the insides of the tire.
I'll probably try road tubeless again sometime. I did really like the ride quality. But when I do it'll be during a period of time, like the oncoming winter months where the combination of moderate temperatures and high mileage ridden will mitigate the sealant problem.
I'll probably try road tubeless again sometime. I did really like the ride quality. But when I do it'll be during a period of time, like the oncoming winter months where the combination of moderate temperatures and high mileage ridden will mitigate the sealant problem.
10-23-17, 05:42 PM
#20
your god hates me
Thread Starter
Join Date: Apr 2006
Posts: 4,592
Bikes: 2016 Richard Sachs, 2010 Carl Strong, 2006 Cannondale Synapse
Mentioned: 10 Post(s)
Tagged: 0 Thread(s)
Quoted: 1254 Post(s)
Liked 1,291 Times
in
712 Posts
I just pulled the tires off to check. It's some DTSwiss woven plastic rim strip that feels like waxed canvas! definitely looks like it could be the culprit. I just changed both wheels to Stan's tape and it was much easier getting the tires back on, so hopefully that was all it took.
Thanks everybody for the suggestions.
Thanks everybody for the suggestions.
10-24-17, 07:51 PM
#21
Senior Member
Join Date: Dec 2009
Location: Denver area (Ken Caryl Valley)
Posts: 1,803
Bikes: 2022 Moots RCS, 2014 BMC SLR01 DA Mech, 2020 Santa Cruz Stigmata, Ibis Ripmo, Trek Top Fuel, Specialized Levo SL, Norco Bigfoot VLT
Mentioned: 8 Post(s)
Tagged: 0 Thread(s)
Quoted: 464 Post(s)
Liked 182 Times
in
118 Posts
Yeah, Stan's helps but two layers of even thinner tape (like Am Classic) helps even more since it is thinner. You may have to make sure that the opposing bead if close to the middle of the rim bed. That makes the process easier. Lastly, always lay new tires in the sun for a couple of hours if possible. Start the install opposite the stem and reverse when taking tires of. I use the same combo of tire and rim on one bike and only need a lever when taking the tires off. I do wear gloves when installing so I can roll the bead over the rim bit by bit. Once the tires are on the rim, they get easier to reinstall.

