


Zootr owners/ lovers, a few questions
 04-10-23, 03:01 PM
#1
Junior Member
Thread Starter
Join Date: Jan 2022
Posts: 179
Mentioned: 2 Post(s)
Tagged: 0 Thread(s)
Quoted: 137 Post(s)
Liked 51 Times
in
31 Posts
Zootr owners/ lovers, a few questions
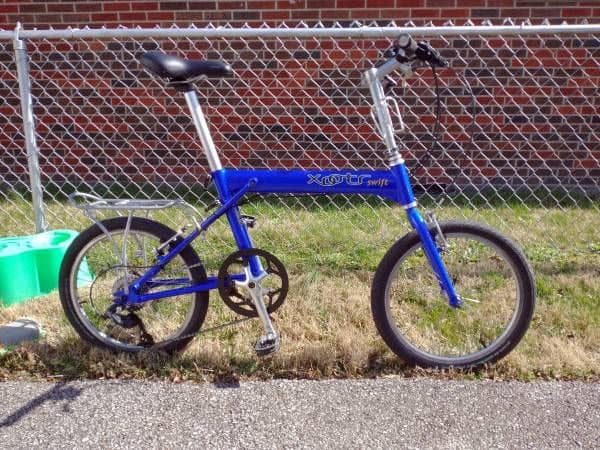
Hi, ran across a xootr for sale on nc cl. My question, how much do they weigh , and is 420 dollars a reasonable price? Cheers.
 04-10-23, 04:03 PM
#2

55+ Club,...

Join Date: Aug 2012
Location: Somewhere in New York, NY
Posts: 4,324
Bikes: 9+,...
Mentioned: 11 Post(s)
Tagged: 0 Thread(s)
Quoted: 1112 Post(s)
Liked 848 Times
in
592 Posts
PS: don't forget the Orgami version of the Swift. It's a solid deal as well.
__________________
If it wasn't for you meddling kids,...
Likes For tds101:
04-10-23, 04:08 PM
#3
55+ Club,...
Join Date: Aug 2012
Location: Somewhere in New York, NY
Posts: 4,324
Bikes: 9+,...
Mentioned: 11 Post(s)
Tagged: 0 Thread(s)
Quoted: 1112 Post(s)
Liked 848 Times
in
592 Posts
Here's a pic or 3,... Seems decent. I'd buy it.


__________________
If it wasn't for you meddling kids,...
Likes For tds101:
04-11-23, 05:42 PM
#4
Full Member

I reckon that my own bike weighs around 9kg at the moment (or perhaps just under 20lbs) but it's been awhile since I weighed it with a luggage scale. That's with a derailleur set up, it could be lighter still with a single speed, depending on what you want to do with your bike and how you want to ride it. I could probably find a lighter cassette if I wanted to be weight weenie supreme. I put an 11t-42t last time I replaced it. I don't think that I need quite that low a gear, even here where I live in the mountains. 11t-36t would do and be a bit lighter which might be better for climbing than having a ridiculously low gear. I climbed all the same roads before I switched.
 04-11-23, 08:24 PM
#5
Junior Member
Thread Starter
Join Date: Jan 2022
Posts: 179
Mentioned: 2 Post(s)
Tagged: 0 Thread(s)
Quoted: 137 Post(s)
Liked 51 Times
in
31 Posts
$420 lseems like a reasonably good dealio.
I reckon that my own bike weighs around 9kg at the moment (or perhaps just under 20lbs) but it's been awhile since I weighed it with a luggage scale. That's with a derailleur set up, it could be lighter still with a single speed, depending on what you want to do with your bike and how you want to ride it. I could probably find a lighter cassette if I wanted to be weight weenie supreme. I put an 11t-42t last time I replaced it. I don't think that I need quite that low a gear, even here where I live in the mountains. 11t-36t would do and be a bit lighter which might be better for climbing than having a ridiculously low gear. I climbed all the same roads before I switched.
I reckon that my own bike weighs around 9kg at the moment (or perhaps just under 20lbs) but it's been awhile since I weighed it with a luggage scale. That's with a derailleur set up, it could be lighter still with a single speed, depending on what you want to do with your bike and how you want to ride it. I could probably find a lighter cassette if I wanted to be weight weenie supreme. I put an 11t-42t last time I replaced it. I don't think that I need quite that low a gear, even here where I live in the mountains. 11t-36t would do and be a bit lighter which might be better for climbing than having a ridiculously low gear. I climbed all the same roads before I switched.
04-12-23, 11:39 AM
#6
Full Member
As somebody else mentioned, Origami is releasing an all new Swift, which they're selling for $700 in a pre-order special. I expect it will be a little heavier than the Xootr version as it's made from Chromoly instead of aluminium and it has disc brakes and more mounts which add grams and ounces. However, it might be worth considering as well. I'm personally not likely to give up my light alu-Swift, but I'm looking forward to riding the new steel bike. I understand that there may also be the option of ordering a longer stem riser with the new bike. But speaking as someone of average not quite tall height (I'm a smidge under 6ft) I think that the stock Xootr stem riser will work well for the vast majority of riders and unless you're extremely tall it should work out well once you find the stem you want. I'm not sure if the new extra-long Origami stem risers will be compatable with the older Xootr model, but you;might approach Paul at Origami if down the line you want something longer.
Last edited by joey buzzard; 04-12-23 at 11:43 AM.
04-12-23, 12:21 PM
#7
Senior Member
Join Date: Feb 2012
Location: Henrico, VA
Posts: 1,480
Bikes: Origami Gazelle, Origami Crane 8, Origami Cricket 7
Mentioned: 10 Post(s)
Tagged: 0 Thread(s)
Quoted: 452 Post(s)
Liked 405 Times
in
241 Posts
The upcoming Origami Swift has an adjustable stem so you can change the angle as you see fit.
__________________
Paul Pinigis
Owner of Origami Bicycle Company
Paul Pinigis
Owner of Origami Bicycle Company
Likes For Pinigis:
04-13-23, 02:09 AM
#8
Senior Member
Join Date: Oct 2005
Posts: 1,174
Mentioned: 3 Post(s)
Tagged: 0 Thread(s)
Quoted: 381 Post(s)
Liked 145 Times
in
93 Posts
The stem just clamps onto the top of the fork. If by is it "adjustable" you mean does it telescope up and down, no it doesn't. I prefer my bars low and aggressive, hence my choice of a stem with zero rise. But iI could easily swap it out for any other standard stem, so finding something which will give you the riding position that you prefer should be fairly straight forward. The front of the bike (like the rest) feels stiff and responsive, and frankly I like the simplicity of it.
As somebody else mentioned, Origami is releasing an all new Swift, which they're selling for $700 in a pre-order special. I expect it will be a little heavier than the Xootr version as it's made from Chromoly instead of aluminium and it has disc brakes and more mounts which add grams and ounces. However, it might be worth considering as well. I'm personally not likely to give up my light alu-Swift, but I'm looking forward to riding the new steel bike. I understand that there may also be the option of ordering a longer stem riser with the new bike. But speaking as someone of average not quite tall height (I'm a smidge under 6ft) I think that the stock Xootr stem riser will work well for the vast majority of riders and unless you're extremely tall it should work out well once you find the stem you want. I'm not sure if the new extra-long Origami stem risers will be compatable with the older Xootr model, but you;might approach Paul at Origami if down the line you want something longer.
As somebody else mentioned, Origami is releasing an all new Swift, which they're selling for $700 in a pre-order special. I expect it will be a little heavier than the Xootr version as it's made from Chromoly instead of aluminium and it has disc brakes and more mounts which add grams and ounces. However, it might be worth considering as well. I'm personally not likely to give up my light alu-Swift, but I'm looking forward to riding the new steel bike. I understand that there may also be the option of ordering a longer stem riser with the new bike. But speaking as someone of average not quite tall height (I'm a smidge under 6ft) I think that the stock Xootr stem riser will work well for the vast majority of riders and unless you're extremely tall it should work out well once you find the stem you want. I'm not sure if the new extra-long Origami stem risers will be compatable with the older Xootr model, but you;might approach Paul at Origami if down the line you want something longer.
04-13-23, 06:37 AM
#9
Senior Member
Join Date: Feb 2012
Location: Henrico, VA
Posts: 1,480
Bikes: Origami Gazelle, Origami Crane 8, Origami Cricket 7
Mentioned: 10 Post(s)
Tagged: 0 Thread(s)
Quoted: 452 Post(s)
Liked 405 Times
in
241 Posts
If you are interested, just PM me, or email paul@origamibicycles.com
__________________
Paul Pinigis
Owner of Origami Bicycle Company
Paul Pinigis
Owner of Origami Bicycle Company
Likes For Pinigis:
04-13-23, 07:40 AM
#10
Senior Member
Join Date: Aug 2014
Location: UK
Posts: 743
Bikes: Dahon Jetstream p8 (sold), customized Dahon Helios x10, customzed Dahon Smooth Hound x11,customized Dahon Hammerhead 8.0 d7, Planet X Free Ranger (mullet setup 1x11), Planet X Giovanissimi 20 (1x9), Frog 52 (1x9) and Frog 48 1s
Mentioned: 0 Post(s)
Tagged: 0 Thread(s)
Quoted: 264 Post(s)
Liked 239 Times
in
175 Posts
I purposely use 9s because 9s XT 11-34 is as light a 9s 11-28 ultegra and lighter than 10 or 11s ultegra/dura-ace. Sora 9s is much heavier and a Sunrace 11-40 is twice the weight.
06-14-23, 12:24 PM
#11

Dilettante

Join Date: Jan 2002
Location: Chicago
Posts: 71
Mentioned: 0 Post(s)
Tagged: 0 Thread(s)
Quoted: 1 Post(s)
Likes: 0
Liked 2 Times
in
2 Posts
I wish you luck with the Origami Swift. I have a Xootr Swift that I'm happy with, but that wider gear ratio looks great and the engineering around the rack is a definite improvement -- although with the rack on the Xootr I'm limited to a single pannier, so that's prevented me from overpacking.
I actually came here because I carefully put the instructions for how to get the Swift into my carry bag in a plastic sleeve, but somehow they got wet anyway and are only partially readable. Of course, I didn't notice this when I took bike out, but only as I tried to get it back in. But I see you don't have a carry bag (yet?) on your site, so of course don't have instructions.
I actually came here because I carefully put the instructions for how to get the Swift into my carry bag in a plastic sleeve, but somehow they got wet anyway and are only partially readable. Of course, I didn't notice this when I took bike out, but only as I tried to get it back in. But I see you don't have a carry bag (yet?) on your site, so of course don't have instructions.
__________________
--
Oldest bike: 1970 Schwinn Twinn Tanndem
--
Oldest bike: 1970 Schwinn Twinn Tanndem
06-14-23, 02:00 PM
#12
Dilettante
Join Date: Jan 2002
Location: Chicago
Posts: 71
Mentioned: 0 Post(s)
Tagged: 0 Thread(s)
Quoted: 1 Post(s)
Likes: 0
Liked 2 Times
in
2 Posts
How to get Zootr Swift into duffel carrying bag.
I had carefully saved these instructions in a plastic sleeve in the duffel bag, but they got wet anyway and aren't readable. The URL with the instructions is long gone, but I did use the Wayback Machine to find a copy. It doesn't have the pictures, but the pictures weren't all that helpful anyway. I'm posting these here in case they are of use to others.
 The first step is to fold your Swift. To get the Swift into the bag, it is necessary to remove the front wheel. Loosen the QR lever for the front wheel and remove it. Rotate the handle bars 180 degrees clockwise (from the rider's perspective). Loosen the QR lever on the riser, but do not remove it yet. We found it easier to pack when the left crank and pedal are forward and the right is at the rear. Loosen both seat post QR levers, pull the post out and fold the Swift. Tip: Using the foam that came with your Swift will protect the finish of the underside of the top tube and bottom bracket while in the bag.
 Place the rear wheel into the bag as far as it will go. You may find it easier to pack the Swift if you disconnect one side of the shoulder strap and put it aside.
 Now you can remove the riser. Notice in the picture how the handlebars are located. This will allow the handlebars to lay across the top tube and for the riser and position it so the grips lay along the top tube.
 Next comes the most difficut step and the one that requires the practice. While lifting up on the rear of the bike (we found lifting on the cross bar just in front of the rear brake the best place), pull the front of the bag over the fork. By pulling up on the rear it rotates the bike forward and brings the rear tire to the top of the bag allowing you to get the clearance necessary to get the bag over the fork and to cover the rear of the top tube.
 Now that the hard part is over, you can place the front tire in the bag. In the picture we placed it in the rear of the bag behind the right pedal by the derailleur.
 Place the seat post in the bag. In the picture we placed the point of the seat down and in the middle front of the bag.
 Voila! Now you can zip up the bag and reattach the should strap if you detached it earlier. Note: Depending on how particular you are about your Swift's finish you may want to place some bubble wrap or other protective material on any metal to metal contact points. Because the bag is such a tight fit, the Swift and its parts do not move around much.
Carry Bag Packing Instructions
The instructions provided are one way we found to fit the Swift into the carrying bag. Feel free to experiment with it to find a routine that works best for you. Getting the Swift into the bag is a tight fit and requires a bit of finesse. We suggest you practice packing your Swift a few times at home first. The first step is to fold your Swift. To get the Swift into the bag, it is necessary to remove the front wheel. Loosen the QR lever for the front wheel and remove it. Rotate the handle bars 180 degrees clockwise (from the rider's perspective). Loosen the QR lever on the riser, but do not remove it yet. We found it easier to pack when the left crank and pedal are forward and the right is at the rear. Loosen both seat post QR levers, pull the post out and fold the Swift. Tip: Using the foam that came with your Swift will protect the finish of the underside of the top tube and bottom bracket while in the bag.
 Place the rear wheel into the bag as far as it will go. You may find it easier to pack the Swift if you disconnect one side of the shoulder strap and put it aside.
 Now you can remove the riser. Notice in the picture how the handlebars are located. This will allow the handlebars to lay across the top tube and for the riser and position it so the grips lay along the top tube.
 Next comes the most difficut step and the one that requires the practice. While lifting up on the rear of the bike (we found lifting on the cross bar just in front of the rear brake the best place), pull the front of the bag over the fork. By pulling up on the rear it rotates the bike forward and brings the rear tire to the top of the bag allowing you to get the clearance necessary to get the bag over the fork and to cover the rear of the top tube.
 Now that the hard part is over, you can place the front tire in the bag. In the picture we placed it in the rear of the bag behind the right pedal by the derailleur.
 Place the seat post in the bag. In the picture we placed the point of the seat down and in the middle front of the bag.
 Voila! Now you can zip up the bag and reattach the should strap if you detached it earlier. Note: Depending on how particular you are about your Swift's finish you may want to place some bubble wrap or other protective material on any metal to metal contact points. Because the bag is such a tight fit, the Swift and its parts do not move around much.
__________________
--
Oldest bike: 1970 Schwinn Twinn Tanndem
--
Oldest bike: 1970 Schwinn Twinn Tanndem
06-15-23, 08:59 AM
#13
Senior Member
Join Date: Feb 2012
Location: Henrico, VA
Posts: 1,480
Bikes: Origami Gazelle, Origami Crane 8, Origami Cricket 7
Mentioned: 10 Post(s)
Tagged: 0 Thread(s)
Quoted: 452 Post(s)
Liked 405 Times
in
241 Posts
I had carefully saved these instructions in a plastic sleeve in the duffel bag, but they got wet anyway and aren't readable. The URL with the instructions is long gone, but I did use the Wayback Machine to find a copy. It doesn't have the pictures, but the pictures weren't all that helpful anyway. I'm posting these here in case they are of use to others.
The first step is to fold your Swift. To get the Swift into the bag, it is necessary to remove the front wheel. Loosen the QR lever for the front wheel and remove it. Rotate the handle bars 180 degrees clockwise (from the rider's perspective). Loosen the QR lever on the riser, but do not remove it yet. We found it easier to pack when the left crank and pedal are forward and the right is at the rear. Loosen both seat post QR levers, pull the post out and fold the Swift. Tip: Using the foam that came with your Swift will protect the finish of the underside of the top tube and bottom bracket while in the bag.
Place the rear wheel into the bag as far as it will go. You may find it easier to pack the Swift if you disconnect one side of the shoulder strap and put it aside.
Now you can remove the riser. Notice in the picture how the handlebars are located. This will allow the handlebars to lay across the top tube and for the riser and position it so the grips lay along the top tube.
Next comes the most difficut step and the one that requires the practice. While lifting up on the rear of the bike (we found lifting on the cross bar just in front of the rear brake the best place), pull the front of the bag over the fork. By pulling up on the rear it rotates the bike forward and brings the rear tire to the top of the bag allowing you to get the clearance necessary to get the bag over the fork and to cover the rear of the top tube.
Now that the hard part is over, you can place the front tire in the bag. In the picture we placed it in the rear of the bag behind the right pedal by the derailleur.
Place the seat post in the bag. In the picture we placed the point of the seat down and in the middle front of the bag.
Voila! Now you can zip up the bag and reattach the should strap if you detached it earlier. Note: Depending on how particular you are about your Swift's finish you may want to place some bubble wrap or other protective material on any metal to metal contact points. Because the bag is such a tight fit, the Swift and its parts do not move around much.
Carry Bag Packing Instructions
The instructions provided are one way we found to fit the Swift into the carrying bag. Feel free to experiment with it to find a routine that works best for you. Getting the Swift into the bag is a tight fit and requires a bit of finesse. We suggest you practice packing your Swift a few times at home first. The first step is to fold your Swift. To get the Swift into the bag, it is necessary to remove the front wheel. Loosen the QR lever for the front wheel and remove it. Rotate the handle bars 180 degrees clockwise (from the rider's perspective). Loosen the QR lever on the riser, but do not remove it yet. We found it easier to pack when the left crank and pedal are forward and the right is at the rear. Loosen both seat post QR levers, pull the post out and fold the Swift. Tip: Using the foam that came with your Swift will protect the finish of the underside of the top tube and bottom bracket while in the bag. Place the rear wheel into the bag as far as it will go. You may find it easier to pack the Swift if you disconnect one side of the shoulder strap and put it aside. Now you can remove the riser. Notice in the picture how the handlebars are located. This will allow the handlebars to lay across the top tube and for the riser and position it so the grips lay along the top tube. Next comes the most difficut step and the one that requires the practice. While lifting up on the rear of the bike (we found lifting on the cross bar just in front of the rear brake the best place), pull the front of the bag over the fork. By pulling up on the rear it rotates the bike forward and brings the rear tire to the top of the bag allowing you to get the clearance necessary to get the bag over the fork and to cover the rear of the top tube. Now that the hard part is over, you can place the front tire in the bag. In the picture we placed it in the rear of the bag behind the right pedal by the derailleur. Place the seat post in the bag. In the picture we placed the point of the seat down and in the middle front of the bag. Voila! Now you can zip up the bag and reattach the should strap if you detached it earlier. Note: Depending on how particular you are about your Swift's finish you may want to place some bubble wrap or other protective material on any metal to metal contact points. Because the bag is such a tight fit, the Swift and its parts do not move around much.
__________________
Paul Pinigis
Owner of Origami Bicycle Company
Paul Pinigis
Owner of Origami Bicycle Company
06-15-23, 09:16 AM
#14
Dilettante
Join Date: Jan 2002
Location: Chicago
Posts: 71
Mentioned: 0 Post(s)
Tagged: 0 Thread(s)
Quoted: 1 Post(s)
Likes: 0
Liked 2 Times
in
2 Posts
I've since found that I did keep a PDF that has the original pictures. I sent it to your business email, and it may or may not attach here.
__________________
--
Oldest bike: 1970 Schwinn Twinn Tanndem
--
Oldest bike: 1970 Schwinn Twinn Tanndem
Likes For zbicyclist:
