


A wheel that can't be dished?
 04-03-23, 03:04 PM
#1

WGB
Thread Starter
Join Date: Jul 2017
Location: Niagara Region
Posts: 2,917
Bikes: Panasonic PT-4500
Mentioned: 46 Post(s)
Tagged: 0 Thread(s)
Quoted: 1800 Post(s)
Liked 2,334 Times
in
1,378 Posts
A wheel that can't be dished?
I was building up my Takara frame last week at the co-op. I installed the rear wheel but it was over too much to the drive side (not dished). The mechanic suggested replacing the drive side spacer with a smaller one.
Dishing is still off (too far to the right side).
I have checked it repeatedly.
Photos tell the tale.
I ensured the dishing gauge only touched the rim and not the tire on both sides
On drive side the guage sat tight on the locking nut on the axle.
On the non-drive side the guage sits "about" an inch above the nut.
Could I remove the drive side spacer completely and rebuild the axle with no spacer at all and move the spacer to the non-drive side??
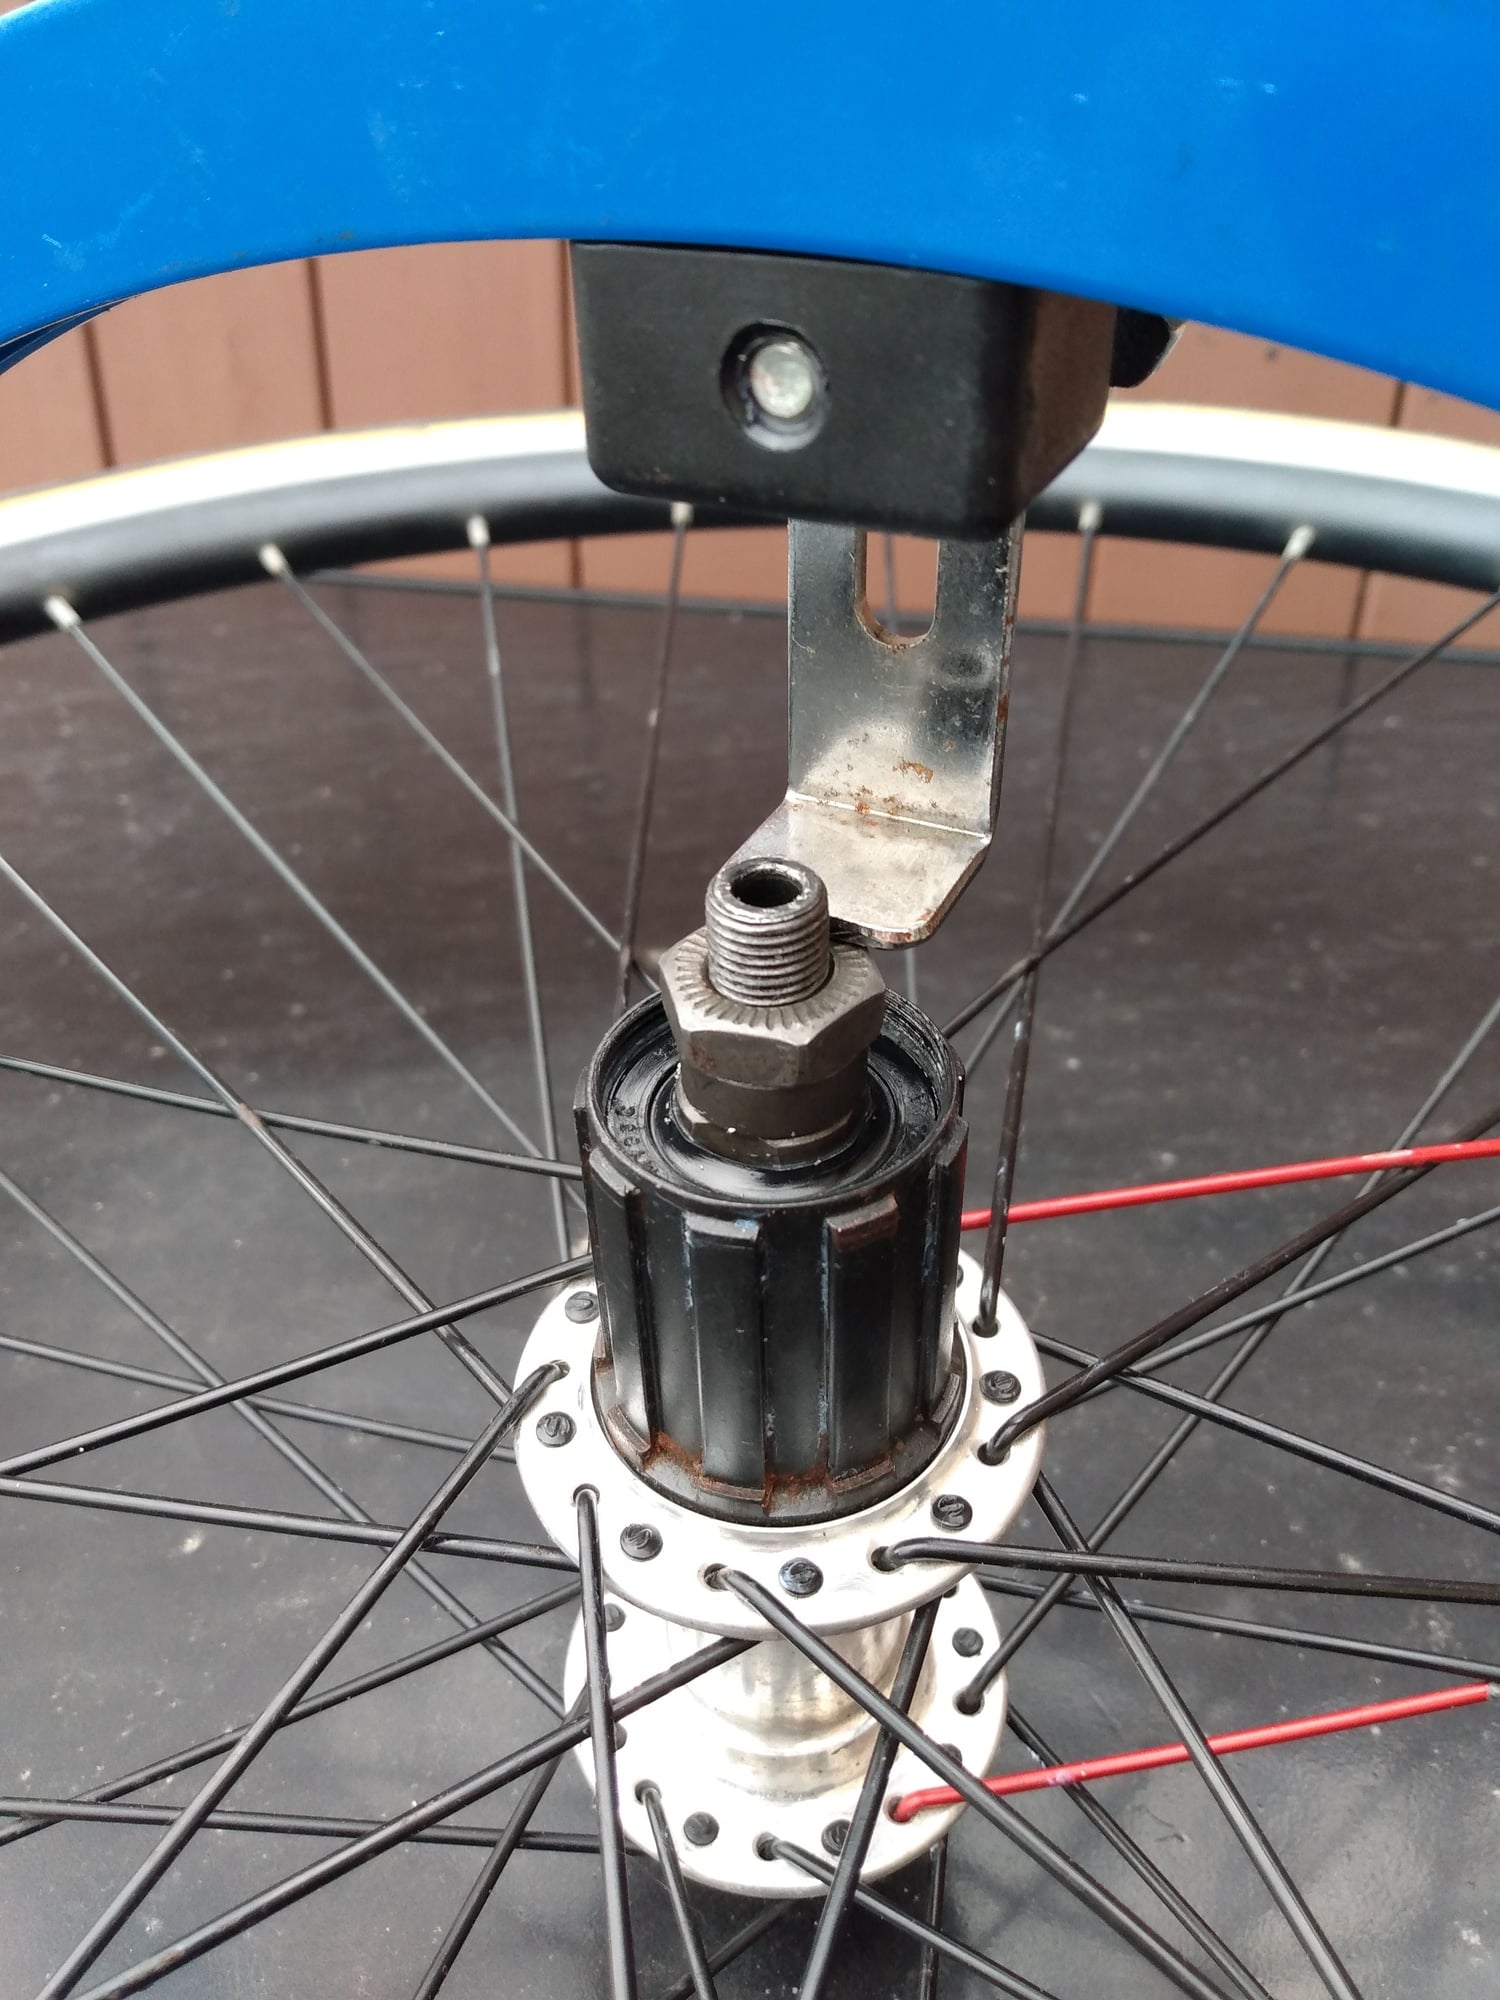
Drive side
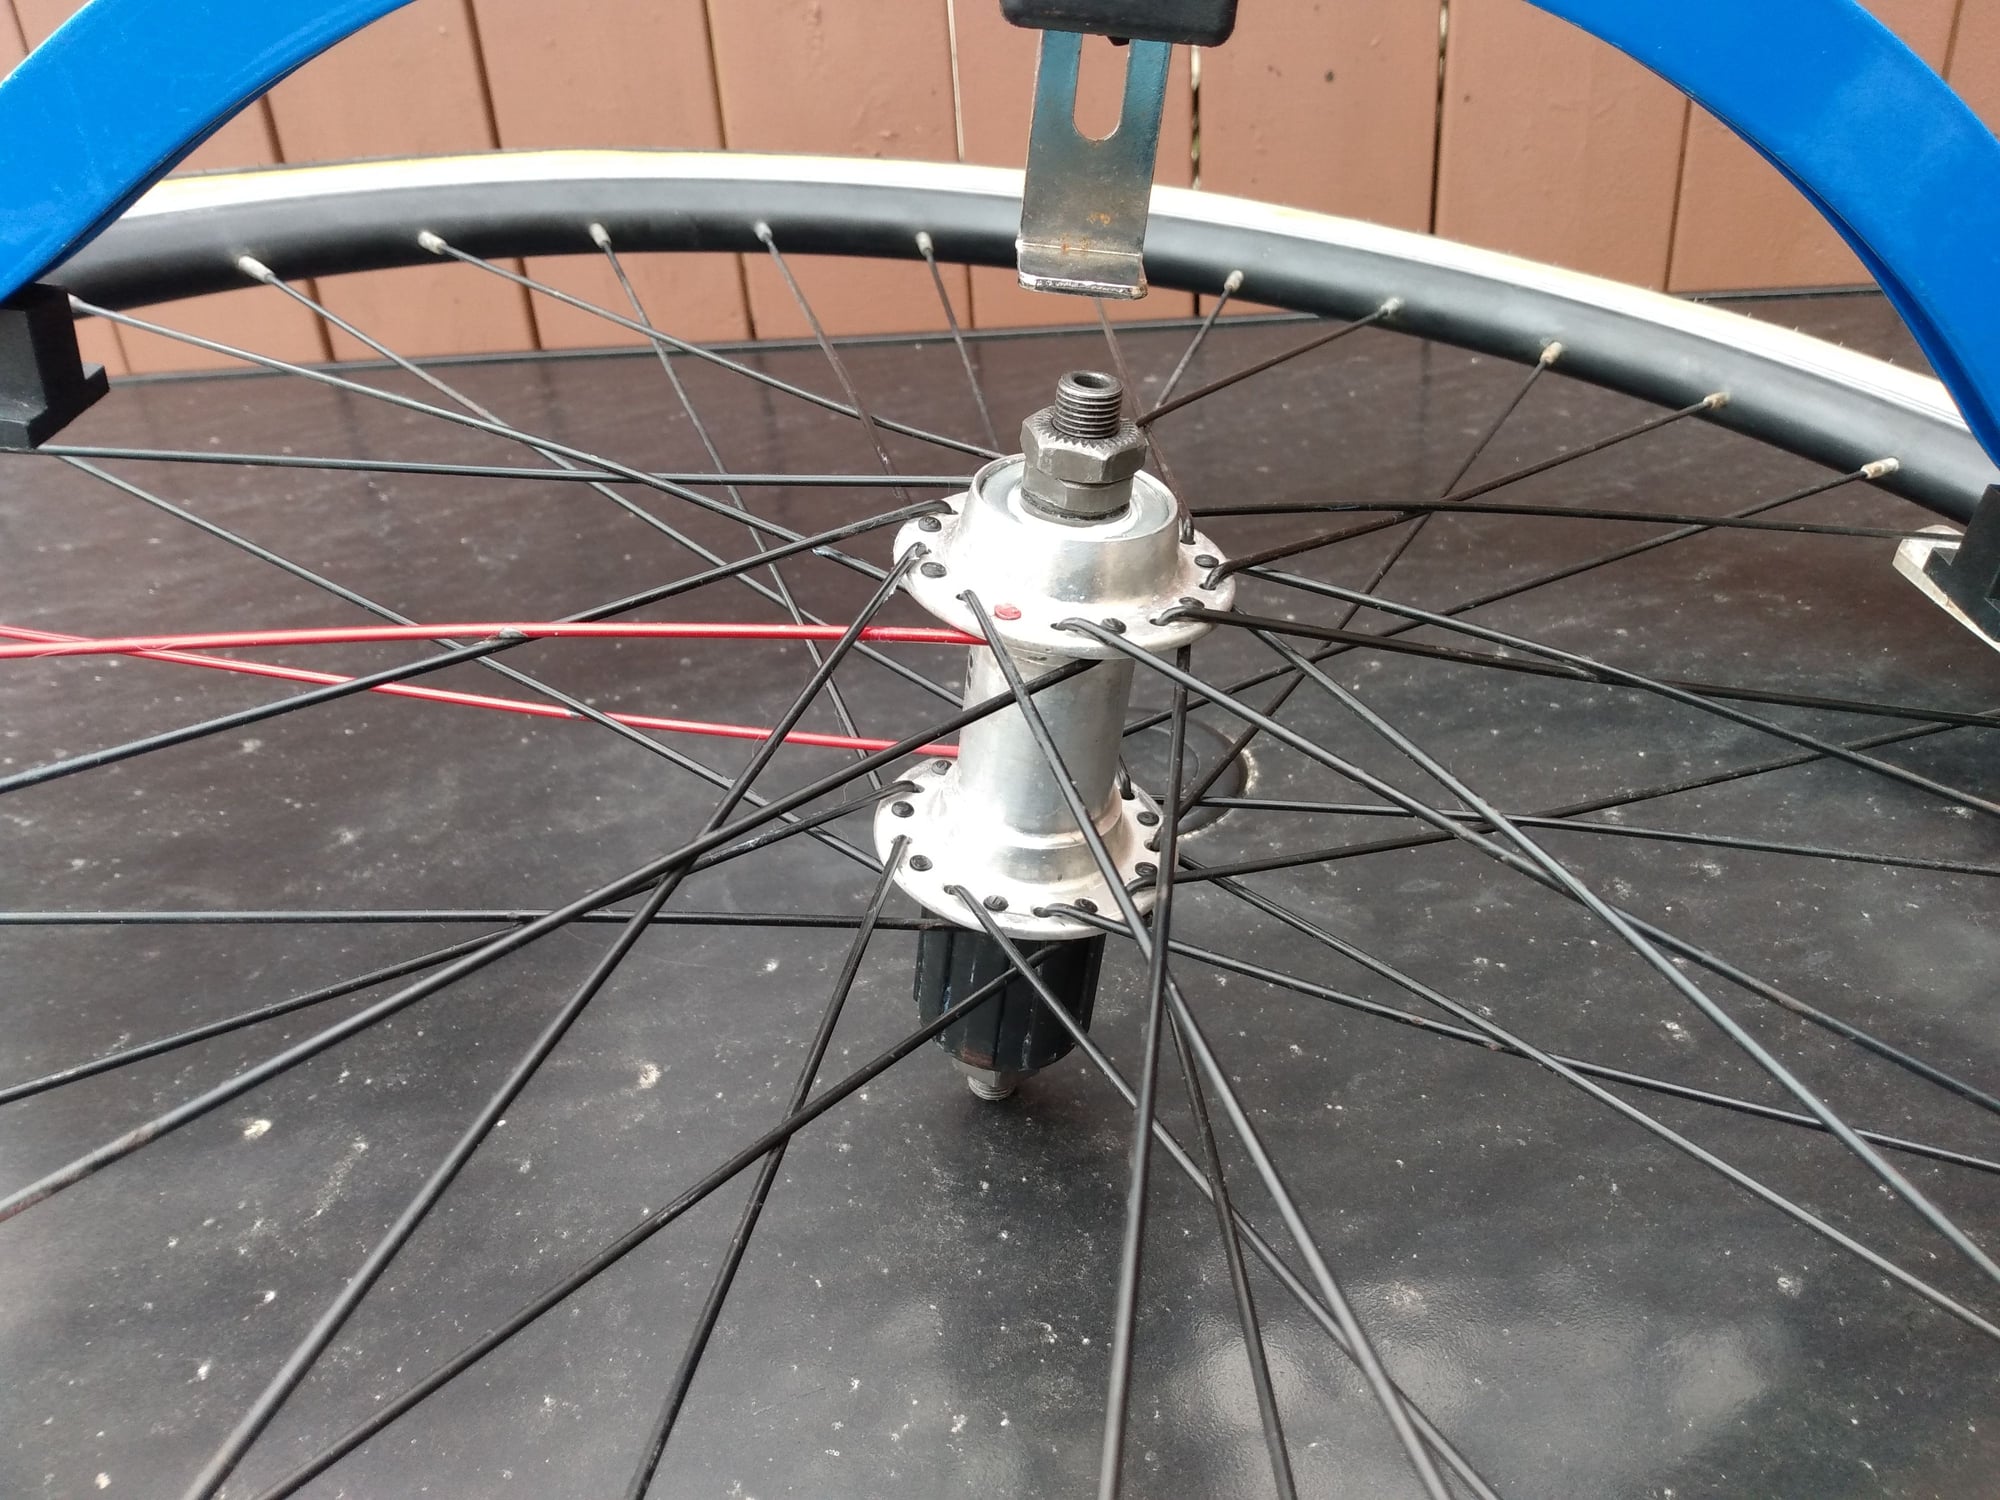
Non-drive side
Dishing is still off (too far to the right side).
I have checked it repeatedly.
Photos tell the tale.
I ensured the dishing gauge only touched the rim and not the tire on both sides
On drive side the guage sat tight on the locking nut on the axle.
On the non-drive side the guage sits "about" an inch above the nut.
Could I remove the drive side spacer completely and rebuild the axle with no spacer at all and move the spacer to the non-drive side??
Drive side
Non-drive side
 04-03-23, 03:35 PM
#2

Senior Member

Join Date: Jul 2006
Location: San Jose (Willow Glen) Ca
Posts: 9,847
Bikes: Kirk Custom JK Special, '84 Team Miyata,(dura ace old school) 80?? SR Semi-Pro 600 Arabesque
Mentioned: 106 Post(s)
Tagged: 0 Thread(s)
Quoted: 2338 Post(s)
Liked 2,827 Times
in
1,543 Posts
Is this a new wheel build or new to you wheel? ares spokes correct length
I am very far from expert, but did correct a difference of maybe 1/2 that on a recent build.... it did help me to remember I only need to move 1/2 the difference as a correction
I am very far from expert, but did correct a difference of maybe 1/2 that on a recent build.... it did help me to remember I only need to move 1/2 the difference as a correction
__________________
Life is too short not to ride the best bike you have, as much as you can
(looking for Torpado Super light frame/fork or for Raleigh International frame fork 58cm)
Life is too short not to ride the best bike you have, as much as you can
(looking for Torpado Super light frame/fork or for Raleigh International frame fork 58cm)
04-03-23, 04:02 PM
#3
Senior Member
Join Date: Mar 2019
Posts: 1,606
Mentioned: 8 Post(s)
Tagged: 0 Thread(s)
Quoted: 581 Post(s)
Liked 921 Times
in
518 Posts
I am suspicious of the spacers you have there - generally the locknut on the drive side only sticks out a few mm beyond the cassette, and, although you don't have the cassette mounted, I would think the locknut is too far out. Is there a slightly smaller spacer on the non-drive side? Because swapping them might make it better. Yes, you could try to put both spacers on the non-drive side, as long as this gives you enough space for the chain to ride on the small cog without hitting the frame. Moving the spacer to the other side will essentially move the dish over by twice the thickness of the spacer.
It also looks like the axle is sticking out more than normal on both sides - it only needs to stick out about 5mm or so, just enough to position the axle in the dropouts while the quick release is tightened. Is it possible some spacers were removed when you reasembled the bearings?
However, once the hub spacing is close to correct (OLD is correct and cassette has just enough clearance so the chain doesn't hit the inside of the dropout when in the smallest cog), you use spoke tension to pull the rim towards correct dish. This generally makes the drive-side spokes much tighter than the those on the non-drive side.
Likes For ClydeClydeson:
04-03-23, 04:32 PM
#4
Really Old Senior Member

You do realize the NDS tension will be somewhere between 50-70% of DS tension? You get dish by using uneven spoke tension from one side to the other.
I STRONGLY recommend NOT screwing with DS spacers. It can be a can of worms.
Your cogs may get moved out of the operating range of the RDER.
I STRONGLY recommend NOT screwing with DS spacers. It can be a can of worms.
Your cogs may get moved out of the operating range of the RDER.
Likes For Bill Kapaun:
04-03-23, 04:33 PM
#5
Senior Member

Join Date: Jul 2015
Location: NW Oregon
Posts: 2,975
Bikes: !982 Trek 930R Custom, Diamondback ascent with SERIOUS updates, Fuji Team Pro CF and a '09 Comencal Meta 5.5
Mentioned: 15 Post(s)
Tagged: 1 Thread(s)
Quoted: 1299 Post(s)
Liked 739 Times
in
534 Posts
The AXLE is sticking out too far on BOTH sides... it should only protrude about 4 to 5mm beyond the Locknuts.
Determine your frame's Dropout width by measuring between the inner surfaces of the Rear dropouts.
report back and we'll go from there, and not a minute sooner.
Takaras have been around a long, long time.. what Model? what Year, if known? Road or MTB? Number of rear gears?(if now a single speed, how many gears, originally, please). And also,, what Overall LENGTH is the entire axle?(this will be a big clue as to the Original O.L.D. of the hub/wheel assy, unless the Axle was swapped out.)
that hub would have began life as a 130 or 135mm O.L.D... we need to get it right for YOUR use.
"O.L.D." is the OUTSIDE Locknut Distance... Axle Length is about 10mm longer than the Original O.L.D. of that axle set....
Last edited by maddog34; 04-03-23 at 05:02 PM.
Likes For maddog34:
04-03-23, 04:38 PM
#6
Senior Member
Join Date: Jul 2015
Location: NW Oregon
Posts: 2,975
Bikes: !982 Trek 930R Custom, Diamondback ascent with SERIOUS updates, Fuji Team Pro CF and a '09 Comencal Meta 5.5
Mentioned: 15 Post(s)
Tagged: 1 Thread(s)
Quoted: 1299 Post(s)
Liked 739 Times
in
534 Posts
You do realize the NDS tension will be somewhere between 50-70% of DS tension? You get dish by using uneven spoke tension from one side to the other.
I STRONGLY recommend NOT screwing with DS spacers. It can be a can of worms.
Your cogs may get moved out of the operating range of the RDER.
I STRONGLY recommend NOT screwing with DS spacers. It can be a can of worms.
Your cogs may get moved out of the operating range of the RDER.
04-03-23, 06:57 PM
#7
Senior Member
Join Date: May 2019
Location: Bloomington, IN
Posts: 2,951
Bikes: Paramount, Faggin, Ochsner, Ciocc, Basso
Mentioned: 117 Post(s)
Tagged: 0 Thread(s)
Quoted: 1303 Post(s)
Liked 1,912 Times
in
1,142 Posts
Wes,
Your drive side spacers are incorrect and should be corrected first then address the dishing b spoke tension . I have seen this way too many times when newbies have rebuilt a hub. Smiles, MH
Your drive side spacers are incorrect and should be corrected first then address the dishing b spoke tension . I have seen this way too many times when newbies have rebuilt a hub. Smiles, MH
04-03-23, 07:05 PM
#8
WGB
Thread Starter
Join Date: Jul 2017
Location: Niagara Region
Posts: 2,917
Bikes: Panasonic PT-4500
Mentioned: 46 Post(s)
Tagged: 0 Thread(s)
Quoted: 1800 Post(s)
Liked 2,334 Times
in
1,378 Posts
Thank you all.
I can do many things but truing a wheel isn't one of my gifts and dishing is even more esoteric for me.
I will return tomorrow night to the Co-op with the wheel and the frame. I suspect that when the mechanic was reassembling the hub axle after changing out that first spacer, something got missed. I won't be the one who fixes this issue.I don't trust my abilities!
Fyi - The bike was a Takara Grand Touring but it was spaced for me by a local frame builder out to 135mm to allow more gearing and he added shifter bosses and bottle bosses and then I had it powder coated. I will post photos when it's further along.
I was just planning on using this spare wheel set to see how it rides and shifts and then this occurred. I just had never seen a wheel this far out of dish. I have a set of 40/36 rims that are being built up for a proper touring wheel set by a man who knows what he's doing when building wheels (unlike me).
Likes For WGB:
04-03-23, 07:36 PM
#9
Senior Member
It looks like whomever worked on the wheel installed the axle and cones/spacers/locknuts backwards. The assembly on the DS is usually just cone, thin spacer, locknut; and the NDS assembly has cone/locknut, with spacers between of whatever thickness to get the proper OLD.
 04-03-23, 08:11 PM
#10
Senior Member
Join Date: Dec 2020
Location: Wake Forest, NC
Posts: 5,795
Bikes: 1989 Cinelli Supercorsa
Mentioned: 11 Post(s)
Tagged: 0 Thread(s)
Quoted: 3514 Post(s)
Liked 2,927 Times
in
1,776 Posts
How did you not see the exposed axle ends are way too long? This is why experienced bike mechanics get the big bucks. 😔
04-03-23, 08:31 PM
#11
Senior Member
Here is the setup on a very basic freehub axle.
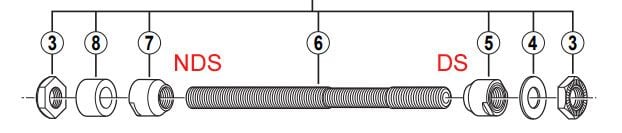
This is a ballpark estimate of the distance from the 'backstop' of the freehub body to the outer edge of the locknut. So about 41mm for 8/9/10 speed and 42.6mm for 11 speed.

This is a ballpark estimate of the distance from the 'backstop' of the freehub body to the outer edge of the locknut. So about 41mm for 8/9/10 speed and 42.6mm for 11 speed.
Likes For KCT1986:
04-03-23, 08:43 PM
#12
Senior Member
Join Date: Oct 2014
Location: Portland, OR
Posts: 12,906
Bikes: (2) ti TiCycles, 2007 w/ triple and 2011 fixed, 1979 Peter Mooney, ~1983 Trek 420 now fixed and ~1973 Raleigh Carlton Competition gravel grinder
Mentioned: 129 Post(s)
Tagged: 0 Thread(s)
Quoted: 4806 Post(s)
Liked 3,932 Times
in
2,557 Posts
Go back (or have the shop mechanic go back) to square one. Arrange the washers and locknuts to get the desired (and measured!) 135 OLD. Put a cassette on and test to make sure the last cod and chain on it clear your frame. With those squared away, you can think about dish.
Currently, your wheel is not dished anywhere near enough. (I am assuming the dishing tool is properly sitting on - or better, almost touching - the rim in both photos.) The rim is sitting too far to the left (non-drive side). Either no dish was put in or it wasn't dished in the right direction. If the spokes were laced with the shorter drive-side ones on the left, every spoke will have to be moved. It may just need a lot more dish but don't touch it until you have the spacers and lockrings right!
This is not a built wheel you have to adjust. It isn't even half built. If it has full tension now, too bad. All the spokes need to be loosened and truing started over again once all the hub stuff is sorted out.
Build order:
1) Dial in the spacers to get the OLD and cassette space you need. (Really easy to do on the bike checks for the cassette and chain clearances with no rim attached.) Usually but not always safe to skip this with brand new hubs of correct OLD using that maker's cassette.
2) Get the correct spokes, both weight and length, calculating the spoke length using the rim's measured ERD, not the published one.. On a front wheel, the right and left spokes are the same on a rim brake bike and I'd guess also on a disc brake bike but I'll leave that for others. On a cassette hub drive-side spokes are usually 2mm shorter and often substantially heavier.
3) Lace the wheel. Double check everything. On a rear, the rim should already be "leaning" to the right, drive-side because of the shorter spokes.
4) Start tightening, focusing very early on getting enough or even too much dish. (Removing dish is easy. Putting in more on a fully tightened wheel is at the very least, living life the hard way and can lead to a problem wheel.)
At least step one was botched here or axle parts changed after the build.
04-03-23, 09:25 PM
#13
Senior Member
Join Date: Apr 2011
Posts: 7,067
Mentioned: 41 Post(s)
Tagged: 0 Thread(s)
Quoted: 4409 Post(s)
Liked 1,566 Times
in
1,028 Posts
I was building up my Takara frame last week at the co-op. I installed the rear wheel but it was over too much to the drive side (not dished). The mechanic suggested replacing the drive side spacer with a smaller one.
Dishing is still off (too far to the right side).
I have checked it repeatedly.
Photos tell the tale.
I ensured the dishing gauge only touched the rim and not the tire on both sides
On drive side the guage sat tight on the locking nut on the axle.
On the non-drive side the guage sits "about" an inch above the nut.
Could I remove the drive side spacer completely and rebuild the axle with no spacer at all and move the spacer to the non-drive side??
Drive side
Non-drive side
04-03-23, 09:58 PM
#14
I am potato.

Join Date: Jun 2015
Location: Pacific Northwest
Posts: 3,116
Bikes: Only precision built, custom high performance elitist machines of the highest caliber. 🍆
Mentioned: 29 Post(s)
Tagged: 0 Thread(s)
Quoted: 1790 Post(s)
Liked 1,631 Times
in
934 Posts
It does look as if the axle itself is in 180 degrees backwards & if tensioned at all it was done so each spoke in turn, exactly the same with no regard to where the rim located over the outer locknuts. Congratulations. Your rim is dead center over the flanges.
Get the axle in right. Loosen each spoke nipple 2-3 turns and start over.
Get the axle in right. Loosen each spoke nipple 2-3 turns and start over.
__________________
I shouldn't have to "make myself more visible;" Drivers should just stop running people over.
Car dependency is a tax.
I shouldn't have to "make myself more visible;" Drivers should just stop running people over.
Car dependency is a tax.
04-03-23, 10:17 PM
#15
Senior Member
Join Date: Dec 2019
Location: South Shore of Long Island
Posts: 2,799
Bikes: 2010 Carrera Volans, 2015 C-Dale Trail 2sl, 2017 Raleigh Rush Hour, 2017 Blue Proseccio, 1992 Giant Perigee, 80s Gitane Rallye Tandem
Mentioned: 12 Post(s)
Tagged: 0 Thread(s)
Quoted: 1088 Post(s)
Liked 1,026 Times
in
723 Posts
I am suspicious of the spacers you have there - generally the locknut on the drive side only sticks out a few mm beyond the cassette, and, although you don't have the cassette mounted, I would think the locknut is too far out. Is there a slightly smaller spacer on the non-drive side? Because swapping them might make it better. Yes, you could try to put both spacers on the non-drive side, as long as this gives you enough space for the chain to ride on the small cog without hitting the frame. Moving the spacer to the other side will essentially move the dish over by twice the thickness of the spacer.
It also looks like the axle is sticking out more than normal on both sides - it only needs to stick out about 5mm or so, just enough to position the axle in the dropouts while the quick release is tightened. Is it possible some spacers were removed when you reasembled the bearings?
However, once the hub spacing is close to correct (OLD is correct and cassette has just enough clearance so the chain doesn't hit the inside of the dropout when in the smallest cog), you use spoke tension to pull the rim towards correct dish. This generally makes the drive-side spokes much tighter than the those on the non-drive side.
It also looks like the axle is sticking out more than normal on both sides - it only needs to stick out about 5mm or so, just enough to position the axle in the dropouts while the quick release is tightened. Is it possible some spacers were removed when you reasembled the bearings?
However, once the hub spacing is close to correct (OLD is correct and cassette has just enough clearance so the chain doesn't hit the inside of the dropout when in the smallest cog), you use spoke tension to pull the rim towards correct dish. This generally makes the drive-side spokes much tighter than the those on the non-drive side.
Likes For Russ Roth:
04-03-23, 11:16 PM
#16
Senior Member
Join Date: Jun 2002
Location: San Jose, CA
Posts: 3,691
Bikes: Too many bikes, too little time to ride
Mentioned: 2 Post(s)
Tagged: 0 Thread(s)
Quoted: 431 Post(s)
Liked 460 Times
in
318 Posts
Is that even the right axle for the hub? Seems like the cone nut will prevent the cassette locking from clearing.
04-04-23, 02:12 AM
#17
Really Old Senior Member
This diagram is fairly typical regarding the amount of spacing on each end of a Shimano Free Hub.
Note the 135 version has the extra 5mm spacer on the NDS!
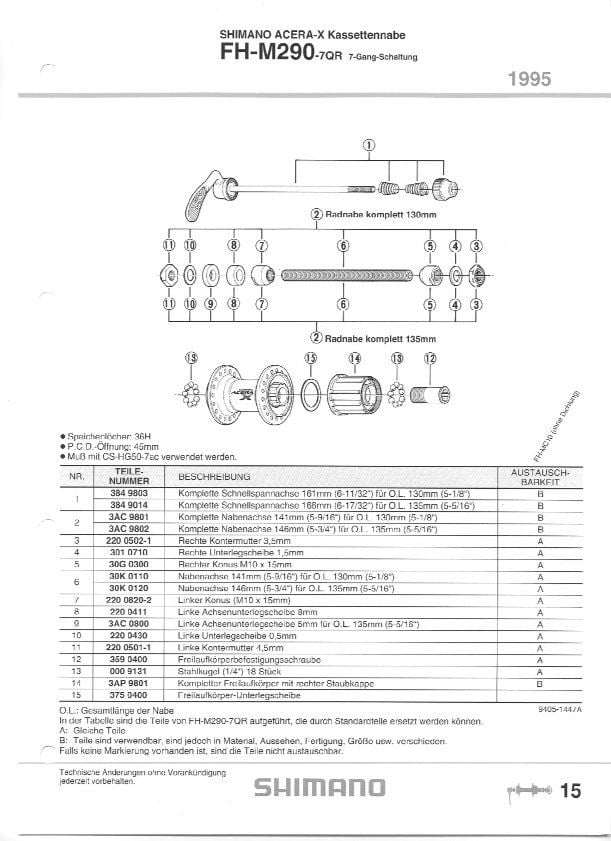
Note the 135 version has the extra 5mm spacer on the NDS!
Likes For Bill Kapaun:
04-04-23, 10:33 AM
#18
Full Member
I was building up my Takara frame last week at the co-op. I installed the rear wheel but it was over too much to the drive side (not dished). The mechanic suggested replacing the drive side spacer with a smaller one.
Dishing is still off (too far to the right side).
I have checked it repeatedly.
Photos tell the tale.
I ensured the dishing gauge only touched the rim and not the tire on both sides
On drive side the guage sat tight on the locking nut on the axle.
On the non-drive side the guage sits "about" an inch above the nut.
Could I remove the drive side spacer completely and rebuild the axle with no spacer at all and move the spacer to the non-drive side??
Drive side
Non-drive side
Dishing is still off (too far to the right side).
I have checked it repeatedly.
Photos tell the tale.
I ensured the dishing gauge only touched the rim and not the tire on both sides
On drive side the guage sat tight on the locking nut on the axle.
On the non-drive side the guage sits "about" an inch above the nut.
Could I remove the drive side spacer completely and rebuild the axle with no spacer at all and move the spacer to the non-drive side??
Drive side
Non-drive side
With your axle seated correctly examine the chain line as you shift. The spacers can be used to manipulate the chain line.
Dont adjust the spokes with the tire on. If you do you will be adjusting it blindly, without any knowledge about the spoke thread's nipple engagement.
04-04-23, 11:07 AM
#19
Senior Member

Join Date: May 2010
Location: Bastrop Texas
Posts: 4,483
Bikes: Univega, Peu P6, Peu PR-10, Ted Williams, Peu UO-8, Peu UO-18 Mixte, Peu Dolomites
Mentioned: 13 Post(s)
Tagged: 0 Thread(s)
Quoted: 968 Post(s)
Liked 1,631 Times
in
1,047 Posts
Yep... Don't be afraid... Just loosen everything up and start over. It's always a learning process and some times ya can't even figure out what ya did wrong the first time...
__________________
 No matter where you're at... There you are... Δf:=f(1/2)-f(-1/2)
No matter where you're at... There you are... Δf:=f(1/2)-f(-1/2)
Likes For zandoval:
04-04-23, 11:16 PM
#20
Senior Member
Join Date: Apr 2009
Location: New Rochelle, NY
Posts: 38,725
Bikes: too many bikes from 1967 10s (5x2)Frejus to a Sumitomo Ti/Chorus aluminum 10s (10x2), plus one non-susp mtn bike I use as my commuter
Mentioned: 140 Post(s)
Tagged: 1 Thread(s)
Quoted: 5793 Post(s)
Liked 2,584 Times
in
1,432 Posts
I'm very confused. You say the rim is too far to the RIGHT, but an undished rear wheel would be off toward the LEFT.
I'm hoping that you simply don't know kept from right. If not, you need to figure out how that happened.
In any case, first get the hub right as far as thd axle and spacing specs for the cassette. THEN, dish the rim to center between axle faces (frame).
I'm hoping that you simply don't know kept from right. If not, you need to figure out how that happened.
In any case, first get the hub right as far as thd axle and spacing specs for the cassette. THEN, dish the rim to center between axle faces (frame).
Last edited by FBinNY; 04-04-23 at 11:26 PM.
Likes For FBinNY:
04-05-23, 05:25 PM
#21
WGB
Thread Starter
Join Date: Jul 2017
Location: Niagara Region
Posts: 2,917
Bikes: Panasonic PT-4500
Mentioned: 46 Post(s)
Tagged: 0 Thread(s)
Quoted: 1800 Post(s)
Liked 2,334 Times
in
1,378 Posts
Update.
I brought the wheel back to the co-op. There was only one mechanic available so I did the work myself, going to him for a pass or fail at each step.
I removed the axle from the hub and stripped it completely. The co-op not only has a bench vise, it has axle vises as well. I'd like a vise, just no place for one in my house.
I built the axle back up, starting on drive side. When I was done I'd moved the spacer to the non-drive side and added two washers on that side, with a washer also added on the drive side. Axle fits snuggly in the drop outs.
After completion of the axle rebuild, I was stunned to see it was within "about" 1-1.5mm of being centered. I will have to spend time on the trueing stand to make adjustments as it's still not perfect but considering my mechanical skills I am very pleased.
I will post a photo. For now the dishing is good enough for the intended purpose of testing how this bike rides.
Likes For WGB:
04-05-23, 07:38 PM
#22
Senior Member
Join Date: Apr 2011
Posts: 7,067
Mentioned: 41 Post(s)
Tagged: 0 Thread(s)
Quoted: 4409 Post(s)
Liked 1,566 Times
in
1,028 Posts
Update.
I brought the wheel back to the co-op. There was only one mechanic available so I did the work myself, going to him for a pass or fail at each step.
I removed the axle from the hub and stripped it completely. The co-op not only has a bench vise, it has axle vises as well. I'd like a vise, just no place for one in my house.
I built the axle back up, starting on drive side. When I was done I'd moved the spacer to the non-drive side and added two washers on that side, with a washer also added on the drive side. Axle fits snuggly in the drop outs.
After completion of the axle rebuild, I was stunned to see it was within "about" 1-1.5mm of being centered. I will have to spend time on the trueing stand to make adjustments as it's still not perfect but considering my mechanical skills I am very pleased.
I will post a photo. For now the dishing is good enough for the intended purpose of testing how this bike rides.
I brought the wheel back to the co-op. There was only one mechanic available so I did the work myself, going to him for a pass or fail at each step.
I removed the axle from the hub and stripped it completely. The co-op not only has a bench vise, it has axle vises as well. I'd like a vise, just no place for one in my house.
I built the axle back up, starting on drive side. When I was done I'd moved the spacer to the non-drive side and added two washers on that side, with a washer also added on the drive side. Axle fits snuggly in the drop outs.
After completion of the axle rebuild, I was stunned to see it was within "about" 1-1.5mm of being centered. I will have to spend time on the trueing stand to make adjustments as it's still not perfect but considering my mechanical skills I am very pleased.
I will post a photo. For now the dishing is good enough for the intended purpose of testing how this bike rides.
Good job fixing it!
04-05-23, 08:04 PM
#23
Really Old Senior Member
You only have to move the rim 1/2 of that to be properly dished.
IF that's a common Shimano hub, there is usually an exploded view available with part #'s etc. One would need the model# though, such as FH-nnnn.
