


Got a little hamfisted when Coldsetting...
 05-12-13, 06:17 PM
#1
Wookie Jesus inspires me.
Thread Starter
Join Date: Mar 2011
Location: Seattle, WA
Posts: 2,215
Mentioned: 0 Post(s)
Tagged: 0 Thread(s)
Quoted: 4 Post(s)
Likes: 0
Liked 2 Times
in
2 Posts
Got a little hamfisted when Coldsetting...
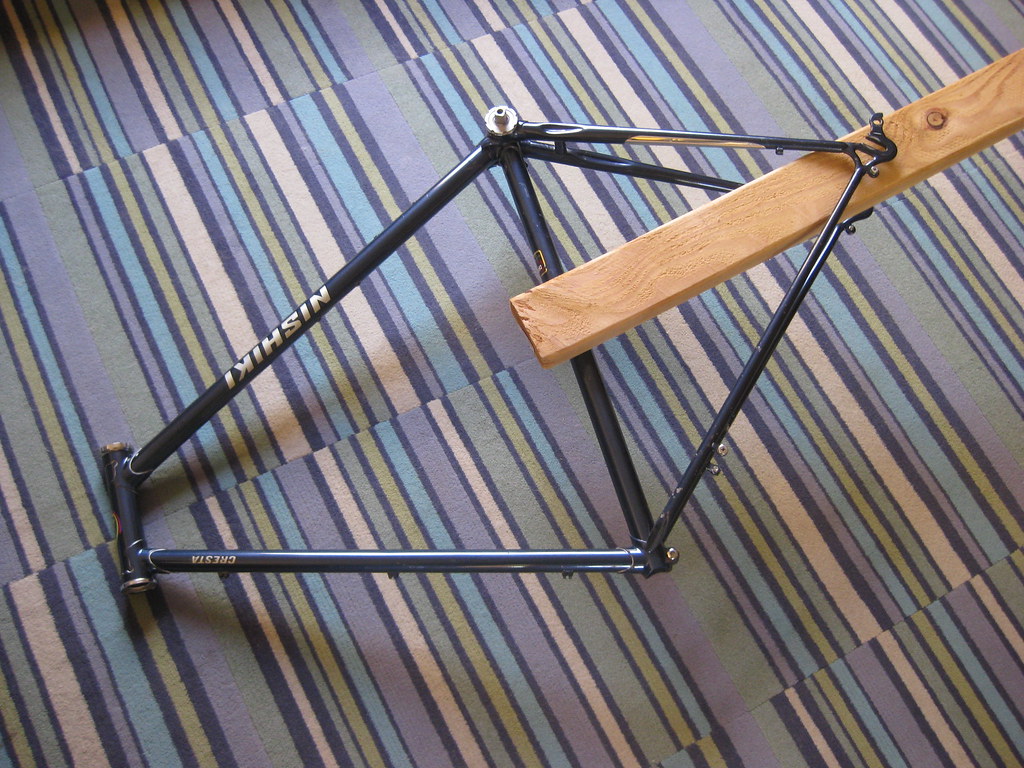
So I have this old unknown HiTen frame. It was 126 and I wanted to coldset it to 135 because I have some XT/Open Pro wheels lying around. Thought this could make a nice beater for my brother. Was cold setting little by litte... 1 mm here, 1mm there.... 128mm, alright gotta keep going. Then I slip and before I know it, the DS stays open up and the total goes to about 145-150. "F***". Well, I set everything back. It's a bit easier to move the stays now, but I don't see any creases in the stays or lug/bridge separation. Am I ok? No harm done... if the frame is toast, I'll just toss it.
 05-12-13, 07:50 PM
#2
Senior Member
Join Date: Mar 2013
Posts: 128
Bikes: 1983 Basso Gap Campy SR, 1984 Basso Gap Shimano 6700, 2009 Cervelo S1, 2009 Trek EX9, Zunow Z-1
Mentioned: 0 Post(s)
Tagged: 0 Thread(s)
Quoted: 0 Post(s)
Likes: 0
Liked 0 Times
in
0 Posts
Well, I'm certainly no expert though I've been through the overshoot a couple of times myself. Now that you have it approximately 135mm go ahead make sure the dropouts are square to each other. Put a wheel in it and see if it is aligned with the seat tube (the tire roughly equidistant from the chainstay and the non-drive stay...
Once you have the wheel installed and the quick release clamped or nuts tightened, I don't think the frame is going to go anywhere as everything should be locked together as a unit.
Once you have the wheel installed and the quick release clamped or nuts tightened, I don't think the frame is going to go anywhere as everything should be locked together as a unit.
 05-12-13, 09:00 PM
#4

Get off my lawn!
Join Date: Nov 2010
Location: The Garden State
Posts: 6,031
Bikes: 1917 Loomis, 1923 Rudge, 1930 Hercules Renown, 1947 Mclean, 1948 JA Holland, 1955 Hetchins, 1957 Carlton Flyer, 1962 Raleigh Sport, 1978&81 Raleigh Gomp GS', 2010 Raliegh Clubman
Mentioned: 9 Post(s)
Tagged: 0 Thread(s)
Quoted: 93 Post(s)
Likes: 0
Liked 98 Times
in
48 Posts
Ya didn't crease it, stick a whelel in it a ride it.
05-13-13, 08:45 AM
#5
Senior Member

Join Date: Feb 2009
Location: san leandro
Posts: 1,344
Bikes: enough bikes to qualify for Hoarders......
Mentioned: 0 Post(s)
Tagged: 0 Thread(s)
Quoted: 2 Post(s)
Likes: 0
Liked 0 Times
in
0 Posts
make sure you did not separate the brake bridge from the stay, it really should not get much easier to move.
05-13-13, 06:58 PM
#6
curmudgineer

Join Date: Dec 2009
Location: Chicago SW burbs
Posts: 4,417
Bikes: 2 many 2 fit here
Mentioned: 8 Post(s)
Tagged: 0 Thread(s)
Quoted: 263 Post(s)
Liked 112 Times
in
70 Posts
That's really a bad sign. The stiffness has gone down, indicating permanent damage (probably micro-cracks). You know how you can bend a paper clip back and forth for a while, and the stiffness stays the same for quite a few repeats. Then suddenly the stiffness goes down, and after a few more repeats it breaks.
If you ride it, you may not notice any issue, but the watchphrase is "cumulative damage". With the pre-existing damage, incremental damage (e.g. from big bumps) will occur more rapidly, leading to a runaway failure.
If you ride it, you may not notice any issue, but the watchphrase is "cumulative damage". With the pre-existing damage, incremental damage (e.g. from big bumps) will occur more rapidly, leading to a runaway failure.
05-13-13, 07:58 PM
#7
Ride, Wrench, Swap, Race

Join Date: Jan 2010
Location: Northern California
Posts: 9,194
Bikes: Cheltenham-Pedersen racer, Boulder F/S Paris-Roubaix, Varsity racer, '52 Christophe, '62 Continental, '92 Merckx, '75 Limongi, '76 Presto, '72 Gitane SC, '71 Schwinn SS, etc.
Mentioned: 132 Post(s)
Tagged: 0 Thread(s)
Quoted: 1565 Post(s)
Liked 1,296 Times
in
866 Posts
Here's where setting only one side at a time pays off, since you still have the opposite side dropout as a reference for
re-centering.
Do a little math, make a correction, then set the other side, and you're done.
I really, really doubt you've got any cracks going on, but likely only stress-relieved the stay in the area of the crimping, which could make it easier to bend one way or the other. But look for any sharp reduction in lateral width which might indicate a degree of buckling.
I would say this perceived "softening" is fairly common among the many frames with crimped stay's I've heaved on.
And some stays (or fork blades) are very easy to set, while others are much, much harder.
Lastly, it's ideal to over-bend a stay and then bend it back ~1mm to it's final, desired location.
This reduces the tendency for the dropout to later move laterally in one direction (back toward the original location).
This is good stress-relieving of the type that will later then require a higher force to knock your frame out of alignment, and is self-evident to all who have had to make repeated corrections in order to home-in on a final alignment. This first 1mm of reverse correction can almost be done with you thumb!
Last edited by dddd; 05-13-13 at 08:05 PM.
05-13-13, 08:04 PM
#8
Senior Member

 05-13-13, 08:45 PM
#9
Senior Member
A far easier and potentially less damaging method is to use a piece of threaded rod with a pair of nuts - just insert in the dropouts and wrench away. Spread the stays to a bit over the intended width, back off and measure, then repeat, spreading them a bit more until you get the O.L.D. that you want.
05-14-13, 12:23 AM
#10
Ride, Wrench, Swap, Race
Join Date: Jan 2010
Location: Northern California
Posts: 9,194
Bikes: Cheltenham-Pedersen racer, Boulder F/S Paris-Roubaix, Varsity racer, '52 Christophe, '62 Continental, '92 Merckx, '75 Limongi, '76 Presto, '72 Gitane SC, '71 Schwinn SS, etc.
Mentioned: 132 Post(s)
Tagged: 0 Thread(s)
Quoted: 1565 Post(s)
Liked 1,296 Times
in
866 Posts
A far easier and potentially less damaging method is to use a piece of threaded rod with a pair of nuts - just insert in the dropouts and wrench away. Spread the stays to a bit over the intended width, back off and measure, then repeat, spreading them a bit more until you get the O.L.D. that you want.
It will always be the case that one side's chainstay will yield while the other stay doesn't, resulting in a crooked frame with possible chainline, tracking, braking and clearance issues.
This is from differences in stress relieving, differences in crimping, differences in bridge-brazing temperature and variations in the tubing's material and dimensional tolerances between the two chainstays.
You'll have to re-center the rear triangle after using that method, not to mention that the rod nuts will require an almost riciculous number of turns to begin to set the triangle. And it's impossible to know when the yielding starts, so you'll expend hours and repeated attempts at having to spread-relax-measure over and over again, then to have to re-center and basically start over. It's likely to be abusive to the chainstays, especially the one that yields doubly while the other one stays put.
But I have to admit that this method gets tossed around on just about every respected forum out there, even if I heartily dis-recommend it.
It sure didn't come from the late Sheldon Brown's site.
05-14-13, 02:17 AM
#11
Senior Member
I tried the late, great Mr. Brown's method and truly screwed up the alignment of my road bike.
I did it again (in only about 10 minutes) using the threaded rod method on my commuter - everything came out fine.
Of course, YMMV.
I did it again (in only about 10 minutes) using the threaded rod method on my commuter - everything came out fine.
Of course, YMMV.
05-14-13, 01:04 PM
#12
Ride, Wrench, Swap, Race
Join Date: Jan 2010
Location: Northern California
Posts: 9,194
Bikes: Cheltenham-Pedersen racer, Boulder F/S Paris-Roubaix, Varsity racer, '52 Christophe, '62 Continental, '92 Merckx, '75 Limongi, '76 Presto, '72 Gitane SC, '71 Schwinn SS, etc.
Mentioned: 132 Post(s)
Tagged: 0 Thread(s)
Quoted: 1565 Post(s)
Liked 1,296 Times
in
866 Posts
Bending metal (especially tubing, and/or metals that are alloyed or processed/worked in some way to increase yield strength) is an art that must be practiced on a variety of sections and thicknesses to gain a feel of what the yielding metal is communicating back to the force applicator.
I would hate to see someone inexperienced in bending tubing working on a valuable frame.
Judgement and caution are paramount imo.
Bending chainstays and fork blades can be a somewhat strenuous endeavor, requiring some gymnastics that must be repeated as many times as is needed to gain control of the progress (rate of yield). More incremental measurements equals more control imo.
I actually get some pretty good exercise aligning frames.
05-14-13, 02:58 PM
#14
Senior Member
Join Date: Apr 2007
Posts: 6,764
Mentioned: 10 Post(s)
Tagged: 0 Thread(s)
Quoted: 1109 Post(s)
Liked 1,202 Times
in
761 Posts
A couple of observations from my SINGLE experience cold setting from 126 to 130. (in other words, I'm no expert).
I used the frame in the vice method and also tried the threaded rod method. I found that I had to do one side at a time. If I tried to do both, one bent slightly easier than the other and it would go out of alignment. I used the "string" method of checking alignment. The vice method is efficient because you can very readily check the alignment and adjust from one side to the other as needed. It takes a lot of muscle power though - next time I might try the Sheldon method instead.

And in the spirit of pics, here's the tool I put together to mimic a real dropout alignment tool.
Rationale, materials and function here https://www.bikeforums.net/showthread...ool?highlight=
I used the frame in the vice method and also tried the threaded rod method. I found that I had to do one side at a time. If I tried to do both, one bent slightly easier than the other and it would go out of alignment. I used the "string" method of checking alignment. The vice method is efficient because you can very readily check the alignment and adjust from one side to the other as needed. It takes a lot of muscle power though - next time I might try the Sheldon method instead.
And in the spirit of pics, here's the tool I put together to mimic a real dropout alignment tool.
Rationale, materials and function here https://www.bikeforums.net/showthread...ool?highlight=
 05-14-13, 05:48 PM
#16


Senior Member

Join Date: Aug 2003
Location: Tampa, Florida
Posts: 13,954
Mentioned: 40 Post(s)
Tagged: 0 Thread(s)
Quoted: 413 Post(s)
Likes: 0
Liked 109 Times
in
78 Posts
I couldn't tell you how many hundreds of frames I've cold set and along the way I've learned a few things.
1. Use math. 120 to 135 = 7mm per side.
2. Do one side at a time. 120, set one side to 127. 127 set the other side to 135. If you want you can be finicky about the 1mm
3. Align dropout faces.
4. Double check your cold set.
Methods:
Sheldon's: I suppose if you want to risk denting the seat tube this method works. My least favorite. Sometimes being cheap doesn't pay off.
Threaded rod: as mentioned above it only spreads the weakest side.
Proper tools: I'm fortunate to have them, it makes cold setting so easy.
No tools: The way I did it before I had the proper tools. Just brute force trying to pull side manually. This really is a work out.
05-14-13, 05:50 PM
#17
Senior Member
Join Date: Feb 2009
Location: san leandro
Posts: 1,344
Bikes: enough bikes to qualify for Hoarders......
Mentioned: 0 Post(s)
Tagged: 0 Thread(s)
Quoted: 2 Post(s)
Likes: 0
Liked 0 Times
in
0 Posts
Adjust


gauge


parallel


gauge


parallel

Last edited by toytech; 05-14-13 at 05:52 PM. Reason: missed a picture
05-15-13, 07:38 AM
#19
Senior Member
Join Date: Nov 2008
Location: South Jersey
Posts: 1,959
Bikes: Too many Bicycles to list
Mentioned: 10 Post(s)
Tagged: 0 Thread(s)
Quoted: 90 Post(s)
Liked 137 Times
in
45 Posts
That's what I was trying to warn against.
It will always be the case that one side's chainstay will yield while the other stay doesn't, resulting in a crooked frame with possible chainline, tracking, braking and clearance issues.
This is from differences in stress relieving, differences in crimping, differences in bridge-brazing temperature and variations in the tubing's material and dimensional tolerances between the two chainstays.
You'll have to re-center the rear triangle after using that method, not to mention that the rod nuts will require an almost riciculous number of turns to begin to set the triangle. And it's impossible to know when the yielding starts, so you'll expend hours and repeated attempts at having to spread-relax-measure over and over again, then to have to re-center and basically start over. It's likely to be abusive to the chainstays, especially the one that yields doubly while the other one stays put.
But I have to admit that this method gets tossed around on just about every respected forum out there, even if I heartily dis-recommend it.
It sure didn't come from the late Sheldon Brown's site.
Glenn


 05-15-13, 12:11 PM
#20
Wookie Jesus inspires me.
Thread Starter
Join Date: Mar 2011
Location: Seattle, WA
Posts: 2,215
Mentioned: 0 Post(s)
Tagged: 0 Thread(s)
Quoted: 4 Post(s)
Likes: 0
Liked 2 Times
in
2 Posts
I did work on one side first and then went to the other. I guess I wasn't too cautious about it since it was a junker frame anyways. Kind of like a trial for coldsetting another nice frame that I have. Now I know that I'd rather pay a shop to do it 
But I'll throw the wheel on this frame and see how it fairs. It's only going to be used for grocery duty anyways.
But I'll throw the wheel on this frame and see how it fairs. It's only going to be used for grocery duty anyways.

