


Dual pivot nutted conversion
 05-04-23, 12:48 AM
#1

Senior Member
Thread Starter

Join Date: Jan 2008
Location: Beaverton, OR
Posts: 14,744
Bikes: Yes
Mentioned: 525 Post(s)
Tagged: 0 Thread(s)
Quoted: 3230 Post(s)
Liked 3,868 Times
in
1,439 Posts
Dual pivot nutted conversion
This has been covered before, but I don't think I've seen step-by-step instructions with a lot of pictures, so since I was doing this today I decided to document the process. I recently bought a set of Tektro R539 brakes at a bargain price, but I wanted nutted brakes and these were recessed. As you may have seen, I found the part I needed for the conversion and convinced a bunch of other people to go in on a bulk purchase to spread out shipping from the UK. Today, I got a box with a bunch of 70 mm Jtek center bolts, and I set about converting my R539's for a frame that needed nutted brake mounts.
To start with, here's a link to the Jtek page for the bolt which is the key to the conversion: Jtek Tektro / Shimano pattern 70mm Dual Pivot Brake Bolt
The process is pretty simple. The front recessed bolt is long enough to work as a nutted brake in the rear, so you just replace the recessed nut with a standard nut and reverse the brake pads and it becomes your rear brake. For the front brake, you need to replace the center bolt of the rear brake with the longer Jtek bolt and again flip the pads so that the brake which was a rear brake becomes a front brake. This is still fairly simple, but for anyone who hasn't done it before I think step-by-step instructions might prove helpful. I'm doing this with a Tektro R539, but the same procedure works with a lot of other dual pivot brakes include 6600-series and earlier Shimano dual pivots and most, if not all, Campagnolo models. You should be able to figure out from the pictures below if this will work for your brakes or not.
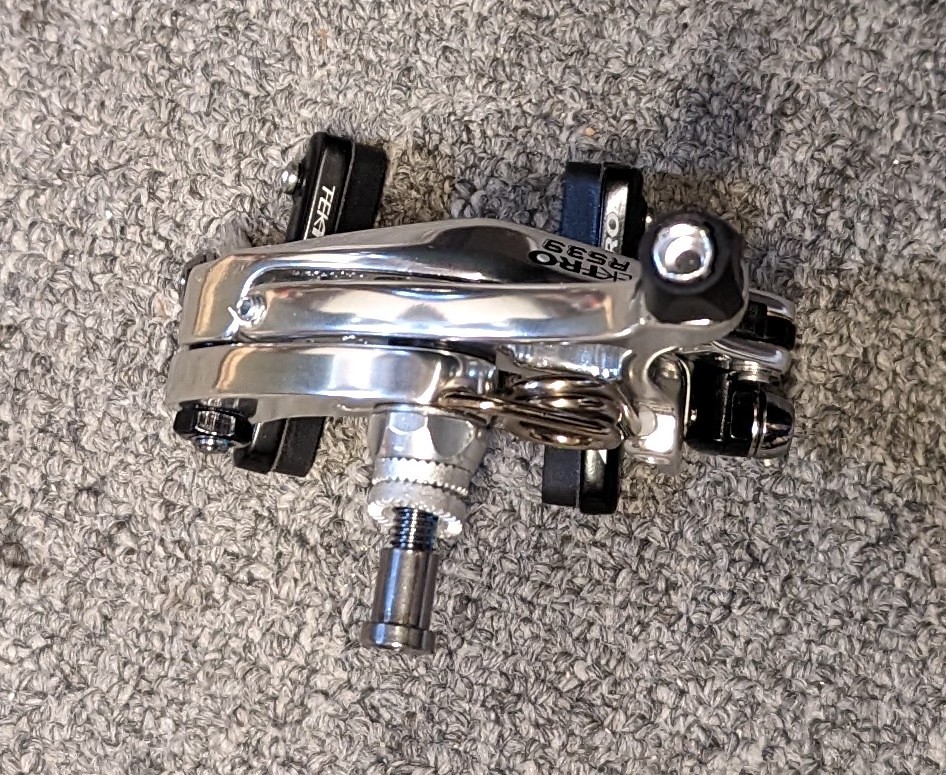
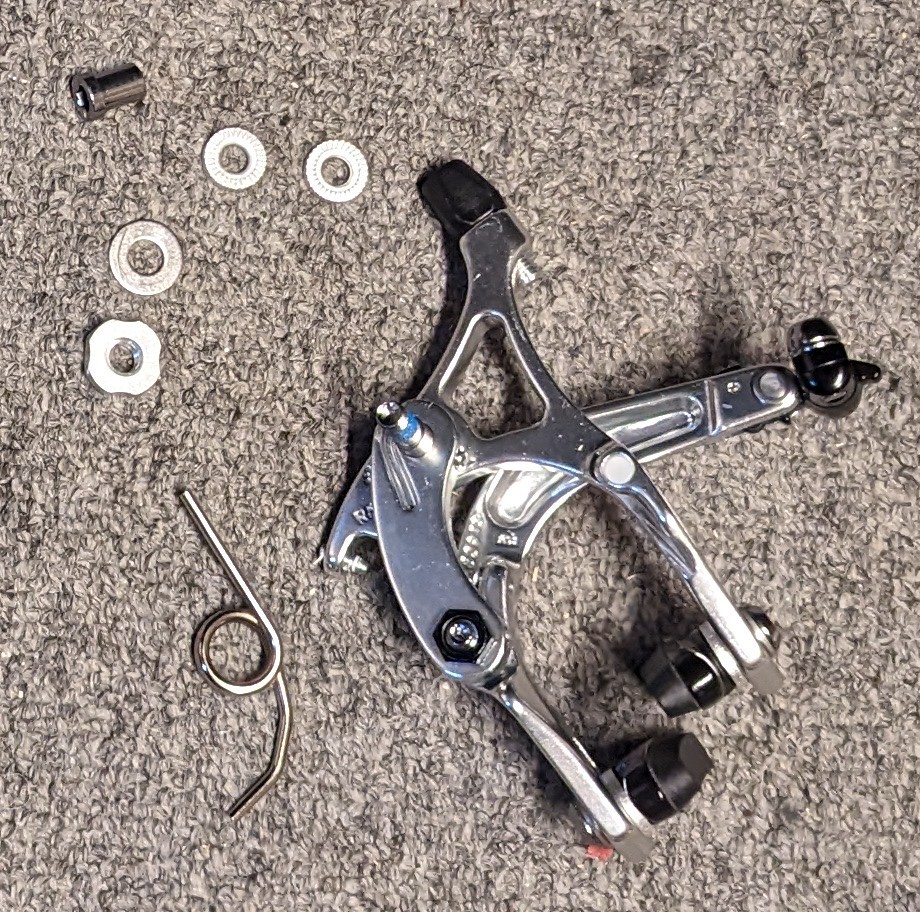
Here are pics of my intended victim..er...I mean...patient before I started.

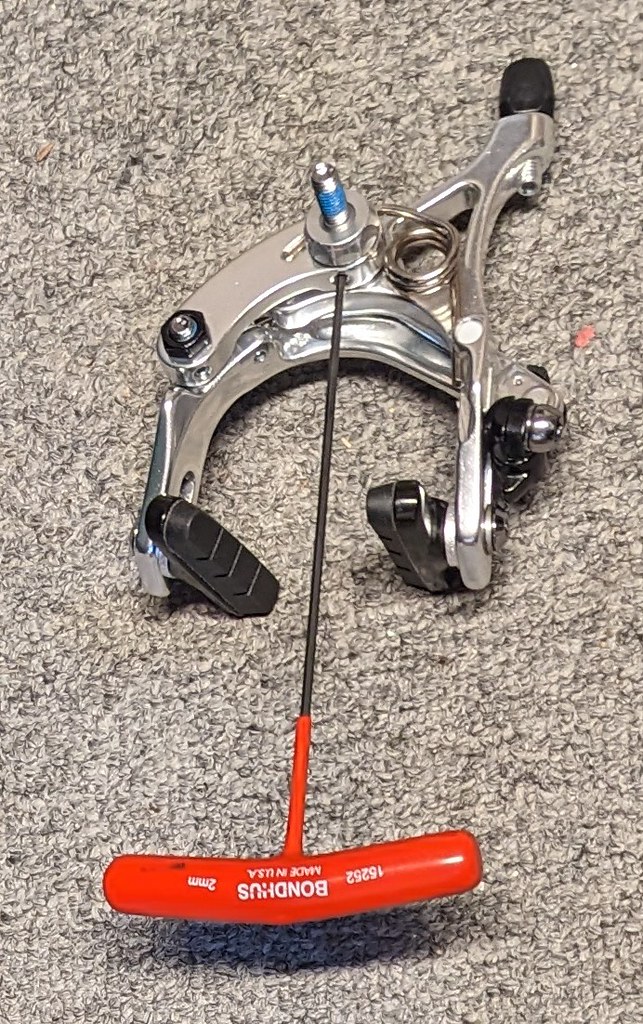
As you'll notice from looking at the bare Jtek bolt, the center bolt has two differently sized threaded sections -- one for the mounting nut, and another to secure the caliper body to the bolt. In the pictures above you can see a large nut holding the bolt in place. However, it is very important to notice that there is a set screw in the bottom of the pivot piece just behind the nut. If you try to remove the nut without first removing the set screw, you'll destroy the center bolt you're removing (a lesson I learned the first time I tried this on my own several years ago). On the Tektro brakes, this set screw has a 2 mm hex head. I think that's pretty standard across brands.
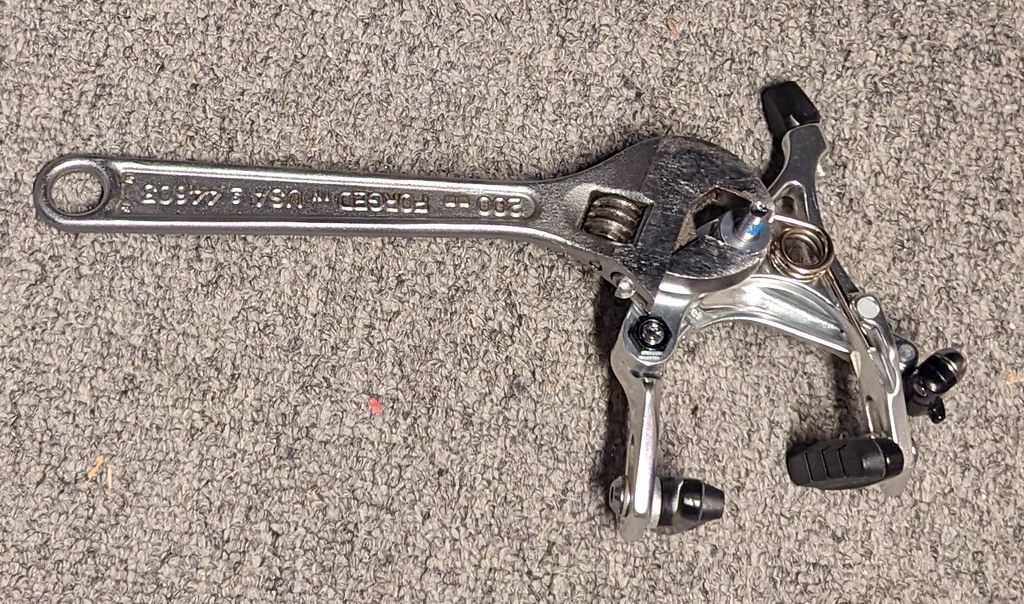
With the set screw removed, you can move on to removing the rear nut. On the Tektro this nut has indents rather than flats for a wrench. Maybe there's a special tool for this, but I just used an adjustable wrench. If you're worried about the finish of the nut, you could wrap it with something to prevent scratching. I didn't and it wasn't marred too badly. It doesn't take a huge amount of pressure to remove this, but it's fairly tight. What I found is that it took a hard pull to break it loose, but once it was loose it spun off very easily. If you encounter strong resistance beyond the initial breaking loose, double check to see if you missed a set screw.
Once you spin the nut off (along with the washer behind it), you'll have exposed the tension spring. You need to remove this in order for the caliper to collapse enough to give you access to the center screw.

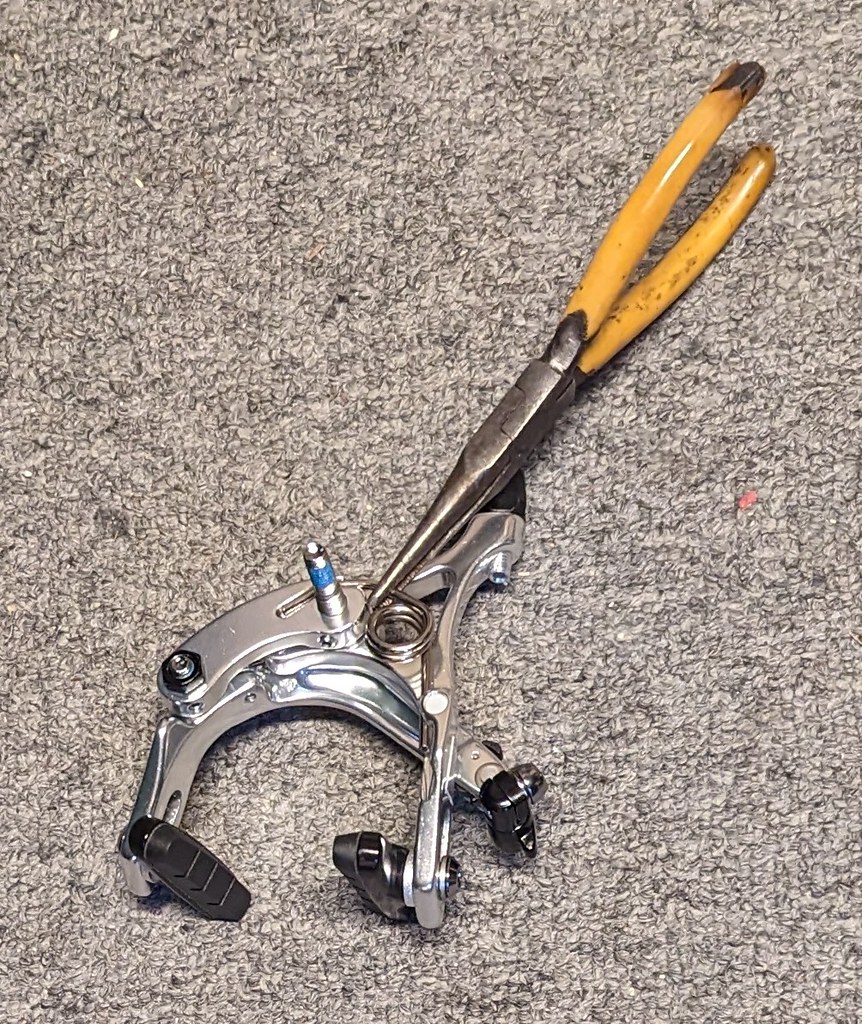
Be careful here. This spring is under tension, and there's a danger of injury as you remove it. I used a pair of needle nose pliers to pop it out. Consider gloves, eye protection, and other precautions according to your level of risk aversion. It's not under a lot of tension but it is a spring, so you never know what might happen when you pop it out. What happened in my case was that it popped out with no drama and fell harmlessly to the floor without so much as attempting to get lost. YMMV
With the spring removed, the pieces of the caliper will swing about freely.
Take note of the little white button on the right of this picture. The spring was holding it in place, but now that you've removed the spring, it's just sitting there and will fall out when you flip the caliper over. Be careful not to lose it. This little piece is necessary for the brake to pivot smoothly under normal operation. On Campagnolo and Shimano brakes, there is a plastic piece that slides around the spring to serve the same function, but on the Tektros it's just a loose button that slips into a hole in the caliper.
You're now ready to remove the center bolt. Flip the caliper over (being careful not to lose the small white button), and you'll see the center bolt fully exposed. It takes a standard 4 mm hex wrench.

If you properly removed the set screw, this bolt should unscrew without much resistance. If you have to apply a lot of torque something is wrong. Look for more set screws. As you remove this bolt, pay attention to the various washers between the parts. You'll need to get them all back in the right place to keep the brake functioning properly. Unfortunately I didn't take pictures of this part. I think the washer arrangement varies from brand to brand.
Once the bolt is out, congratulations, you've fully broken your brake.

Now just do everything in reverse to put it back together again with the longer bolt. The center bolt threads into the short pivot piece at the rear of the caliper. Don't overtighten it. It needs to be a little loose to let the pieces pivot. The set screw keeps it from coming loose.

To start with, here's a link to the Jtek page for the bolt which is the key to the conversion: Jtek Tektro / Shimano pattern 70mm Dual Pivot Brake Bolt
The process is pretty simple. The front recessed bolt is long enough to work as a nutted brake in the rear, so you just replace the recessed nut with a standard nut and reverse the brake pads and it becomes your rear brake. For the front brake, you need to replace the center bolt of the rear brake with the longer Jtek bolt and again flip the pads so that the brake which was a rear brake becomes a front brake. This is still fairly simple, but for anyone who hasn't done it before I think step-by-step instructions might prove helpful. I'm doing this with a Tektro R539, but the same procedure works with a lot of other dual pivot brakes include 6600-series and earlier Shimano dual pivots and most, if not all, Campagnolo models. You should be able to figure out from the pictures below if this will work for your brakes or not.
Here are pics of my intended victim..er...I mean...patient before I started.
As you'll notice from looking at the bare Jtek bolt, the center bolt has two differently sized threaded sections -- one for the mounting nut, and another to secure the caliper body to the bolt. In the pictures above you can see a large nut holding the bolt in place. However, it is very important to notice that there is a set screw in the bottom of the pivot piece just behind the nut. If you try to remove the nut without first removing the set screw, you'll destroy the center bolt you're removing (a lesson I learned the first time I tried this on my own several years ago). On the Tektro brakes, this set screw has a 2 mm hex head. I think that's pretty standard across brands.
With the set screw removed, you can move on to removing the rear nut. On the Tektro this nut has indents rather than flats for a wrench. Maybe there's a special tool for this, but I just used an adjustable wrench. If you're worried about the finish of the nut, you could wrap it with something to prevent scratching. I didn't and it wasn't marred too badly. It doesn't take a huge amount of pressure to remove this, but it's fairly tight. What I found is that it took a hard pull to break it loose, but once it was loose it spun off very easily. If you encounter strong resistance beyond the initial breaking loose, double check to see if you missed a set screw.
Once you spin the nut off (along with the washer behind it), you'll have exposed the tension spring. You need to remove this in order for the caliper to collapse enough to give you access to the center screw.
Be careful here. This spring is under tension, and there's a danger of injury as you remove it. I used a pair of needle nose pliers to pop it out. Consider gloves, eye protection, and other precautions according to your level of risk aversion. It's not under a lot of tension but it is a spring, so you never know what might happen when you pop it out. What happened in my case was that it popped out with no drama and fell harmlessly to the floor without so much as attempting to get lost. YMMV
With the spring removed, the pieces of the caliper will swing about freely.
Take note of the little white button on the right of this picture. The spring was holding it in place, but now that you've removed the spring, it's just sitting there and will fall out when you flip the caliper over. Be careful not to lose it. This little piece is necessary for the brake to pivot smoothly under normal operation. On Campagnolo and Shimano brakes, there is a plastic piece that slides around the spring to serve the same function, but on the Tektros it's just a loose button that slips into a hole in the caliper.
You're now ready to remove the center bolt. Flip the caliper over (being careful not to lose the small white button), and you'll see the center bolt fully exposed. It takes a standard 4 mm hex wrench.
If you properly removed the set screw, this bolt should unscrew without much resistance. If you have to apply a lot of torque something is wrong. Look for more set screws. As you remove this bolt, pay attention to the various washers between the parts. You'll need to get them all back in the right place to keep the brake functioning properly. Unfortunately I didn't take pictures of this part. I think the washer arrangement varies from brand to brand.
Once the bolt is out, congratulations, you've fully broken your brake.
Now just do everything in reverse to put it back together again with the longer bolt. The center bolt threads into the short pivot piece at the rear of the caliper. Don't overtighten it. It needs to be a little loose to let the pieces pivot. The set screw keeps it from coming loose.
__________________
My Bikes
My Bikes
Last edited by Andy_K; 05-04-23 at 09:43 AM.

Likes For Andy_K:
05-04-23, 12:48 AM
#2
Senior Member
Thread Starter
Join Date: Jan 2008
Location: Beaverton, OR
Posts: 14,744
Bikes: Yes
Mentioned: 525 Post(s)
Tagged: 0 Thread(s)
Quoted: 3230 Post(s)
Liked 3,868 Times
in
1,439 Posts
The next part is by far the trickiest part of the process -- getting the spring back into place. I started by fitting it into the slot in the rear pivot piece and re-installing the washer and rear nut to hold the spring in place. Again, don't overtighten, and check to make sure all the pieces still move freely.
Notice that I also put the little white button back where it goes. You need to do that before fully setting the spring in place.

That's the easy part. Next, you need to pull the spring past the caliper arm and get it to snap into place. If you unscrew the shoulder centering set screw it'll let the arms open a couple of millimeters wider. I'm not sure how much this helps, but it seemed like a good idea.

I found that my needle nose pliers weren't giving my sufficient grip to pull the spring past the caliper arm and into place, so I broke out my handy dandy mini vise grips. That did the trick. Again, let me stress that if you don't have the white button in place before you do this, you might not be able to get it in place afterward, so you could end up doing it twice.

Finally, restore the centering screw to its proper position, reinstall the set screw below the center bolt, and you're pretty much finished. I dug out a few pieces from my junk drawer for the test fit installation. It looks like I need to make a trip to the hardware store for some cleaner looking washers and nuts, but this will do for now.

For the sake of final presentation, I installed this on the Stella frame hanging above my desk.


Don't forget to flip the brake pads around before riding. Since you switched front and rear brakes, both sets of pads will be facing the wrong way, as you can see these are. Also, double check to make sure you tightened the set screw. It's going to be holding the center bolt in place.
Notice that I also put the little white button back where it goes. You need to do that before fully setting the spring in place.
That's the easy part. Next, you need to pull the spring past the caliper arm and get it to snap into place. If you unscrew the shoulder centering set screw it'll let the arms open a couple of millimeters wider. I'm not sure how much this helps, but it seemed like a good idea.
I found that my needle nose pliers weren't giving my sufficient grip to pull the spring past the caliper arm and into place, so I broke out my handy dandy mini vise grips. That did the trick. Again, let me stress that if you don't have the white button in place before you do this, you might not be able to get it in place afterward, so you could end up doing it twice.
Finally, restore the centering screw to its proper position, reinstall the set screw below the center bolt, and you're pretty much finished. I dug out a few pieces from my junk drawer for the test fit installation. It looks like I need to make a trip to the hardware store for some cleaner looking washers and nuts, but this will do for now.
For the sake of final presentation, I installed this on the Stella frame hanging above my desk.
Don't forget to flip the brake pads around before riding. Since you switched front and rear brakes, both sets of pads will be facing the wrong way, as you can see these are. Also, double check to make sure you tightened the set screw. It's going to be holding the center bolt in place.
__________________
My Bikes
My Bikes
Last edited by Andy_K; 05-04-23 at 01:50 AM.
Likes For Andy_K:
05-04-23, 06:51 PM
#3
aged to perfection

Join Date: Jun 2009
Location: PacNW
Posts: 1,814
Bikes: Dinucci Allez 2.0, Richard Sachs, Alex Singer, Serotta, Masi GC, Raleigh Pro Mk.1, Hetchins, etc
Mentioned: 24 Post(s)
Tagged: 0 Thread(s)
Quoted: 837 Post(s)
Liked 1,258 Times
in
663 Posts
really great summary of an interesting mod Andy ! nice !
/markp
/markp
