


Huffy + Campagnolo Super Record = The Ultimate C&V Sacrilege build
 03-19-23, 09:03 AM
#376

www.theheadbadge.com

Join Date: Sep 2005
Location: Southern Florida
Posts: 28,514
Bikes: https://www.theheadbadge.com
Mentioned: 124 Post(s)
Tagged: 0 Thread(s)
Quoted: 2422 Post(s)
Liked 4,396 Times
in
2,093 Posts


 03-19-23, 09:10 AM
#377
Senior Member
Re pedal as dropper plate…
I was thinking that you might this side of the pedal shaped object for the plate….
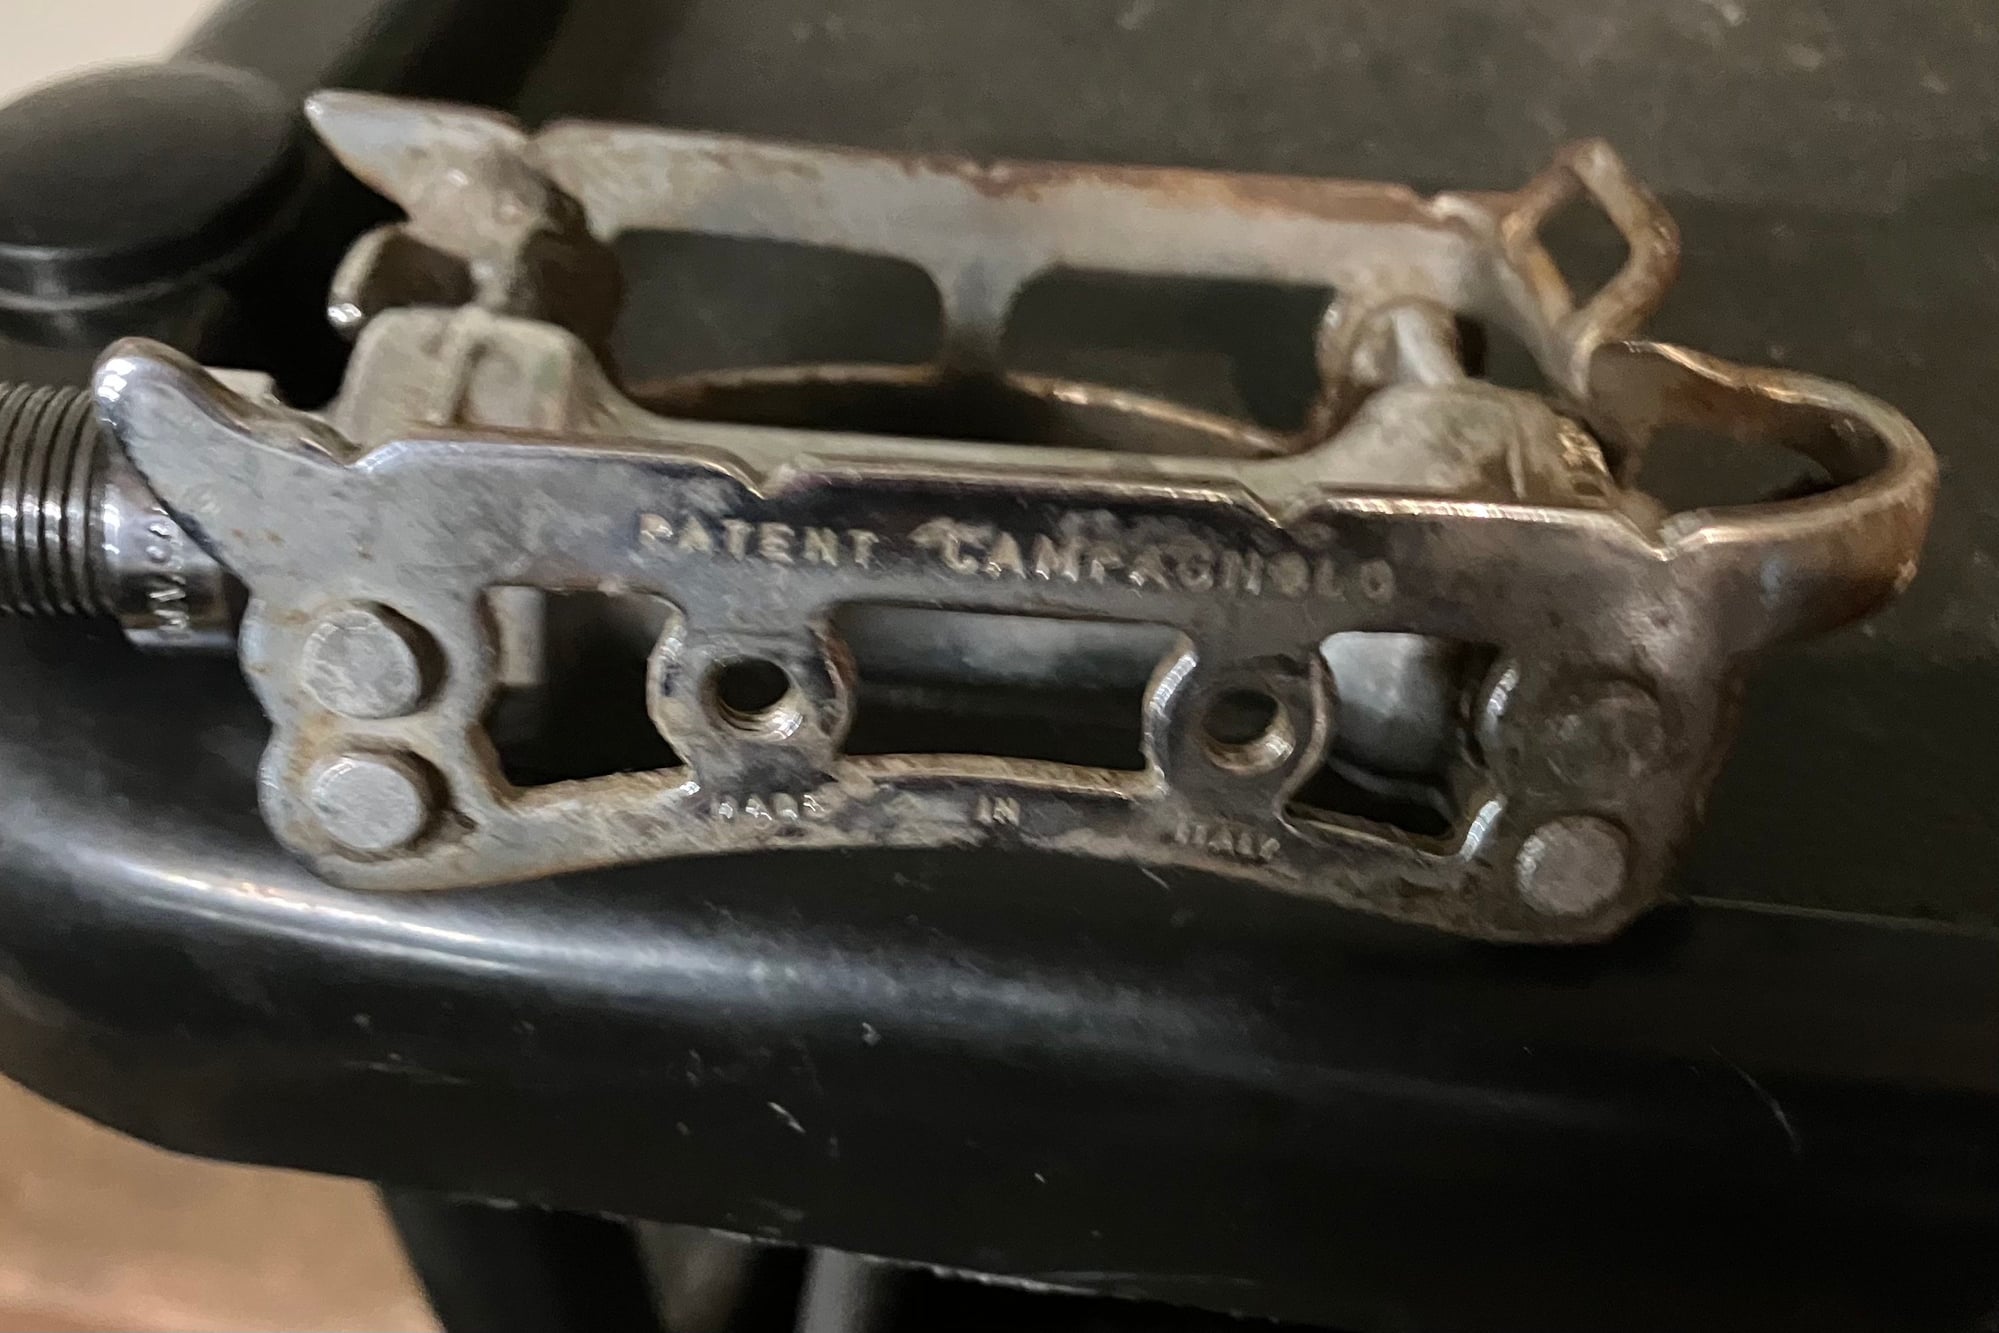
and this is why this pedal shaped object is good for little else
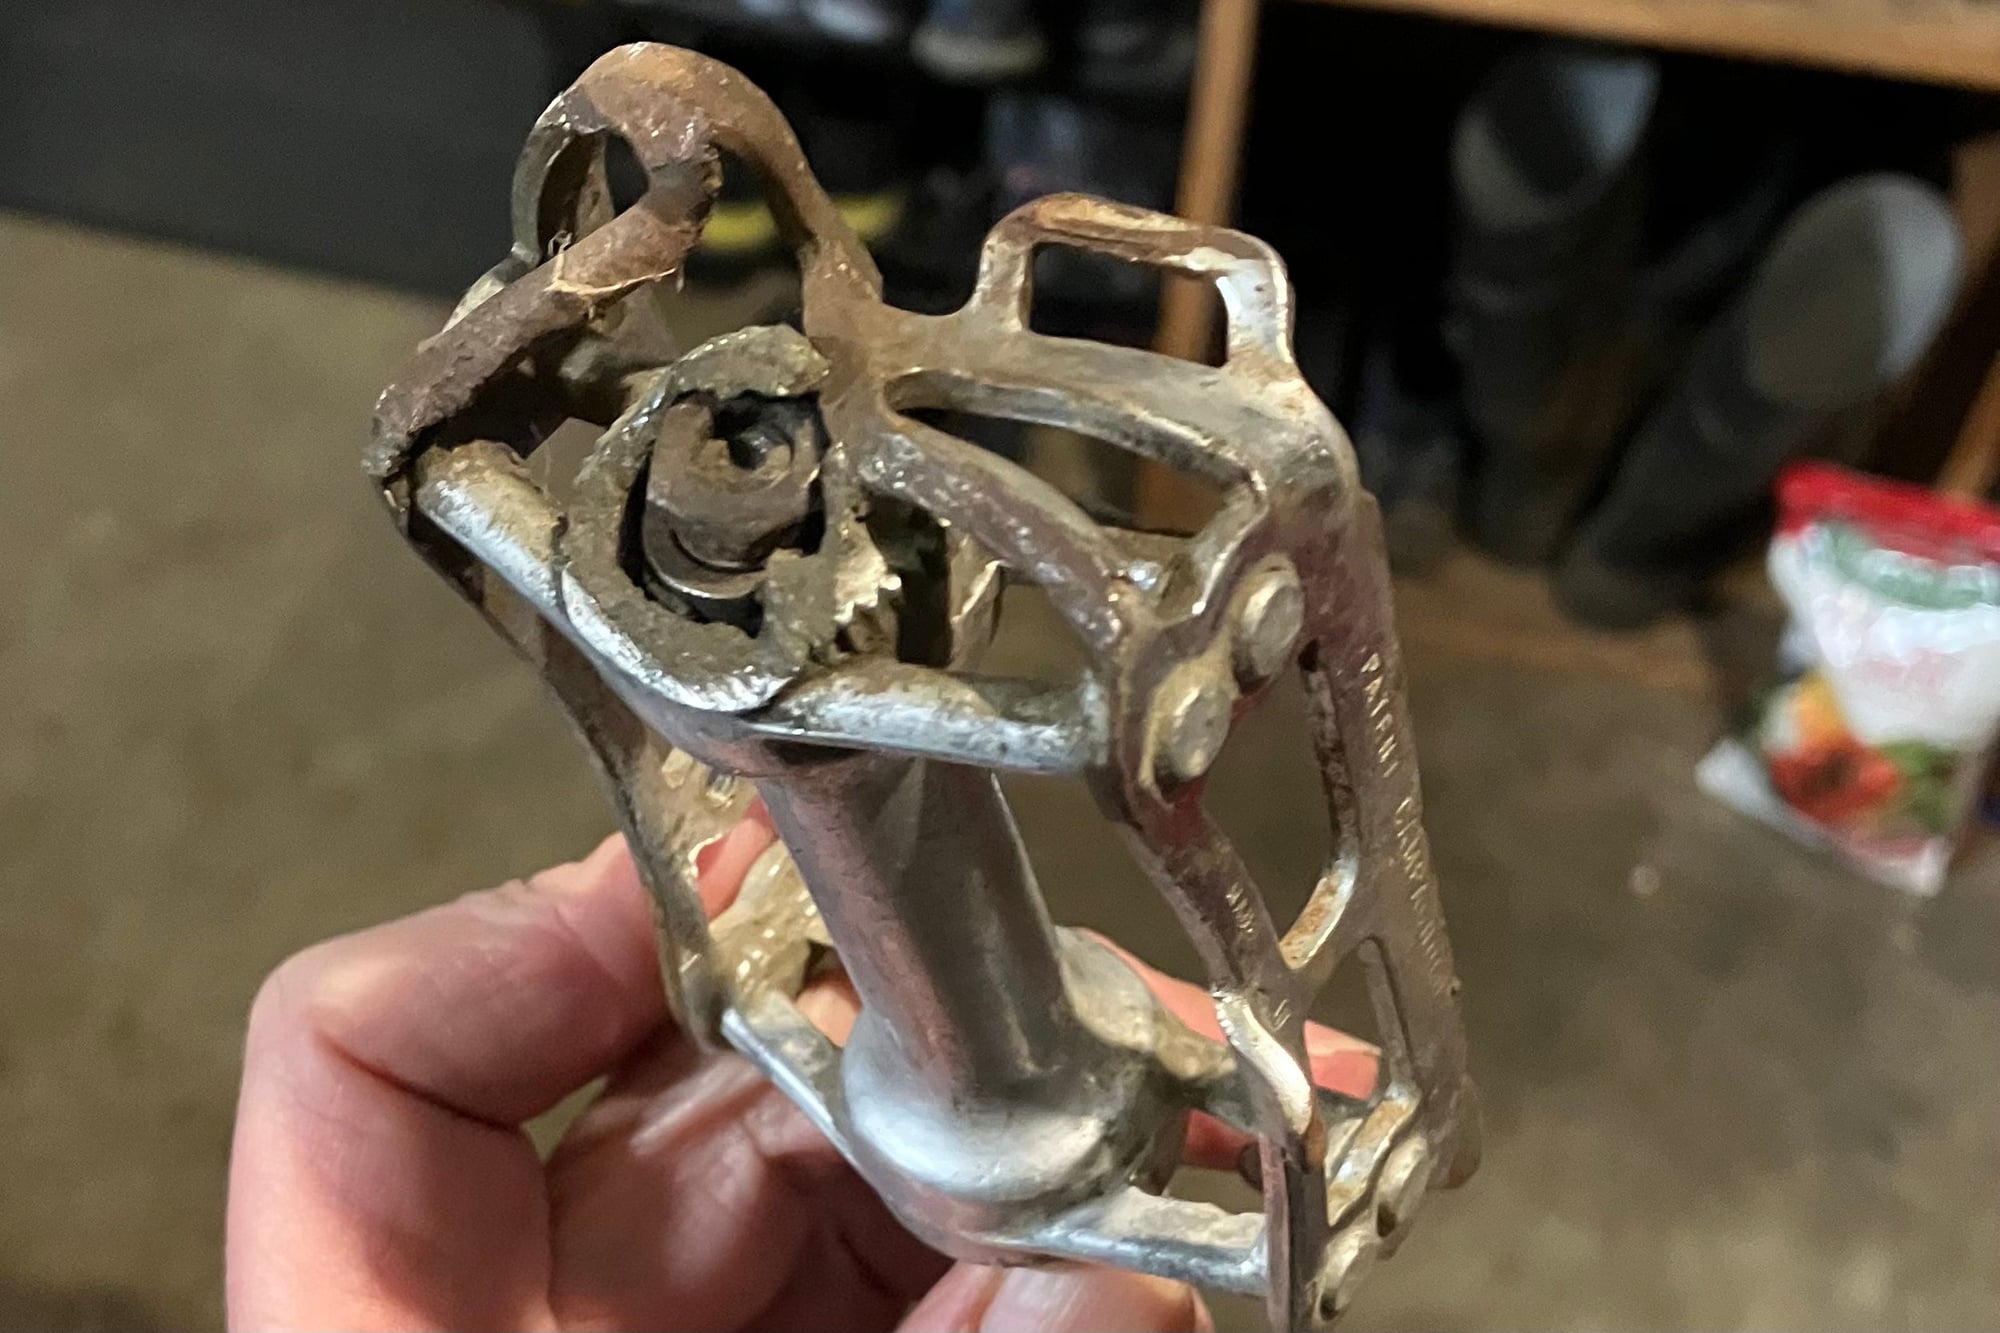
Even steel Campy does not stand up to the abrasive power of asphalt when the weight of a pickup is applied from above. Btw, the rider walked away and rode the next day.
I was thinking that you might this side of the pedal shaped object for the plate….
and this is why this pedal shaped object is good for little else
Even steel Campy does not stand up to the abrasive power of asphalt when the weight of a pickup is applied from above. Btw, the rider walked away and rode the next day.
Likes For Mr. Spadoni:
03-19-23, 09:14 AM
#378
Edumacator
Join Date: Jan 2018
Location: Goose Creek, SC
Posts: 6,822
Bikes: '87 Crestdale, '87 Basso Gap, '92 Rossin Performance EL-OS, 1990 VanTuyl, 1980s Losa, 1985 Trek 670, 1982 AD SLE, 1987 PX10, etc...
Mentioned: 59 Post(s)
Tagged: 0 Thread(s)
Quoted: 2441 Post(s)
Liked 3,136 Times
in
1,975 Posts
I like Johns idea above.
To keep it campy, he could use a carcass from a seatpost.
To keep it campy, he could use a carcass from a seatpost.
__________________
1987 Crest Cannondale, 1987 Basso Gap, 1992 Rossin Performance EL, 1990ish Van Tuyl, 1985 Trek 670, 1982 AD SLE, 2003 Pinarello Surprise, 1990ish MBK Atlantique, 1987 Peugeot Competition, 1987 Nishiki Tri-A, 1981 Faggin, 1996 Cannondale M500, 1984 Mercian, 1982 AD SuperLeicht, 1985 Massi (model unknown), 1988 Daccordi Griffe , 1989 Fauxsin MTB, 1981 Ciocc Mockba, 1992 Bianchi Giro, 1977 Colnago Super
1987 Crest Cannondale, 1987 Basso Gap, 1992 Rossin Performance EL, 1990ish Van Tuyl, 1985 Trek 670, 1982 AD SLE, 2003 Pinarello Surprise, 1990ish MBK Atlantique, 1987 Peugeot Competition, 1987 Nishiki Tri-A, 1981 Faggin, 1996 Cannondale M500, 1984 Mercian, 1982 AD SuperLeicht, 1985 Massi (model unknown), 1988 Daccordi Griffe , 1989 Fauxsin MTB, 1981 Ciocc Mockba, 1992 Bianchi Giro, 1977 Colnago Super
Likes For jdawginsc:
03-19-23, 09:31 PM
#379
Ride, Wrench, Swap, Race

Join Date: Jan 2010
Location: Northern California
Posts: 9,194
Bikes: Cheltenham-Pedersen racer, Boulder F/S Paris-Roubaix, Varsity racer, '52 Christophe, '62 Continental, '92 Merckx, '75 Limongi, '76 Presto, '72 Gitane SC, '71 Schwinn SS, etc.
Mentioned: 132 Post(s)
Tagged: 0 Thread(s)
Quoted: 1565 Post(s)
Liked 1,296 Times
in
866 Posts
It really looks like it might be easiest to cut off the brake bridge and weld it back on an inch lower.
It'll look cleaner with the bridge somewhat hidden behind the caliper.
If you prepped the surfaces and fashioned a fixture bracket beforehand, an experienced welder could do this in five minutes, then the burnt area gets new paint.
This doesn't solve the problem in front, where I would use the Sheldon Brown "parallel plates" drop-down mount with a sleeve between the two small plates.
Likes For dddd:
03-20-23, 11:18 AM
#380
The Huffmeister
Thread Starter

Join Date: Jul 2008
Location: The Le Grande HQ
Posts: 2,741
Bikes: '79 Trek 938, '86 Jim Merz Allez SE, '90 Miyata 1000, '68 PX-10, '80 PXN-10, '73 Super Course, '87 Guerciotti, '83 Trek 600, '80 Huffy Le Grande
Mentioned: 45 Post(s)
Tagged: 0 Thread(s)
Quoted: 1227 Post(s)
Liked 3,561 Times
in
1,412 Posts
 03-20-23, 11:44 AM
#381
Cantilever believer

Join Date: Nov 2021
Location: Phoenix, AZ
Posts: 1,569
Mentioned: 5 Post(s)
Tagged: 0 Thread(s)
Quoted: 536 Post(s)
Liked 1,844 Times
in
835 Posts
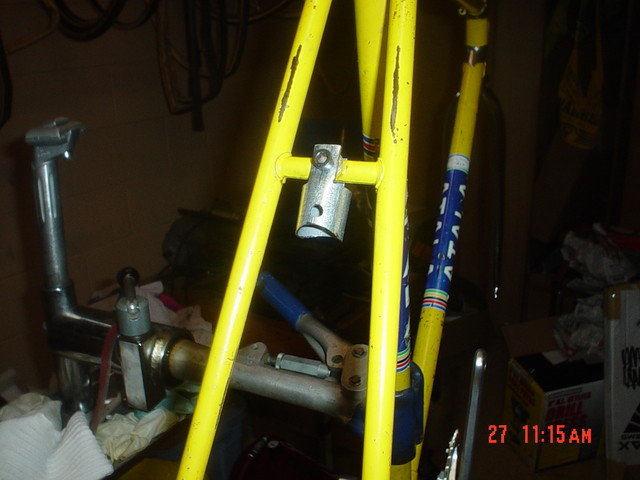
What is that fabbed from - conduit, seatpost, or some other unlucky cylindrical steel object? I may have need to create something like that for a unknown future project.
__________________
Richard C. Moeur, PE - Phoenix AZ, USA
https://www.richardcmoeur.com/bikestuf.html
Richard C. Moeur, PE - Phoenix AZ, USA
https://www.richardcmoeur.com/bikestuf.html

Likes For RCMoeur:
03-20-23, 11:52 AM
#382
Old fart
Join Date: Nov 2004
Location: Appleton WI
Posts: 24,792
Bikes: Several, mostly not name brands.
Mentioned: 153 Post(s)
Tagged: 0 Thread(s)
Quoted: 3591 Post(s)
Liked 3,401 Times
in
1,935 Posts
Likes For JohnDThompson:
03-20-23, 12:44 PM
#383
Ride, Wrench, Swap, Race
Join Date: Jan 2010
Location: Northern California
Posts: 9,194
Bikes: Cheltenham-Pedersen racer, Boulder F/S Paris-Roubaix, Varsity racer, '52 Christophe, '62 Continental, '92 Merckx, '75 Limongi, '76 Presto, '72 Gitane SC, '71 Schwinn SS, etc.
Mentioned: 132 Post(s)
Tagged: 0 Thread(s)
Quoted: 1565 Post(s)
Liked 1,296 Times
in
866 Posts
Conduit being kinda thin-walled, it looks like the bridge needed to have a lot of spacers fitted so as to maintain the full inside-diameter spacing of the big conduit at it's contact points.
And the brake stud might need to be the longer "front" style, to bridge across that diameter, with an internal sleeve to support the tightening compression.
Looks like a quite-chunky addition, but possibly made "aesthetic" with careful scupting and paint(?).
Perhaps also, a smaller diameter of possibly thicker-walled steel tubing might look nicer in this application(?) and make the caliper stud length less of an issue.
With so many joinings going on, I would initially leave the bolts/nuts on the loose side, then "pre-load" the assembly under considerable actual braking force while giving the nuts a final tightening.
This might prevent slippage in use on the bike's maiden voyage where the pads might then contact the tire, and can be pulled off by just one person using all of one's bodily abilities together with perhaps an elastic band applying force to the lever whilst pulling the rear tire forward.
Last edited by dddd; 03-20-23 at 12:54 PM.
03-20-23, 04:22 PM
#384
The Huffmeister
Thread Starter
Join Date: Jul 2008
Location: The Le Grande HQ
Posts: 2,741
Bikes: '79 Trek 938, '86 Jim Merz Allez SE, '90 Miyata 1000, '68 PX-10, '80 PXN-10, '73 Super Course, '87 Guerciotti, '83 Trek 600, '80 Huffy Le Grande
Mentioned: 45 Post(s)
Tagged: 0 Thread(s)
Quoted: 1227 Post(s)
Liked 3,561 Times
in
1,412 Posts
Re pedal as dropper plate�
I was thinking that you might this side of the pedal shaped object for the plate�.
and this is why this pedal shaped object is good for little else
Even steel Campy does not stand up to the abrasive power of asphalt when the weight of a pickup is applied from above. Btw, the rider walked away and rode the next day.
Really glad to hear that the rider of that is okay!
I'm okay with non-Campy if it is home made or fabricated from scratch. Due to the weight (remember, we are starting with a barge) I'm hesitant to go steel any place I can go alloy or titanium. Obviously a titanium brake adapter makes little sense if alloy can do the same thing. Course the whole point of this build is to not make any sense whatsoever, so there's that. I do actually have some aluminum bracket stuff that I am going to try to use first for a fabricated brake adapter but if it turns out to be a huge fail I'll definitely consider other options.
03-20-23, 04:39 PM
#385
The Huffmeister
Thread Starter
Join Date: Jul 2008
Location: The Le Grande HQ
Posts: 2,741
Bikes: '79 Trek 938, '86 Jim Merz Allez SE, '90 Miyata 1000, '68 PX-10, '80 PXN-10, '73 Super Course, '87 Guerciotti, '83 Trek 600, '80 Huffy Le Grande
Mentioned: 45 Post(s)
Tagged: 0 Thread(s)
Quoted: 1227 Post(s)
Liked 3,561 Times
in
1,412 Posts
It really looks like it might be easiest to cut off the brake bridge and weld it back on an inch lower.
It'll look cleaner with the bridge somewhat hidden behind the caliper.
If you prepped the surfaces and fashioned a fixture bracket beforehand, an experienced welder could do this in five minutes, then the burnt area gets new paint.
This doesn't solve the problem in front, where I would use the Sheldon Brown "parallel plates" drop-down mount with a sleeve between the two small plates.
It'll look cleaner with the bridge somewhat hidden behind the caliper.
If you prepped the surfaces and fashioned a fixture bracket beforehand, an experienced welder could do this in five minutes, then the burnt area gets new paint.
This doesn't solve the problem in front, where I would use the Sheldon Brown "parallel plates" drop-down mount with a sleeve between the two small plates.
I think we'll get something going that won't require a welder or cutting stuff off or any of that. I can weld, but I'm not great at it. Since we have the deadline and I've got some material, I'm going to give it a go and if it works it works, and if it doesn't, it won't be the first thing!
I need to fabricate:
1. Front brake thing
2. Rear brake thing
3. Shift clamp adapter thing
3.5. Shift cable clamp adapter thing
4. FD adapter thing
5. Rear derailleur hanger thing
Basically I just have a lot of things to make! But that is what makes this build fun. I'm lamenting the fact that homemade bracketry does not offend the senses quite as much as butchered Campy stuff, but we all have to make sacrifices.
Likes For AdventureManCO:
03-20-23, 04:43 PM
#386
The Huffmeister
Thread Starter
Join Date: Jul 2008
Location: The Le Grande HQ
Posts: 2,741
Bikes: '79 Trek 938, '86 Jim Merz Allez SE, '90 Miyata 1000, '68 PX-10, '80 PXN-10, '73 Super Course, '87 Guerciotti, '83 Trek 600, '80 Huffy Le Grande
Mentioned: 45 Post(s)
Tagged: 0 Thread(s)
Quoted: 1227 Post(s)
Liked 3,561 Times
in
1,412 Posts
Likes For AdventureManCO:
03-20-23, 04:50 PM
#387
Master Parts Rearranger

Join Date: Mar 2015
Location: Portlandia's Kuiper Belt, OR
Posts: 4,403
Bikes: 1982 Trek 720 - 1985 Trek 620 - 1984 Trek 620 - 1980 Trek 510 - Other luminaries past and present
Mentioned: 221 Post(s)
Tagged: 0 Thread(s)
Quoted: 1556 Post(s)
Liked 2,024 Times
in
989 Posts
Duct tape still a possibility??? 
03-20-23, 04:51 PM
#388
The Huffmeister
Thread Starter
Join Date: Jul 2008
Location: The Le Grande HQ
Posts: 2,741
Bikes: '79 Trek 938, '86 Jim Merz Allez SE, '90 Miyata 1000, '68 PX-10, '80 PXN-10, '73 Super Course, '87 Guerciotti, '83 Trek 600, '80 Huffy Le Grande
Mentioned: 45 Post(s)
Tagged: 0 Thread(s)
Quoted: 1227 Post(s)
Liked 3,561 Times
in
1,412 Posts

Although I've got the second piece of junk Huffy in the garage right now.
I've thought about cutting it up to look at how these things are brazed and contruct, but I've been too tempted by the idea of putting on the current gen highest tier electronic groupset on it

If I win the lottery ya'll know what I will be doing!
Likes For AdventureManCO:
03-20-23, 04:57 PM
#389
The Huffmeister
Thread Starter
Join Date: Jul 2008
Location: The Le Grande HQ
Posts: 2,741
Bikes: '79 Trek 938, '86 Jim Merz Allez SE, '90 Miyata 1000, '68 PX-10, '80 PXN-10, '73 Super Course, '87 Guerciotti, '83 Trek 600, '80 Huffy Le Grande
Mentioned: 45 Post(s)
Tagged: 0 Thread(s)
Quoted: 1227 Post(s)
Liked 3,561 Times
in
1,412 Posts
Likes For AdventureManCO:
03-20-23, 05:08 PM
#390
Senior Member

I like the idea of using one of these without the strap. It is made of iron so it is fitting for the Huffy.
https://www.menards.com/main/electri...os=54&exp=true

https://www.menards.com/main/electri...os=54&exp=true
Likes For rjhammett:
03-20-23, 05:17 PM
#391
The Huffmeister
Thread Starter
Join Date: Jul 2008
Location: The Le Grande HQ
Posts: 2,741
Bikes: '79 Trek 938, '86 Jim Merz Allez SE, '90 Miyata 1000, '68 PX-10, '80 PXN-10, '73 Super Course, '87 Guerciotti, '83 Trek 600, '80 Huffy Le Grande
Mentioned: 45 Post(s)
Tagged: 0 Thread(s)
Quoted: 1227 Post(s)
Liked 3,561 Times
in
1,412 Posts
Ooooooh, look what I just found on this website!!!
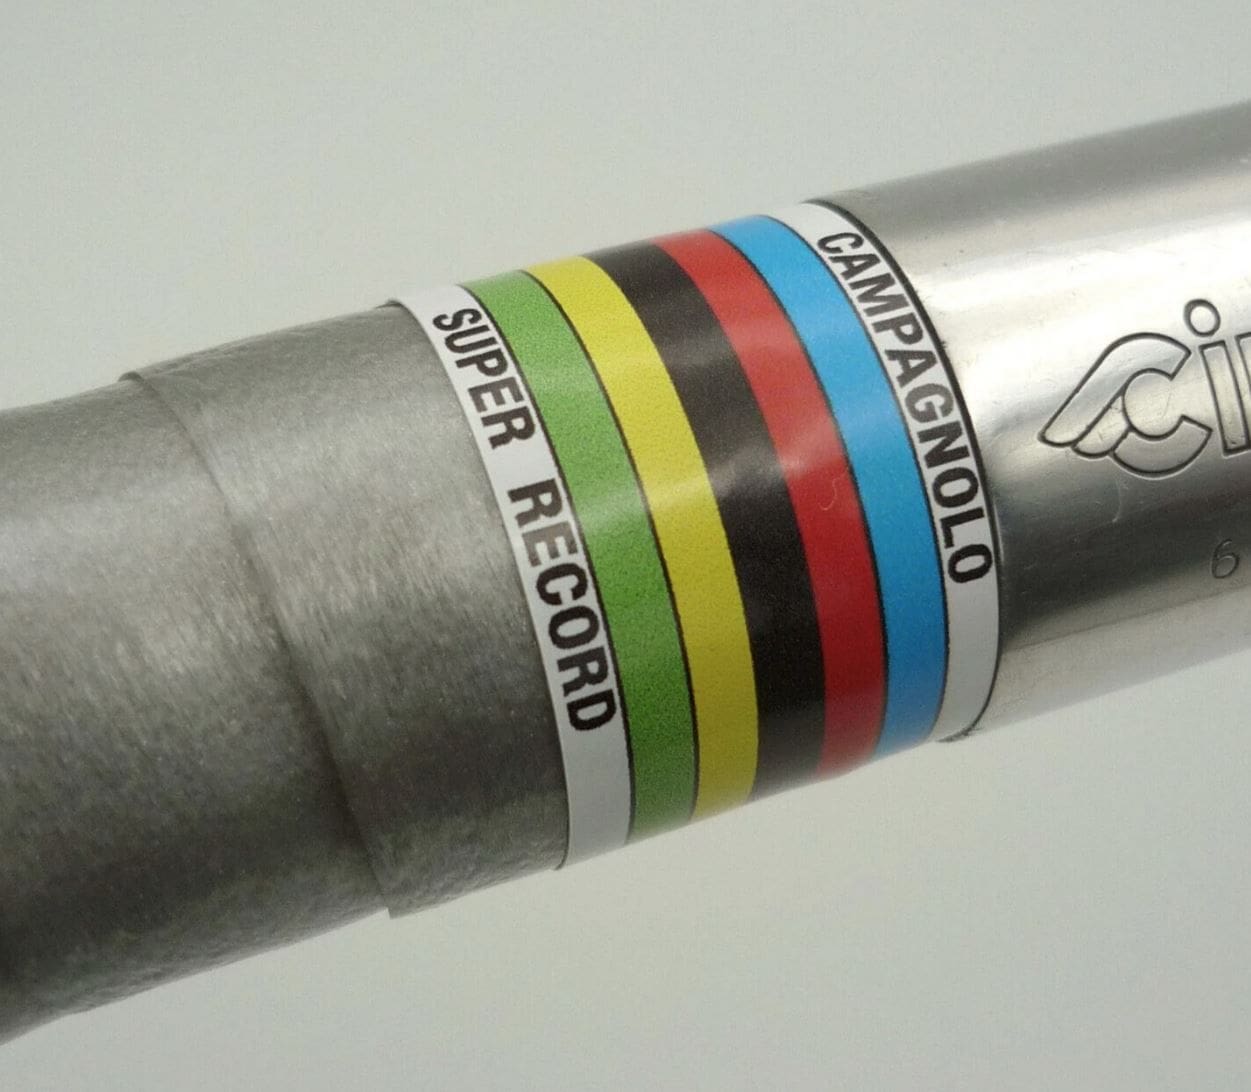
https://www.velobitz.co.uk/handlebar...epro#gallery-1
Listen here to what it says!
"Add a touch of Campagnolo World Champion finesse..."
That's exactly what I'm trying to do! Like exactly! It's like they read my flippin' mind. Loving this.
Now. I don't know if you know what I'm thinking, buuuuuuuuuuuuut... the overall surface area of a bike...
Based on this post (thanks Landgolier for doing the work !!) a classic steel bicycle (size 58, pretty much exactly the Huffy) is nearly exactly 1 meter of surface area. 1 meter = 1550 square inches.
In the description, it says that each sticker is 114mm x 19mm, which of course 2166 sq mm, everyone knows that. So 2166sq mm = .002166 sq meters, which of course is 3.357 sq in.
So given that an average bike is 1550 square inches, and each one of these stickers equates to 3.357 sq inches, and there are two of them in each package, that means:
1550sq inches / (3.357 x 2) =
1550sq inches / 6.71 = 230.839
So, if I wanted to cover the whole bike frame in Campagnolo Super Record World Champion stickers, I would need about 231 sets of them. The price on the website is 2.50 pounds (weird British currency) so the conversion on this is =
1 pound (GPB) = $1.23
Therefore,
2.50 GPB = $3.07
So, given that we need 231 sets of these stickers, and the price equates to $3.07 today (shipping not included), it would cost us:
$709
$709!!!!!!!
Wow! That's even cheaper than a Joe Bell paintjob! I'm sold.
Likes For AdventureManCO:
03-20-23, 05:42 PM
#392

Senior Member
Join Date: Dec 2005
Posts: 17,159
Mentioned: 481 Post(s)
Tagged: 0 Thread(s)
Quoted: 3811 Post(s)
Liked 6,716 Times
in
2,613 Posts
I�m concerned that the most prohibitive cost will be that small bottle of Tulio�s urine you�ll need to officially christen this bike as Campy-worthy. Maybe someone should start a kickstarter campaign.
Likes For nlerner:
03-20-23, 05:53 PM
#393
Banned.

Join Date: Jul 2009
Location: PAZ
Posts: 12,294
Mentioned: 255 Post(s)
Tagged: 0 Thread(s)
Quoted: 2588 Post(s)
Liked 4,824 Times
in
1,709 Posts
In the description, it says that each sticker is 114mm x 19mm, which of course 2166 sq mm, everyone knows that. So 2166sq mm = .002166 sq meters, which of course is 3.357 sq in.
So given that an average bike is 1550 square inches, and each one of these stickers equates to 3.357 sq inches, and there are two of them in each package, that means:
1550sq inches / (3.357 x 2) =
1550sq inches / 6.71 = 230.839
So, if I wanted to cover the whole bike frame in Campagnolo Super Record World Champion stickers, I would need about 231 sets of them. The price on the website is 2.50 pounds (weird British currency) so the conversion on this is =
1 pound (GPB) = $1.23
Therefore,
2.50 GPB = $3.07
So, given that we need 231 sets of these stickers, and the price equates to $3.07 today (shipping not included), it would cost us: $709

This thread has now officially been ruined for me.
You're dead to me now, Dave.

DD
 03-20-23, 06:24 PM
#394
The Huffmeister
Thread Starter
Join Date: Jul 2008
Location: The Le Grande HQ
Posts: 2,741
Bikes: '79 Trek 938, '86 Jim Merz Allez SE, '90 Miyata 1000, '68 PX-10, '80 PXN-10, '73 Super Course, '87 Guerciotti, '83 Trek 600, '80 Huffy Le Grande
Mentioned: 45 Post(s)
Tagged: 0 Thread(s)
Quoted: 1227 Post(s)
Liked 3,561 Times
in
1,412 Posts
You know, I'm not very good at math myself. Numbers hurt my head...especially the numbers following a dollar sign and affiliated with Campagnolo items.
BTW I actually did order some of those stickers lol. They will look PERFECT sandwiching the 'Huffy 12 Speed' seat tube graphic. Lest we forget that Huffy was the winning steed for a World Champi...err, a local race Championship in the real wor...err, in a fake TV series.
STILL!
Lest we forget the Huffy's Championship Pedigree! It deserves those 'World Champion' colors!
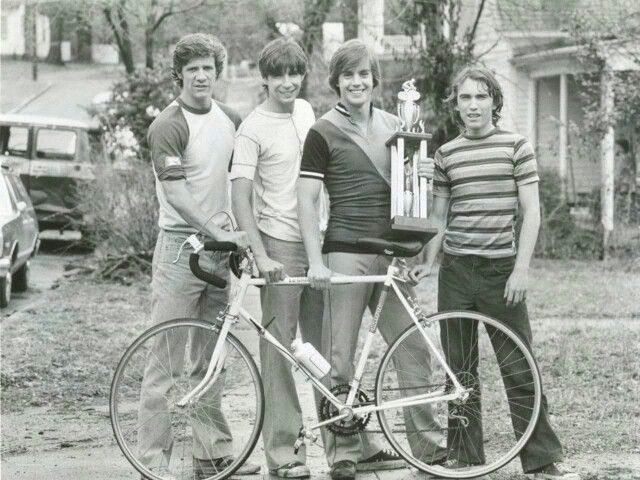
Photographic evidence of the Le Grande's winning race pedigree. Pay no attention to the fact that these are all paid actors. It's about heart!
Last edited by AdventureManCO; 03-20-23 at 06:36 PM.
Likes For AdventureManCO:
03-20-23, 06:34 PM
#395
Banned.
Join Date: Jul 2009
Location: PAZ
Posts: 12,294
Mentioned: 255 Post(s)
Tagged: 0 Thread(s)
Quoted: 2588 Post(s)
Liked 4,824 Times
in
1,709 Posts
And I lol'ed at that Campy prices comment

DD
Likes For Drillium Dude:
03-20-23, 08:14 PM
#396
Old fart
Join Date: Nov 2004
Location: Appleton WI
Posts: 24,792
Bikes: Several, mostly not name brands.
Mentioned: 153 Post(s)
Tagged: 0 Thread(s)
Quoted: 3591 Post(s)
Liked 3,401 Times
in
1,935 Posts
Or just a short section of tube over the brake mounting bolt to reinforce the conduit.
Likes For JohnDThompson:
03-20-23, 08:36 PM
#397
Senior Member
Join Date: May 2019
Location: Bloomington, IN
Posts: 2,951
Bikes: Paramount, Faggin, Ochsner, Ciocc, Basso
Mentioned: 117 Post(s)
Tagged: 0 Thread(s)
Quoted: 1303 Post(s)
Liked 1,912 Times
in
1,142 Posts
Youse guys are way over thinking the brake problems for dropping the caliper. A bit of aluminum bar stock and some drilling will give a drop bolt part. Even a bit of 6X1 tapping would make it quite functional with no extra weight. I am currently working on making a part for this issue. Smiles, MH
Likes For Mad Honk:
03-20-23, 08:43 PM
#398
The Huffmeister
Thread Starter
Join Date: Jul 2008
Location: The Le Grande HQ
Posts: 2,741
Bikes: '79 Trek 938, '86 Jim Merz Allez SE, '90 Miyata 1000, '68 PX-10, '80 PXN-10, '73 Super Course, '87 Guerciotti, '83 Trek 600, '80 Huffy Le Grande
Mentioned: 45 Post(s)
Tagged: 0 Thread(s)
Quoted: 1227 Post(s)
Liked 3,561 Times
in
1,412 Posts
 03-20-23, 09:03 PM
#399
Banned.
Join Date: Jul 2009
Location: PAZ
Posts: 12,294
Mentioned: 255 Post(s)
Tagged: 0 Thread(s)
Quoted: 2588 Post(s)
Liked 4,824 Times
in
1,709 Posts
DD
Likes For Drillium Dude:
03-20-23, 09:13 PM
#400
Senior Member
Join Date: May 2019
Location: Bloomington, IN
Posts: 2,951
Bikes: Paramount, Faggin, Ochsner, Ciocc, Basso
Mentioned: 117 Post(s)
Tagged: 0 Thread(s)
Quoted: 1303 Post(s)
Liked 1,912 Times
in
1,142 Posts
Yeah I thought that was the point! And we may even get to close to 1000 posts over the bike project. Smiles, MH
Likes For Mad Honk: