


Cottered Crank Removal for a newbie
 08-10-09, 09:27 PM
#1
Newbie
Thread Starter
Join Date: Aug 2009
Posts: 4
Mentioned: 0 Post(s)
Tagged: 0 Thread(s)
Quoted: 0 Post(s)
Likes: 0
Liked 0 Times
in
0 Posts
Cottered Crank Removal for a newbie
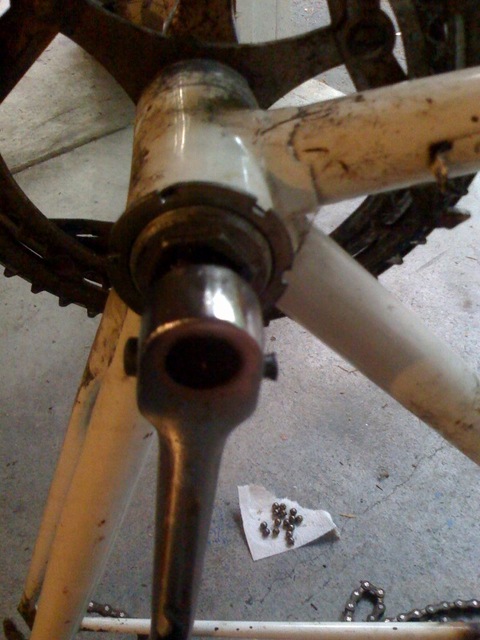
Hi all, I'm new here and looking for some help. I just inherited my dad's old Peugeot from the 70's and I'm trying to fix it up and turn it into a fixed gear. Before I even attempt to describe the problem let me tell you that I am completely 100% new to trying to fix bikes. I got pretty much everything off the bike and got to the crank. With no idea about how to take off normal cranks or how cranks work, i just started unscrewing stuff (good idea right?). Well I started by unscrewing the part that is right up against the frame (I don't know what it's called). This eventually came undone to expose the ball bearings. As I started pulling and moving stuff around the ball bearings started coming out and falling down into the tubes. I got all of them out (you can see them in the picture on that piece of paper towel).
I have three questions.
1. How do I remove these cranks? I have found that these are cottered cranks (right??) and looked up the common ways of getting them out. I have smacked away at the screw trying to get it loose and it has done nothing but mushroom the screw head making it impossible to put the nut back on. Any other ideas? Also, the other side doesn't even have a screw coming out, it looks like someone tried to drill it out or something (see picture).
2. How do I put the ball bearings back? Do I just put them back where they belong? It seems like they would just fall right out, there is nothing on the other side keeping it in? I should probably wash them off to get the dirt and stuff off right?
3. This seemed to be working just fine before I decided to mess with it. Should I just put it back together? Do I just put the ball bearings back in and screw it back and try to put the cap back on the screw I smacked away at?
Advice please!
Thanks,
Matt
 08-10-09, 09:29 PM
#2
Newbie
Thread Starter
Join Date: Aug 2009
Posts: 4
Mentioned: 0 Post(s)
Tagged: 0 Thread(s)
Quoted: 0 Post(s)
Likes: 0
Liked 0 Times
in
0 Posts
I forgot the pictures:
the screw after i smacked away at it with a hammer
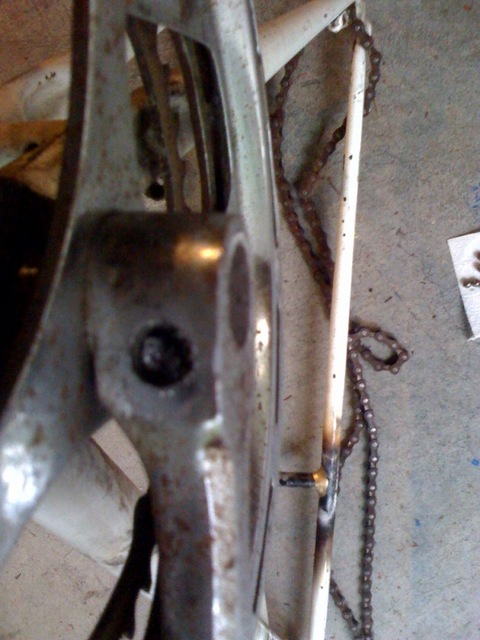
kind of hard to see, but it looks like someone tried to drill out the screw.
the screw after i smacked away at it with a hammer
kind of hard to see, but it looks like someone tried to drill out the screw.
08-10-09, 09:48 PM
#3

Veteran Racer
Join Date: Jul 2009
Location: Ciudad de Vacas, Tejas
Posts: 11,760
Bikes: 32 frames + 80 wheels
Mentioned: 26 Post(s)
Tagged: 0 Thread(s)
Quoted: 1337 Post(s)
Liked 765 Times
in
432 Posts
Matt,
The "screws" are what's called the cotter pins, hence the term cottered crank. They are wedges which are tightened with the threaded nuts. They need to be driven out though the side opposite the threads. You will need to find replacements, as the ones you have now are ruined. Once they are removed, the crank arms will slide right off the axle. Beyond that, read Sheldon Brown's article
https://www.sheldonbrown.com/tooltips/cotters.html
 08-11-09, 01:23 AM
#5
Newbie
Thread Starter
Join Date: Aug 2009
Posts: 4
Mentioned: 0 Post(s)
Tagged: 0 Thread(s)
Quoted: 0 Post(s)
Likes: 0
Liked 0 Times
in
0 Posts
Yea I read those already and tried the hammer part but I don't want to drill. Is it safe to just leave it as is, with no nut back on top and ride like that? Also, what do i do about the ball bearings falling out? Do i just shove them back in and screw it back? What is stopping them from falling out like they did after i took it off?
-matt
-matt


 08-11-09, 02:36 AM
#7
Senior Member
Yea I read those already and tried the hammer part but I don't want to drill. Is it safe to just leave it as is, with no nut back on top and ride like that? Also, what do i do about the ball bearings falling out? Do i just shove them back in and screw it back? What is stopping them from falling out like they did after i took it off?
-matt
-matt
As a matter of fact, I've only taken two cottered cranks apart (both mid-70s Peugeots), and had to pay both times to get them unstuck. And I hit them plenty hard with a hammer (while bracing the cranks with a wood block).
Last edited by sunburst; 08-11-09 at 02:40 AM.
08-11-09, 04:37 AM
#8
Senior Member
Join Date: Nov 2005
Location: Stratford Ontario Canada
Posts: 365
Bikes: NORCO, GIANT
Mentioned: 0 Post(s)
Tagged: 0 Thread(s)
Quoted: 1 Post(s)
Likes: 0
Liked 0 Times
in
0 Posts
I use a small socket and put it over the threaded part and pound on it. That way you dont pound it flush with the crank arm. But now that youve done that drill it out. Take a punch tap a starting point on the threaded side centred that way your drill bit will go strait through and not slip off and scrap your crank arm. But if you are updating your cranks than just quik cut it off as showen above. French threading so save anything treaded. And if you up date, the new cranks and shaft will have a ring with the bearings pressed in it I have a peugeot PB9 frame with a updated BB ( any Peugeot gurus out there know if this would be compatable) PM me. Yours for the price of shipping.
08-11-09, 05:22 AM
#9
Registered User
Join Date: Jul 2008
Location: Methuen, MA
Posts: 386
Bikes: Armstrong, Robin Hood, Hercules, Phillips
Mentioned: 0 Post(s)
Tagged: 0 Thread(s)
Quoted: 0 Post(s)
Likes: 0
Liked 0 Times
in
0 Posts
no you can't ride without the nuts on the cotters, they will fall out from vibrations, and you may have an accident and die. you may well have to take it to the LBS if you arent comfortable witht he removal. they don't respond well to force. i have never had to use more than 1 solid smack with a hammer, but it needs to be perfectly lined up.
after you get the cotters out and get to the bearings part of your project.
buy new bearings at the LBS, bring them a couple to get the right size. 24 bearings from the LBS cost me $1. and a new can of grease from the auto parts store cost me 3.99. and will last me many bikes. but your auto mechanic may give you a half cup of grease for nothing.
the grease is a solid, and will smear around the spindle like peanut butter. then you can attach the bearings they will stick around the edge nicely like a necklace. then put the spindle back into the bracket without touching the sides, like you are playing 'Operation' . at this point i stuck a small rag into the bracket to hold the spindle straight and level. Put more grease into the cup and then attach the other bearings. Once you line the cup up with the spindle, sneak the rag out a little at time so everything stays straight and level.
hint i didn't read: don't tighten the bracket as much as possible. i had to back mine out to a point where it spun freely.
08-11-09, 07:13 AM
#10
Veteran Racer
Join Date: Jul 2009
Location: Ciudad de Vacas, Tejas
Posts: 11,760
Bikes: 32 frames + 80 wheels
Mentioned: 26 Post(s)
Tagged: 0 Thread(s)
Quoted: 1337 Post(s)
Liked 765 Times
in
432 Posts
You said you want to turn it into a fixed gear. Certainly, the frame itself is a good candidate since it has horizontal dropouts and the same 120mm rear dropout spacing as a track (fixed) hub. The cranks are another matter; the bearing races in the cups and spindle (axle) are probably pretty much ruined, the design of the crank does not make it easy to remove one of the chainrings, and you may have a hard time finding the proper replacement cotter pins, since it is an old French bike that is not the same as other brands. So, how much are you willing and able to spend? If it were me, I'd go ahead and buy a modern cotterless track (single chainring) crank with whatever size chainring you want to use and a modern cartridge sealed bottom bracket with French threaded cups/rings.
08-11-09, 07:20 AM
#11


.

Join Date: Aug 2005
Location: Rocket City, No'ala
Posts: 12,764
Bikes: 2014 Trek Domane 5.2, 1985 Pinarello Treviso, 1990 Gardin Shred, 2006 Bianchi San Jose
Mentioned: 3 Post(s)
Tagged: 0 Thread(s)
Quoted: 62 Post(s)
Likes: 0
Liked 29 Times
in
14 Posts
Go here https://velo-orange.com/grcrufrthbob.html and get a French threaded bottom bracket to go with a JIS tapered crank like a Sugino RD.
08-11-09, 07:30 AM
#12
Senior Member
Join Date: Nov 2007
Posts: 1,218
Mentioned: 0 Post(s)
Tagged: 0 Thread(s)
Quoted: 1 Post(s)
Likes: 0
Liked 0 Times
in
0 Posts
Take a 2 x 2, cut it to length to support the other side of the crank, like maybe 12 inches long. Drill a hole in the end of it for the cotter to slip into when it comes loose. Rest/wedge the crank on the 2 x2, and pound on it with a hammer, or a hammer and a big punch if the hammer alone doesn't work. This takes the stress off the BB axle, and gives you something really firm to hammer against.
Next time, don't take the nut off - just loosen it enough so you pound on it, instead of the cotter threads.
Next time, don't take the nut off - just loosen it enough so you pound on it, instead of the cotter threads.
08-11-09, 08:40 AM
#13
My bikes became Vintage
The method sciencemonster describes is the time honoured way it has always been done, usually not even having a hole in the 2 x 2, just supporting the crank really close to the cotter. Shops have used special tools, most of which are no longer made. However, Mark Stonich makes a neat cotter press that would be handy for someone who works a lot with old bikes.
