


SunTour New Winner freewheel disassembly
 05-21-24, 10:47 AM
#1
Wheelman
Thread Starter
Join Date: Aug 2021
Location: Putney, London UK
Posts: 900
Bikes: 1982 Holdsworth Avanti (531), 1961 Holdsworth Cyclone
Mentioned: 4 Post(s)
Tagged: 0 Thread(s)
Quoted: 311 Post(s)
Liked 729 Times
in
370 Posts
SunTour New Winner freewheel disassembly
Hiya Folks,
Got a bit bored today - it's raining outside - so I checked out my New Winner body collection.
I made a New Winner Ultra 6 for my Holdsworth Cyclone and I really like it,
so why not do a proper clean and adjust on a spare body to get that nice tick sound that people don't have any more.
And I might learn something - I've never fully disassembled a freewheel, yet.
It turns out to be slightly more complicated: Sheldon says there are two versions of New Winner body https://www.sheldonbrown.com/suntour-freewheel.html
And I've got both:
Early body
The Perfect / Pro Compe compatability is slightly interesting because the largest New Winner sprocket is 32 but there is a 38 for Perfect / Pro Compe
Here's what mine look like:
Early (Aug 1979)
And late (Feb 1984)
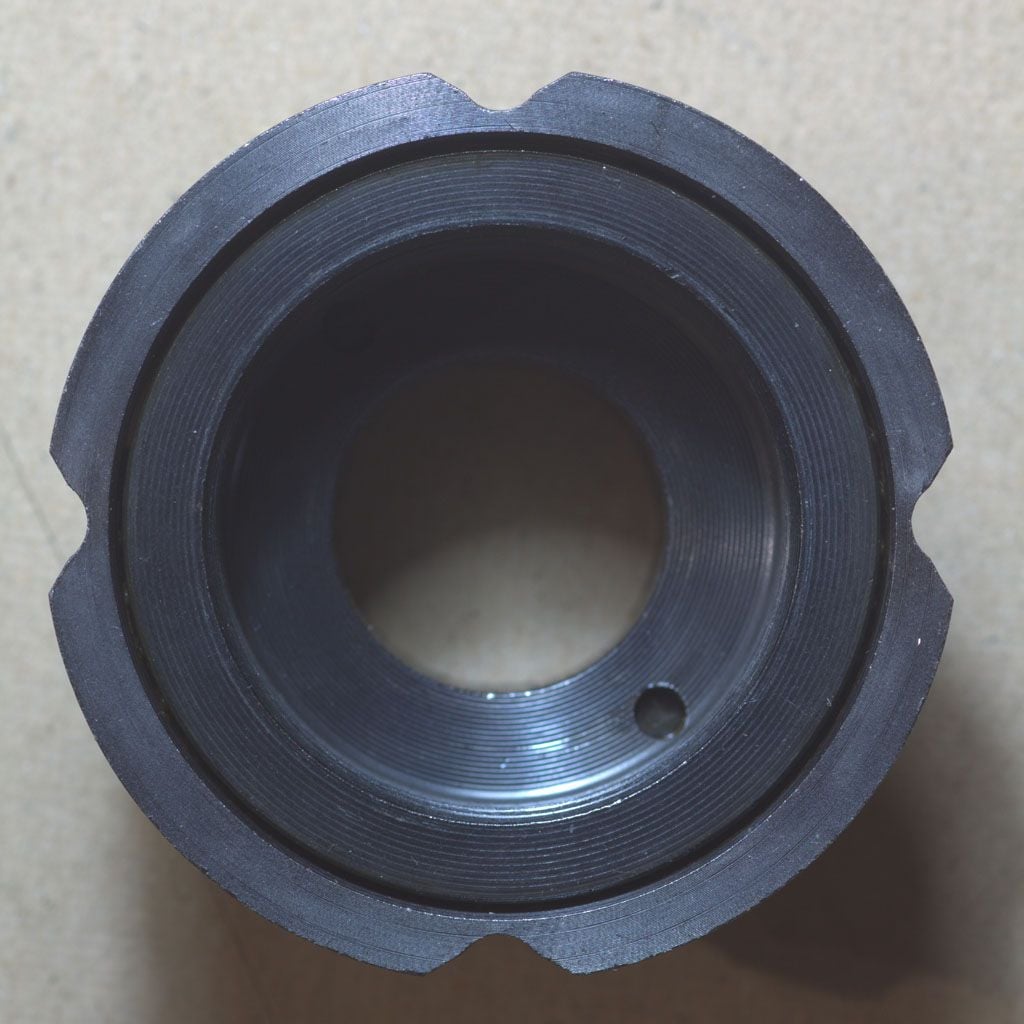
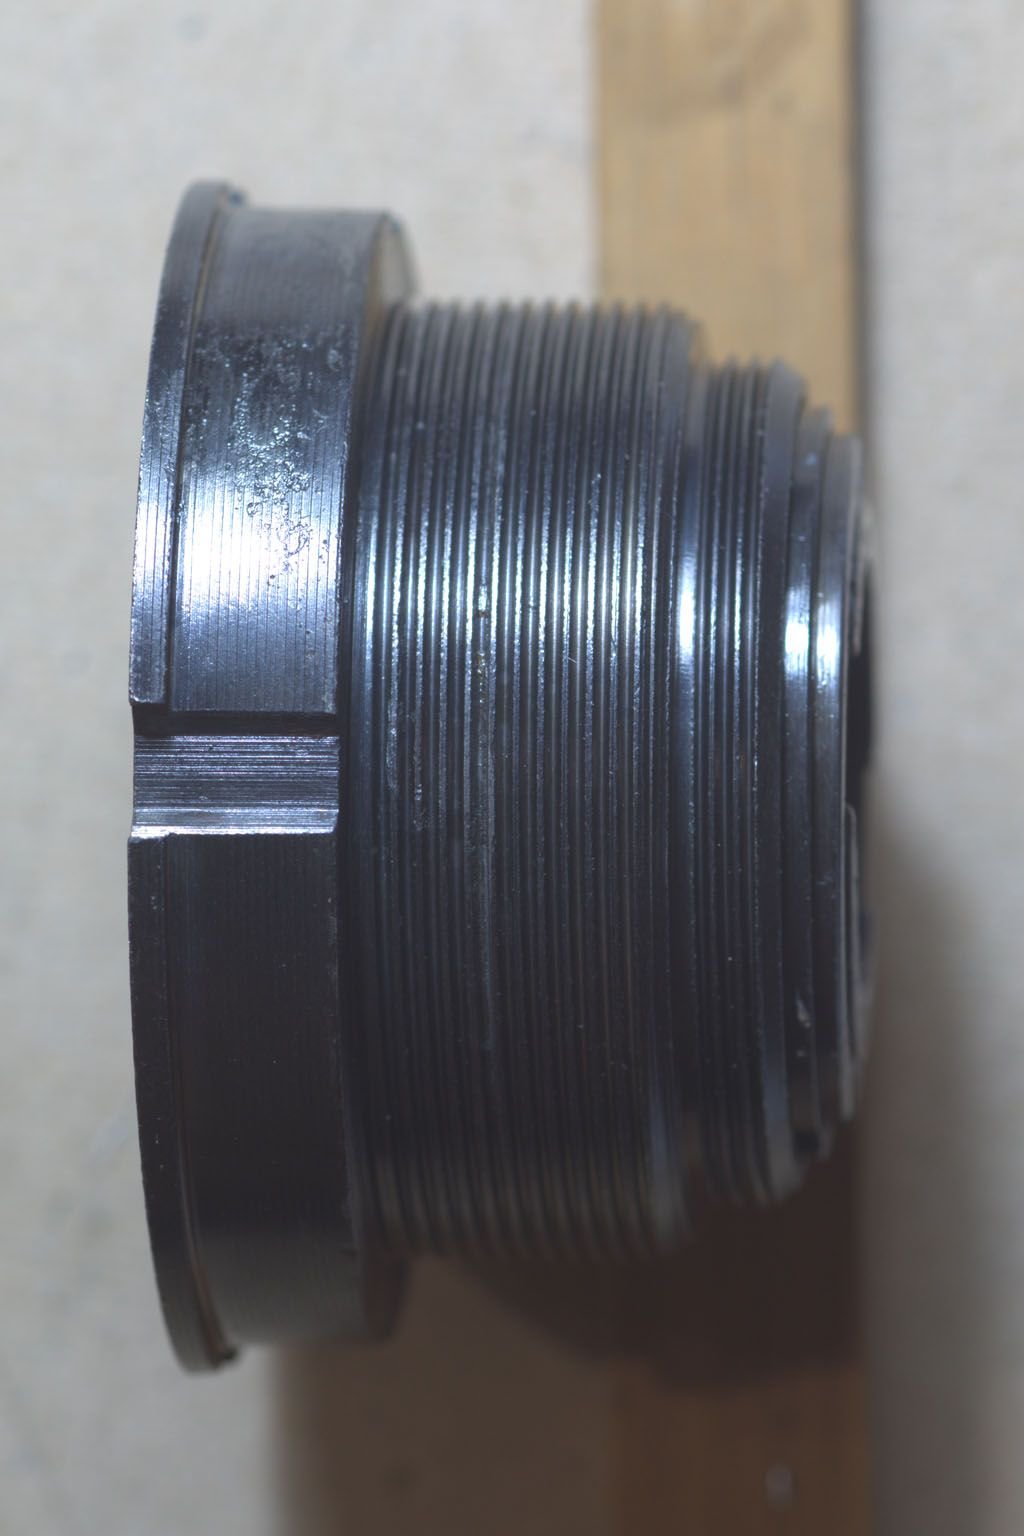
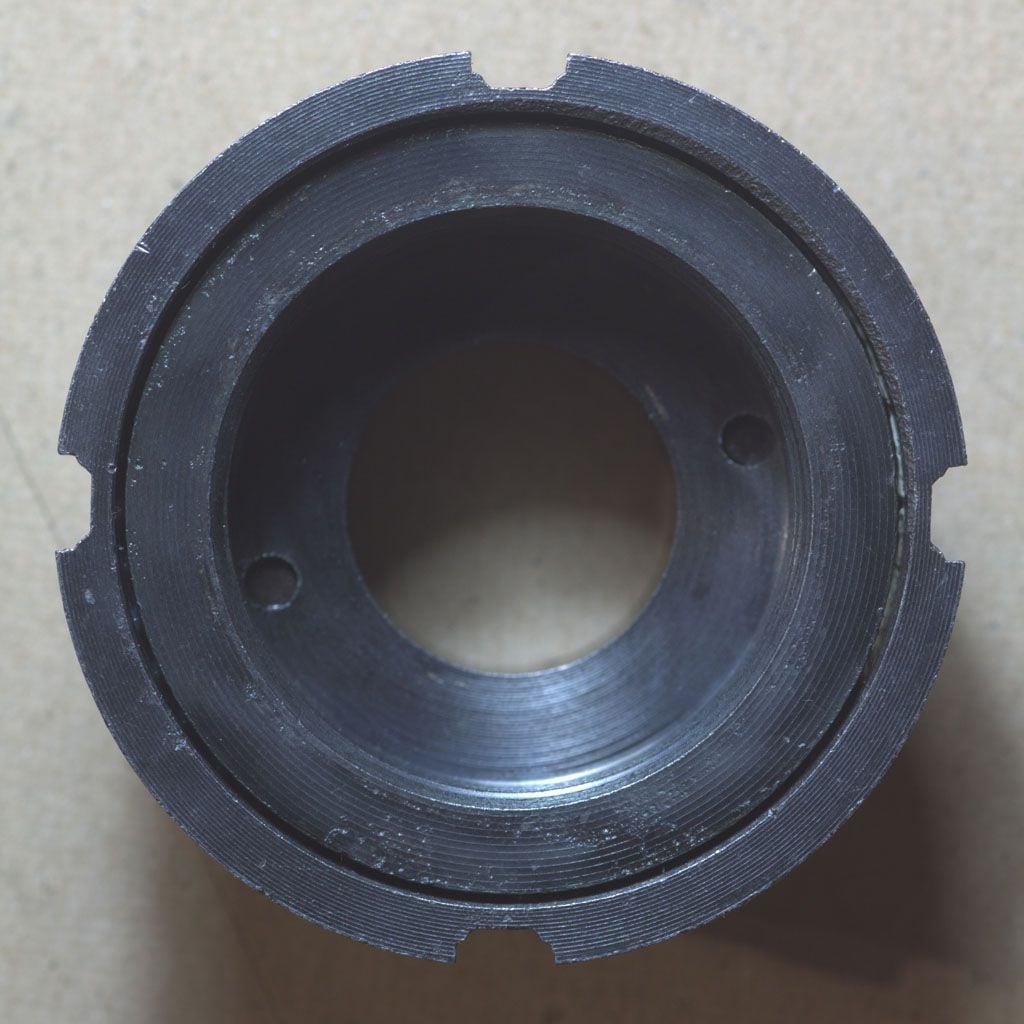
You can see from the pics that the early is in very good condition but the late is slightly mangled.
So my theory is I could use the back of the late one with the lockring/race/etc of the early one.
The main issue now is how to disassemble the body, I know there's a special SunTour tool that would help if I had one.
But supposedly I can do it with a drift if I apply enough WD40 etc first.
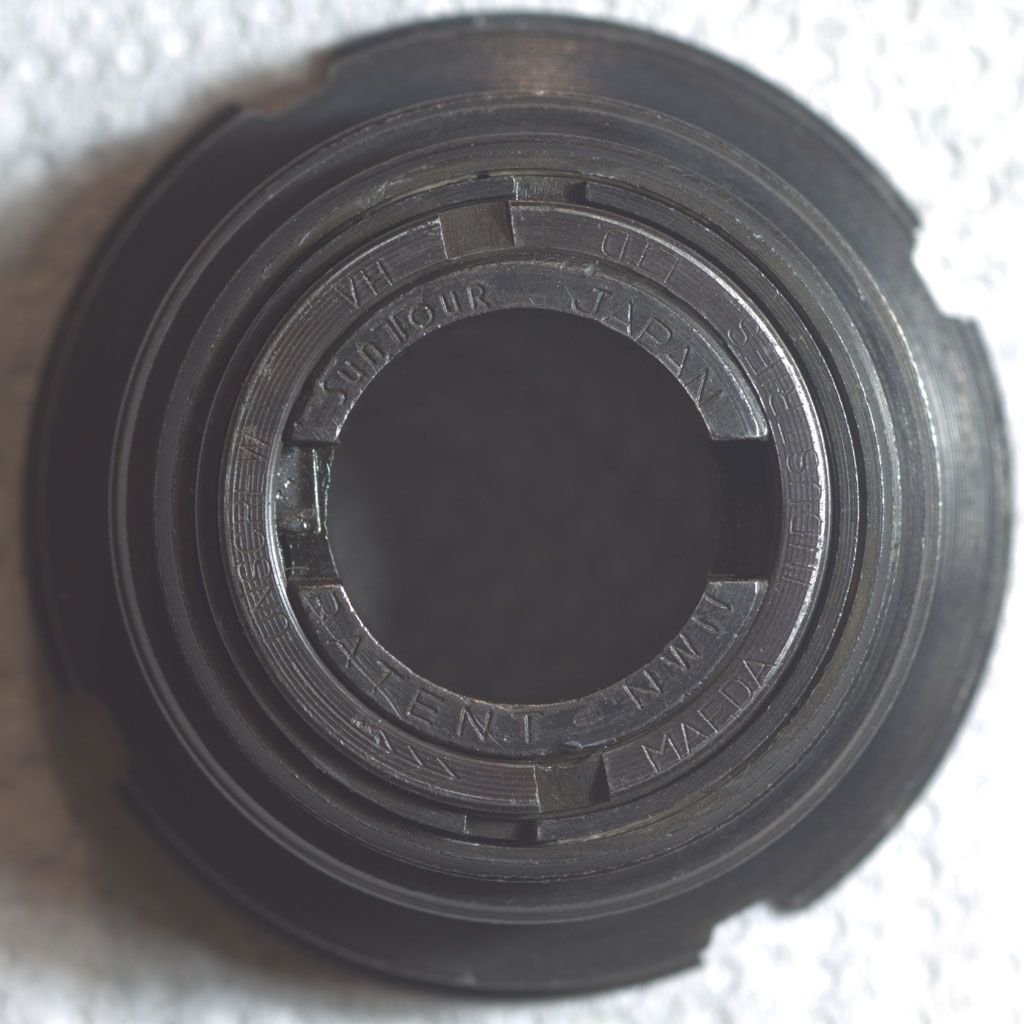
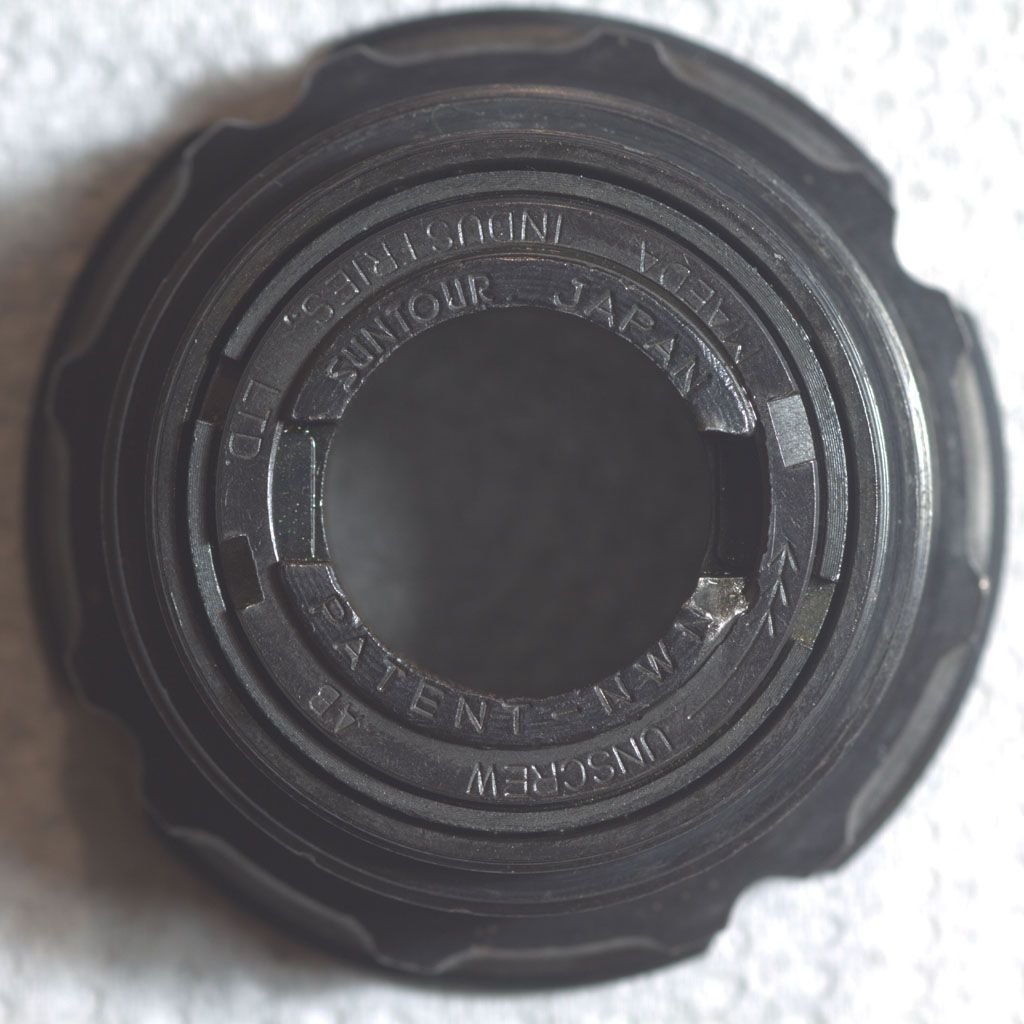
It does say on the lockring which direction to drift:
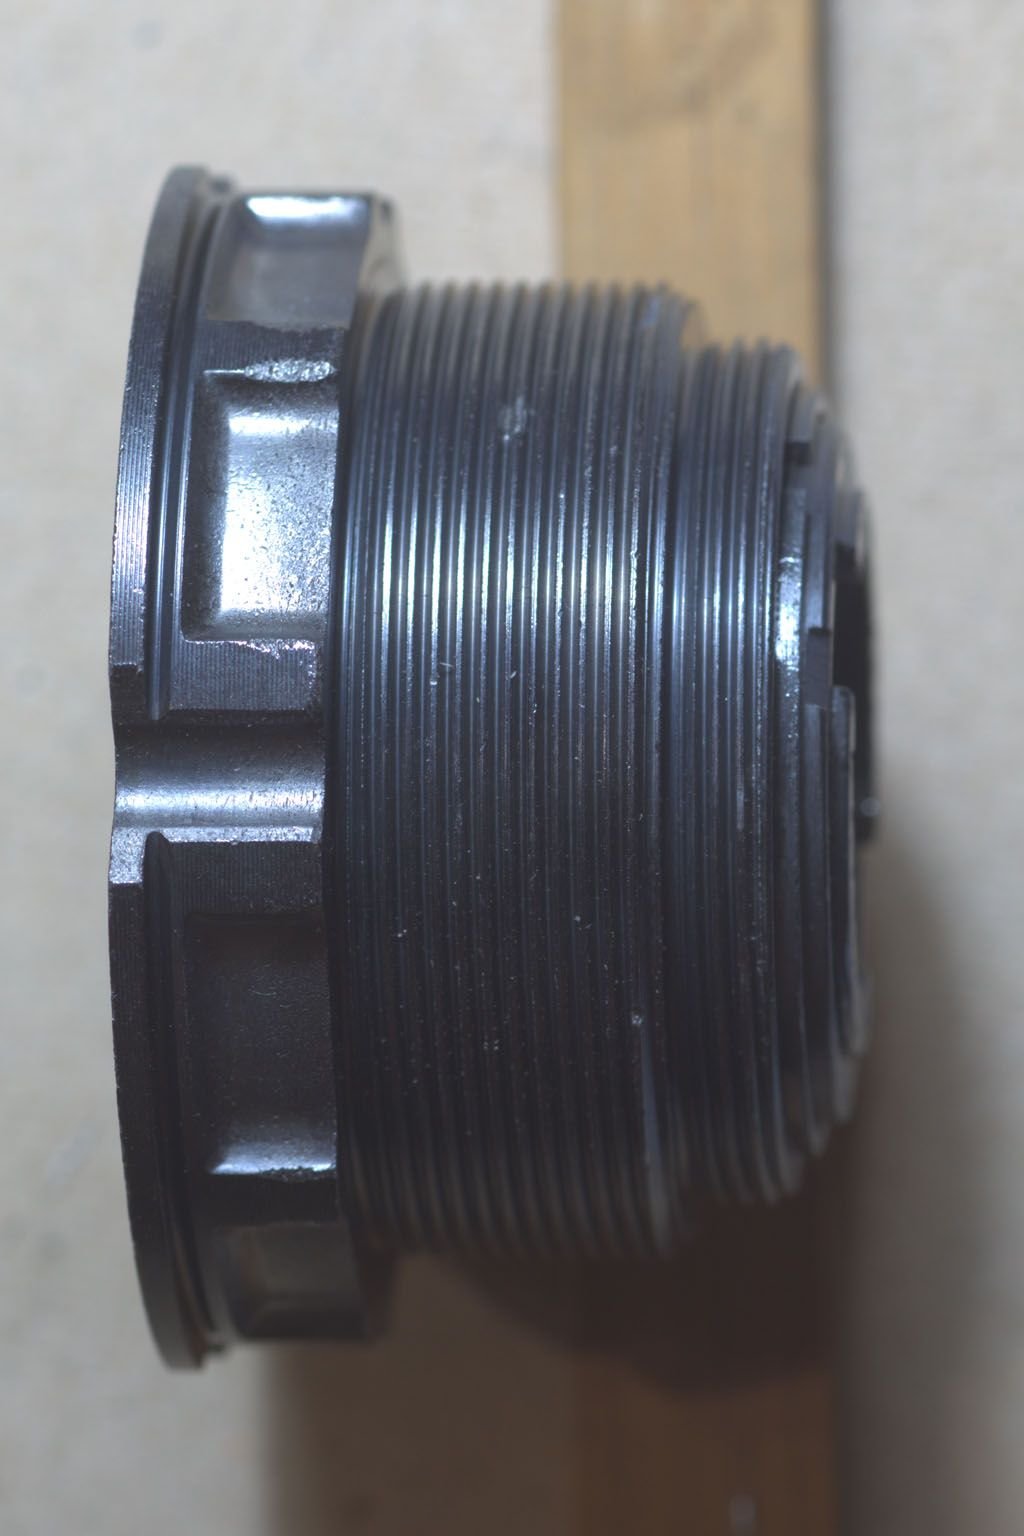
But what's the ring outside the lockring ?
I'm guessing it's for adjusting the bearing clearance.
Got a bit bored today - it's raining outside - so I checked out my New Winner body collection.
I made a New Winner Ultra 6 for my Holdsworth Cyclone and I really like it,
so why not do a proper clean and adjust on a spare body to get that nice tick sound that people don't have any more.
And I might learn something - I've never fully disassembled a freewheel, yet.
It turns out to be slightly more complicated: Sheldon says there are two versions of New Winner body https://www.sheldonbrown.com/suntour-freewheel.html
And I've got both:
Early body
machined from a solid block of steel and have squared notches for the large sprockets
Weight 185g
Takes Perfect and Pro Compe splined sprockets if you file them a bit
Late bodyshaped body (forged or cast) and have deeper, curved grooves for the splined sprockets
Weight 181g
Takes Perfect and Pro Compe splined sprockets without modification
.The Perfect / Pro Compe compatability is slightly interesting because the largest New Winner sprocket is 32 but there is a 38 for Perfect / Pro Compe
Here's what mine look like:
Early (Aug 1979)
And late (Feb 1984)
You can see from the pics that the early is in very good condition but the late is slightly mangled.
So my theory is I could use the back of the late one with the lockring/race/etc of the early one.
The main issue now is how to disassemble the body, I know there's a special SunTour tool that would help if I had one.
But supposedly I can do it with a drift if I apply enough WD40 etc first.
It does say on the lockring which direction to drift:
But what's the ring outside the lockring ?
I'm guessing it's for adjusting the bearing clearance.
Last edited by Aardwolf; 05-22-24 at 06:22 AM.

Likes For Aardwolf:
05-21-24, 11:17 AM
#2
Senior Member

Join Date: Feb 2008
Location: Peoria, IL
Posts: 4,530
Mentioned: 86 Post(s)
Tagged: 0 Thread(s)
Quoted: 1846 Post(s)
Liked 3,488 Times
in
1,617 Posts
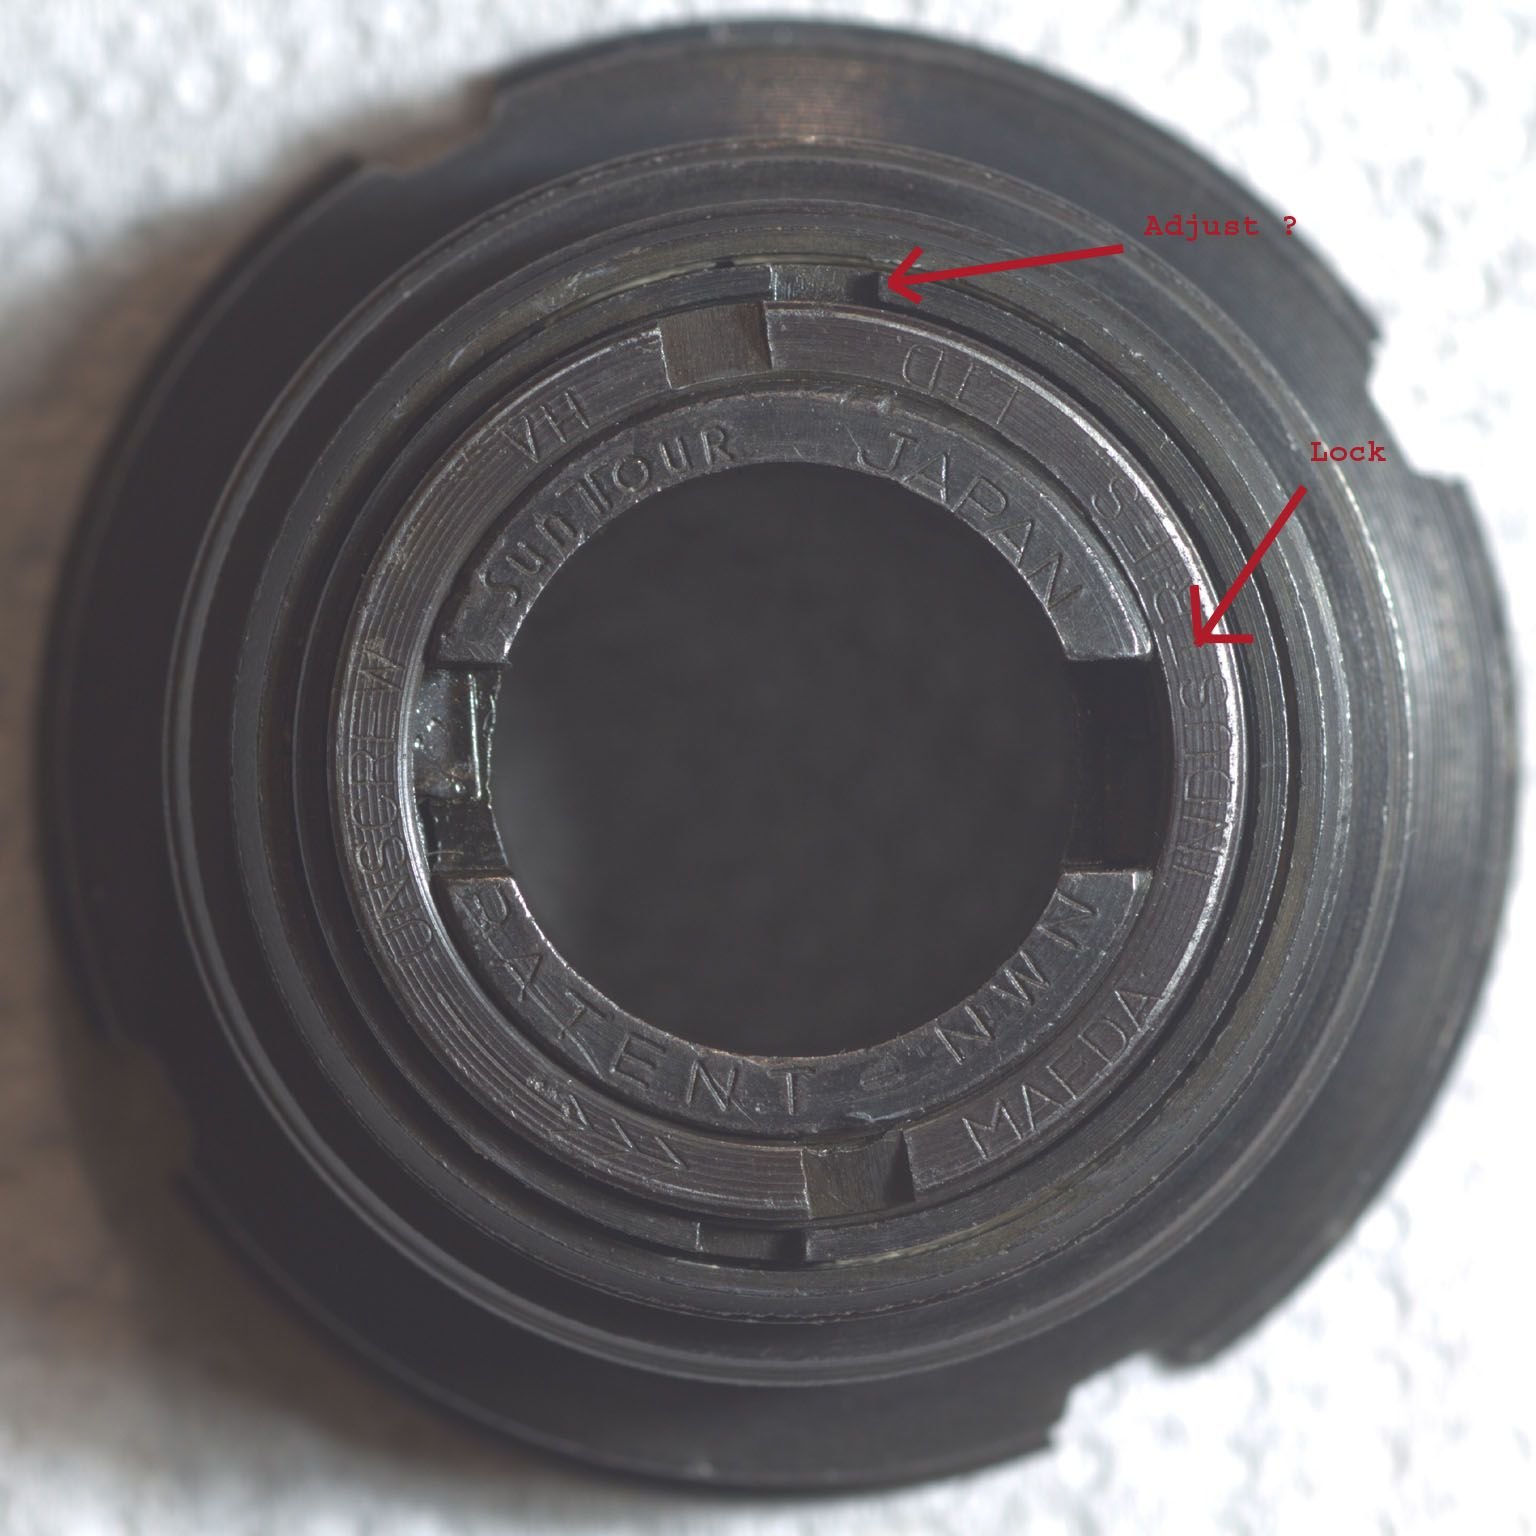
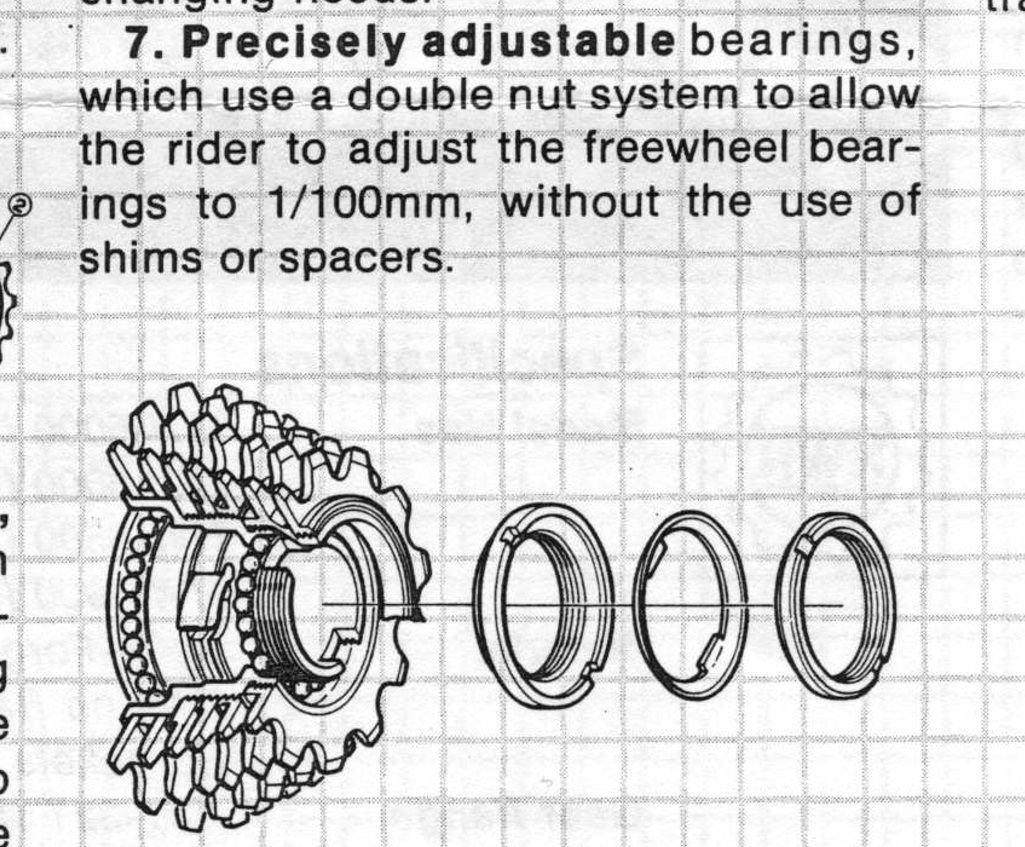
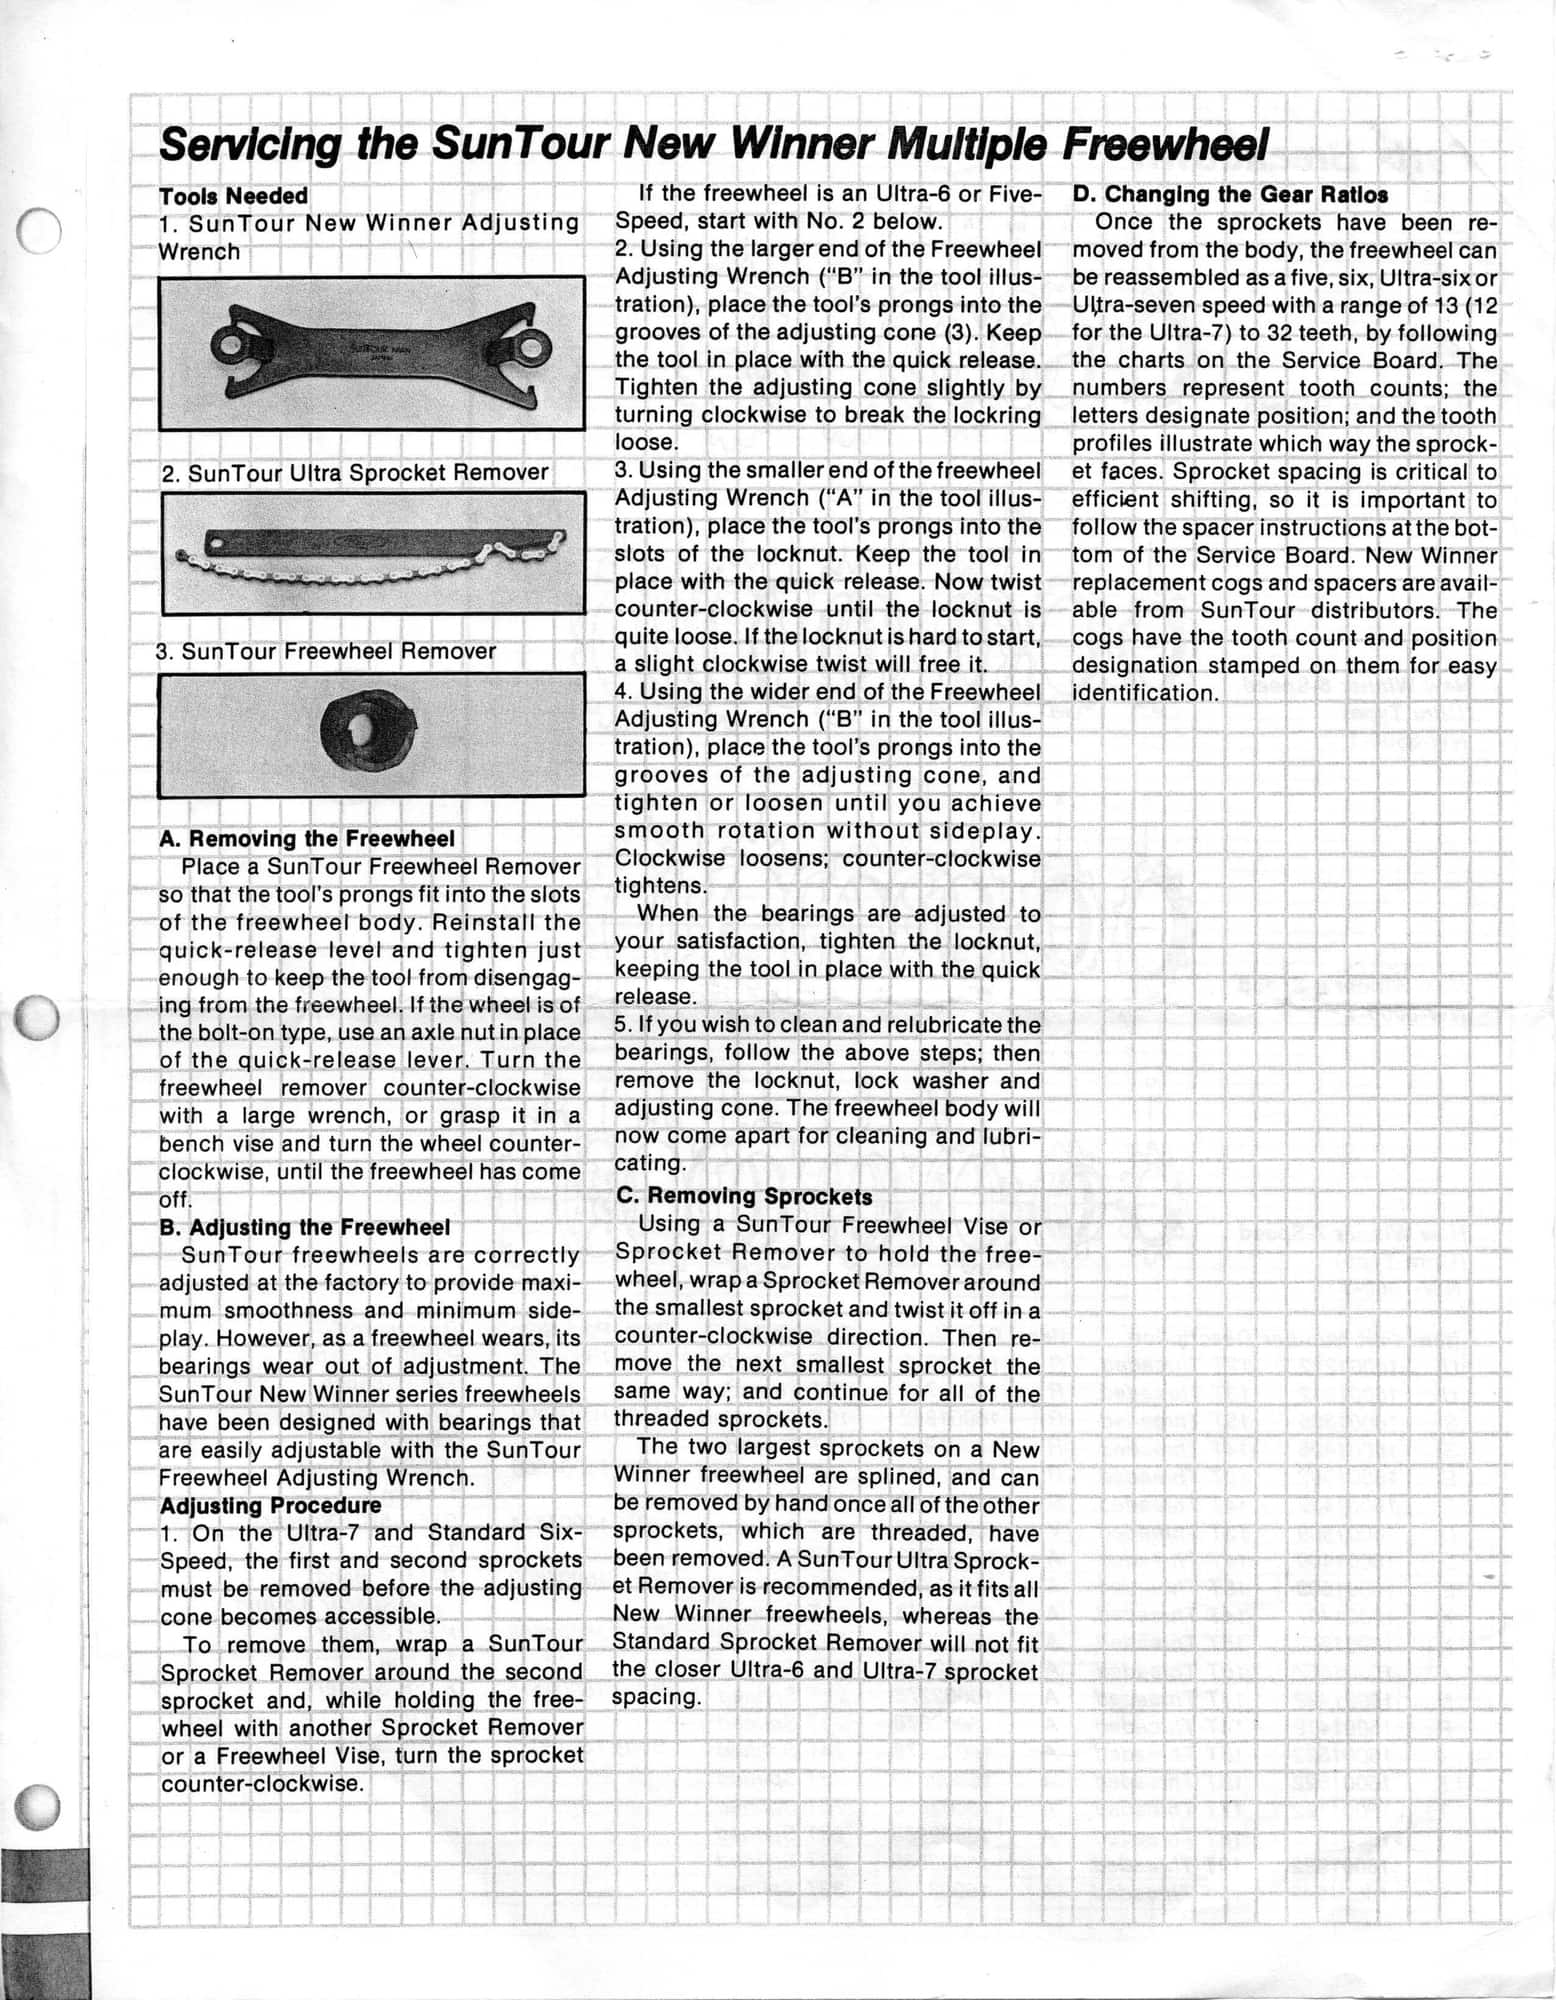
Until Pastor Bob stops by to provide the complete answer, let me offer the drawing from the New Winner pamphlet.
the largest diameter notched ring appears to be the bearing cone, while the mid-diameter notched ring looks like a lock ring.
Of course, the smallest diameter notched "ring" is the freewheel body.
I've got some of these, and I have one of the adjustment tools, but never took one apart. I suspect that two tools are required to do it properly??
Steve in Peoria
05-21-24, 11:34 AM
#3
Wheelman
Thread Starter
Join Date: Aug 2021
Location: Putney, London UK
Posts: 900
Bikes: 1982 Holdsworth Avanti (531), 1961 Holdsworth Cyclone
Mentioned: 4 Post(s)
Tagged: 0 Thread(s)
Quoted: 311 Post(s)
Liked 729 Times
in
370 Posts
Until Pastor Bob stops by to provide the complete answer, let me offer the drawing from the New Winner pamphlet.
the largest diameter notched ring appears to be the bearing cone, while the mid-diameter notched ring looks like a lock ring.
Of course, the smallest diameter notched "ring" is the freewheel body.
I've got some of these, and I have one of the adjustment tools, but never took one apart. I suspect that two tools are required to do it properly??
Steve in Peoria
the largest diameter notched ring appears to be the bearing cone, while the mid-diameter notched ring looks like a lock ring.
Of course, the smallest diameter notched "ring" is the freewheel body.
I've got some of these, and I have one of the adjustment tools, but never took one apart. I suspect that two tools are required to do it properly??
Steve in Peoria

Yep you do need two tools to do it the official way
Sheldon:
Two of the special tools shown below, now rare, are used to
disassemble or adjust the New Winner body, but this work is very rarely
necessary. You may be able to get by with one of these tools and a chain whip,
with the freewheel body mounted on a wheel, but two are needed for
convenience of bearing adjustment.
.disassemble or adjust the New Winner body, but this work is very rarely
necessary. You may be able to get by with one of these tools and a chain whip,
with the freewheel body mounted on a wheel, but two are needed for
convenience of bearing adjustment.
One sold on Ebay UK for �16 a couple of months back, so I'm now looking.
But there's probably a way to do it without the tool.
05-21-24, 11:45 AM
#4
Senior Member
Join Date: Feb 2008
Location: Peoria, IL
Posts: 4,530
Mentioned: 86 Post(s)
Tagged: 0 Thread(s)
Quoted: 1846 Post(s)
Liked 3,488 Times
in
1,617 Posts
It suggests that only one tool is needed, but this does include clamping the body in place.
It also mentions the threading of the cone and locknut, which isn't always obvious on a freewheel.
If I'm reading it correctly, the cone and locknut have right hand threading:
"Tighten the adjusting cone slightly by turning clockwise to break the lockring loose."
"Now twist counter-clockwise until the locknut is quite loose."
Let me insert the page below. Hopefully the full resolution will be maintained.
Steve in Peoria
Likes For steelbikeguy:
Likes For Aardwolf:
05-22-24, 02:56 AM
#6

Senior Member
Join Date: Aug 2007
Location: Evanston, IL
Posts: 5,176
Bikes: many
Mentioned: 65 Post(s)
Tagged: 0 Thread(s)
Quoted: 1472 Post(s)
Liked 1,439 Times
in
791 Posts
They appear to be thick as thieves on US eBay. A search for "SunTour freewheel wrench" turned up five just now. Not cheap, but not terribly expensive either, $25-$35 new in package.
05-22-24, 04:05 AM
#7
Senior Member
Join Date: Jun 2021
Posts: 1,720
Bikes: '38 Schwinn New World, ’69 Peugeot PX-10, '72 Peugeot PX-10, ‘7? Valgan, '78 Raleigh Comp GS, ’79 Holdsworth Pro, ’80 Peugeot TH-8 tandem, '87 Trek 400T, ‘7? Raleigh Sports, ‘7? Raleigh Superbe, ‘6? Hercules
Mentioned: 17 Post(s)
Tagged: 0 Thread(s)
Quoted: 772 Post(s)
Liked 1,642 Times
in
782 Posts
Perhaps only tangentially related to the subject at hand, but adding this to the thread for future searchers, & because it's just visually cool!
Likes For ehcoplex:
05-22-24, 05:19 AM
#8
Freewheel Medic

Join Date: Oct 2005
Location: An Island on the Coast of GA!
Posts: 12,933
Bikes: Snazzy* Schwinns, Classy Cannondales & a Super Pro Aero Lotus (* Ed.)
Mentioned: 141 Post(s)
Tagged: 0 Thread(s)
Quoted: 1481 Post(s)
Liked 2,251 Times
in
990 Posts
I don't have much to add except these pointers:
A freewheel vise is very helpful. If you are not familiar with this tool, it is an aluminum devise which fits inside the threaded hub area of the freewheel. The bottom half of the vise/tool is then fitted into a bench vise, which when tighten expands the top half, which in turn secures the freewheel. See picture below.
(Freewheel vise tool holding the inner body of a Sachs-Aris 7-speed (with typical contaminated "Peanut Butter" grease) after removal of retaining ring/outer bearing race)
Second, sometimes the reassembly and adjustment of the bearings can be tricky, in that the final turn to secure the lockring and the adjustable cone tends to move the other. This ends up causing the bearings to be too tight or too loose. Having two of the special Suntour tools can help, but this creates a tight working space.
Finally, Suntour's literature describes their special wrench as easy to use. However, taking a look at Aardwolf 's pictures, we can see how the notches on the inner lockring are not flat but slanted. This causes the wrench tabs to naturally slip out of place.
BTW, I just received a box with six freewheels needing service. Some are New Winners. As I work on them, I'll take pictures and post here.
__________________
Bob
Enjoying the GA coast all year long!
Thanks for visiting my website: www.freewheelspa.com
Bob
Enjoying the GA coast all year long!
Thanks for visiting my website: www.freewheelspa.com
Likes For pastorbobnlnh:
05-22-24, 05:28 AM
#9
Senior Member
Join Date: Aug 2007
Location: Evanston, IL
Posts: 5,176
Bikes: many
Mentioned: 65 Post(s)
Tagged: 0 Thread(s)
Quoted: 1472 Post(s)
Liked 1,439 Times
in
791 Posts
Even further afield, I have a Flickr album with visual cog info for a number of different freewheels... SunTour seems to have produced any number of different diagrams for their product line.
05-22-24, 05:52 AM
#10
Wheelman
Thread Starter
Join Date: Aug 2021
Location: Putney, London UK
Posts: 900
Bikes: 1982 Holdsworth Avanti (531), 1961 Holdsworth Cyclone
Mentioned: 4 Post(s)
Tagged: 0 Thread(s)
Quoted: 311 Post(s)
Liked 729 Times
in
370 Posts
I had noticed that the ebay search can be quite tricky for this particular item - it shows up under several desciptions
Now I know the NOS original item is called "SunTour Adjustment Wrench Model:TA-180".
Hadn't spotted there were more on ebay.com than ebay.co.uk.
"Suntour freewheel wrench"
Ebay.com:
�39.63 = $35 + $15.39 postage
�47.18 = $34.99 + $25
�42.92 = $34.20 + $20.37
�41.84 = $30 + $23.20
�38.36 = $25 + $23.78
Ebay.co.uk�47.18 = $34.99 + $25
�42.92 = $34.20 + $20.37
�41.84 = $30 + $23.20
�38.36 = $25 + $23.78
�51.50 = $41.04 + $24.44 < 62% off, was $108
�18.90 = �15.95 + �2.95 < sold 26th March "Suntour NWN New Winner Freewheel tool"
.�18.90 = �15.95 + �2.95 < sold 26th March "Suntour NWN New Winner Freewheel tool"
So it looks like the ones on Ebay.com aren't showing on ebay.co.uk.
$25 (= �19.66) I would pay but �38.36 is getting too steep for me, I'll wait for another to show on Ebay UK.
I've also got a cunning plan for a spare bit of 4mm steel bar and some files.
05-22-24, 06:00 AM
#11
Wheelman
Thread Starter
Join Date: Aug 2021
Location: Putney, London UK
Posts: 900
Bikes: 1982 Holdsworth Avanti (531), 1961 Holdsworth Cyclone
Mentioned: 4 Post(s)
Tagged: 0 Thread(s)
Quoted: 311 Post(s)
Liked 729 Times
in
370 Posts
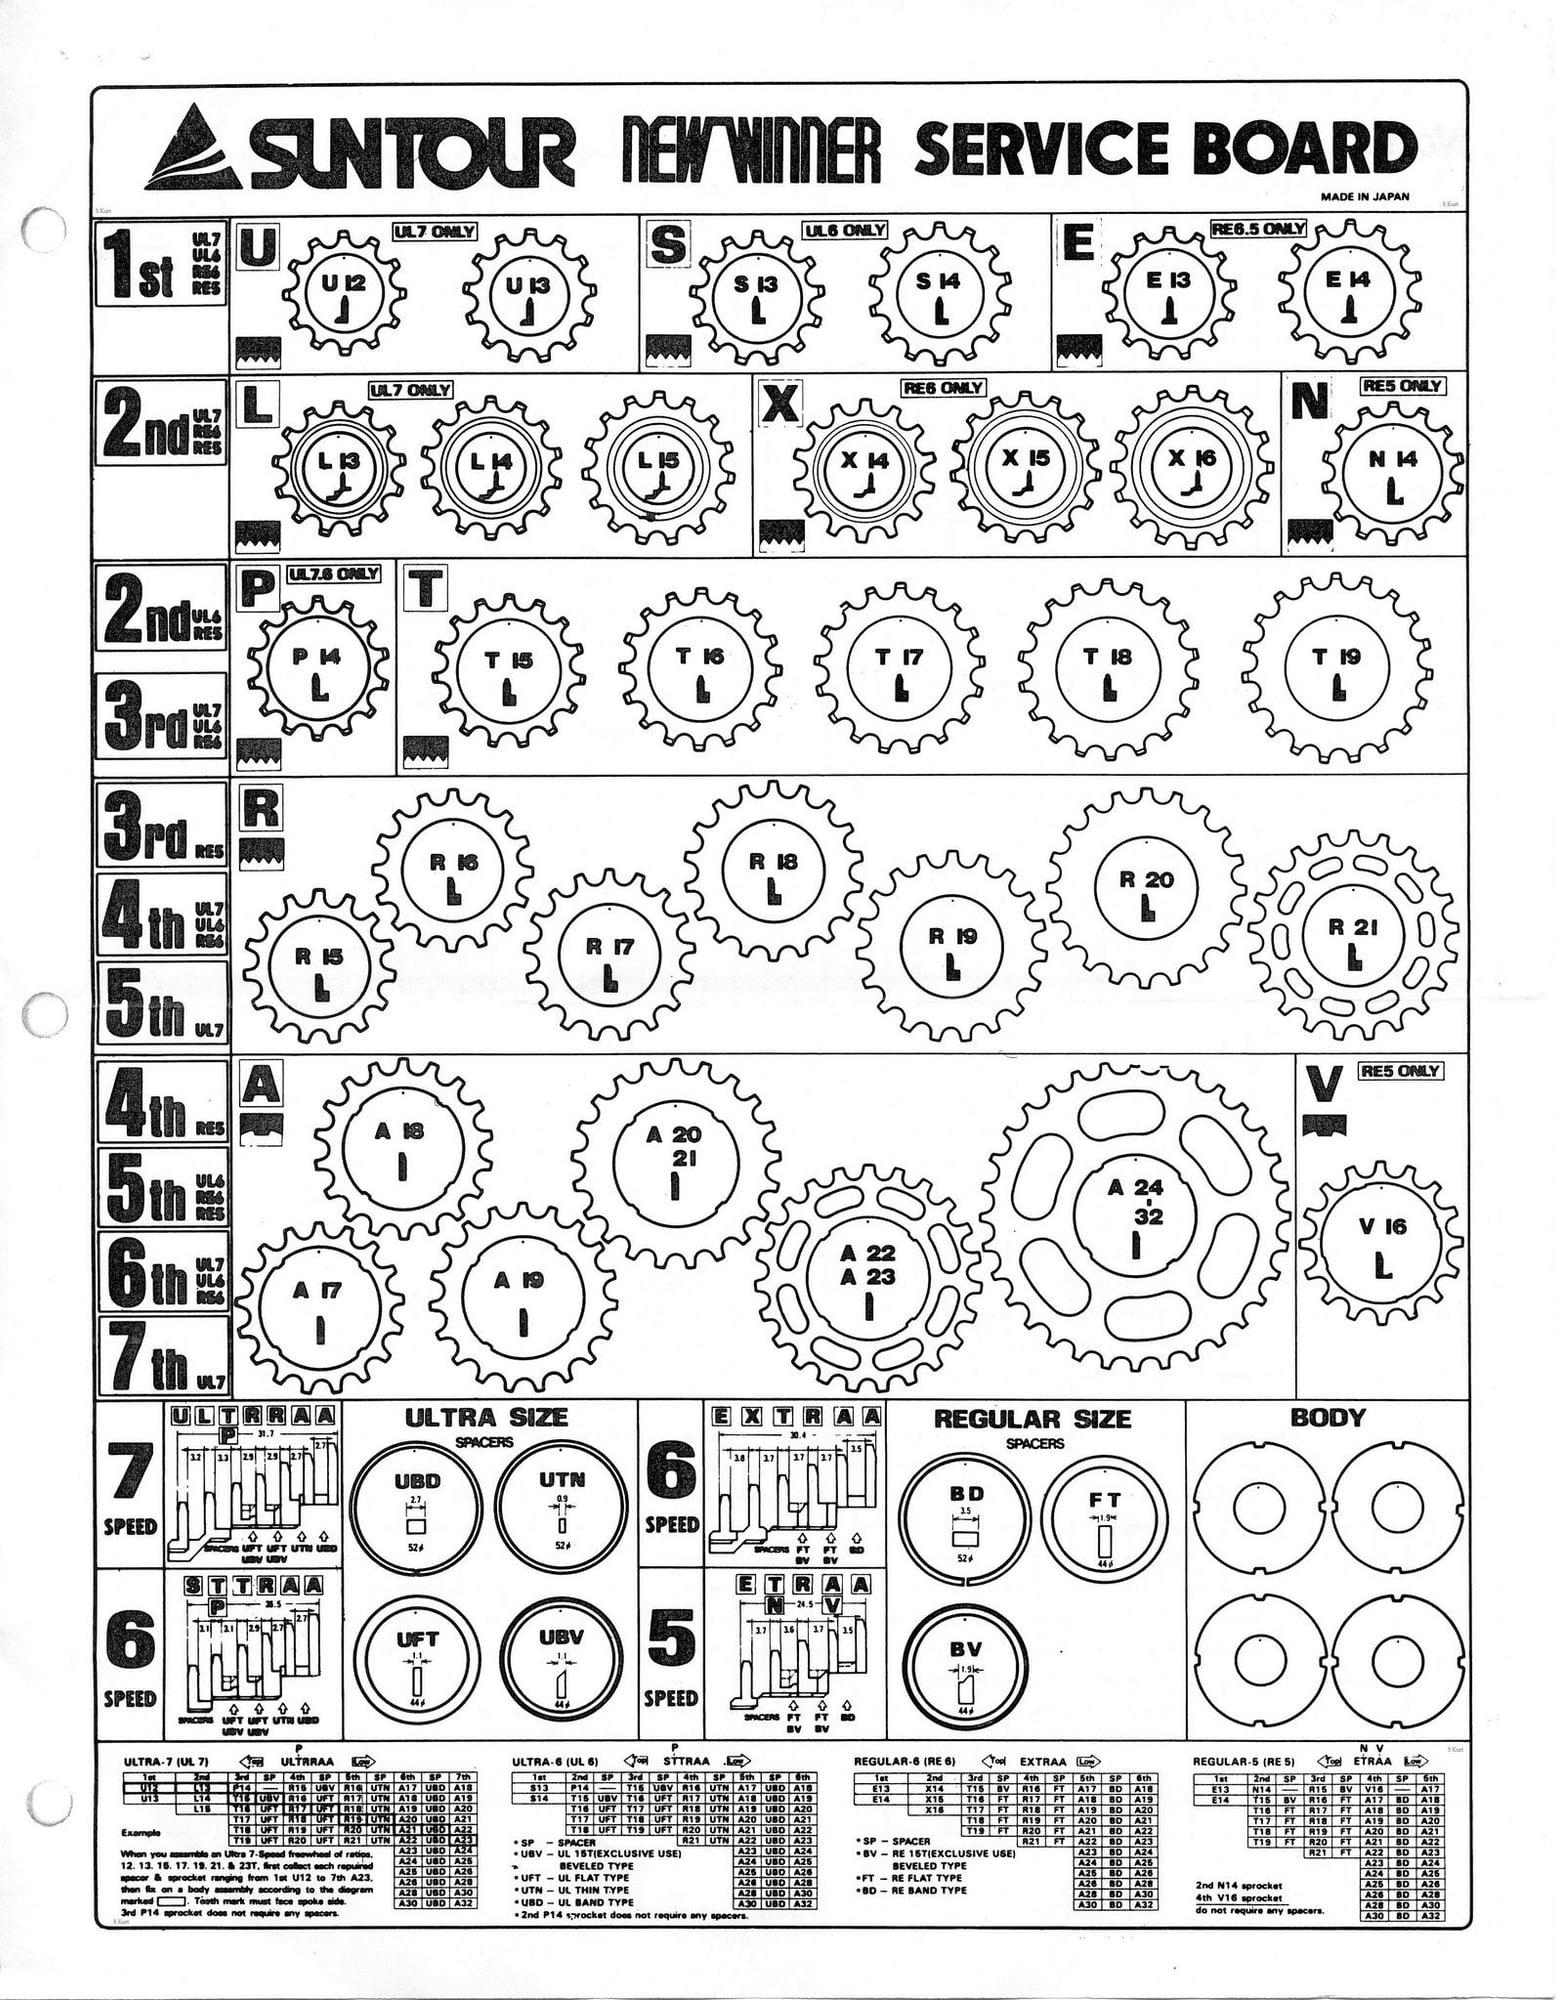
What it doesn't really show is the gear spacing.
Here's a chart I found on a UK forum - I've only ever seen this one scan of it
And I still don't understand the measurements.
 05-22-24, 06:04 AM
#12
Wheelman
Thread Starter
Join Date: Aug 2021
Location: Putney, London UK
Posts: 900
Bikes: 1982 Holdsworth Avanti (531), 1961 Holdsworth Cyclone
Mentioned: 4 Post(s)
Tagged: 0 Thread(s)
Quoted: 311 Post(s)
Liked 729 Times
in
370 Posts
Even further afield, I have a Flickr album with visual cog info for a number of different freewheels... SunTour seems to have produced any number of different diagrams for their product line.
There's a tear/wrinkle in the "6 speed" / Spacers box on the right.
05-22-24, 10:35 AM
#13
Senior Member
Join Date: Feb 2008
Location: Peoria, IL
Posts: 4,530
Mentioned: 86 Post(s)
Tagged: 0 Thread(s)
Quoted: 1846 Post(s)
Liked 3,488 Times
in
1,617 Posts
I don't have much to add except these pointers:
A freewheel vise is very helpful. If you are not familiar with this tool, it is an aluminum devise which fits inside the threaded hub area of the freewheel. The bottom half of the vise/tool is then fitted into a bench vise, which when tighten expands the top half, which in turn secures the freewheel. See picture below.
(Freewheel vise tool holding the inner body of a Sachs-Aris 7-speed (with typical contaminated "Peanut Butter" grease) after removal of retaining ring/outer bearing race)
I'm guessing that it might be sufficient to just have the freewheel threaded onto a hub, since we just need to keep the inner portion of the body in place?
edit; the SunTour tool has that weird loop in the middle of the tabs that engage the cone and lockring. Is that designed to fit over the axle or QR and keep the tool properly centered on the freewheel?
edit #2: ... yes it is. I was re-reading the instructions on the page I posted above, and noticed the sentence "Keep the tool in place with the quick release". It appears that SunTour did intend folks to make the adjustment with the freewheel mounted on a wheel.
Steve in Peoria
(only used my SunTour New Winner adjustment tool to tighten the bearings once, after hearing the knock-knock-knock sound when riding. I'd had a couple of bearing cones on Perfects unscrew themselves, and that sound causes a bit of PTSD now)
Last edited by steelbikeguy; 05-22-24 at 10:40 AM.
05-22-24, 11:32 AM
#14
Wheelman
Thread Starter
Join Date: Aug 2021
Location: Putney, London UK
Posts: 900
Bikes: 1982 Holdsworth Avanti (531), 1961 Holdsworth Cyclone
Mentioned: 4 Post(s)
Tagged: 0 Thread(s)
Quoted: 311 Post(s)
Liked 729 Times
in
370 Posts
The John Allen instructions on Sheldon's site are here: https://www.sheldonbrown.com/rebuild-freewheel.html
- Disassembled on the wheel.
- Says you can use a punch on the lock ring
- Uses loctite blue on the lock ring
Likes For Aardwolf:
05-22-24, 01:34 PM
#15
Senior Member
Join Date: Oct 2008
Location: Right where I'm supposed to be
Posts: 1,657
Bikes: Franklin Frames Custom, Rivendell Bombadil
Mentioned: 2 Post(s)
Tagged: 0 Thread(s)
Quoted: 126 Post(s)
Liked 216 Times
in
132 Posts
Not to dissuade you Aardwolf, but is disassembly really necessary ? You likely don't hear the ticks from sticky/solidified grease/oil or whatever may be in there. I've only ever flushed and relubed any freewheel and that has always worked. If it isn't broke, don't go breaking it !
Likes For Garthr:
05-22-24, 03:12 PM
#16
Wheelman
Thread Starter
Join Date: Aug 2021
Location: Putney, London UK
Posts: 900
Bikes: 1982 Holdsworth Avanti (531), 1961 Holdsworth Cyclone
Mentioned: 4 Post(s)
Tagged: 0 Thread(s)
Quoted: 311 Post(s)
Liked 729 Times
in
370 Posts
Not to dissuade you Aardwolf, but is disassembly really necessary ? You likely don't hear the ticks from sticky/solidified grease/oil or whatever may be in there. I've only ever flushed and relubed any freewheel and that has always worked. If it isn't broke, don't go breaking it !
These are spares and I thought I'd try doing the job properly - including replacing the 40 year old ball bearings and applying some fresh grease (bearings only).
When I said "nice tick sound that people don't have any more", I was referring to the modern cassettes with their horrible loud 'ratchet' noise.
Probably not very clear, but I really hate the modern noise.
It may well be totally unnecessary but I won't know until I've tried it.
SunTour:
"SunTour freewheels are correctly adjusted at the factory to provide maximum smoothness and minimum side-play.
However, as a freewheel wears, its bearings wear out of adjustment."
However, as a freewheel wears, its bearings wear out of adjustment."
Likes For Aardwolf:
05-22-24, 04:43 PM
#17
Freewheel Medic
Join Date: Oct 2005
Location: An Island on the Coast of GA!
Posts: 12,933
Bikes: Snazzy* Schwinns, Classy Cannondales & a Super Pro Aero Lotus (* Ed.)
Mentioned: 141 Post(s)
Tagged: 0 Thread(s)
Quoted: 1481 Post(s)
Liked 2,251 Times
in
990 Posts
Not to dissuade you Aardwolf, but is disassembly really necessary ? You likely don't hear the ticks from sticky/solidified grease/oil or whatever may be in there. I've only ever flushed and relubed any freewheel and that has always worked. If it isn't broke, don't go breaking it !
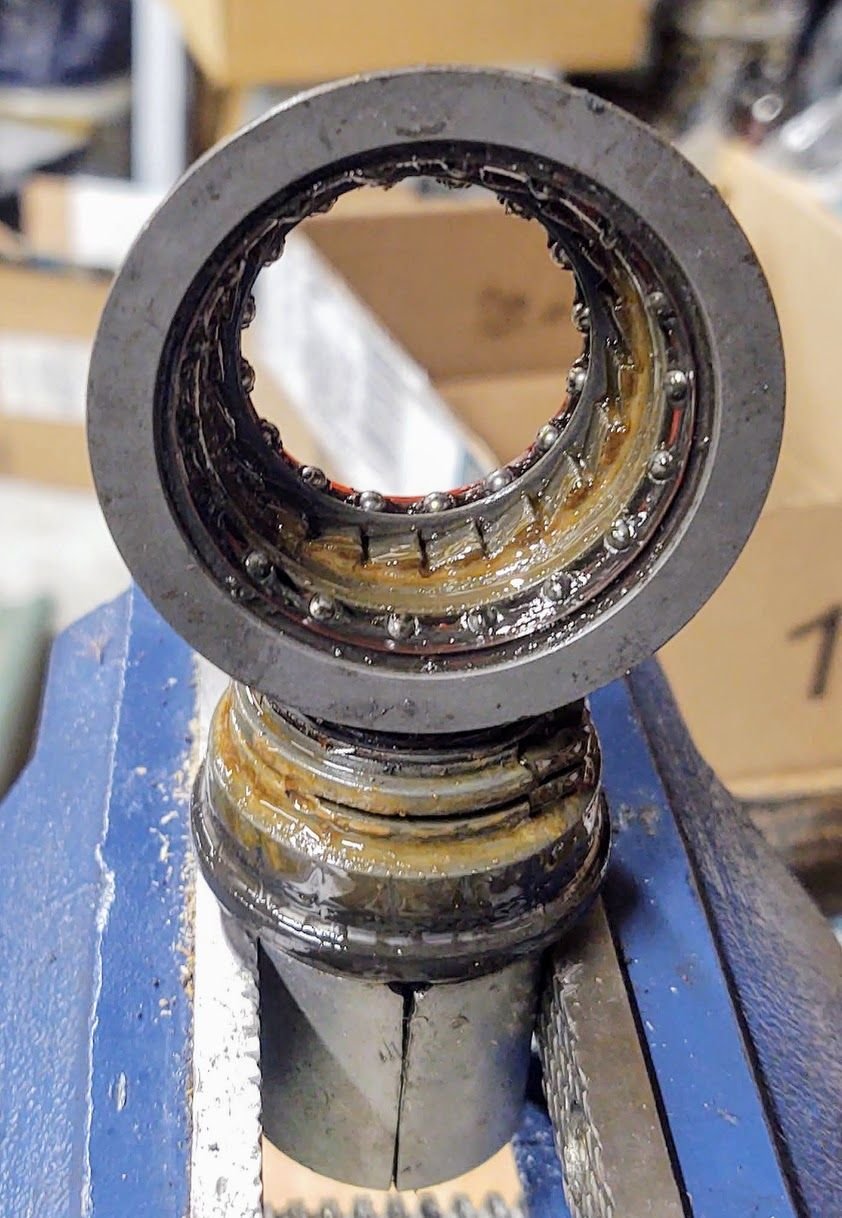
The original oil had dispersed/evaporated from the grease leaving behind a sticky residue. Just look at those bearings defying gravity! Also, the pawls remained closed until I pulled them out.
In the case of the Sachs I pictured earlier, it is challenging to fully flush out the contaminated grease due to the plastic seals. This is even the case when the sprockets are removed and WD40 is injected into the tiny port hole on the side of the body. It usually takes a tooth brush scrubbing to remove old grease from the pawl wells on the inner body.
Just my two cents.
__________________
Bob
Enjoying the GA coast all year long!
Thanks for visiting my website: www.freewheelspa.com
Bob
Enjoying the GA coast all year long!
Thanks for visiting my website: www.freewheelspa.com
Likes For pastorbobnlnh:
05-22-24, 05:09 PM
#18
Senior Member
Join Date: May 2019
Location: Bloomington, IN
Posts: 3,016
Bikes: Paramount, Faggin, Ochsner, Ciocc, Basso
Mentioned: 122 Post(s)
Tagged: 0 Thread(s)
Quoted: 1328 Post(s)
Liked 1,982 Times
in
1,177 Posts
When the larger cogs are replaced the taper on the cogs is essential for proper shifting. If they are installed upside down the shifting does not work properly. It happened a few times during my time in the shop with the new winner boards and cogs. The left side of the chart posted shows the correct mounting position of the tapers. Smiles, MH

Likes For Mad Honk:
05-22-24, 05:59 PM
#19
Wheelman
Thread Starter
Join Date: Aug 2021
Location: Putney, London UK
Posts: 900
Bikes: 1982 Holdsworth Avanti (531), 1961 Holdsworth Cyclone
Mentioned: 4 Post(s)
Tagged: 0 Thread(s)
Quoted: 311 Post(s)
Liked 729 Times
in
370 Posts
When the larger cogs are replaced the taper on the cogs is essential for proper shifting. If they are installed upside down the shifting does not work properly. It happened a few times during my time in the shop with the new winner boards and cogs. The left side of the chart posted shows the correct mounting position of the tapers. Smiles, MH
Luckily the cogs only go on two ways.
Think I found the A cogs need the side with the letters ('A28', 'A32' etc) towards the spokes.
Likes For Aardwolf:
05-25-24, 01:15 PM
#20
Wheelman
Thread Starter
Join Date: Aug 2021
Location: Putney, London UK
Posts: 900
Bikes: 1982 Holdsworth Avanti (531), 1961 Holdsworth Cyclone
Mentioned: 4 Post(s)
Tagged: 0 Thread(s)
Quoted: 311 Post(s)
Liked 729 Times
in
370 Posts
Yay, progress.
After a lot of filing I made some tools out of some 4mm steel bar and 1/8" ally bar I had lying around:
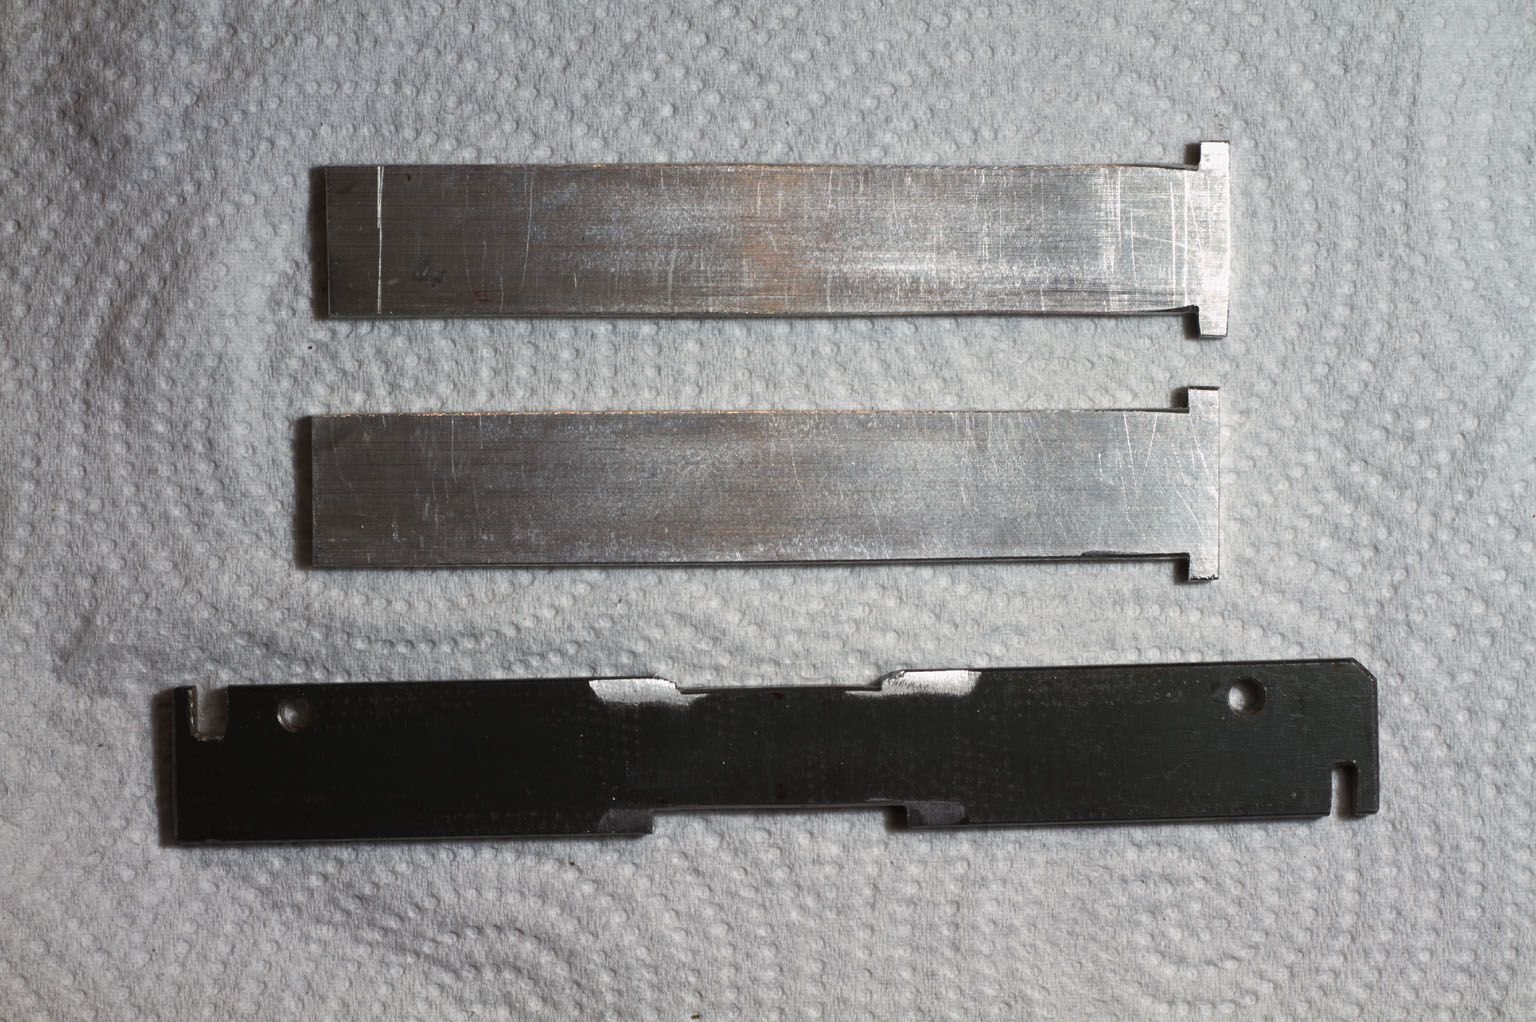
Here's the ally bars in use:
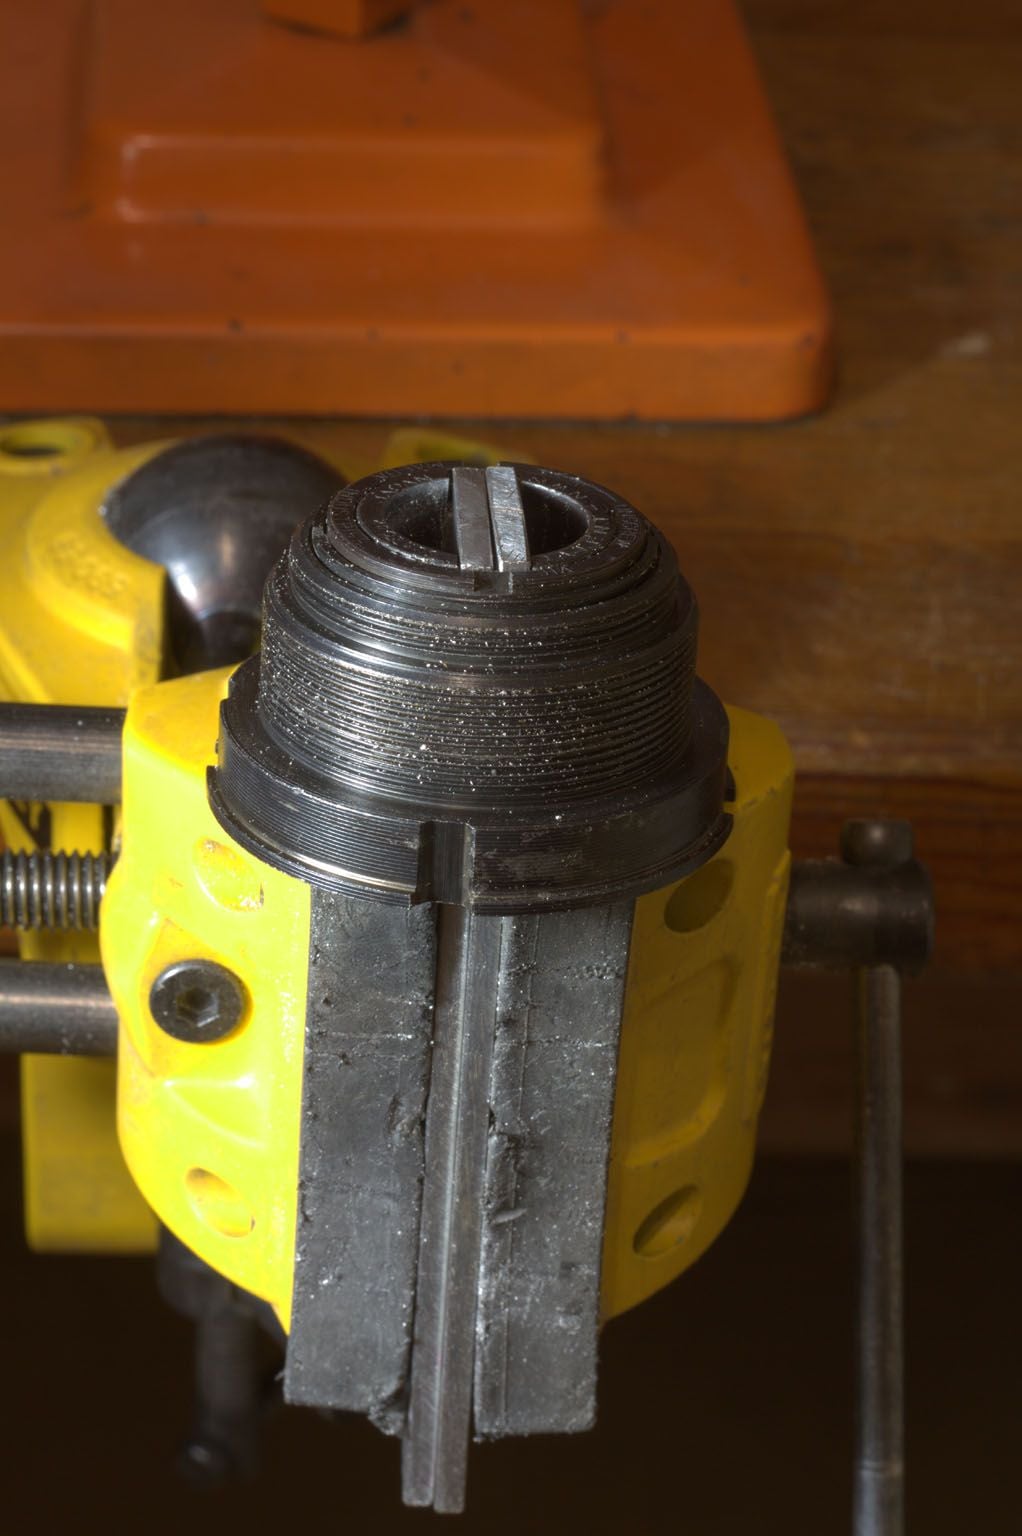
The steel bar fits in the lockring slots and adjuster slots.
One body came apart quite easily, the other is resisting:

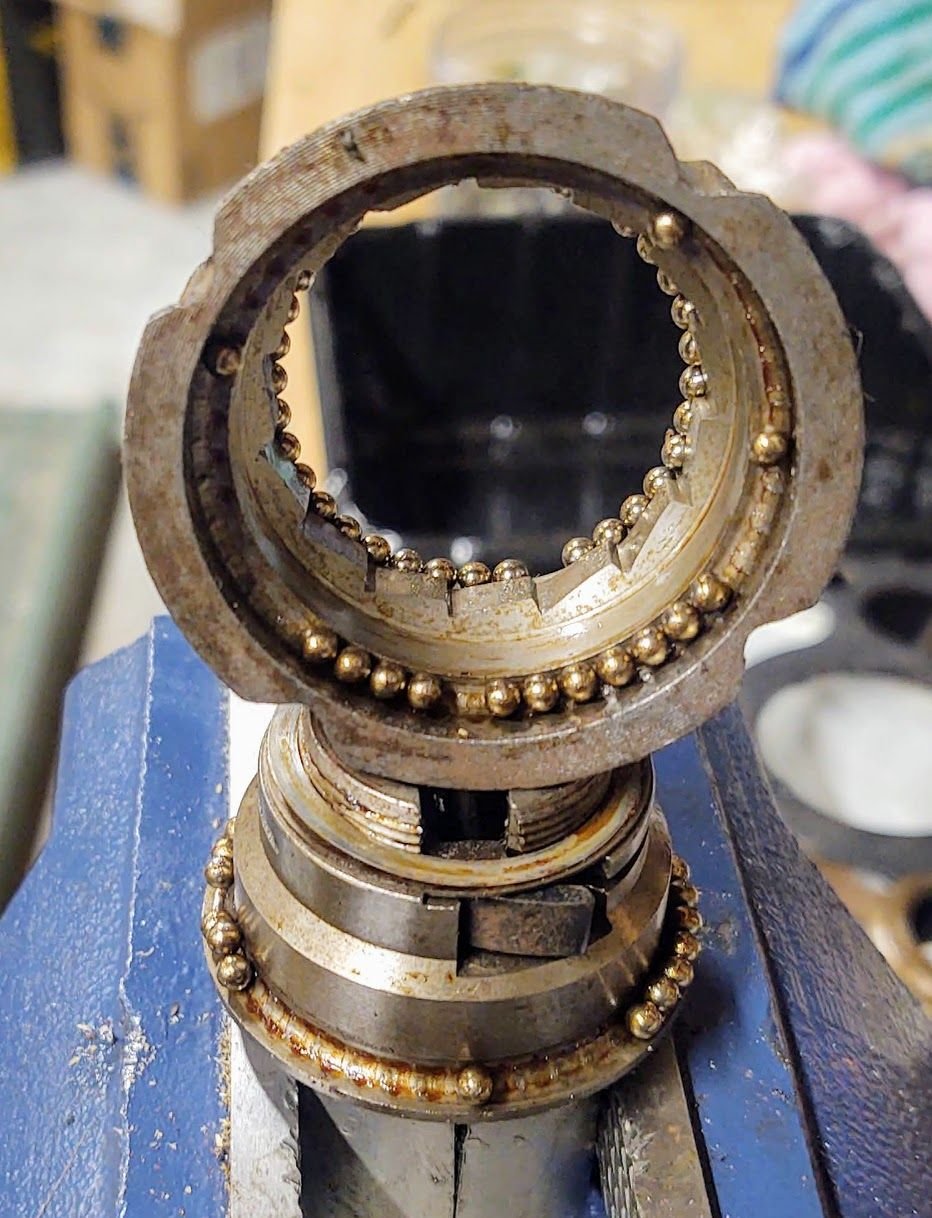
30 balls in the small race
41 in the large race.
500 in the post for tomorrow
After a lot of filing I made some tools out of some 4mm steel bar and 1/8" ally bar I had lying around:
Here's the ally bars in use:
The steel bar fits in the lockring slots and adjuster slots.
One body came apart quite easily, the other is resisting:
30 balls in the small race
41 in the large race.
500 in the post for tomorrow
Likes For Aardwolf:
05-26-24, 06:28 AM
#21
Freewheel Medic
Join Date: Oct 2005
Location: An Island on the Coast of GA!
Posts: 12,933
Bikes: Snazzy* Schwinns, Classy Cannondales & a Super Pro Aero Lotus (* Ed.)
Mentioned: 141 Post(s)
Tagged: 0 Thread(s)
Quoted: 1481 Post(s)
Liked 2,251 Times
in
990 Posts
Don't worry about counting the bearings when you reassemble the freewheel. Just add grease to the race and and using the grease on your finger place the bearings in the race until it is filled.
Also, be careful if you remove the pawls from their pivots. The pin which holds the spring can slip out and it and spring are easily lost. I speak with experience!!!
Fantastic work in development of your own tools for this job!
BTW, your stubborn NW is not unusual. I'd estimate that about 25-33% of the ones I've worked on never yielded to my powers of persuasion. I'd guess I've worked on 75-100 over the past years.
__________________
Bob
Enjoying the GA coast all year long!
Thanks for visiting my website: www.freewheelspa.com
Bob
Enjoying the GA coast all year long!
Thanks for visiting my website: www.freewheelspa.com
Likes For pastorbobnlnh:
05-26-24, 08:29 AM
#22
Wheelman
Thread Starter
Join Date: Aug 2021
Location: Putney, London UK
Posts: 900
Bikes: 1982 Holdsworth Avanti (531), 1961 Holdsworth Cyclone
Mentioned: 4 Post(s)
Tagged: 0 Thread(s)
Quoted: 311 Post(s)
Liked 729 Times
in
370 Posts
Don't worry about counting the bearings when you reassemble the freewheel. Just add grease to the race and and using the grease on your finger place the bearings in the race until it is filled.
Also, be careful if you remove the pawls from their pivots. The pin which holds the spring can slip out and it and spring are easily lost. I speak with experience!!!
Fantastic work in development of your own tools for this job!
BTW, your stubborn NW is not unusual. I'd estimate that about 25-33% of the ones I've worked on never yielded to my powers of persuasion. I'd guess I've worked on 75-100 over the past years.
Also, be careful if you remove the pawls from their pivots. The pin which holds the spring can slip out and it and spring are easily lost. I speak with experience!!!
Fantastic work in development of your own tools for this job!
BTW, your stubborn NW is not unusual. I'd estimate that about 25-33% of the ones I've worked on never yielded to my powers of persuasion. I'd guess I've worked on 75-100 over the past years.
I counted the balls to check if my estimate was realistic - the 41 left room for about 2.5 balls in that race which seems about right.
I moved the pawls up and down about 2mm to check they were properly free but didn't remove them - I could see the spring fitting was probably going to be tricksy.
I used Finish Line wet lube on the pawl pivots because it stays where you put it and it's not too thick, but I'm not convinced a thinner oil wouldn't be better.
Now to have a better go at the difficult ones.
Likes For Aardwolf:
