


I’m Stumped: Voyageur Lockring
 07-16-22, 05:22 PM
#1
Junior Member
Thread Starter
I’m Stumped: Voyageur Lockring
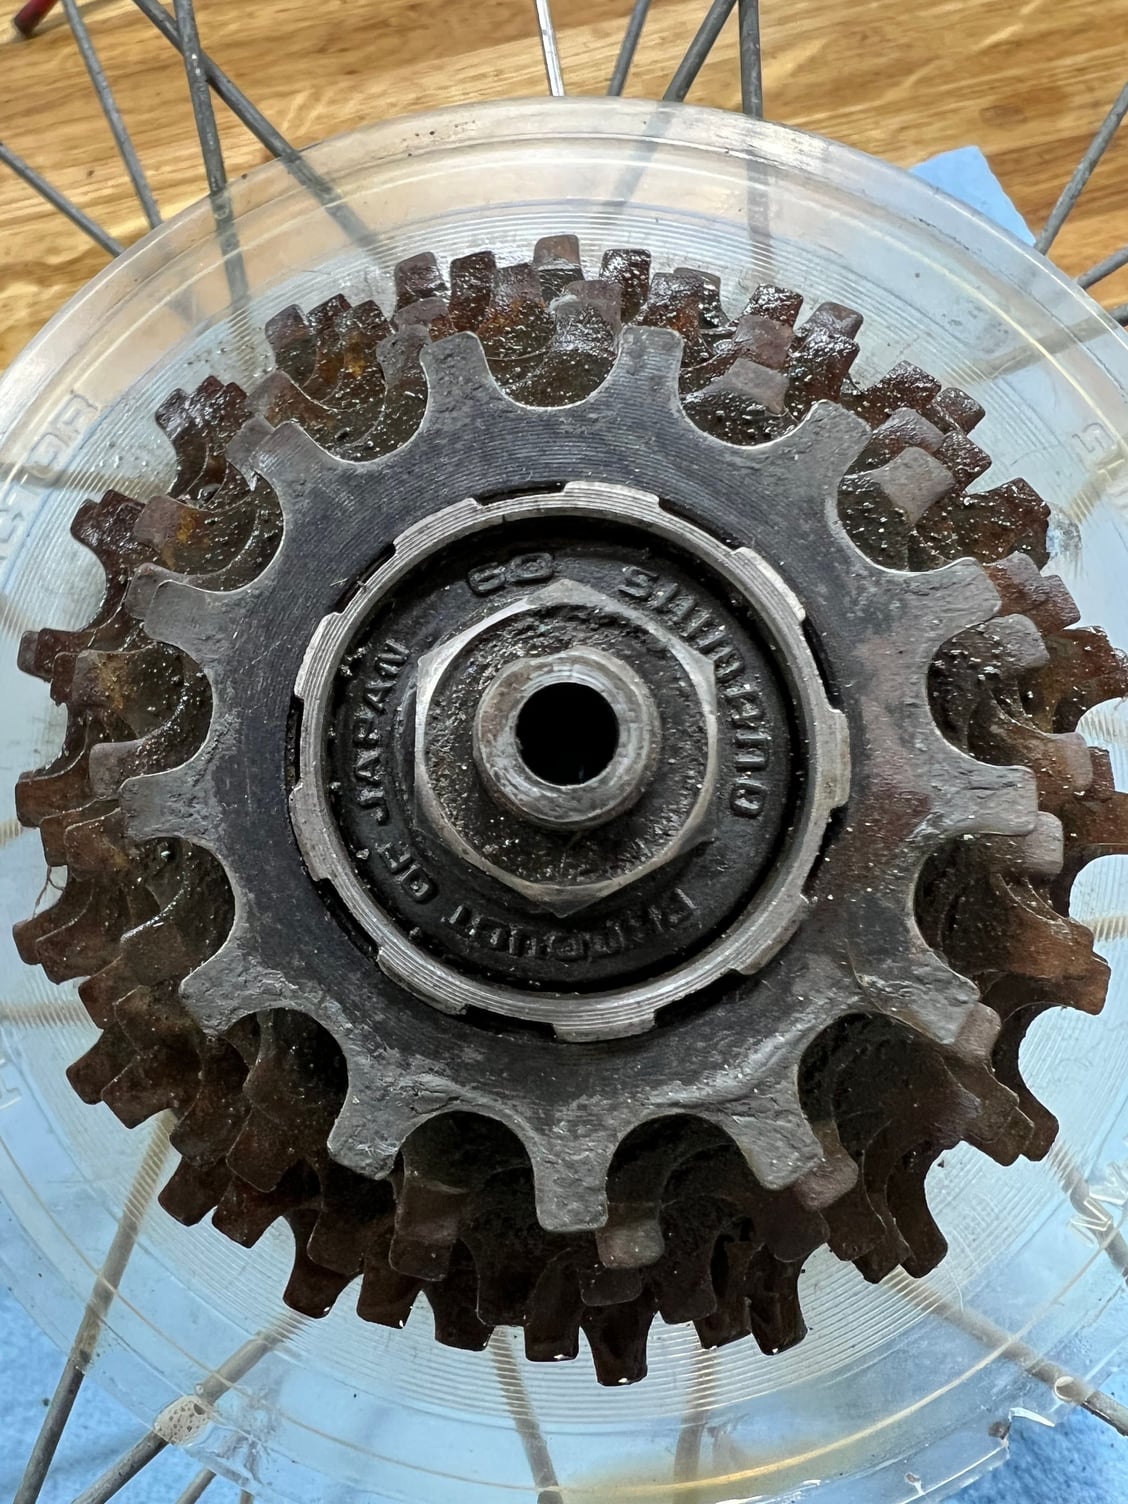
I’m trying to resurrect what I believe to be a 1980 Voyageur 11.8. I can’t seem to locate a tool to remove this nine-spline lockring. Can anyone point me in the tool’s direction or provide removal guidance? Thanks!
 07-16-22, 05:27 PM
#2

Bikes are okay, I guess.

Join Date: Jan 2015
Location: Richmond, Virginia
Posts: 6,938
Bikes: Waterford Paramount Touring, Giant CFM-2, Raleigh Sports 3-speeds in M23 & L23, Schwinn Cimarron oddball build, Marin Palisades Trail dropbar conversion, Nishiki Cresta GT
Mentioned: 69 Post(s)
Tagged: 0 Thread(s)
Quoted: 2647 Post(s)
Liked 2,446 Times
in
1,557 Posts
Not a lockring. The Uniglide cassette is held on by the threaded outer cog. Get two chain whips and go to town. Should come off easy.
Likes For thumpism:
07-16-22, 06:02 PM
#3
Junior Member
Thread Starter
07-16-22, 07:02 PM
#4
Friendship is Magic

Join Date: Nov 2010
Location: Sacramento, CA
Posts: 22,985
Bikes: old ones
Mentioned: 304 Post(s)
Tagged: 0 Thread(s)
Quoted: 26425 Post(s)
Liked 10,381 Times
in
7,209 Posts
.
...if you are resurrecting this, and it has significant wear on the chain, there's a possibility that one or more of those Uniglide cogs is worn, and the new chain you install will skip. I don't know of a reliable source for Uniglide cogs, but sometimes you can get lucky at a bike co-op, if it turns out to be a problem. There are instructions on the Sheldon Browne page for replacing those freehubs with something that uses Hyperglide clusters.
...if you are resurrecting this, and it has significant wear on the chain, there's a possibility that one or more of those Uniglide cogs is worn, and the new chain you install will skip. I don't know of a reliable source for Uniglide cogs, but sometimes you can get lucky at a bike co-op, if it turns out to be a problem. There are instructions on the Sheldon Browne page for replacing those freehubs with something that uses Hyperglide clusters.
__________________
Likes For 3alarmer:
07-16-22, 07:56 PM
#5
mycocyclist

Join Date: Dec 2016
Location: Monkey Junction, Wilmington, NC
Posts: 1,235
Bikes: 1964 Schwinn Paramount P-13 DeLuxe, 1964 Schwinn Sport Super Sport, 1972 Falcon San Remo, 1974 Maserati MT-1, 1974 Raleigh International, 1984 Lotus Odyssey, 198? Rossin Ghibli, 1990 LeMond Le Vanquer (sic), 1991 Specialized Allez Transition Pro, +
Mentioned: 23 Post(s)
Tagged: 0 Thread(s)
Quoted: 910 Post(s)
Liked 822 Times
in
453 Posts
Toad The Wet Sprocket
"But is you want to remove the sprockets from a freewheel or an old Uniglde Freehub, you can pace the chain on the smallest front sprocket, and remove the chain from the rear derailer. A chain with a SRAM PowerLink or other removable and replaceable link can easily be disconnected. With another chain, you may have to remove the lower (tension) pulley of the rear derailer to extract the chain, or disconnect the chain using a chain tool-- see our article on chains.
With the right pedal behind top position (around 10 o'clock), wrap the lower of chain around the the outermost sprocket, starting at the bottom, and the upper run around an inner sprocket, starting at the top. The closer the two sprockets are in size the better this works. Get as much slack out of the chain as you can. If you haven't disconnected the chain, shape it into a figure-8 behind the sprockets.
Now step down on the right pedal, backpedaling. Because the outer sprocket is smaller, it will turn faster and unscrew. You may have to reposition the chain once or twice before the sprocket is completely loose.
Repeat as necessary to remove additional sprockets until you reach a splined sprocket and can lift the rest of the sprockets off. Be sure to keep all sprockets and spacers in order for replacement." Source.
I learned this long time ago and it has come in very handy very far from home.
I prefer to mod the sprocket to fit a Hyperglide on my Uniglide bodies. Source.
Likes For machinist42:
07-16-22, 08:02 PM
#6
SE Wis
Join Date: Apr 2005
Location: Milwaukee, WI
Posts: 10,517
Bikes: '68 Raleigh Sprite, '02 Raleigh C500, '84 Raleigh Gran Prix, '91 Trek 400, 2013 Novara Randonee, 1990 Trek 970
Mentioned: 40 Post(s)
Tagged: 0 Thread(s)
Quoted: 2747 Post(s)
Liked 3,401 Times
in
2,058 Posts
Likes For dedhed:
07-16-22, 09:30 PM
#7
Junior Member
Thread Starter
.
...if you are resurrecting this, and it has significant wear on the chain, there's a possibility that one or more of those Uniglide cogs is worn, and the new chain you install will skip. I don't know of a reliable source for Uniglide cogs, but sometimes you can get lucky at a bike co-op, if it turns out to be a problem. There are instructions on the Sheldon Browne page for replacing those freehubs with something that uses Hyperglide clusters.
...if you are resurrecting this, and it has significant wear on the chain, there's a possibility that one or more of those Uniglide cogs is worn, and the new chain you install will skip. I don't know of a reliable source for Uniglide cogs, but sometimes you can get lucky at a bike co-op, if it turns out to be a problem. There are instructions on the Sheldon Browne page for replacing those freehubs with something that uses Hyperglide clusters.
Or, use this method:
"But is you want to remove the sprockets from a freewheel or an old Uniglde Freehub, you can pace the chain on the smallest front sprocket, and remove the chain from the rear derailer. A chain with a SRAM PowerLink or other removable and replaceable link can easily be disconnected. With another chain, you may have to remove the lower (tension) pulley of the rear derailer to extract the chain, or disconnect the chain using a chain tool-- see our article on chains.
With the right pedal behind top position (around 10 o'clock), wrap the lower of chain around the the outermost sprocket, starting at the bottom, and the upper run around an inner sprocket, starting at the top. The closer the two sprockets are in size the better this works. Get as much slack out of the chain as you can. If you haven't disconnected the chain, shape it into a figure-8 behind the sprockets.
Now step down on the right pedal, backpedaling. Because the outer sprocket is smaller, it will turn faster and unscrew. You may have to reposition the chain once or twice before the sprocket is completely loose.
Repeat as necessary to remove additional sprockets until you reach a splined sprocket and can lift the rest of the sprockets off. Be sure to keep all sprockets and spacers in order for replacement." Source.
I learned this long time ago and it has come in very handy very far from home.
I prefer to mod the sprocket to fit a Hyperglide on my Uniglide bodies. Source.
07-16-22, 09:31 PM
#8
Junior Member
Thread Starter
07-17-22, 05:27 PM
#9
Freewheel Medic

Join Date: Oct 2005
Location: An Island on the Coast of GA!
Posts: 12,885
Bikes: Snazzy* Schwinns, Classy Cannondales & a Super Pro Aero Lotus (* Ed.)
Mentioned: 140 Post(s)
Tagged: 0 Thread(s)
Quoted: 1453 Post(s)
Liked 2,196 Times
in
963 Posts
Another possible source for replacement sprockets is to modify HG sprockets from the newer cassettes. If you are interested I can explain how to do this, which is easy. You must save the smallest, threaded sprocket and the spacers.
__________________
Bob
Enjoying the GA coast all year long!
Thanks for visiting my website: www.freewheelspa.com
Bob
Enjoying the GA coast all year long!
Thanks for visiting my website: www.freewheelspa.com

Likes For pastorbobnlnh:
07-17-22, 05:39 PM
#10
Senior Member
Join Date: Jan 2019
Location: Toledo Ohio
Posts: 1,496
Bikes: 1964 Huffy Sportsman, 1972 Fuji Newest, 1973 Schwinn Super Sport (3), 1982 Trek 412, 1983 Trek 700, 1989 Miyata 1000LT, 1991 Bianchi Boardwalk, plus others
Mentioned: 21 Post(s)
Tagged: 0 Thread(s)
Quoted: 583 Post(s)
Liked 699 Times
in
394 Posts
Have I not read that the beauty of Uniglide is that the sprockets can be flipped over? No experience with it myself though.
Likes For sd5782:
07-17-22, 06:51 PM
#11
www.theheadbadge.com

Join Date: Sep 2005
Location: Southern Florida
Posts: 28,514
Bikes: https://www.theheadbadge.com
Mentioned: 124 Post(s)
Tagged: 0 Thread(s)
Quoted: 2422 Post(s)
Liked 4,396 Times
in
2,093 Posts
-Kurt
__________________


07-17-22, 07:17 PM
#12
Junior Member
Thread Starter
Thanks for the offer to explain. I’ve researched a Uniglide-to-Hyperglide conversion, and, at this point, I’ll save mods for later. Right now, I’m going to clean and lube what I’ve got and see how inexpensively I can get this Voyageur pedaling again!
Likes For theofam:
07-17-22, 08:47 PM
#13
Senior Member

Also, don't be too shy of old hubs if they spin and don't grind. A good flush out and re-oiling with TriFlow and you have a nice spare hub. IMHO, most bikes never ever see parts wear out from riding, most die of neglect or from sitting in the rain.
07-17-22, 09:03 PM
#14
Junior Member
Thread Starter
When you get all frisky at the used bike parts store, fish around and look at the freehubs. There is a mid time period where the uniglide threads remain on the outside of the hub, but also have hyper glide threads on the inside edge. These hubs can be nice spares to have around. I just converted an older hub to allow a newer cassette. They only issue is that going from six to seven speeds on the hub there can be less clearance between chain and frame in the small cog position.
Also, don't be too shy of old hubs if they spin and don't grind. A good flush out and re-oiling with TriFlow and you have a nice spare hub. IMHO, most bikes never ever see parts wear out from riding, most die of neglect or from sitting in the rain.
Also, don't be too shy of old hubs if they spin and don't grind. A good flush out and re-oiling with TriFlow and you have a nice spare hub. IMHO, most bikes never ever see parts wear out from riding, most die of neglect or from sitting in the rain.
Likes For theofam:
07-18-22, 12:02 PM
#15
Senior Member
I have a 1980 Lotus Excelle with a Shimano groupset that includes a 6 cog UniGlide cassette. It’s difficult to assess the degree of wear on the OP’s specimen but a good cleaning is always needed to fully check things out. Once the smallest cog/lockring is removed, the remaining 5 cogs merely side off the cassette hub body. My cog assembly was held together by 3 long thin machine screws but I’ve read that they aren’t absolutely necessary and are primarily a convenience. For a thorough cleaning and wear evaluation, I’d recommend a full disassembly of the cassette. As mentioned, the second through last cogs can be “flipped” if excessive wear is noted. Be cautious with the spacers as they are plastic. RE: the smallest cog not being able to be “flipped”, my riding style rarely includes use of the smallest cog ") so it matters little to me if that cog is worn
so it matters little to me if that cog is worn  .
.
so it matters little to me if that cog is worn .
07-22-22, 10:17 PM
#16
Junior Member
Thread Starter
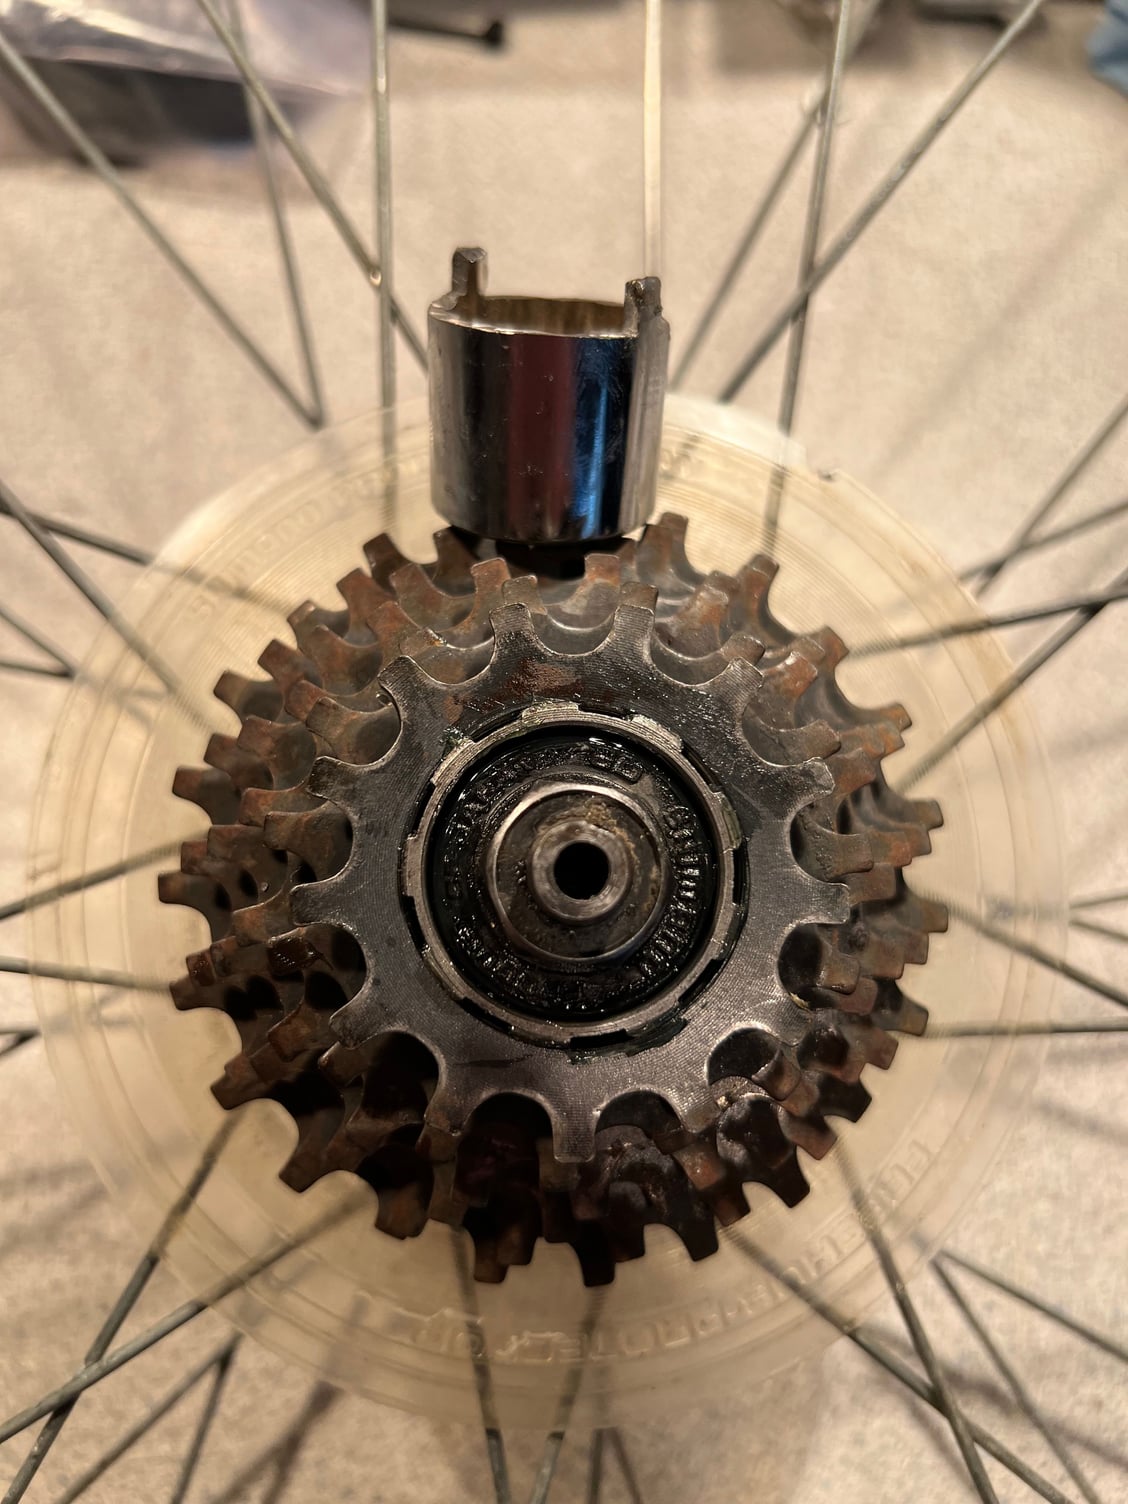
I rebuilt the freehub:
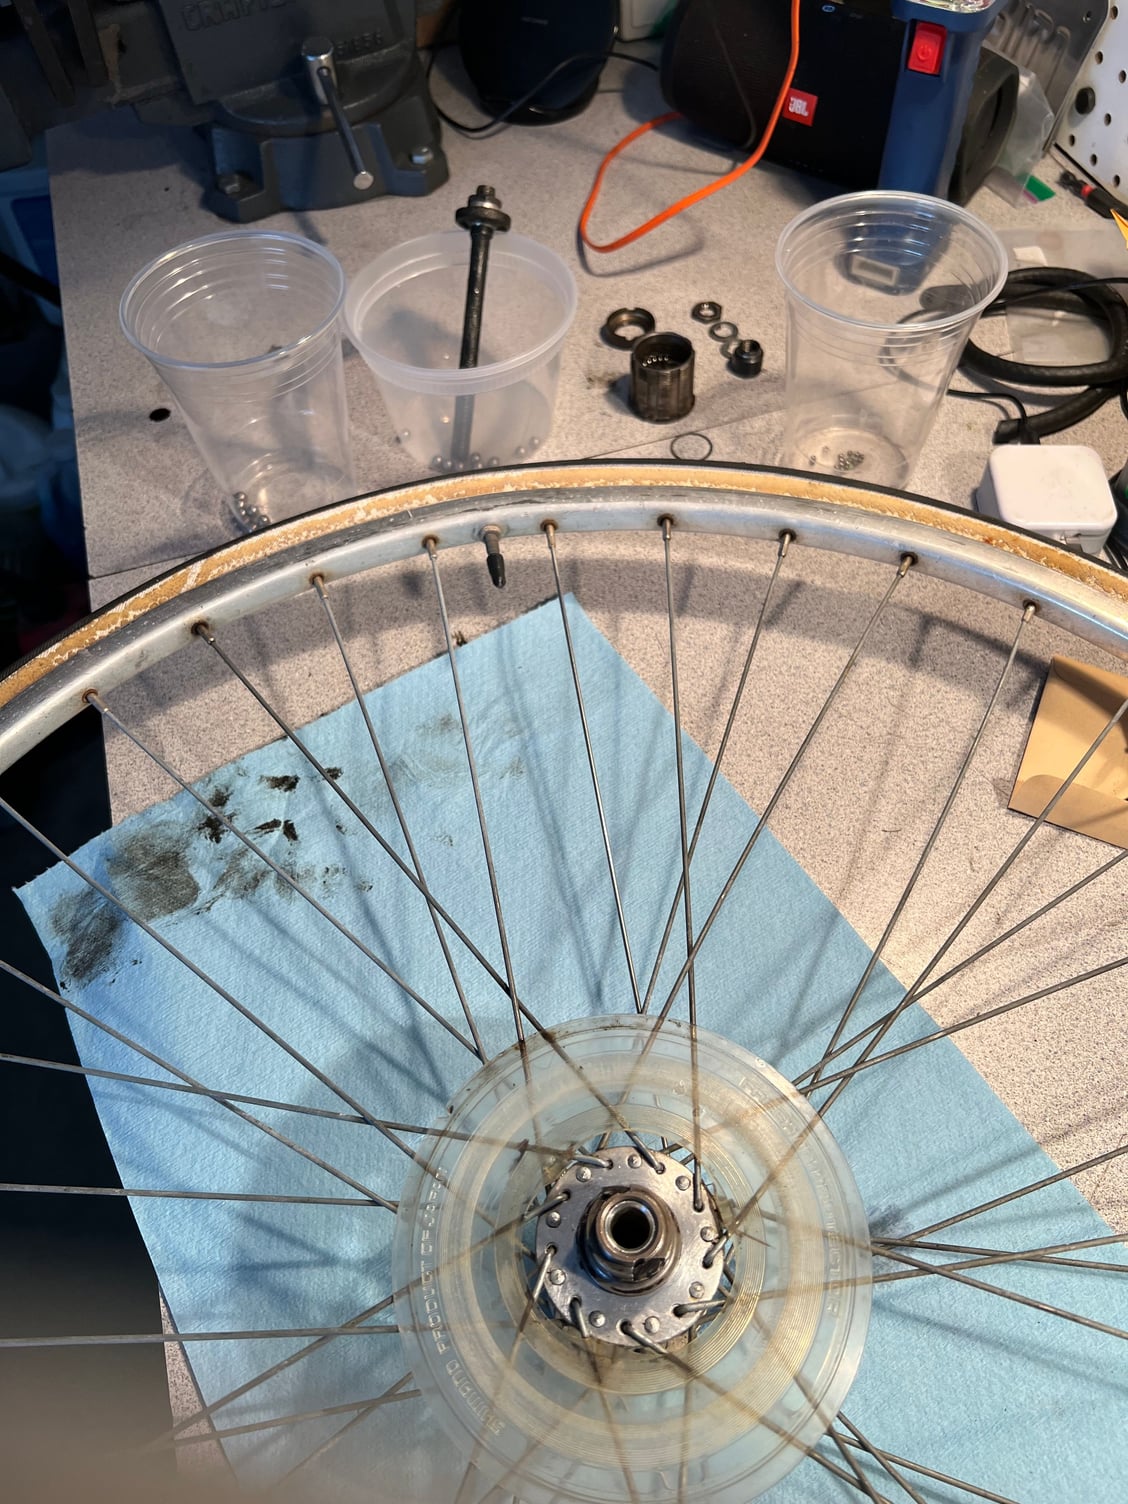
cleaned the cassette, and even made a freehub removal/install tool out of a 13/16” socket.
Everything seems to be working fine. I did find a broken spoke, so the wheel is at my LBS to have a spoke made and the wheel trued.
A big “thanks” to all of you for weighing in with advice!
cleaned the cassette, and even made a freehub removal/install tool out of a 13/16” socket.
Everything seems to be working fine. I did find a broken spoke, so the wheel is at my LBS to have a spoke made and the wheel trued.
A big “thanks” to all of you for weighing in with advice!
Likes For theofam:
07-23-22, 09:28 AM
#17
Senior Member
Nice work on the hub rebuild! I’ve considered making a free hub removal tool but haven’t been pushed to the actual need for one yet.
07-23-22, 09:44 AM
#18
Senior Member
I rebuilt the freehub:
cleaned the cassette, and even made a freehub removal/install tool out of a 13/16” socket.
Everything seems to be working fine. I did find a broken spoke, so the wheel is at my LBS to have a spoke made and the wheel trued.
A big “thanks” to all of you for weighing in with advice!
cleaned the cassette, and even made a freehub removal/install tool out of a 13/16” socket.
Everything seems to be working fine. I did find a broken spoke, so the wheel is at my LBS to have a spoke made and the wheel trued.
A big “thanks” to all of you for weighing in with advice!
07-23-22, 11:44 AM
#19
Junior Member
Thread Starter
So, if you are going to do it, I used a Dremel with a cutoff wheel marked “reinforced” on it. I bought a five-pack, but it only required one cutoff wheel. After that, a file and micrometer were necessary to file the teeth to size (3.6-3.7mm, if memory serves).
07-23-22, 11:49 AM
#20
Junior Member
Thread Starter
Dude, you get a gold star for doing that. I like wrenching on stuff, but a freewheel rebuild is tedious. Since you seem extra motivated (!!!!) look at some youtube videos on rebuilding sealed bottom brackets. Most folks toss them as they are cheaper to buy than fix, but you can do it. Some are very much like sealed bearing hubs. Just a pair of bearings that are seated on an axle. I pulled one apart just to see. A good quality pair of sealed bearings likely costs as much as a new unit, but the satisfaction of not filling up the landfill may be worth it.
YouTube is so great! I’m always really grateful people have taken the time to video their expertise. It does feel good to revive old bikes (and motorcycles) to, as you say, keep them out of the dump.
Likes For theofam:
07-23-22, 03:06 PM
#21
Senior Member
Dude, you get a gold star for doing that. I like wrenching on stuff, but a freewheel rebuild is tedious. Since you seem extra motivated (!!!!) look at some youtube videos on rebuilding sealed bottom brackets. Most folks toss them as they are cheaper to buy than fix, but you can do it. Some are very much like sealed bearing hubs. Just a pair of bearings that are seated on an axle. I pulled one apart just to see. A good quality pair of sealed bearings likely costs as much as a new unit, but the satisfaction of not filling up the landfill may be worth it.
 . The sentiment of “the satisfaction of not filling up the landfill” definitely rings true for me! To be sure, not everything can be rehabbed but I do enjoy the challenge .
Likes For sovende:
07-23-22, 03:23 PM
#22
Senior Member
It’s more than a bit of a “curse” but I’m hard pressed to throw most anything away that has “any” potential for rehabilitation . The sentiment of “the satisfaction of not filling up the landfill” definitely rings true for me! To be sure, not everything can be rehabbed but I do enjoy the challenge .
. The sentiment of “the satisfaction of not filling up the landfill” definitely rings true for me! To be sure, not everything can be rehabbed but I do enjoy the challenge .
07-23-22, 04:11 PM
#23
Junior Member
Thread Starter
Working on a whole house fan from Tamarack Tech. One fan is dying. Tamarack won't sell repair parts (grrrrrrr) Some web searches show that they are made by Shyuan Ya in Tawain. No luck on distributors here.......unless you sleuth the web and find out they relabel them as Dayton via Zoro/Grainger. 90 bucks sure beats 700 for the whole unit! Yeah everyone should try to "Beat the Man" when it comes to repairs. But it is a curse time wise.
