


Building my first wheel
 12-25-12, 07:30 PM
#1
perpetually frazzled
Thread Starter

Join Date: Sep 2008
Location: Linton, IN
Posts: 2,467
Bikes: 1977 Bridgestone Kabuki Super Speed; 1979 Raleigh Professional; 1983 Raleigh Rapide mixte; 1974 Peugeot UO-8; 1993 Univega Activa Trail; 1972 Raleigh Sports; 1967 Phillips; 1981 Schwinn World Tourist; 1976 Schwinn LeTour mixte; 1964 Western Flyer
Mentioned: 0 Post(s)
Tagged: 0 Thread(s)
Quoted: 5 Post(s)
Likes: 0
Liked 6 Times
in
6 Posts
Building my first wheel
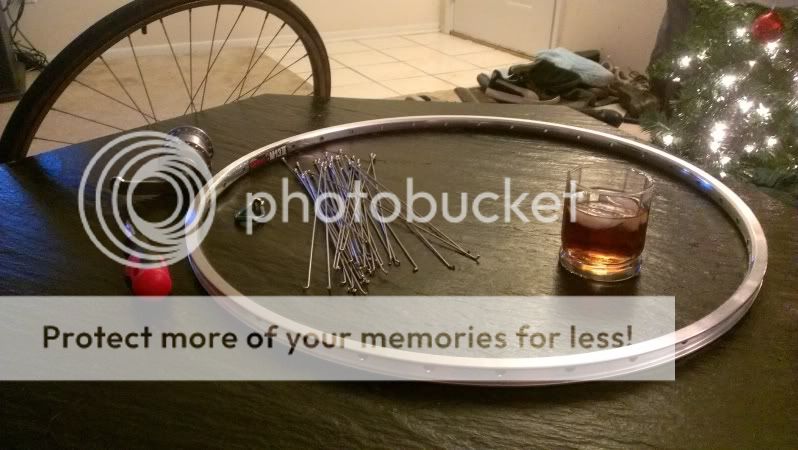
With a Sun M13 rim, brass nipples, and a Sachs Duomatic hub. Oh, and plenty of liquid courage. The plan for tonight is to get it laced. Truing, tensioning, and the like is going to happen tomorrow, I think.
 12-25-12, 07:36 PM
#2
Senior Member

Join Date: Mar 2011
Location: Tampa Bay, Florida
Posts: 1,698
Bikes: 87 Bridgestone 550 (Shocking Electric Metallic Pink)
Mentioned: 0 Post(s)
Tagged: 0 Thread(s)
Quoted: 0 Post(s)
Likes: 0
Liked 4 Times
in
3 Posts
Good luck....will be watching, something I have yet to tackle, a complete relace....partials I have done....but NOT from scratch.
12-25-12, 07:44 PM
#3

Senior Member

Join Date: Apr 2005
Location: Wherever
Posts: 16,748
Mentioned: 92 Post(s)
Tagged: 0 Thread(s)
Quoted: 556 Post(s)
Likes: 0
Liked 132 Times
in
78 Posts
Good luck and have fun.
This site helped me immensely.
https://miketechinfo.com/new-tech-wheels-tires.htm
This site helped me immensely.
https://miketechinfo.com/new-tech-wheels-tires.htm
12-25-12, 07:51 PM
#4
Senior Member

Join Date: May 2008
Location: Zang's Spur, CO
Posts: 9,086
Mentioned: 11 Post(s)
Tagged: 0 Thread(s)
Quoted: 3389 Post(s)
Liked 5,565 Times
in
2,887 Posts
I *always* split the lacing and truing across separate days.
Doing it all in one day is too much like work.
Doing it all in one day is too much like work.
 12-25-12, 08:26 PM
#6
Really Old Senior Member

Just use small steps when you start to increase the tension.
Overshooting and then trying to back off doesn't seem to work as well.
Overshooting and then trying to back off doesn't seem to work as well.
12-25-12, 08:35 PM
#7
perpetually frazzled
Thread Starter
Join Date: Sep 2008
Location: Linton, IN
Posts: 2,467
Bikes: 1977 Bridgestone Kabuki Super Speed; 1979 Raleigh Professional; 1983 Raleigh Rapide mixte; 1974 Peugeot UO-8; 1993 Univega Activa Trail; 1972 Raleigh Sports; 1967 Phillips; 1981 Schwinn World Tourist; 1976 Schwinn LeTour mixte; 1964 Western Flyer
Mentioned: 0 Post(s)
Tagged: 0 Thread(s)
Quoted: 5 Post(s)
Likes: 0
Liked 6 Times
in
6 Posts
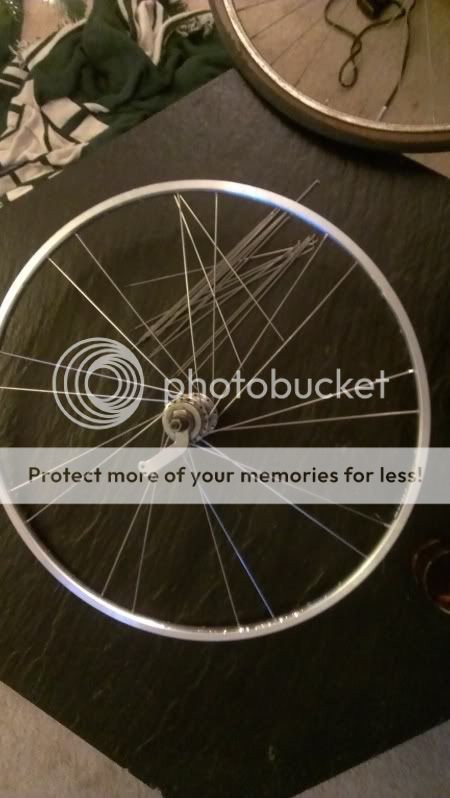
Well, the lacing was easy...now for the scary part...


12-25-12, 08:51 PM
#9
MIKE is my name!

Join Date: Mar 2012
Location: finland,baltimore
Posts: 2,846
Bikes: hans lutz, , puch mistral ultima,2x Austro Daimler Smoked chrome Ultima,Austro Daimler Mixte,Austro Daimler 531 mixte, flying arrow,F Moser,
Mentioned: 5 Post(s)
Tagged: 0 Thread(s)
Quoted: 7 Post(s)
Liked 20 Times
in
4 Posts
I was taught to take up the spokes until the threads disappear in the nipples exactly,
then you could take them up with screwdriver until the driver pops out,
the key is to take them up evenly first, odds are you get pretty close on first shot,
but a rear wheel has dish to deal with,
you will get it
then you could take them up with screwdriver until the driver pops out,
the key is to take them up evenly first, odds are you get pretty close on first shot,
but a rear wheel has dish to deal with,
you will get it
12-25-12, 08:54 PM
#10
Senior Member
Join Date: Aug 2008
Location: SoCal
Posts: 2,694
Bikes: A few BSO's.
Mentioned: 4 Post(s)
Tagged: 0 Thread(s)
Quoted: 164 Post(s)
Likes: 0
Liked 55 Times
in
27 Posts
It looks like a wheel to me. Remember dish and spoke tension and just go s...l...o...w.
I have built 8 or 9 wheels, usually about 6-8 months between efforts. I always go back to these videos for a refresher.
https://www.ehow.com/video_2363029_to...cle-wheel.html
It's very satisfying to roll on wheels you built yourself. Best of luck.
I have built 8 or 9 wheels, usually about 6-8 months between efforts. I always go back to these videos for a refresher.
https://www.ehow.com/video_2363029_to...cle-wheel.html
It's very satisfying to roll on wheels you built yourself. Best of luck.
12-25-12, 09:17 PM
#11
Senior Member

Join Date: Sep 2011
Location: Baltimore MD
Posts: 3,333
Bikes: '72 Motobecane Grand Record, '72 Gitane tandem, '72 Raleigh Super Course, '73 Raleigh Gran Sport, '73 Colnago Super, '76 Fiorelli Coppi, '78 Raleigh SBDU Team Pro, '78 Trek 930, '81 Holdsworth Special 650B, '86 Masi GC, ’94 Bridgestone RB-T
Mentioned: 67 Post(s)
Tagged: 0 Thread(s)
Quoted: 787 Post(s)
Liked 522 Times
in
282 Posts
I was taught to take up the spokes until the threads disappear in the nipples exactly,
then you could take them up with screwdriver until the driver pops out,
the key is to take them up evenly first, odds are you get pretty close on first shot,
but a rear wheel has dish to deal with,
you will get it
then you could take them up with screwdriver until the driver pops out,
the key is to take them up evenly first, odds are you get pretty close on first shot,
but a rear wheel has dish to deal with,
you will get it
__________________
The man who dies with the most toys�is dead. - Rootboy
The man who dies with the most toys�is dead. - Rootboy
12-25-12, 09:19 PM
#12
perpetually frazzled
Thread Starter
Join Date: Sep 2008
Location: Linton, IN
Posts: 2,467
Bikes: 1977 Bridgestone Kabuki Super Speed; 1979 Raleigh Professional; 1983 Raleigh Rapide mixte; 1974 Peugeot UO-8; 1993 Univega Activa Trail; 1972 Raleigh Sports; 1967 Phillips; 1981 Schwinn World Tourist; 1976 Schwinn LeTour mixte; 1964 Western Flyer
Mentioned: 0 Post(s)
Tagged: 0 Thread(s)
Quoted: 5 Post(s)
Likes: 0
Liked 6 Times
in
6 Posts
It's a rear wheel, but it's a singlespeed, so there's no difference in dish, so no biggie there. I also went with straight gauge spokes, so chances are, there isn't much wrap when tensioning. Looks like I've got it pretty square, but there's one significant wobble. Going to have to straighten that, then continue with tensioning. I started the wheel screwing the nipples to hide the threads, but the problem with that seems to be that the shop didn't even out the thread count - some were stiffly screwed on, others were loose enough to screw by hand, while I tried to tension it by one turn per spoke.
12-25-12, 09:59 PM
#13
What??? Only 2 wheels?

Join Date: Apr 2010
Location: Boston-ish, MA
Posts: 13,434
Bikes: 72 Peugeot UO-8, 82 Peugeot TH8, 87 Bianchi Brava, 76? Masi Grand Criterium, 74 Motobecane Champion Team, 86 & 77 Gazelle champion mondial, 81? Grandis, 82? Tommasini, 83 Peugeot PF10
Mentioned: 189 Post(s)
Tagged: 0 Thread(s)
Quoted: 1223 Post(s)
Liked 645 Times
in
232 Posts
First wheel I ever built was oh so satisfying. I then commuted 1000 miles on it, and it is still going strong. Oh so satisfying!
Enjoy the process.
Enjoy the process.
__________________
Real cyclists use toe clips.
With great bikes comes great responsibility.
jimmuller
Real cyclists use toe clips.
With great bikes comes great responsibility.
jimmuller
12-25-12, 10:07 PM
#14
Senior Member

Join Date: May 2010
Location: Bastrop Texas
Posts: 4,515
Bikes: Univega, Peu P6, Peu PR-10, Ted Williams, Peu UO-8, Peu UO-18 Mixte, Peu Dolomites
Mentioned: 13 Post(s)
Tagged: 0 Thread(s)
Quoted: 983 Post(s)
Liked 1,650 Times
in
1,060 Posts
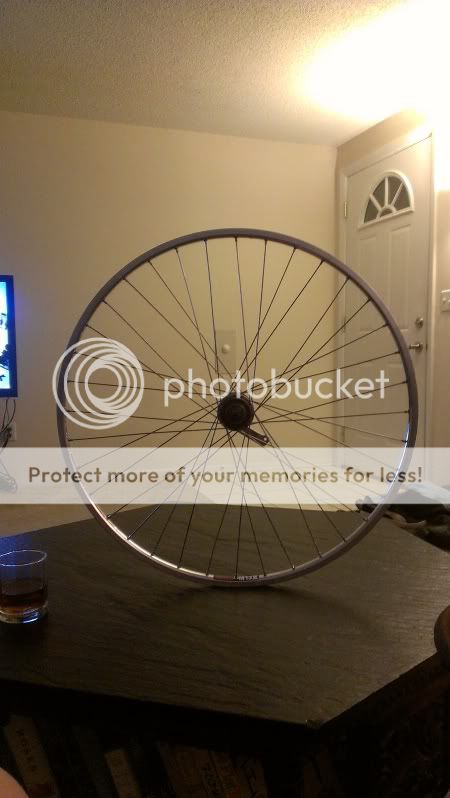
Bravo - No longer a wheel cherry...
 12-25-12, 11:20 PM
#17
Senior Member
Join Date: Jul 2009
Posts: 806
Mentioned: 4 Post(s)
Tagged: 0 Thread(s)
Quoted: 249 Post(s)
Likes: 0
Liked 29 Times
in
22 Posts
I think I saw the label on the rim located wrong. The label covers the seam and is directly opposite the valve stem hole and the spokes 'should' be laced so that the spokes on either side of the seam are pulling towards each other and the spokes on either side of the stem are pulling away from each other. This serves two issues. 1. more clearance to filling the tire and more strength at the seam.
12-26-12, 07:33 AM
#18
perpetually frazzled
Thread Starter
Join Date: Sep 2008
Location: Linton, IN
Posts: 2,467
Bikes: 1977 Bridgestone Kabuki Super Speed; 1979 Raleigh Professional; 1983 Raleigh Rapide mixte; 1974 Peugeot UO-8; 1993 Univega Activa Trail; 1972 Raleigh Sports; 1967 Phillips; 1981 Schwinn World Tourist; 1976 Schwinn LeTour mixte; 1964 Western Flyer
Mentioned: 0 Post(s)
Tagged: 0 Thread(s)
Quoted: 5 Post(s)
Likes: 0
Liked 6 Times
in
6 Posts
the spokes on either side of the stem are trailing. I used the wheel in the background as a. model, and followed sheldons instructions. I'm a visual kinesthetic learner, so it was really handy to have a model.
12-26-12, 08:04 AM
#19
MIKE is my name!
Join Date: Mar 2012
Location: finland,baltimore
Posts: 2,846
Bikes: hans lutz, , puch mistral ultima,2x Austro Daimler Smoked chrome Ultima,Austro Daimler Mixte,Austro Daimler 531 mixte, flying arrow,F Moser,
Mentioned: 5 Post(s)
Tagged: 0 Thread(s)
Quoted: 7 Post(s)
Liked 20 Times
in
4 Posts
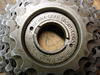
That's a sweet hub, I got three of em, and one in commission, it's so nice not to have cables,
It's on my adopted grocery getter, a early 70's bike, this Mac won't let me copy paste, but snag the pic of my flying arrow from that thread.
It's on my adopted grocery getter, a early 70's bike, this Mac won't let me copy paste, but snag the pic of my flying arrow from that thread.
12-26-12, 08:55 AM
#20

feros ferio

Join Date: Jul 2000
Location: www.ci.encinitas.ca.us
Posts: 21,809
Bikes: 1959 Capo Modell Campagnolo; 1960 Capo Sieger (2); 1962 Carlton Franco Suisse; 1970 Peugeot UO-8; 1982 Bianchi Campione d'Italia; 1988 Schwinn Project KOM-10;
Mentioned: 44 Post(s)
Tagged: 0 Thread(s)
Quoted: 1395 Post(s)
Liked 1,336 Times
in
842 Posts
I think I saw the label on the rim located wrong. The label covers the seam and is directly opposite the valve stem hole and the spokes 'should' be laced so that the spokes on either side of the seam are pulling towards each other and the spokes on either side of the stem are pulling away from each other. This serves two issues. 1. more clearance to filling the tire and more strength at the seam.
__________________
"Far and away the best prize that life offers is the chance to work hard at work worth doing." --Theodore Roosevelt
Capo: 1959 Modell Campagnolo, S/N 40324; 1960 Sieger (2), S/N 42624, 42597
Carlton: 1962 Franco Suisse, S/N K7911
Peugeot: 1970 UO-8, S/N 0010468
Bianchi: 1982 Campione d'Italia, S/N 1.M9914
Schwinn: 1988 Project KOM-10, S/N F804069
12-26-12, 09:48 AM
#21
likes to ride an old bike
Join Date: Dec 2010
Location: Madison
Posts: 669
Mentioned: 0 Post(s)
Tagged: 0 Thread(s)
Quoted: 0 Post(s)
Likes: 0
Liked 1 Time
in
1 Post
+1 on the above advice to read Sheldon's and Mike T's pages on wheelbuilding.
The bit that I wish was more explicit in those great tutorials: Don't wait until the wheel has tension to "tune" the spokes!
After the wheel firms up but before you start tensioning it, give it an initial "tuning" -- get all the spokes on each side of the wheel to sound the same as each other. It'll just be a dull thunk at this stage. This gives you confidence that the tensions you are starting with are equal, even if the thread lengths on your spokes were not precisely equal.
Now, start the tensioning loop:
* Bring the whole wheel up an incremental amount (I usually go 1/2 turn)
* Stress-relieve the spokes again
* True the wheel again at the new tension.
** If you can true by tightening (a) "flat" sounding spoke(s) or by loosening (a) "sharp" sounding spoke(s), do it. Otherwise, tighten on one side and loosen on the other, together. This keeps the tension more even on each side; it keeps the wheel in "tune".
* Check the "tuning" to ensure you didn't make some gross error.
* Repeat this loop until the spoke tension is sufficient.
12-26-12, 09:52 AM
#22
What??? Only 2 wheels?
Join Date: Apr 2010
Location: Boston-ish, MA
Posts: 13,434
Bikes: 72 Peugeot UO-8, 82 Peugeot TH8, 87 Bianchi Brava, 76? Masi Grand Criterium, 74 Motobecane Champion Team, 86 & 77 Gazelle champion mondial, 81? Grandis, 82? Tommasini, 83 Peugeot PF10
Mentioned: 189 Post(s)
Tagged: 0 Thread(s)
Quoted: 1223 Post(s)
Liked 645 Times
in
232 Posts
A 36-spoke wheel has 9 groups of 4, a 32-spoke wheel only 8 groups of 4. With 8 groups, an even number, the pattern will be the same on opposites sides of the wheel, with 9 the pattern will be different on opposite sides.
All that being said...
I've often wondered whether it makes much difference how the wheel is laced at the seam (i.e. at the label). I've never seen a wheel come apart, not that I've seen all that many wheels. But the divergent spacing at the valve stem has been described to me as important for how easy it is to get a pump head on the valve. Then again, I've seen factory wheels be strung wrong, and one can get a pump head on the valve regardless fo the spokes, so maybe that isn't so critical either.
And all that being said, I'm curious how all of you do 32-spoke wheels. Divergent or convergent spokes at that valve and seam? What was the industry concensus when 32-spoke wheels came into general use (in the 80's, right)?
I don't recall Sheldon's nice article describing 32 as being different from 36.
Comments, anyone?
__________________
Real cyclists use toe clips.
With great bikes comes great responsibility.
jimmuller
Real cyclists use toe clips.
With great bikes comes great responsibility.
jimmuller
Last edited by jimmuller; 12-26-12 at 11:25 AM. Reason: clarity. I some words out.
12-26-12, 10:24 AM
#23
Senior Member
Join Date: Aug 2006
Location: Portland OR
Posts: 7,639
Bikes: 61 Bianchi Specialissima 71 Peugeot G50 7? P'geot PX10 74 Raleigh GranSport 75 P'geot UO8 78? Raleigh Team Pro 82 P'geot PSV 86 P'geot PX 91 Bridgestone MB0 92 B'stone XO1 97 Rans VRex 92 Cannondale R1000 94 B'stone MB5 97 Vitus 997
Mentioned: 146 Post(s)
Tagged: 0 Thread(s)
Quoted: 392 Post(s)
Likes: 0
Liked 49 Times
in
31 Posts
I diverge at the valve with all hole counts.
12-26-12, 04:51 PM
#24
Senior Member

Join Date: Mar 2008
Location: Rhode Island (an obscure suburb of Connecticut)
Posts: 5,630
Bikes: one of each
Mentioned: 5 Post(s)
Tagged: 0 Thread(s)
Quoted: 8 Post(s)
Likes: 0
Liked 12 Times
in
12 Posts
I always forget to lube the threads before I start. Don't forget to lube the threads.
12-26-12, 08:45 PM
#25
aka Tom Reingold

Join Date: Jan 2009
Location: New York, NY, and High Falls, NY, USA
Posts: 40,522
Bikes: 1962 Rudge Sports, 1971 Raleigh Super Course, 1971 Raleigh Pro Track, 1974 Raleigh International, 1975 Viscount Fixie, 1982 McLean, 1996 Lemond (Ti), 2002 Burley Zydeco tandem
Mentioned: 511 Post(s)
Tagged: 0 Thread(s)
Quoted: 7359 Post(s)
Liked 2,497 Times
in
1,449 Posts
I put a rubber band around the hub shell. That makes some people scratch their heads and ask how I got it in there.
__________________
Tom Reingold, tom@noglider.com
New York City and High Falls, NY
Blogs: The Experienced Cyclist; noglider's ride blog
�When man invented the bicycle he reached the peak of his attainments.� � Elizabeth West, US author
Please email me rather than PM'ing me. Thanks.
Tom Reingold, tom@noglider.com
New York City and High Falls, NY
Blogs: The Experienced Cyclist; noglider's ride blog
�When man invented the bicycle he reached the peak of his attainments.� � Elizabeth West, US author
Please email me rather than PM'ing me. Thanks.