


Dynamo headlight mounting on bike without fork crown hole?
 05-31-22, 03:54 PM
#1

Senior Member
Thread Starter

Dynamo headlight mounting on bike without fork crown hole?
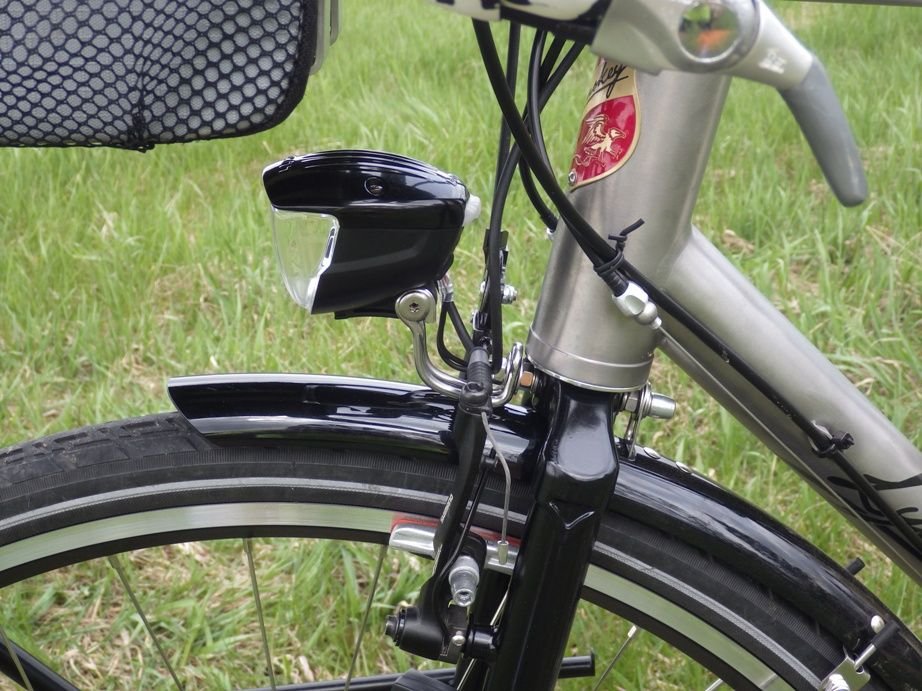
As you can see on the below pictures, the fork crown hole on the bike does not extend through the front of the fork. Does anyone know of an alternative way to mount a dynamo headlight to this fork? I'd like to avoid a handlebar mount as that will interfere with bar bag use.

 05-31-22, 06:41 PM
#2

Zoom zoom zoom zoom bonk

Join Date: Sep 2006
Location: New Zealand
Posts: 4,624
Bikes: Giant Defy, Trek 1.7c, BMC GF02, Fuji Tahoe, Scott Sub 35, Kona Rove, Trek Verve+2
Mentioned: 6 Post(s)
Tagged: 0 Thread(s)
Quoted: 551 Post(s)
Liked 722 Times
in
366 Posts
You can use the rack mount point half way down the fork.
Or you can drill the front of the fork.
Or you can drill the front of the fork.
Likes For znomit:
06-01-22, 06:02 AM
#4
Senior Member
Join Date: Aug 2010
Location: Madison, WI
Posts: 11,207
Bikes: 1961 Ideor, 1966 Perfekt 3 Speed AB Hub, 1994 Bridgestone MB-6, 2006 Airnimal Joey, 2009 Thorn Sherpa, 2013 Thorn Nomad MkII, 2015 VO Pass Hunter, 2017 Lynskey Backroad, 2017 Raleigh Gran Prix, 1980s Bianchi Mixte on a trainer. Others are now gone.
Mentioned: 48 Post(s)
Tagged: 0 Thread(s)
Quoted: 3461 Post(s)
Liked 1,466 Times
in
1,144 Posts
My fork crown hole was already in use for a cable hanger, so I used some threaded rod instead of the bolt for more length in my canti brake mount.
I pasted this text from a previous post I made:
The headlight is mounted on a brake cantilever mount. It would have been easier to mount the light on the fork crown, but that is already used for the canti brake cable hanger, that is why I mounted the light in an alternative place. The brake mounting bolt was not long enough to be safely used, I used galvanized threaded rod and several nuts and washers instead. The light mount is an extra tall Edelux light mount, slightly straightened to get the light up higher above the fender and also move the rear of the light further above any tire spray on wet days. Used blue (removable) threadlocker and made sure that these nuts are all very tight, I do not want this to loosen since my front brake uses the same mount as the light.
More detail here, this is where I copied the text that I pasted above:
https://www.bikeforums.net/electroni...b-charger.html
As I noted above, I used the extra tall mount, the mount I used was an Edelux mount but that might be the same as the extra long B&M mount.
Likes For Tourist in MSN:
06-01-22, 10:04 AM
#5
Senior Member

Join Date: Feb 2008
Location: Peoria, IL
Posts: 4,476
Mentioned: 86 Post(s)
Tagged: 0 Thread(s)
Quoted: 1829 Post(s)
Liked 3,376 Times
in
1,580 Posts
If you don't care how it looks, you can use my technique. 
I just used a T bracket, covered it in tape, put some old inner tube around the fork blade for protection, and used hose clamps to secure the bracket to the fork blade. This is on a recumbent, and there weren't many options. While it's ugly as sin, it worked quite nicely!

Steve in Peoria
I just used a T bracket, covered it in tape, put some old inner tube around the fork blade for protection, and used hose clamps to secure the bracket to the fork blade. This is on a recumbent, and there weren't many options. While it's ugly as sin, it worked quite nicely!
Steve in Peoria
06-01-22, 11:34 AM
#6
Senior Member
Join Date: Dec 2010
Location: northern Deep South
Posts: 8,904
Bikes: Fuji Touring, Novara Randonee
Mentioned: 36 Post(s)
Tagged: 0 Thread(s)
Quoted: 2604 Post(s)
Liked 1,933 Times
in
1,213 Posts
Note to self: make sure any custom bike I order has a through-hole on the fork crown for my dyno light.
steelbikeguy, that setup looks like the light is mounted kind of low. Aren't the German dyno lights designed to be around fork height for "standard" wheel sizes, e.g. 26", 650B, or 700C?
steelbikeguy, that setup looks like the light is mounted kind of low. Aren't the German dyno lights designed to be around fork height for "standard" wheel sizes, e.g. 26", 650B, or 700C?
06-01-22, 11:56 AM
#7
Senior Member
Join Date: Aug 2010
Location: Madison, WI
Posts: 11,207
Bikes: 1961 Ideor, 1966 Perfekt 3 Speed AB Hub, 1994 Bridgestone MB-6, 2006 Airnimal Joey, 2009 Thorn Sherpa, 2013 Thorn Nomad MkII, 2015 VO Pass Hunter, 2017 Lynskey Backroad, 2017 Raleigh Gran Prix, 1980s Bianchi Mixte on a trainer. Others are now gone.
Mentioned: 48 Post(s)
Tagged: 0 Thread(s)
Quoted: 3461 Post(s)
Liked 1,466 Times
in
1,144 Posts
Note to self: make sure any custom bike I order has a through-hole on the fork crown for my dyno light.
steelbikeguy, that setup looks like the light is mounted kind of low. Aren't the German dyno lights designed to be around fork height for "standard" wheel sizes, e.g. 26", 650B, or 700C?
steelbikeguy, that setup looks like the light is mounted kind of low. Aren't the German dyno lights designed to be around fork height for "standard" wheel sizes, e.g. 26", 650B, or 700C?
I have mounted a dyno powered light that low, and any debris or tree leaves in the road left big shadows behind it, so that was a problem. And a pot hole was harder to see too. I picked up a used donated dynohub wheel from a bike charity for cheap, had a spare vintage light on the shelf so put them together. But in my case, this was on my errand bike, only ridden on well lit city streets to grocery store or other places near home. For that purpose, the low height is not that bad.
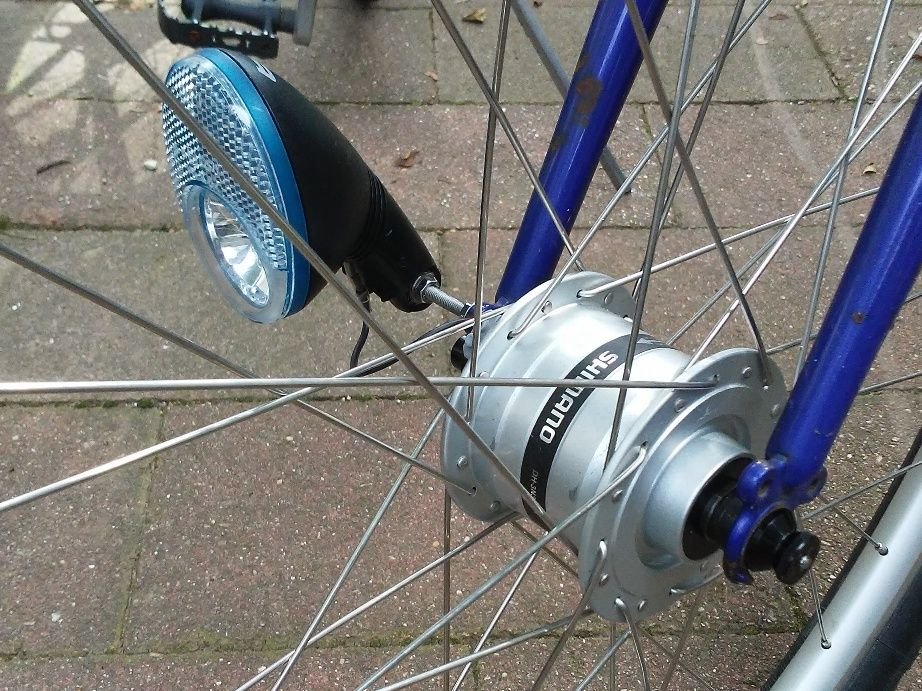
Simplest wiring job I have ever done, the hub and light were both grounded to the frame so only one wire needed.
Regarding the German rules, I am clueless on that.
06-03-22, 01:04 PM
#8
Senior Member
Join Date: Aug 2010
Location: Madison, WI
Posts: 11,207
Bikes: 1961 Ideor, 1966 Perfekt 3 Speed AB Hub, 1994 Bridgestone MB-6, 2006 Airnimal Joey, 2009 Thorn Sherpa, 2013 Thorn Nomad MkII, 2015 VO Pass Hunter, 2017 Lynskey Backroad, 2017 Raleigh Gran Prix, 1980s Bianchi Mixte on a trainer. Others are now gone.
Mentioned: 48 Post(s)
Tagged: 0 Thread(s)
Quoted: 3461 Post(s)
Liked 1,466 Times
in
1,144 Posts
I assumed that there would be more ideas, but looks like there are none. So, I will throw out one more idea.
You can buy plates that are called Cantilever Brake Boosters that attach to the canti brake mounts, you could put a light on one of those plates. They are intended for bikes where the canti mounts flex too much. That said, I have no clue how much clearance you have below your bar bag.
The shipping time looks like it is shipped from asia.
https://www.amazon.com/Aluminium-Bic...dp/B08THVNXF8/
I bought one of those plates to use on another fork that I have, but have not used that plate yet.
06-06-22, 02:24 AM
#9
I�m a little Surly

Join Date: Jan 2010
Location: Near the district
Posts: 2,422
Bikes: Two Cross Checks, a Karate Monkey, a Disc Trucker, and a VO Randonneur
Mentioned: 5 Post(s)
Tagged: 0 Thread(s)
Quoted: 699 Post(s)
Liked 1,294 Times
in
647 Posts

If you�re going to put a front rack on just put it there.
06-06-22, 06:26 AM
#10
Senior Member
Join Date: Feb 2008
Location: Peoria, IL
Posts: 4,476
Mentioned: 86 Post(s)
Tagged: 0 Thread(s)
Quoted: 1829 Post(s)
Liked 3,376 Times
in
1,580 Posts
Note to self: make sure any custom bike I order has a through-hole on the fork crown for my dyno light.
steelbikeguy, that setup looks like the light is mounted kind of low. Aren't the German dyno lights designed to be around fork height for "standard" wheel sizes, e.g. 26", 650B, or 700C?
steelbikeguy, that setup looks like the light is mounted kind of low. Aren't the German dyno lights designed to be around fork height for "standard" wheel sizes, e.g. 26", 650B, or 700C?
The light I'm using is home built, so the impact on the beam isn't too bad.
When I had my conventional touring/commuting bike frame made, I specified a threaded boss brazed onto the fork blade to permit the mounting of a headlight. I got used to this position for the headlight a long time ago when I used a fork mounted "block" dynamo. Over the 22 years that I've had it, it's worked fine.
Steve in Peoria
06-06-22, 10:07 AM
#11
Senior Member
Join Date: Aug 2010
Location: Madison, WI
Posts: 11,207
Bikes: 1961 Ideor, 1966 Perfekt 3 Speed AB Hub, 1994 Bridgestone MB-6, 2006 Airnimal Joey, 2009 Thorn Sherpa, 2013 Thorn Nomad MkII, 2015 VO Pass Hunter, 2017 Lynskey Backroad, 2017 Raleigh Gran Prix, 1980s Bianchi Mixte on a trainer. Others are now gone.
Mentioned: 48 Post(s)
Tagged: 0 Thread(s)
Quoted: 3461 Post(s)
Liked 1,466 Times
in
1,144 Posts
06-06-22, 11:05 AM
#12
Senior Member
Join Date: Feb 2008
Location: Peoria, IL
Posts: 4,476
Mentioned: 86 Post(s)
Tagged: 0 Thread(s)
Quoted: 1829 Post(s)
Liked 3,376 Times
in
1,580 Posts
A lot of 'bent riders will mount a light to the frame near the front. The potential disadvantage is that it might throw enough light to the side to light up your feet and be distracting. Having the light attached to the frame also means that it won't light the way when you are making a turn, which was my main motivation for mounting my light to the fork blade.
To their credit, Bacchetta did provide bottle mounting bosses under the frame tube near the cranks which made a handy spot for attaching a light. I made a bracket so I could mount a little Cateye Micro II, which I used as a back-up light (just in case I had a wiring problem with the dynamo, etc.)

Steve in Peoria
06-07-22, 08:37 PM
#13
Senior Member
Join Date: Sep 2004
Location: Chicago area
Posts: 2,551
Bikes: Airborne "Carpe Diem", Motobecane "Mirage", Trek 6000, Strida 2, Dahon "Helios XL", Dahon "Mu XL", Tern "Verge S11i"
Mentioned: 23 Post(s)
Tagged: 0 Thread(s)
Quoted: 980 Post(s)
Liked 582 Times
in
399 Posts
I considered drilling a hole through the front of the fork, but the metal there is not really thick enough to tap threads in. I suppose I could use a bolt long enough to engage the threads at the back to hold the light on, and then use a locknut to hold the fender on. For the present I've decided to leave things as they are.

Moderately acceptable light mounting.
Likes For sweeks:
06-08-22, 06:12 AM
#14
Senior Member
Join Date: Aug 2010
Location: Madison, WI
Posts: 11,207
Bikes: 1961 Ideor, 1966 Perfekt 3 Speed AB Hub, 1994 Bridgestone MB-6, 2006 Airnimal Joey, 2009 Thorn Sherpa, 2013 Thorn Nomad MkII, 2015 VO Pass Hunter, 2017 Lynskey Backroad, 2017 Raleigh Gran Prix, 1980s Bianchi Mixte on a trainer. Others are now gone.
Mentioned: 48 Post(s)
Tagged: 0 Thread(s)
Quoted: 3461 Post(s)
Liked 1,466 Times
in
1,144 Posts
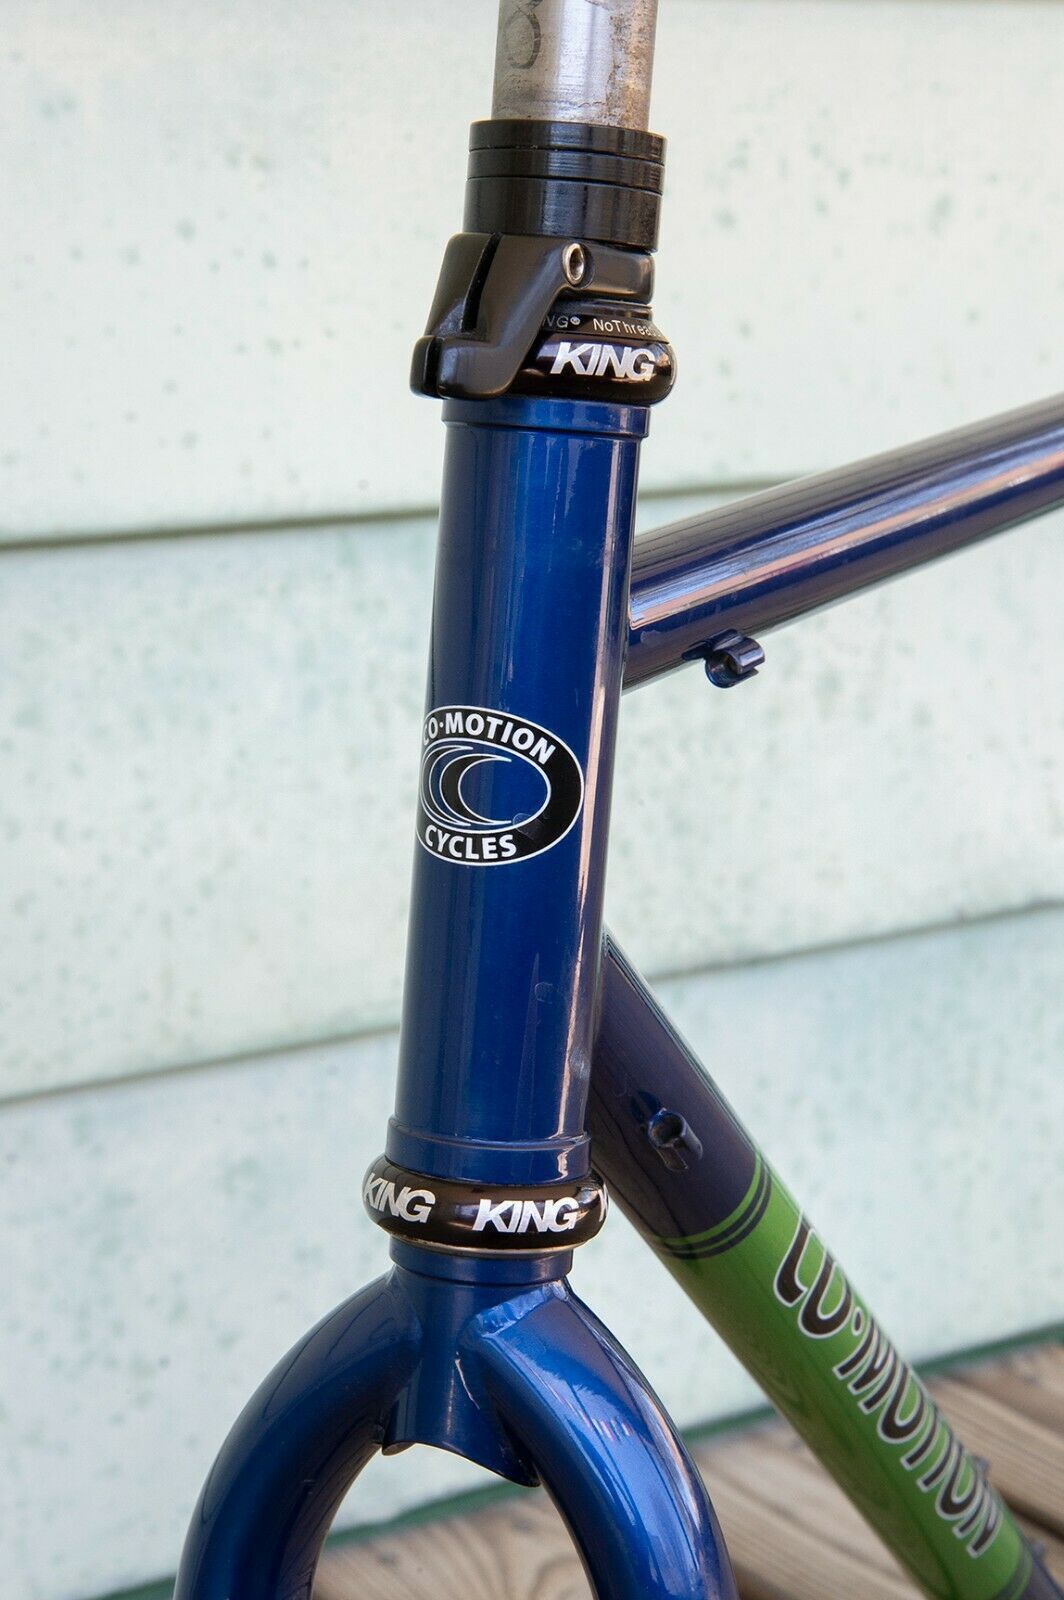
I have the exact same problem on my Airborne, which has a Co-Motion front fork. I currently have my dyno-hub-powered light mounted on the left-side brake post.
I considered drilling a hole through the front of the fork, but the metal there is not really thick enough to tap threads in. I suppose I could use a bolt long enough to engage the threads at the back to hold the light on, and then use a locknut to hold the fender on. For the present I've decided to leave things as they are.
....
If you have the tools to drill the steerer tube, that is what I would do. Then cover up the metal where you drilled it with finger nail polish to prevent rust.
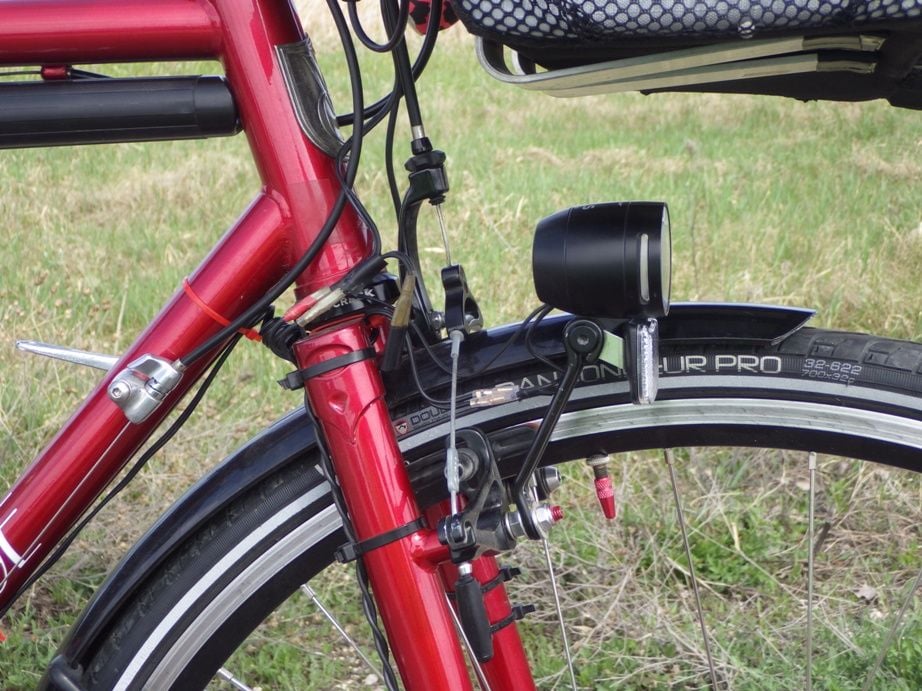
Different bike in photo below, if a long bolt is impractical, use threaded rod. In the photo below, I used a threaded rod for extra length, as I also had a fender mount to deal with. And my headtube was so big that I needed to move the light mount further forward from the fork. This is a touring bike and I do not carry lots of open end wrenches, so one of the nuts was one of those allen wrench type nuts that are used on rim brake blocks so I can use an allen wrench on it if I needed to remove the fender. This fork hole was not threaded, so the nuts on the threaded rod are torqued tight enough that it should not move.
The light mount is similar to a standard B&M, but that is not what I used, I bent a different mount to fit my needs. So, you will not see an identical one for sale anywhere, but there are similar ones.
If you drill it, if you have a drill press, that would be best. You want to make sure that the hole is directly ahead and not off to one side. My first dyno powered headlight went on a fork where the hole was not exactly straight ahead, the light beam was clearly in the wrong place. My light mount was plastic so I could not bend it for aim. Eventually I realized that I could use some of those weird spherical shaped washers like on rim brake blocks to allow me to aim it. But it is best if you do not need to resort to that, so getting the hole straight is better.
This placement of course assumes you have enough clearance for a light under your handlebar bag.
09-08-22, 11:26 AM
#15
Newbie

Join Date: Jun 2007
Location: Monroe, WA
Posts: 41
Bikes: Peugeot PX10, Miyata 712, Surly LHT, Schwinn Peloton, Guerciotti Aelle, Schwinn SuperSport, Peugeot Orient Express, GT Avalanche, Motobecane Nemesis, Trek 330, no-name Chinese carbon bike, and a Soma Fog Cutter V2..
Mentioned: 0 Post(s)
Tagged: 0 Thread(s)
Quoted: 13 Post(s)
Liked 26 Times
in
14 Posts
I'm facing a similar puzzle at the moment on my gravel bike, with the added wrinkle that the fork is carbon, and has no crown hole that goes through. There's a rivnut in the back to mount a fender, but I have yet to find a bracket that would reach under the crown, and I don't have a machine shop to try and make one. The fork has three rivnuts on each blade for mounting bottles or racks, and I think a long m5 bolt with a nylock nut against the fork and another holding the lamp against the head of the bolt might do the trick.
Wire routing is the real conundrum, though. I want the lamp on the left, but the hub connector is on the right. I'd like to minimize the use of zip ties, both for aesthetic reasons, and to avoid abrasion against the carbon. I'm thinking I might splice the wire with 2.8mm spade connectors, right below the lamp, staggered along the wire, so they're not directly adjacent, then run the wire through the 6mm openings of the hollow thru-axle (I thought about Schmidt's coax connectors, but they're 6.2mm in diameter). If I need to take off the wheel, I disconnect it on the lamp side, pull the wire back out and use my 6mm Allen key to remove the axle.
Any obvious flaws to this plan?
09-08-22, 01:49 PM
#16
Newbie
Join Date: Jun 2007
Location: Monroe, WA
Posts: 41
Bikes: Peugeot PX10, Miyata 712, Surly LHT, Schwinn Peloton, Guerciotti Aelle, Schwinn SuperSport, Peugeot Orient Express, GT Avalanche, Motobecane Nemesis, Trek 330, no-name Chinese carbon bike, and a Soma Fog Cutter V2..
Mentioned: 0 Post(s)
Tagged: 0 Thread(s)
Quoted: 13 Post(s)
Liked 26 Times
in
14 Posts
I should also add that my backup plan is a 28.6mm rack-mount-adapter seat clamp in place of one of my headset spacers. I've ordered the Axiom Gear Trekk version. I'm hoping that it does actually have a uniform thickness, as it appears. My fork bung is 90mm long and extends into the headset, so it will be safe to clamp the steerer tube.

Likes For hankamania:
09-08-22, 04:16 PM
#17
Senior Member
Join Date: Feb 2008
Location: Peoria, IL
Posts: 4,476
Mentioned: 86 Post(s)
Tagged: 0 Thread(s)
Quoted: 1829 Post(s)
Liked 3,376 Times
in
1,580 Posts
....
Wire routing is the real conundrum, though. I want the lamp on the left, but the hub connector is on the right. I'd like to minimize the use of zip ties, both for aesthetic reasons, and to avoid abrasion against the carbon. I'm thinking I might splice the wire with 2.8mm spade connectors, right below the lamp, staggered along the wire, so they're not directly adjacent, then run the wire through the 6mm openings of the hollow thru-axle (I thought about Schmidt's coax connectors, but they're 6.2mm in diameter). If I need to take off the wheel, I disconnect it on the lamp side, pull the wire back out and use my 6mm Allen key to remove the axle.
Any obvious flaws to this plan?
I've got a Schmidt disc brake hub dynamo, circa 2008, and it also requires putting the connectors on the right. The wiring has to run up the right fork blade and down the left, and it's not the best looking arrangement. It would probably look a bit stealthier if I had used black wire for both conductors.. oh well.
The only practical issues with the proposed scheme might just be that extra connectors introduces more opportunities for wire and connector failures.
Steve in Peoria
09-08-22, 04:55 PM
#18
Newbie
Join Date: Jun 2007
Location: Monroe, WA
Posts: 41
Bikes: Peugeot PX10, Miyata 712, Surly LHT, Schwinn Peloton, Guerciotti Aelle, Schwinn SuperSport, Peugeot Orient Express, GT Avalanche, Motobecane Nemesis, Trek 330, no-name Chinese carbon bike, and a Soma Fog Cutter V2..
Mentioned: 0 Post(s)
Tagged: 0 Thread(s)
Quoted: 13 Post(s)
Liked 26 Times
in
14 Posts
I discovered the big flaw to my plan... The rivnuts on the side of the fork aren't square with the plane of the wheel (they're all sloping in towards the wheel - it's symmetrical, and intentional). So... Headset spacer bracket it is!
 09-12-22, 03:28 PM
#20
Newbie
Join Date: Jun 2007
Location: Monroe, WA
Posts: 41
Bikes: Peugeot PX10, Miyata 712, Surly LHT, Schwinn Peloton, Guerciotti Aelle, Schwinn SuperSport, Peugeot Orient Express, GT Avalanche, Motobecane Nemesis, Trek 330, no-name Chinese carbon bike, and a Soma Fog Cutter V2..
Mentioned: 0 Post(s)
Tagged: 0 Thread(s)
Quoted: 13 Post(s)
Liked 26 Times
in
14 Posts
I received the Axiom clamp, and I think it's going to work. It had a lip on the edge to keep it from falling down the seat tube, but that ground off easily enough with my Dremel, The black paint on it was helpful to spot if any part of the lip was left - I'd hate for that to be a point of stress when clamped.
