


Making room for 650b
 07-12-22, 04:09 PM
#1
ambulatory senior
Thread Starter
Join Date: Dec 2016
Location: Peoria Il
Posts: 5,998
Bikes: Austro Daimler modified by Gugie! Raleigh Professional and lots of other bikes.
Mentioned: 76 Post(s)
Tagged: 0 Thread(s)
Quoted: 1955 Post(s)
Liked 3,661 Times
in
1,679 Posts
Making room for 650b
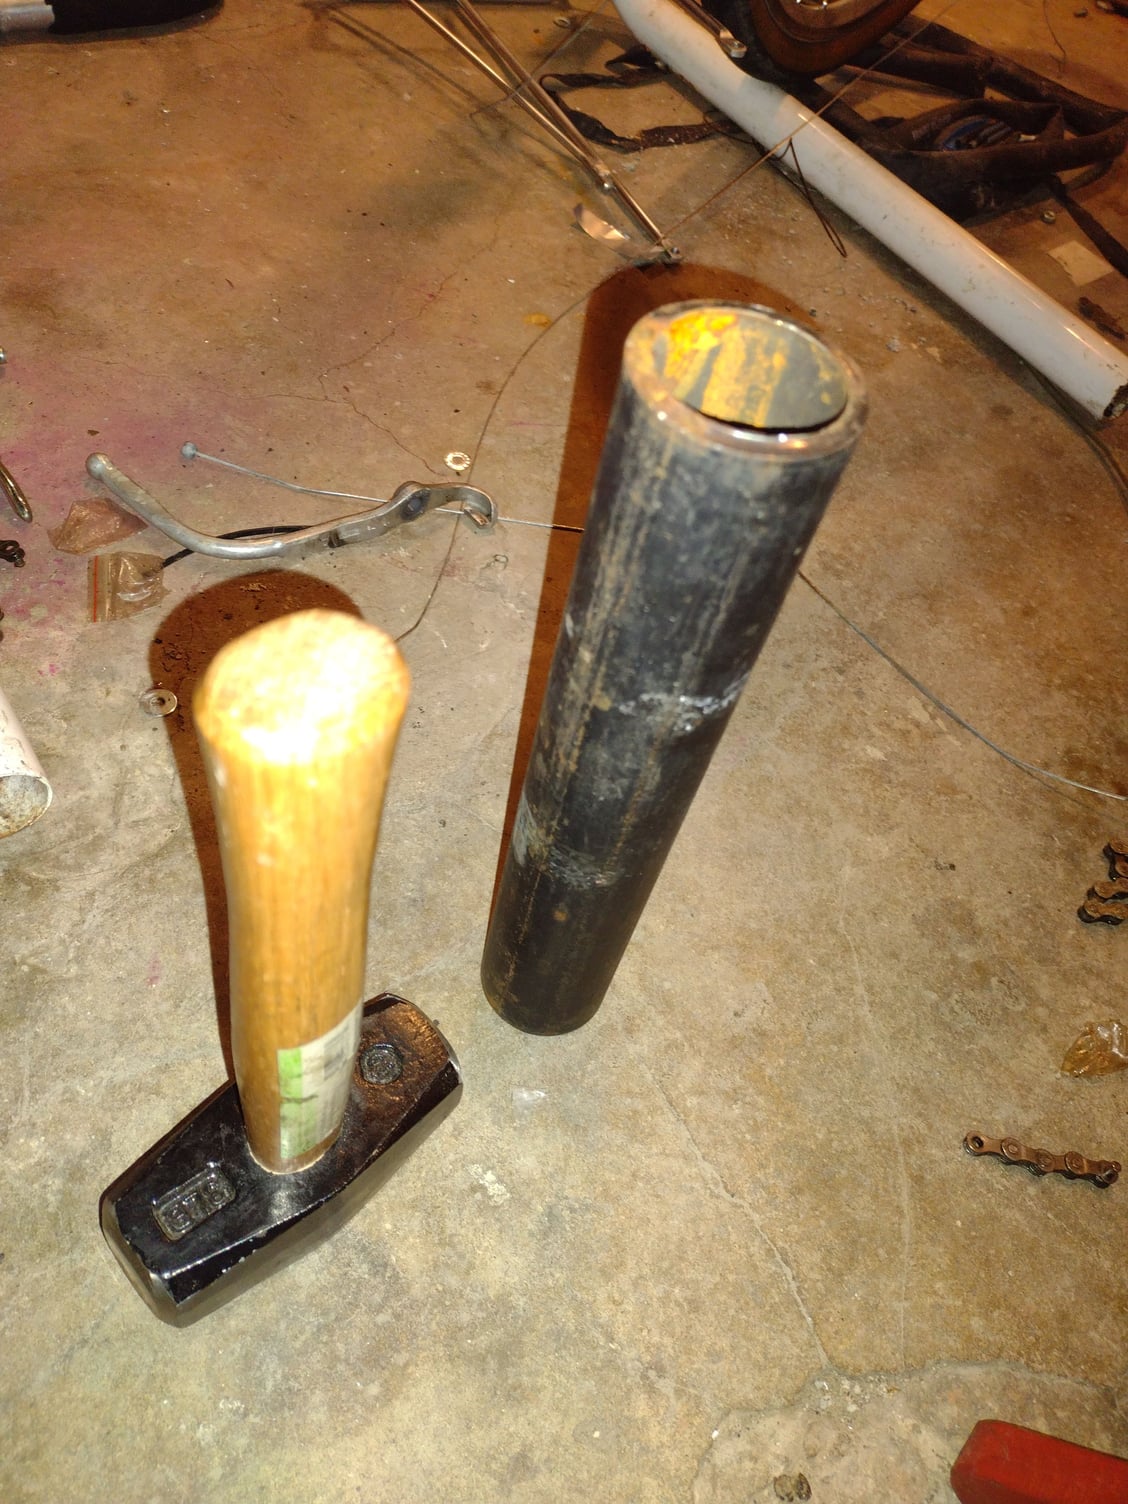
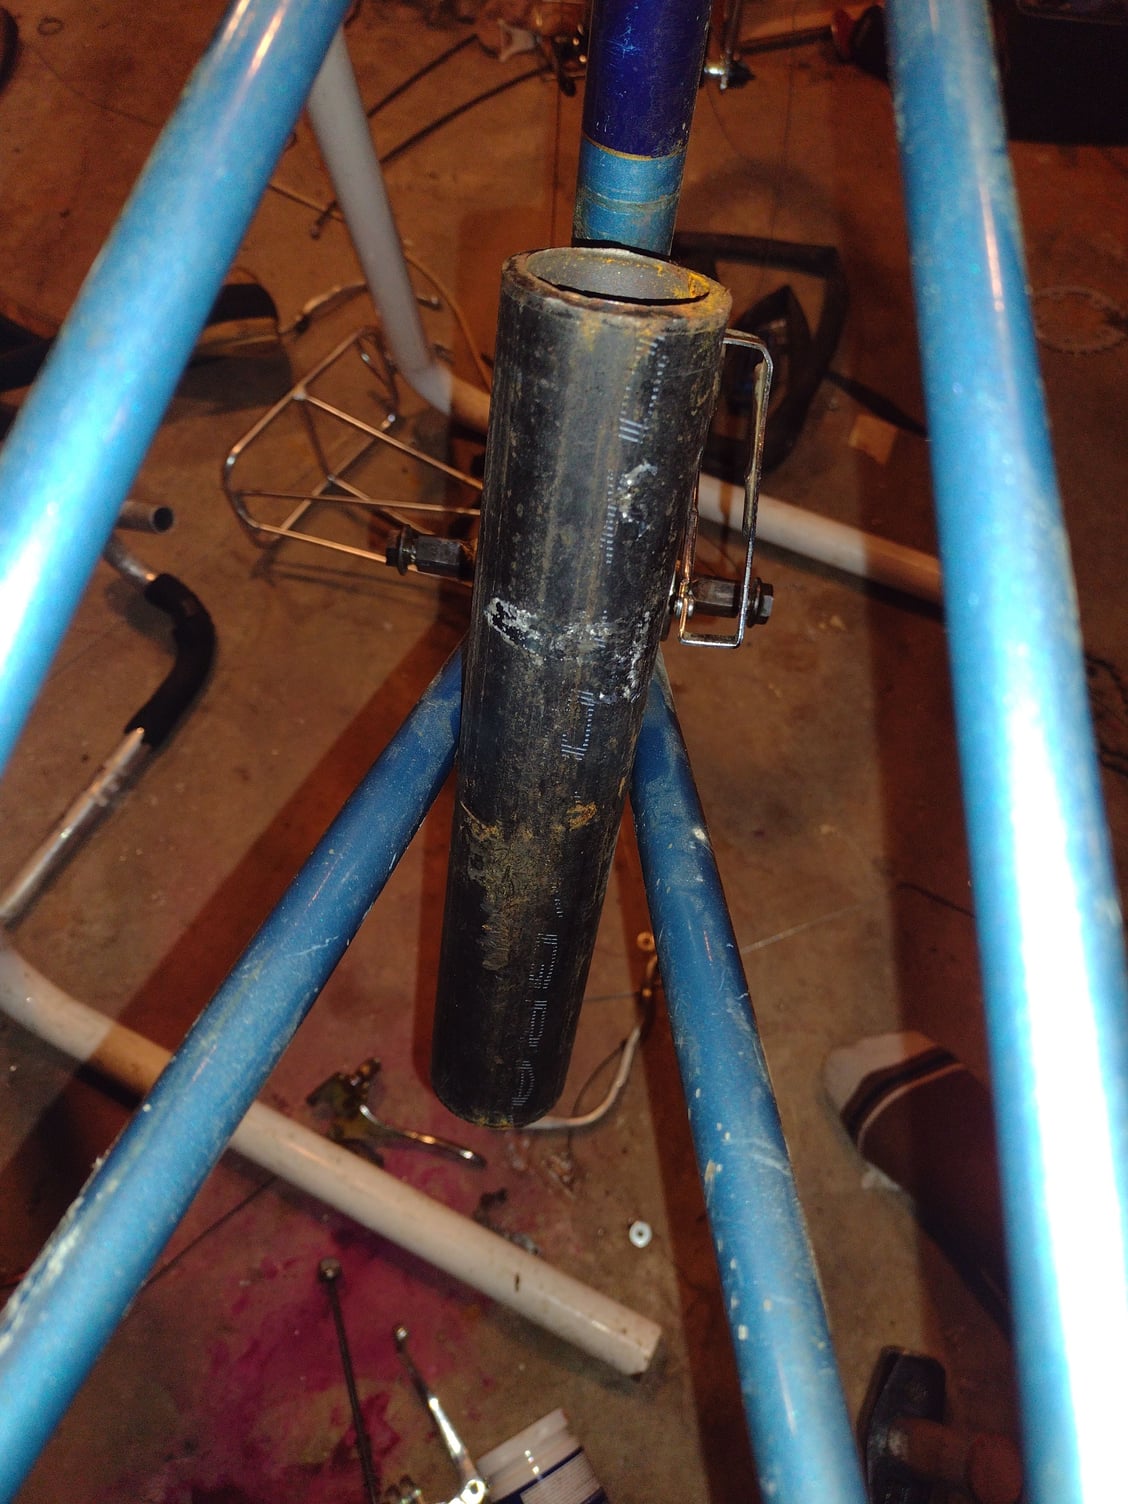
I have tried this technique twice now and had some success. For bikes that don't have enough space at the chainstays I use a piece of pipe with the o.d. of 2". I put a hub in the bikes dropouts and pound the pipe into the chain stays behind the bottom bracket. It doesn't yield huge room but it gives you enough for 42s and in both cases the rear dropout spacing was essentially the same after. I use a 2 pound sledge and go slow but it does seem to work. I did it first on an 88-89 letour and just did it on an old motobecane grand touring. This may be horrifying by some standards but it seems to work for me.

Motobecane
Motobecane
 07-12-22, 05:03 PM
#2

working on my sandal tan

Join Date: Aug 2011
Location: CID
Posts: 22,629
Bikes: 1991 Bianchi Eros, 1964 Armstrong, 1988 Diamondback Ascent, 1988 Bianchi Premio, 1987 Bianchi Sport SX, 1980s Raleigh mixte (hers), All-City Space Horse (hers)
Mentioned: 98 Post(s)
Tagged: 0 Thread(s)
Quoted: 3871 Post(s)
Liked 2,568 Times
in
1,579 Posts
I've seen pictures of people using vise-grips with no padding (!) to indent chainstays, so tapping dimples with a hammer sounds downright humane.
Speaking of "making room", I think your camera would have an easier time focusing on the chainstays if you backed up a little.
Speaking of "making room", I think your camera would have an easier time focusing on the chainstays if you backed up a little.
Likes For ThermionicScott:
07-12-22, 05:09 PM
#3
ambulatory senior
Thread Starter
Join Date: Dec 2016
Location: Peoria Il
Posts: 5,998
Bikes: Austro Daimler modified by Gugie! Raleigh Professional and lots of other bikes.
Mentioned: 76 Post(s)
Tagged: 0 Thread(s)
Quoted: 1955 Post(s)
Liked 3,661 Times
in
1,679 Posts
I've seen pictures of people using vise-grips with no padding (!) to indent chainstays, so tapping dimples with a hammer sounds downright humane.
Speaking of "making room", I think your camera would have an easier time focusing on the chainstays if you backed up a little.
Speaking of "making room", I think your camera would have an easier time focusing on the chainstays if you backed up a little.
07-12-22, 05:13 PM
#4
ambulatory senior
Thread Starter
Join Date: Dec 2016
Location: Peoria Il
Posts: 5,998
Bikes: Austro Daimler modified by Gugie! Raleigh Professional and lots of other bikes.
Mentioned: 76 Post(s)
Tagged: 0 Thread(s)
Quoted: 1955 Post(s)
Liked 3,661 Times
in
1,679 Posts
Likes For 52telecaster:
07-12-22, 05:14 PM
#5
ambulatory senior
Thread Starter
Join Date: Dec 2016
Location: Peoria Il
Posts: 5,998
Bikes: Austro Daimler modified by Gugie! Raleigh Professional and lots of other bikes.
Mentioned: 76 Post(s)
Tagged: 0 Thread(s)
Quoted: 1955 Post(s)
Liked 3,661 Times
in
1,679 Posts
 07-12-22, 05:43 PM
#6
Senior Member

Join Date: Dec 2008
Location: Seattle, WA
Posts: 649
Mentioned: 16 Post(s)
Tagged: 0 Thread(s)
Quoted: 81 Post(s)
Liked 221 Times
in
65 Posts
Your technique looks like it works more or less, but I'd be a little worried about spreading out the angles where the chainstays meet the bottom bracket shell. But then, maybe that's a good thing since it gives you more clearance, which after all is what you're after.
I generally use a large set of vice grips to gently squeeze the dimples. I protect the out side of the chainstay with piece of 3/4'' copper tubing cut in half lengthwise, and use a small socket wrench on the inside that roughly has the contour/size of the dimple I'm trying to make.
I know for sure that however you do it, you still need to check alignment and spacing after you're done, even if you have a rear dummy hub installed while doing the dimpling.
Likes For lonesomesteve:
07-12-22, 06:22 PM
#7
Senior Member

Join Date: Jan 2008
Location: Beaverton, OR
Posts: 14,744
Bikes: Yes
Mentioned: 525 Post(s)
Tagged: 0 Thread(s)
Quoted: 3230 Post(s)
Liked 3,868 Times
in
1,439 Posts
The last picture is helpful. I was imagining the 2" pipe going in end first, and it seemed horrible. I guess with that, you have three forces resisting the pipe -- the inside curvature of the stays, the linear alignment of the stays, and the strength of the chainstay bridge. Which one is going to give first? It sounds like you've experimentally determined that to be the curvature of the stays, though I'd be curious if you've measured the rear dropout spacing while the pipe is hammered in place. I recently read someone suggesting a toe strap wrapped around the chainstays at the bridge to support the braze while cold setting rear spacing. I'm not convinced a toe strap has more strength than the braze, but maybe if it's an old Raleigh....
Since I think @gugie is traveling today, I'll do some work as his publicist and mention a tool I saw him post a couple of years ago.
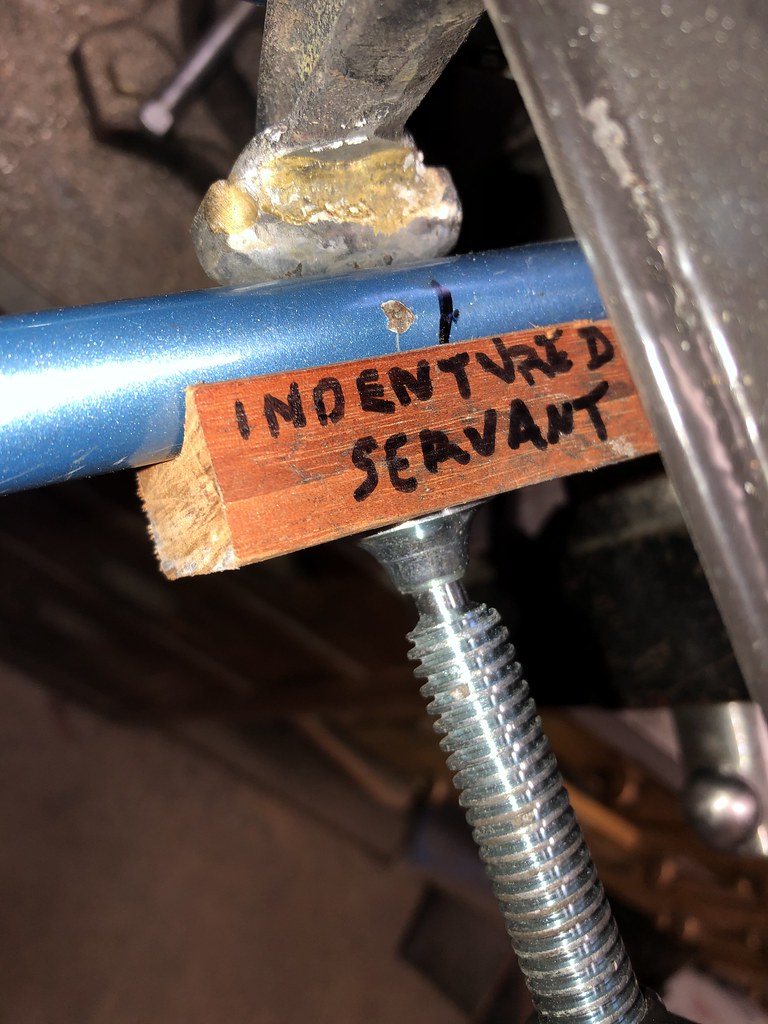
This is obviously just a C-clamp with a blob brazed on one end, and a block of wood supporting the outside of the stay. Assuming the curvature of the block matches the curvature of the stay, this should pretty reliably indent the inside of the stay and only the inside.
On the other hand, I do really like using a really big hammer on my bikes now and then.
Since I think @gugie is traveling today, I'll do some work as his publicist and mention a tool I saw him post a couple of years ago.
This is obviously just a C-clamp with a blob brazed on one end, and a block of wood supporting the outside of the stay. Assuming the curvature of the block matches the curvature of the stay, this should pretty reliably indent the inside of the stay and only the inside.
On the other hand, I do really like using a really big hammer on my bikes now and then.
__________________
My Bikes
My Bikes
Likes For Andy_K:
07-12-22, 07:07 PM
#8
Bike Butcher of Portland

Join Date: Jul 2014
Location: Portland, OR
Posts: 11,639
Bikes: It's complicated.
Mentioned: 1299 Post(s)
Tagged: 0 Thread(s)
Quoted: 4682 Post(s)
Liked 5,801 Times
in
2,285 Posts
Your technique looks like it works more or less, but I'd be a little worried about spreading out the angles where the chainstays meet the bottom bracket shell. But then, maybe that's a good thing since it gives you more clearance, which after all is what you're after.
I generally use a large set of vice grips to gently squeeze the dimples. I protect the out side of the chainstay with piece of 3/4'' copper tubing cut in half lengthwise, and use a small socket wrench on the inside that roughly has the contour/size of the dimple I'm trying to make.
I know for sure that however you do it, you still need to check alignment and spacing after you're done, even if you have a rear dummy hub installed while doing the dimpling.
I generally use a large set of vice grips to gently squeeze the dimples. I protect the out side of the chainstay with piece of 3/4'' copper tubing cut in half lengthwise, and use a small socket wrench on the inside that roughly has the contour/size of the dimple I'm trying to make.
I know for sure that however you do it, you still need to check alignment and spacing after you're done, even if you have a rear dummy hub installed while doing the dimpling.
I actually think Russel's method is quite elegant. Alignment check should always be done after any indentation.
__________________
If someone tells you that you have enough bicycles and you don't need any more, stop talking to them. You don't need that kind of negativity in your life.
If someone tells you that you have enough bicycles and you don't need any more, stop talking to them. You don't need that kind of negativity in your life.
Likes For gugie:
07-12-22, 09:12 PM
#9
ambulatory senior
Thread Starter
Join Date: Dec 2016
Location: Peoria Il
Posts: 5,998
Bikes: Austro Daimler modified by Gugie! Raleigh Professional and lots of other bikes.
Mentioned: 76 Post(s)
Tagged: 0 Thread(s)
Quoted: 1955 Post(s)
Liked 3,661 Times
in
1,679 Posts
My usual alignment check involves a ride but it would be better to use the string method.
Likes For 52telecaster:
07-13-22, 05:21 AM
#10
Senior Member
Join Date: Sep 2017
Location: Eastern Shore, MD
Posts: 2,107
Bikes: Road ready: 1993 Koga Miyata City Liner Touring Hybrid, 1989 Centurion Sport DLX, "I Blame GP" Bridgestone CB-1. Projects: Yea, I got a problem....
Mentioned: 24 Post(s)
Tagged: 0 Thread(s)
Quoted: 753 Post(s)
Liked 737 Times
in
422 Posts
A big C clamp with 2 fitted wooden blocks placed out side of where the dimple is formed by the pipe would contain a lot of the spreading forces.
I do wonder if adding a vertical dimple to a chain stay that already has a horizontal crease would open the crease up and start a horizontal crack.
I do wonder if adding a vertical dimple to a chain stay that already has a horizontal crease would open the crease up and start a horizontal crack.
Last edited by bark_eater; 07-13-22 at 05:27 AM.
07-13-22, 09:27 AM
#11
ambulatory senior
Thread Starter
Join Date: Dec 2016
Location: Peoria Il
Posts: 5,998
Bikes: Austro Daimler modified by Gugie! Raleigh Professional and lots of other bikes.
Mentioned: 76 Post(s)
Tagged: 0 Thread(s)
Quoted: 1955 Post(s)
Liked 3,661 Times
in
1,679 Posts
A big C clamp with 2 fitted wooden blocks placed out side of where the dimple is formed by the pipe would contain a lot of the spreading forces.
I do wonder if adding a vertical dimple to a chain stay that already has a horizontal crease would open the crease up and start a horizontal crack.
I do wonder if adding a vertical dimple to a chain stay that already has a horizontal crease would open the crease up and start a horizontal crack.
07-13-22, 08:09 PM
#12
Senior Member
Join Date: Dec 2016
Location: Long Island, NY
Posts: 2,110
Bikes: Trek 800 x 2, Schwinn Heavy Duti, Schwinn Traveler, Schwinn Le Tour Luxe, Schwinn Continental, Cannondale M400 and Lambert, Schwinn Super Sport
Mentioned: 14 Post(s)
Tagged: 0 Thread(s)
Quoted: 809 Post(s)
Liked 1,024 Times
in
666 Posts
The problem with modern cameras, including or especially, cell phone cameras is that they are programed to autofocus on something in the frame. Often what you want to keep in focus and what the camera wants to focus on are different things. If @52telecaster wanted to take an artfully framed picture of his, are those 5-tens?, shoes, then, bingo, the camera focused on the right thing and the frame was artfully placed out of focus. Good job camera, except that Autoexposure is not talking to the autofocus so the subject of the picture, 52Telecasters shoe is too dark.
While modern camera have made great improvements in picture taking, they must be overridden sometimes to focus on what you want them to focus on. Then you still might have to post process the image to correct the auto exposure.
I ended up getting all techy, but just want to say, modern cameras still need a human.
Oh, and by the way, thanks for the tip on dimpling the chainstay. I may have to keep this in mind. I like the shape of the dimples for chainstays that have not been dimpled already. What are you doing for the brakes?

Likes For Velo Mule:
07-13-22, 10:09 PM
#13
ambulatory senior
Thread Starter
Join Date: Dec 2016
Location: Peoria Il
Posts: 5,998
Bikes: Austro Daimler modified by Gugie! Raleigh Professional and lots of other bikes.
Mentioned: 76 Post(s)
Tagged: 0 Thread(s)
Quoted: 1955 Post(s)
Liked 3,661 Times
in
1,679 Posts
The problem with modern cameras, including or especially, cell phone cameras is that they are programed to autofocus on something in the frame. Often what you want to keep in focus and what the camera wants to focus on are different things. If @52telecaster wanted to take an artfully framed picture of his, are those 5-tens?, shoes, then, bingo, the camera focused on the right thing and the frame was artfully placed out of focus. Good job camera, except that Autoexposure is not talking to the autofocus so the subject of the picture, 52Telecasters shoe is too dark.
While modern camera have made great improvements in picture taking, they must be overridden sometimes to focus on what you want them to focus on. Then you still might have to post process the image to correct the auto exposure.
I ended up getting all techy, but just want to say, modern cameras still need a human.
Oh, and by the way, thanks for the tip on dimpling the chainstay. I may have to keep this in mind. I like the shape of the dimples for chainstays that have not been dimpled already. What are you doing for the brakes?
While modern camera have made great improvements in picture taking, they must be overridden sometimes to focus on what you want them to focus on. Then you still might have to post process the image to correct the auto exposure.
I ended up getting all techy, but just want to say, modern cameras still need a human.
Oh, and by the way, thanks for the tip on dimpling the chainstay. I may have to keep this in mind. I like the shape of the dimples for chainstays that have not been dimpled already. What are you doing for the brakes?
07-14-22, 05:39 AM
#14
Edumacator
Join Date: Jan 2018
Location: Goose Creek, SC
Posts: 6,808
Bikes: '87 Crestdale, '87 Basso Gap, '92 Rossin Performance EL-OS, 1990 VanTuyl, 1980s Losa, 1985 Trek 670, 1982 AD SLE, 1987 PX10, etc...
Mentioned: 59 Post(s)
Tagged: 0 Thread(s)
Quoted: 2440 Post(s)
Liked 3,129 Times
in
1,968 Posts
At least even if Russell�s solution splits the brazing on the chainstay bridge, the right and left dimples are sure to be perfectly aligned!
Interesting solutions found here...
Interesting solutions found here...
__________________
1987 Crest Cannondale, 1987 Basso Gap, 1992 Rossin Performance EL, 1990ish Van Tuyl, 1985 Trek 670, 1982 AD SLE, 2003 Pinarello Surprise, 1990ish MBK Atlantique, 1987 Peugeot Competition, 1987 Nishiki Tri-A, 1981 Faggin, 1996 Cannondale M500, 1984 Mercian, 1982 AD SuperLeicht, 1985 Massi (model unknown), 1988 Daccordi Griffe , 1989 Fauxsin MTB, 1981 Ciocc Mockba, 1992 Bianchi Giro, 1977 Colnago Super
1987 Crest Cannondale, 1987 Basso Gap, 1992 Rossin Performance EL, 1990ish Van Tuyl, 1985 Trek 670, 1982 AD SLE, 2003 Pinarello Surprise, 1990ish MBK Atlantique, 1987 Peugeot Competition, 1987 Nishiki Tri-A, 1981 Faggin, 1996 Cannondale M500, 1984 Mercian, 1982 AD SuperLeicht, 1985 Massi (model unknown), 1988 Daccordi Griffe , 1989 Fauxsin MTB, 1981 Ciocc Mockba, 1992 Bianchi Giro, 1977 Colnago Super
Likes For jdawginsc:
07-14-22, 07:28 AM
#15
Not lost wanderer.

Join Date: Jan 2013
Location: Lititz, Pa
Posts: 3,331
Bikes: In USA; 73 Raleigh Super Course dingle speed, 72 Raleigh Gran Sport SS, 72 Geoffry Butler, 81 Centurion Pro-Tour, 74 Gugie Grandier Sportier
Mentioned: 73 Post(s)
Tagged: 0 Thread(s)
Quoted: 886 Post(s)
Liked 998 Times
in
525 Posts
I have done the same thing to put 700c x 38mm on a Super Course.
Only I used a Barbell weight lock.
Only I used a Barbell weight lock.
__________________
Cambodia bikes, Bridgestone SRAM 2 speed, 2012 Fuji Stratos...
Cambodia bikes, Bridgestone SRAM 2 speed, 2012 Fuji Stratos...
Likes For bwilli88:
07-14-22, 09:56 AM
#16
Senior Member
Join Date: Apr 2011
Location: Maryland, USA
Posts: 2,440
Bikes: Drysdale/Gitane/Zeus/Masi/Falcon/Palo Alto/Raleigh/Legnano
Mentioned: 34 Post(s)
Tagged: 0 Thread(s)
Quoted: 987 Post(s)
Liked 639 Times
in
406 Posts
Maybe not, some things sensitive eyes should not see?
I presume there's no specific tool made for this, perhaps there should be.
This looks like it takes courage; I just wonder what you'd be willing to do to, say, a 52 Telecaster...
I presume there's no specific tool made for this, perhaps there should be.
This looks like it takes courage; I just wonder what you'd be willing to do to, say, a 52 Telecaster...
__________________
Larry:1958 Drysdale, 1961 Gitane Gran Sport, 1974 Zeus track, 1988 Masi Gran Corsa, 1974 Falcon, 1980 Palo Alto, 1973 Raleigh Gran Sport, 1974 Legnano. Susan: 1976 Windsor Profesional.
Larry:1958 Drysdale, 1961 Gitane Gran Sport, 1974 Zeus track, 1988 Masi Gran Corsa, 1974 Falcon, 1980 Palo Alto, 1973 Raleigh Gran Sport, 1974 Legnano. Susan: 1976 Windsor Profesional.
07-14-22, 10:30 AM
#17

Senior Member
Join Date: Dec 2005
Posts: 17,159
Mentioned: 481 Post(s)
Tagged: 0 Thread(s)
Quoted: 3811 Post(s)
Liked 6,707 Times
in
2,613 Posts
For my Lemond, I used a wood block, a steel rod, and my bench vise:


Before (right side):

After (right side)

Key to this process was that the chain stays were already kind of flattened, so the bit stayed in place while I squeezed the vice. I've tried it with more rounded stays and was unsuccessful.
Before (right side):
After (right side)
Key to this process was that the chain stays were already kind of flattened, so the bit stayed in place while I squeezed the vice. I've tried it with more rounded stays and was unsuccessful.
Likes For nlerner:
07-14-22, 10:43 AM
#18
Senior Member
Regarding the pipe technique, how do you keep both dimples even (the same depth)? Does the direction of the hammering control which stay gets dented?
P.S. - try THAT with a graphite frame, sucka! :-)
P.S. - try THAT with a graphite frame, sucka! :-)
07-14-22, 11:14 AM
#19
ambulatory senior
Thread Starter
Join Date: Dec 2016
Location: Peoria Il
Posts: 5,998
Bikes: Austro Daimler modified by Gugie! Raleigh Professional and lots of other bikes.
Mentioned: 76 Post(s)
Tagged: 0 Thread(s)
Quoted: 1955 Post(s)
Liked 3,661 Times
in
1,679 Posts
Telecasters are tools that get grossly abused. For the record my 52 is a reissue but it's seen plenty of hard use. I have five teles and folks should send them to me if they want them reliced. Mine get dents almost every night I gig and that's 3-4 nights a week.
Likes For 52telecaster:
07-14-22, 11:16 AM
#20
ambulatory senior
Thread Starter
Join Date: Dec 2016
Location: Peoria Il
Posts: 5,998
Bikes: Austro Daimler modified by Gugie! Raleigh Professional and lots of other bikes.
Mentioned: 76 Post(s)
Tagged: 0 Thread(s)
Quoted: 1955 Post(s)
Liked 3,661 Times
in
1,679 Posts
07-14-22, 11:17 AM
#21
ambulatory senior
Thread Starter
Join Date: Dec 2016
Location: Peoria Il
Posts: 5,998
Bikes: Austro Daimler modified by Gugie! Raleigh Professional and lots of other bikes.
Mentioned: 76 Post(s)
Tagged: 0 Thread(s)
Quoted: 1955 Post(s)
Liked 3,661 Times
in
1,679 Posts
For my Lemond, I used a wood block, a steel rod, and my bench vise:
Before (right side):
After (right side)
Key to this process was that the chain stays were already kind of flattened, so the bit stayed in place while I squeezed the vice. I've tried it with more rounded stays and was unsuccessful.
Before (right side):
After (right side)
Key to this process was that the chain stays were already kind of flattened, so the bit stayed in place while I squeezed the vice. I've tried it with more rounded stays and was unsuccessful.
07-14-22, 11:20 AM
#22
ambulatory senior
Thread Starter
Join Date: Dec 2016
Location: Peoria Il
Posts: 5,998
Bikes: Austro Daimler modified by Gugie! Raleigh Professional and lots of other bikes.
Mentioned: 76 Post(s)
Tagged: 0 Thread(s)
Quoted: 1955 Post(s)
Liked 3,661 Times
in
1,679 Posts
There is only room to hit the pipe in about one spot. I'm driving it between the stays. Since the stays are supposed to be the same thickness they dent fairly symmetrically. Straightening the frame after is recommended.
07-14-22, 11:24 PM
#23
Senior Member
07-15-22, 05:01 AM
#24
ambulatory senior
Thread Starter
Join Date: Dec 2016
Location: Peoria Il
Posts: 5,998
Bikes: Austro Daimler modified by Gugie! Raleigh Professional and lots of other bikes.
Mentioned: 76 Post(s)
Tagged: 0 Thread(s)
Quoted: 1955 Post(s)
Liked 3,661 Times
in
1,679 Posts
07-15-22, 01:09 PM
#25
Senior Member

No idea about Android.
Likes For due ruote:
