


De-Gunking Balky Shifters - For the Long Haul
 03-26-24, 09:36 PM
#1

Cantilever believer
Thread Starter

Join Date: Nov 2021
Location: Phoenix, AZ
Posts: 1,565
Mentioned: 5 Post(s)
Tagged: 0 Thread(s)
Quoted: 536 Post(s)
Liked 1,839 Times
in
832 Posts
De-Gunking Balky Shifters - For the Long Haul
For the past week or so, I've been down with a bug and haven't felt much like riding or wrenching. Over the weekend I felt decent enough to at least get something done, so I decided to degunk a pile of accumulated shifters in the ultrasonic cleaner. And since I'm doing so, expound on the process I use for successful degunking.
I know there are webpages and videos that say "Hey, having a balky Rapidfire trigger shifter or STI brifter is no problem! Just flush it with a bunch of solvent / degreaser / WD and it'll start working again!" My experience is that such actions seem to work well initially, but oftentimes don't provide a permanent fix. The solvents do work to soften up the decades-old grease in the pawls and other mechanisms, but once the lighter fractions of the introduced liquids inevitably evaporate, the grease starts to re-solidify and the problem rears its ugly non-clicking head again after months or even weeks. And if you're rebuilding bikes for resale or giveaway, this can be embarrassing, in that the recipient ends up with something that doesn't work anymore and they're mystified as to how it could have happened, and in many cases having no skills, materials, or ability to fix it themselves.
Over the years, I've experimented with several different techniques after the popular fast n' easy methods didn't provide a long-term fix. I tried long-term soaking in penetrant or heavy-duty cleaner, which still didn't dislodge the gunk and in some cases resulted in corrosion that rendered the shifter unusable. I tried alternate soaking and working the mechanisms repeatedly - this sometimes worked, but often resulted in relapses as the grease was still trapped inside the mechanisms in places that can't be reached with tools or sprays.
What I discovered through years of experimentation and testing is the only long-term solution that has consistently worked for me is to remove the shifter from the bicycle and use an ultrasonic cleaner in extended treatment cycles to drive the old grease completely out of all the surfaces, pawls, bushings, sleeves, and other areas, test thoroughly, and then re-lube lightly to restore the action and protect it from corrosion.
Now this isn't a simple "8 minutes and done" task. In most cases, when I receive these shifters, they're not clicking at all or in many cases the levers are completely frozen in place. A short ultrasonic bath isn't going to do much of anything for that.
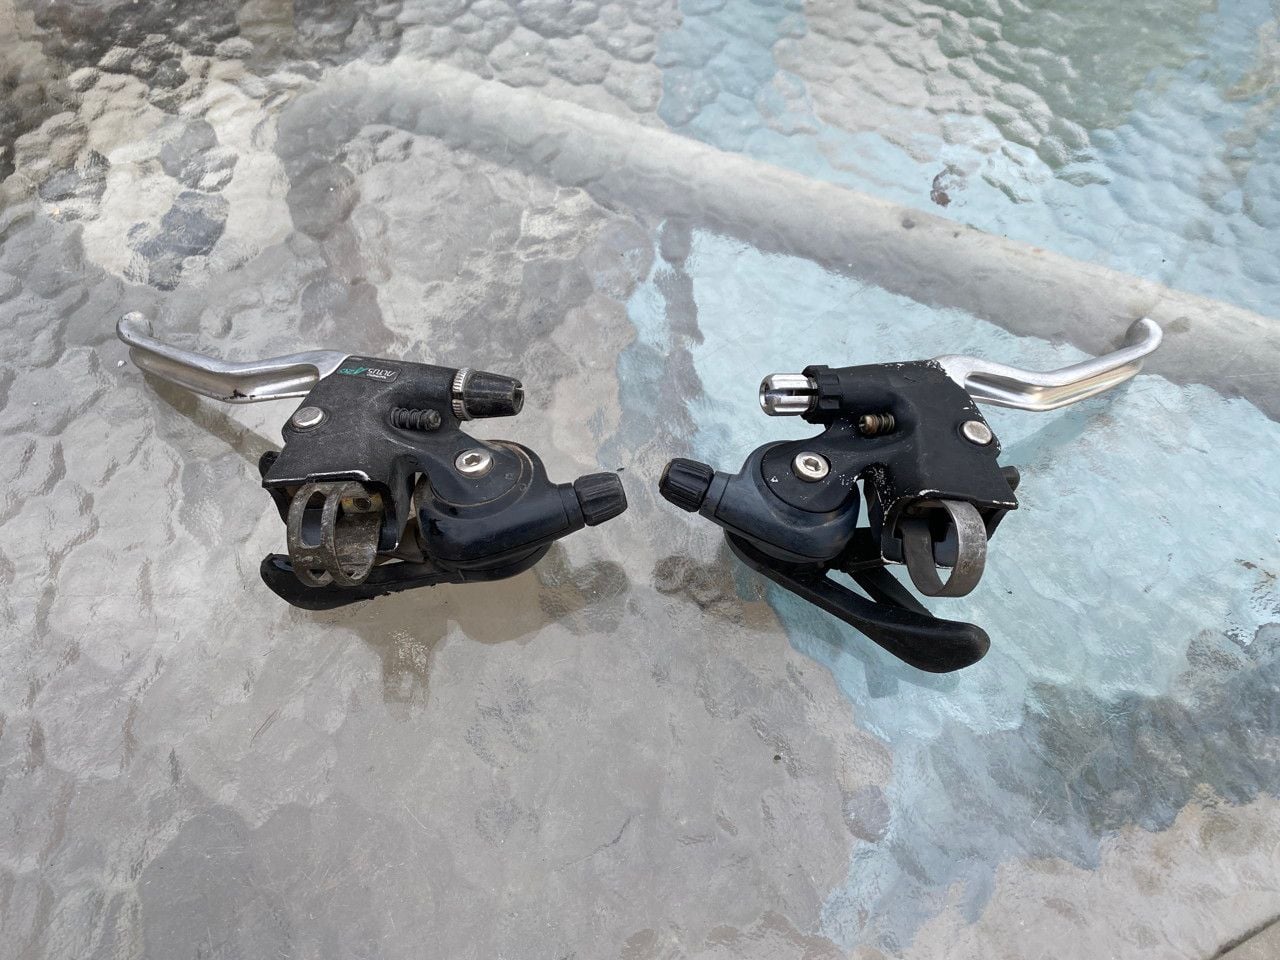
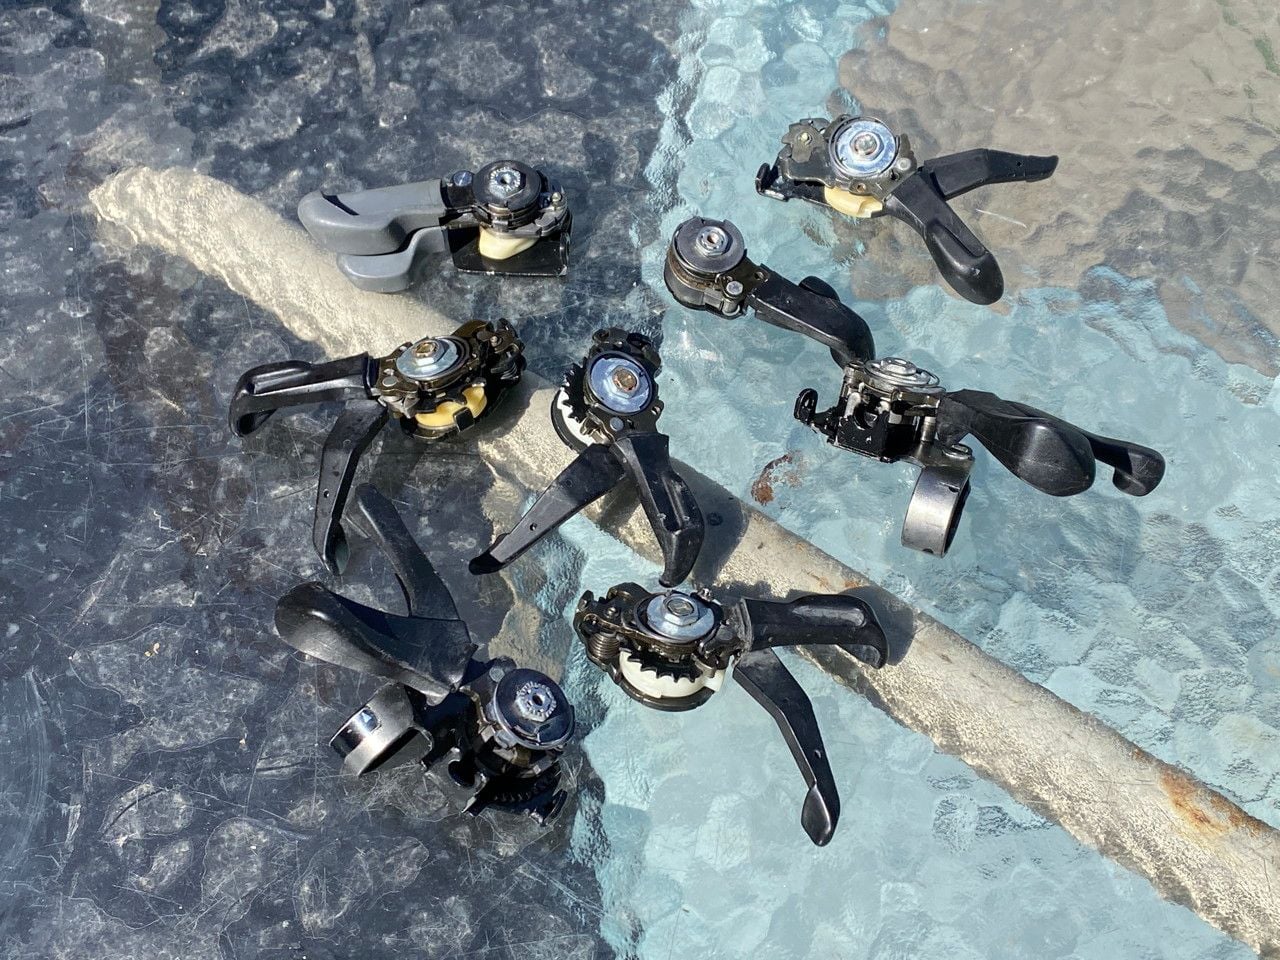
A typical set of gummed-up shifters, still mounted with the brake levers
If possible/practical, I begin by removing most of the plastic covers over the shift mechanism, along with removing hoods on brifters. Some first-generation Rapidfires disintegrate upon disassembly, recent Rapidfires are integral with the brake lever, and many brifters are just plain disassembly-proof, so there are some limits to what you can take apart, although at a minimum with non-brifters I try to expose any pawls or other mechanisms that need special attention. And very often I'll be greeted with a sploosh of WD-40 or other cleaner residue attesting to some other person's unsuccessful prior attempt to persuade the shifter to function.
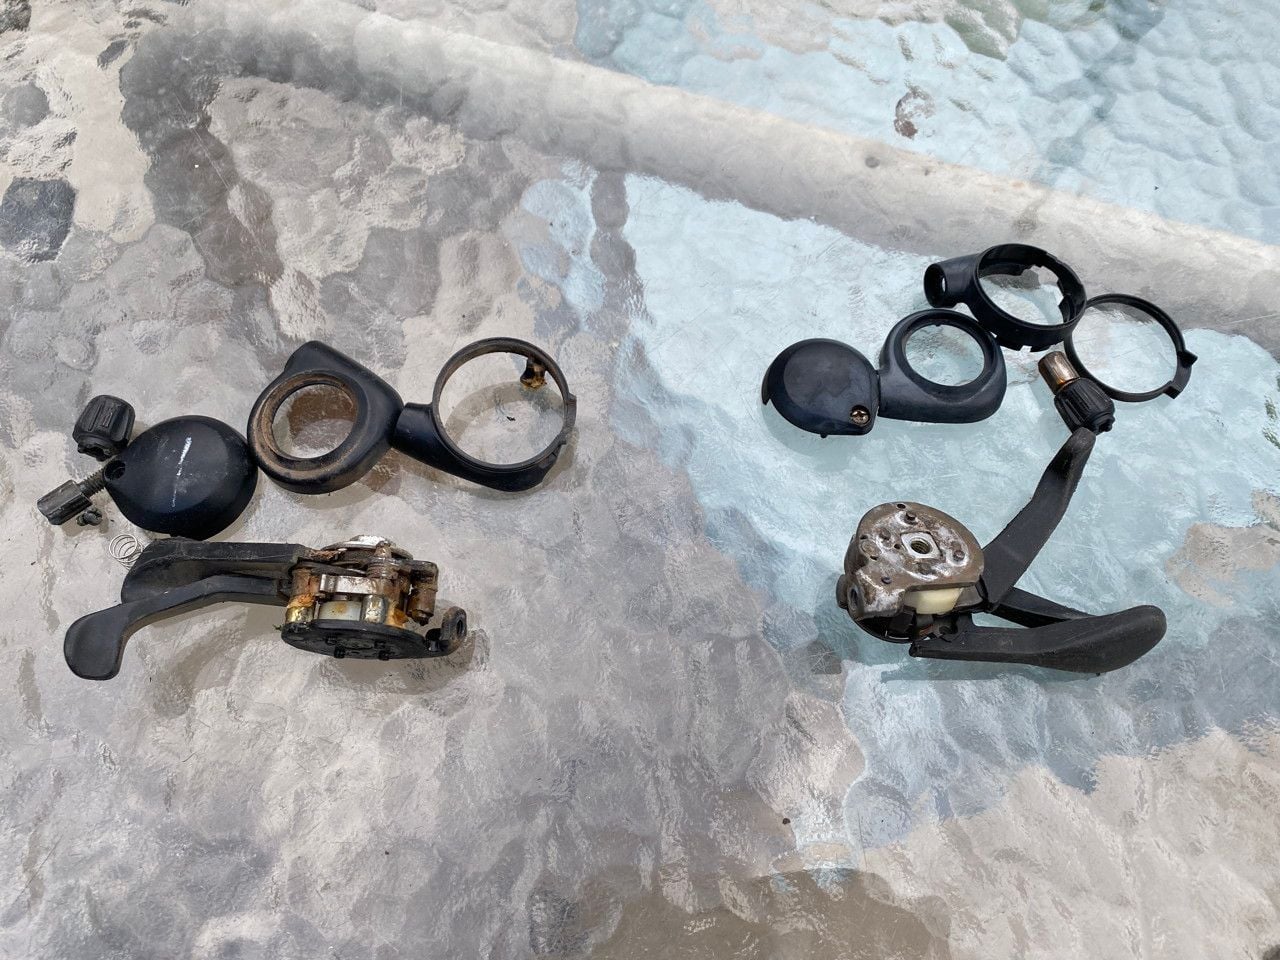
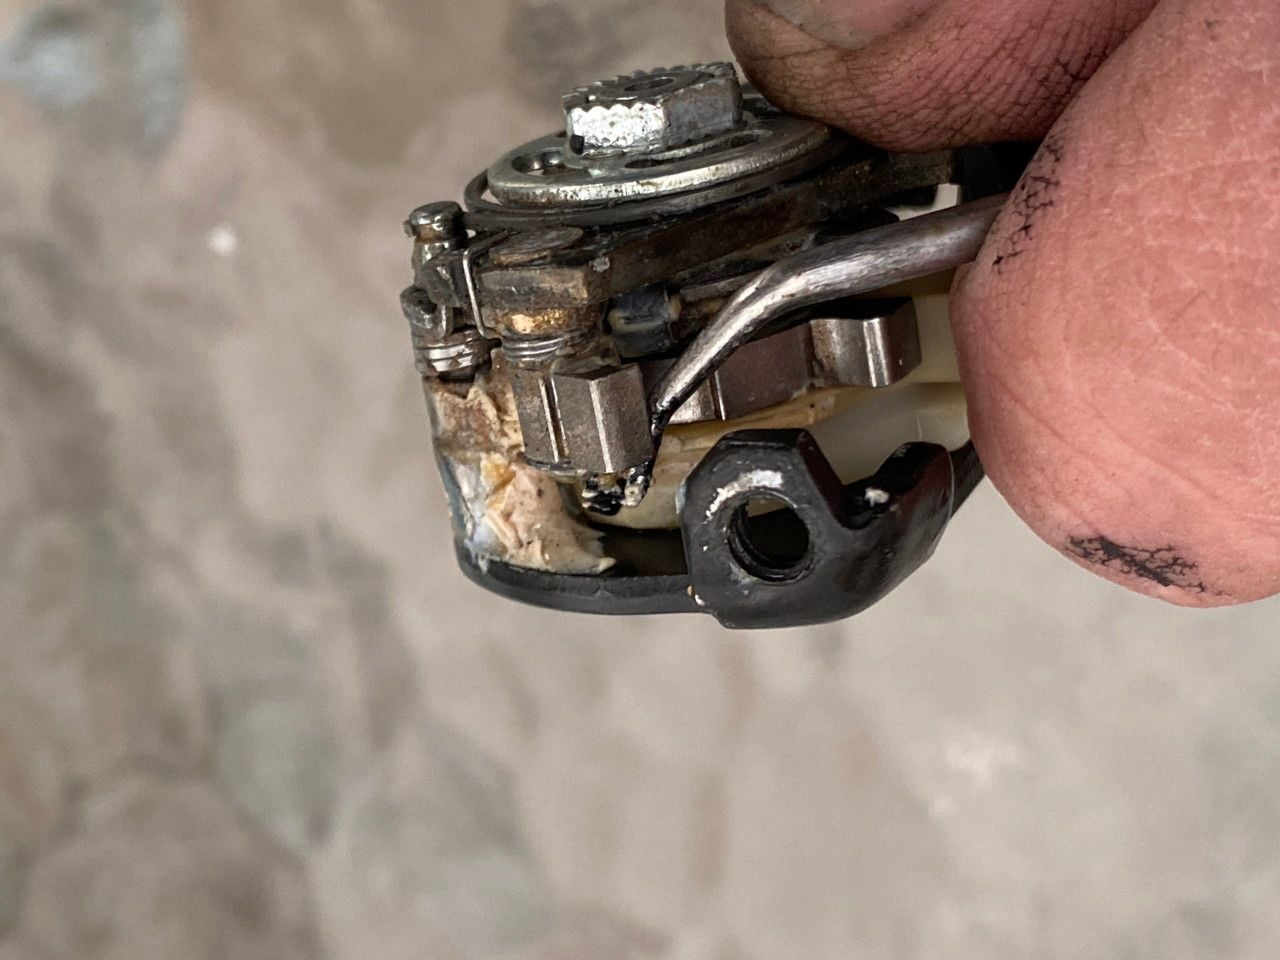
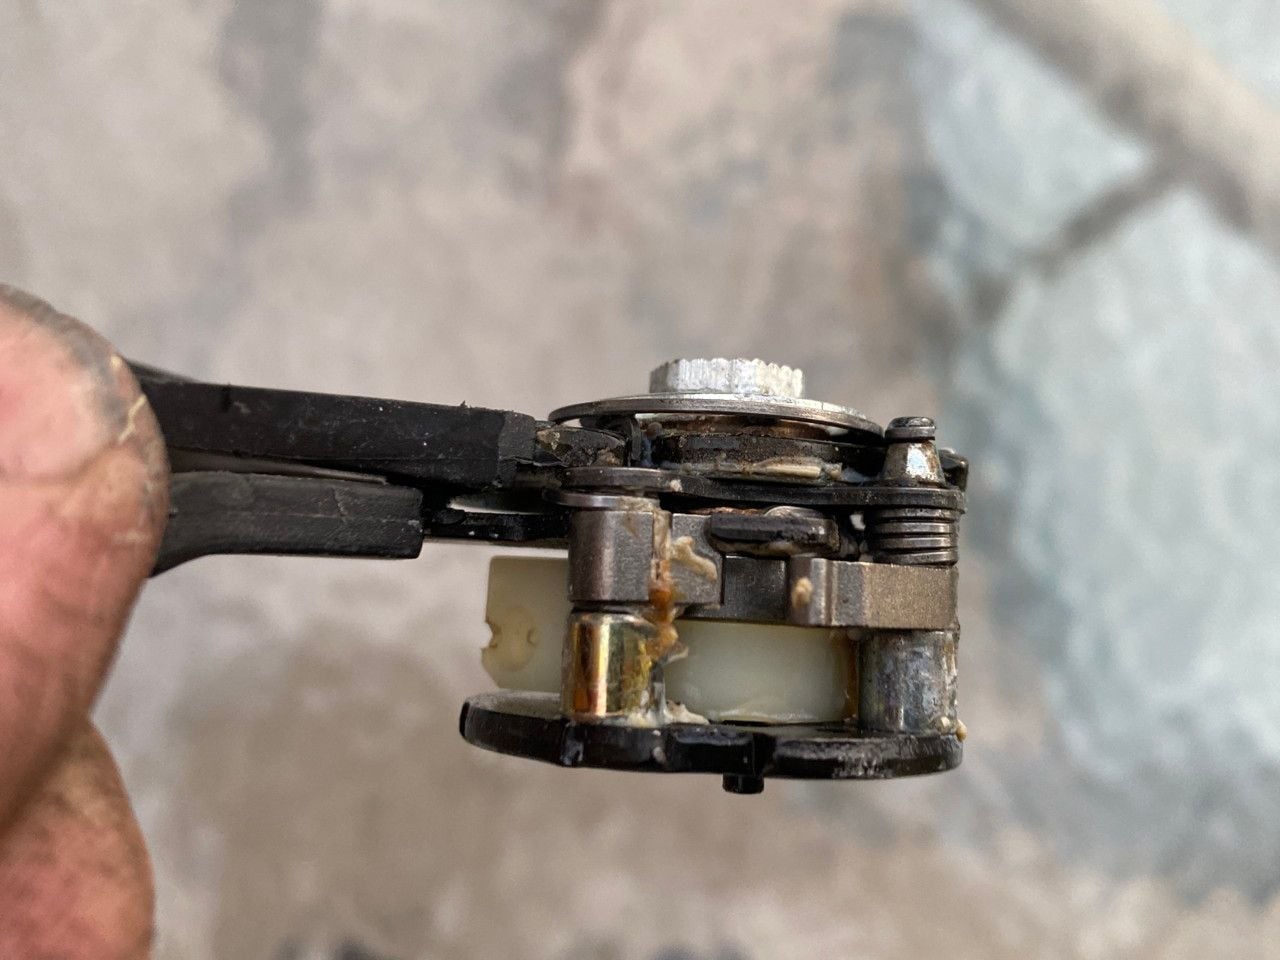
Carefully popping off the plastic bits to get to the innards
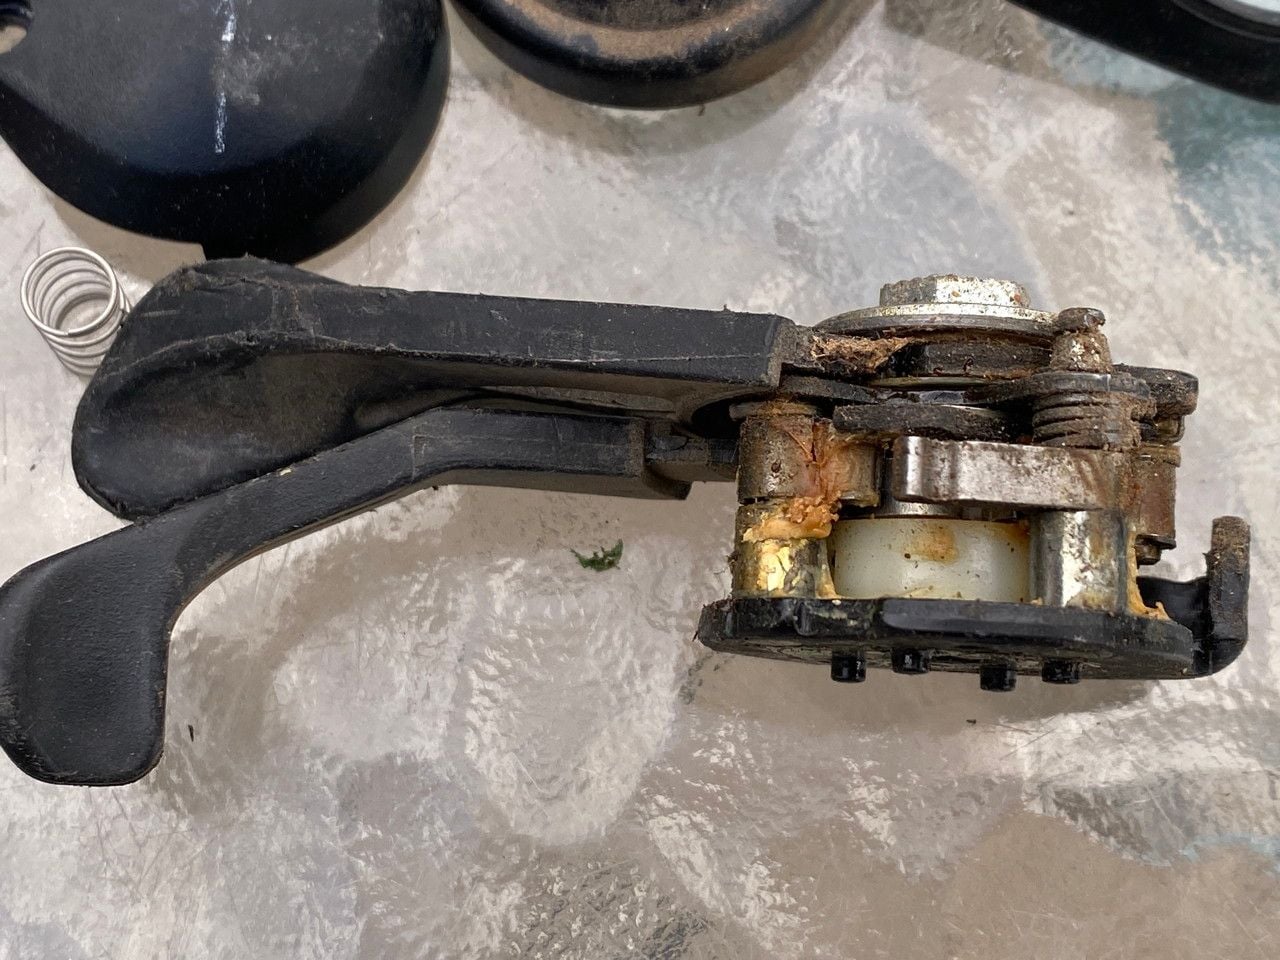
Eeeeewwww. Three decades of gunkiness revealed.
Once disassembled, I soak the shifters in a 4:1 water / citrus cleaner concentrate solution in an ultrasonic cleaner (I'm using a Harbor Freight, but an industrial cleaner might be better), turn on heat, and start with 2-3 cycles just to begin the process. I try to process multiple sets at a time for maximum efficiency, but doing them one or two at a time is OK too.
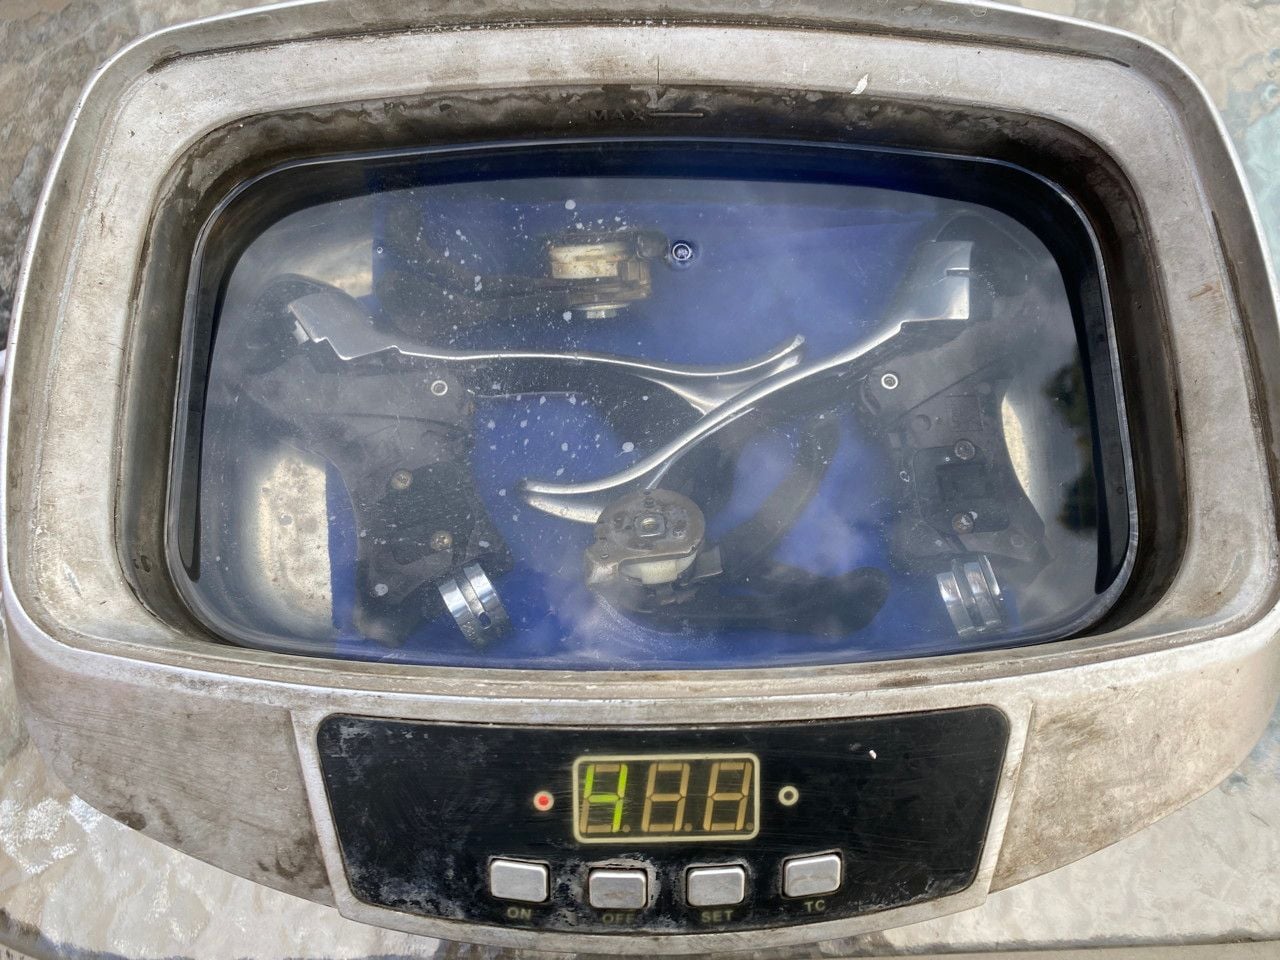
What's cookin'? A pair of Rapidfires and a pair of Dura-Ace brifters in a zesty citrus broth. But it'll be a while...
After 25 minutes of cycle time, I use a scribe or awl and try to work any pawls or ratchets back and forth to try to loosen them, spraying with Clean Streak to aid the process.

Sprayin' the Clean Streak. This stuff is great, in that it loosens gunk in a hurry. But it doesn't necessarily get all of it out - that's why you need the ultrasonic.
Workin' the pawls with the awl. Get it moving, then work it back n' forth a whole bunch of times. Repeat again after some more cleaning cycles.
Often the first time I try to work it it won't move at all, and even the first 10-20 times may be difficult. But patience and perseverance is a virtue, and I'll work the pawls until they move somewhat freely. Then several more cleaning cycles, and I'll start trying to work the entire mechanism to get it clicking. Sometimes you'll hear it run through the range, sometimes it'll still be stubbornly stuck, and sometimes it'll click through 2-3 gears but not quite make the full range. I repeat this clean / work / test cycle as needed until all shifters are clicking through their entire range.
Old grease is slowly oozing its way out of the tight spots, persuaded by ultrasonic vibration, heat, and persistence
We're done, right? Nope. Stopping now will probably result in later failure. We've made progress, but there's still a lot of old gunky grease lurking in there. So I continue with 5 or more cleaning cycles with the solvent, then flush the shifters again with Clean Streak, and run them another 5 or more cycles in clean water with heat to rinse out any remaining grease. I discovered using the old cleaner fluid too long results in depositing a thin layer of dislodged grease uniformly on everything (including the insides of hidden bearing surfaces), so the hot water cleaning cycles reduces this problem.
OK, they've been run through a bunch of times and click freely through all gears. Great! I put them out to dry thoroughly, and then lube amply with silicone spray. Are we done? Noooo - we've even had failures at this stage. Now comes the... "Below Zero Test". I discovered the hard way that a shifter that behaves fine at room temperature can become balky when cold - again, that old stubborn unseen grease is the culprit. So I place the shifters in my coldest deep freeze (preferably below -10�F), leave them for a while, and once fully chilled pull them out and immediately test them through their entire range. If they are fully functioning, great - now they can be reassembled and placed back in service. But about 20% of the time a shifter that is great at 70� will be slooow or nonfunctional in the cold - it goes back through a bunch more cycles until it shifts freely when freezing.
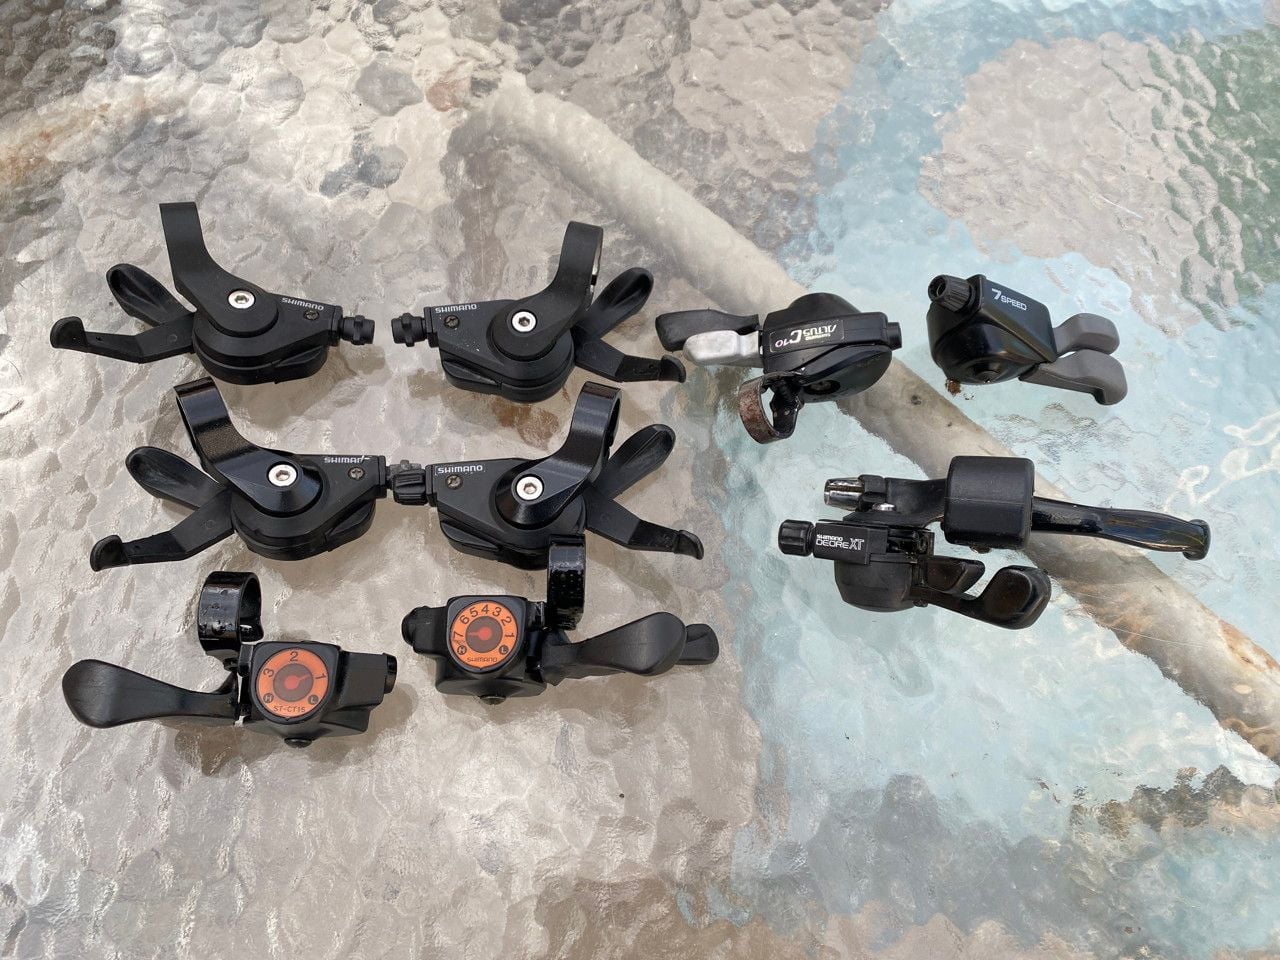
Clean at last, clean at last! And we passed the Below Zero Test too!
Then find the removed pieces, carefully reassemble (don't lose those little screws), maybe mask and paint any exposed metal, and they're ready for more decades of clean-clicking duty!
Reporting back for C&V multi-speed duty!
There are side effects. I try to remove any plastic piece with a view window before dunking, as these will become a permanent milky opaque after several ultrasonic/heat cycles. Decals can delaminate, and even baked-on factory paint may flake off after a bunch of ultrasonic cycles. But I still see this as preferable to a shifter that might unexpectedly gum up in the future, and I've become adept at repainting visible areas and protecting less-visible ones.
About 5% of the time, the shifter is just plain broken or worn out, and no amount of cleaning will rehabilitate it. But you can't tell for sure until you've eliminated the gunk as a possible cause.
Is this harder than the popular "flush and go" method? Yes, but I've had very few recurrences of problems, and even fewer since I added the "below zero test" step.
Is this time-consuming? Yes, but I'll typically do it while I'm working on another task such as rebuilding a bike. This way it's just something I check and work on every so often as part of another task. I will also often do as many as I can fit into the cleaner at a time, just remembering not to mix up the taken-off parts.
Do I stand behind it? Yes, to the point of using these refurbished shifters on many of my own bikes with no subsequent failures. I think I've sent at least 50+ shifters through this system so far, with great success.
Wouldn't it be easier to just go on AmazBabaBay and buy new inexpensive shifters? Probably, but I like the satisfaction of bringing old parts back to life, and saving myself or the nonprofits a few bucks too.
And after all that why am I posting this? I know relatively few BFers may have the patience, time, or ability to put this effort into rehabilitating shifters. But my experience has been that the popular "flush and rush" method may be fine for one's own bike where you can repeat after it wears off and gunks up again, but if I'm sending a bike off to someone who is depending on the shifters to always keep working, at least I've discovered a method that offers a much greater chance of long-term success.
I know there are webpages and videos that say "Hey, having a balky Rapidfire trigger shifter or STI brifter is no problem! Just flush it with a bunch of solvent / degreaser / WD and it'll start working again!" My experience is that such actions seem to work well initially, but oftentimes don't provide a permanent fix. The solvents do work to soften up the decades-old grease in the pawls and other mechanisms, but once the lighter fractions of the introduced liquids inevitably evaporate, the grease starts to re-solidify and the problem rears its ugly non-clicking head again after months or even weeks. And if you're rebuilding bikes for resale or giveaway, this can be embarrassing, in that the recipient ends up with something that doesn't work anymore and they're mystified as to how it could have happened, and in many cases having no skills, materials, or ability to fix it themselves.
Over the years, I've experimented with several different techniques after the popular fast n' easy methods didn't provide a long-term fix. I tried long-term soaking in penetrant or heavy-duty cleaner, which still didn't dislodge the gunk and in some cases resulted in corrosion that rendered the shifter unusable. I tried alternate soaking and working the mechanisms repeatedly - this sometimes worked, but often resulted in relapses as the grease was still trapped inside the mechanisms in places that can't be reached with tools or sprays.
What I discovered through years of experimentation and testing is the only long-term solution that has consistently worked for me is to remove the shifter from the bicycle and use an ultrasonic cleaner in extended treatment cycles to drive the old grease completely out of all the surfaces, pawls, bushings, sleeves, and other areas, test thoroughly, and then re-lube lightly to restore the action and protect it from corrosion.
Now this isn't a simple "8 minutes and done" task. In most cases, when I receive these shifters, they're not clicking at all or in many cases the levers are completely frozen in place. A short ultrasonic bath isn't going to do much of anything for that.
A typical set of gummed-up shifters, still mounted with the brake levers
If possible/practical, I begin by removing most of the plastic covers over the shift mechanism, along with removing hoods on brifters. Some first-generation Rapidfires disintegrate upon disassembly, recent Rapidfires are integral with the brake lever, and many brifters are just plain disassembly-proof, so there are some limits to what you can take apart, although at a minimum with non-brifters I try to expose any pawls or other mechanisms that need special attention. And very often I'll be greeted with a sploosh of WD-40 or other cleaner residue attesting to some other person's unsuccessful prior attempt to persuade the shifter to function.
Carefully popping off the plastic bits to get to the innards
Eeeeewwww. Three decades of gunkiness revealed.
Once disassembled, I soak the shifters in a 4:1 water / citrus cleaner concentrate solution in an ultrasonic cleaner (I'm using a Harbor Freight, but an industrial cleaner might be better), turn on heat, and start with 2-3 cycles just to begin the process. I try to process multiple sets at a time for maximum efficiency, but doing them one or two at a time is OK too.
What's cookin'? A pair of Rapidfires and a pair of Dura-Ace brifters in a zesty citrus broth. But it'll be a while...
After 25 minutes of cycle time, I use a scribe or awl and try to work any pawls or ratchets back and forth to try to loosen them, spraying with Clean Streak to aid the process.
Sprayin' the Clean Streak. This stuff is great, in that it loosens gunk in a hurry. But it doesn't necessarily get all of it out - that's why you need the ultrasonic.
Workin' the pawls with the awl. Get it moving, then work it back n' forth a whole bunch of times. Repeat again after some more cleaning cycles.
Often the first time I try to work it it won't move at all, and even the first 10-20 times may be difficult. But patience and perseverance is a virtue, and I'll work the pawls until they move somewhat freely. Then several more cleaning cycles, and I'll start trying to work the entire mechanism to get it clicking. Sometimes you'll hear it run through the range, sometimes it'll still be stubbornly stuck, and sometimes it'll click through 2-3 gears but not quite make the full range. I repeat this clean / work / test cycle as needed until all shifters are clicking through their entire range.
Old grease is slowly oozing its way out of the tight spots, persuaded by ultrasonic vibration, heat, and persistence
We're done, right? Nope. Stopping now will probably result in later failure. We've made progress, but there's still a lot of old gunky grease lurking in there. So I continue with 5 or more cleaning cycles with the solvent, then flush the shifters again with Clean Streak, and run them another 5 or more cycles in clean water with heat to rinse out any remaining grease. I discovered using the old cleaner fluid too long results in depositing a thin layer of dislodged grease uniformly on everything (including the insides of hidden bearing surfaces), so the hot water cleaning cycles reduces this problem.
OK, they've been run through a bunch of times and click freely through all gears. Great! I put them out to dry thoroughly, and then lube amply with silicone spray. Are we done? Noooo - we've even had failures at this stage. Now comes the... "Below Zero Test". I discovered the hard way that a shifter that behaves fine at room temperature can become balky when cold - again, that old stubborn unseen grease is the culprit. So I place the shifters in my coldest deep freeze (preferably below -10�F), leave them for a while, and once fully chilled pull them out and immediately test them through their entire range. If they are fully functioning, great - now they can be reassembled and placed back in service. But about 20% of the time a shifter that is great at 70� will be slooow or nonfunctional in the cold - it goes back through a bunch more cycles until it shifts freely when freezing.
Clean at last, clean at last! And we passed the Below Zero Test too!
Then find the removed pieces, carefully reassemble (don't lose those little screws), maybe mask and paint any exposed metal, and they're ready for more decades of clean-clicking duty!
Reporting back for C&V multi-speed duty!
There are side effects. I try to remove any plastic piece with a view window before dunking, as these will become a permanent milky opaque after several ultrasonic/heat cycles. Decals can delaminate, and even baked-on factory paint may flake off after a bunch of ultrasonic cycles. But I still see this as preferable to a shifter that might unexpectedly gum up in the future, and I've become adept at repainting visible areas and protecting less-visible ones.
About 5% of the time, the shifter is just plain broken or worn out, and no amount of cleaning will rehabilitate it. But you can't tell for sure until you've eliminated the gunk as a possible cause.
Is this harder than the popular "flush and go" method? Yes, but I've had very few recurrences of problems, and even fewer since I added the "below zero test" step.
Is this time-consuming? Yes, but I'll typically do it while I'm working on another task such as rebuilding a bike. This way it's just something I check and work on every so often as part of another task. I will also often do as many as I can fit into the cleaner at a time, just remembering not to mix up the taken-off parts.
Do I stand behind it? Yes, to the point of using these refurbished shifters on many of my own bikes with no subsequent failures. I think I've sent at least 50+ shifters through this system so far, with great success.
Wouldn't it be easier to just go on AmazBabaBay and buy new inexpensive shifters? Probably, but I like the satisfaction of bringing old parts back to life, and saving myself or the nonprofits a few bucks too.
And after all that why am I posting this? I know relatively few BFers may have the patience, time, or ability to put this effort into rehabilitating shifters. But my experience has been that the popular "flush and rush" method may be fine for one's own bike where you can repeat after it wears off and gunks up again, but if I'm sending a bike off to someone who is depending on the shifters to always keep working, at least I've discovered a method that offers a much greater chance of long-term success.
__________________
Richard C. Moeur, PE - Phoenix AZ, USA
https://www.richardcmoeur.com/bikestuf.html
Richard C. Moeur, PE - Phoenix AZ, USA
https://www.richardcmoeur.com/bikestuf.html

Likes For RCMoeur:
03-26-24, 09:57 PM
#2
Full Member
Join Date: May 2022
Location: Dixiana, AL
Posts: 250
Bikes: 1993 Diamond Back Sorrento, 1965 Schwinn Racer 3-speed, 1987 Schwinn High Sierra, 1990 Specialized Sirrus, 2020 Specialized Sirrus 3.0, 2013 Giant Seek 1
Mentioned: 3 Post(s)
Tagged: 0 Thread(s)
Quoted: 87 Post(s)
Liked 776 Times
in
199 Posts
What is the citrus cleaner you are using? I recently started using an ultrasonic for just this purpose.
03-26-24, 10:21 PM
#3
Cantilever believer
Thread Starter
Join Date: Nov 2021
Location: Phoenix, AZ
Posts: 1,565
Mentioned: 5 Post(s)
Tagged: 0 Thread(s)
Quoted: 536 Post(s)
Liked 1,839 Times
in
832 Posts
The other weapon is the Finish Line Clean Streak spray degreaser. This stuff is much more aggressive, and a lot more expensive. And deceptively good at loosening parts. I say this because several years ago at the nonprofits we'd just spray a balky shifter with Clean Streak and many times it would start working again almost immediately. A miracle product! But then a few weeks or months later we'd deal with a disappointed recipient or customer with a shifter that stopped working again - the Clean Streak loosened it up all right, but only temporarily until it evaporated and the old grease re-solidified. And I hate to think of all the others who didn't bring it back and just gave up on having a working shifter.
 Combining the short-term power of Clean Streak with the slow-but-sure ultrasonic + citrus cleaner seems to be what works to get it all out.
Are there better options? As I recall, you're not supposed to use anything aromatic or combustible in an ultrasonic cleaner, as to avoid voiding the warranty or experiencing an Earth-Shattering Kaboom. If others out there have a better option for the ultrasonic bath, I'd be open to testing it if the cost is within reason. But note that the final baths are in plain hot water to get rid of the remaining residue.
__________________
Richard C. Moeur, PE - Phoenix AZ, USA
https://www.richardcmoeur.com/bikestuf.html
Richard C. Moeur, PE - Phoenix AZ, USA
https://www.richardcmoeur.com/bikestuf.html
Likes For RCMoeur:
03-27-24, 06:39 AM
#4
Newbie
Hi Richard,
Thanks for this; am going to link the folks at the Co-op to this thread!
The freezer test is excellent!
Fixed my neighbor's gripshifter last week - not gunked up with old grease, but filled with spider webs/egg sacs.
Thanks and good health, Weogo
Thanks for this; am going to link the folks at the Co-op to this thread!
The freezer test is excellent!
Fixed my neighbor's gripshifter last week - not gunked up with old grease, but filled with spider webs/egg sacs.
Thanks and good health, Weogo
03-27-24, 08:58 AM
#5
Senior Member
Join Date: Oct 2023
Location: New Jersey
Posts: 571
Mentioned: 5 Post(s)
Tagged: 0 Thread(s)
Quoted: 366 Post(s)
Liked 273 Times
in
175 Posts
The truth is, with a used bike, you are getting somebody else's problems, even if it has been serviced. Sellers don't typically check if every frame is straight, overhaul every bearing, check the dish of the wheels or the tension of the spokes........
Thank you for going the extra mile to make your bikes reliable for those that get them.
Thank you also for your post, which quite clearly shows the life cycle of a shifter and how to fix one that is no longer working.
Thank you for going the extra mile to make your bikes reliable for those that get them.
Thank you also for your post, which quite clearly shows the life cycle of a shifter and how to fix one that is no longer working.
03-27-24, 10:54 AM
#6
Full Member
Join Date: Nov 2022
Location: California's capital
Posts: 467
Bikes: Litespeed Firenze, Spot Acme, Specialzed S Works Pro Race, Davidson Stiletto, Colnago Superissimo
Mentioned: 1 Post(s)
Tagged: 0 Thread(s)
Quoted: 133 Post(s)
Liked 301 Times
in
173 Posts
Very impressive before/after. Nice to see such a positive result.
Confess being intimidated by these complicated little things and generally limit myself to the spray-and-pray method—usually better than nothing but not a full restore. Never leave bikes outdoors but sweat and grit always make their way in, eventually.
Confess being intimidated by these complicated little things and generally limit myself to the spray-and-pray method—usually better than nothing but not a full restore. Never leave bikes outdoors but sweat and grit always make their way in, eventually.
03-28-24, 06:54 PM
#7
Method to My Madness
Join Date: Nov 2020
Location: Orange County, California
Posts: 3,663
Bikes: Trek FX 2, Cannondale Synapse, Cannondale CAAD4, Santa Cruz Stigmata GRX
Mentioned: 4 Post(s)
Tagged: 0 Thread(s)
Quoted: 1948 Post(s)
Liked 1,472 Times
in
1,020 Posts
RCMoeur: Have you tried this elaborate method on the more mechanically complex STI levers?
03-28-24, 07:29 PM
#8
Cantilever believer
Thread Starter
Join Date: Nov 2021
Location: Phoenix, AZ
Posts: 1,565
Mentioned: 5 Post(s)
Tagged: 0 Thread(s)
Quoted: 536 Post(s)
Liked 1,839 Times
in
832 Posts
RCMoeur: Have you tried this elaborate method on the more mechanically complex STI levers?
Brifters are admittedly much different to clean because the shifting mechanism is completely encased in the brake lever housing, and one can't readily access the pawls and bushings. I know some brave souls have been able to disassemble brifters to get access, but my attempts resulted in a non-reassemblable mess. So for these, it's both simpler (soak in ultrasonic, spray, work mechanism, repeat), and harder (they usually take many more cycles before clicking freely). And they fail the "below zero test" much more often than Rapidfires, because of the inability to directly access all the gunk in the innards. So you just have to keep repeating the cleaning cycles, dry, lube, and test until they do.
One hard & fast rule with brifters: always take the hoods off. The intense cleaning process is very rough on the rubber. Doesn't seem to affect plastic parts, though. Also, don't expect any electronic connectors (such as the ones for the old Flight Deck system) to work after this process - so far, I haven't encountered any installed buttons, but if I did, I'd detach them first.
Also... when trying to shake cleaning solution out of brifters, don't hold the brake lever down and the insides open. That little barrel-shaped cable stop will fly out and it will roll somewhere inaccessible...
__________________
Richard C. Moeur, PE - Phoenix AZ, USA
https://www.richardcmoeur.com/bikestuf.html
Richard C. Moeur, PE - Phoenix AZ, USA
https://www.richardcmoeur.com/bikestuf.html
