


Busted Carbon - Help Please?


Likes For FBOATSB:
 02-14-22, 11:32 AM
#27

Le Crocodile

Join Date: Oct 2005
Location: Santa Barbara Calif.
Posts: 1,873
Mentioned: 4 Post(s)
Tagged: 0 Thread(s)
Quoted: 370 Post(s)
Liked 787 Times
in
311 Posts
The reason JB Weld is totally ubiquitous is not because it's "cheap", it is because it works.
I have used Marine-Tex, West Systems, vinyl esters, fiberglass, and JB Weld. For repairs that call for a tough and permanent bond, JB does a great job.
One of the great things about JB, is that you can get a small and fresh quantity. Fresh? Yep, once epoxy "sugars" (gets gritty and isn't smooth flowing when wet) it's done. JB Weld is used in industrial applications all the time.

Likes For Erzulis Boat:
02-14-22, 11:48 AM
#28

Senior Member
Join Date: Jan 2006
Location: Berwyn PA
Posts: 6,408
Bikes: I hate bikes!
Mentioned: 39 Post(s)
Tagged: 0 Thread(s)
Quoted: 431 Post(s)
Liked 710 Times
in
233 Posts
First off I am glad you are ok and this didn't cause any kind of accident or injury.
I would adhere the frame to the saddle with carbon specific tape and then encase the area in PC7 epoxy.
As aothers have mentioned, given the amont of flex in the design and the fact that it has already failed once, I would not go too far in investing in a repair. See if you can get it stable and take it for a ride.
If I were faced with this decison, I would get a new saddle. Failures of this type when repaired, give me the heebe jeebees. Be safe!
I
Likes For fender1:
02-14-22, 12:00 PM
#29
SE Wis
Join Date: Apr 2005
Location: Milwaukee, WI
Posts: 10,515
Bikes: '68 Raleigh Sprite, '02 Raleigh C500, '84 Raleigh Gran Prix, '91 Trek 400, 2013 Novara Randonee, 1990 Trek 970
Mentioned: 40 Post(s)
Tagged: 0 Thread(s)
Quoted: 2747 Post(s)
Liked 3,398 Times
in
2,057 Posts
Likes For dedhed:
02-14-22, 12:27 PM
#30
Senior Member

Join Date: Jul 2006
Location: San Jose (Willow Glen) Ca
Posts: 9,847
Bikes: Kirk Custom JK Special, '84 Team Miyata,(dura ace old school) 80?? SR Semi-Pro 600 Arabesque
Mentioned: 106 Post(s)
Tagged: 0 Thread(s)
Quoted: 2338 Post(s)
Liked 2,824 Times
in
1,541 Posts
Mad Honk has small piece carbon fiber experience, IIRC thoughts?
__________________
Life is too short not to ride the best bike you have, as much as you can
(looking for Torpado Super light frame/fork or for Raleigh International frame fork 58cm)
Life is too short not to ride the best bike you have, as much as you can
(looking for Torpado Super light frame/fork or for Raleigh International frame fork 58cm)
02-14-22, 01:56 PM
#31
Banned.
Thread Starter

Join Date: Jul 2009
Location: PAZ
Posts: 12,294
Mentioned: 255 Post(s)
Tagged: 0 Thread(s)
Quoted: 2588 Post(s)
Liked 4,824 Times
in
1,709 Posts
Further detailed analysis of the saddle components and manufacture process has made me realize I need to share some additional photos - plus some observations.
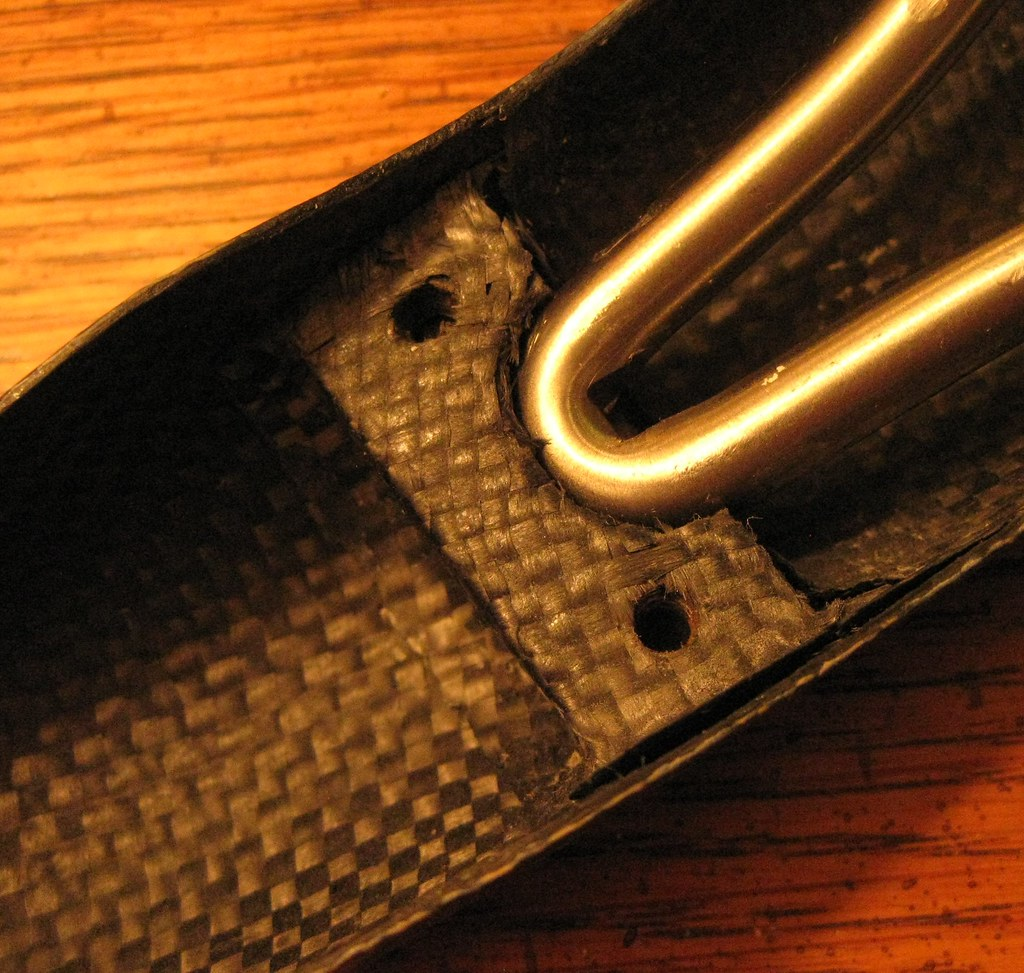
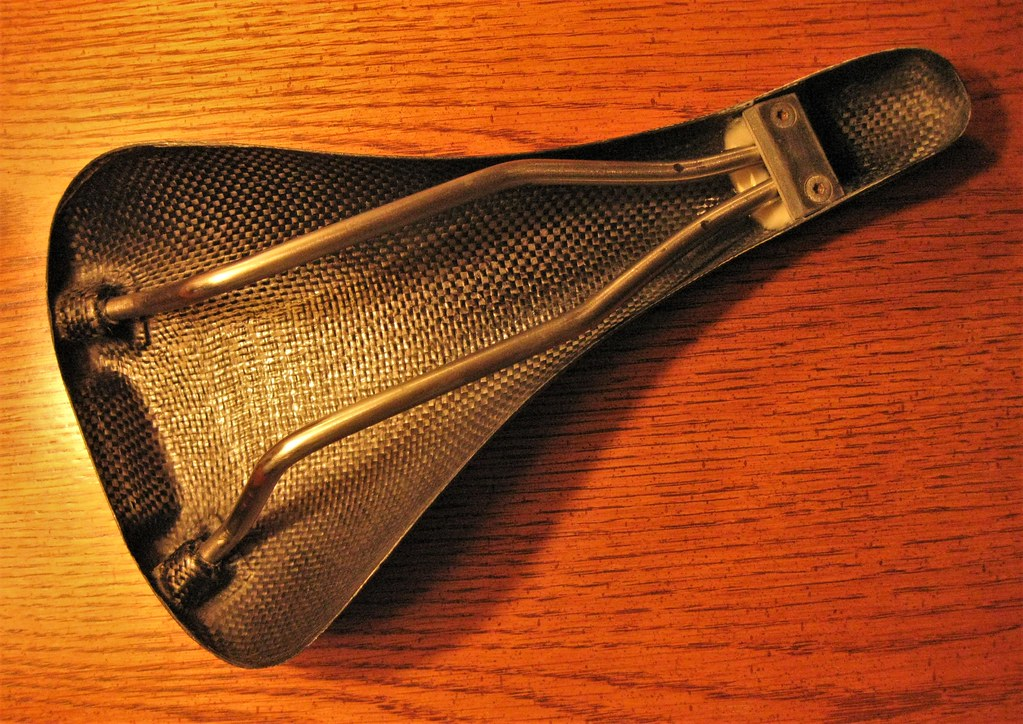
First of all, the anchoring piece is made of some sort of PVC or polycarbonate. It has two holes drilled into it from the top, and a plate - also of polycarbonate, with two countersunk holes - carries two screws which screw down into the anchor. This plate covers the front U-bend of the rail and holds it in place. Details in the following photos:

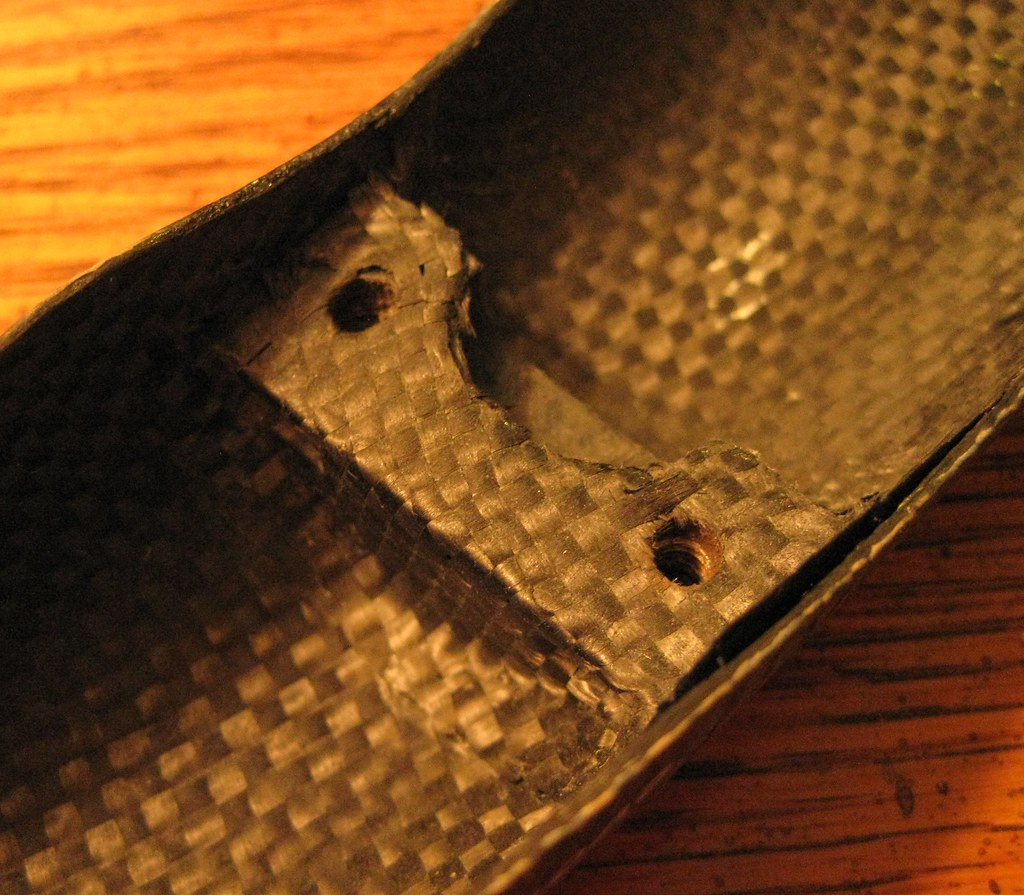
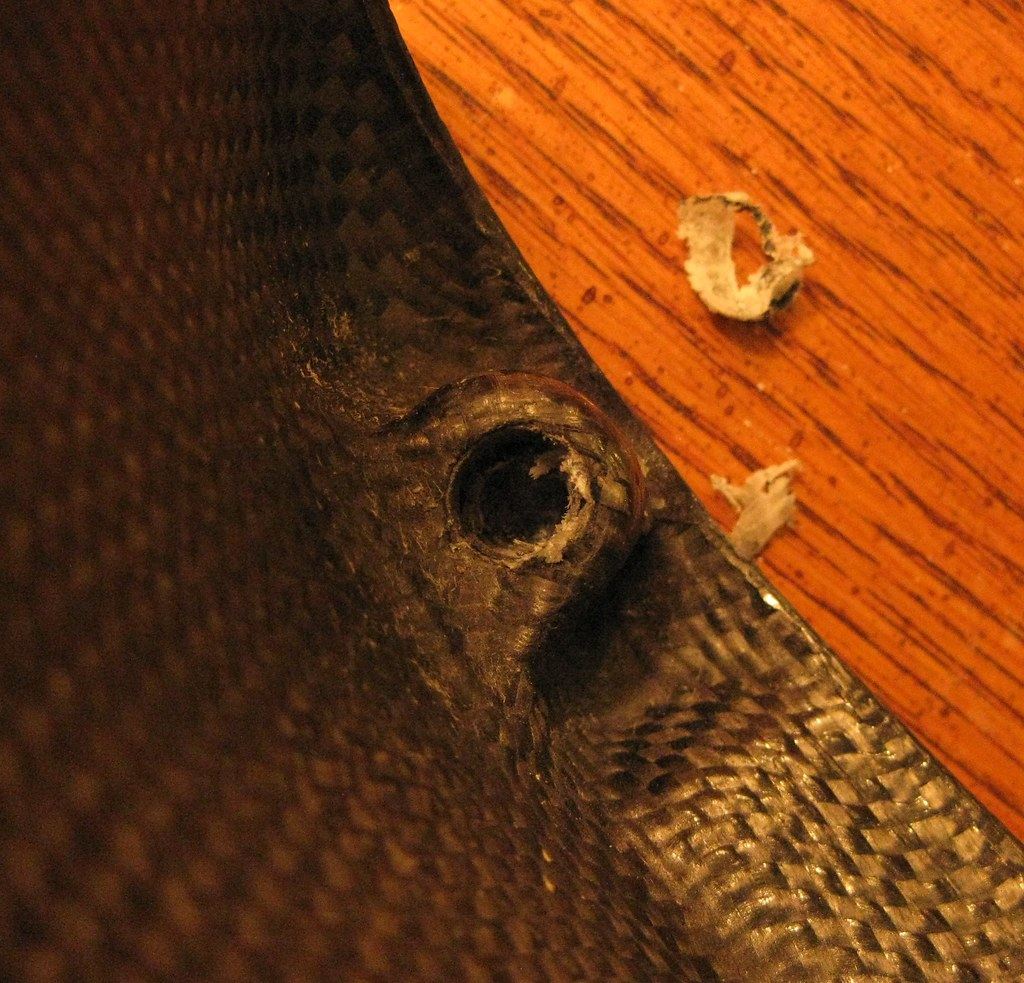
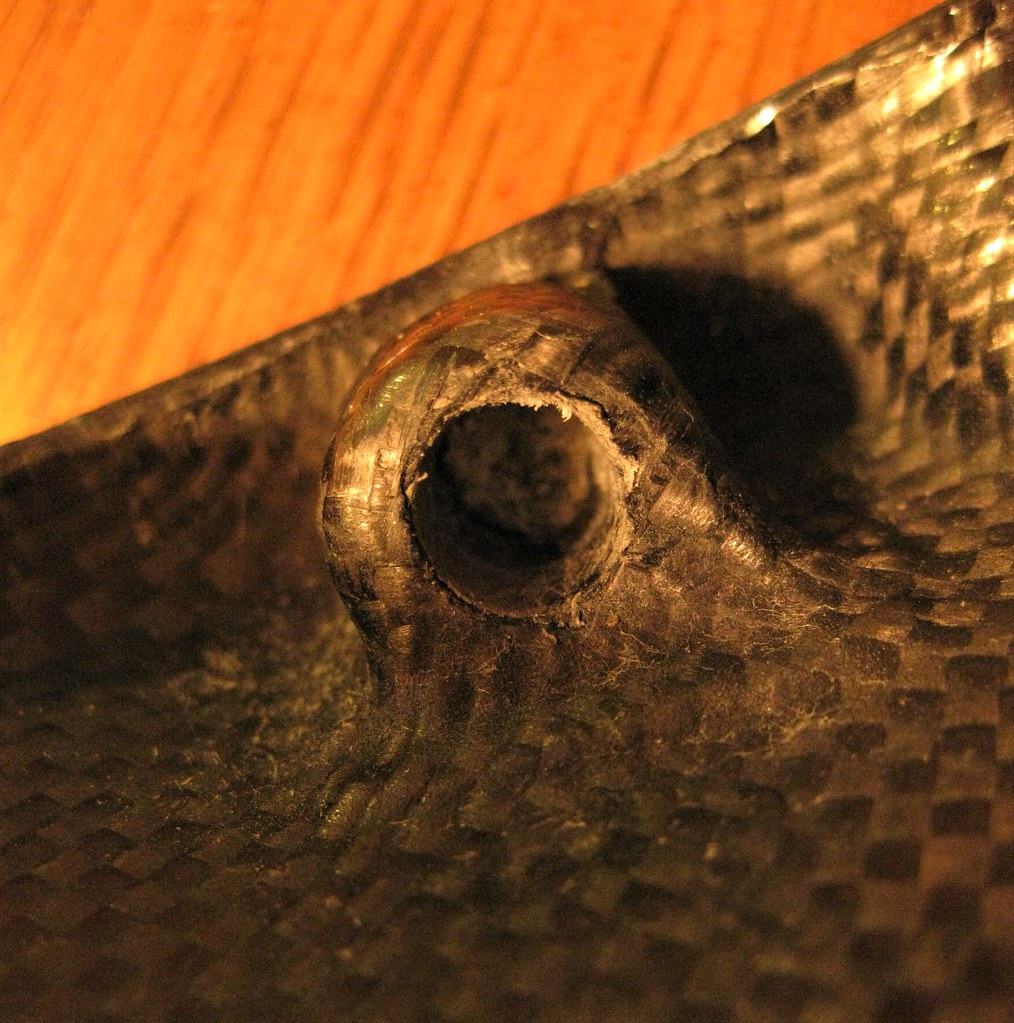
The carbon layer covers the entirety of the underside of the shell, and before the failure it simply wrapped over and around the entire nose anchor piece. Pretty sure the anchor piece was also held in place by some epoxy, but it must have been a very, very thin layer as the only evidence of epoxy is in the backside of the two drilled holes:

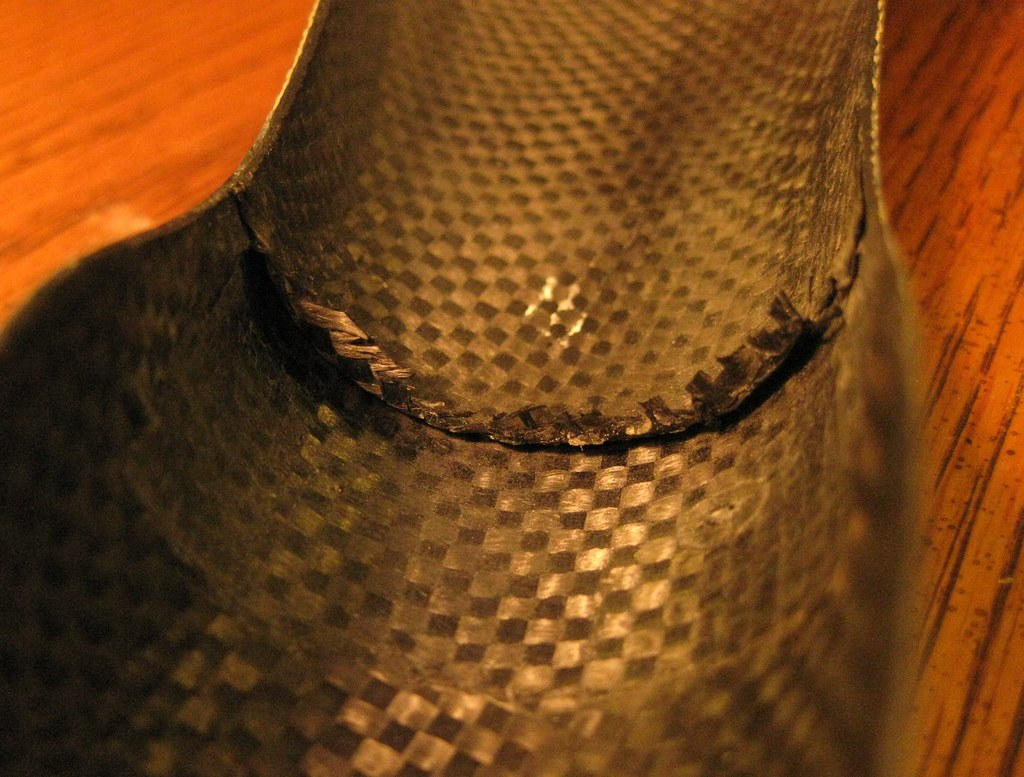
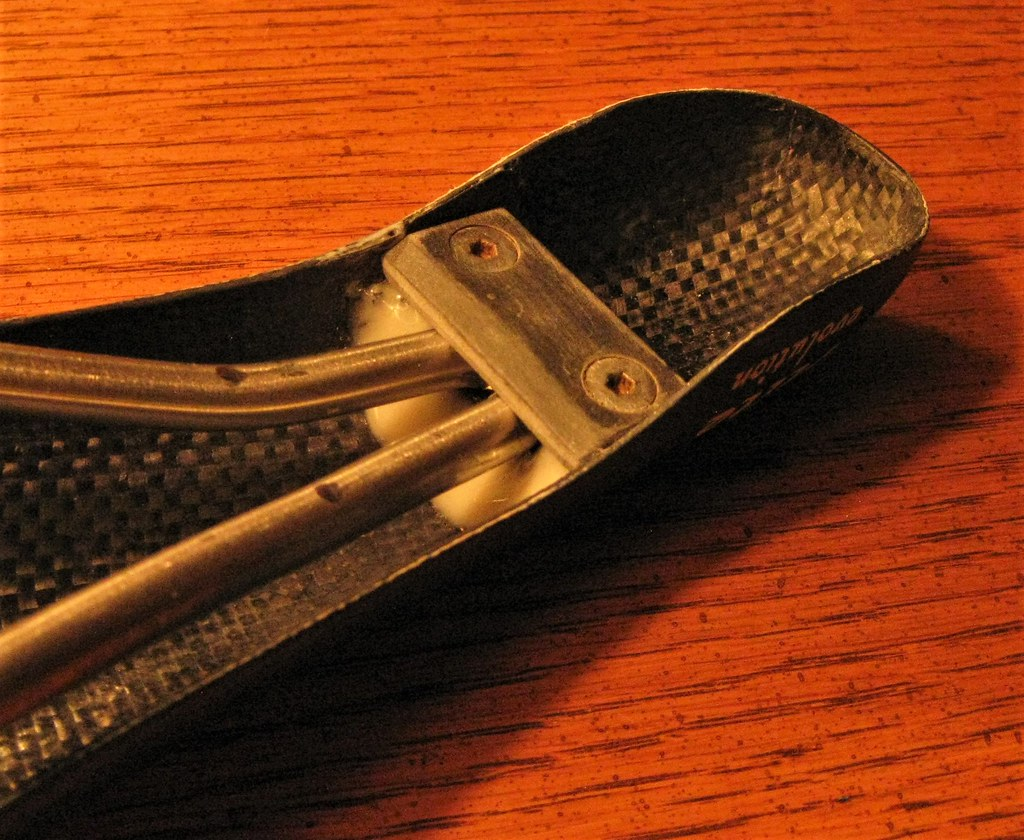
From the evidence, the failure occurred when the hit exceeded the load the carbon layer was designed to take - first at the rear of the anchor (the force transferred forward by the saddle rail U-bend). The carbon layer doesn't seem to have been well-formed to the base of the anchor, and curves upwards as can be seen from these next couple shots - for orientation purposes, that tiny bit of white paint is towards the rear of the saddle:

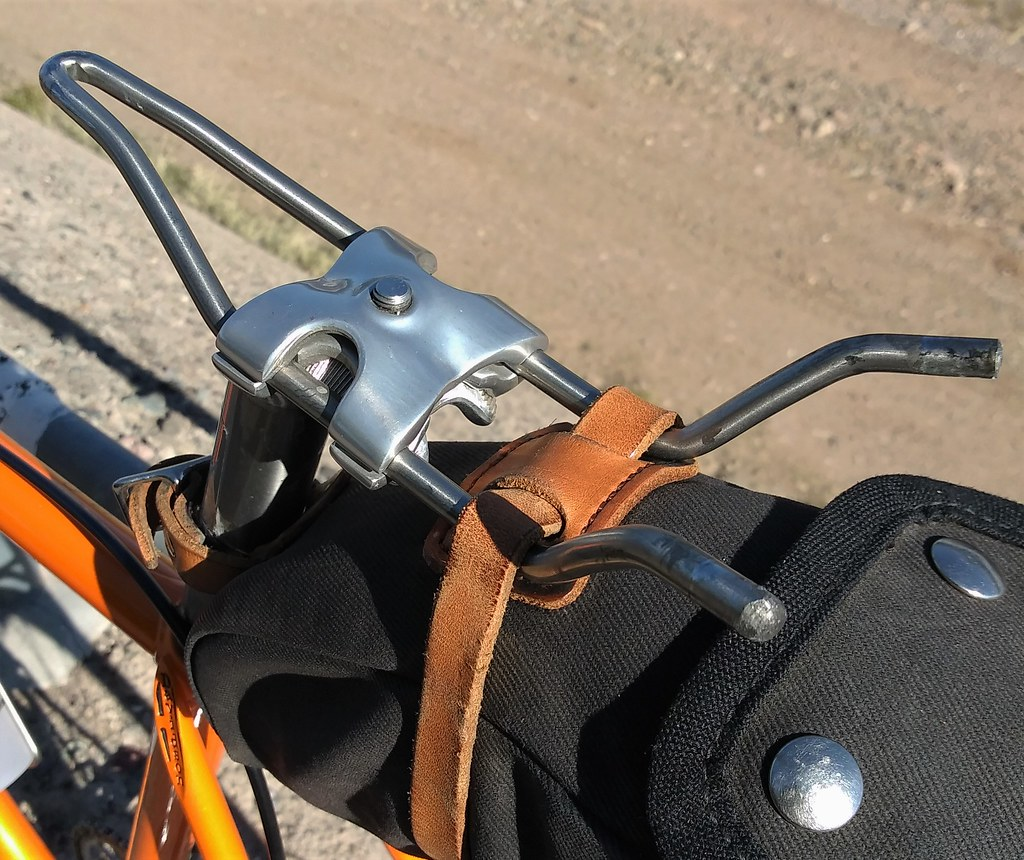
At the rear, the saddle rails were held in place in their anchors by interference fit along with a small amount of silicone. I assume these anchors are also polycarbonate, bonded with epoxy, and covered by the main carbon layer. Luckily, that layer didn't fail as well. I cleaned out the dried-up silicone and will replace. Some pics to show details:
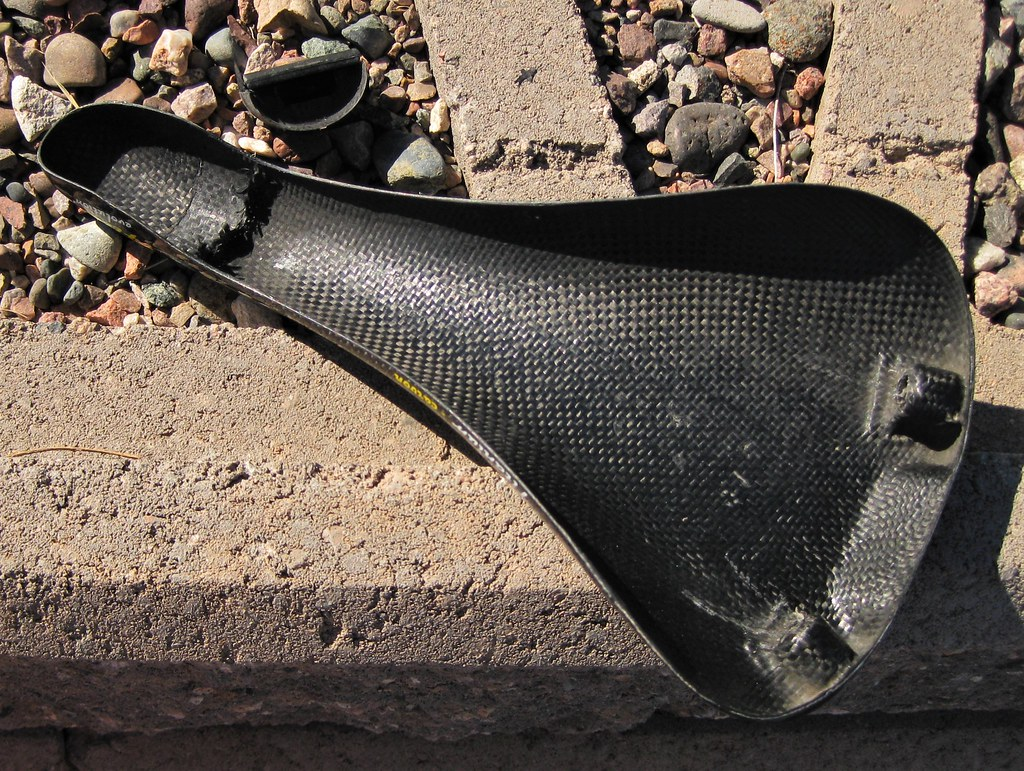
Last but certainly not least is a close-up look at the forward anchor - separated from the shell. From the evidence, it appears this piece would have been epoxied to the shell, then covered over completely by the final carbon layer. This layer is a simple 90 degree weave, and comes apart by hand, suggesting it was not pre-impregnated with resin. I've had one other version of this saddle, and the underside had been coated with a shiny epoxy or resin - probably for added strength. This layer is extremely thin, so I have to wonder: was it really doing much in the way of strengthening the forward anchor point, or would the epoxy affixing the anchor have been doing the job? This anchor is very tight when placed back into the shell - in fact, I have to give it a massive tug to get it back out, and it even stayed in place when I did a test re-fit of the saddle rails. Anyway, this is what it looks like now I've prepped it for re-installation; note I've removed most of the remaining carbon layer except at the front and the triangular bit that will go back in last to shore up the inner flank:


I left the remaining bit of the carbon layer on the front of the anchor to help with lining it up and for aesthetic purposes.
So, what's the solution? Honestly, I'm gonna go with what I know: JB Weld. After all, it's epoxy - right? Just recently used it to repair a metal light fixture outside the house and it's holding up fine. In this application, the forces will mainly be vertical; the hit it took was a shearing load, but in all honesty that was me not paying attention!
I have reviewed the other posts (still need to make some responses) and I was very interested in the one with the carbon weave availability at McMaster-Carr. For now, I'm gonna try this with epoxy only, but may revisit with a small layer of carbon weave, too. Have to check on availability and do a little research into how to properly place/attach the stuff.
So, off to Wal-Mart for the JB Weld and some liquid silicone. I'll update the thread with pics of the process soon.
DD
First of all, the anchoring piece is made of some sort of PVC or polycarbonate. It has two holes drilled into it from the top, and a plate - also of polycarbonate, with two countersunk holes - carries two screws which screw down into the anchor. This plate covers the front U-bend of the rail and holds it in place. Details in the following photos:
The carbon layer covers the entirety of the underside of the shell, and before the failure it simply wrapped over and around the entire nose anchor piece. Pretty sure the anchor piece was also held in place by some epoxy, but it must have been a very, very thin layer as the only evidence of epoxy is in the backside of the two drilled holes:
From the evidence, the failure occurred when the hit exceeded the load the carbon layer was designed to take - first at the rear of the anchor (the force transferred forward by the saddle rail U-bend). The carbon layer doesn't seem to have been well-formed to the base of the anchor, and curves upwards as can be seen from these next couple shots - for orientation purposes, that tiny bit of white paint is towards the rear of the saddle:
At the rear, the saddle rails were held in place in their anchors by interference fit along with a small amount of silicone. I assume these anchors are also polycarbonate, bonded with epoxy, and covered by the main carbon layer. Luckily, that layer didn't fail as well. I cleaned out the dried-up silicone and will replace. Some pics to show details:
Last but certainly not least is a close-up look at the forward anchor - separated from the shell. From the evidence, it appears this piece would have been epoxied to the shell, then covered over completely by the final carbon layer. This layer is a simple 90 degree weave, and comes apart by hand, suggesting it was not pre-impregnated with resin. I've had one other version of this saddle, and the underside had been coated with a shiny epoxy or resin - probably for added strength. This layer is extremely thin, so I have to wonder: was it really doing much in the way of strengthening the forward anchor point, or would the epoxy affixing the anchor have been doing the job? This anchor is very tight when placed back into the shell - in fact, I have to give it a massive tug to get it back out, and it even stayed in place when I did a test re-fit of the saddle rails. Anyway, this is what it looks like now I've prepped it for re-installation; note I've removed most of the remaining carbon layer except at the front and the triangular bit that will go back in last to shore up the inner flank:
I left the remaining bit of the carbon layer on the front of the anchor to help with lining it up and for aesthetic purposes.
So, what's the solution? Honestly, I'm gonna go with what I know: JB Weld. After all, it's epoxy - right? Just recently used it to repair a metal light fixture outside the house and it's holding up fine. In this application, the forces will mainly be vertical; the hit it took was a shearing load, but in all honesty that was me not paying attention!
I have reviewed the other posts (still need to make some responses) and I was very interested in the one with the carbon weave availability at McMaster-Carr. For now, I'm gonna try this with epoxy only, but may revisit with a small layer of carbon weave, too. Have to check on availability and do a little research into how to properly place/attach the stuff.
So, off to Wal-Mart for the JB Weld and some liquid silicone. I'll update the thread with pics of the process soon.
DD

Last edited by Drillium Dude; 02-16-22 at 02:16 AM.
02-14-22, 02:24 PM
#32
Banned.
Thread Starter
Join Date: Jul 2009
Location: PAZ
Posts: 12,294
Mentioned: 255 Post(s)
Tagged: 0 Thread(s)
Quoted: 2588 Post(s)
Liked 4,824 Times
in
1,709 Posts
Ha ha 
What surprised me: what hurt the most when I got home was my feet - specifically both big toes. Prolonged forward pressure against the toebox (I like my shoes on the tight size); almost felt as though I had ingrown toenails on both of them. Not fun.
DD
What surprised me: what hurt the most when I got home was my feet - specifically both big toes. Prolonged forward pressure against the toebox (I like my shoes on the tight size); almost felt as though I had ingrown toenails on both of them. Not fun.
DD
02-14-22, 02:54 PM
#33
Newbie
Join Date: Jul 2018
Location: New York
Posts: 62
Bikes: 1974 Raleigh Competition (sn A8326), 1973 Raleigh Competition (sn A4985), 1982 Dawes Atlantis, 1985 Condor, 1990 Trimble 140U, 1990 Trimble 160U, 1974 Free Spirit Ted Williams Racer, 1974 Raleigh Gran Sport
Mentioned: 2 Post(s)
Tagged: 0 Thread(s)
Quoted: 30 Post(s)
Liked 35 Times
in
10 Posts
Today this happened:
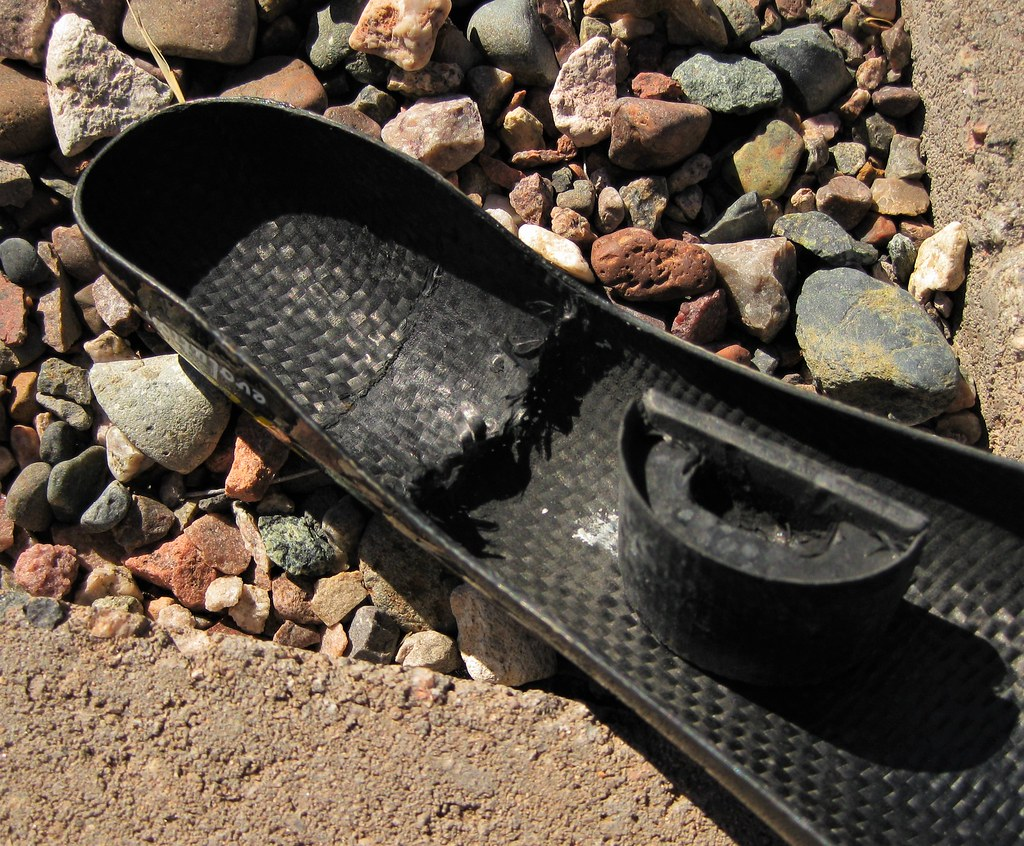
I was sitting "heavy" when I hit a substantial bump at substantial speed. Crack! I stuck the shell under my jersey, the anchor in a jersey pocket, and rode standing up the remaining 15 miles. Yes, my legs were damned tired at the finish
The failure seems pretty localized. The shredded bit looks to be a single layer that butted up against the base of the forward anchoring point; doesn't even look as though it was structural. Is it possible to clean that up with an X-Acto, then use epoxy to re-attach the anchor piece? Note there doesn't appear to have been any epoxy holding the anchor in the original configuration; doesn't appear to have been any at the rear attachment points, either.
I'd really like to save this saddle. Carbon repair experts are encouraged to weigh in with their suggestions; if suggesting products, please provide name brands so I can find them if/when I go lookin'
Thanks!
DD
Best of luck-
Ford
Ghent, NY
USA
Likes For fordbailey:
02-14-22, 03:21 PM
#34
Senior Member

Join Date: Nov 2015
Posts: 4,488
Mentioned: 102 Post(s)
Tagged: 0 Thread(s)
Quoted: 1641 Post(s)
Likes: 0
Liked 831 Times
in
540 Posts
I guess the trick might come down to how you'll get the repair resin to penetrate the CF weave on the saddle shell and the rail receiver piece.
Maybe you can use one of those counter top food packaging vacuum bag system over the repair area to "push in" the resin into the surrounding structure?
Maybe you can use one of those counter top food packaging vacuum bag system over the repair area to "push in" the resin into the surrounding structure?
Last edited by Chombi1; 02-15-22 at 12:49 PM.
02-14-22, 04:10 PM
#35
Banned.
Thread Starter
Join Date: Jul 2009
Location: PAZ
Posts: 12,294
Mentioned: 255 Post(s)
Tagged: 0 Thread(s)
Quoted: 2588 Post(s)
Liked 4,824 Times
in
1,709 Posts
Found this stuff:
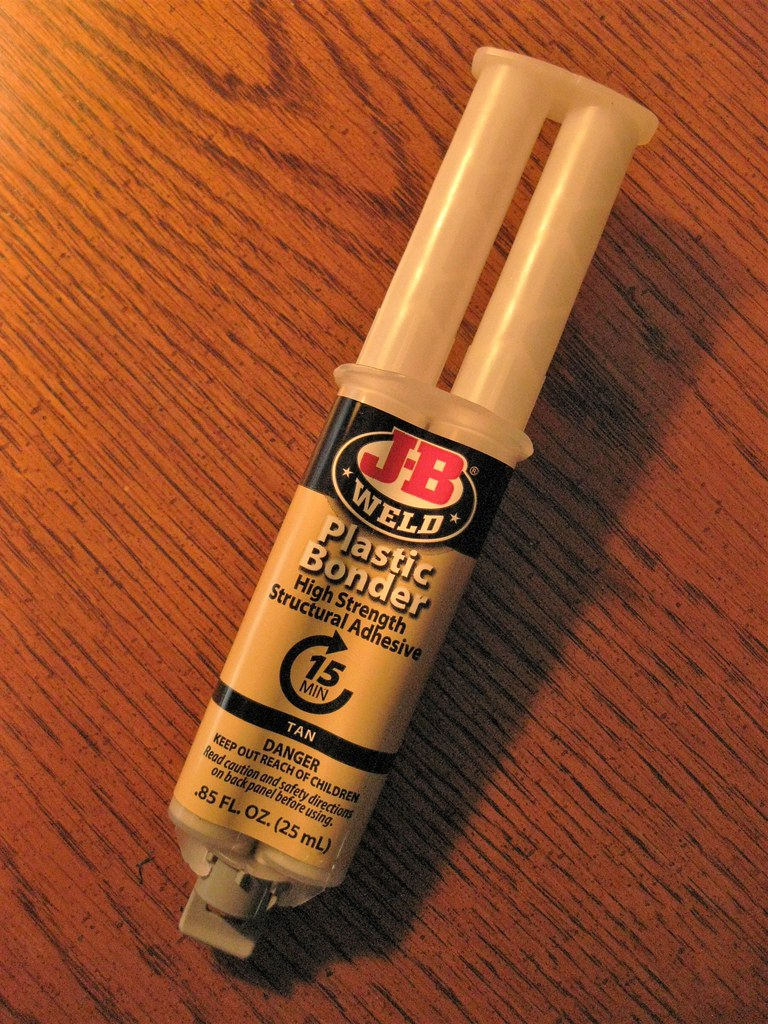
Carbon fiber was called out specifically in the compatibility list. Dries tan, not clear, but what the hey - the repair site is on the underside of the saddle so I don't really care.
Finishing up the prep work with a little more sanding of the mating surfaces. I figure as the interference fit is pretty tight, I'm going to get a goodly amount of epoxy squeezing out. With that in mind, I have wet paper towels and Q-tips standing by
The fix will be completed tonight and I'll wait until tomorrow to road test. Feeling pretty confident, however, now that I've found a bonding agent specifically for plastic to CF.
DD
02-14-22, 04:16 PM
#36
Banned.
Thread Starter
Join Date: Jul 2009
Location: PAZ
Posts: 12,294
Mentioned: 255 Post(s)
Tagged: 0 Thread(s)
Quoted: 2588 Post(s)
Liked 4,824 Times
in
1,709 Posts
I guess the trick might come down to how you'll get the repair resin to 0enetrate the CF we've on the saddle shell and the rail receiver piece.
Maybe you can use one of those counter top food packaging vacuum bag system over the repair area to "push in" the resin into the surrounding structure?
Maybe you can use one of those counter top food packaging vacuum bag system over the repair area to "push in" the resin into the surrounding structure?
This photo shows the strands loose from the the one large piece I removed from the front anchor point; I was able to undo them by hand, which suggests more than ever to me that this layer served in an aesthetic capacity rather than structural:

DD
02-14-22, 06:31 PM
#37
Banned.
Thread Starter
Join Date: Jul 2009
Location: PAZ
Posts: 12,294
Mentioned: 255 Post(s)
Tagged: 0 Thread(s)
Quoted: 2588 Post(s)
Liked 4,824 Times
in
1,709 Posts
All done. Gonna give it 24 hours before I whip out some 120 grit, do some cleanup of excess epoxy, and put everything back together.
I used a goodly amount of epoxy in the shell, then pressed in the anchor. A goodly amount of epoxy squeegeed out around the edges - which gave me an idea: why not add a bead/fillet of epoxy to both the front and rear of the anchor? Figured they'd serve as strengthening fillets in the absence of the original CF layer. A little ugly, but strength is the important factor:


Should be able to put it back together tomorrow morning and - fingers crossed - have a successful apres-ride report in the afternoon.
DD
I used a goodly amount of epoxy in the shell, then pressed in the anchor. A goodly amount of epoxy squeegeed out around the edges - which gave me an idea: why not add a bead/fillet of epoxy to both the front and rear of the anchor? Figured they'd serve as strengthening fillets in the absence of the original CF layer. A little ugly, but strength is the important factor:
Should be able to put it back together tomorrow morning and - fingers crossed - have a successful apres-ride report in the afternoon.
DD
02-14-22, 06:57 PM
#38
Bike Butcher of Portland

Join Date: Jul 2014
Location: Portland, OR
Posts: 11,639
Bikes: It's complicated.
Mentioned: 1299 Post(s)
Tagged: 0 Thread(s)
Quoted: 4682 Post(s)
Liked 5,800 Times
in
2,284 Posts
Just run bolts through the saddle to clamp that bit on.
And keep in the rivets while riding.

And keep in the rivets while riding.
__________________
If someone tells you that you have enough bicycles and you don't need any more, stop talking to them. You don't need that kind of negativity in your life.
If someone tells you that you have enough bicycles and you don't need any more, stop talking to them. You don't need that kind of negativity in your life.
Likes For gugie:
02-14-22, 07:12 PM
#39
small ring

Join Date: Jul 2012
Location: PNW
Posts: 1,025
Mentioned: 24 Post(s)
Tagged: 0 Thread(s)
Quoted: 438 Post(s)
Liked 925 Times
in
370 Posts
How many grams did that add?
__________________
59 Allegro Special -- 72 Bob Jackson -- 74 Motobecane Grand Jubile -- 74 Sekine SHS 271 -- 80 Nishiki International
85 Shogun 800 -- 86 Tommasini Super Prestige -- 92 Specialized Rockhopper -- 17 Colnago Arabesque
59 Allegro Special -- 72 Bob Jackson -- 74 Motobecane Grand Jubile -- 74 Sekine SHS 271 -- 80 Nishiki International
85 Shogun 800 -- 86 Tommasini Super Prestige -- 92 Specialized Rockhopper -- 17 Colnago Arabesque
Likes For droppedandlost:
02-14-22, 07:23 PM
#40
Senior Member
Join Date: Jul 2017
Posts: 248
Mentioned: 1 Post(s)
Tagged: 0 Thread(s)
Quoted: 143 Post(s)
Likes: 0
Liked 90 Times
in
64 Posts
Must be that the mechanic who takes care of the equipment for the professional team that pays you to ride should be able to just put a new replacement saddle on your bicycle
Likes For TPL:
02-14-22, 09:08 PM
#41
Banned.
Thread Starter
Join Date: Jul 2009
Location: PAZ
Posts: 12,294
Mentioned: 255 Post(s)
Tagged: 0 Thread(s)
Quoted: 2588 Post(s)
Liked 4,824 Times
in
1,709 Posts
First off I am glad you are ok and this didn't cause any kind of accident or injury.
I would adhere the frame to the saddle with carbon specific tape and then encase the area in PC7 epoxy.
As others have mentioned, given the amoUnt of flex in the design and the fact that it has already failed once, I would not go too far in investing in a repair. See if you can get it stable and take it for a ride.
If I were faced with this decison, I would get a new saddle. Failures of this type when repaired, give me the heebe jeebees. Be safe!
I've wanted to keep the monetary outlay low for the reasons you've pointed out (plus I'm cheap!); giving a fix a go makes monetary sense, and I'll be sensible with the test run as well. Hoping my extra strengthening with the epoxy makes this at least as reliable as it was before - or perhaps even more so.
DD
02-14-22, 09:09 PM
#42
Banned.
Thread Starter
Join Date: Jul 2009
Location: PAZ
Posts: 12,294
Mentioned: 255 Post(s)
Tagged: 0 Thread(s)
Quoted: 2588 Post(s)
Liked 4,824 Times
in
1,709 Posts
DD
02-14-22, 09:58 PM
#43
Banned.
Thread Starter
Join Date: Jul 2009
Location: PAZ
Posts: 12,294
Mentioned: 255 Post(s)
Tagged: 0 Thread(s)
Quoted: 2588 Post(s)
Liked 4,824 Times
in
1,709 Posts
It'll take some time to feel comfortable that this fix has worked, but for now it sure seems solid enough. Tomorrow's test run will tell the tale.
DD
02-14-22, 09:59 PM
#44
Banned.
Thread Starter
Join Date: Jul 2009
Location: PAZ
Posts: 12,294
Mentioned: 255 Post(s)
Tagged: 0 Thread(s)
Quoted: 2588 Post(s)
Liked 4,824 Times
in
1,709 Posts
Dunno, but if the extra stuff translates into extra strength I don't care in the slightest!
DD
DD
02-14-22, 10:02 PM
#45
Banned.
Thread Starter
Join Date: Jul 2009
Location: PAZ
Posts: 12,294
Mentioned: 255 Post(s)
Tagged: 0 Thread(s)
Quoted: 2588 Post(s)
Liked 4,824 Times
in
1,709 Posts
DD
Likes For Drillium Dude:
02-14-22, 10:46 PM
#46
Senior Member
Join Date: Jun 2006
Posts: 20,305
Mentioned: 130 Post(s)
Tagged: 0 Thread(s)
Quoted: 3464 Post(s)
Liked 2,830 Times
in
1,996 Posts
Apparently that wasn't the process used in the initial manufacture, so I'm not concerned about it. From the evidence the top outer shell is the only CF that has pre-preg resin; the polycarbonate anchors were apparently epoxied to the shell, then covered with a finishing, non-pre-preg layer of CF. Not sure how it was attached - but I'm assuming a light film of epoxy over the entire underside of the shell.
This photo shows the strands loose from the the one large piece I removed from the front anchor point; I was able to undo them by hand, which suggests more than ever to me that this layer served in an aesthetic capacity rather than structural:
DD
This photo shows the strands loose from the the one large piece I removed from the front anchor point; I was able to undo them by hand, which suggests more than ever to me that this layer served in an aesthetic capacity rather than structural:
DD
02-14-22, 11:22 PM
#47
Banned.
Thread Starter
Join Date: Jul 2009
Location: PAZ
Posts: 12,294
Mentioned: 255 Post(s)
Tagged: 0 Thread(s)
Quoted: 2588 Post(s)
Liked 4,824 Times
in
1,709 Posts
Re-assembly complete:


Saddle is back on the bike, ready to go for tomorrow. I have high hopes - hopefully they aren't misplaced.
Flexibility has been retained by using silicone in the rear anchors and leaving the front U-bend floating. Both are per original spec. I think the additional epoxy will result in a stronger bond between the forward anchor and the shell, so perhaps I've made this a touch stronger in this area than the original. Fingers crossed; again, finding CF repair specific JB Weld has my confidence level up higher than it might have been.
DD
Likes For Drillium Dude:
02-14-22, 11:31 PM
#48
Banned.
Thread Starter
Join Date: Jul 2009
Location: PAZ
Posts: 12,294
Mentioned: 255 Post(s)
Tagged: 0 Thread(s)
Quoted: 2588 Post(s)
Liked 4,824 Times
in
1,709 Posts

Thanks for the suggestion; I figured on getting some negative feedback about using JB Weld, but I totally agree: it works. That's enough for me.
DD
Likes For Drillium Dude:

Likes For Millstone:
02-15-22, 05:16 AM
#50
Banned.
Thread Starter
Join Date: Jul 2009
Location: PAZ
Posts: 12,294
Mentioned: 255 Post(s)
Tagged: 0 Thread(s)
Quoted: 2588 Post(s)
Liked 4,824 Times
in
1,709 Posts
The top wasn't affected at all:

DD