


Suntour Barcons: maintenance and adjustment
 03-13-24, 09:25 AM
#1

Senior Member
Thread Starter
Join Date: Apr 2011
Location: Maryland, USA
Posts: 2,441
Bikes: Drysdale/Gitane/Zeus/Masi/Falcon/Palo Alto/Raleigh/Legnano
Mentioned: 34 Post(s)
Tagged: 0 Thread(s)
Quoted: 987 Post(s)
Liked 640 Times
in
406 Posts
Suntour Barcons: maintenance and adjustment
A search gave me THIS TOPIC on barcons amidst many others on sale or selection of above, and cable routing and the type pictured is the type I am dealing with. But I am working on a project and I have the barcons in the ends of the bars, no housing or tape yet, I kinda think they feel like cr*p and am unsure how to adjust the lever retention/adjustment bolt (the one with two nuts on the end, one being near-unobtainable if I lose it) it seems to me that the amount of tension on the bolt affects the presence/absence of the ratcheting action/sound.. I would not mind input on adjustment. Plus I have not taken the black metal over off the ratchet mechanism, the one held by a little Philips screw... what will I find in there (I've seen the exploded view but do not want little parts springing all over the place) -- is there any value in breaking them down and perhaps cleaning and lubing? 50-year old set that has been sitting a long time.
__________________
Larry:1958 Drysdale, 1961 Gitane Gran Sport, 1974 Zeus track, 1988 Masi Gran Corsa, 1974 Falcon, 1980 Palo Alto, 1973 Raleigh Gran Sport, 1974 Legnano. Susan: 1976 Windsor Profesional.
Larry:1958 Drysdale, 1961 Gitane Gran Sport, 1974 Zeus track, 1988 Masi Gran Corsa, 1974 Falcon, 1980 Palo Alto, 1973 Raleigh Gran Sport, 1974 Legnano. Susan: 1976 Windsor Profesional.
 03-13-24, 09:59 AM
#2
only here for the "LIKES"

Join Date: Nov 2004
Location: squirrel cage of anxiety and delusion
Posts: 480
Mentioned: 143 Post(s)
Tagged: 0 Thread(s)
Quoted: 1643 Post(s)
Liked 2,240 Times
in
1,052 Posts
they are not difficult to disassemble. nothing is going to spring out at you. the most "challenging" part is removing the circlip, don't let it fly away. the innards are just a bunch of shims/washers, the toothed wheel, the pawl, and that's about it. i think there is a small spring behind the pawl, but it's in a bore in the housing and shouldn't fly out.
when putting everything back together, make sure that the toothed wheel is oriented in the proper way to engage the pawl.
i have a set of Raleigh / Suntour barcons like this, and they were in poor working condition. i took them apart (one at a time, in case there were any disassembly/assembly questions), cleaned everything, especially the pawl (making sure it moved freely in the housing), gave the innards a light lube, and now they function excellently.
to set the tension, you loosen the 'unobtanium' outer nut, tighten the screw to whatever tension you desire, then retighten the 'unobtanium' outer nut.
i think someone reproduces that outer nut.
Last edited by hazetguy; 03-13-24 at 10:02 AM.
Likes For hazetguy:
03-13-24, 10:17 AM
#3
Senior Member
Thread Starter
Join Date: Apr 2011
Location: Maryland, USA
Posts: 2,441
Bikes: Drysdale/Gitane/Zeus/Masi/Falcon/Palo Alto/Raleigh/Legnano
Mentioned: 34 Post(s)
Tagged: 0 Thread(s)
Quoted: 987 Post(s)
Liked 640 Times
in
406 Posts
Thanks, it sounds like I should not be afraid of diving in. For lube, what did you use? Light motor oil, chain lube (I have plenty left over, not that I wax chains), Park grease, other?
I need to dig around in the tool drawer, I think I have one of those odd little tools that are to hold the twin-slot backsides of chainring bolts... I wonder if that would fit the "unobtainium bolt? Yeah, I seem to recall a topic on replacements being "available", no idea where that topic is and I hope I don't need them!
Thew black-painted covers over the ratchets are a bit scratched up; need to decide if I want to bother with touching up the paint while I am at it, or simply use a Sharpie, or leave as-is.
My first time messing with barcons since Jimmy Carter was president, dim memories so I am re-learning. This is a friend's bike and we both seem to think I took this pair off my bike and sold them to him (I recall previously having a set of Campy barcons and did not like them either), back in the 1970's.
they are not difficult to disassemble. nothing is going to spring out at you. the most "challenging" part is removing the circlip, don't let it fly away. the innards are just a bunch of shims/washers, the toothed wheel, the pawl, and that's about it. i think there is a small spring behind the pawl, but it's in a bore in the housing and shouldn't fly out.
when putting everything back together, make sure that the toothed wheel is oriented in the proper way to engage the pawl.
i have a set of Raleigh / Suntour barcons like this, and they were in poor working condition. i took them apart (one at a time, in case there were any disassembly/assembly questions), cleaned everything, especially the pawl (making sure it moved freely in the housing), gave the innards a light lube, and now they function excellently.
to set the tension, you loosen the 'unobtanium' outer nut, tighten the screw to whatever tension you desire, then retighten the 'unobtanium' outer nut.
i think someone reproduces that outer nut.
when putting everything back together, make sure that the toothed wheel is oriented in the proper way to engage the pawl.
i have a set of Raleigh / Suntour barcons like this, and they were in poor working condition. i took them apart (one at a time, in case there were any disassembly/assembly questions), cleaned everything, especially the pawl (making sure it moved freely in the housing), gave the innards a light lube, and now they function excellently.
to set the tension, you loosen the 'unobtanium' outer nut, tighten the screw to whatever tension you desire, then retighten the 'unobtanium' outer nut.
i think someone reproduces that outer nut.
__________________
Larry:1958 Drysdale, 1961 Gitane Gran Sport, 1974 Zeus track, 1988 Masi Gran Corsa, 1974 Falcon, 1980 Palo Alto, 1973 Raleigh Gran Sport, 1974 Legnano. Susan: 1976 Windsor Profesional.
Larry:1958 Drysdale, 1961 Gitane Gran Sport, 1974 Zeus track, 1988 Masi Gran Corsa, 1974 Falcon, 1980 Palo Alto, 1973 Raleigh Gran Sport, 1974 Legnano. Susan: 1976 Windsor Profesional.
03-13-24, 10:42 AM
#4
Senior Member

Join Date: Feb 2013
Location: Alta California
Posts: 14,270
Mentioned: 415 Post(s)
Tagged: 1 Thread(s)
Quoted: 3814 Post(s)
Liked 3,345 Times
in
2,182 Posts
-----
often found them where the outer nut had been lost
recall getting replacements in a packet of ten from a distributor in Minneapolis, but this was many years ago
might be smart, while you have them apart, to put a drop of Loctite on the threads so that this nut will stay home
-----
often found them where the outer nut had been lost
recall getting replacements in a packet of ten from a distributor in Minneapolis, but this was many years ago
might be smart, while you have them apart, to put a drop of Loctite on the threads so that this nut will stay home
-----
Likes For juvela:
03-13-24, 03:05 PM
#5
Senior Member
video of disassembly and reassembly
if anyone needs the locknut https://m.bikeforums.net/showthread.php?p=22082240
Likes For Big Block:
03-13-24, 09:03 PM
#6
blahblahblah chrome moly

Join Date: Apr 2009
Location: Seattle
Posts: 1,994
Mentioned: 92 Post(s)
Tagged: 0 Thread(s)
Quoted: 1181 Post(s)
Liked 2,576 Times
in
1,076 Posts
Not sure if I have ever lubed mine. A little oil probably won't hurt, but any excess will drip down on the lever and thence to your fingers, which could be a safety concern if it makes your fingers slip off the brake levers. So, just a drop of oil per side maybe, any old oil should do.
No, that tool has the fingers too far apart. I have a VAR screwdriver-style made for TA Pro 5-vis chainring bolts, which are a couple mm smaller, works for Suntour Barcon nuts.
But really, most any wide-blade screwdriver can work. If the shaft of the bolt intrudes, preventing the screwdriver from staying seated in the slot, you can make a custom tool by filing or grinding a slight recess in the center of the blade, leaving just enough unmolested on either side of the recess.
You can also replace the Suntour nut with a generic nut from the hardware store. I think they're M4 x 0.7, a common size — someone correct me if I'm mis-remembering. Don't bother getting nyloc nuts, the bolt isn't long enough to reach the nyloc material. I think the standard nuts take a 7 mm wrench, not a screwdriver, and they won't look "right", but they'll work, probably more reliably than the original.
Someone, I forget whether they're on BF, designed a plastic part for 3d printing, that lets you replace also the inner nut, the one that nestles into the hexagonal recess. Then you do use a nyloc nut since there's only one nut, no jam-nut. He put the file on some downloadable forum like Thingiverse, so you can make your own if you have access to a 3d printer. Maybe someone here will remember who or where. This was a number of years ago and I never heard of anyone having any problem with that system, so I think it's proven reliable. Or maybe the people who hated it just kept quiet? Seems unlikely...
I think I have one of those odd little tools that are to hold the twin-slot backsides of chainring bolts... I wonder if that would fit the "unobtainium bolt?
But really, most any wide-blade screwdriver can work. If the shaft of the bolt intrudes, preventing the screwdriver from staying seated in the slot, you can make a custom tool by filing or grinding a slight recess in the center of the blade, leaving just enough unmolested on either side of the recess.
You can also replace the Suntour nut with a generic nut from the hardware store. I think they're M4 x 0.7, a common size — someone correct me if I'm mis-remembering. Don't bother getting nyloc nuts, the bolt isn't long enough to reach the nyloc material. I think the standard nuts take a 7 mm wrench, not a screwdriver, and they won't look "right", but they'll work, probably more reliably than the original.
Someone, I forget whether they're on BF, designed a plastic part for 3d printing, that lets you replace also the inner nut, the one that nestles into the hexagonal recess. Then you do use a nyloc nut since there's only one nut, no jam-nut. He put the file on some downloadable forum like Thingiverse, so you can make your own if you have access to a 3d printer. Maybe someone here will remember who or where. This was a number of years ago and I never heard of anyone having any problem with that system, so I think it's proven reliable. Or maybe the people who hated it just kept quiet? Seems unlikely...
Last edited by bulgie; 03-13-24 at 09:11 PM.
Likes For bulgie:
03-14-24, 06:36 AM
#7

Senior Member
Join Date: Dec 2005
Posts: 17,159
Mentioned: 481 Post(s)
Tagged: 0 Thread(s)
Quoted: 3811 Post(s)
Liked 6,709 Times
in
2,613 Posts
I think it was @oneclick who created that alternative?
03-14-24, 08:56 AM
#8
Senior Member
Join Date: Oct 2011
Location: Fairplay Co
Posts: 9,523
Bikes: Current 79 Nishiki Custum Sport, Jeunet 620, notable previous bikes P.K. Ripper loop tail, Kawahara Laser Lite, Paramount Track full chrome, Raliegh Internatioanl, Motobecan Super Mirage. 59 Crown royak 3 speed
Mentioned: 26 Post(s)
Tagged: 1 Thread(s)
Quoted: 790 Post(s)
Liked 1,769 Times
in
635 Posts
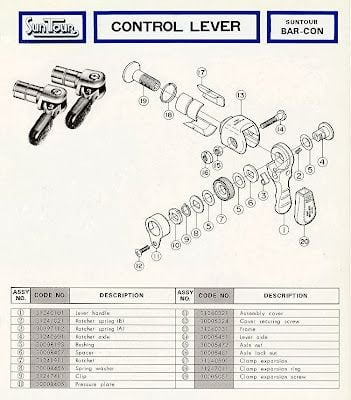
Main thing is to be care full when removing the back screw and clip washer as said these have a tendency to go missing and are hard to replace and the threading on the back screw can tend to be bit finicky delicate.. This diagram should be helpful
Last edited by zukahn1; 03-14-24 at 09:00 AM.
03-14-24, 11:58 AM
#9
Crawlin' up, flyin' down

Join Date: Jan 2006
Location: Democratic Peoples' Republic of Berkeley
Posts: 5,658
Bikes: 1967 Paramount; 1982-ish Ron Cooper; 1978 Eisentraut "A"; two mid-1960s Cinelli Speciale Corsas; and others in various stages of non-rideability.
Mentioned: 40 Post(s)
Tagged: 0 Thread(s)
Quoted: 1027 Post(s)
Liked 2,531 Times
in
1,059 Posts
I have Suntour barcons on a couple of bikes and it has never occurred to me to take them apart beyond what was needed to install them. They just work, pretty much flawlessly.
__________________
"I'm in shape -- round is a shape." Andy Rooney
"I'm in shape -- round is a shape." Andy Rooney
03-14-24, 01:20 PM
#10
Senior Member
Thread Starter
Join Date: Apr 2011
Location: Maryland, USA
Posts: 2,441
Bikes: Drysdale/Gitane/Zeus/Masi/Falcon/Palo Alto/Raleigh/Legnano
Mentioned: 34 Post(s)
Tagged: 0 Thread(s)
Quoted: 987 Post(s)
Liked 640 Times
in
406 Posts
Thanks! I'll watch in the entirety, although I suspect YouTube will stop it seven times for ads...
Have Dremel, Will Grind. It does not hurt that I got all-new screwdrivers perhaps a year ago, and did not throw out the old ones, some of which I have had since high school -- one of which is to be sacrificed.
Thank you -- now I just have to learn how to blow it up to size before printing.
It does not hurt that I got all-new screwdrivers perhaps a year ago, and did not throw out the old ones, some of which I have had since high school -- one of which is to be sacrificed.Thank you -- now I just have to learn how to blow it up to size before printing.
__________________
Larry:1958 Drysdale, 1961 Gitane Gran Sport, 1974 Zeus track, 1988 Masi Gran Corsa, 1974 Falcon, 1980 Palo Alto, 1973 Raleigh Gran Sport, 1974 Legnano. Susan: 1976 Windsor Profesional.
Larry:1958 Drysdale, 1961 Gitane Gran Sport, 1974 Zeus track, 1988 Masi Gran Corsa, 1974 Falcon, 1980 Palo Alto, 1973 Raleigh Gran Sport, 1974 Legnano. Susan: 1976 Windsor Profesional.
03-14-24, 01:54 PM
#11
blahblahblah chrome moly
Join Date: Apr 2009
Location: Seattle
Posts: 1,994
Mentioned: 92 Post(s)
Tagged: 0 Thread(s)
Quoted: 1181 Post(s)
Liked 2,576 Times
in
1,076 Posts
I think it was @oneclick who created that alternative?
This is an adapter, to let you use a generic nyloc nut to replace both of the nuts on the Suntour "axle". Done this way, you only need one tool, a screwdriver on the head of the bolt. The bushing keeps the nut from turning.
Last edited by bulgie; 03-14-24 at 02:01 PM.
03-14-24, 01:59 PM
#12
blahblahblah chrome moly
Join Date: Apr 2009
Location: Seattle
Posts: 1,994
Mentioned: 92 Post(s)
Tagged: 0 Thread(s)
Quoted: 1181 Post(s)
Liked 2,576 Times
in
1,076 Posts
I haven't seen any YT ads since I started using Brave as my browser. It's based on Chromium, which is open-source I believe? So it's similar to Chrome, but not made by Google. Its main claim to fame is that it's more security- and privacy-oriented, they don't sell your eyeballs like Google does.
I don't know how it blocks YT ads, they don't seem to advertize that as a feature, but it's a nice bonus. YT has not retaliated against me in any way. Maybe they'll find a way around the ad blocking, but so far so nice.
I don't know how it blocks YT ads, they don't seem to advertize that as a feature, but it's a nice bonus. YT has not retaliated against me in any way. Maybe they'll find a way around the ad blocking, but so far so nice.
03-14-24, 02:23 PM
#13
Senior Member
Likes For Big Block:
03-14-24, 02:32 PM
#14
Senior Member
Join Date: Oct 2011
Location: Fairplay Co
Posts: 9,523
Bikes: Current 79 Nishiki Custum Sport, Jeunet 620, notable previous bikes P.K. Ripper loop tail, Kawahara Laser Lite, Paramount Track full chrome, Raliegh Internatioanl, Motobecan Super Mirage. 59 Crown royak 3 speed
Mentioned: 26 Post(s)
Tagged: 1 Thread(s)
Quoted: 790 Post(s)
Liked 1,769 Times
in
635 Posts
Will here's a bit larger pic of the diagram.

03-14-24, 04:24 PM
#15
Senior Member
Thread Starter
Join Date: Apr 2011
Location: Maryland, USA
Posts: 2,441
Bikes: Drysdale/Gitane/Zeus/Masi/Falcon/Palo Alto/Raleigh/Legnano
Mentioned: 34 Post(s)
Tagged: 0 Thread(s)
Quoted: 987 Post(s)
Liked 640 Times
in
406 Posts
I haven't seen any YT ads since I started using Brave as my browser. It's based on Chromium, which is open-source I believe? So it's similar to Chrome, but not made by Google. Its main claim to fame is that it's more security- and privacy-oriented, they don't sell your eyeballs like Google does. I don't know how it blocks YT ads, they don't seem to advertize that as a feature, but it's a nice bonus. YT has not retaliated against me in any way. Maybe they'll find a way around the ad blocking, but so far so nice.

Appreciated! -- of course, now, I don't have to bother learning anything, now that I have a nice copy in my hands...

__________________
Larry:1958 Drysdale, 1961 Gitane Gran Sport, 1974 Zeus track, 1988 Masi Gran Corsa, 1974 Falcon, 1980 Palo Alto, 1973 Raleigh Gran Sport, 1974 Legnano. Susan: 1976 Windsor Profesional.
Larry:1958 Drysdale, 1961 Gitane Gran Sport, 1974 Zeus track, 1988 Masi Gran Corsa, 1974 Falcon, 1980 Palo Alto, 1973 Raleigh Gran Sport, 1974 Legnano. Susan: 1976 Windsor Profesional.
03-14-24, 05:35 PM
#16
Senior Member
Join Date: Dec 2005
Posts: 17,159
Mentioned: 481 Post(s)
Tagged: 0 Thread(s)
Quoted: 3811 Post(s)
Liked 6,709 Times
in
2,613 Posts
I found it, it is here on Shapeways, the designer is John Thurston. Good guy, very smart, don't think he's on BF though.
This is an adapter, to let you use a generic nyloc nut to replace both of the nuts on the Suntour "axle". Done this way, you only need one tool, a screwdriver on the head of the bolt. The bushing keeps the nut from turning.
This is an adapter, to let you use a generic nyloc nut to replace both of the nuts on the Suntour "axle". Done this way, you only need one tool, a screwdriver on the head of the bolt. The bushing keeps the nut from turning.
03-15-24, 09:14 AM
#17
Senior Member
Thread Starter
Join Date: Apr 2011
Location: Maryland, USA
Posts: 2,441
Bikes: Drysdale/Gitane/Zeus/Masi/Falcon/Palo Alto/Raleigh/Legnano
Mentioned: 34 Post(s)
Tagged: 0 Thread(s)
Quoted: 987 Post(s)
Liked 640 Times
in
406 Posts
Pretty good video.
I have almost zero confidence of (a) reassembly without a set of snap-ring pliers, or (b) the local auto parts store of Home Depot having small ones, so I ordered a set online; if I succeed without them before arrival, well, extra tools never hurt!
At the risk of driving myself nuts, thinking of removal and reinstallation of that tiny coil spring while holding the parts and both hands inside a 5 gallon bucket -- not that it might not escape anyway!
In retrospect, I'll wager they were working great and I accidentally included there shifters in the pic of parts I stuck in the vibratory tumbler w/walnut shells, thereby gumming up the works. Making a mental note for the future, don't do that with anything with moving parts not 100% disassembled. [EDIT] Opening up the first one, oh yes, fully jammed up with walnut-shell grit!
[SECOND EDIT] All done! Using a tiny 90-degree pick, I handled the snap rings without snap-ring pliers, and was able to cancel the Amazon order. Leaving the final adjustment of tension until hooked up to the derailleurs (per video), they do feel like velvet (well, ratcheting velvet) now. Keeping all the parts laid out in order of disassembly helped, thanks to the video AND the exploded view -- but that meant cleaning each part one as a time and returning to the queue. By the way, because I had it handy, I used a thin film of Park grease as lubricant.
__________________
Larry:1958 Drysdale, 1961 Gitane Gran Sport, 1974 Zeus track, 1988 Masi Gran Corsa, 1974 Falcon, 1980 Palo Alto, 1973 Raleigh Gran Sport, 1974 Legnano. Susan: 1976 Windsor Profesional.
Larry:1958 Drysdale, 1961 Gitane Gran Sport, 1974 Zeus track, 1988 Masi Gran Corsa, 1974 Falcon, 1980 Palo Alto, 1973 Raleigh Gran Sport, 1974 Legnano. Susan: 1976 Windsor Profesional.
Last edited by tiger1964; 03-15-24 at 11:51 AM. Reason: ..
03-19-24, 06:56 PM
#18
Senior Member
Join Date: Dec 2005
Posts: 17,159
Mentioned: 481 Post(s)
Tagged: 0 Thread(s)
Quoted: 3811 Post(s)
Liked 6,709 Times
in
2,613 Posts
Here's a pic of that 3-D printed insert installed:
It looks a bit raw.
And I also found in my stash a set of @oneclick's brass replacement nuts as well as a back-up set of the 3-D jobbers, which come as one connected piece.
It looks a bit raw.
And I also found in my stash a set of @oneclick's brass replacement nuts as well as a back-up set of the 3-D jobbers, which come as one connected piece.
03-20-24, 08:05 AM
#19
Senior Member
Thread Starter
Join Date: Apr 2011
Location: Maryland, USA
Posts: 2,441
Bikes: Drysdale/Gitane/Zeus/Masi/Falcon/Palo Alto/Raleigh/Legnano
Mentioned: 34 Post(s)
Tagged: 0 Thread(s)
Quoted: 987 Post(s)
Liked 640 Times
in
406 Posts
You'd have to look really close to notice that's not "stock".
I am holding off final adjustment of tension until derailleurs (NR) are on the bike, and I have not yet modified a screwdriver to make a special SunTour Barcon tool for that.
I am holding off final adjustment of tension until derailleurs (NR) are on the bike, and I have not yet modified a screwdriver to make a special SunTour Barcon tool for that.
__________________
Larry:1958 Drysdale, 1961 Gitane Gran Sport, 1974 Zeus track, 1988 Masi Gran Corsa, 1974 Falcon, 1980 Palo Alto, 1973 Raleigh Gran Sport, 1974 Legnano. Susan: 1976 Windsor Profesional.
Larry:1958 Drysdale, 1961 Gitane Gran Sport, 1974 Zeus track, 1988 Masi Gran Corsa, 1974 Falcon, 1980 Palo Alto, 1973 Raleigh Gran Sport, 1974 Legnano. Susan: 1976 Windsor Profesional.
03-20-24, 12:22 PM
#21
blahblahblah chrome moly
Join Date: Apr 2009
Location: Seattle
Posts: 1,994
Mentioned: 92 Post(s)
Tagged: 0 Thread(s)
Quoted: 1181 Post(s)
Liked 2,576 Times
in
1,076 Posts
03-20-24, 12:56 PM
#22
Newbie
Join Date: Mar 2024
Location: Vancouver, WA
Posts: 2
Bikes: 1985 Schwinn Passage fully loaded touring, Sunseeker Eco-Tad
Mentioned: 0 Post(s)
Tagged: 0 Thread(s)
Quoted: 0 Post(s)
Likes: 0
Liked 1 Time
in
1 Post
Suntour Barcons
I have a bike with a set of those on it. They never had any "clicks" in the operation. The simply had a friction adjustment and worked real well. That was before the whole SIS and click shifting, of course. The bike had the down tube shifters and those were atrocious when on a fully loaded tour and climbing a serious grade on a narrow road with no margin. So I modified the down tube levers to be cable stops and installed the Suntour Barcons, I could shift without trying to locate the shifter levers and kept my hands on the bars.
03-20-24, 03:26 PM
#23
Senior Member
Join Date: Dec 2005
Posts: 17,159
Mentioned: 481 Post(s)
Tagged: 0 Thread(s)
Quoted: 3811 Post(s)
Liked 6,709 Times
in
2,613 Posts
I was kinda surprised not to see a nyloc nut in there, Mark! I think, at the time, I just didn't have one on hand and figured I'd see how it worked with the standard jam nut. I haven't used that bike a lot (my fancy '61 Hetchins), but haven't had any slippage. I do wonder what the failure sequence is for those shifters and their hardware. If that outside round nut is the one that loosens and falls into a sewer grate, does the rest of the hardware stay in place? Can we find a lab to do some testing?
Likes For nlerner:
03-20-24, 04:31 PM
#24
Senior Member
Join Date: May 2019
Location: Bloomington, IN
Posts: 2,950
Bikes: Paramount, Faggin, Ochsner, Ciocc, Basso
Mentioned: 117 Post(s)
Tagged: 0 Thread(s)
Quoted: 1303 Post(s)
Liked 1,912 Times
in
1,142 Posts
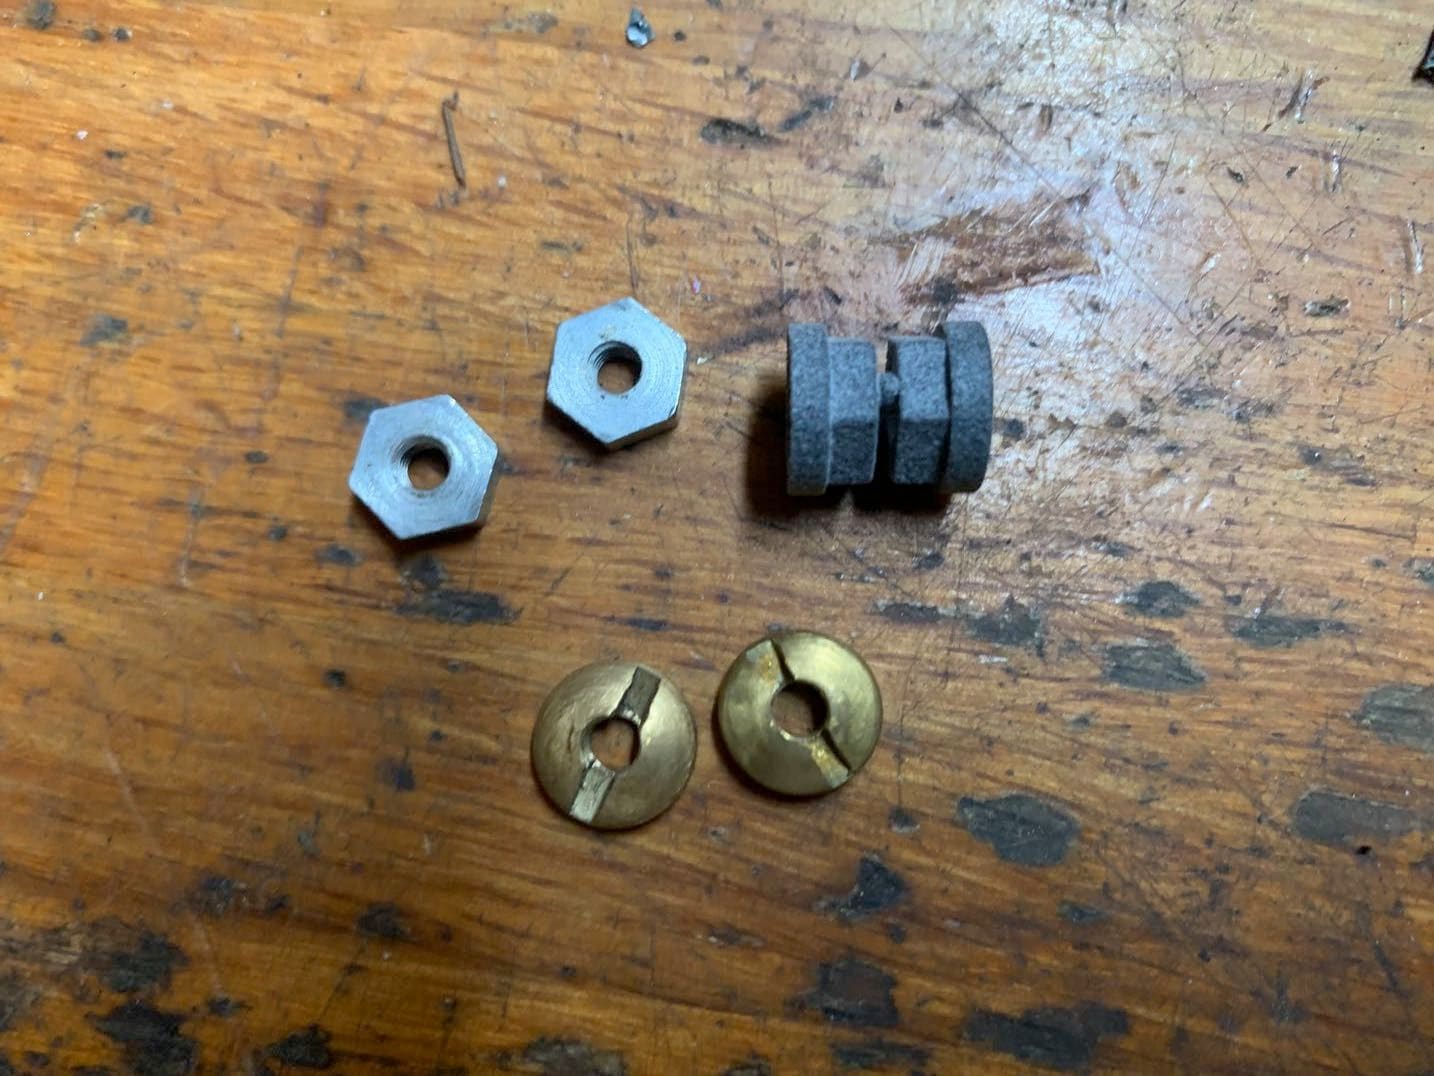
Today I was in the hardware aisle looking for a 1/4"-20 chrome cap screw, which they did not have. But the did have a bunch of pan head screws that looked like a good candidate for the lock nuts in question here. So at 22 cents per it was worth a try for a couple of sacrificial screws to find if they would work. Back home and about a half hour with a 7/32"drill bit and a 4 X .7 mm tap, I had prototype one finished. I will refine the process and post it here since a lot of folks are looking for these. Smiles, MH
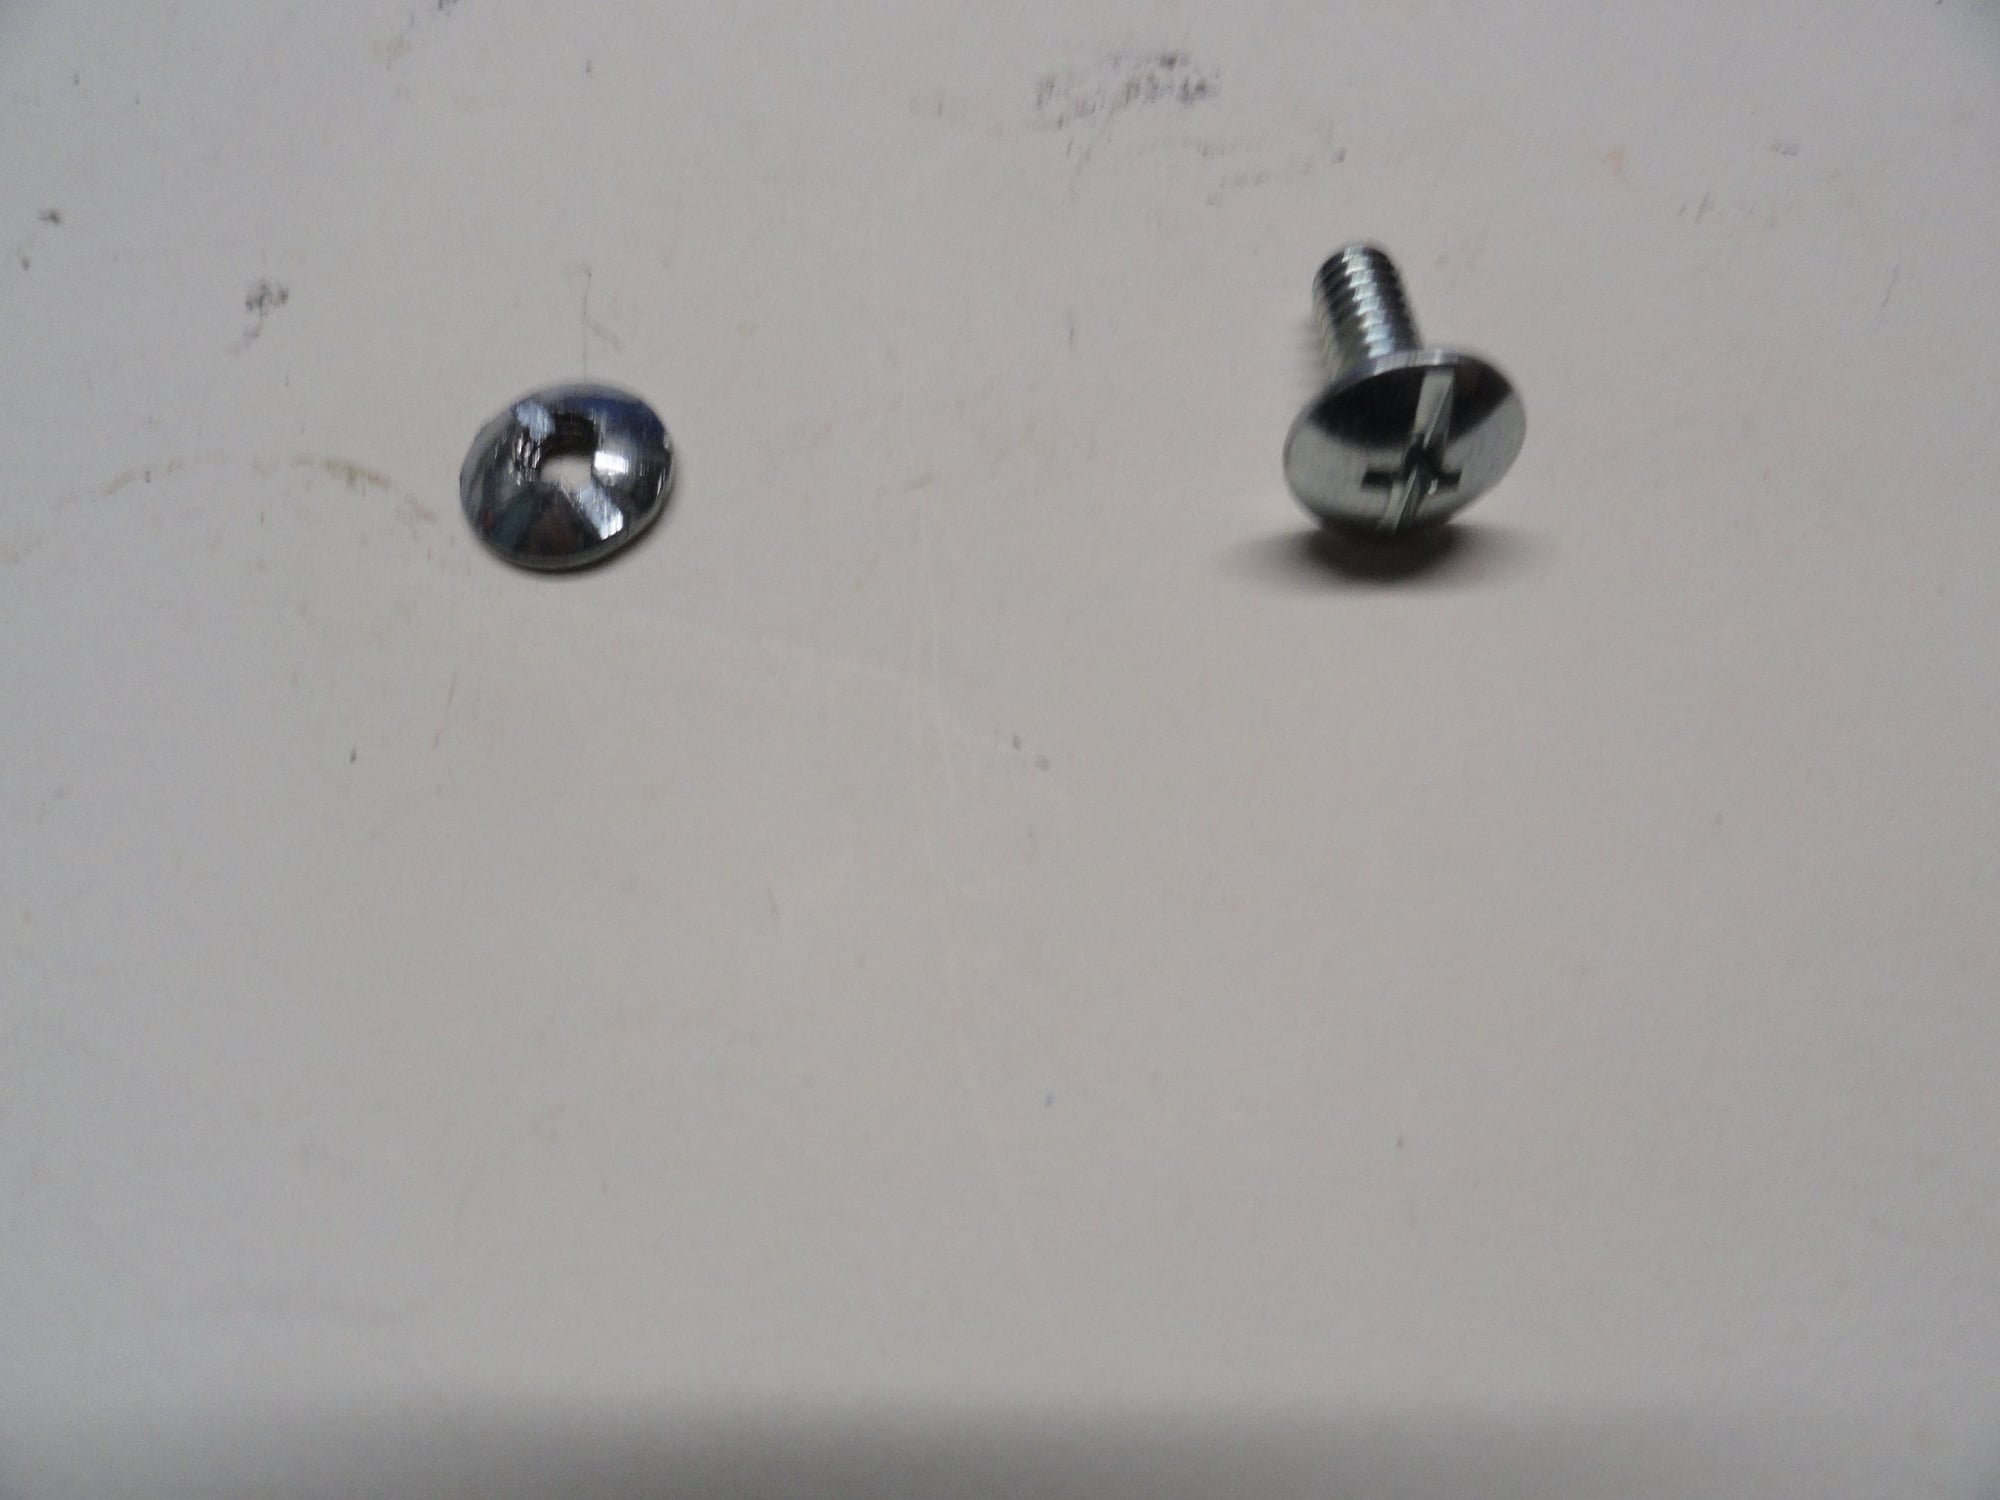
The original screw on the right and prototype one on the left.
Another picture showing a bit more detail.
The original screw on the right and prototype one on the left.
Another picture showing a bit more detail.
Last edited by Mad Honk; 03-21-24 at 05:28 PM.
Likes For Mad Honk:
03-21-24, 05:35 PM
#25
Senior Member
Join Date: May 2019
Location: Bloomington, IN
Posts: 2,950
Bikes: Paramount, Faggin, Ochsner, Ciocc, Basso
Mentioned: 117 Post(s)
Tagged: 0 Thread(s)
Quoted: 1303 Post(s)
Liked 1,912 Times
in
1,142 Posts
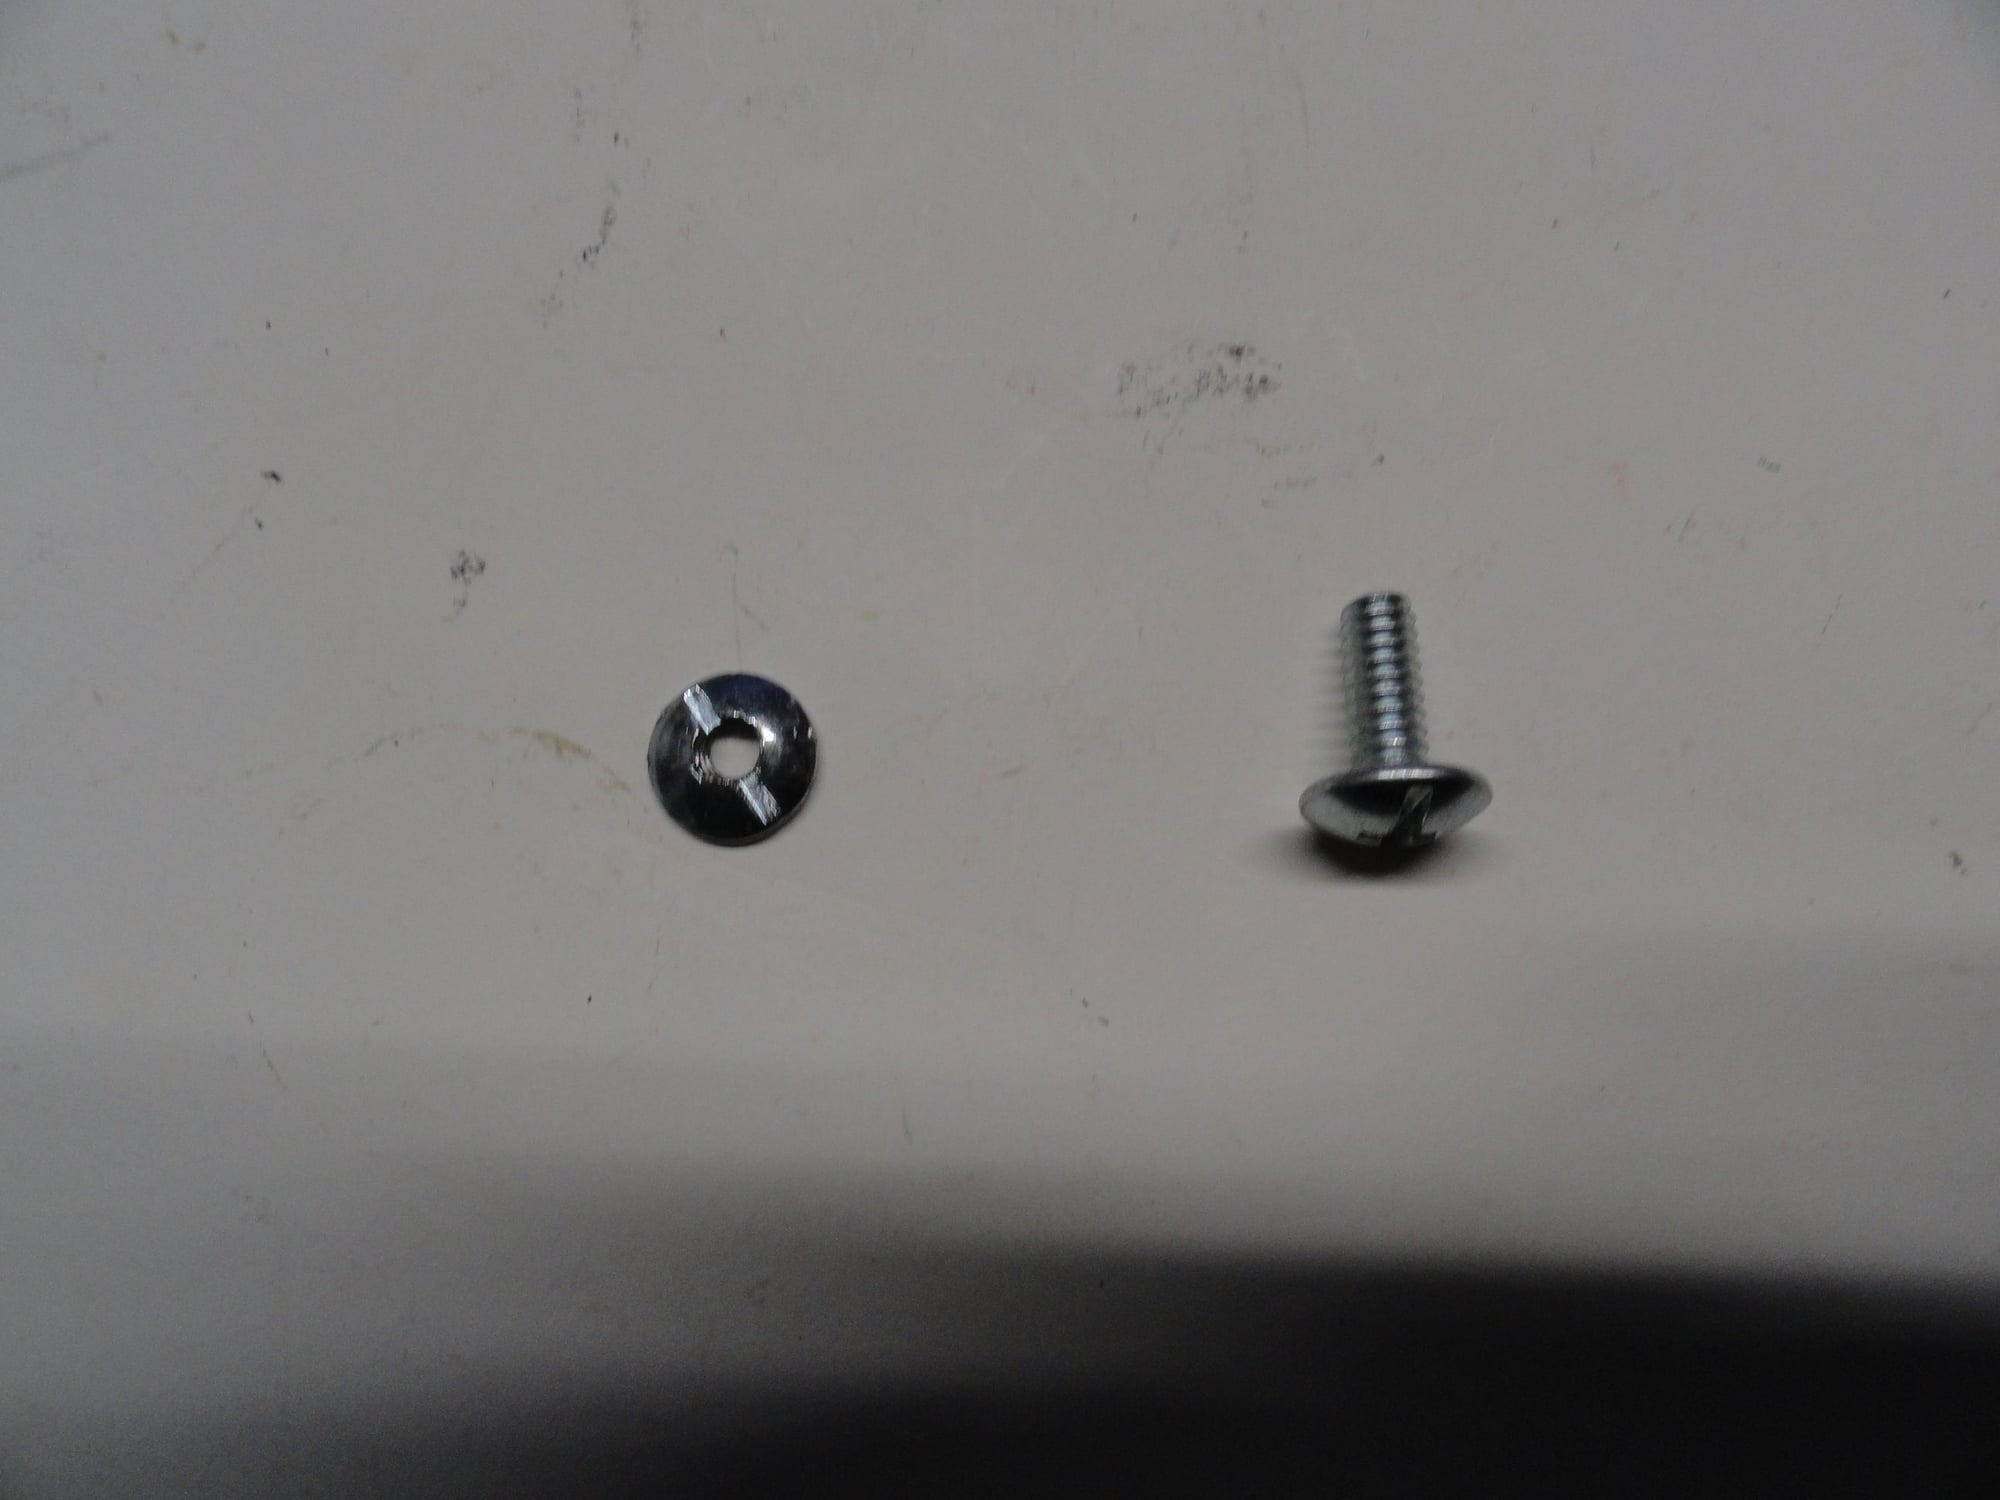
So today was another day to a hardware store where I found the chrome seat binder bolt, and picked up a new 4 X .7 tap and a couple of 4 X.7 bolts to do the finish work on the replacement lock nuts. Cost was under $7. I did finish one pair this afternoon and only need to put on a clear coat of paint to prevent rust formation. I was unable to find stainless steel bolts for the job, so I used what is at hand. Here are the finished lock nuts. Smiles, MH

This is what they came out looking like. A satin finish and not chrome, but it is what I have on hand.

What the new lock nuts look like on a lever.
This is what they came out looking like. A satin finish and not chrome, but it is what I have on hand.
What the new lock nuts look like on a lever.
Last edited by Mad Honk; 03-21-24 at 05:38 PM.
Likes For Mad Honk: