


Seatpost - Seat Tube Clearance - How much is too much?
 05-06-23, 08:08 AM
#126
Full Member
Thread Starter
I have been doing a little research on straight flute reamers. Some are designed to only cut at the bottom tip and the side flutes do next to nothing. Apparently these will follow the tip and may cut sideways / angled if not guided perfectly straight. I would think that these would not be a good choice for hand reaming.
Then there is the adjustable reamer. These are apparently somewhat "barrel" shaped. With these the side flutes actually do the cutting down in the bore (they have to as the barrel enters the bore). So is this type of reamer good at self guiding in hand reaming and recommended for this application?
This may explain the problem with my frame if the person using the reamer didn't realize that it was slightly barrel shape and not cylindrical.
As for sizing it appears that the 31.6mm probably originated from the standard tube O.D. of 1.25" (31.75mm). Straight flute 1.25" reamers are readily available. I am assuming (correct me if I am wrong) that they're not recommended for this application because they are not self centering/guiding as their adjustable counterparts.
 05-06-23, 08:42 PM
#127
Senior Member
Join Date: May 2005
Location: SFBay
Posts: 2,334
Bikes: n, I would like n+1
Mentioned: 0 Post(s)
Tagged: 0 Thread(s)
Quoted: 127 Post(s)
Likes: 0
Liked 133 Times
in
108 Posts
I�ve hesitated to chime into this mess of a thread for many reasons. That said:
1. Adjustable reamers don�t cost a ton. Dull the edges with a stone and they won�t want to cut the aluminum just as was said above.
2. If you want Ti to more faithfully follow an existing hole with an unsteady hand, have someone fab you a simple nose bushing and take a big enough cut to be worth the trouble.
3. Someone skilled with a hand scraper (not so common anymore) could probably get the last bits of glue out, though you might have easier options there.
4. If the builder is willing to share the adhesive you may discover that it gets very weak well within the temperature range of a heat gun, and within what the frame would survive. Pulling it out may be possible in that situation if you can get a slot shaped plate behind it.
Edit on #4, you may need to slot the sleeve first the way one does a stuck and corroded seatpost. This is to allow some expansion room due to CTE differences between the aluminum and Ti.
Last edited by jccaclimber; 05-06-23 at 09:01 PM.
05-08-23, 10:11 AM
#128
Full Member
Thread Starter
4. If the builder is willing to share the adhesive you may discover that it gets very weak well within the temperature range of a heat gun, and within what the frame would survive. Pulling it out may be possible in that situation if you can get a slot shaped plate behind it.
Edit on #4, you may need to slot the sleeve first the way one does a stuck and corroded seatpost. This is to allow some expansion room due to CTE differences between the aluminum and Ti.
Edit on #4, you may need to slot the sleeve first the way one does a stuck and corroded seatpost. This is to allow some expansion room due to CTE differences between the aluminum and Ti.
I am also considering making a relief slot in the existing bushing using hand mechanical means or possibly hand assisted by chemical etch with sodium hydroxide (lye). From what I can find titanium should be impervious to chemical attack by sodium hydroxide whereas it will readily attack aluminum.
05-08-23, 10:56 AM
#129
Senior Member
Join Date: May 2005
Location: SFBay
Posts: 2,334
Bikes: n, I would like n+1
Mentioned: 0 Post(s)
Tagged: 0 Thread(s)
Quoted: 127 Post(s)
Likes: 0
Liked 133 Times
in
108 Posts
This is an interesting idea. Are you thinking a piece of pipe/tube extended off the seat tube to hold the reamer parallel to the seat tube?
The builder didn't say explicitly what they used but said that it was "standard industry practice" to use JB-Qwik-Weld. There is a piece of the existing shim missing where the reamer grabbed it. I am going to see if I can scrape some adhesive from the edges and see if it looks like JB.
I am also considering making a relief slot in the existing bushing using hand mechanical means or possibly hand assisted by chemical etch with sodium hydroxide (lye). From what I can find titanium should be impervious to chemical attack by sodium hydroxide whereas it will readily attack aluminum.
It might not ream great otherwise once you slot it. Reamers like to catch on edges.
If it has already peeled out somewhere I�d try to ream or peel out a bit more. The usual stuck seatpost remedies apply here. Take care when using lye, it�s hard on life, and especially eyeballs.
05-08-23, 02:18 PM
#130
Senior Member
Join Date: Apr 2011
Posts: 7,161
Mentioned: 41 Post(s)
Tagged: 0 Thread(s)
Quoted: 4467 Post(s)
Liked 1,603 Times
in
1,054 Posts
I like the idea of corroding or etching the aluminum out. It won't affect the Ti or the epoxy. If not drain cleaner, PCB etchant might do it
05-08-23, 07:58 PM
#131
Full Member
Thread Starter
Correct. My bad choice of words.
Can't ream it any more as it already has the clamp slot cut into it.
Saw an interesting video on YouTube about using liquid gallium to remove stuck aluminum seat post in a steel frame. Apparently the gallium infiltrates into the aluminum matrix and makes it soft and brittle so the stuck seat post easily fractures and comes out in chunks. I don't think it would be a good choice here as I would like to get all of the aluminum out in as few pieces as possible.
This will be my last resort if mechanical means don't work sufficiently.
05-08-23, 08:04 PM
#132
Full Member
Thread Starter
05-08-23, 08:55 PM
#133
Senior Member
Join Date: Apr 2011
Posts: 7,161
Mentioned: 41 Post(s)
Tagged: 0 Thread(s)
Quoted: 4467 Post(s)
Liked 1,603 Times
in
1,054 Posts
But drain cleaner/lye might be faster.
05-08-23, 09:18 PM
#134
Senior Member
Join Date: May 2005
Location: SFBay
Posts: 2,334
Bikes: n, I would like n+1
Mentioned: 0 Post(s)
Tagged: 0 Thread(s)
Quoted: 127 Post(s)
Likes: 0
Liked 133 Times
in
108 Posts
Normally judicious use of a hacksaw in pliers or a file is sufficient, though it is quite easy to damage a frame if you aren't paying attention.
05-09-23, 06:43 AM
#135
Senior Member
Join Date: Apr 2011
Posts: 7,161
Mentioned: 41 Post(s)
Tagged: 0 Thread(s)
Quoted: 4467 Post(s)
Liked 1,603 Times
in
1,054 Posts
05-09-23, 09:54 AM
#136
Senior Member
Join Date: May 2005
Location: SFBay
Posts: 2,334
Bikes: n, I would like n+1
Mentioned: 0 Post(s)
Tagged: 0 Thread(s)
Quoted: 127 Post(s)
Likes: 0
Liked 133 Times
in
108 Posts
Depends on how good the bond is. Often the bond to the sleeve is reliant on the sleeve being continuous in at least one portion. Cut it in this strips, maybe warm the adhesive, and you can sometimes peel the sleeve or drive out strips. I�ve done this successfully to remove bonded in bushings and other sleeve shims on things a lot more expensive than a bike frame.
The OP mentions that the reamer grabbing the sleeve already peeled it out in one place, so there�s evidence it might work. Not a ton of harm if it doesn�t so long as nobody gets careless and drives something into the Ti portion.
The OP mentions that the reamer grabbing the sleeve already peeled it out in one place, so there�s evidence it might work. Not a ton of harm if it doesn�t so long as nobody gets careless and drives something into the Ti portion.
05-09-23, 01:53 PM
#137

I am potato.

Join Date: Jun 2015
Location: Pacific Northwest
Posts: 3,123
Bikes: Only precision built, custom high performance elitist machines of the highest caliber. 🍆
Mentioned: 29 Post(s)
Tagged: 0 Thread(s)
Quoted: 1793 Post(s)
Liked 1,637 Times
in
938 Posts
At the very least, removing the remaining epoxy film after the aluminum sleeve has been eaten away should be an easy matter.
__________________
I shouldn't have to "make myself more visible;" Drivers should just stop running people over.
Car dependency is a tax.
I shouldn't have to "make myself more visible;" Drivers should just stop running people over.
Car dependency is a tax.
05-09-23, 02:30 PM
#138
Senior Member
Join Date: Apr 2009
Location: New Rochelle, NY
Posts: 38,792
Bikes: too many bikes from 1967 10s (5x2)Frejus to a Sumitomo Ti/Chorus aluminum 10s (10x2), plus one non-susp mtn bike I use as my commuter
Mentioned: 140 Post(s)
Tagged: 1 Thread(s)
Quoted: 5824 Post(s)
Liked 2,659 Times
in
1,477 Posts
You have a simple problem, which calls for a simple solution. However you keep imagining complications, and letting them keep you from moving on.
Earlier I suggested reaming the sleeve, and referenced how differential cutting would have the reamer would follow the bore and "prefer" to cut the sleeve rather than the Ti frame.
Then you decided to research reamers to find more objections. Additionally, you decided the existing slot makes reaming impossible, ignoring the fact that people have been reaming slotted seat tubes for over a century.
I get that it's so simple and straightforward that it tempts looking for problems, but you need to resist overthinking.
As for the slot, machining across gaps is so common that there's a name for it.
So, look for a helical reamer, and/or use a rat tail or triangular file to chamfer the slot so the cutter reenegages on a ramp rather a hard edge. With a minimal degree of skill you'll be done 5 minutes after you start.
FWIW if it helps, I'm an experienced machinist, who's also trained many others over the years, so I'm not winging it here.
Likes For FBinNY:
05-09-23, 07:38 PM
#139
Full Member
Thread Starter
This thread is like a Tim Allen routine.
You have a simple problem, which calls for a simple solution. However you keep imagining complications, and letting them keep you from moving on.
Earlier I suggested reaming the sleeve, and referenced how differential cutting would have the reamer would follow the bore and "prefer" to cut the sleeve rather than the Ti frame.
Then you decided to research reamers to find more objections. Additionally, you decided the existing slot makes reaming impossible, ignoring the fact that people have been reaming slotted seat tubes for over a century.
I get that it's so simple and straightforward that it tempts looking for problems, but you need to resist overthinking.
As for the slot, machining across gaps is so common that there's a name for it.
So, look for a helical reamer, and/or use a rat tail or triangular file to chamfer the slot so the cutter reenegages on a ramp rather a hard edge. With a minimal degree of skill you'll be done 5 minutes after you start.
FWIW if it helps, I'm an experienced machinist, who's also trained many others over the years, so I'm not winging it here.
While I have an (electrical) engineering background I have no experience in this type of repair/machining. I am pretty mechanically inclined and rebuild small engines and do somewhat complex repairs and maintenance on cars.
You are correct in that I am probably way overthinking this but the risk of a mis-step could damage the frame. This is why I am proceeding at such a slow pace. I have 3 other bikes to ride so getting this one rideable is not an urgent priority.
As for reamers, I haven't invested in one yet. I think that I can get the existing shim out without having to ream it any further. The builder did most of this for me! I will probably invest in a straight flute adjustable hand reamer as it will self-center better with its slight barrel shape. Is this thinking correct?
The replacement shim is already a correct fit on the seatpost so it should need reaming only down in the seat tube where the welding heat distorted the titanium tube.
05-09-23, 08:13 PM
#140
Senior Member
Join Date: Apr 2009
Location: New Rochelle, NY
Posts: 38,792
Bikes: too many bikes from 1967 10s (5x2)Frejus to a Sumitomo Ti/Chorus aluminum 10s (10x2), plus one non-susp mtn bike I use as my commuter
Mentioned: 140 Post(s)
Tagged: 1 Thread(s)
Quoted: 5824 Post(s)
Liked 2,659 Times
in
1,477 Posts
While not absolutely necessary, the helix helps bridge the slot, so try for one those.
Also, the good news is that there should be no reason to ream the frame itself. The builder would have done that in order to fit the original sleeve.
__________________
FB
Chain-L site
An ounce of diagnosis is worth a pound of cure.
Just because I'm tired of arguing, doesn't mean you're right.
�One accurate measurement is worth a thousand expert opinions� - Adm Grace Murray Hopper - USN
WARNING, I'm from New York. Thin skinned people should maintain safe distance.
FB
Chain-L site
An ounce of diagnosis is worth a pound of cure.
Just because I'm tired of arguing, doesn't mean you're right.
�One accurate measurement is worth a thousand expert opinions� - Adm Grace Murray Hopper - USN
WARNING, I'm from New York. Thin skinned people should maintain safe distance.
05-13-23, 06:01 PM
#141
Full Member
Thread Starter
Correct. The tube wall thickness is only 0.9mm so not much material to do anything with. Hence the need for a separate shim.
Last edited by Steve_sr; 05-13-23 at 06:46 PM.
05-13-23, 06:45 PM
#142
Full Member
Thread Starter
I wanted to test the ability of heat from a heat gun to soften the epoxy holding the shim enough to remove it. Here is the setup:
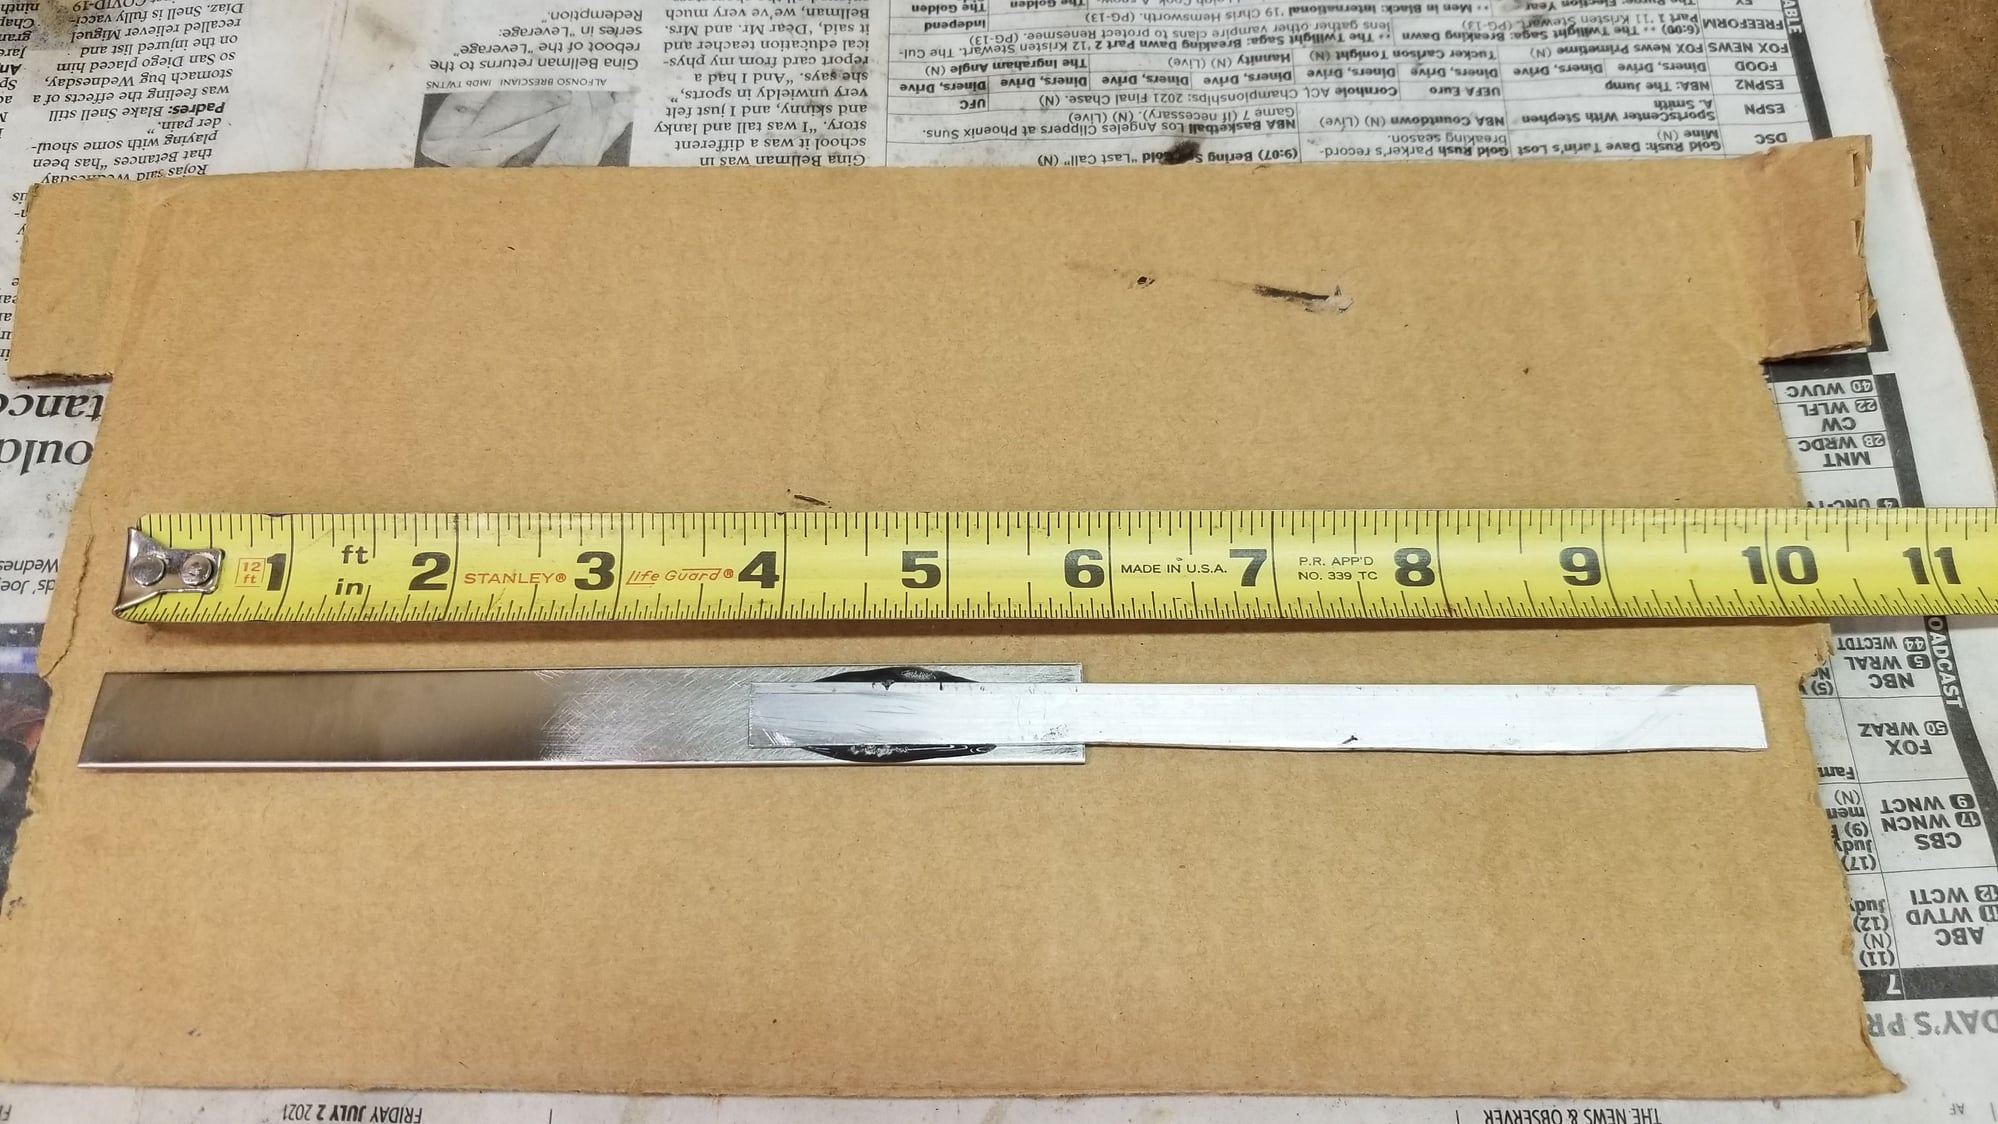
Test coupon back side

Test coupon front side
Here is a test coupon made with a scrap of stainless steel (wider piece) bonded to a piece of aluminum (narrow piece). The stainless steel simulated the titanium frame and the aluminum the shim. This was designed so that I could direct the heat solely at the ss on top of the glue bond and avoid hitting (and adding heat) the aluminum. To accomplish this I bent the aluminum back out of the way.
I mounted the test coupon vertically in a drill press vice. I then took a Master Appliance 1200W heat gun with the 5/8" reducing nozzle and aimed it directly at the ss in front of the glue bond. I started at mid heat and slowly turned the heat up until I reached 100%. I was half expecting to see the epoxy start to decompose and start to smoke and the aluminum piece to fall off but that never happened.
I finally got tired of waiting and grabbed a screwdriver and lightly pushed on the end of the aluminum strip and it fell to the bench. The epoxy effectively peeled from both substrates. I was sort of surprised as both pieces had been roughened with 180 grit sandpaper. I gues that this is how epoxy bonds fail with heat.

Epoxy peeled from each surface
The conclusion that can be reached is that there is a heat transfer problem. Titanium is only slightly better at transferring heat than the ss while the aluminum is an order of magnitude better so grabs and dissipates what little heat manages to make it through the titanium and the glue joint.
This means that it would likely be impossible to get the seat tube and shim hot enough to remove it whole. So it looks like it will need to be split lengthwise, probably at the existing slot, to create a gap and then peeled a little at a time with heat.
Test coupon back side
Test coupon front side
Here is a test coupon made with a scrap of stainless steel (wider piece) bonded to a piece of aluminum (narrow piece). The stainless steel simulated the titanium frame and the aluminum the shim. This was designed so that I could direct the heat solely at the ss on top of the glue bond and avoid hitting (and adding heat) the aluminum. To accomplish this I bent the aluminum back out of the way.
I mounted the test coupon vertically in a drill press vice. I then took a Master Appliance 1200W heat gun with the 5/8" reducing nozzle and aimed it directly at the ss in front of the glue bond. I started at mid heat and slowly turned the heat up until I reached 100%. I was half expecting to see the epoxy start to decompose and start to smoke and the aluminum piece to fall off but that never happened.
I finally got tired of waiting and grabbed a screwdriver and lightly pushed on the end of the aluminum strip and it fell to the bench. The epoxy effectively peeled from both substrates. I was sort of surprised as both pieces had been roughened with 180 grit sandpaper. I gues that this is how epoxy bonds fail with heat.
Epoxy peeled from each surface
The conclusion that can be reached is that there is a heat transfer problem. Titanium is only slightly better at transferring heat than the ss while the aluminum is an order of magnitude better so grabs and dissipates what little heat manages to make it through the titanium and the glue joint.
This means that it would likely be impossible to get the seat tube and shim hot enough to remove it whole. So it looks like it will need to be split lengthwise, probably at the existing slot, to create a gap and then peeled a little at a time with heat.
05-13-23, 06:49 PM
#143
Senior Member
Join Date: Apr 2009
Location: New Rochelle, NY
Posts: 38,792
Bikes: too many bikes from 1967 10s (5x2)Frejus to a Sumitomo Ti/Chorus aluminum 10s (10x2), plus one non-susp mtn bike I use as my commuter
Mentioned: 140 Post(s)
Tagged: 1 Thread(s)
Quoted: 5824 Post(s)
Liked 2,659 Times
in
1,477 Posts
Ream out the old, fit the new shim, bonding with the adhesive of your choice, then cut the slot with a 32tpi hacksaw using 2 blades together with the frame as a guide. Finish with a flat file to make it all look pretty.
Note that you don't need a great bond for the shim since clamping the post keeps it home. The bond is purely for convenience to prevent movement as you fit the post.
BTW - it's now mid May. Set yourself a firm deadline to be riding this by Memorial Day weekend.
Last edited by FBinNY; 05-13-23 at 07:17 PM.
05-19-23, 06:20 PM
#144
Full Member
Thread Starter
Almost time to break out the champagne! I used a hacksaw blade handle to create a complete slot in the shim where the existing clamp slot was. I then decided to apply heat from the inside of the shim to the aluminum which has much better heat transfer. I was originally concerned about having to get both heat and tools inside there at the same time but didn't really have to. I grabbed one edge of the rim at the existing slot and twisted inward and the glue released. It didn't look like the glue bonded very well but maybe that was a good thing. Here are some photos of the results:

Slot extended in shim.

Shim removed!

Removed shim.

Removed shim.

Removed shim.
It appears that the vertical stripes are glue residue and I am trying to figure out how this happened i.e how the glue was placed before the shim was apparently pressed into place. Note that there is noticeable deformation of the shim near the weld protrusions, especially for the top tube.
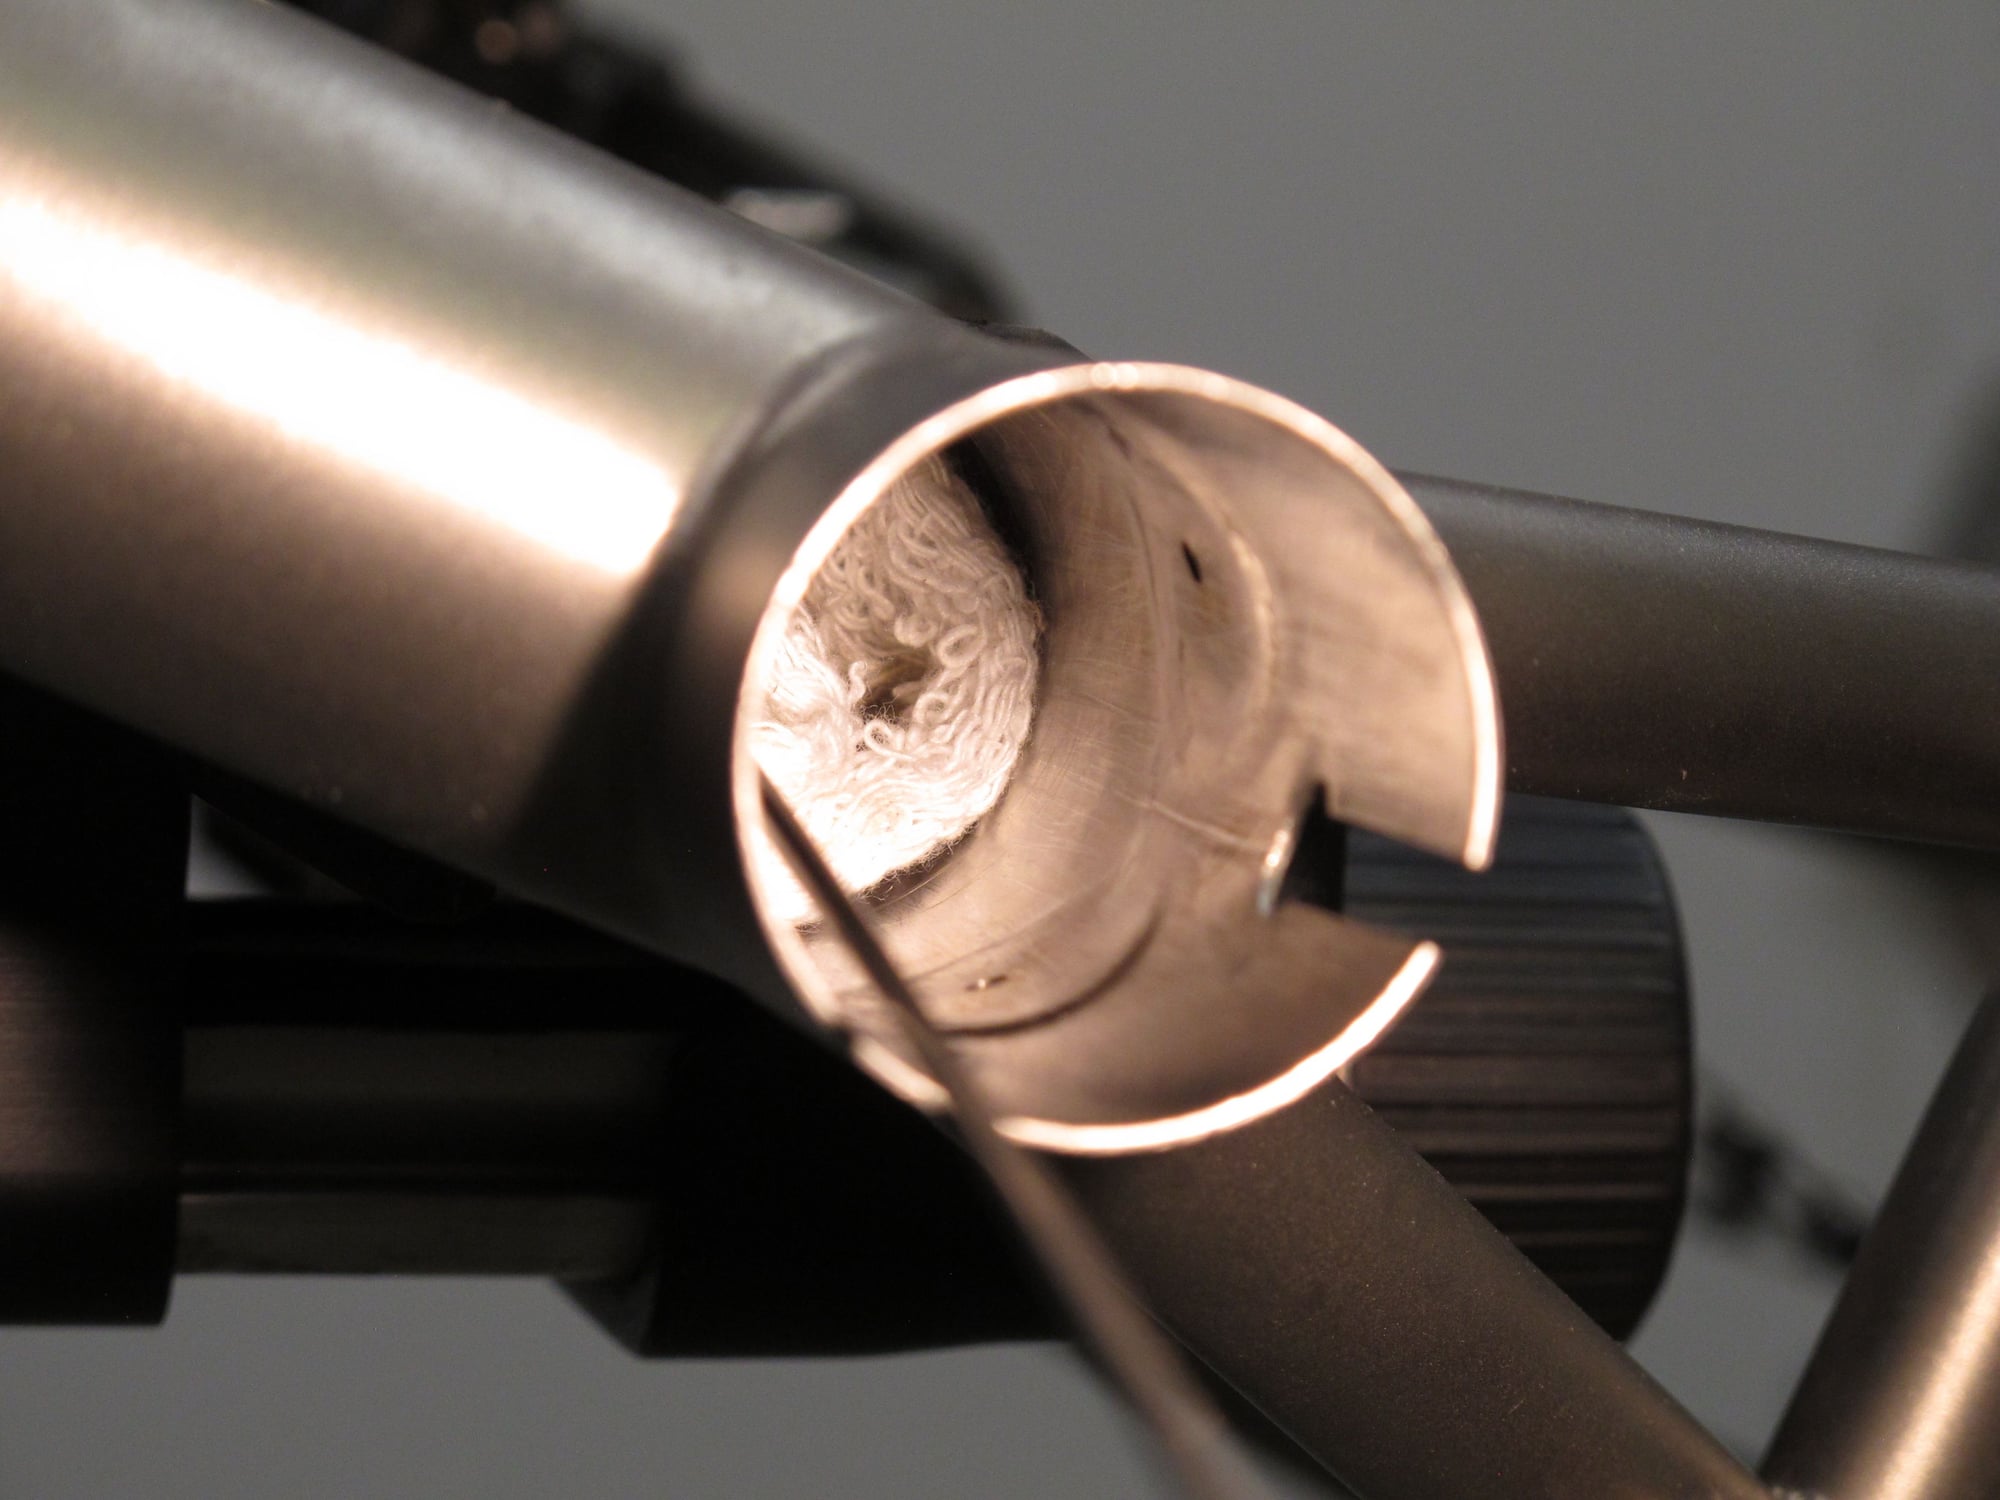
Seat stay weld penetration

Top tube weld penetration
Here are some photos of the weld protrusions. I am wondering if this is normal or if this may have been part of the problem in reaming the original shim. The lighting angle makes these look worse but they are probably .010-.015" into the bore. It looks like someone tried to hit some of the higher spots with a file but didn't do much.
Should I attempt to improve the situation before installing the new shim and if so, how? rounded file?
I also noticed that the inside bore of the tube is pretty polished which may have contributed to the lack of glue adhesion. Should I break the glaze with some scotchbrite before installing the new shim?
Slot extended in shim.
Shim removed!
Removed shim.
Removed shim.
Removed shim.
It appears that the vertical stripes are glue residue and I am trying to figure out how this happened i.e how the glue was placed before the shim was apparently pressed into place. Note that there is noticeable deformation of the shim near the weld protrusions, especially for the top tube.
Seat stay weld penetration
Top tube weld penetration
Here are some photos of the weld protrusions. I am wondering if this is normal or if this may have been part of the problem in reaming the original shim. The lighting angle makes these look worse but they are probably .010-.015" into the bore. It looks like someone tried to hit some of the higher spots with a file but didn't do much.
Should I attempt to improve the situation before installing the new shim and if so, how? rounded file?
I also noticed that the inside bore of the tube is pretty polished which may have contributed to the lack of glue adhesion. Should I break the glaze with some scotchbrite before installing the new shim?
Likes For Steve_sr:
05-19-23, 07:11 PM
#145
Senior Member
Join Date: Apr 2011
Posts: 7,161
Mentioned: 41 Post(s)
Tagged: 0 Thread(s)
Quoted: 4467 Post(s)
Liked 1,603 Times
in
1,054 Posts
Almost time to break out the champagne! I used a hacksaw blade handle to create a complete slot in the shim where the existing clamp slot was. I then decided to apply heat from the inside of the shim to the aluminum which has much better heat transfer. I was originally concerned about having to get both heat and tools inside there at the same time but didn't really have to. I grabbed one edge of the rim at the existing slot and twisted inward and the glue released. It didn't look like the glue bonded very well but maybe that was a good thing. Here are some photos of the results:
Slot extended in shim.
Shim removed!
Removed shim.
Removed shim.
Removed shim.
It appears that the vertical stripes are glue residue and I am trying to figure out how this happened i.e how the glue was placed before the shim was apparently pressed into place. Note that there is noticeable deformation of the shim near the weld protrusions, especially for the top tube.
Seat stay weld penetration
Top tube weld penetration
Here are some photos of the weld protrusions. I am wondering if this is normal or if this may have been part of the problem in reaming the original shim. The lighting angle makes these look worse but they are probably .010-.015" into the bore. It looks like someone tried to hit some of the higher spots with a file but didn't do much.
Should I attempt to improve the situation before installing the new shim and if so, how? rounded file?
I also noticed that the inside bore of the tube is pretty polished which may have contributed to the lack of glue adhesion. Should I break the glaze with some scotchbrite before installing the new shim?
I don't think the welds sticking out matter. You need a bonding gap that the epoxy lives in, and fine lines protruding into that gap don't matter. So unless you can't slide the new shim in, I'd live them alone.
When bonding, don't worry about getting all the old epoxy out - wet epoxy sticks to cured epoxy better than anything else. Give everything a good wet sand, put a light coating both inside the tube and around the shim. Use acetone soaked cloth to wipe up the epoxy that will flow out and into the slot. Maybe use wetted gauze clamped in a hemostat to get the stuff that will flow out of the bottom of the shim into the tube. Have lots of rags/gauze and acetone before you start to glue so you don't end up shmearing it all over. Cured epoxy isn't going anywhere.
After you glue it, leave it alone for 24 hours - or better yet 48. Then drill and slot the shim. Go slow and maybe use hand tools to keep the temps down. I could see using a sacrificial seat post to cut and drill against.
05-20-23, 02:10 PM
#146
Full Member
Thread Starter
The new shim will need to be reamed round before the hole and slot can be cut. This is one place where the frame maker screwed up and reamed the shim way too big.
05-20-23, 03:24 PM
#147
Senior Member
Join Date: Apr 2011
Posts: 7,161
Mentioned: 41 Post(s)
Tagged: 0 Thread(s)
Quoted: 4467 Post(s)
Liked 1,603 Times
in
1,054 Posts
The new shim is good match to make up the gap between the post and the seat tube. The new shim will not go past the weds without being press-fit or hammered into place. The weld protrusions prevent this. Hence my question. The photos also show the old shim as being deformed around the welds apparently due to the action of the original reamer. The new shim shim will fit well both above and below the welds but not in the vicinity due to the weld protrusion.
The new shim will need to be reamed round before the hole and slot can be cut. This is one place where the frame maker screwed up and reamed the shim way too big.
The new shim will need to be reamed round before the hole and slot can be cut. This is one place where the frame maker screwed up and reamed the shim way too big.
Why is the brand new shim not the right shape? Why don't you buy the right thing instead of stacking bad on top of bad. Any machinist can turn an aluminum shim.
05-20-23, 06:17 PM
#148
Full Member
Thread Starter
The new shim is fine. It is the bore in the seat tube in the vicinity of the welds that isn't.
05-20-23, 07:39 PM
#149
I am potato.
Join Date: Jun 2015
Location: Pacific Northwest
Posts: 3,123
Bikes: Only precision built, custom high performance elitist machines of the highest caliber. 🍆
Mentioned: 29 Post(s)
Tagged: 0 Thread(s)
Quoted: 1793 Post(s)
Liked 1,637 Times
in
938 Posts
" Diamond family" refers to a subset of hand tools; A hand file.
05-20-23, 11:41 PM
#150
Senior Member
Join Date: Apr 2011
Posts: 7,161
Mentioned: 41 Post(s)
Tagged: 0 Thread(s)
Quoted: 4467 Post(s)
Liked 1,603 Times
in
1,054 Posts
Autocorrect changed "file" to "family".
I don't understand why a new shim needs to be reamed. Knock the welds down and the shim should go in undistorted.
I don't understand why a new shim needs to be reamed. Knock the welds down and the shim should go in undistorted.