


Anvil frame jig questions
 04-17-22, 10:40 PM
#1
Junior Member
Thread Starter
Anvil frame jig questions
Hey all, new builder here! Just picked up this jig from a local guy who was building frames down in Hollister. Does anyone know how to remove the centering code for the head tube? I am going to build something with an oversized head tube and it's too big for the current cone. There is a screw underneath that I removed but it still seems to be quite stuck on there.
Thanks!
-C
Thanks!
-C
 04-18-22, 01:15 AM
#2


Randomhead
Join Date: Aug 2008
Location: Happy Valley, Pennsylvania
Posts: 24,399
Mentioned: 0 Post(s)
Tagged: 0 Thread(s)
Quoted: 4 Post(s)
Liked 3,699 Times
in
2,519 Posts
It has a cone for the lower holder?
sorry I can't answer your question
sorry I can't answer your question
04-18-22, 07:32 AM
#3

Senior Member
Join Date: Feb 2012
Location: Rochester, NY
Posts: 18,093
Bikes: Stewart S&S coupled sport tourer, Stewart Sunday light, Stewart Commuting, Stewart Touring, Co Motion Tandem, Stewart 3-Spd, Stewart Track, Fuji Finest, Mongoose Tomac ATB, GT Bravado ATB, JCP Folder, Stewart 650B ATB
Mentioned: 0 Post(s)
Tagged: 0 Thread(s)
Quoted: 4208 Post(s)
Liked 3,875 Times
in
2,315 Posts
I replaced my Anvil's lower head tube cone with one that allowed the HT end to be longer than the lug's lower edge (providing a bit of HT to feed filler from, it gets cut off later). IIRC the OEM cone was a snug fit on the supporting arm, no other attachment method but for the snug fit and the bolt mentioned. Andy
__________________
AndrewRStewart
AndrewRStewart
Likes For Andrew R Stewart:
04-18-22, 12:12 PM
#5
Senior Member
Join Date: Jan 2013
Location: South Jersey
Posts: 2,266
Mentioned: 18 Post(s)
Tagged: 0 Thread(s)
Quoted: 714 Post(s)
Liked 800 Times
in
475 Posts
 04-18-22, 05:07 PM
#6
framebuilder
I just checked my 1st generation Anvil and the back end of its cone looks similar to the fixture pieces dsaul pictured in his above post. My other Anvil is still located in storage in Bucha Ukraine (I hope it is still there unless the Russians broke in and took it). I've heard that the college campus where our frame workshop is located had only minor damage. They broke some windows and kicked in some dorm doors but didn't take their desk top computers. Yuriy the caretaker of our shop had to flee for his life. It is only 2 blocks off of Bucha's main drag where there was total destruction. I second his suggestion to hit the bolt head after it has been loosened. Don't forget that if you replace the original bolt it is probably imperial fraction size instead of metric.
I have several sizes of brass hammers when I need to hit an important steel part. I would also suggest getting some penetrating oil. PB Blaster is one, Kroil is another. Fixtures can be prone to corrosion because of dripping flux.
Since i have a picture of the inside of our workshop in Bucha on my desktop, I'll post a picture of what it looked like before the invading Russians. I'm curious what it might look like now.
Likes For Doug Fattic:
04-18-22, 07:59 PM
#7
blahblahblah chrome moly

Join Date: Apr 2009
Location: Seattle
Posts: 1,993
Mentioned: 92 Post(s)
Tagged: 0 Thread(s)
Quoted: 1179 Post(s)
Liked 2,575 Times
in
1,076 Posts
04-19-22, 03:09 PM
#8
Junior Member
Thread Starter
I just checked my 1st generation Anvil and the back end of its cone looks similar to the fixture pieces dsaul pictured in his above post. My other Anvil is still located in storage in Bucha Ukraine (I hope it is still there unless the Russians broke in and took it). I've heard that the college campus where our frame workshop is located had only minor damage. They broke some windows and kicked in some dorm doors but didn't take their desk top computers. Yuriy the caretaker of our shop had to flee for his life. It is only 2 blocks off of Bucha's main drag where there was total destruction. I second his suggestion to hit the bolt head after it has been loosened. Don't forget that if you replace the original bolt it is probably imperial fraction size instead of metric.
I have several sizes of brass hammers when I need to hit an important steel part. I would also suggest getting some penetrating oil. PB Blaster is one, Kroil is another. Fixtures can be prone to corrosion because of dripping flux.
Since i have a picture of the inside of our workshop in Bucha on my desktop, I'll post a picture of what it looked like before the invading Russians. I'm curious what it might look like now.
I have several sizes of brass hammers when I need to hit an important steel part. I would also suggest getting some penetrating oil. PB Blaster is one, Kroil is another. Fixtures can be prone to corrosion because of dripping flux.
Since i have a picture of the inside of our workshop in Bucha on my desktop, I'll post a picture of what it looked like before the invading Russians. I'm curious what it might look like now.
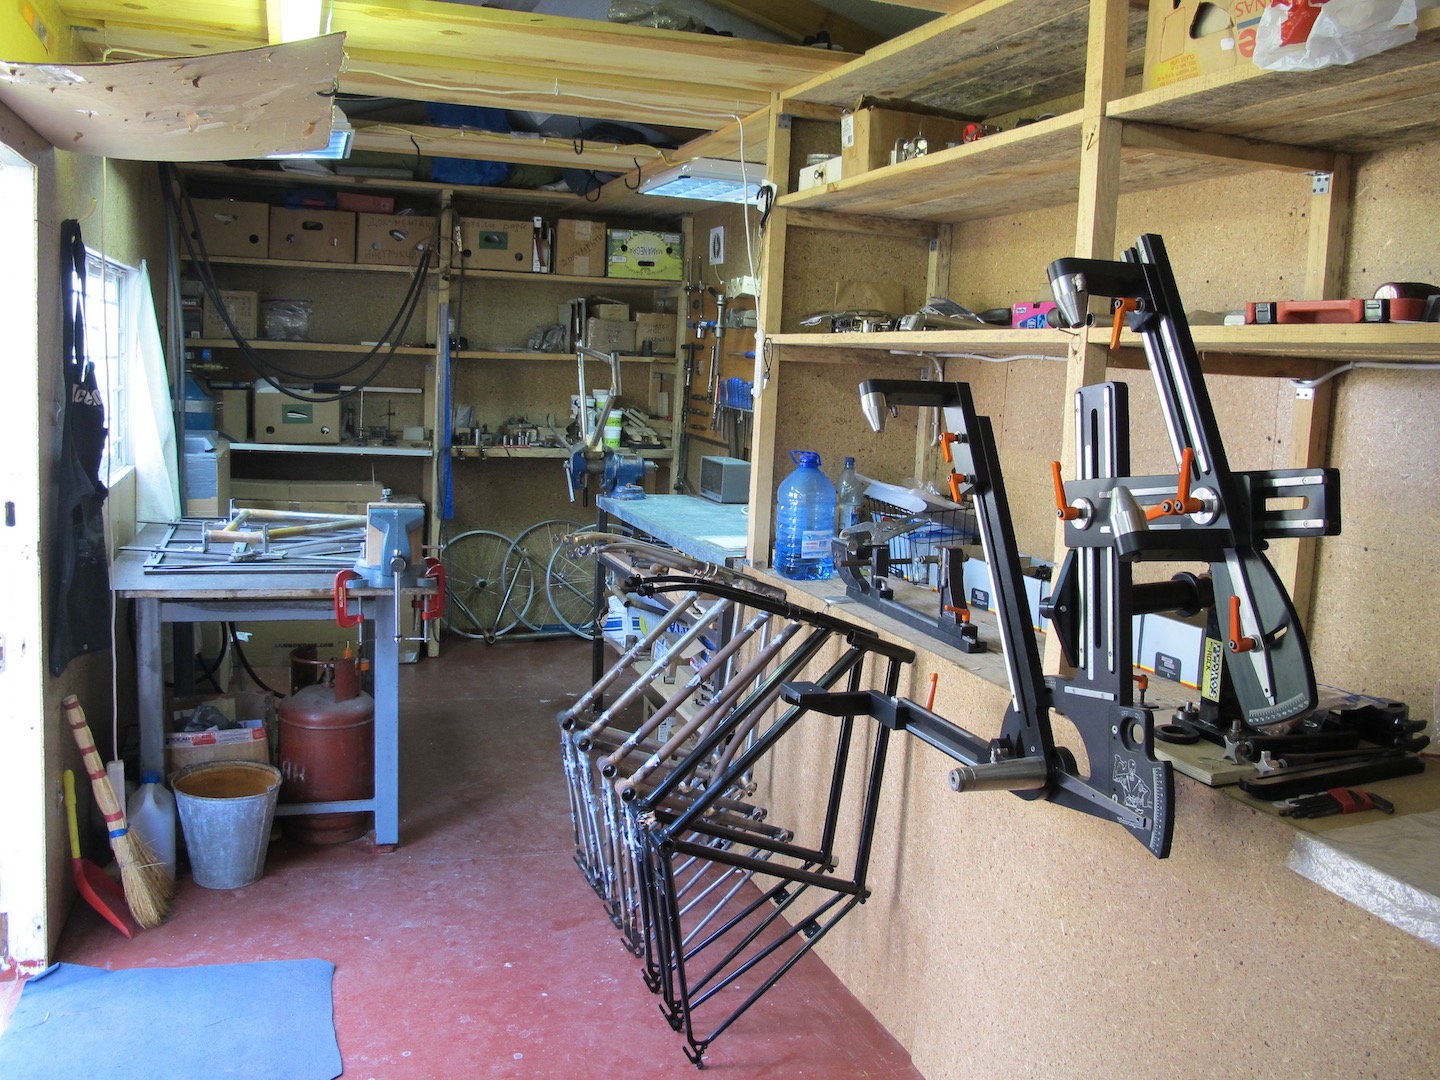
Giving this a go this week, doing some practice miters on the anvil tube cutting jig!
04-19-22, 09:23 PM
#9
framebuilder
I took a picture of my Niles, MI based Anvil lower HT cone. This one did not have very tight tolerances between the 2 pieces. The cone came right out of the socket. The bolt is a 1/4" X 20. Just to repeat, dsaul's suggestion to unloosen the screw a few turns and hitting the screw head with a hammer would be my choice. If for some reason it didn't loosen, then I'd go to plan B. The likely culprit is flux that has seeped into the cracks acting like glue. You might try pouring or soaking the part in very hot or even boiling water. That might dissolve the offending flux and at the same time provide heat that might break the bond between the aluminum and steel pieces.

04-20-22, 06:16 AM
#10
Randomhead
Join Date: Aug 2008
Location: Happy Valley, Pennsylvania
Posts: 24,399
Mentioned: 0 Post(s)
Tagged: 0 Thread(s)
Quoted: 4 Post(s)
Liked 3,699 Times
in
2,519 Posts
Too bad the previous owner didn't get pucks from Anvil before they closed.
04-20-22, 11:53 AM
#11
Junior Member
Thread Starter
I took a picture of my Niles, MI based Anvil lower HT cone. This one did not have very tight tolerances between the 2 pieces. The cone came right out of the socket. The bolt is a 1/4" X 20. Just to repeat, dsaul's suggestion to unloosen the screw a few turns and hitting the screw head with a hammer would be my choice. If for some reason it didn't loosen, then I'd go to plan B. The likely culprit is flux that has seeped into the cracks acting like glue. You might try pouring or soaking the part in very hot or even boiling water. That might dissolve the offending flux and at the same time provide heat that might break the bond between the aluminum and steel pieces.
04-20-22, 05:18 PM
#12
Randomhead
Join Date: Aug 2008
Location: Happy Valley, Pennsylvania
Posts: 24,399
Mentioned: 0 Post(s)
Tagged: 0 Thread(s)
Quoted: 4 Post(s)
Liked 3,699 Times
in
2,519 Posts
The lower head tube location part of the fixture changed many times. The big change was to pucks. Which is a very short cone, if you will, but one for each size of headtube. I'm a bit surprised nobody is selling pucks, there have to be people out there that need them. The cones weren't big enough, and a long cone makes it harder than it has to be to get the frame off of the fixture. I'm in the process of replacing the lower cone on my fixture with a series of pucks.
04-21-22, 04:29 AM
#13
Senior Member
Join Date: Jan 2013
Location: South Jersey
Posts: 2,266
Mentioned: 18 Post(s)
Tagged: 0 Thread(s)
Quoted: 714 Post(s)
Liked 800 Times
in
475 Posts
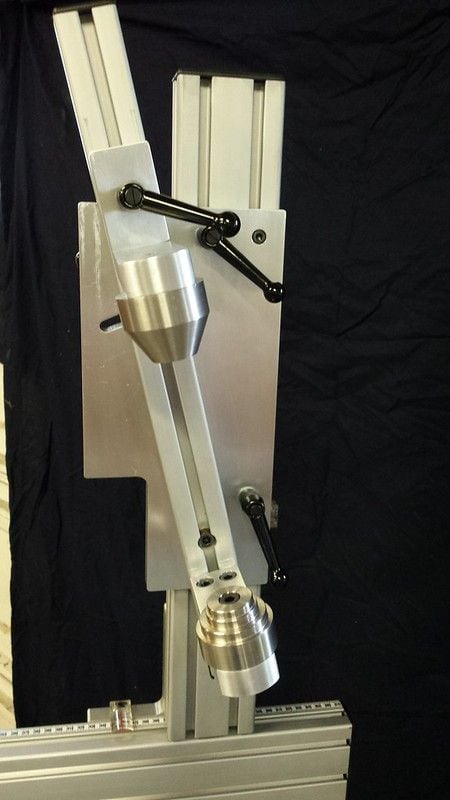
I can make the pucks, if you can provide the dimension for the interface with the standoff. My personal jig has a stepped puck on the bottom for 3 different head tube sizes and the lower standoff is adjustable to keep the lower edge of the headtube in line with the pivot point for the head tube angle. I have a fairly short 50mm diameter cone for the upper standoff.
04-21-22, 08:52 AM
#14
Senior Member
Join Date: Feb 2012
Location: Rochester, NY
Posts: 18,093
Bikes: Stewart S&S coupled sport tourer, Stewart Sunday light, Stewart Commuting, Stewart Touring, Co Motion Tandem, Stewart 3-Spd, Stewart Track, Fuji Finest, Mongoose Tomac ATB, GT Bravado ATB, JCP Folder, Stewart 650B ATB
Mentioned: 0 Post(s)
Tagged: 0 Thread(s)
Quoted: 4208 Post(s)
Liked 3,875 Times
in
2,315 Posts
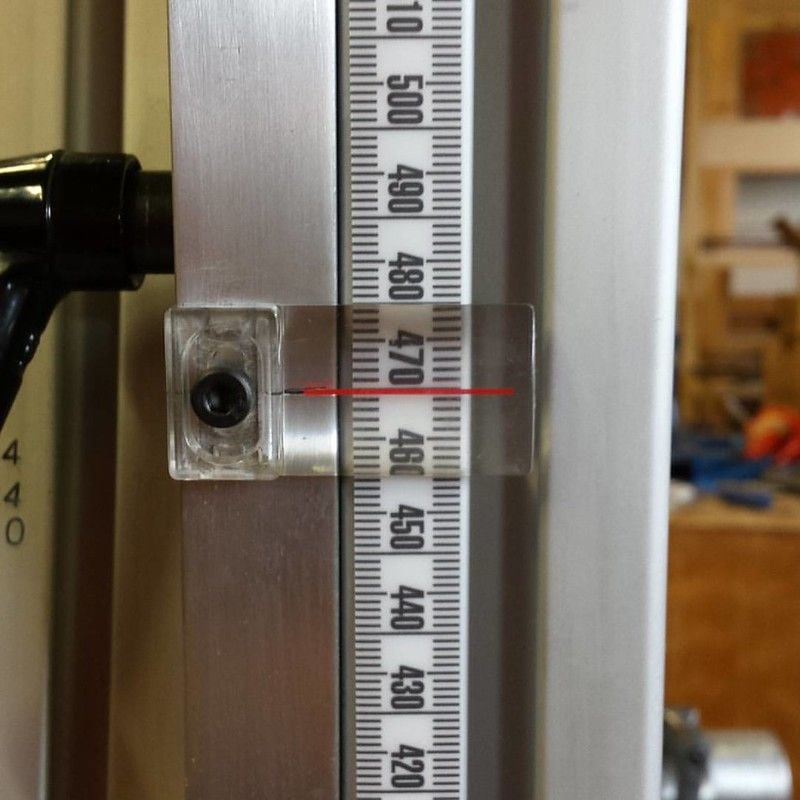
dsaul- I like your magnifier lens over the scale. I keep a number of hand held magnifying glasses about my shop... Andy
__________________
AndrewRStewart
AndrewRStewart
Likes For Andrew R Stewart:
04-21-22, 10:17 AM
#15
Randomhead
Join Date: Aug 2008
Location: Happy Valley, Pennsylvania
Posts: 24,399
Mentioned: 0 Post(s)
Tagged: 0 Thread(s)
Quoted: 4 Post(s)
Liked 3,699 Times
in
2,519 Posts
I didn't even notice that pointer, where do you get them? That's one of many things missing from my fixture. I was thinking about just 3d printing some pointers, but pointer like that would be better
04-21-22, 04:54 PM
#16
Senior Member
Join Date: Jan 2013
Location: South Jersey
Posts: 2,266
Mentioned: 18 Post(s)
Tagged: 0 Thread(s)
Quoted: 714 Post(s)
Liked 800 Times
in
475 Posts
I got them from here https://www.ereplacementparts.com/pointer-p-35337.html I had to make some modifications to them, but they were the best option that I could find. The funny thing is that I don't have them on my fixture. I put them on a fixture that I made for someone else. My own fixture is always the test bed and the more refined stuff goes on things that I make for others. Here is a better look at the pointer.
04-21-22, 07:21 PM
#17
Team Beer
Join Date: Apr 2004
Location: Sacramento CA
Posts: 6,339
Bikes: Too Many
Mentioned: 3 Post(s)
Tagged: 0 Thread(s)
Quoted: 114 Post(s)
Liked 159 Times
in
104 Posts
I can make the pucks, if you can provide the dimension for the interface with the standoff. My personal jig has a stepped puck on the bottom for 3 different head tube sizes and the lower standoff is adjustable to keep the lower edge of the headtube in line with the pivot point for the head tube angle. I have a fairly short 50mm diameter cone for the upper standoff.
__________________
I'm not one for fawning over bicycles, but I do believe that our bikes communicate with us, and what this bike is saying is, "You're an idiot." BikeSnobNYC
I'm not one for fawning over bicycles, but I do believe that our bikes communicate with us, and what this bike is saying is, "You're an idiot." BikeSnobNYC
Likes For Cynikal:
04-22-22, 11:35 AM
#18
Randomhead
Join Date: Aug 2008
Location: Happy Valley, Pennsylvania
Posts: 24,399
Mentioned: 0 Post(s)
Tagged: 0 Thread(s)
Quoted: 4 Post(s)
Liked 3,699 Times
in
2,519 Posts
I got them from here https://www.ereplacementparts.com/pointer-p-35337.html I had to make some modifications to them, but they were the best option that I could find. The funny thing is that I don't have them on my fixture. I put them on a fixture that I made for someone else. My own fixture is always the test bed and the more refined stuff goes on things that I make for others.
04-22-22, 11:59 AM
#19
Junior Member
Thread Starter
I can make the pucks, if you can provide the dimension for the interface with the standoff. My personal jig has a stepped puck on the bottom for 3 different head tube sizes and the lower standoff is adjustable to keep the lower edge of the headtube in line with the pivot point for the head tube angle. I have a fairly short 50mm diameter cone for the upper standoff.
Likes For Richmonder:
04-28-22, 03:36 PM
#20
Junior Member
Thread Starter
I got them from here // I had to make some modifications to them, but they were the best option that I could find. The funny thing is that I don't have them on my fixture. I put them on a fixture that I made for someone else. My own fixture is always the test bed and the more refined stuff goes on things that I make for others. Here is a better look at the pointer.
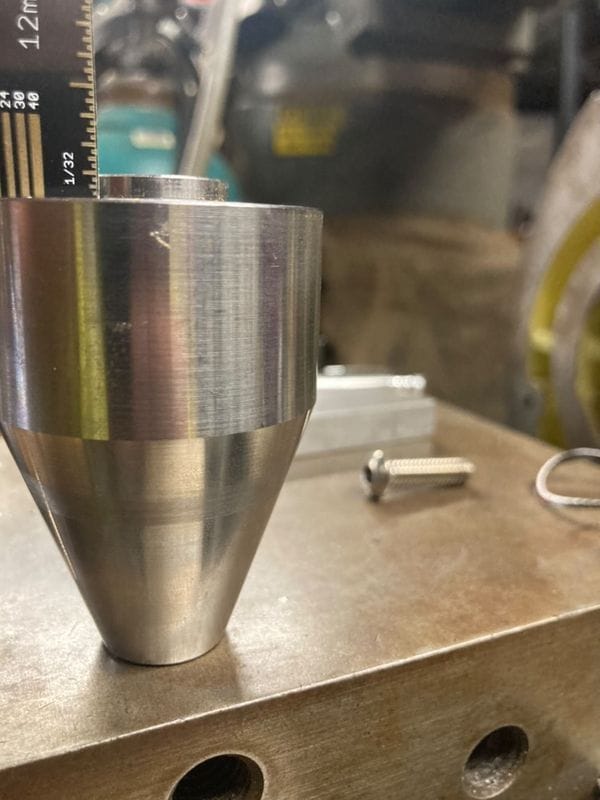
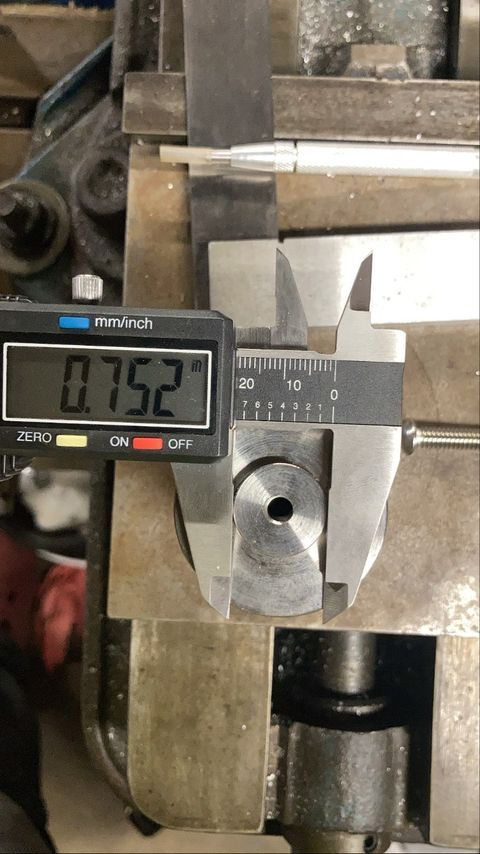
Looks like the centering cone is 44.44mm +-.05mm
The step where it attaches to the arm is 1/16th of an inch or 1.54mm
The centering cone is 64.45mm high
Looks like I need to get some more posts in before I can post the photos. Hope they will be helpful for others with this jig!
04-28-22, 04:16 PM
#21
Senior Member
Join Date: Jan 2013
Location: South Jersey
Posts: 2,266
Mentioned: 18 Post(s)
Tagged: 0 Thread(s)
Quoted: 714 Post(s)
Liked 800 Times
in
475 Posts
Ok I got some measurements. Can you make me a new centering cone dsaul ?! Let me know what you think and I can paypal you.
Looks like the centering cone is 44.44mm +-.05mm
The step where it attaches to the arm is 1/16th of an inch or 1.54mm
The centering cone is 64.45mm high
Looks like I need to get some more posts in before I can post the photos. Hope they will be helpful for others with this jig!
Looks like the centering cone is 44.44mm +-.05mm
The step where it attaches to the arm is 1/16th of an inch or 1.54mm
The centering cone is 64.45mm high
Looks like I need to get some more posts in before I can post the photos. Hope they will be helpful for others with this jig!
05-03-22, 09:47 AM
#22
Senior Member
Join Date: Jan 2013
Location: South Jersey
Posts: 2,266
Mentioned: 18 Post(s)
Tagged: 0 Thread(s)
Quoted: 714 Post(s)
Liked 800 Times
in
475 Posts
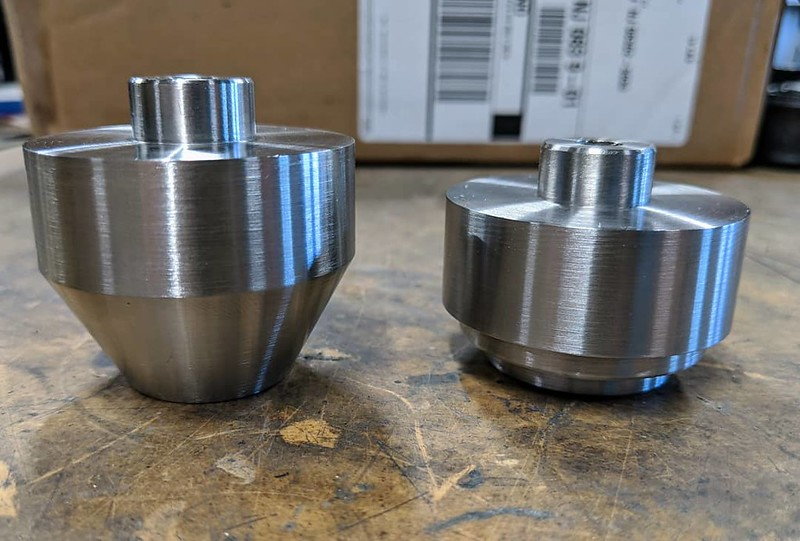
Some pics of the OP's lower head tube cone and standoff.
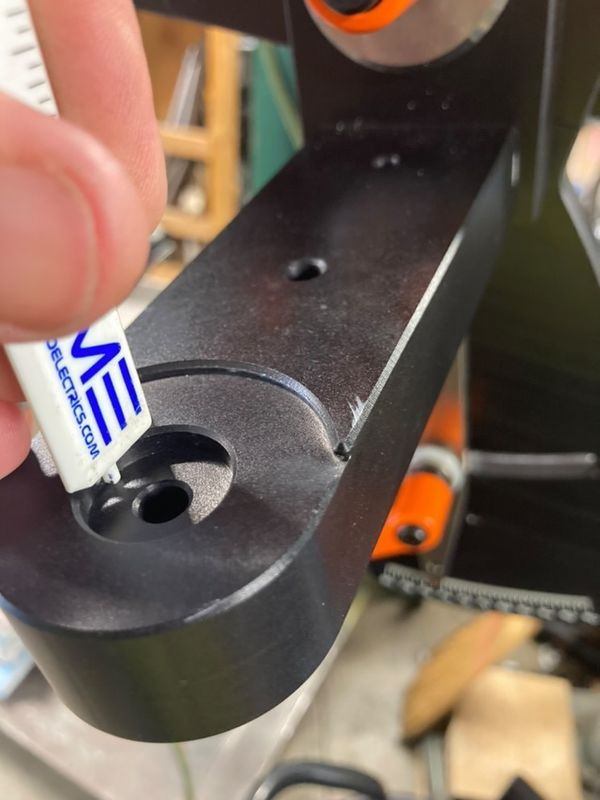
This is the 56mm replacement cone that I made to fit larger head tubes.
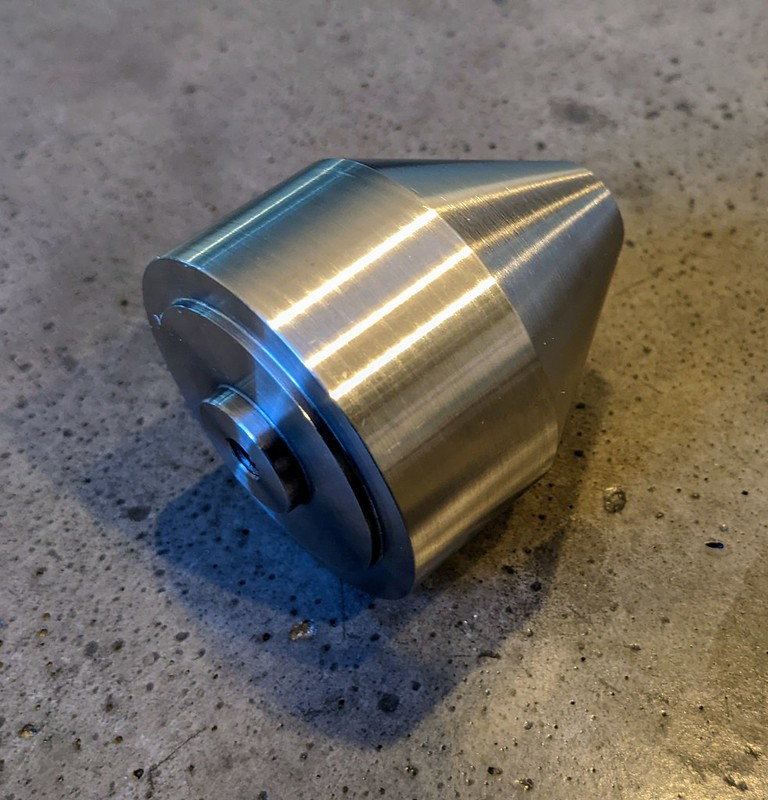
This is the 56mm replacement cone that I made to fit larger head tubes.
Likes For dsaul:
Likes For Richmonder:
