


1972 Schwinn Paramount - eBay clunker to RESTORED
 12-28-23, 08:47 AM
#1

My Workshop = Happy Place
Thread Starter

Join Date: Aug 2023
Location: Norwalk, CT
Posts: 88
Bikes: Schwinns, and many others.
Mentioned: 5 Post(s)
Tagged: 0 Thread(s)
Quoted: 42 Post(s)
Liked 224 Times
in
56 Posts
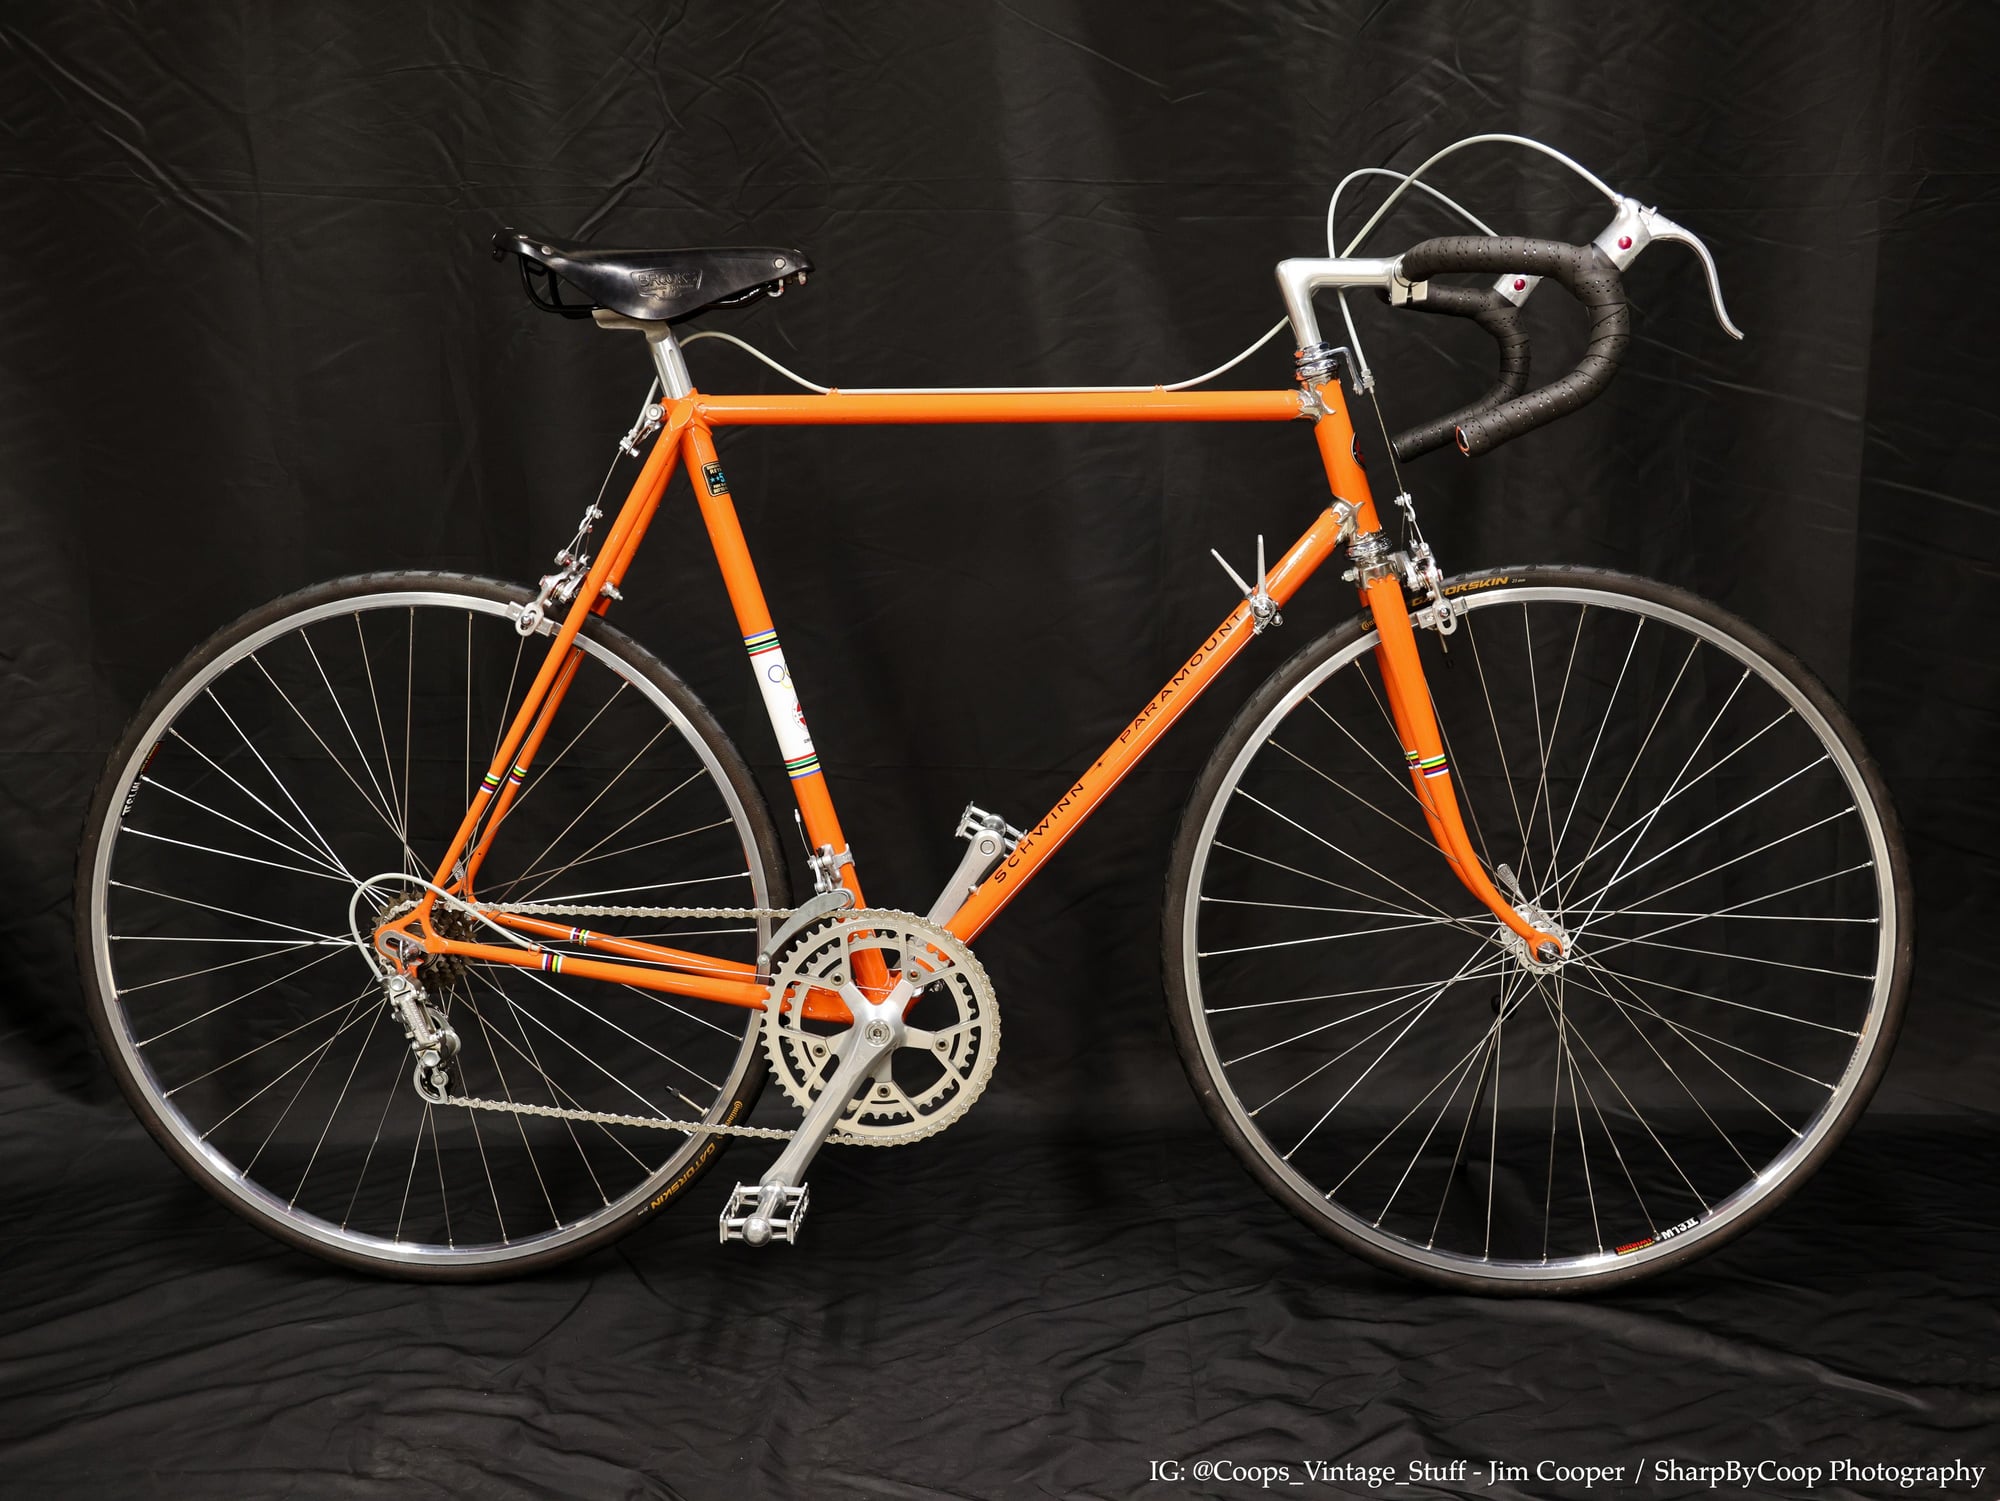
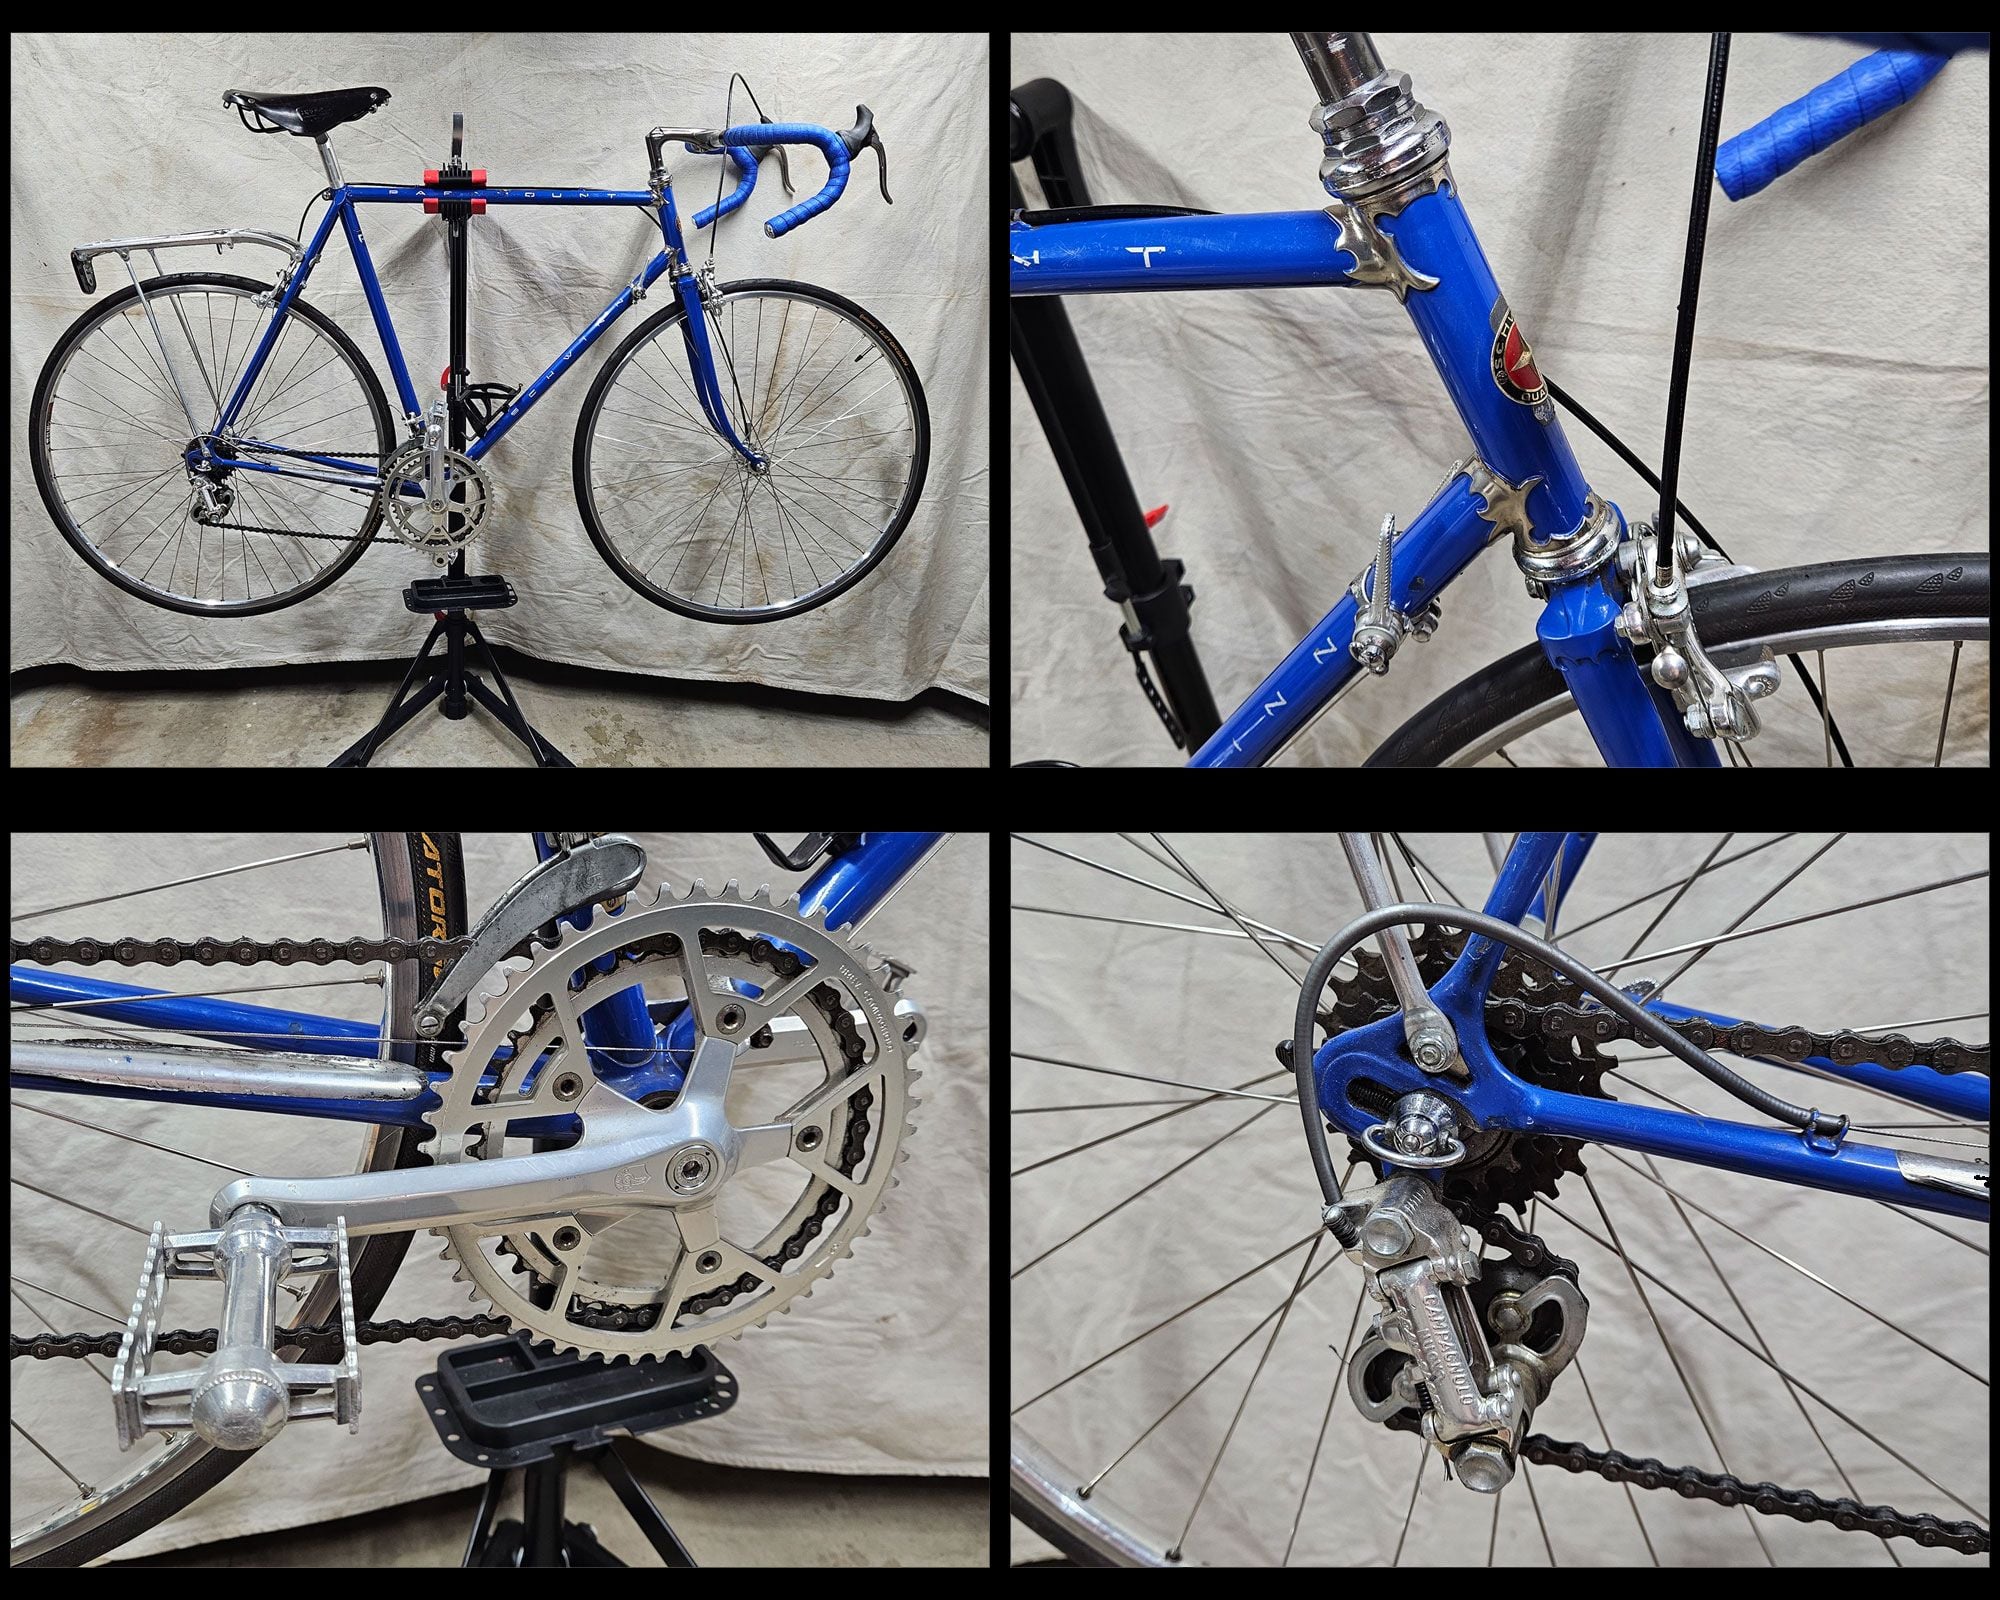
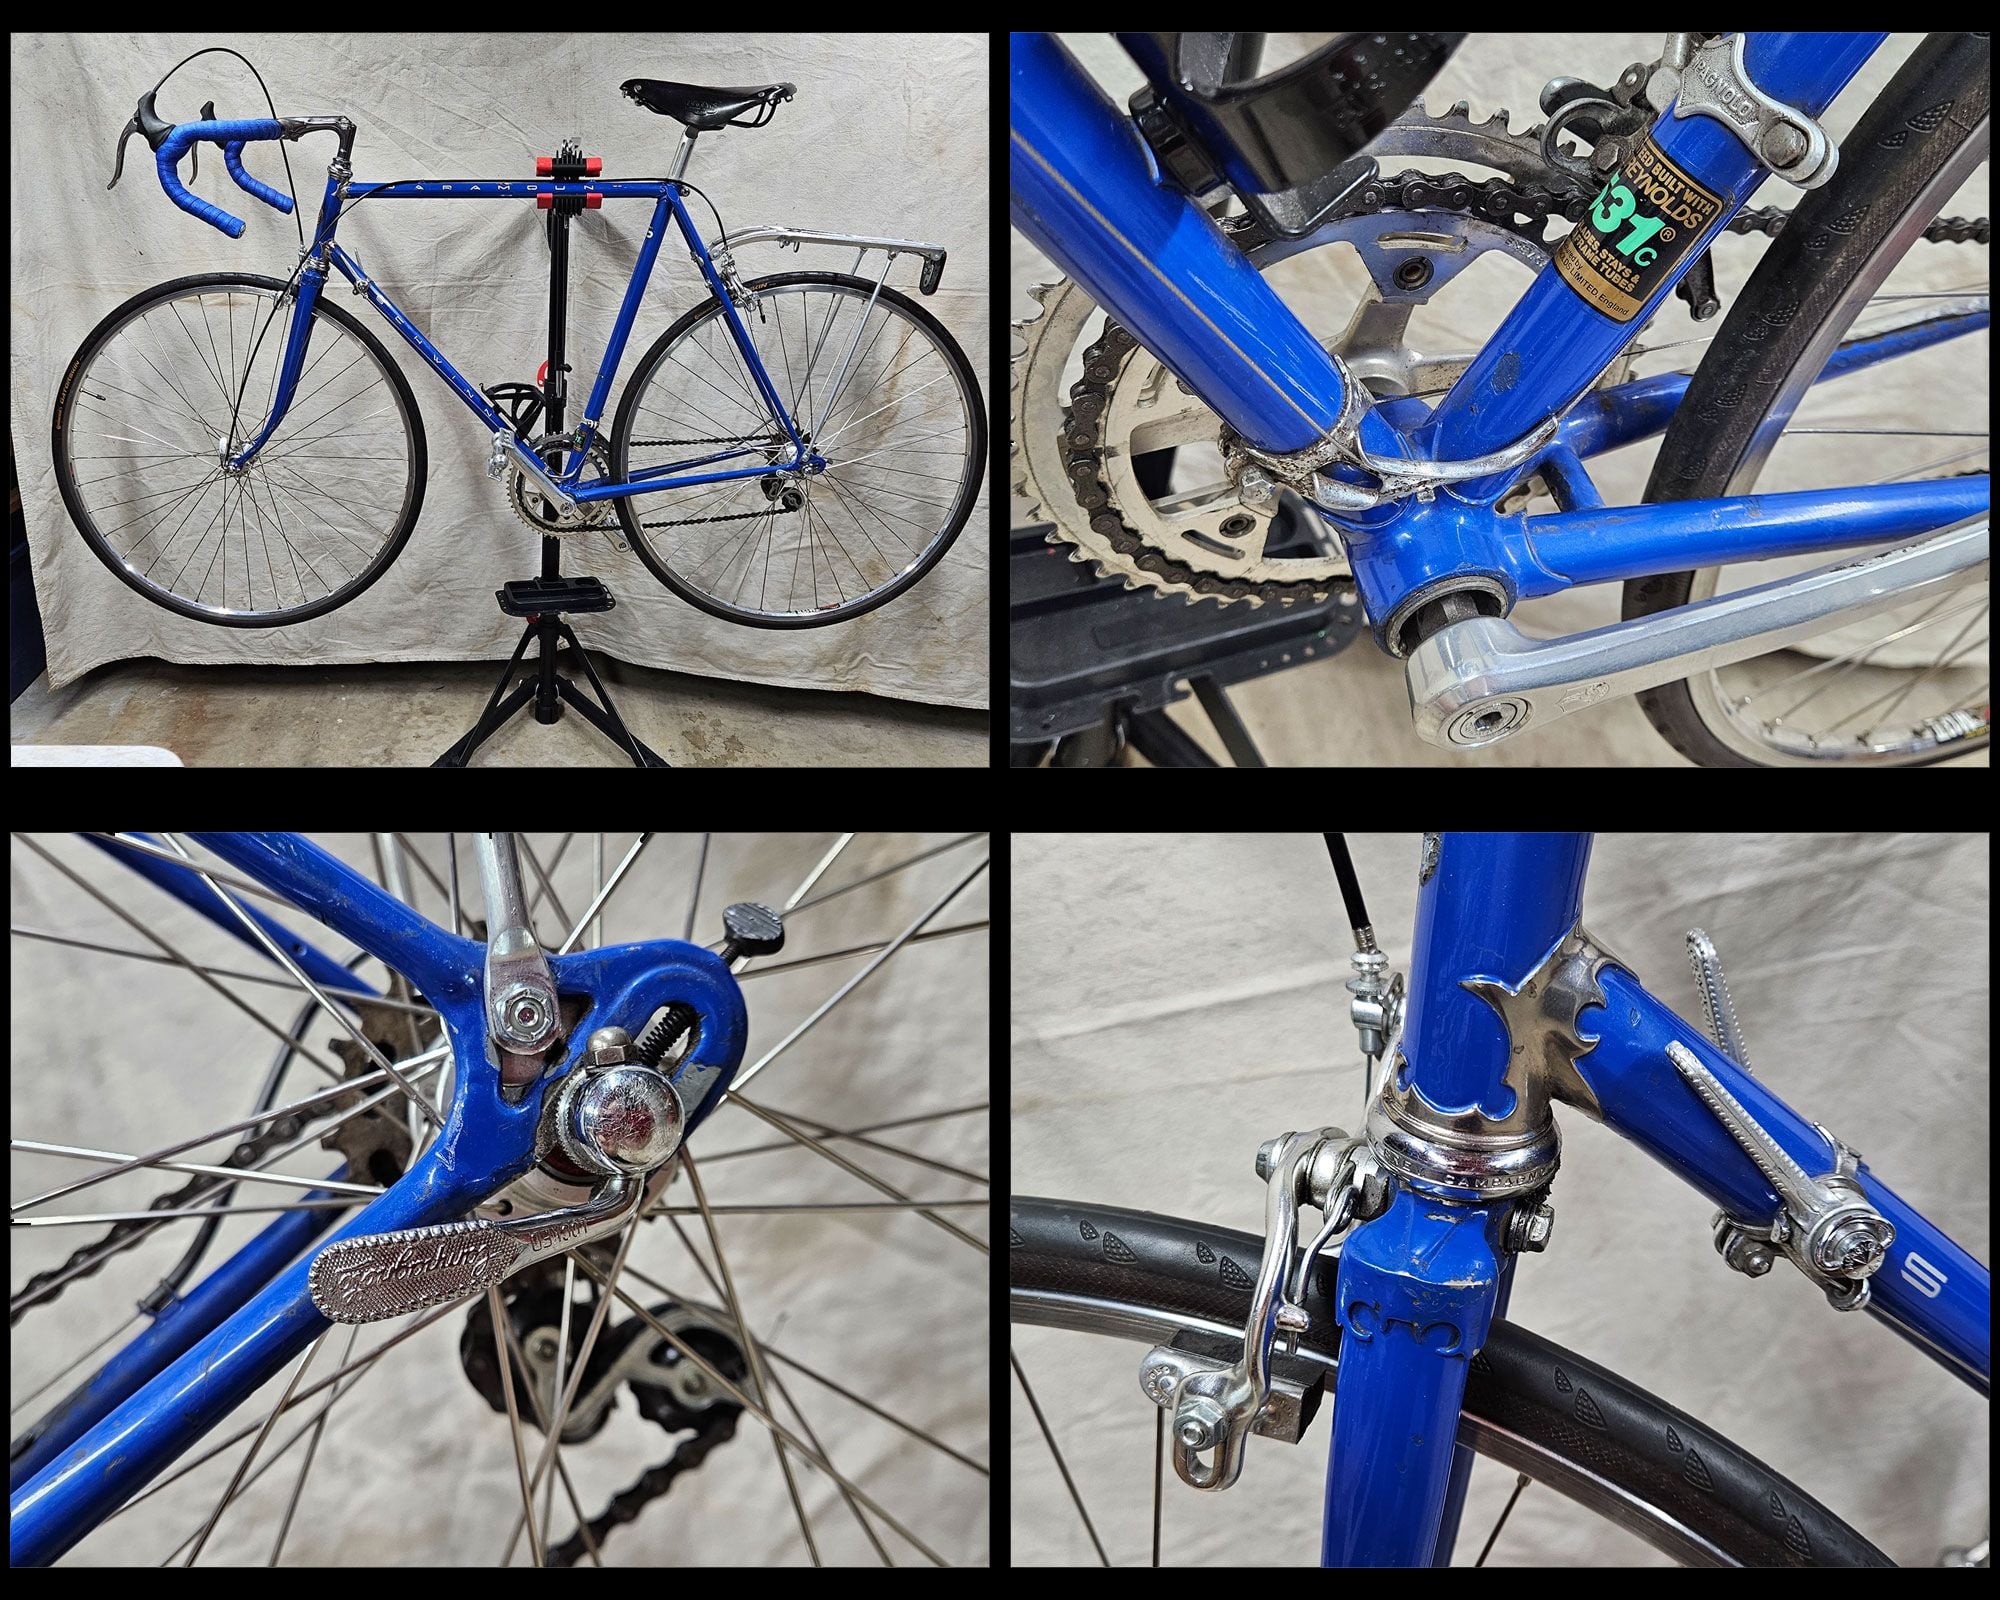
1972 Schwinn Paramount - eBay clunker to RESTORED
Hi friends,
I posted a 'Schwinn Paramount Questions' thread a couple of months ago when I acquired this bike off eBay. Trusted seller, gave a great deal, yet the bike had 'mysteries' and untrue components.
They were answered knowledgeably by the members here. Thank YOU!
I took it upon myself to bring this up to acceptable standards. What a great two months worth of hunting down compatible items, fitting them, and most impressively (for me) was PAINTING the frame. This WAS difficult.
DISCLAIMER: This is NOT a 'Concours' restoration. You can pick it apart easily.
Lots of incorrect pieces and decorations, yet at age 70, and for my satisfaction this is quite good enough. I PLAN on riding it when it's capable in the Northeast USA.

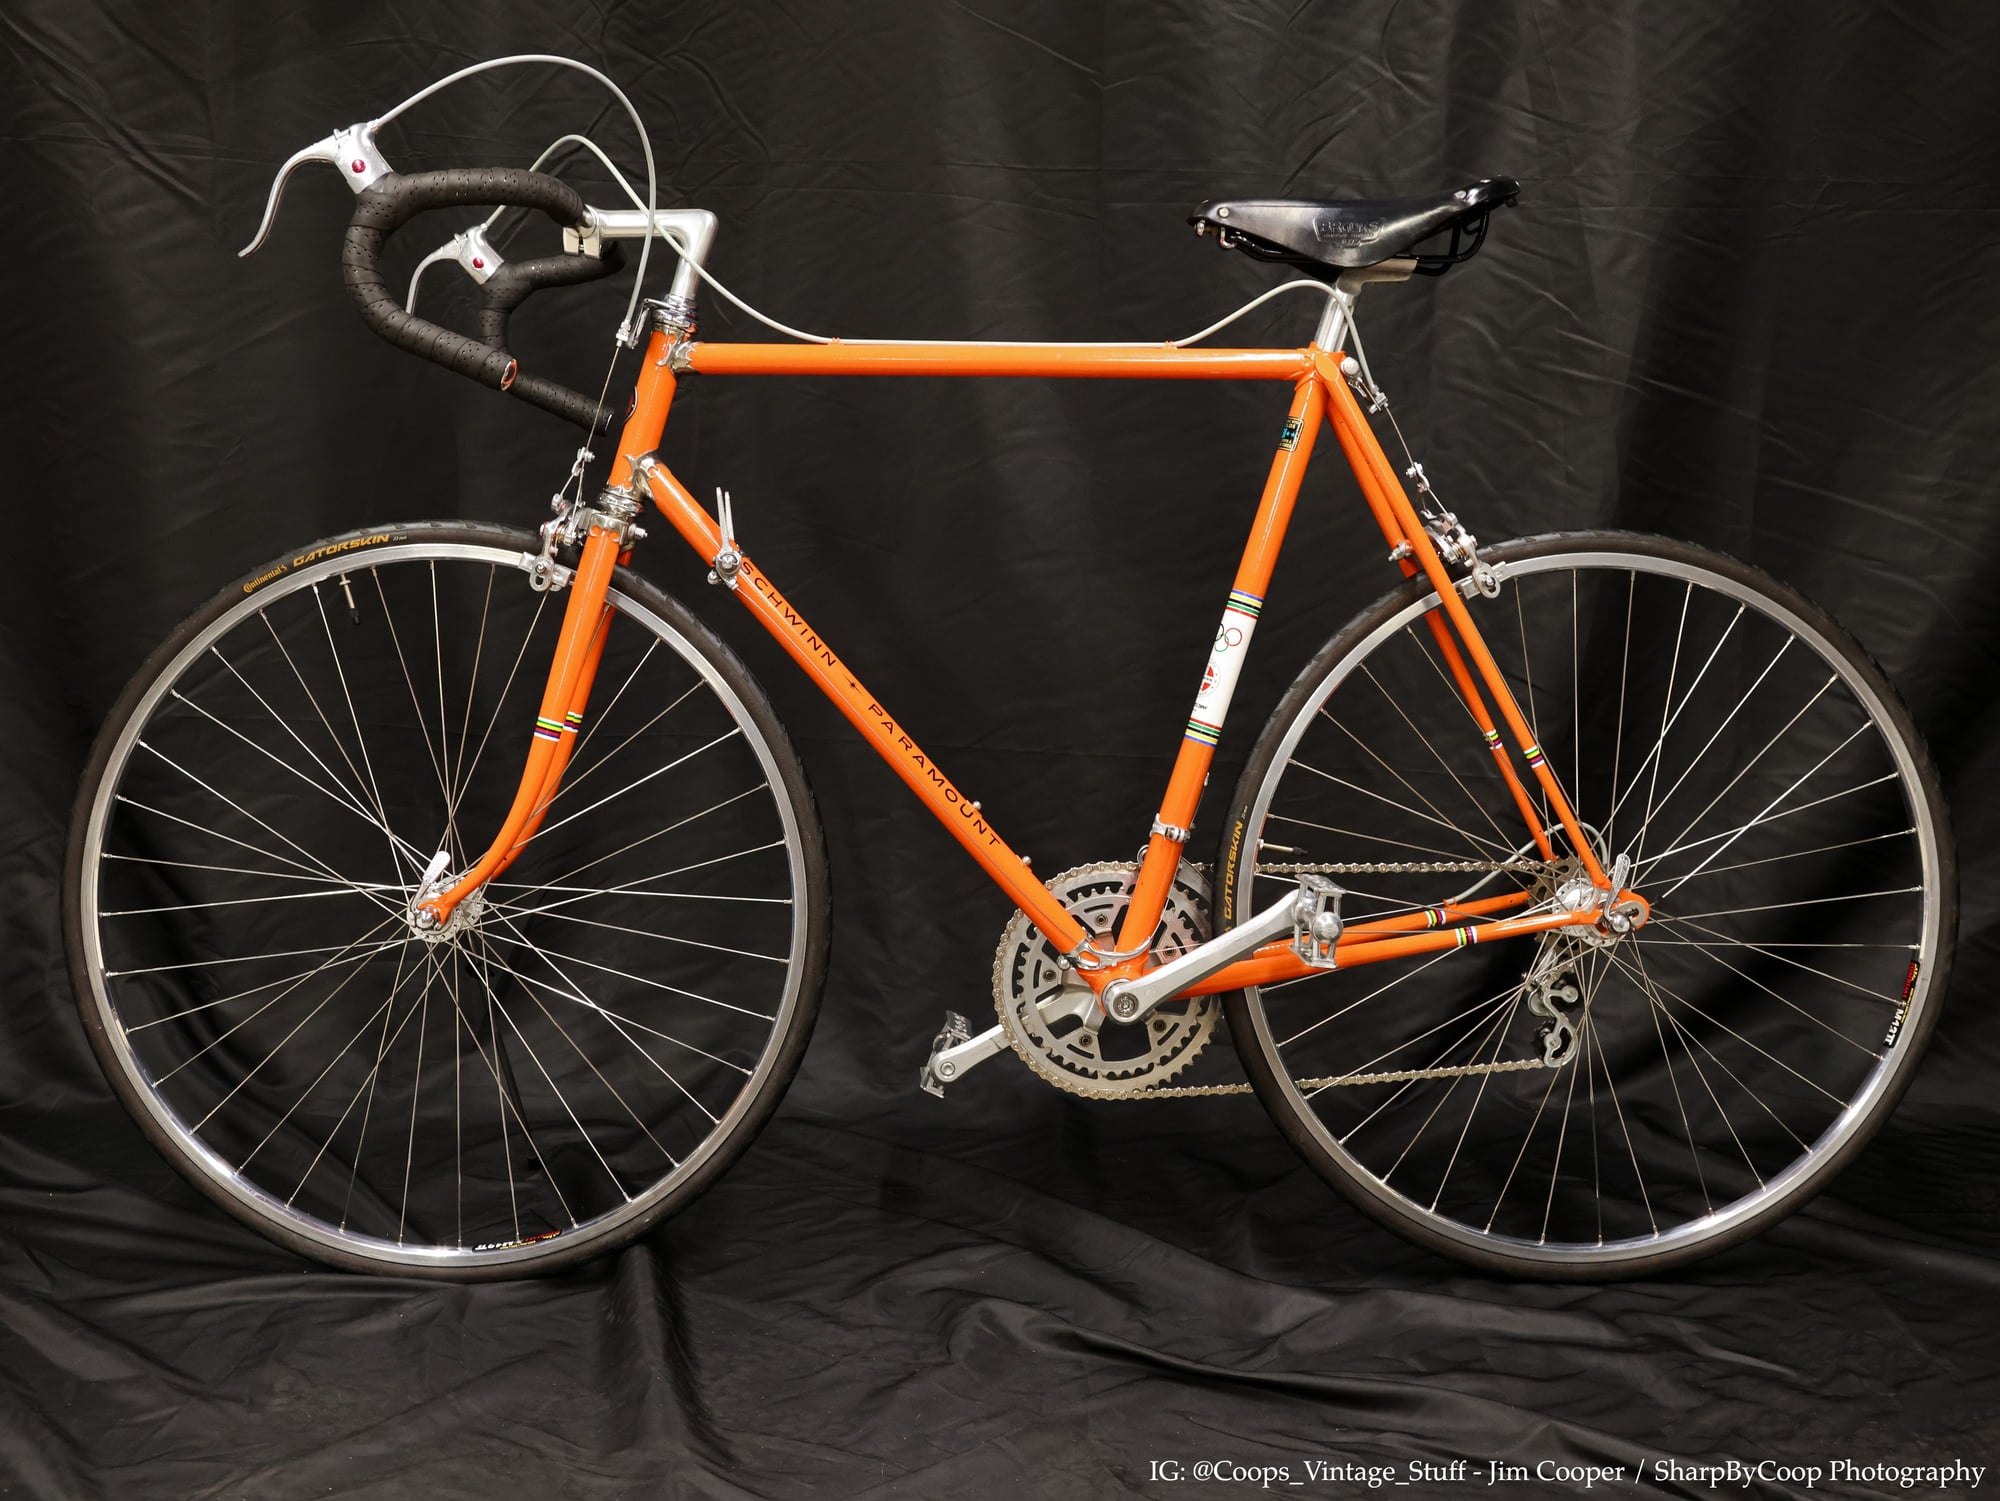
You can link to more images I captured on my Photography Website Album: 1972 Schwinn Paramount (I am a professional product photographer by trade. I can't help but TRY to do them justice).
How Janky was this? Very. Here's the original bike as rec'd.
Note the cheapo Italian brakes, wrong levers and stem, incorrect year decals, and ugly paint.
I know you will appreciate the work. Happy to answer questions. (It still needs a ft derailleur spring to be installed before riding. Another casualty I found. One is on the way.)
Thanks for viewing!
Coop
I posted a 'Schwinn Paramount Questions' thread a couple of months ago when I acquired this bike off eBay. Trusted seller, gave a great deal, yet the bike had 'mysteries' and untrue components.
They were answered knowledgeably by the members here. Thank YOU!
I took it upon myself to bring this up to acceptable standards. What a great two months worth of hunting down compatible items, fitting them, and most impressively (for me) was PAINTING the frame. This WAS difficult.
DISCLAIMER: This is NOT a 'Concours' restoration. You can pick it apart easily.
Lots of incorrect pieces and decorations, yet at age 70, and for my satisfaction this is quite good enough. I PLAN on riding it when it's capable in the Northeast USA.
You can link to more images I captured on my Photography Website Album: 1972 Schwinn Paramount (I am a professional product photographer by trade. I can't help but TRY to do them justice).
How Janky was this? Very. Here's the original bike as rec'd.
Note the cheapo Italian brakes, wrong levers and stem, incorrect year decals, and ugly paint.
I know you will appreciate the work. Happy to answer questions. (It still needs a ft derailleur spring to be installed before riding. Another casualty I found. One is on the way.)
Thanks for viewing!
Coop

Likes For SharpByCoop:
12-28-23, 09:18 AM
#2
Senior Member

Join Date: Jan 2015
Location: Los Angeles
Posts: 4,707
Bikes: 82 Medici, 2011 Richard Sachs, 2011 Milwaukee Road
Mentioned: 55 Post(s)
Tagged: 0 Thread(s)
Quoted: 1952 Post(s)
Liked 2,013 Times
in
1,112 Posts
Beautiful!
Question 1: How did you paint it?
Question 1: How did you paint it?
__________________
I don't do: disks, tubeless, e-shifting, or bead head nymphs.
I don't do: disks, tubeless, e-shifting, or bead head nymphs.
Likes For Classtime:
12-28-23, 09:38 AM
#3
My Workshop = Happy Place
Thread Starter
Join Date: Aug 2023
Location: Norwalk, CT
Posts: 88
Bikes: Schwinns, and many others.
Mentioned: 5 Post(s)
Tagged: 0 Thread(s)
Quoted: 42 Post(s)
Liked 224 Times
in
56 Posts
Paint? Outdoors hanging from a chain under a tree without wind. Too much work to make a booth in my crowded garage, and my basement would have stunk up the entire house.
Coop
- Stripped it down to bare with caustic paint stripper and lots of hard scraping.
- Polished the lugs. No chrome lower lugs or rear chain area on this model. Hmmm....
- Did a search. Others said use a 'liquid mask'. I bought a small bottle from a hobby store, and hand painted the lugs. VERY time consuming.
- Then.... sand tubes and grey ENAMEL primer. All painting with spray cans.
- First try: Automotive gloss orange sparkle 'engine' paint. Fail. Sand it smooth. Clogged nozzle with sparkle bits. Yuck.
- Second try: Krylon bright orange enamel. More like bright rust tan. Unacceptable color. Dull.
- Third try: Rustoleum Orange gloss (I went into Lowes and sprayed a sample on a white piece of paper this time. The Rustoleum was GREAT!)
- Actually dried glossy. I have learned to NOT recoat for days with enamel. (Learned the hard way)
- Spent time with Exacto knife and trimmed and peeled away the paint from the lugs and liquid mask. This took hours.
- Ordered and applied period decals (eBay seller bicyclebones) THIS was tough. They broke apart numerous times, yet I wrangled them together with enough warm soapy water and patience.
- Added the rainbow flourishes on the tubes only because I had them. Why not!
- Took it outdoors on last time and sprayed the entire bike with enamel clear, including over the polished lugs. Everything is sealed up.
- NOW I understand why a good painter would charge $1000. I learned and saved the money, yet I'm not thrilled to try this again.
Coop
Likes For SharpByCoop:
Likes For Bad Lag:
12-28-23, 10:58 AM
#5
Senior Member
Join Date: Aug 2020
Location: Saratoga, CA
Posts: 831
Bikes: 1981 Bianchi Specialissima, 1971 Bob Jackson. 2012 Kestrel 4000. 2012 Willier. 2016 Fuji Cross 1.1, 1950 Hetchins, 194X James Fothergill, 1971 Paramount P15, 1973 Paramount P12, 1963 Legnano
Mentioned: 25 Post(s)
Tagged: 0 Thread(s)
Quoted: 279 Post(s)
Liked 955 Times
in
391 Posts
Great job on bringing this back. I also loved the way you photographed it.
congratulations on a great build
congratulations on a great build
Likes For SwimmerMike:
12-28-23, 11:14 AM
#6
Full Member
Join Date: Jul 2023
Location: Idaho, USA
Posts: 218
Bikes: Aluminum and Steel
Mentioned: 1 Post(s)
Tagged: 0 Thread(s)
Quoted: 103 Post(s)
Liked 376 Times
in
139 Posts
Wow!!!
__________________
�Ride like the wind boy! Ride like the wind��
-The Voice inside my head, circa 1982
�Ride like the wind boy! Ride like the wind��
-The Voice inside my head, circa 1982
Likes For IdahoBrett:
12-28-23, 11:21 AM
#7
Senior Member
Join Date: Jul 2006
Posts: 3,065
Mentioned: 63 Post(s)
Tagged: 0 Thread(s)
Quoted: 1217 Post(s)
Liked 187 Times
in
118 Posts
I've been admiring your work over at Bladeforums for probably two decades now so it's cool to see you here as well. You picked a heck of a bike to start with (masking those lugs!), came out very nice. Excited to see what else you get into.
Likes For Spoonrobot:
12-28-23, 11:28 AM
#8
Senior Member
Join Date: May 2019
Location: Bloomington, IN
Posts: 2,950
Bikes: Paramount, Faggin, Ochsner, Ciocc, Basso
Mentioned: 117 Post(s)
Tagged: 0 Thread(s)
Quoted: 1303 Post(s)
Liked 1,912 Times
in
1,142 Posts
Great job! And nice enough to show off a bit. thanks for sharing. Smiles, MH
Likes For Mad Honk:
12-28-23, 11:35 AM
#9

Se�or Member

Join Date: Oct 2004
Location: Hardy, VA
Posts: 17,926
Bikes: Mostly English - predominantly Raleighs
Mentioned: 70 Post(s)
Tagged: 0 Thread(s)
Quoted: 1492 Post(s)
Liked 1,096 Times
in
642 Posts
Very impressed with the result.
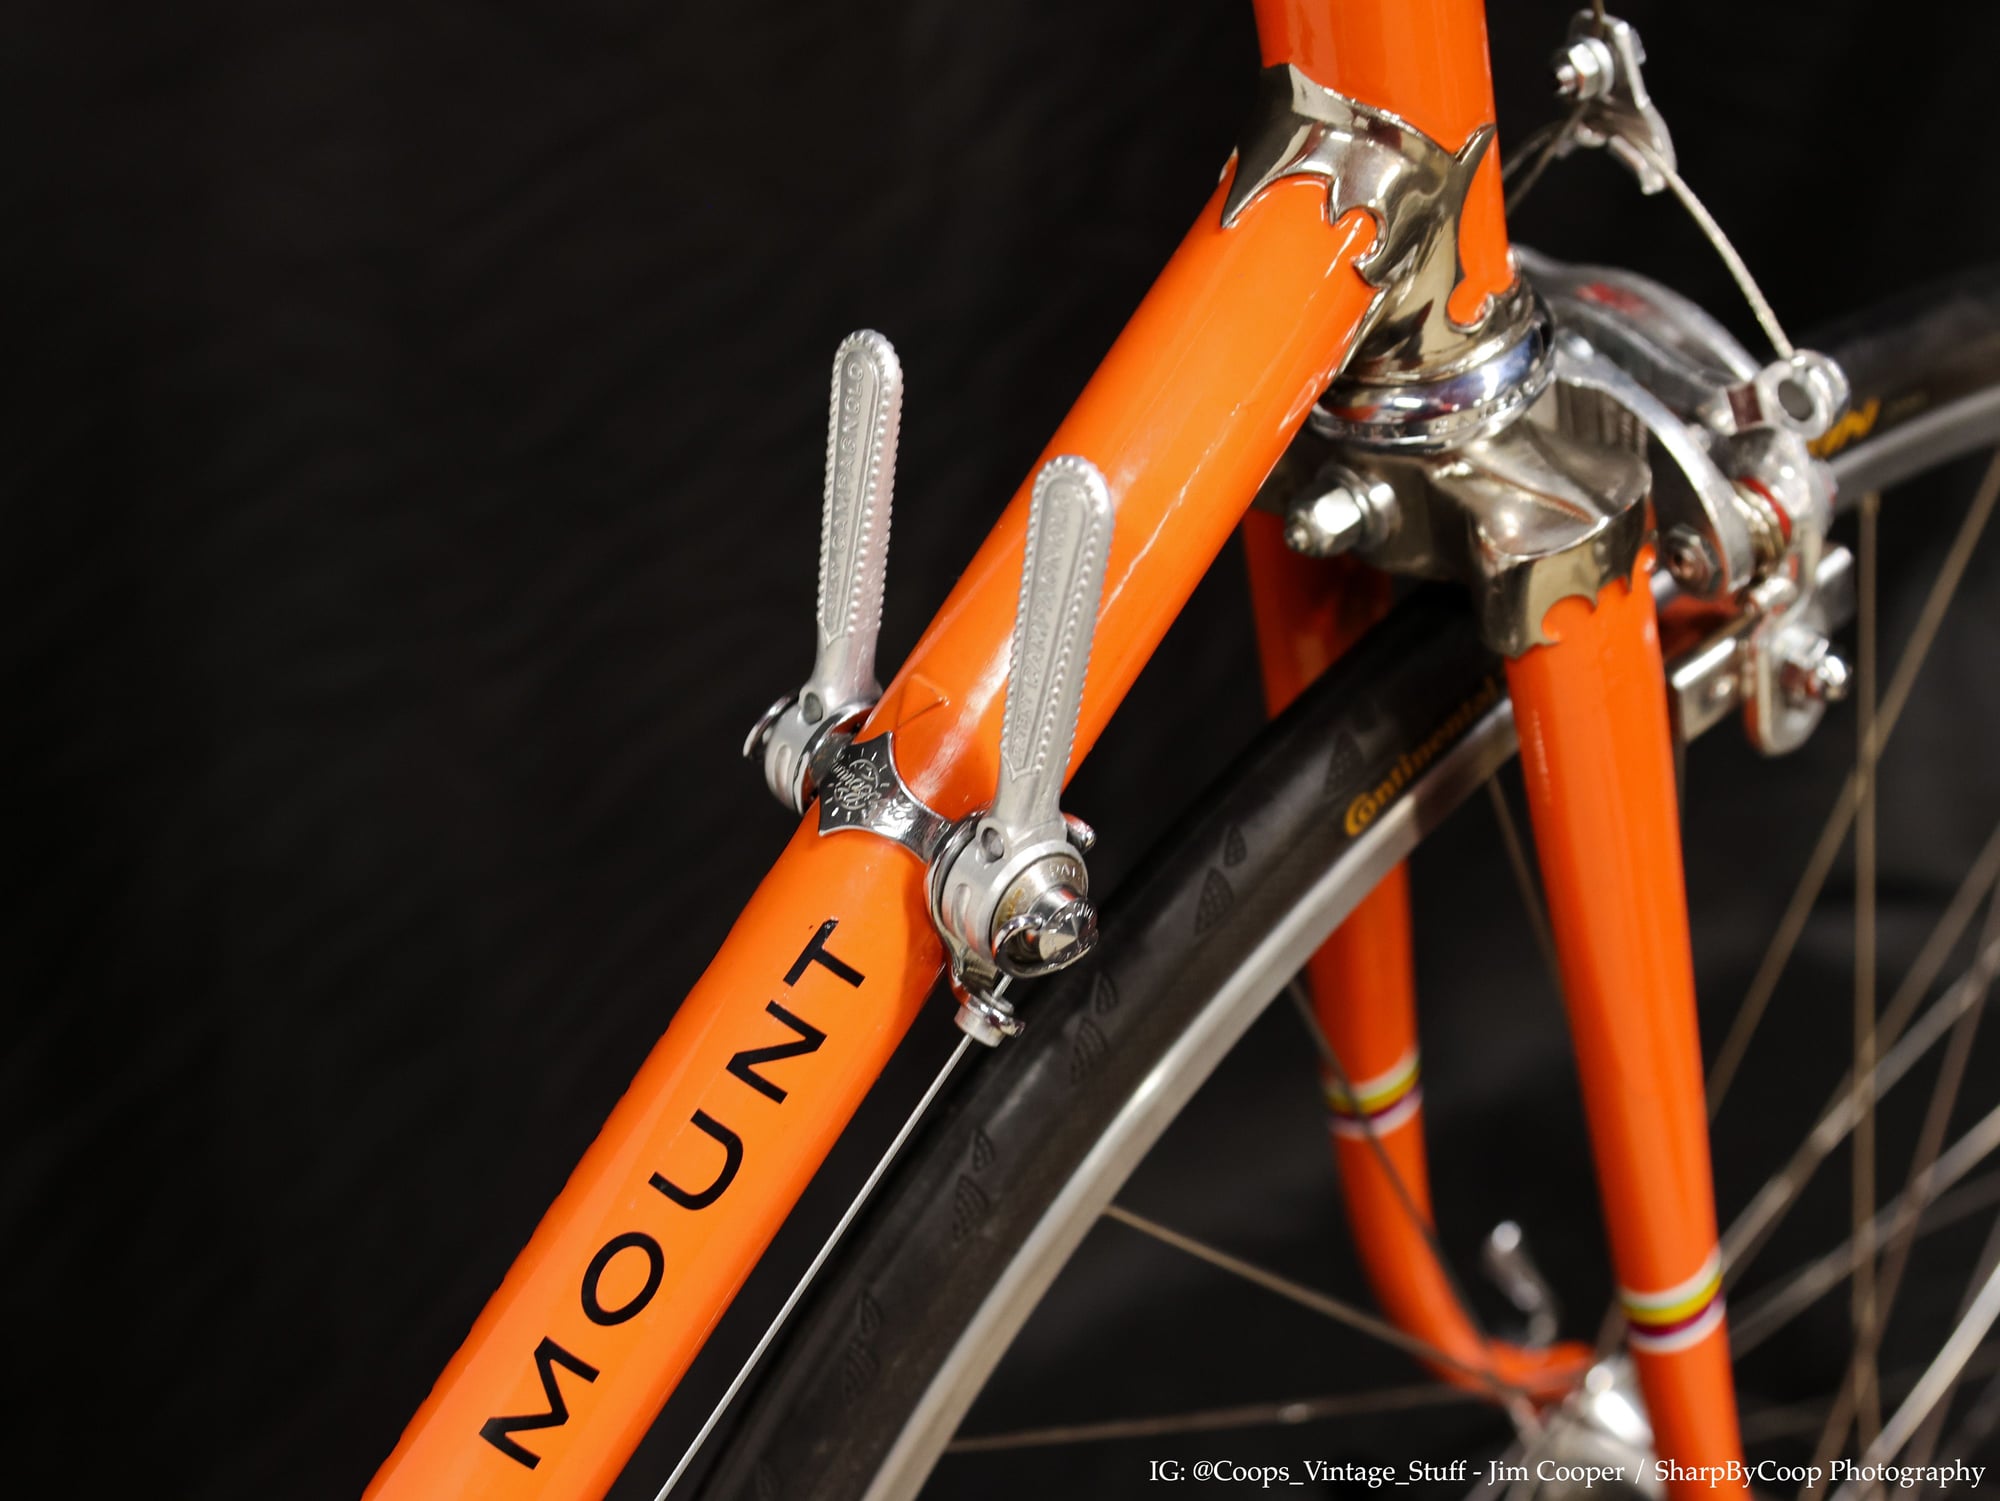
I have one observation to pass along. The raised triangle on the downtube that is just above your shift levers is a feature that is intended to help prevent the levers from sliding down the tube as cable pressure is exerted on the mechanism. If you have the bolt on the shifter clamp really cranked down, and have the shift cables optimally adjusted you may not have slippage. However, if it should occur, it would require adjustment (quite possibly interrupting an enjoyable ride) and could mar that lovely orange finish. This would be an almost impossible scenario if you were to re-mount the clamp so that is is just above (and touching) that small, raised triangle.
I have one observation to pass along. The raised triangle on the downtube that is just above your shift levers is a feature that is intended to help prevent the levers from sliding down the tube as cable pressure is exerted on the mechanism. If you have the bolt on the shifter clamp really cranked down, and have the shift cables optimally adjusted you may not have slippage. However, if it should occur, it would require adjustment (quite possibly interrupting an enjoyable ride) and could mar that lovely orange finish. This would be an almost impossible scenario if you were to re-mount the clamp so that is is just above (and touching) that small, raised triangle.
__________________
In search of what to search for.
In search of what to search for.
12-28-23, 11:36 AM
#10
Senior Member

Join Date: Sep 2013
Location: Chicago
Posts: 1,082
Bikes: '72 Peugeot PX-10 '78 Motobecane Le Champion '83 Motobecane Grand Jubile '85 Trek 830 '88 Merckx Team ADR Corsa Extra
Mentioned: 5 Post(s)
Tagged: 0 Thread(s)
Quoted: 471 Post(s)
Liked 1,214 Times
in
651 Posts
That's very high level bike photography. Great job on the restore too. You have a great deal more patience than I do. Thanks for sharing your process.
__________________
Likes For Sedgemop:
12-28-23, 11:38 AM
#11

Senior Member
Join Date: Jun 2006
Posts: 20,305
Mentioned: 130 Post(s)
Tagged: 0 Thread(s)
Quoted: 3464 Post(s)
Liked 2,831 Times
in
1,997 Posts
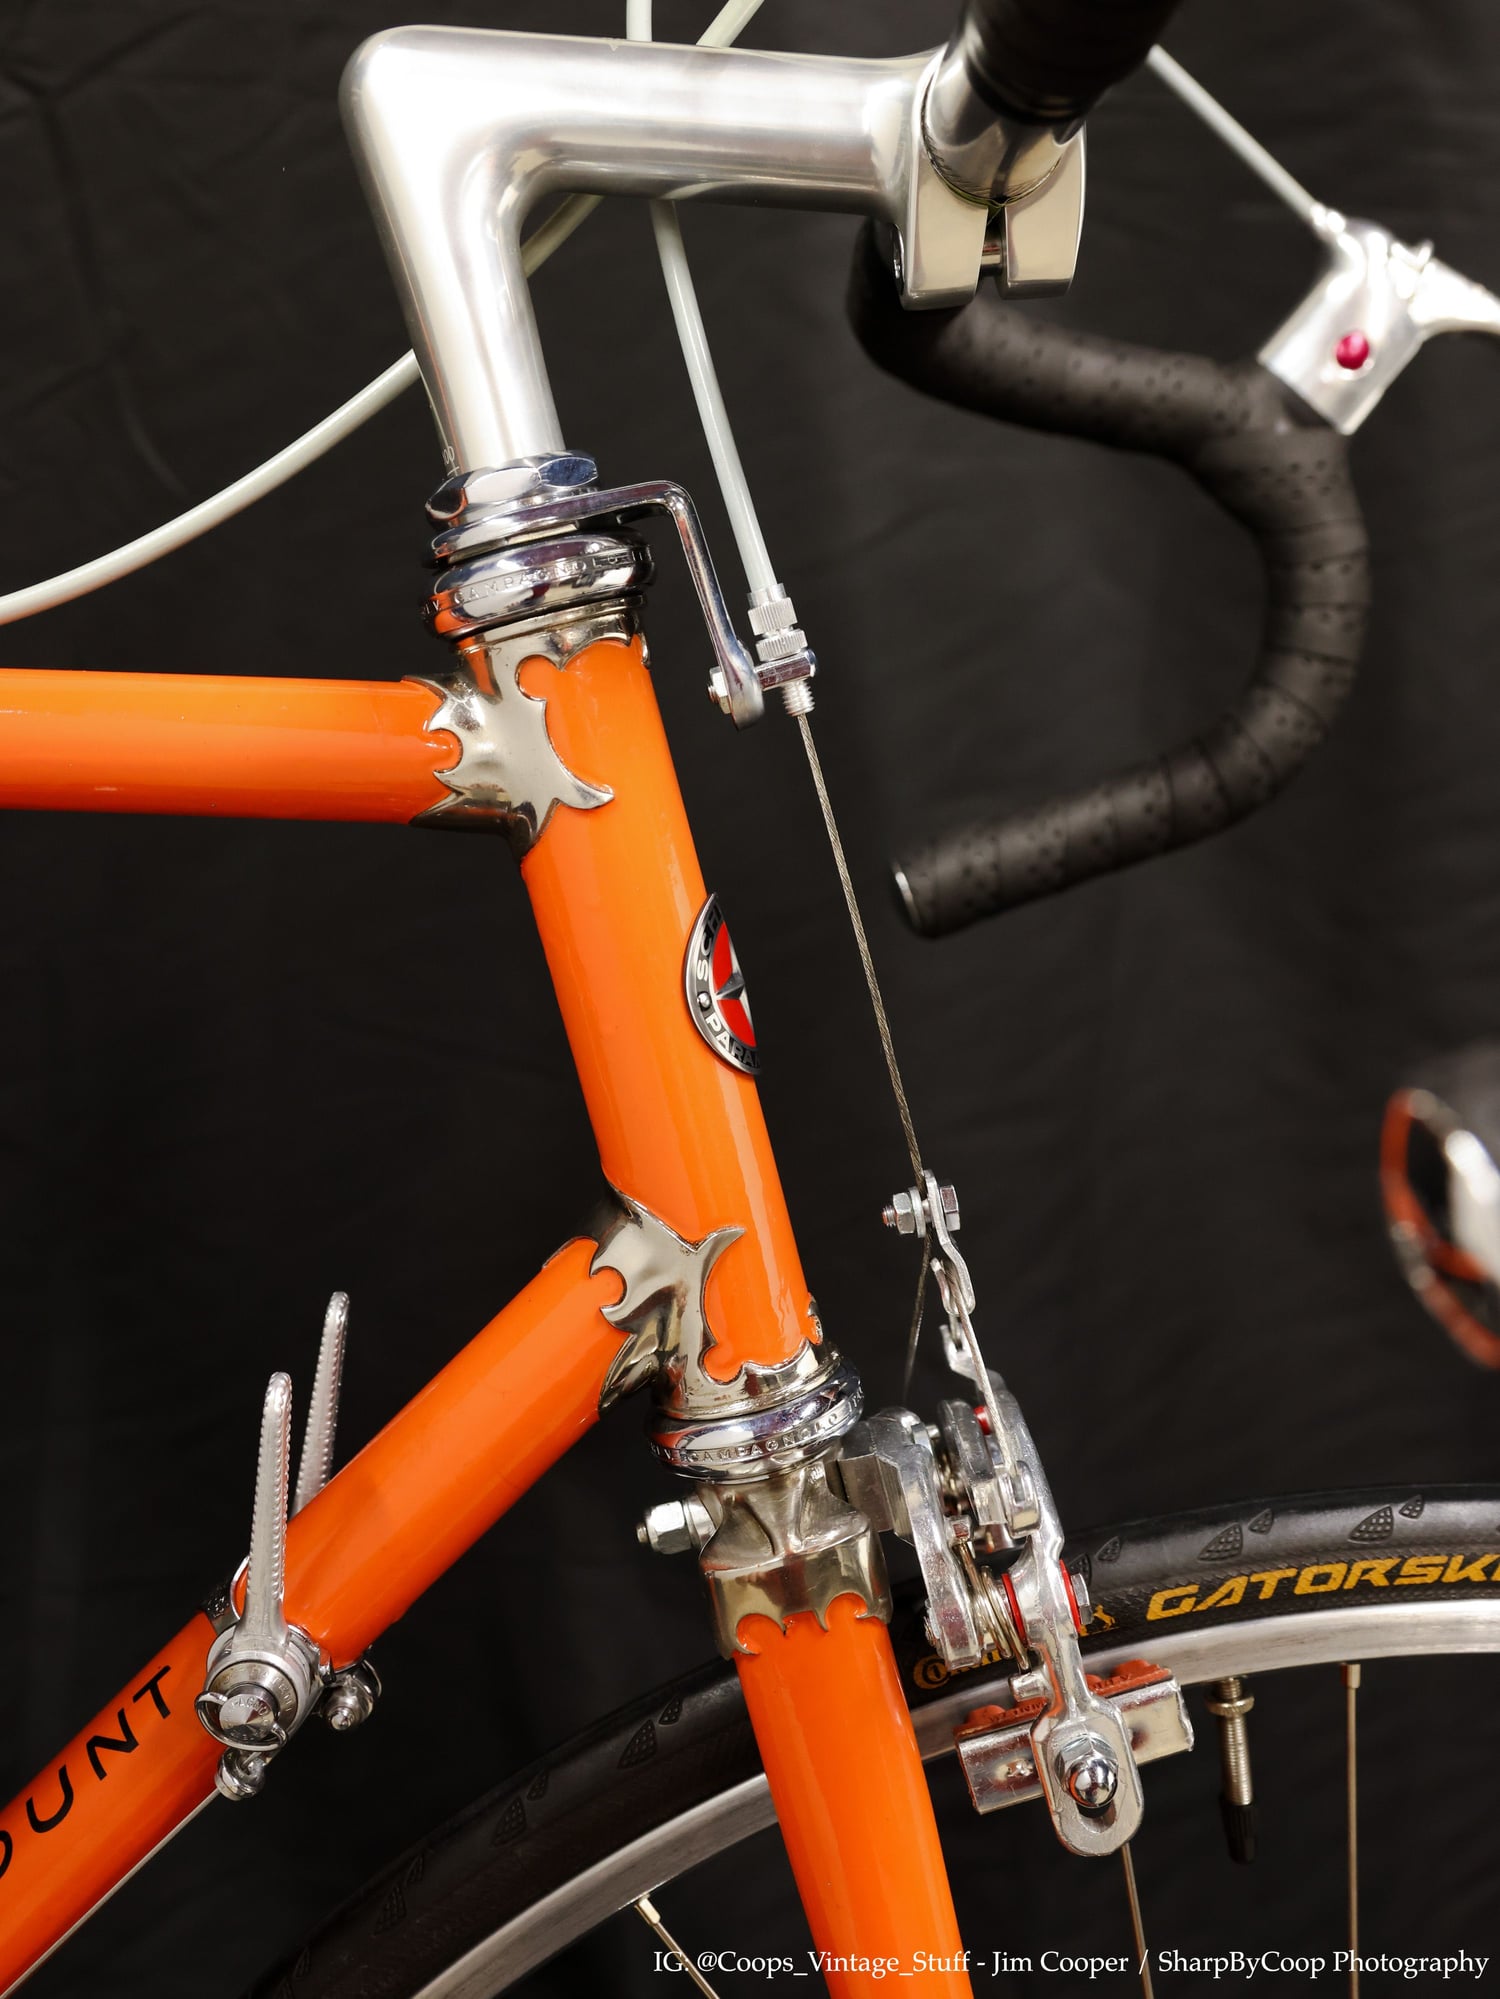
The exposing of the chrome fork crown is commendable and a bit amazed it was not molested under the blue.
�I would look for some Weinmann compatible gum brake lever hoods.
��the paint looks good, I would not have done the stay bands but it is not my bike.
previous owner placed the waterbottle bosses no doubt, on the as delivered bikes, I was perplexed that Schwinn essentially ignored that cage clamp or clamps would go over the graphics.
Likes For repechage:
12-28-23, 11:38 AM
#12
The Huffmeister

Join Date: Jul 2008
Location: The Le Grande HQ
Posts: 2,741
Bikes: '79 Trek 938, '86 Jim Merz Allez SE, '90 Miyata 1000, '68 PX-10, '80 PXN-10, '73 Super Course, '87 Guerciotti, '83 Trek 600, '80 Huffy Le Grande
Mentioned: 45 Post(s)
Tagged: 0 Thread(s)
Quoted: 1227 Post(s)
Liked 3,555 Times
in
1,410 Posts
Can you do mine?
j/k GREAT work!!
j/k GREAT work!!
__________________
There were 135 Confentes, but only one...Huffente!

There were 135 Confentes, but only one...Huffente!
Likes For AdventureManCO:
Likes For Hobbiano:
Likes For ACHiPo:
12-28-23, 12:39 PM
#15
feros ferio

Join Date: Jul 2000
Location: www.ci.encinitas.ca.us
Posts: 21,799
Bikes: 1959 Capo Modell Campagnolo; 1960 Capo Sieger (2); 1962 Carlton Franco Suisse; 1970 Peugeot UO-8; 1982 Bianchi Campione d'Italia; 1988 Schwinn Project KOM-10;
Mentioned: 44 Post(s)
Tagged: 0 Thread(s)
Quoted: 1393 Post(s)
Liked 1,329 Times
in
837 Posts
What rims are you using with the Gatorskins? I am having a bear of a time installing new tires on older rims.
__________________
"Far and away the best prize that life offers is the chance to work hard at work worth doing." --Theodore Roosevelt
Capo: 1959 Modell Campagnolo, S/N 40324; 1960 Sieger (2), S/N 42624, 42597
Carlton: 1962 Franco Suisse, S/N K7911
Peugeot: 1970 UO-8, S/N 0010468
Bianchi: 1982 Campione d'Italia, S/N 1.M9914
Schwinn: 1988 Project KOM-10, S/N F804069
Likes For John E:
12-28-23, 12:43 PM
#16
Senior Member

Join Date: Aug 2016
Location: Visalia, CA
Posts: 2,249
Mentioned: 45 Post(s)
Tagged: 0 Thread(s)
Quoted: 981 Post(s)
Liked 1,844 Times
in
609 Posts
Hello,
Lovely restoration, thanks for sharing! There's another greenish Paramount with Nervex lugs on eBay right now that's about the same size and in need of similar TLC. Maybe go in for round #2? Ha, ha!
I'm with John... I just put some Gatorskins on a set of unmarked rims that look like older Mavics and they are a beast. But at least once they're on they usually don't need to come off for a long time!
-Gregory
Lovely restoration, thanks for sharing! There's another greenish Paramount with Nervex lugs on eBay right now that's about the same size and in need of similar TLC. Maybe go in for round #2? Ha, ha!
-Gregory
Likes For Kilroy1988:
12-28-23, 01:14 PM
#17
Senior Member
Join Date: Oct 2015
Location: PDX
Posts: 13,046
Bikes: Merz x 5 + Specialized Merz Allez x 2, Strawberry/Newlands/DiNucci/Ti x3, Gordon, Fuso/Moulton x2, Bornstein, Paisley,1958-74 Paramounts x3, 3rensho, 74 Moto TC, 73-78 Raleigh Pro's x5, Marinoni x2, 1960 Cinelli SC, 1980 Bianchi SC, PX-10 X 2
Mentioned: 267 Post(s)
Tagged: 0 Thread(s)
Quoted: 4512 Post(s)
Liked 6,387 Times
in
3,672 Posts
Job well done, another Christmas miracle. 
Always a great day when a Paramount is returned to its former glory.
Always a great day when a Paramount is returned to its former glory.
Likes For merziac:
12-28-23, 02:04 PM
#18
My Workshop = Happy Place
Thread Starter
Join Date: Aug 2023
Location: Norwalk, CT
Posts: 88
Bikes: Schwinns, and many others.
Mentioned: 5 Post(s)
Tagged: 0 Thread(s)
Quoted: 42 Post(s)
Liked 224 Times
in
56 Posts
The exposing of the chrome fork crown is commendable and a bit amazed it was not molested under the blue.
�I would look for some Weinmann compatible gum brake lever hoods.
��the paint looks good, I would not have done the stay bands but it is not my bike.
previous owner placed the waterbottle bosses no doubt, on the as delivered bikes, I was perplexed that Schwinn essentially ignored that cage clamp or clamps would go over the graphics.
�I would look for some Weinmann compatible gum brake lever hoods.
��the paint looks good, I would not have done the stay bands but it is not my bike.
previous owner placed the waterbottle bosses no doubt, on the as delivered bikes, I was perplexed that Schwinn essentially ignored that cage clamp or clamps would go over the graphics.
Yeah the bands will glare at a purist and please a non-purist. I get it! I haven't figured out what cage to place there, yet it WON'T be that horrible plastic one it came with!
Ha! Thank you. Get in line....
Lovely restoration, thanks for sharing! There's another greenish Paramount with Nervex lugs on eBay right now that's about the same size and in need of similar TLC. Maybe go in for round #2? Ha, ha!
I'm with John... I just put some Gatorskins on a set of unmarked rims that look like older Mavics and they are a beast. But at least once they're on they usually don't need to come off for a long time!
-Gregory
I'm with John... I just put some Gatorskins on a set of unmarked rims that look like older Mavics and they are a beast. But at least once they're on they usually don't need to come off for a long time!
-Gregory
Thank you all.
Note: Look closely at the replaced headbadge emblem. It was a Paramount refrigerator magnet which I reshaped to fit. Embossed screws and all. SO SUE me! (They did not match the existing holes at all, so I had no recourse. Again, NOT a Concours.) I'm not ashamed.
Just got that broken spring and it stopped raining. I think I need to give it some love...
Likes For SharpByCoop:
12-28-23, 02:05 PM
#19
Full Member
Join Date: Jan 2023
Posts: 486
Mentioned: 0 Post(s)
Tagged: 0 Thread(s)
Quoted: 175 Post(s)
Likes: 0
Liked 452 Times
in
232 Posts
Looks great and nice presentation with the photography.
(I wouldn't consider the original as acquired being a clunker, but at least you've changed your mind after the good work.)
Now that you tackled this one, DIY hands on learned, don't be discouraged from saving another!
For a shop setup, HVLP and a compressor with volume, water trap is ideal. Spray paint tents are pretty cheap but it still adds up. The big expense will be in paint and materials. Fortunately the budget minded can do really well without.
Budget refinishing:
Can't estimate in monetary the value in ones time, but the following in materials is approx. $100.
Concur on the Rust-Oleum. Especially the orange. The 2X is excellent. Has good pigment and ideal for rattlecan jobs on bikes that have a decent substrate. Sand the bike without a full strip. Mask off chrome. No primer needed and apply directly the Rust-O 2X.
For a more robust finish on full stripped frames, I'm liking their Self Etching primer. Go easy on it. Two light coats. I don't sand or finger midge the frame prior the color coat. Avoid handling. Then choose your color coat. Two part urethane is ideal, lays on well and quickly cures. Though it gets pricey and can be too thick for my liking on a classic lugged bike. Lacquer lays smooth and flashing will go away during early curing. (You can still get it in CA... boo hoo). Give it a week to cure. Depending the results of the color coat(s), this is the time to lightly wet sand out blems and flaws.
Next come decal / transfers / striping. Prefer the elegant and thin water applique transfers. Yes, patience is required but one key is extra soaking in luke warm water and pre wetting the frame.
Finish with Eastwood 2K two part urethane clear. Go easy and two light coats should do it. I dont like the large spray pattern but it atomizes pretty good. 10 minutes between coats. No advantage to over coat and having a thick clear. Let it cure a few days, room temp, avoid humidity. Wet sand 1200 to 2000 grit any flawed areas or the entire frame if you wish. Usually let it set another week and then work it with a rubbing compound.
(Edited to correct auto-spell. poo)
Last edited by chain_whipped; 12-28-23 at 02:08 PM.
Likes For chain_whipped:
12-28-23, 02:08 PM
#20
My Workshop = Happy Place
Thread Starter
Join Date: Aug 2023
Location: Norwalk, CT
Posts: 88
Bikes: Schwinns, and many others.
Mentioned: 5 Post(s)
Tagged: 0 Thread(s)
Quoted: 42 Post(s)
Liked 224 Times
in
56 Posts
Very impressed with the result.
I have one observation to pass along. The raised triangle on the downtube that is just above your shift levers is a feature that is intended to help prevent the levers from sliding down the tube as cable pressure is exerted on the mechanism. If you have the bolt on the shifter clamp really cranked down, and have the shift cables optimally adjusted you may not have slippage. However, if it should occur, it would require adjustment (quite possibly interrupting an enjoyable ride) and could mar that lovely orange finish. This would be an almost impossible scenario if you were to re-mount the clamp so that is is just above (and touching) that small, raised triangle.
I have one observation to pass along. The raised triangle on the downtube that is just above your shift levers is a feature that is intended to help prevent the levers from sliding down the tube as cable pressure is exerted on the mechanism. If you have the bolt on the shifter clamp really cranked down, and have the shift cables optimally adjusted you may not have slippage. However, if it should occur, it would require adjustment (quite possibly interrupting an enjoyable ride) and could mar that lovely orange finish. This would be an almost impossible scenario if you were to re-mount the clamp so that is is just above (and touching) that small, raised triangle.
I like how the points align even if wrong. It's tight. I will leave it. Good eye, though! Thank you. Next one I'll do this!
12-28-23, 02:12 PM
#21
My Workshop = Happy Place
Thread Starter
Join Date: Aug 2023
Location: Norwalk, CT
Posts: 88
Bikes: Schwinns, and many others.
Mentioned: 5 Post(s)
Tagged: 0 Thread(s)
Quoted: 42 Post(s)
Liked 224 Times
in
56 Posts
chain_whipped WOW! Great info. Noted and saved here. You have done this more than once. This is my second.
I was a house painter for 12 years out of high school. Preparation, as you know, is key.
Rustoleum 2x FTMFW!
Thank you.
Coop
I was a house painter for 12 years out of high school. Preparation, as you know, is key.
Rustoleum 2x FTMFW!
Thank you.
Coop
12-28-23, 02:23 PM
#22
Full Member
Join Date: Jan 2023
Posts: 486
Mentioned: 0 Post(s)
Tagged: 0 Thread(s)
Quoted: 175 Post(s)
Likes: 0
Liked 452 Times
in
232 Posts
Forgot to mention and about prep during the process. Obviously the need to remove all grease or contaminates.
For fully stripped frame, wipe with acetone. But don't use acetone on frames that have its original paint and sanded. In this case, rather use a thinner. Make sure all is dry, then spray.
For fully stripped frame, wipe with acetone. But don't use acetone on frames that have its original paint and sanded. In this case, rather use a thinner. Make sure all is dry, then spray.
Likes For chain_whipped:
12-28-23, 04:20 PM
#23
Old bikes, Older guy

Join Date: Jun 2014
Location: Fiscal Conservative on the Lefty Coast - Oregon
Posts: 843
Bikes: A few modern, Several vintage, All ridden when weather allows.
Mentioned: 8 Post(s)
Tagged: 0 Thread(s)
Quoted: 251 Post(s)
Liked 167 Times
in
115 Posts
__________________
Remember: Real bikes have pedals.
...and never put a yellow tail on a Red, White and Blue kite!
Remember: Real bikes have pedals.
...and never put a yellow tail on a Red, White and Blue kite!
Likes For Senior Ryder 00:
12-28-23, 05:11 PM
#24
Senior Member
Join Date: Jun 2006
Posts: 20,305
Mentioned: 130 Post(s)
Tagged: 0 Thread(s)
Quoted: 3464 Post(s)
Liked 2,831 Times
in
1,997 Posts
I would reference
speedbicycles.ch
for what might be the Standard for bicycle photography currently, and for quite a while now.
the Paramounts without hoods probably started out as one of the touring variations with the “dual position” levers.
speedbicycles.ch
for what might be the Standard for bicycle photography currently, and for quite a while now.
the Paramounts without hoods probably started out as one of the touring variations with the “dual position” levers.
Likes For repechage:
12-28-23, 08:46 PM
#25
My Workshop = Happy Place
Thread Starter
Join Date: Aug 2023
Location: Norwalk, CT
Posts: 88
Bikes: Schwinns, and many others.
Mentioned: 5 Post(s)
Tagged: 0 Thread(s)
Quoted: 42 Post(s)
Liked 224 Times
in
56 Posts
I just purchased those N.O.S Weinmann levers and brakes. OLD boxes from the sixties or seventies. I will keep it as such to show that cool red anodized button. For now.
Thank you.