


Modifying a frame as a prototype
 01-01-24, 08:42 PM
#1
Junior Member
Thread Starter
Modifying a frame as a prototype
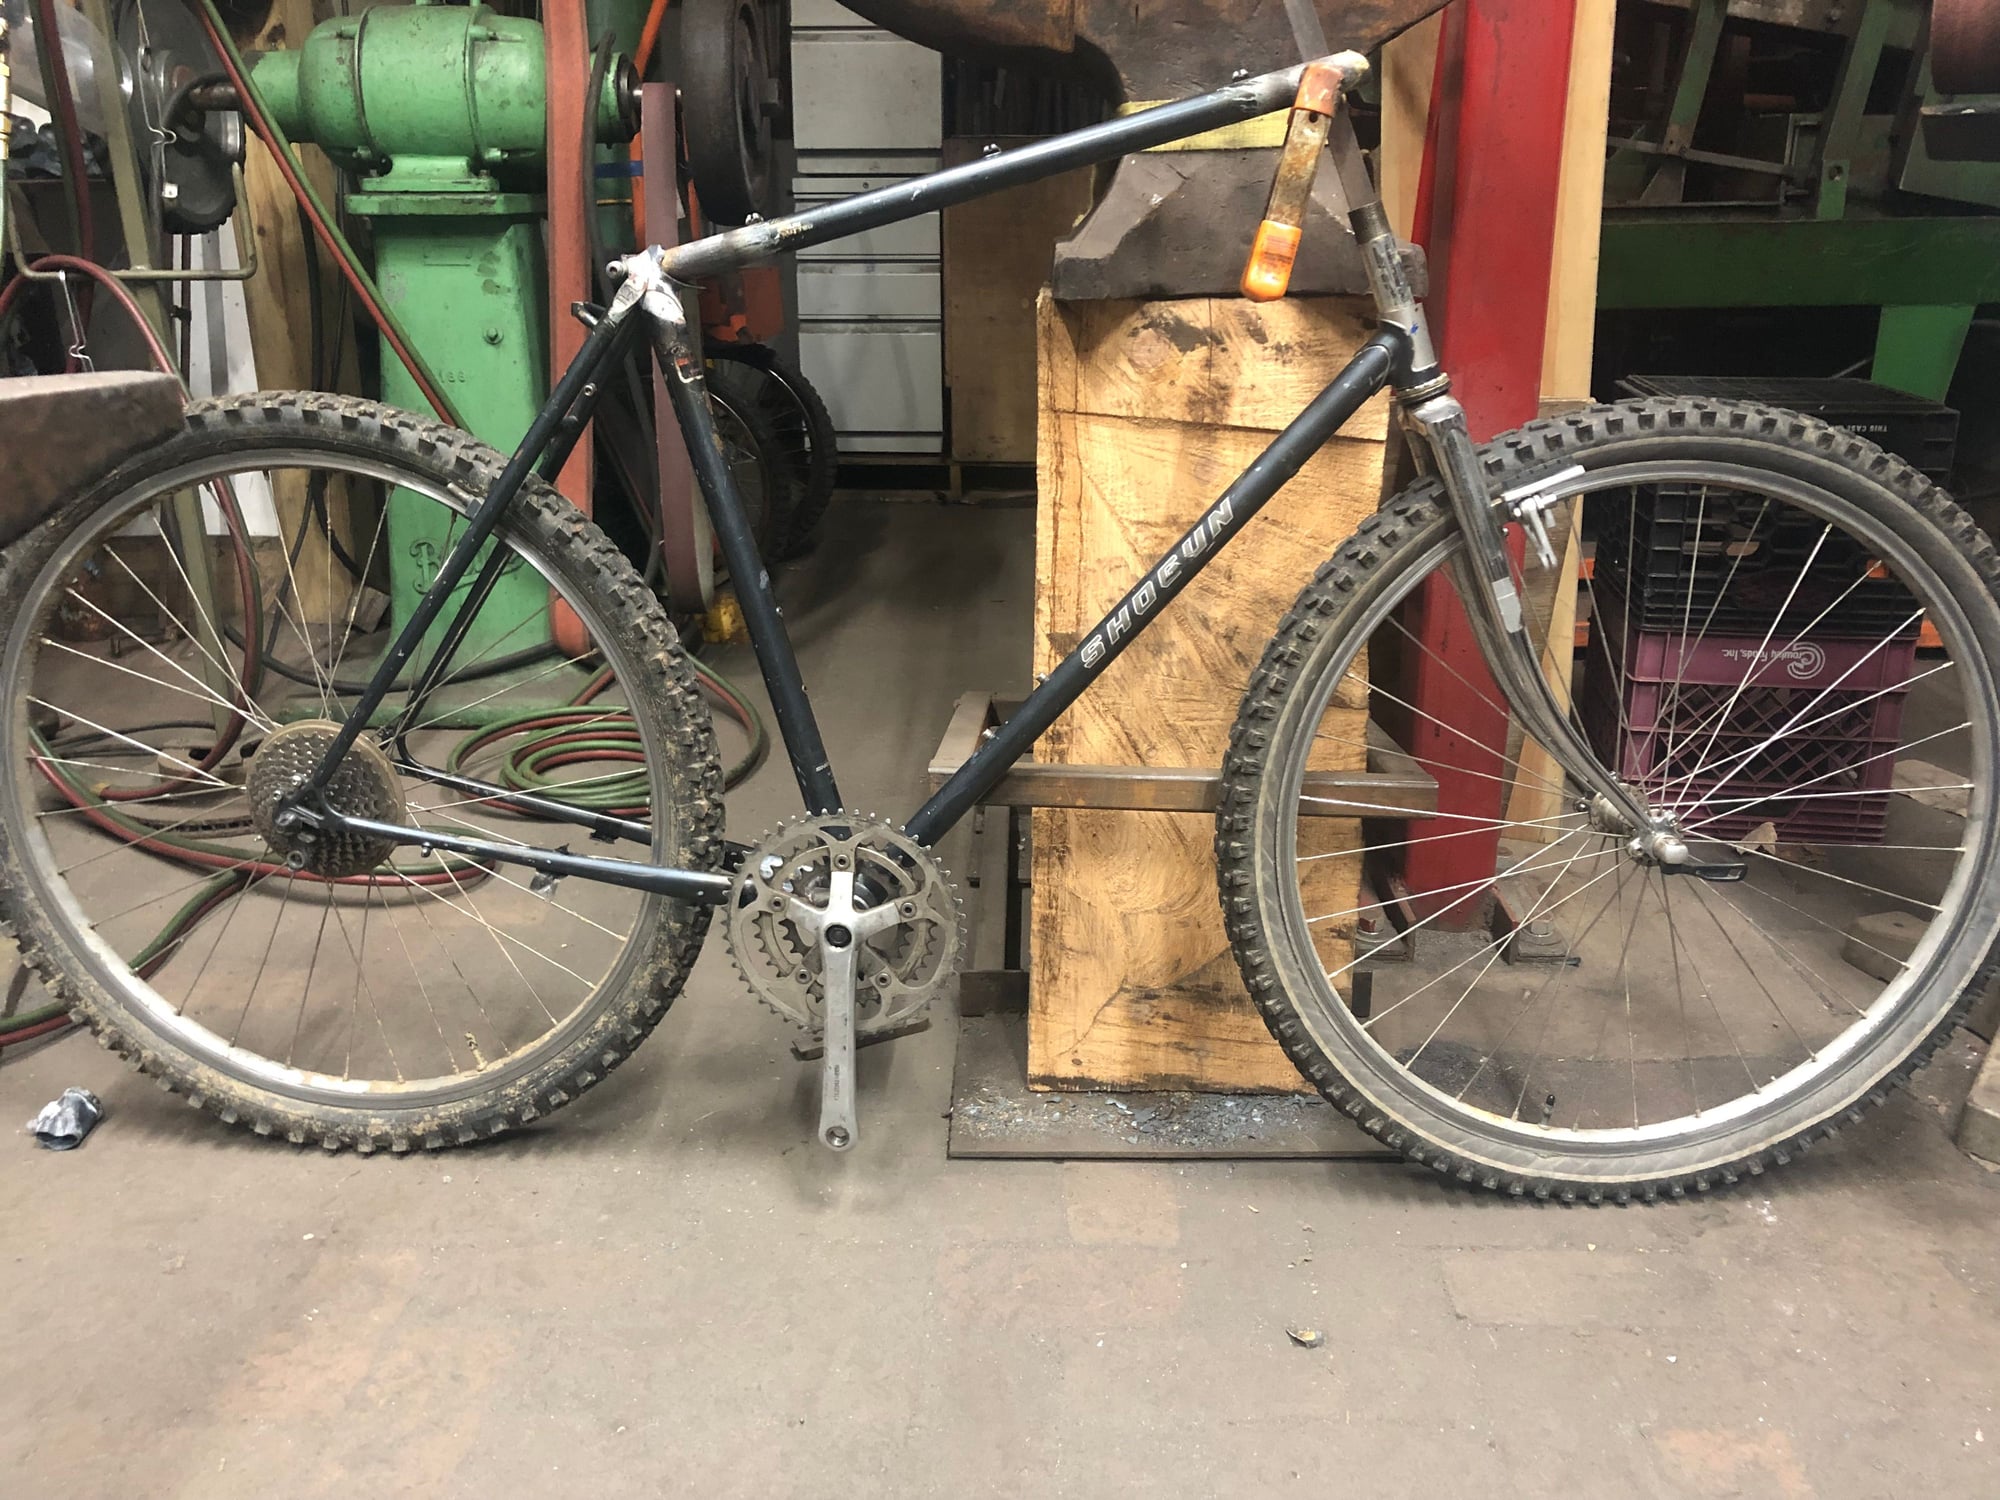
Shortly after deciding on my short reach/tall stack/fat-tire design, I started rooting around to see what bits and pieces I have for such a build. One bit which drew my attention was a 1980's 21" Shogun 500. After playing around with my trusty ruler and CAD a bit, I determined that if I could swap in a 230mm head tube I could get very close to the reach/stack which I was hoping to build (within 5mm). So that was good, but what about the tire clearance? It had 50mm clearance for 559s, so it was in striking distance. BB drop was right where I wanted it (slightly higher, actually), so it seems like a very good practice candidate to hone my frame modifying/building skills.
After a bit of hand-wringing around the matter, and playing around with the ruler some more, I pulled the trigger.
I first removed the bridge between the stays, and then used a hardwood wedge to expand the stays out to 65mm, with the goal of a 55mm tire. I drove it in with a hammer, which seemed to go okay:
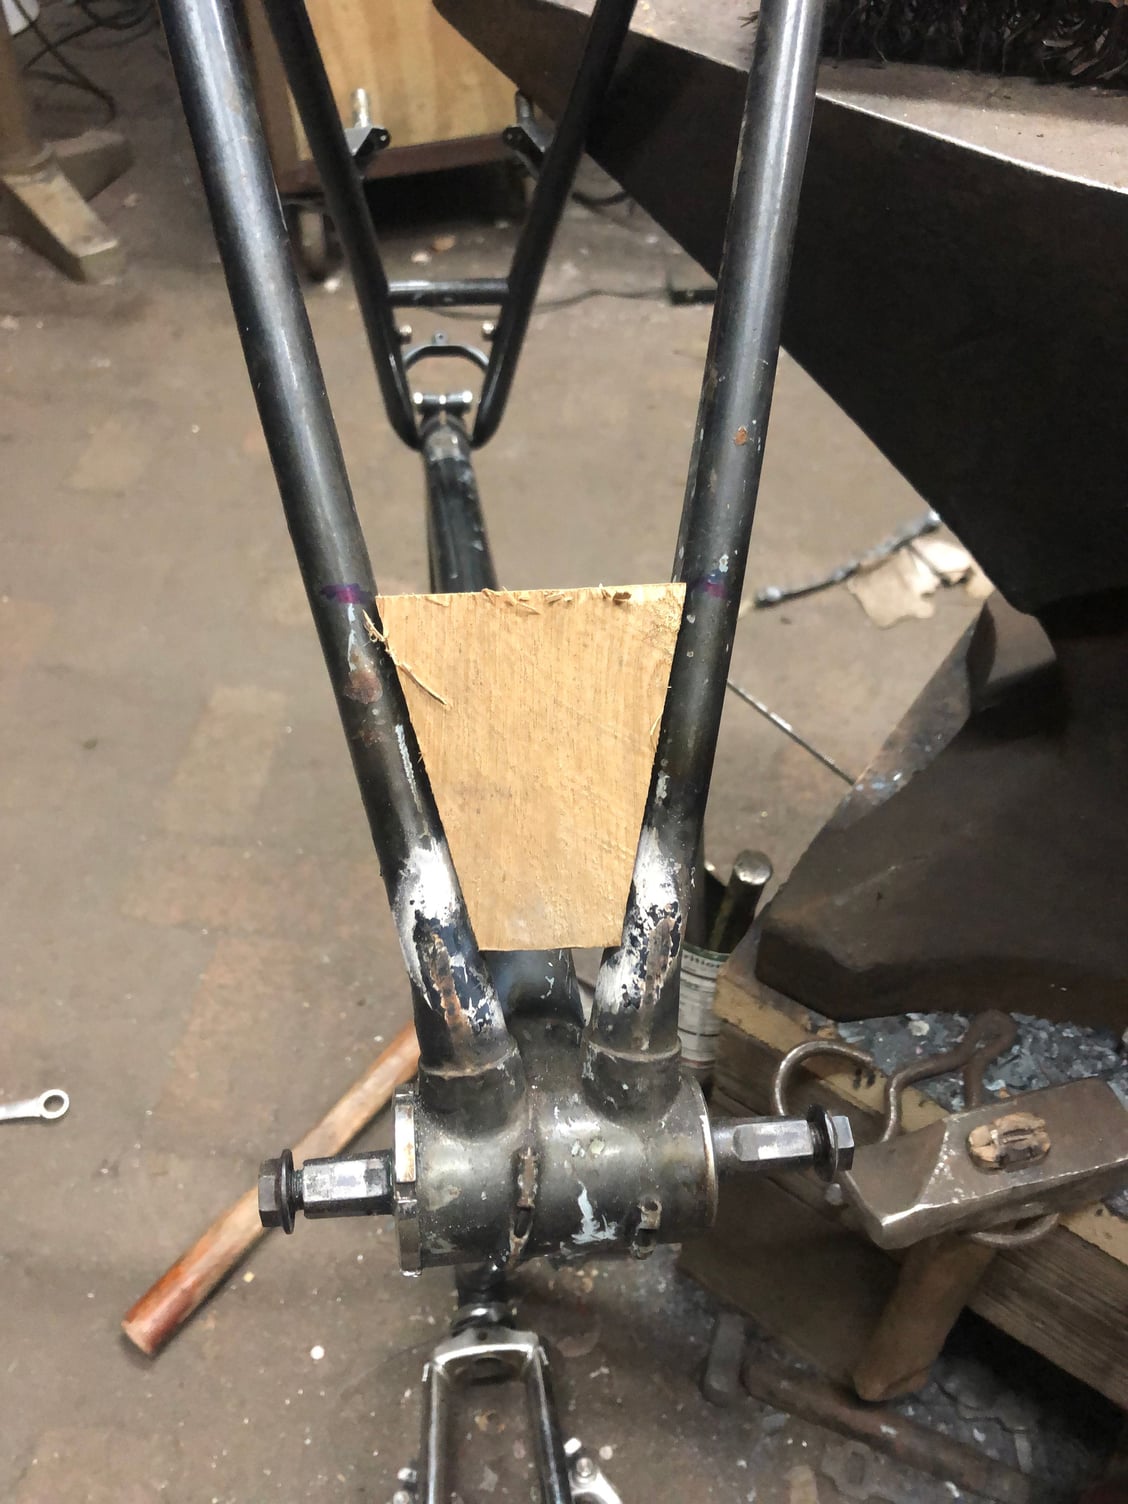
I wish I had measured things a bit more before clubbing away...it would be nice to know where the bending is actually happening. There is no obvious, abrupt deformation, so I am feeling all is well.
Now, all I needed was a 360mm wide hub and things would be great. Unfortunately, there were none around, so I bent the stays back in line, around a 65mm diameter block:

I used the threaded rod to get the drop-outs pretty close to 136, then I bumped it with my fly press around the wood block to set it. Looks decent and fits some 2.125 knobbies:
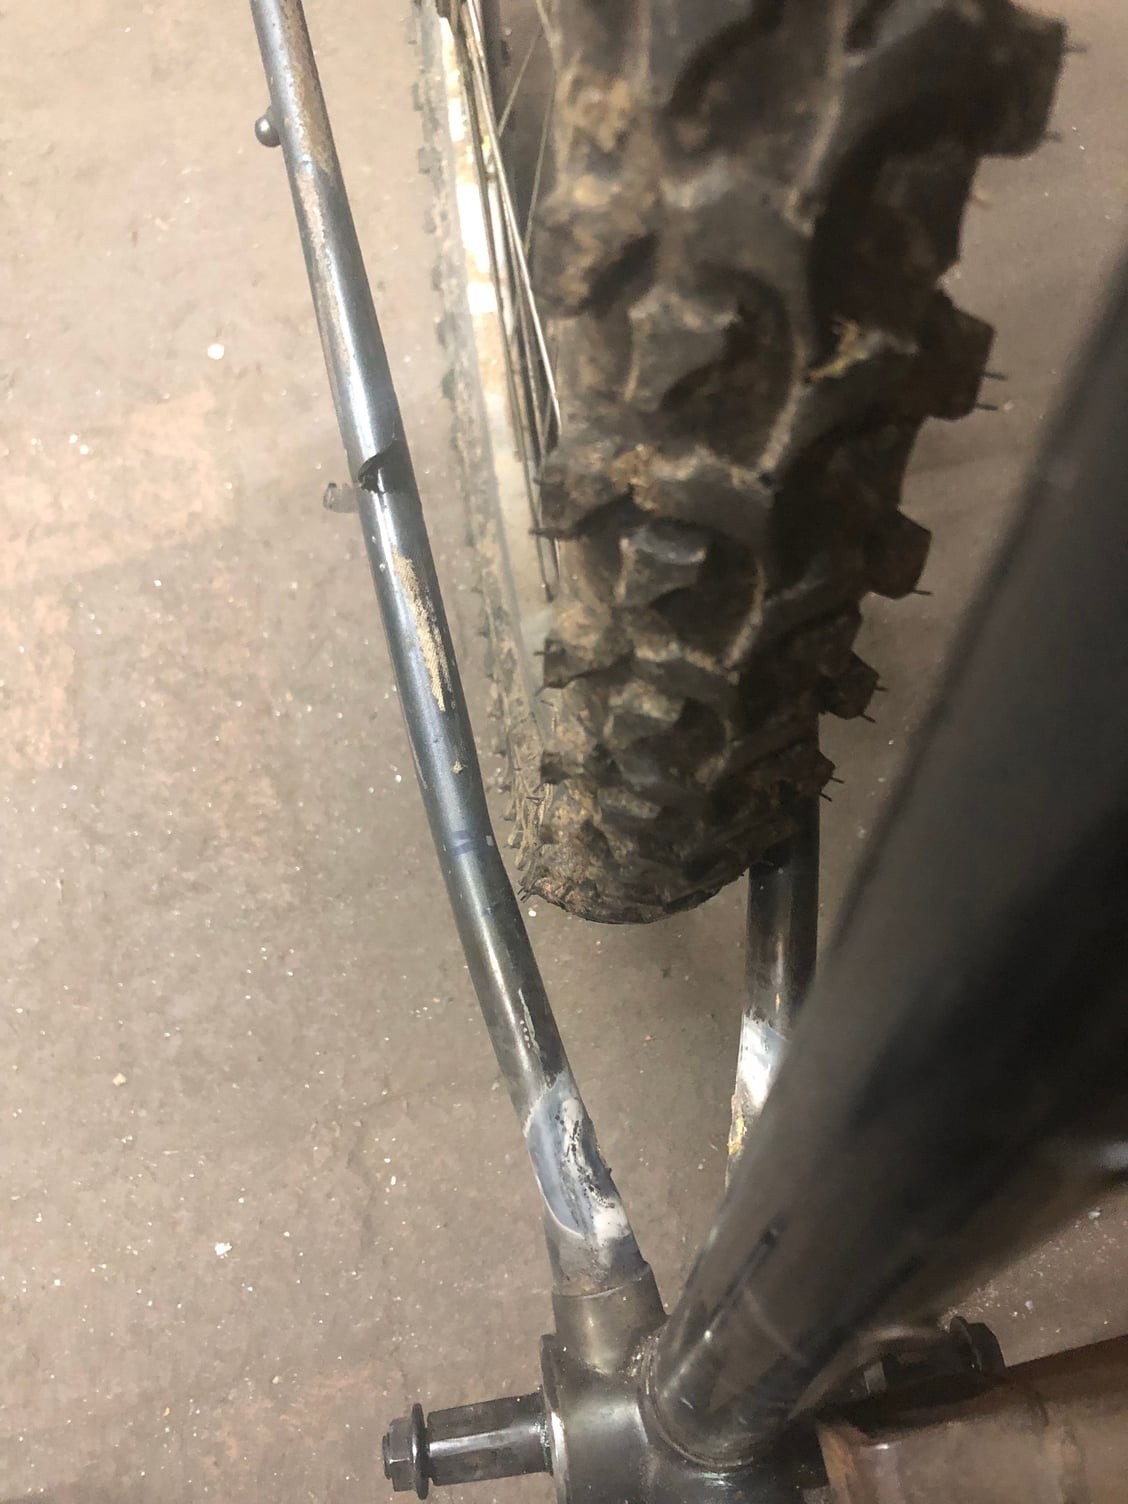
The stays are 443mm, so the bend is pretty slight. I am hoping my bend is in the correct place for non-knobby tires (I think it is right at 12"). I put on a triple crankset and there is plenty of clearance, so things seem good there too.
Next step is to rotate the TT about 15degrees up and install a taller head tube. Due to the angle of the HT, I should be able to reuse the existing top-tube if I can keep the whole thing. I think I am going to cut the HT and see if I can un-braze it from the ST. I'll file down the lug and fillet braze the TT. If I can I will reuse the existing DT lug.
After a bit of hand-wringing around the matter, and playing around with the ruler some more, I pulled the trigger.
I first removed the bridge between the stays, and then used a hardwood wedge to expand the stays out to 65mm, with the goal of a 55mm tire. I drove it in with a hammer, which seemed to go okay:
I wish I had measured things a bit more before clubbing away...it would be nice to know where the bending is actually happening. There is no obvious, abrupt deformation, so I am feeling all is well.
Now, all I needed was a 360mm wide hub and things would be great. Unfortunately, there were none around, so I bent the stays back in line, around a 65mm diameter block:
I used the threaded rod to get the drop-outs pretty close to 136, then I bumped it with my fly press around the wood block to set it. Looks decent and fits some 2.125 knobbies:
The stays are 443mm, so the bend is pretty slight. I am hoping my bend is in the correct place for non-knobby tires (I think it is right at 12"). I put on a triple crankset and there is plenty of clearance, so things seem good there too.
Next step is to rotate the TT about 15degrees up and install a taller head tube. Due to the angle of the HT, I should be able to reuse the existing top-tube if I can keep the whole thing. I think I am going to cut the HT and see if I can un-braze it from the ST. I'll file down the lug and fillet braze the TT. If I can I will reuse the existing DT lug.
Last edited by dschad; 01-02-24 at 06:44 AM.
 01-02-24, 06:24 PM
#3

blahblahblah chrome moly

I did much the same to a mid-level UJB (Bridgestone, pre-Grant) road bike, bent the chainstays out to take 26" ballooner knobbies, in about '86-88, as a polo bike. Put canti bosses at the 559 height and that's all, didn't even paint it. Awesome polo bike.
But then I brought it to Moab and used it on the Slickrock Trail, a super fun bike for trials-like stuff on the more interesting little "problems" on the slickrock. I used Avocet 1.9" slicks (or were they Specialized Fat Boys? Some kinda fat slick), great traction on the slickrock and less flinging sand on the chain (compared to knobbies) during the brief sandy sections between the slickrock.
I indented the chainstays so much that the inner wall and the outer wall of the chainstays were practically touching, but it never broke there. Both polo and slickrock are essentially a bunch of violent sprints, but I never wished for more stiffness � despite the stays having practically no resistance to flex, there where the stays were squished. Maybe it would have broken eventually, but after I didn't play polo for a few years I gave the bike away, no idea what happened after that.
Likes For bulgie:
01-03-24, 07:57 AM
#4
Junior Member
Thread Starter
I did much the same to a mid-level UJB (Bridgestone, pre-Grant) road bike, bent the chainstays out to take 26" ballooner knobbies, in about '86-88, as a polo bike. Put canti bosses at the 559 height and that's all, didn't even paint it. Awesome polo bike.
But then I brought it to Moab and used it on the Slickrock Trail, a super fun bike for trials-like stuff on the more interesting little "problems" on the slickrock. I used Avocet 1.9" slicks (or were they Specialized Fat Boys? Some kinda fat slick), great traction on the slickrock and less flinging sand on the chain (compared to knobbies) during the brief sandy sections between the slickrock.
I indented the chainstays so much that the inner wall and the outer wall of the chainstays were practically touching, but it never broke there. Both polo and slickrock are essentially a bunch of violent sprints, but I never wished for more stiffness � despite the stays having practically no resistance to flex, there where the stays were squished. Maybe it would have broken eventually, but after I didn't play polo for a few years I gave the bike away, no idea what happened after that.
But then I brought it to Moab and used it on the Slickrock Trail, a super fun bike for trials-like stuff on the more interesting little "problems" on the slickrock. I used Avocet 1.9" slicks (or were they Specialized Fat Boys? Some kinda fat slick), great traction on the slickrock and less flinging sand on the chain (compared to knobbies) during the brief sandy sections between the slickrock.
I indented the chainstays so much that the inner wall and the outer wall of the chainstays were practically touching, but it never broke there. Both polo and slickrock are essentially a bunch of violent sprints, but I never wished for more stiffness � despite the stays having practically no resistance to flex, there where the stays were squished. Maybe it would have broken eventually, but after I didn't play polo for a few years I gave the bike away, no idea what happened after that.
I tend to underestimate/over-"engineer" things, thinking how can just a thin section handle whatever issue (one such musing - how can a 1/4 Al (?) mounting stud in a caliper brake handle all the force to skid a bike to a stop?!) .
Fun to do destructive testing to start to understand the material properties, and be amazed at how a pencil line thin layer of brass stays intact as the tubes around it distort and collapse.
01-03-24, 08:28 AM
#5
Junior Member
Thread Starter
I did a bit of de-lugging (or maybe de-tubing) last night, with varying levels of success. I cut the HT in the center, and then focused on heating the lug on the ST. Using my brazing tip, this succeeded in smoking up the shop nicely, but I was unable to keep the entire thing heated sufficiently to get anywhere beyond slightly distorting the lug. So I swapped in my cutting tip and had better success, but I ended up ripping the top of the lug off. I was working on it upside-down and wiggling too much I think. Wiggling is a no-no I think, just pull directly out and/or rotate.
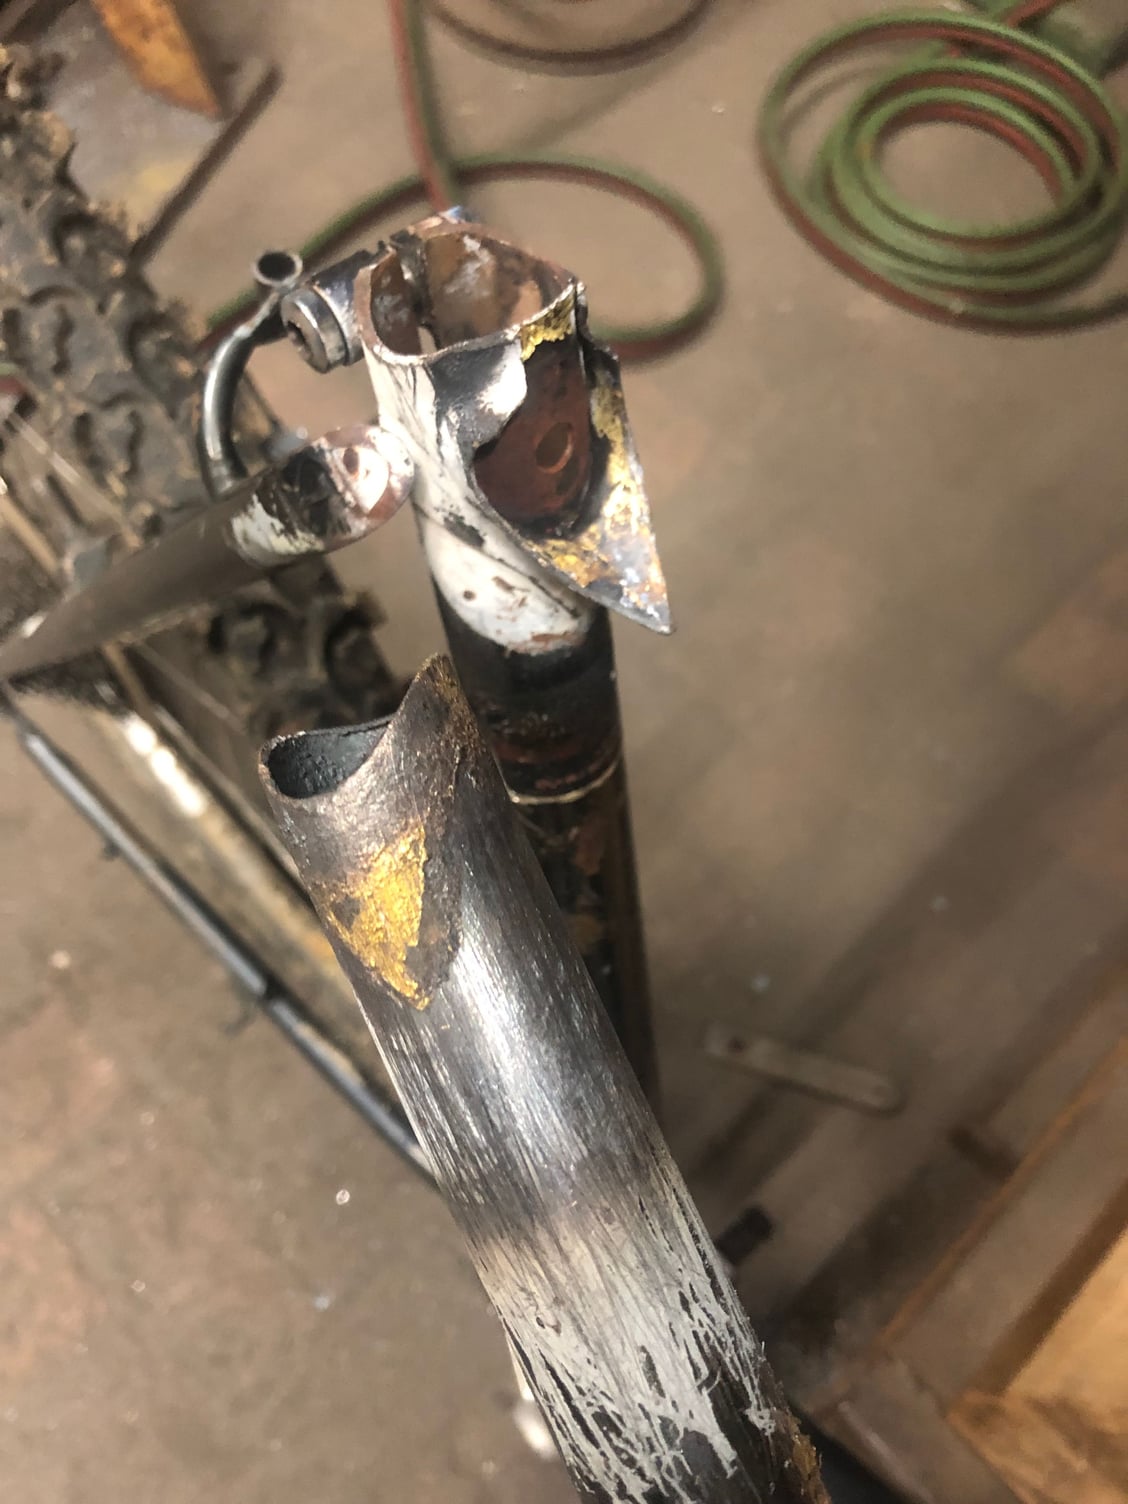
But, not to worry - I don't think that the lug is going to make into the next phase anyway, and the focus was keeping the TT in good shape for reuse. I did think about grinding it out at the ST lug, but this was a good exercise for sure.
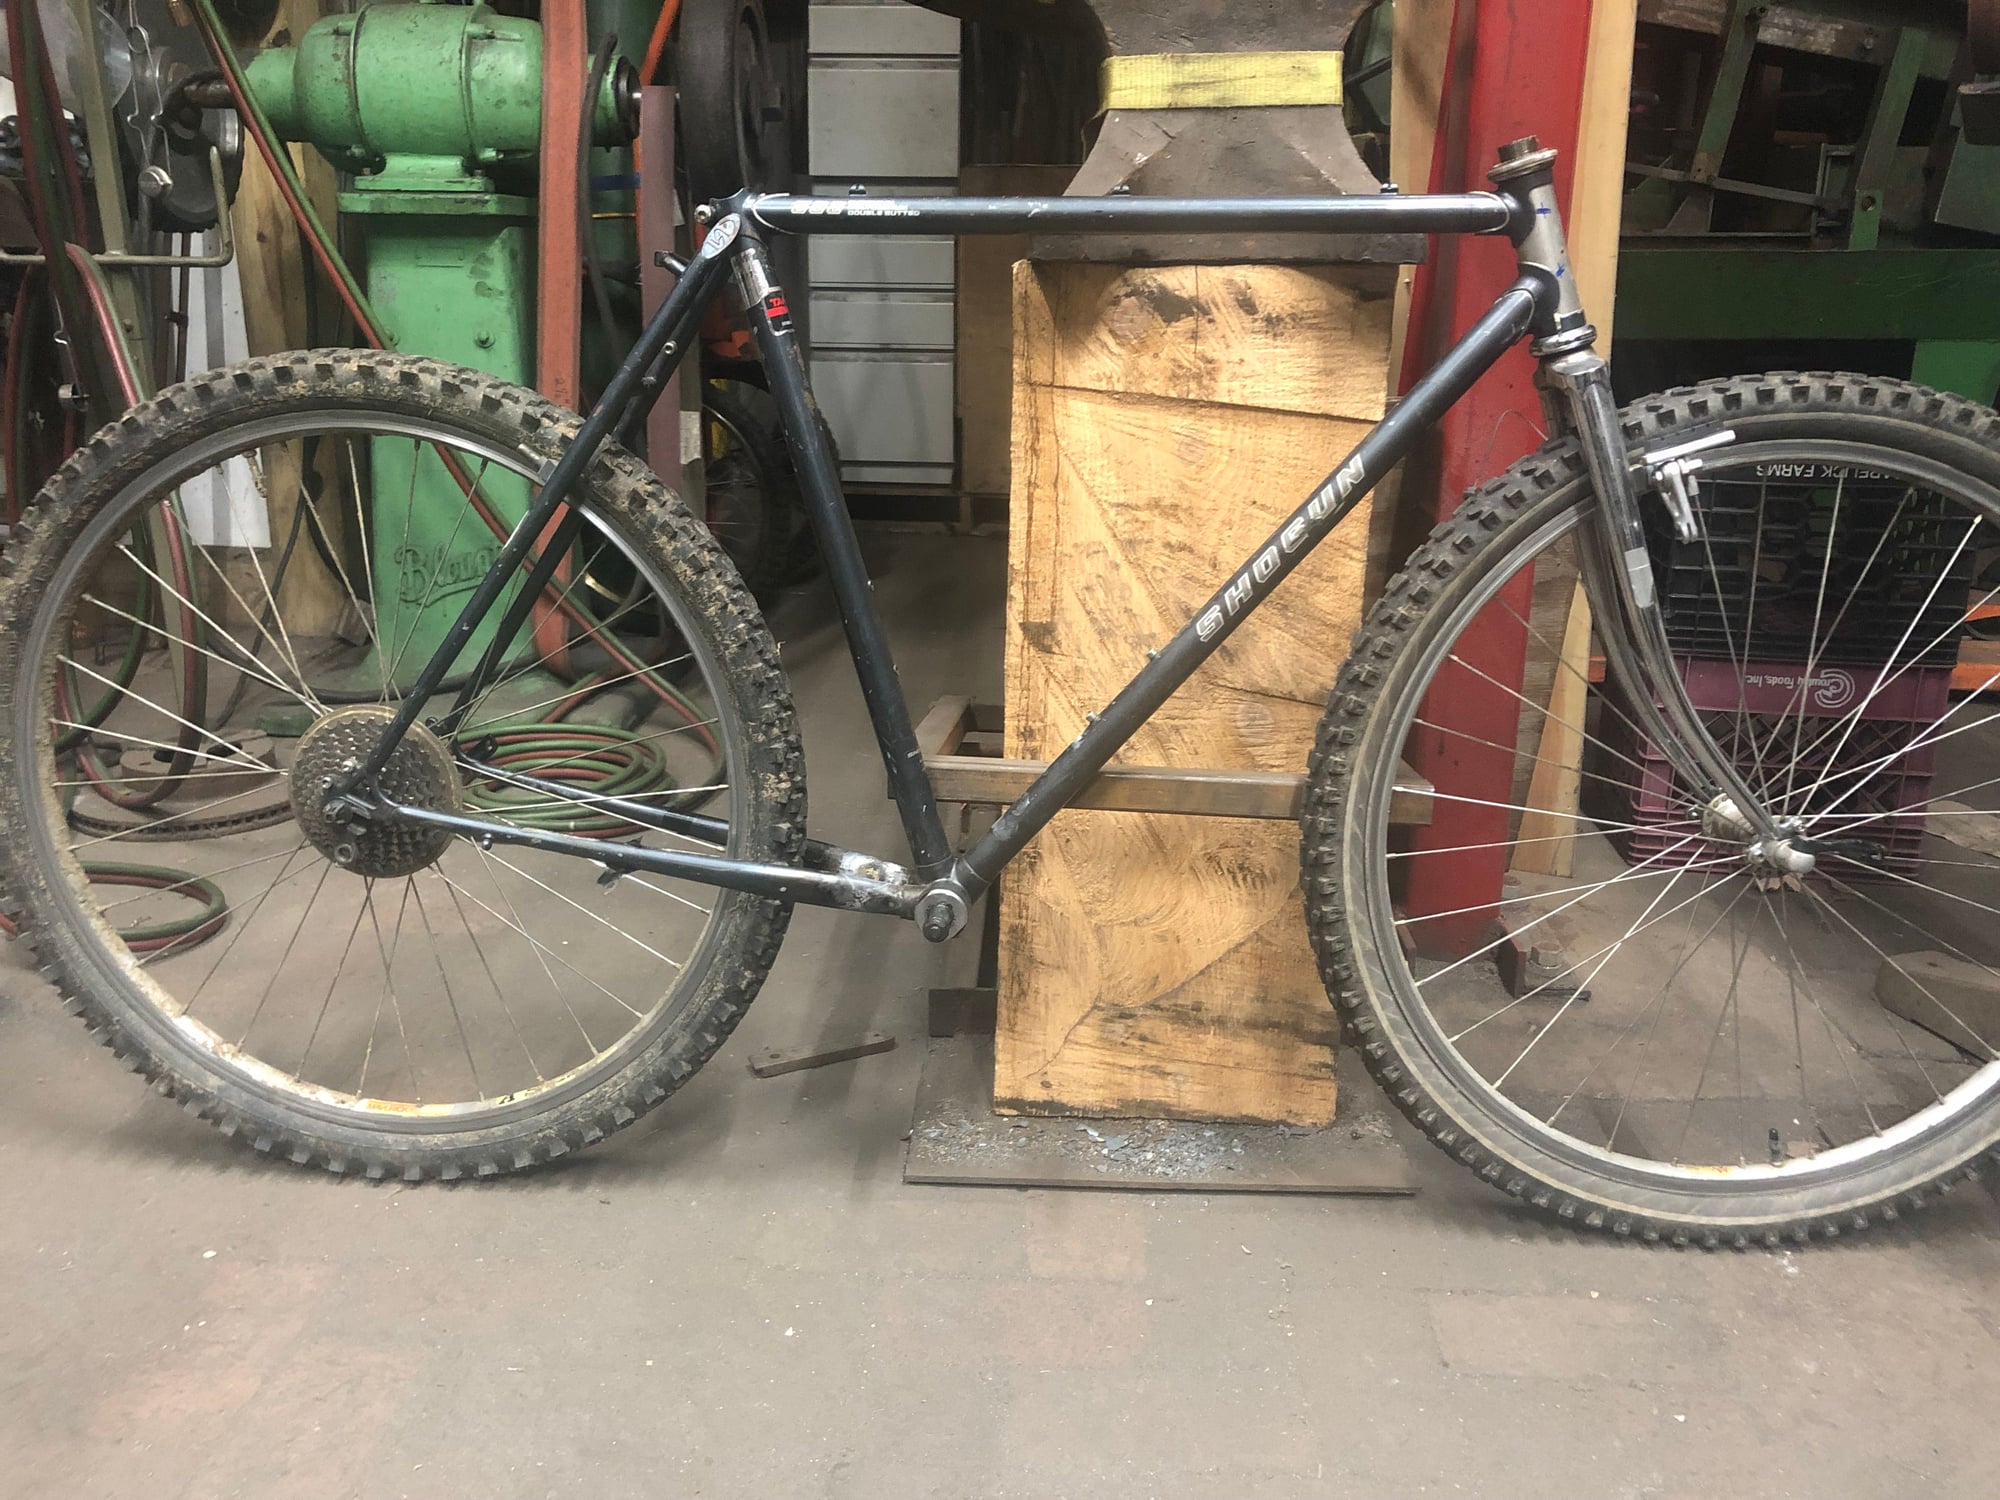
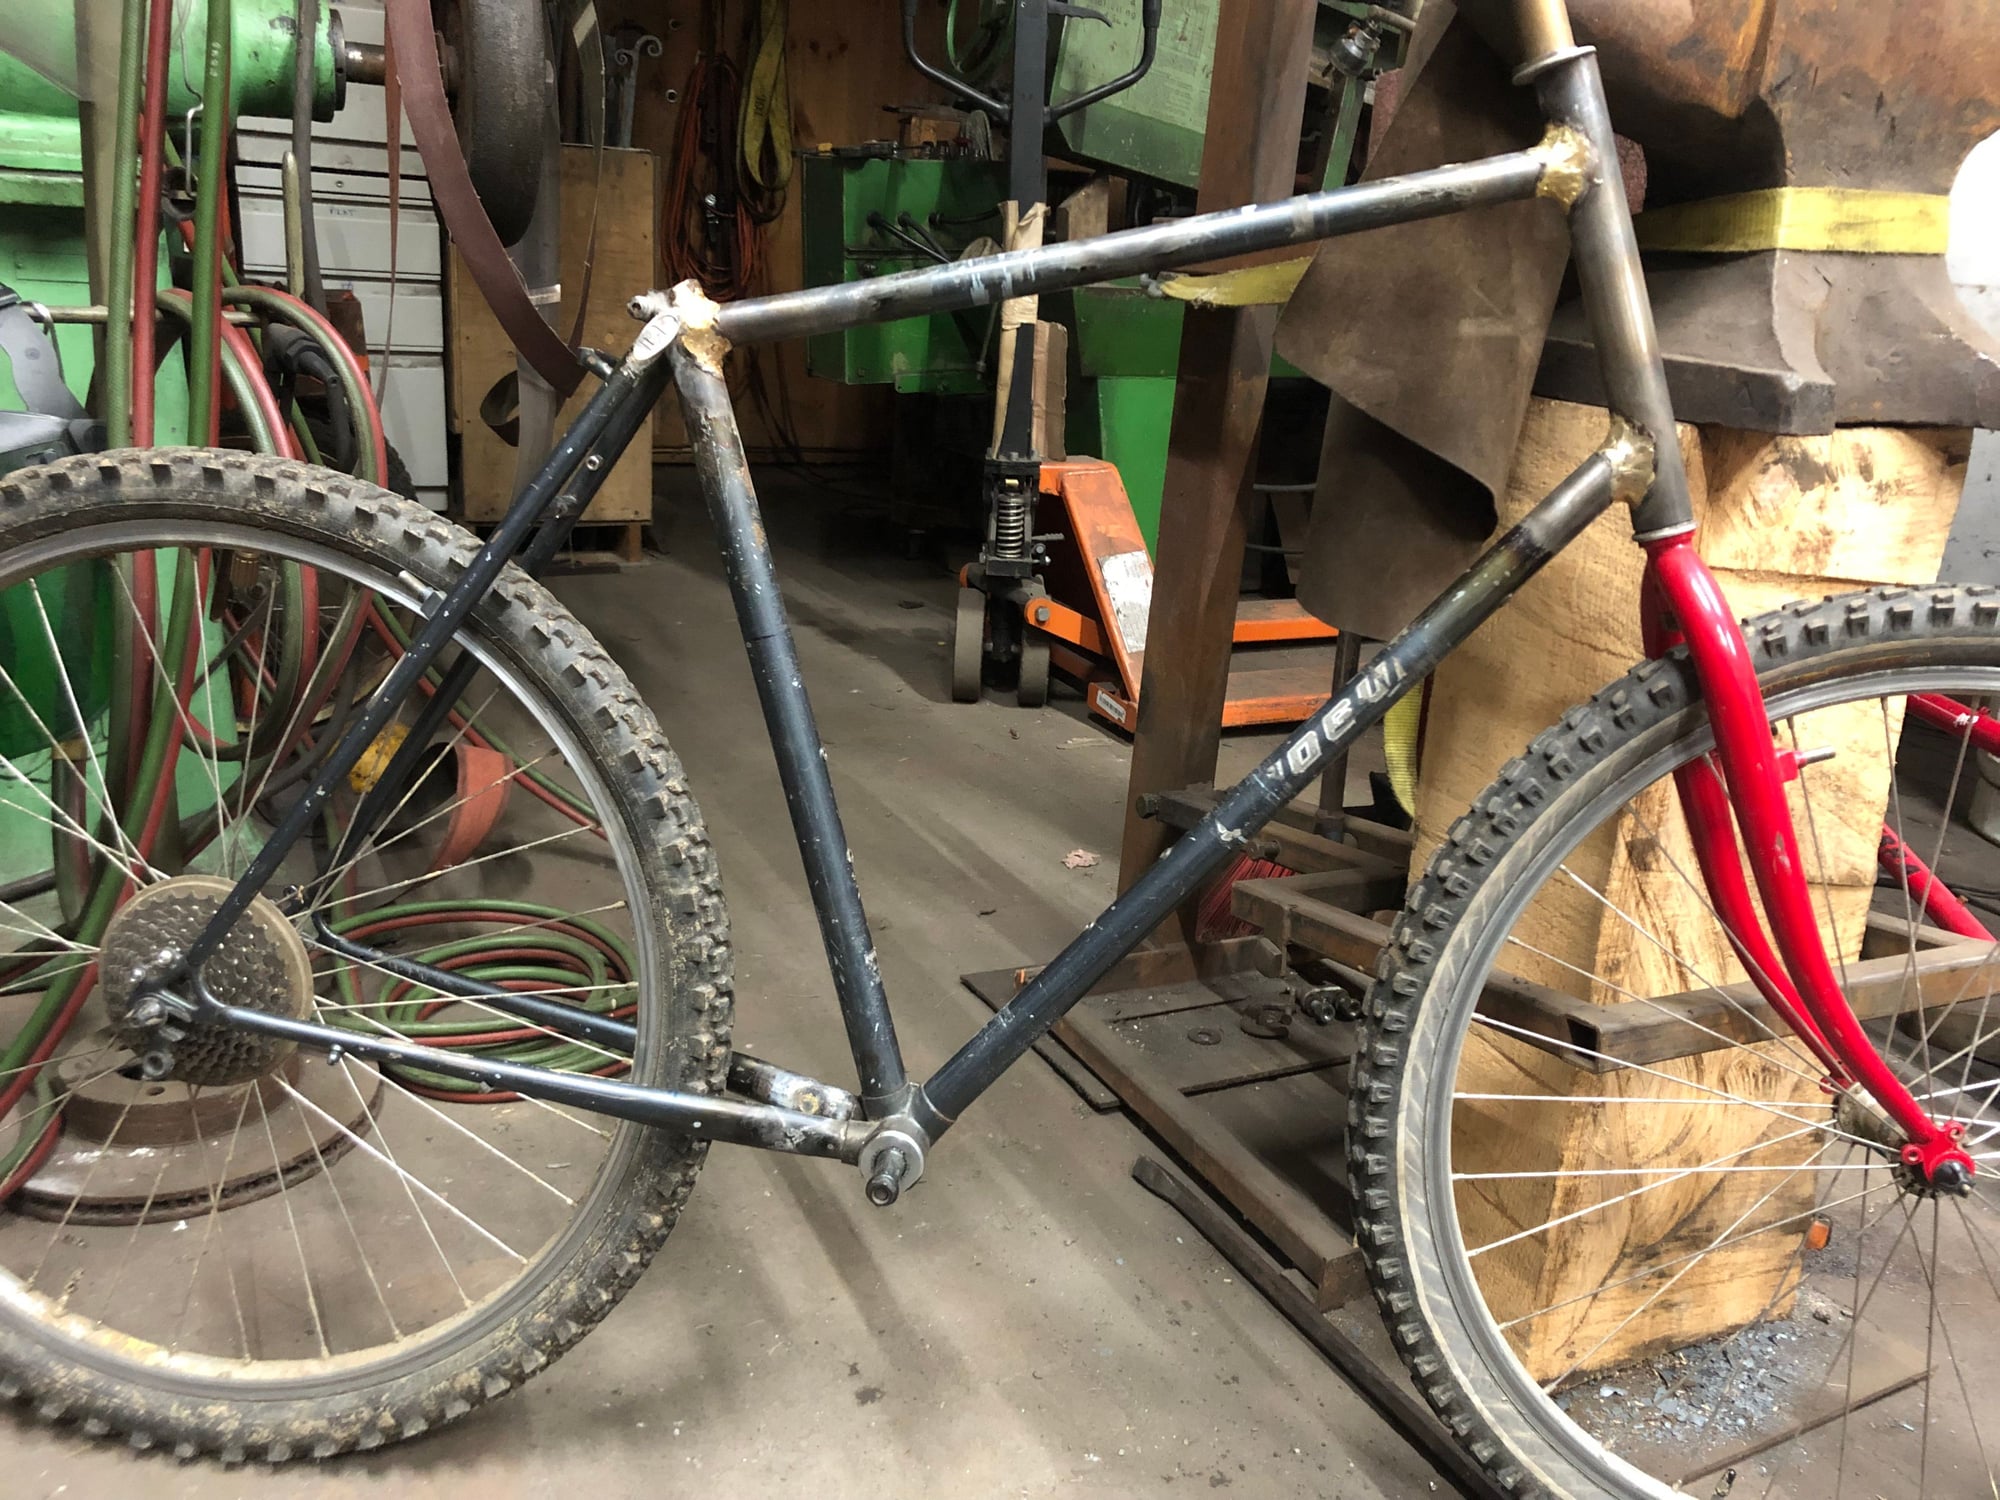
Of course, I couldn't go to bed without a mock up:
TT is long enough, but I'm not sure about the look...I'm considering extending the ST, which expands the project a significantly...
I'll work on getting the HT swapped in tonight and see what it looks like after that.
But, not to worry - I don't think that the lug is going to make into the next phase anyway, and the focus was keeping the TT in good shape for reuse. I did think about grinding it out at the ST lug, but this was a good exercise for sure.
Of course, I couldn't go to bed without a mock up:
TT is long enough, but I'm not sure about the look...I'm considering extending the ST, which expands the project a significantly...
I'll work on getting the HT swapped in tonight and see what it looks like after that.
Last edited by dschad; 01-03-24 at 12:06 PM.
Likes For dschad:
01-03-24, 11:07 AM
#6
Senior Member
Nice work! It's possible that the first bend you made actually happened in the BB lug. I have heard they can be quite floppy (and the "old school" system of frame alignment kind of assumes this).
01-03-24, 03:44 PM
#7
blahblahblah chrome moly
Hope they used a thick-wall stay there, because it barely counts as tubing anymore when you squish it down that far.
Likes For bulgie:
01-03-24, 04:42 PM
#8
Junior Member
Thread Starter
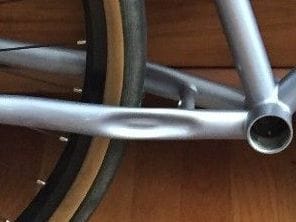
I've seen some frames, Taiwanese I think, where they indented the right-side chainstay so much you can see the inside dent coming through into the outside (chainring) dent! This is a pic of a Rawland but I've seen the same on some other brands, maybe made in the same factory.
Hope they used a thick-wall stay there, because it barely counts as tubing anymore when you squish it down that far.
Hope they used a thick-wall stay there, because it barely counts as tubing anymore when you squish it down that far.
That's pretty interesting, although I prefer the smooth outside at least.
Likes For dschad:
01-14-24, 07:56 PM
#9
Junior Member
Thread Starter
Progress on the most measured frame in history
So, after endless measuring, thinking and remeasuring...I finally got sick of it and put the bloody thing back together.
I found a nice fork in my stash, fits great, although the steerer needs to be extended.
Overall the frame is working out very nicely for the geometry I was hoping (in my other design) - 73STA, 71.5HTA, or somewhere around there. The trail with the 58 offset fork is about 59. Drop is like 60, for 10" BB height, plenty good. And front center is coming in at 605, which gives me room for 26x2.3 with fenders (according to my calculations). This is going to be a little bit short in reach (like 10mm), but with my huge HT, I can get the stack I want. I still need to trim the HT at the top and see about getting it reamed.
Super fun. Can't wait to ride it!
Likes For dschad:
01-14-24, 08:41 PM
#10
blahblahblah chrome moly
So, after endless measuring, thinking and remeasuring...I finally got sick of it and put the bloody thing back together.
I found a nice fork in my stash, fits great, although the steerer needs to be extended.
Overall the frame is working out very nicely for the geometry I was hoping (in my other design) - 73STA, 71.5HTA, or somewhere around there. The trail with the 58 offset fork is about 59. Drop is like 60, for 10" BB height, plenty good. And front center is coming in at 605, which gives me room for 26x2.3 with fenders (according to my calculations). This is going to be a little bit short in reach (like 10mm), but with my huge HT, I can get the stack I want. I still need to trim the HT at the top and see about getting it reamed.
Super fun. Can't wait to ride it!
I found a nice fork in my stash, fits great, although the steerer needs to be extended.
Overall the frame is working out very nicely for the geometry I was hoping (in my other design) - 73STA, 71.5HTA, or somewhere around there. The trail with the 58 offset fork is about 59. Drop is like 60, for 10" BB height, plenty good. And front center is coming in at 605, which gives me room for 26x2.3 with fenders (according to my calculations). This is going to be a little bit short in reach (like 10mm), but with my huge HT, I can get the stack I want. I still need to trim the HT at the top and see about getting it reamed.
Super fun. Can't wait to ride it!
01-14-24, 10:06 PM
#11
Junior Member
Thread Starter
That anvil was recomissioned as the anvil for a treadle hammer when I was reorganizing to save space (getting stuff off the floor!) The foot linkage brings a 70# head down. Gives that third hand you need sometimes.
I have a pretty good setup with gas, coal and an induction forge. I used the latter to unbraze the lugs from the tubes, it allows an even heat of 360 degrees.
This bike project is very unlike blacksmithing, because I am using the smallest lines on my ruler. And even the units that don't really apply in America.
01-15-24, 03:36 AM
#12
blahblahblah chrome moly

But seriously, I'm jealous of your blacksmith setup. I have no room for a forge or even an anvil in my tiny shop, and wifey won't let me take over the back yard...
01-15-24, 07:26 AM
#13
Junior Member
Thread Starter
But be careful, it grows - 20 years later you might find you a have a 5000# hammer bolted to a yard of concrete...
01-15-24, 11:03 AM
#14
Senior Member
Join Date: Feb 2012
Location: Rochester, NY
Posts: 18,341
Bikes: Stewart S&S coupled sport tourer, Stewart Sunday light, Stewart Commuting, Stewart Touring, Co Motion Tandem, Stewart 3-Spd, Stewart Track, Fuji Finest, Mongoose Tomac ATB, GT Bravado ATB, JCP Folder, Stewart 650B ATB
Liked 4,188 Times
in
2,471 Posts
Induction heating is a neat topic. I've watched it done in large scale factory vids and it's pretty amazing how quickly the steel heats to a bright orange. Your induction forge reminds me of reading of hearth brazing with a plug of filler inserted into the joint first. I'm grateful that the wife enjoys watching "Forged in Fire" and tolerated noise and smells from the basement. Andy
__________________
AndrewRStewart
AndrewRStewart
01-15-24, 02:50 PM
#15
blahblahblah chrome moly
Ugh, I watched part of one episode and turned it off in disgust part way through. Contestants were given the task of making a Katana (Japanese sword), and they started with a chunk of steel as long as a sword and proceeded to make "Katana-shaped objects" by grinding away metal off the chunk til it looked right. I'm no expert but even I know that's not how katanas are made!
Are other episodes less annoying, i.e. should I give it a second try?
Are other episodes less annoying, i.e. should I give it a second try?
01-15-24, 04:08 PM
#16
Junior Member
Thread Starter
Induction heating is a neat topic. I've watched it done in large scale factory vids and it's pretty amazing how quickly the steel heats to a bright orange. Your induction forge reminds me of reading of hearth brazing with a plug of filler inserted into the joint first. I'm grateful that the wife enjoys watching "Forged in Fire" and tolerated noise and smells from the basement. Andy
You wouldn't have time if you'd get an anvil...
The few times I've seen it, I was ranting at the TV. I'm a bit biased, but I don't think there is enough interesting forging, and they do a disservice to the science. Lots of good forging on YouTube to help understand the processes.
Back to the Zen of filing brass fillets...
01-15-24, 05:23 PM
#17
Senior Member
Join Date: Feb 2012
Location: Rochester, NY
Posts: 18,341
Bikes: Stewart S&S coupled sport tourer, Stewart Sunday light, Stewart Commuting, Stewart Touring, Co Motion Tandem, Stewart 3-Spd, Stewart Track, Fuji Finest, Mongoose Tomac ATB, GT Bravado ATB, JCP Folder, Stewart 650B ATB
Liked 4,188 Times
in
2,471 Posts
I like the first two rounds of the contest when the contestants are at the "forge". Watching the various methods, abilities and outcomes side by side is the fun part IMO. Making replica weaponry isn't my thing either. One of the better episodes was when previous champs went against one of the judges. Or another when each contestant had their teacher/mentor there to do "X" amount of the work. But I also agree that the show is a bit contrived and not very realistic at times. Andy (who no longer thinks everything he sees on TV is true...)
__________________
AndrewRStewart
AndrewRStewart
01-15-24, 07:23 PM
#18
blahblahblah chrome moly
01-15-24, 07:48 PM
#19
blahblahblah chrome moly
There's no level of small that my neighbors would like. I'm in an urban neighborhood with postage-stamp sized lots. One neighbor is 10 feet from where I'd be hammering, in the driveway, since I have almost no shop space. I really like my neighbors (on all sides), wouldn't want to make their lives miserable for my hobby. I feel bad enough using a die-grinder out there, try to keep the noisier processes in my tiny basement. Ceiling there is too low to really swing a hammer though. And that's where my lathe and mill are, in a roughly 10'x10' space.
I love hammering on red hot metal though. Maybe in another lifetime...
I love hammering on red hot metal though. Maybe in another lifetime...
Likes For bulgie:
01-16-24, 08:23 AM
#20
Junior Member
Thread Starter
A lot of blacksmithing guilds have common space and equipment where you can work and learn ("open forge"). You might look for a group to join and take advantage of their resources, and/or share your building/torching skills. I know there is a lot of activity in the PNW.
Likes For dschad:
01-16-24, 09:51 AM
#21
Senior Member
Join Date: Feb 2012
Location: Rochester, NY
Posts: 18,341
Bikes: Stewart S&S coupled sport tourer, Stewart Sunday light, Stewart Commuting, Stewart Touring, Co Motion Tandem, Stewart 3-Spd, Stewart Track, Fuji Finest, Mongoose Tomac ATB, GT Bravado ATB, JCP Folder, Stewart 650B ATB
Liked 4,188 Times
in
2,471 Posts
I tried to hook up with two different "maker space" type collectives when I moved back home 15 years ago. One wasn't allowed (wood floors and fire code) to have welding done (or tanks even just stored inside) and the other was rife with guys who seemed to seek the alpha dog position regardless of their skills or knowledge. But these collectives of like minded dooers can be a good way to access tools and space unavailable elsewhere.
In Chicago Owen at Blue City Cycles set up a collective frame building/painting collective as another example. A number of people had their own shop space in an old warehouse. My sister has much the same studio space in an old manufacturing building here in Rochester. She much have a dozen+ artist neighbors there. Andy
In Chicago Owen at Blue City Cycles set up a collective frame building/painting collective as another example. A number of people had their own shop space in an old warehouse. My sister has much the same studio space in an old manufacturing building here in Rochester. She much have a dozen+ artist neighbors there. Andy
__________________
AndrewRStewart
AndrewRStewart
01-16-24, 09:56 AM
#22
Senior Member
[QUOTE=Andrew R Stewart;23130877]In Chicago Owen at Blue City Cycles set up a collective frame building/painting collective as another example./QUOTE]
I tried to get in touch a couple months ago, but have heard nothing back. (I need lathe access for a frame repair.) Do you perhaps have a reliable way to contact Owen? (PM or email is fine.)
I tried to get in touch a couple months ago, but have heard nothing back. (I need lathe access for a frame repair.) Do you perhaps have a reliable way to contact Owen? (PM or email is fine.)
01-16-24, 10:07 AM
#23
Senior Member
Join Date: Feb 2012
Location: Rochester, NY
Posts: 18,341
Bikes: Stewart S&S coupled sport tourer, Stewart Sunday light, Stewart Commuting, Stewart Touring, Co Motion Tandem, Stewart 3-Spd, Stewart Track, Fuji Finest, Mongoose Tomac ATB, GT Bravado ATB, JCP Folder, Stewart 650B ATB
Liked 4,188 Times
in
2,471 Posts
Sorry but the last time I dealt with Owen was back in 2012 or so. I bought the old jig from Cyclery North and visited with him and other guys in the building. Is Blue City Cycles no longer even open? I just pulled up their website and it looked like it was still open for business.
What's the turning project? Could this be done long distance? I have a SB 9A i use for small bits. Andy
What's the turning project? Could this be done long distance? I have a SB 9A i use for small bits. Andy
__________________
AndrewRStewart
AndrewRStewart
01-16-24, 10:14 AM
#24
Junior Member
Thread Starter
I tried to hook up with two different "maker space" type collectives when I moved back home 15 years ago. One wasn't allowed (wood floors and fire code) to have welding done (or tanks even just stored inside) and the other was rife with guys who seemed to seek the alpha dog position regardless of their skills or knowledge. But these collectives of like minded dooers can be a good way to access tools and space unavailable elsewhere.
01-21-24, 04:06 PM
#25
Junior Member
Thread Starter
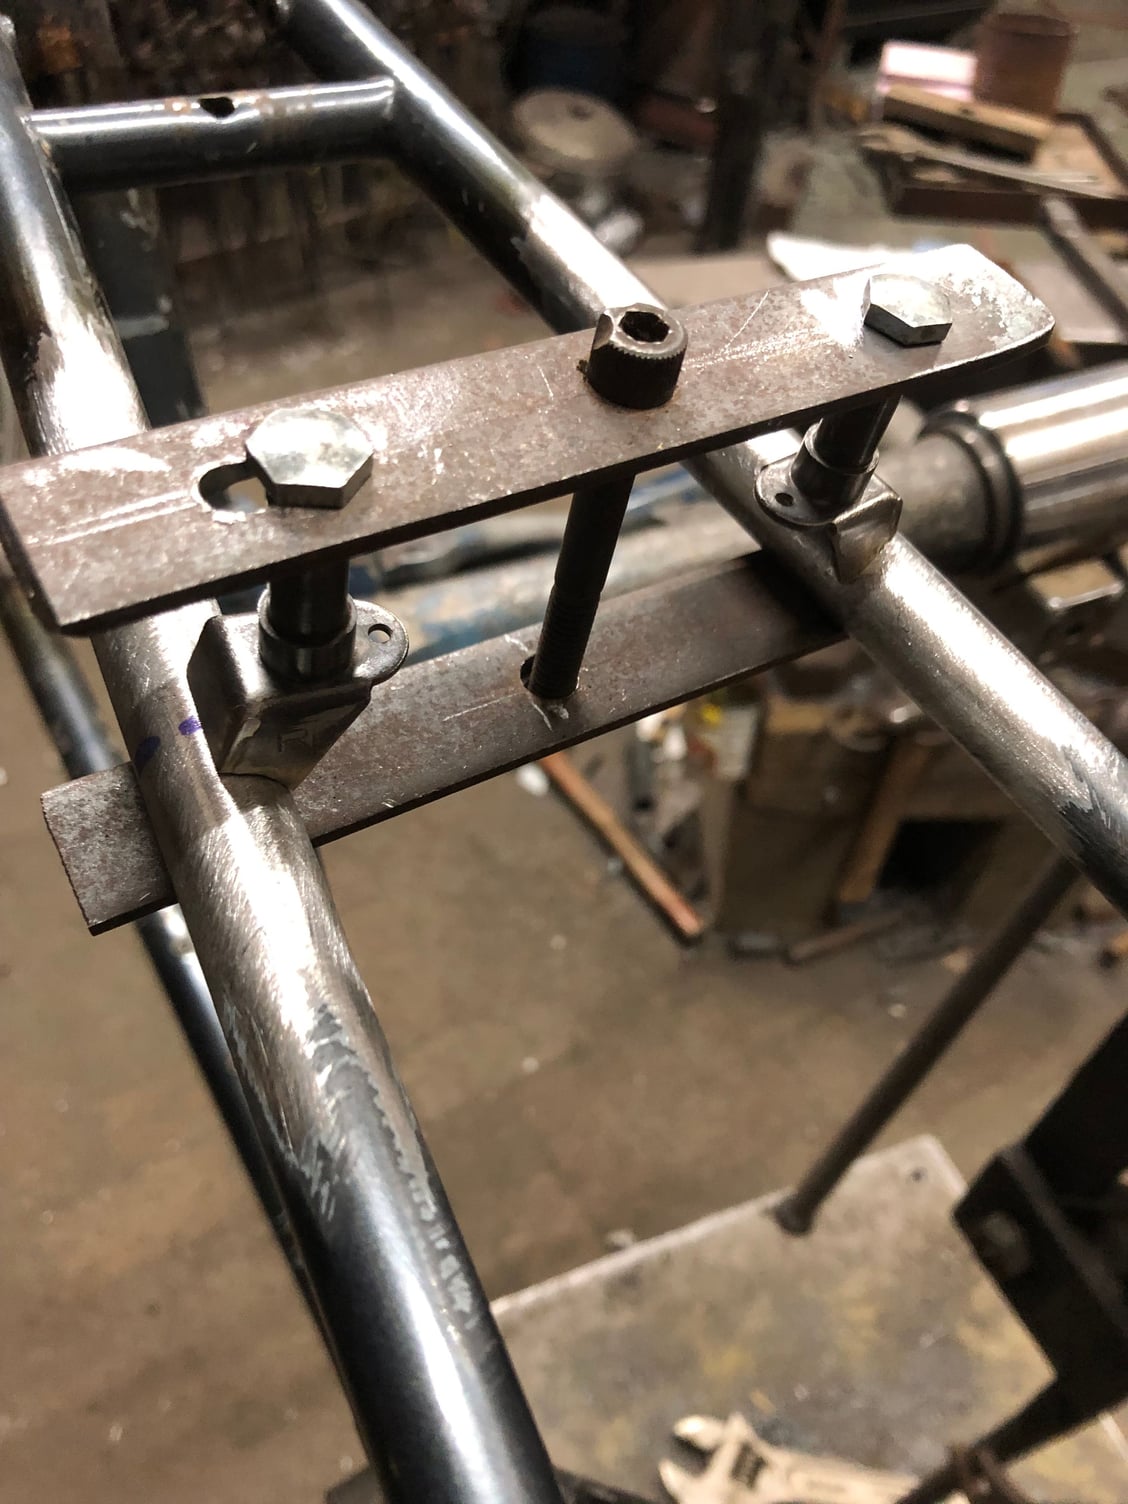
Brake bosses
Coming down the home stretch I suppose, or at least I can see it around the next corner. I relocated the canti bosses which were setup for 27".
I made the tool (based on versions I've seen by others on this site):
Found a dirty wheel and verified that my ruler was accurate:
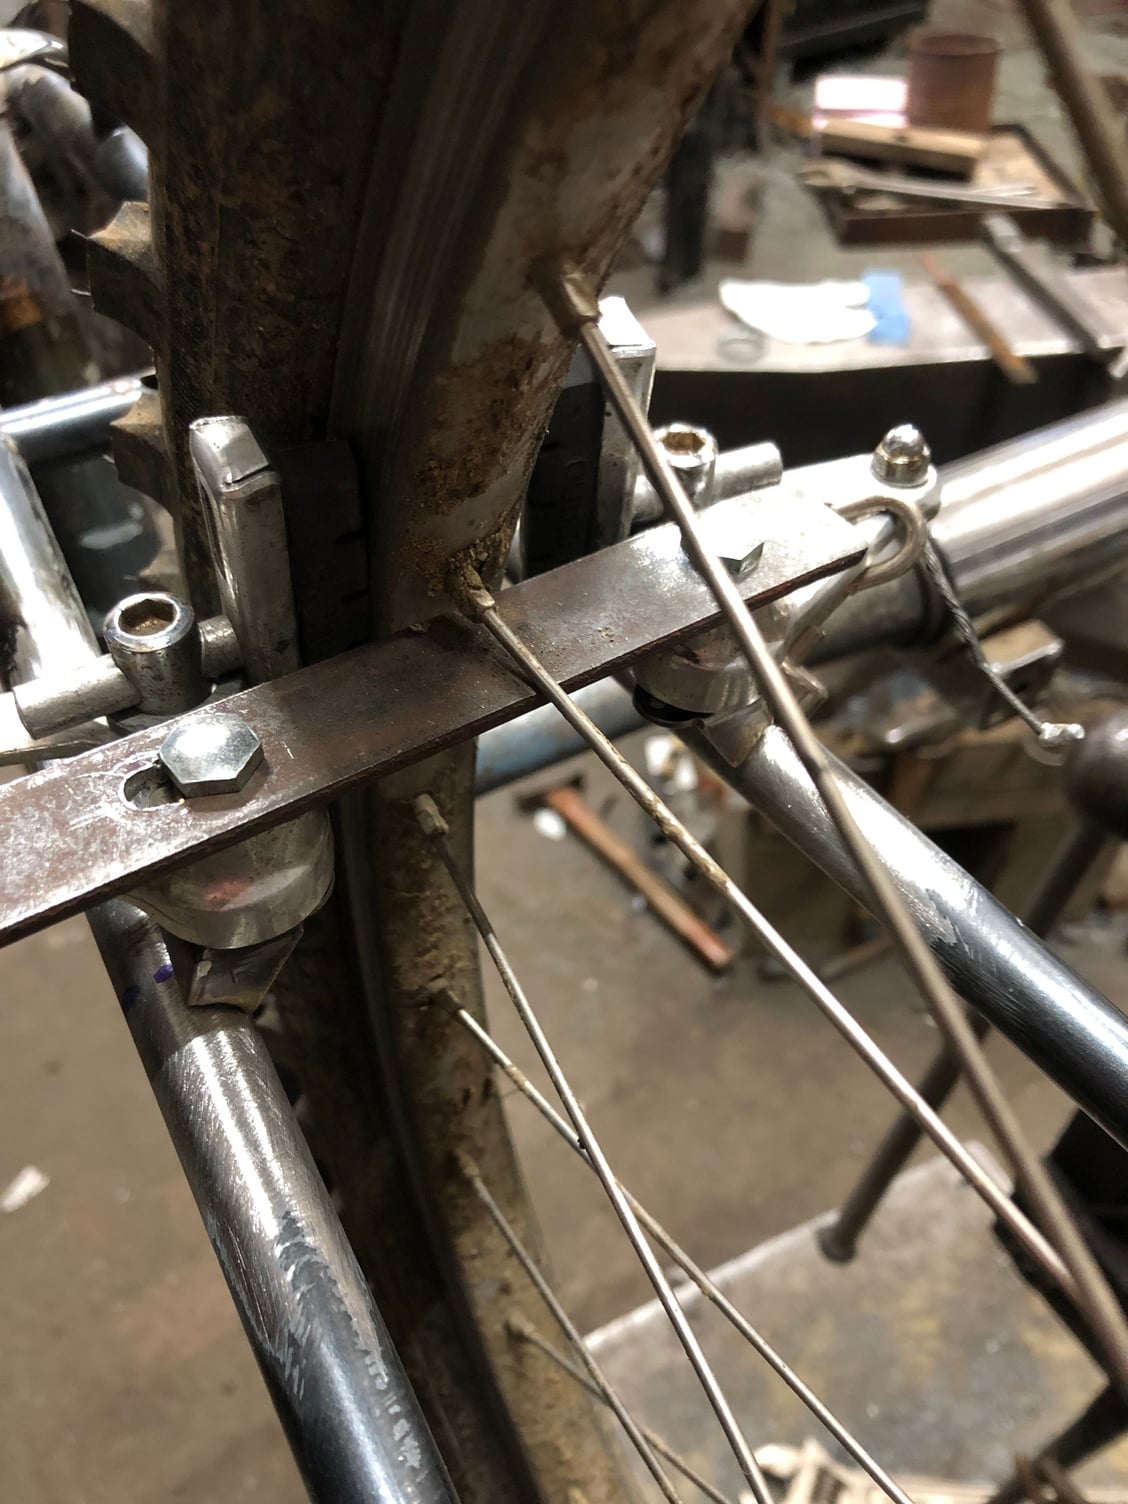
and pulled the trigger while I still had a bit of feeling in my fingers (shop is cold!):
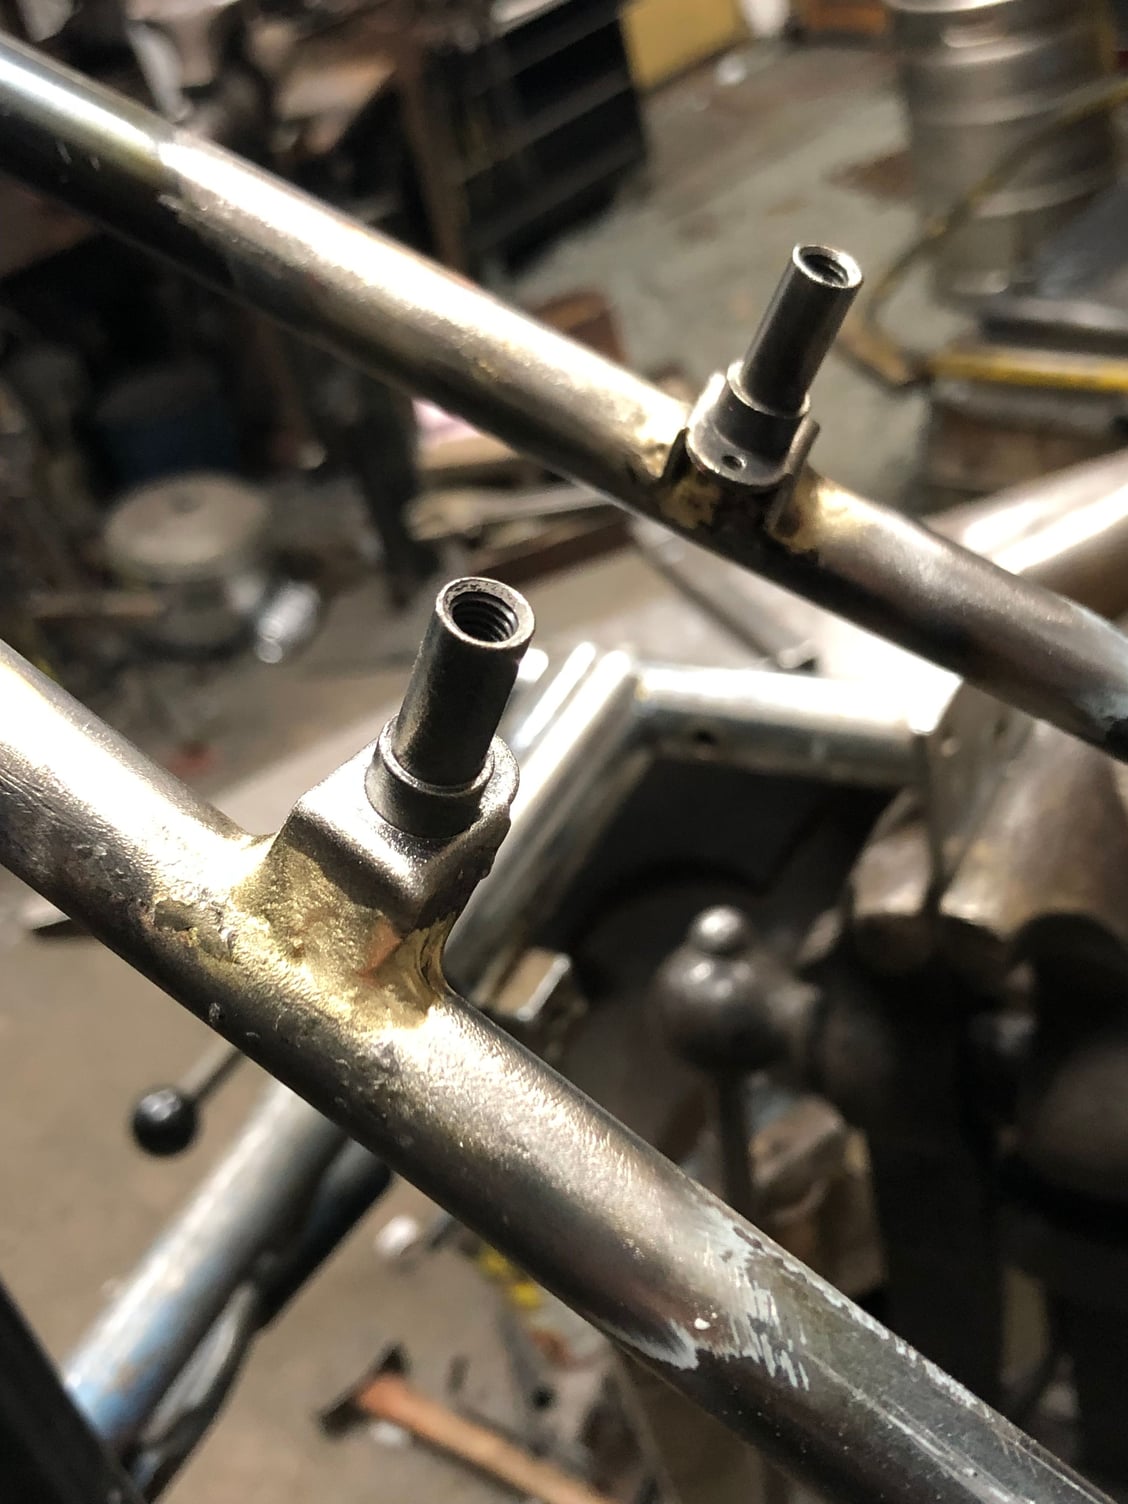
Lots more braze than the little piddly amount Shogun put on there! I went with the more-is-better approach, and I wanted a larger, smooth fillet:
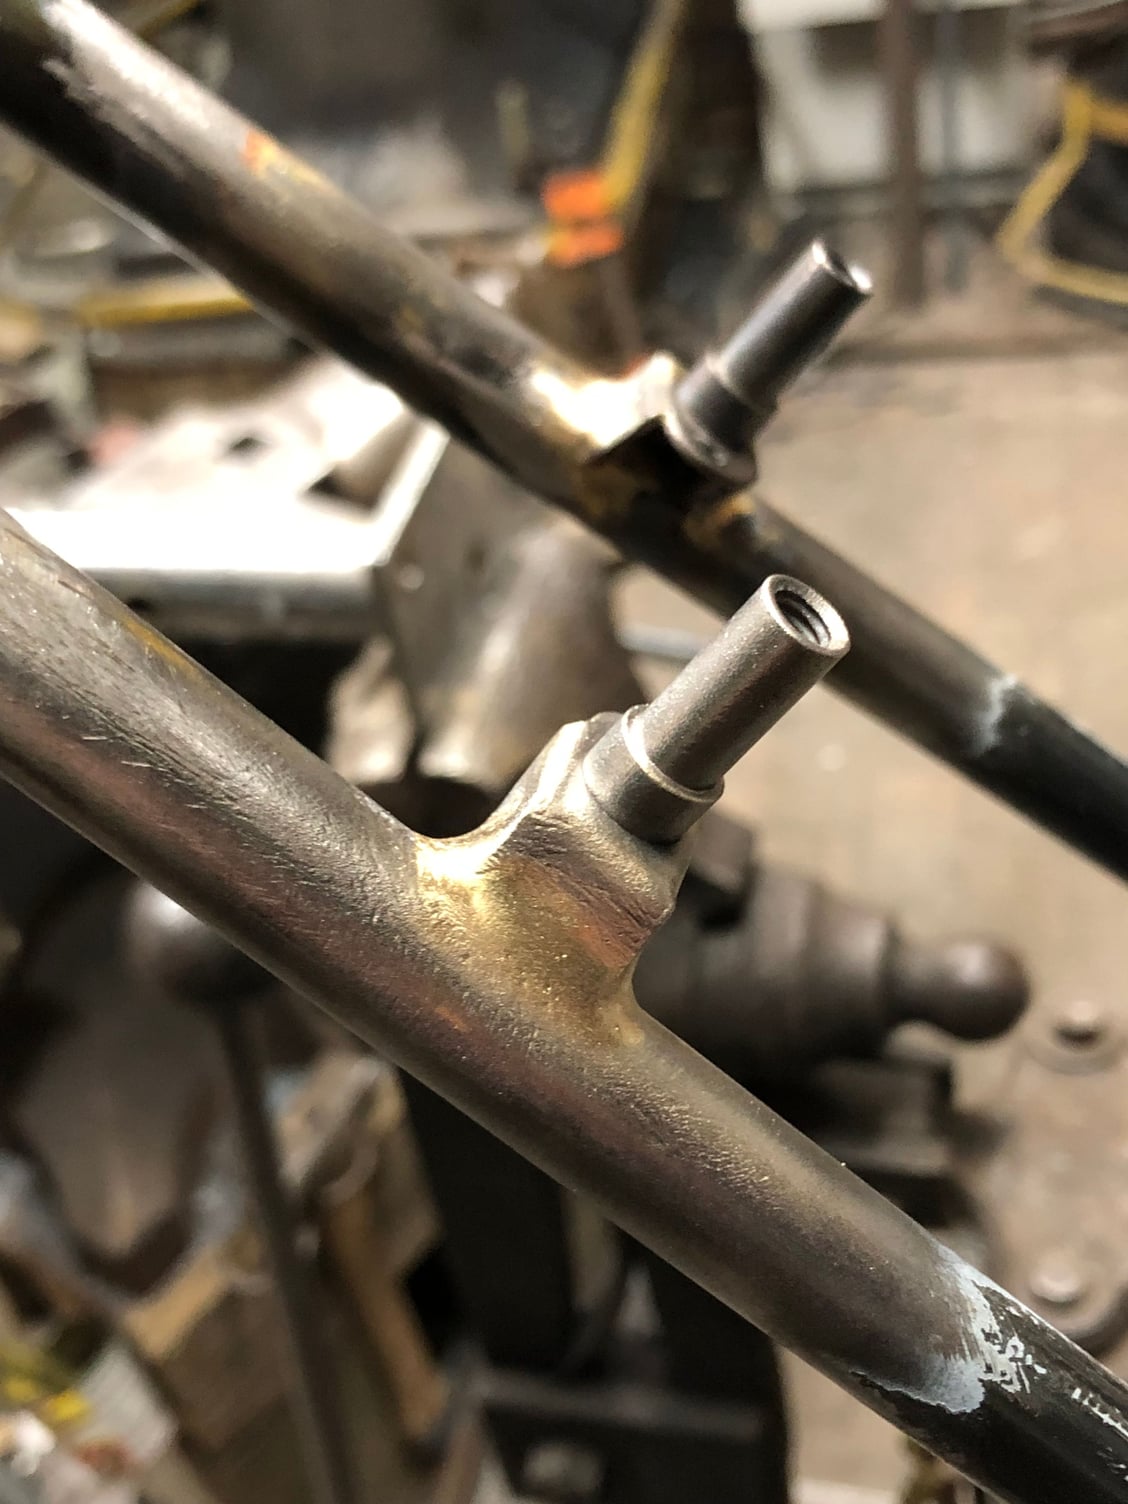
I think those will work well:
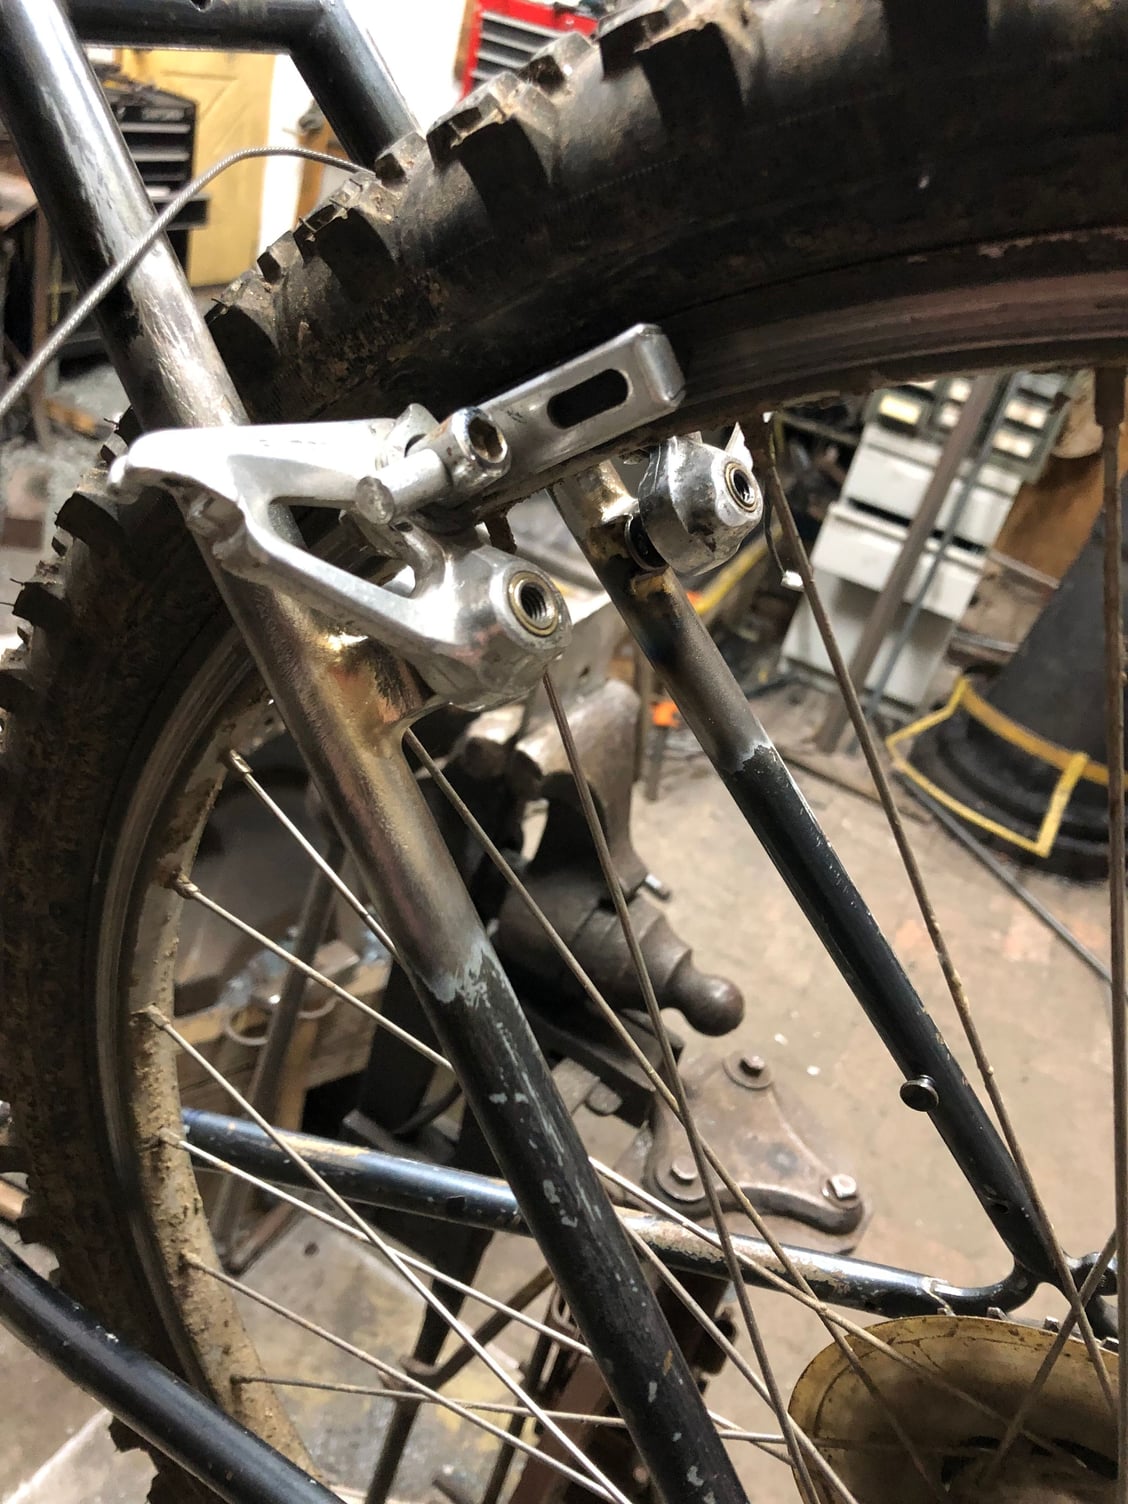
assuming they don't fly off...
Next up steerer tube extension and getting the HT faced and reamed. I'm going to order some 7/8 tubing for the steerer-tube to use as a mandrel. I think I am also going to build a stem, so I'll get some extra.
I made the tool (based on versions I've seen by others on this site):
Found a dirty wheel and verified that my ruler was accurate:
and pulled the trigger while I still had a bit of feeling in my fingers (shop is cold!):
Lots more braze than the little piddly amount Shogun put on there! I went with the more-is-better approach, and I wanted a larger, smooth fillet:
I think those will work well:
assuming they don't fly off...
Next up steerer tube extension and getting the HT faced and reamed. I'm going to order some 7/8 tubing for the steerer-tube to use as a mandrel. I think I am also going to build a stem, so I'll get some extra.