


Lug making Part Dux
 02-22-20, 08:22 PM
#1

Senior Member
Thread Starter
Join Date: Feb 2012
Location: Rochester, NY
Posts: 18,095
Bikes: Stewart S&S coupled sport tourer, Stewart Sunday light, Stewart Commuting, Stewart Touring, Co Motion Tandem, Stewart 3-Spd, Stewart Track, Fuji Finest, Mongoose Tomac ATB, GT Bravado ATB, JCP Folder, Stewart 650B ATB
Mentioned: 0 Post(s)
Tagged: 0 Thread(s)
Quoted: 4210 Post(s)
Liked 3,875 Times
in
2,315 Posts
Lug making Part Dux
https://www.bikeforums.net/framebuil...ug-making.html was the first time I tried to make some lugs. That part didn't go too badly (other things did go really bad...) but I came to some conclusions and now can try them in redoing the frame the first lugs were for.
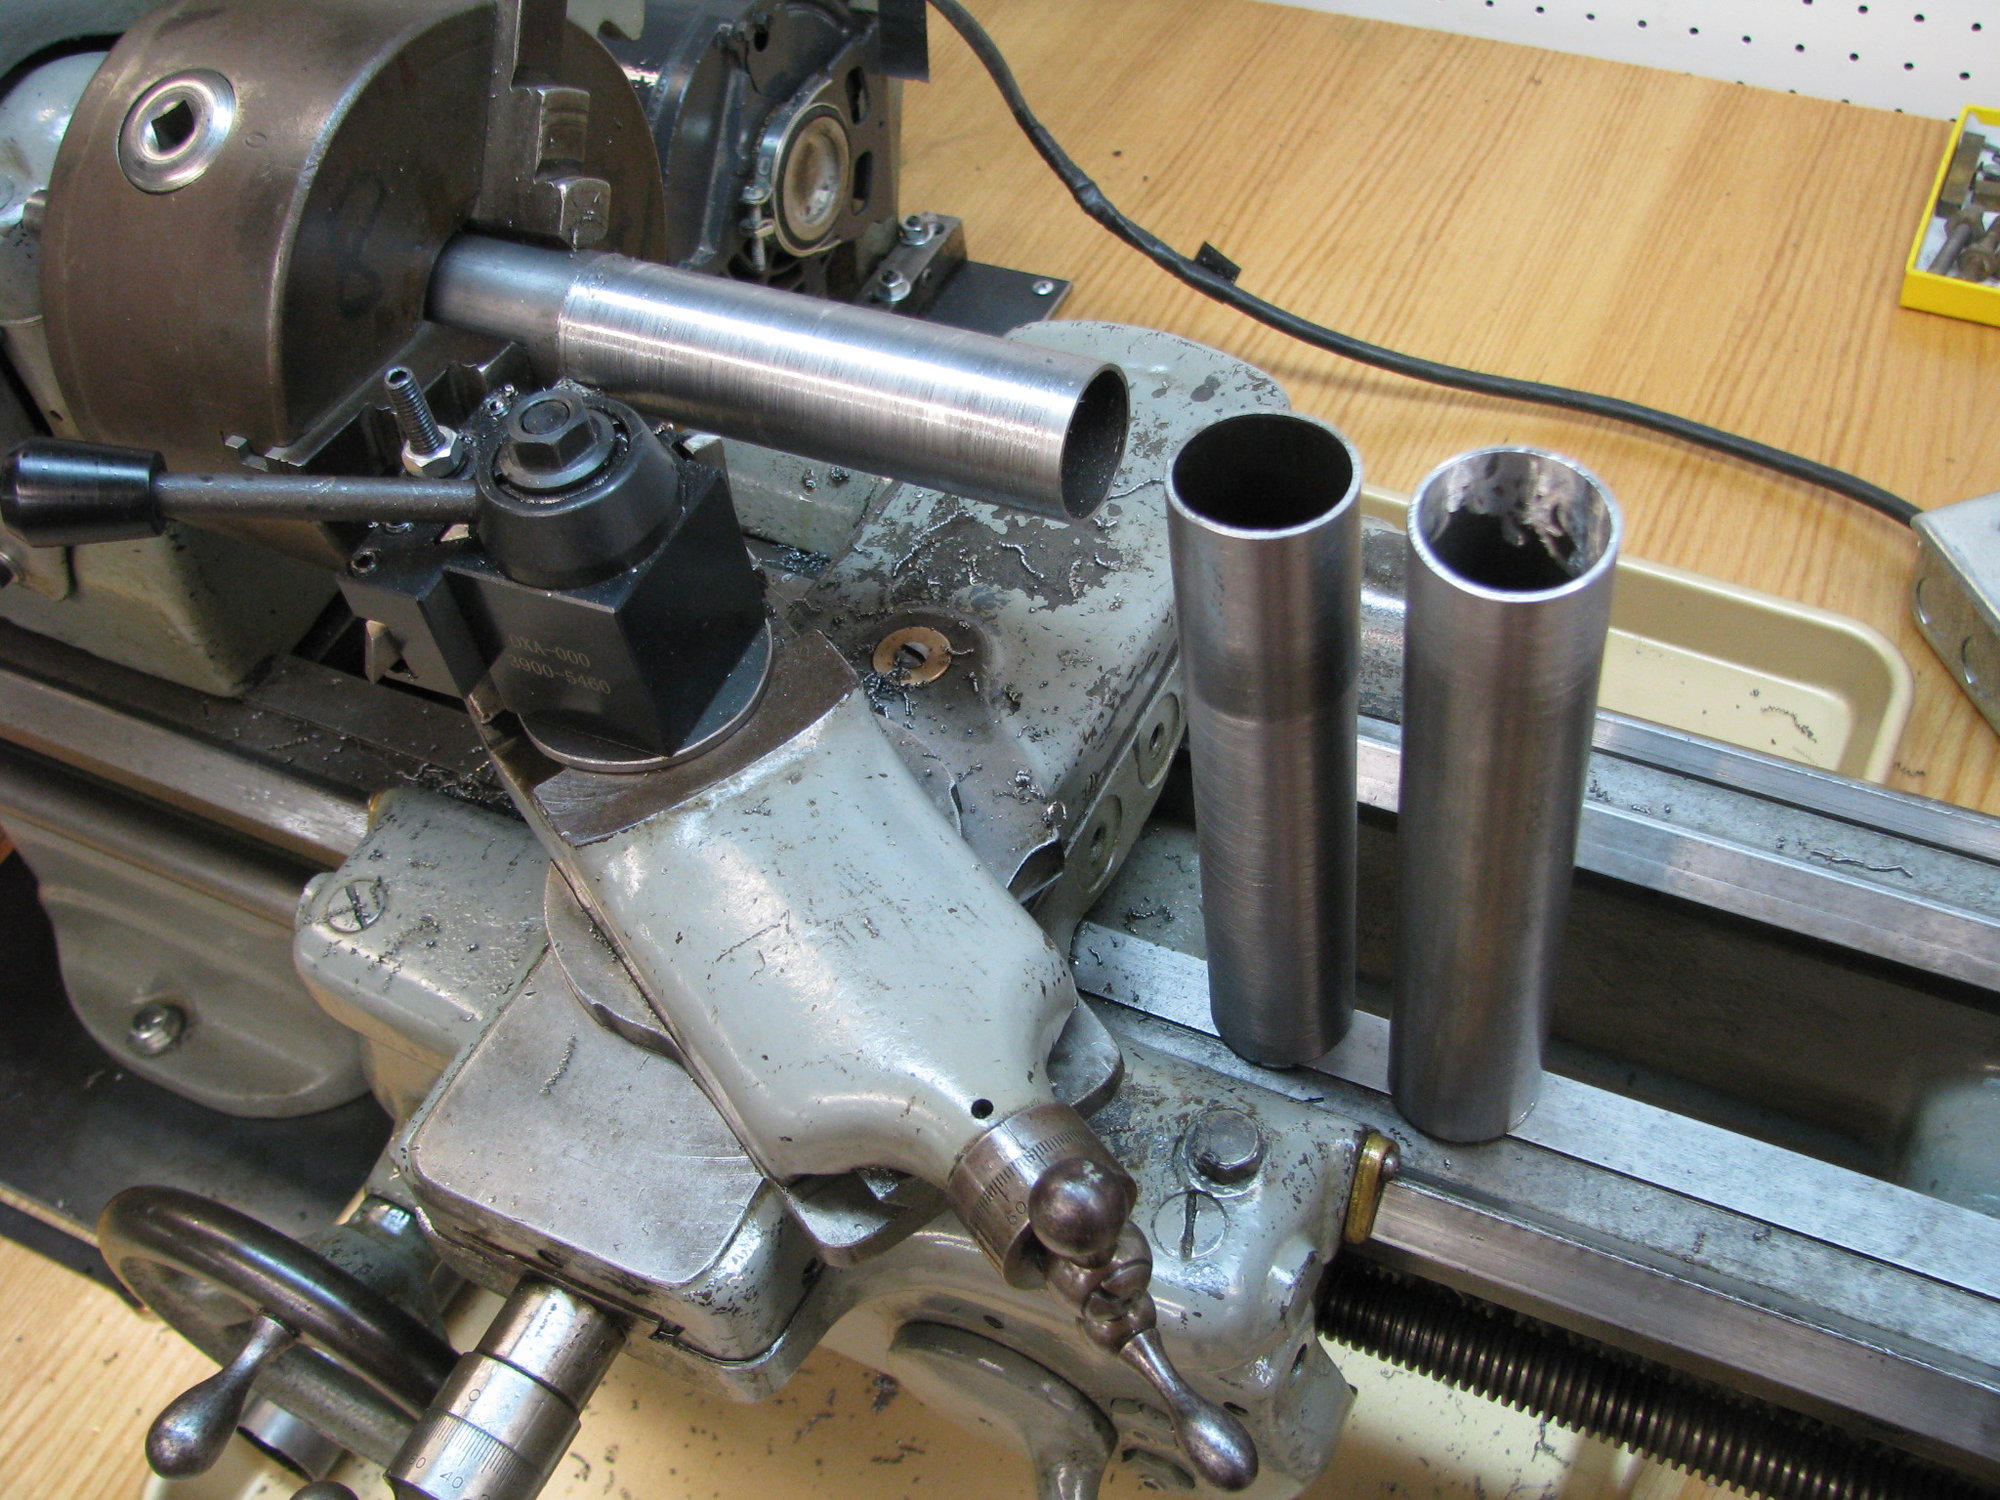
First up was the wall thickness of the lugs. The .058" walled tubing was just too thick for my tastes. Sure one could thin the lugs on a grinder/sander before, or with a file after, brazing. But the cool guys thinned their tubes on a lathe or a cylindrical grinder. I always wanted a real lathe so the last few months have seen me spend money and time selling my "toy" Atlas for a far more solid South Bend. It is solid and big enough to let me turn down some 4130 tube from the .058" to about .85mm.
Here's a shot of the lathe set up with a before and an after example.
This will be another long winded and many month project. I'll post as I have more story. Andy
__________________
AndrewRStewart
AndrewRStewart
Last edited by Andrew R Stewart; 02-22-20 at 08:25 PM.
 02-22-20, 09:29 PM
#2
framebuilder
Wow Andy you got a South Bend? What size is it? I have a 9"SB tool room lathe but have always wanted a 10" heavy that has a much bigger through hole. If you got a heavy or 13" i'm jealous! Did you ever get a vertical milling machine?
02-23-20, 07:55 AM
#3


Randomhead
Join Date: Aug 2008
Location: Happy Valley, Pennsylvania
Posts: 24,399
Mentioned: 0 Post(s)
Tagged: 0 Thread(s)
Quoted: 4 Post(s)
Liked 3,699 Times
in
2,519 Posts
I thought the motor on the heavys was in the base. I always wanted a heavy 10 until I got my Sheldon tool room lathe. It's beat, but very nice.
02-23-20, 03:32 PM
#4
Senior Member
Thread Starter
Join Date: Feb 2012
Location: Rochester, NY
Posts: 18,095
Bikes: Stewart S&S coupled sport tourer, Stewart Sunday light, Stewart Commuting, Stewart Touring, Co Motion Tandem, Stewart 3-Spd, Stewart Track, Fuji Finest, Mongoose Tomac ATB, GT Bravado ATB, JCP Folder, Stewart 650B ATB
Mentioned: 0 Post(s)
Tagged: 0 Thread(s)
Quoted: 4210 Post(s)
Liked 3,875 Times
in
2,315 Posts
The lathe is a SB 9"C. So no crown race cutting. It's pretty worn but is so much more solid then my old Atlas 6". I did get a vertical mill a bunch of years ago. It went through some of the same take a bit apart and clean what I can that this SB just got.
Lug Making content- I've got a Columbus head tube, on order, that's 38mm OD and .8mm wall. I think it might slip over a 36mm HT about right to be used as lug blank stock. Andy
Lug Making content- I've got a Columbus head tube, on order, that's 38mm OD and .8mm wall. I think it might slip over a 36mm HT about right to be used as lug blank stock. Andy
__________________
AndrewRStewart
AndrewRStewart
Last edited by Andrew R Stewart; 02-23-20 at 04:21 PM.
02-24-20, 12:02 PM
#5
framebuilder
I found this accessory to be helpful when reducing the � of a longer tube.
02-24-20, 12:54 PM
#6
Randomhead
Join Date: Aug 2008
Location: Happy Valley, Pennsylvania
Posts: 24,399
Mentioned: 0 Post(s)
Tagged: 0 Thread(s)
Quoted: 4 Post(s)
Liked 3,699 Times
in
2,519 Posts
Doug, what happened to your cross slide in that pic?
I have resolved to make some plugs to fit in the ends of tubes so I can use a live center in the tailstock. I have a steady rest, but I haven't used it.
I have resolved to make some plugs to fit in the ends of tubes so I can use a live center in the tailstock. I have a steady rest, but I haven't used it.
02-24-20, 01:37 PM
#7
framebuilder
My lathe bed is 4 1/2" long so I just pushed it back out of the way of my picture. My lathe came with the house. The previous owner had bought it before WWII to use mostly as a wood lathe. He had hardly ever used it before I got it. I paid him standard market value at the time including some other wood tools that I sold to my father-in-law.
02-24-20, 06:36 PM
#8
Senior Member
Thread Starter
Join Date: Feb 2012
Location: Rochester, NY
Posts: 18,095
Bikes: Stewart S&S coupled sport tourer, Stewart Sunday light, Stewart Commuting, Stewart Touring, Co Motion Tandem, Stewart 3-Spd, Stewart Track, Fuji Finest, Mongoose Tomac ATB, GT Bravado ATB, JCP Folder, Stewart 650B ATB
Mentioned: 0 Post(s)
Tagged: 0 Thread(s)
Quoted: 4210 Post(s)
Liked 3,875 Times
in
2,315 Posts
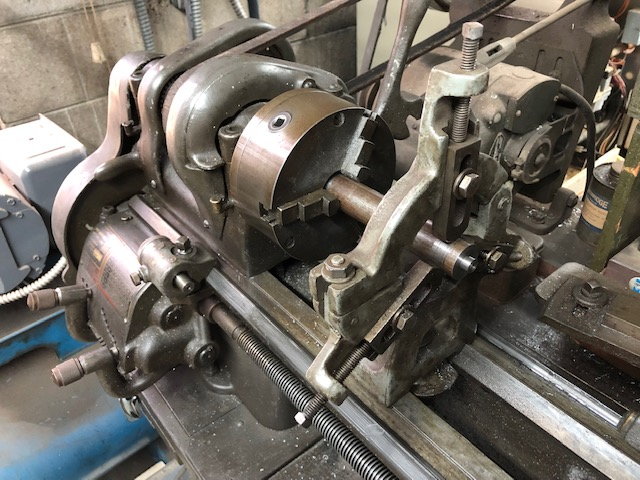
It's almost comical sometimes how one goal involves many tangents away and return to the initial goal's efforts. Case in point is these photos of a steady rest that I just did a brazing repair on. Why? so I can steady tubes for thinning. (Although I didn't use it for the OP attempts). Great minds think alike, some just say it first I'll get some machine tool paint and finish off this steady rest soon. Andy
Any one interested about the frame in the backround? A very uncommon frame.
I'll get some machine tool paint and finish off this steady rest soon. AndyAny one interested about the frame in the backround? A very uncommon frame.
__________________
AndrewRStewart
AndrewRStewart
Last edited by Andrew R Stewart; 02-24-20 at 06:44 PM. Reason: Viewer challenge
02-24-20, 06:42 PM
#9
Senior Member
Thread Starter
Join Date: Feb 2012
Location: Rochester, NY
Posts: 18,095
Bikes: Stewart S&S coupled sport tourer, Stewart Sunday light, Stewart Commuting, Stewart Touring, Co Motion Tandem, Stewart 3-Spd, Stewart Track, Fuji Finest, Mongoose Tomac ATB, GT Bravado ATB, JCP Folder, Stewart 650B ATB
Mentioned: 0 Post(s)
Tagged: 0 Thread(s)
Quoted: 4210 Post(s)
Liked 3,875 Times
in
2,315 Posts
Timing can be everything. Today I received the 38mmx.8mm wall Columbus HT I considered as a lug blank sleeve/tube for 36mm OD HTs. It slips over the 36mm tube with a bit too much gap for what I am OK with for silver but fine for brass. However after brazing up the lug I suspect this fit will "evolve" somewhat. Will keep you all posted. Pretty soon I'll need to decide the frame geometry I'm making the lugs for Andy
Andy
__________________
AndrewRStewart
AndrewRStewart
02-24-20, 08:15 PM
#10
framebuilder
Likes For Doug Fattic:
02-24-20, 09:17 PM
#11
Senior Member
Thread Starter
Join Date: Feb 2012
Location: Rochester, NY
Posts: 18,095
Bikes: Stewart S&S coupled sport tourer, Stewart Sunday light, Stewart Commuting, Stewart Touring, Co Motion Tandem, Stewart 3-Spd, Stewart Track, Fuji Finest, Mongoose Tomac ATB, GT Bravado ATB, JCP Folder, Stewart 650B ATB
Mentioned: 0 Post(s)
Tagged: 0 Thread(s)
Quoted: 4210 Post(s)
Liked 3,875 Times
in
2,315 Posts
As the thread drifts
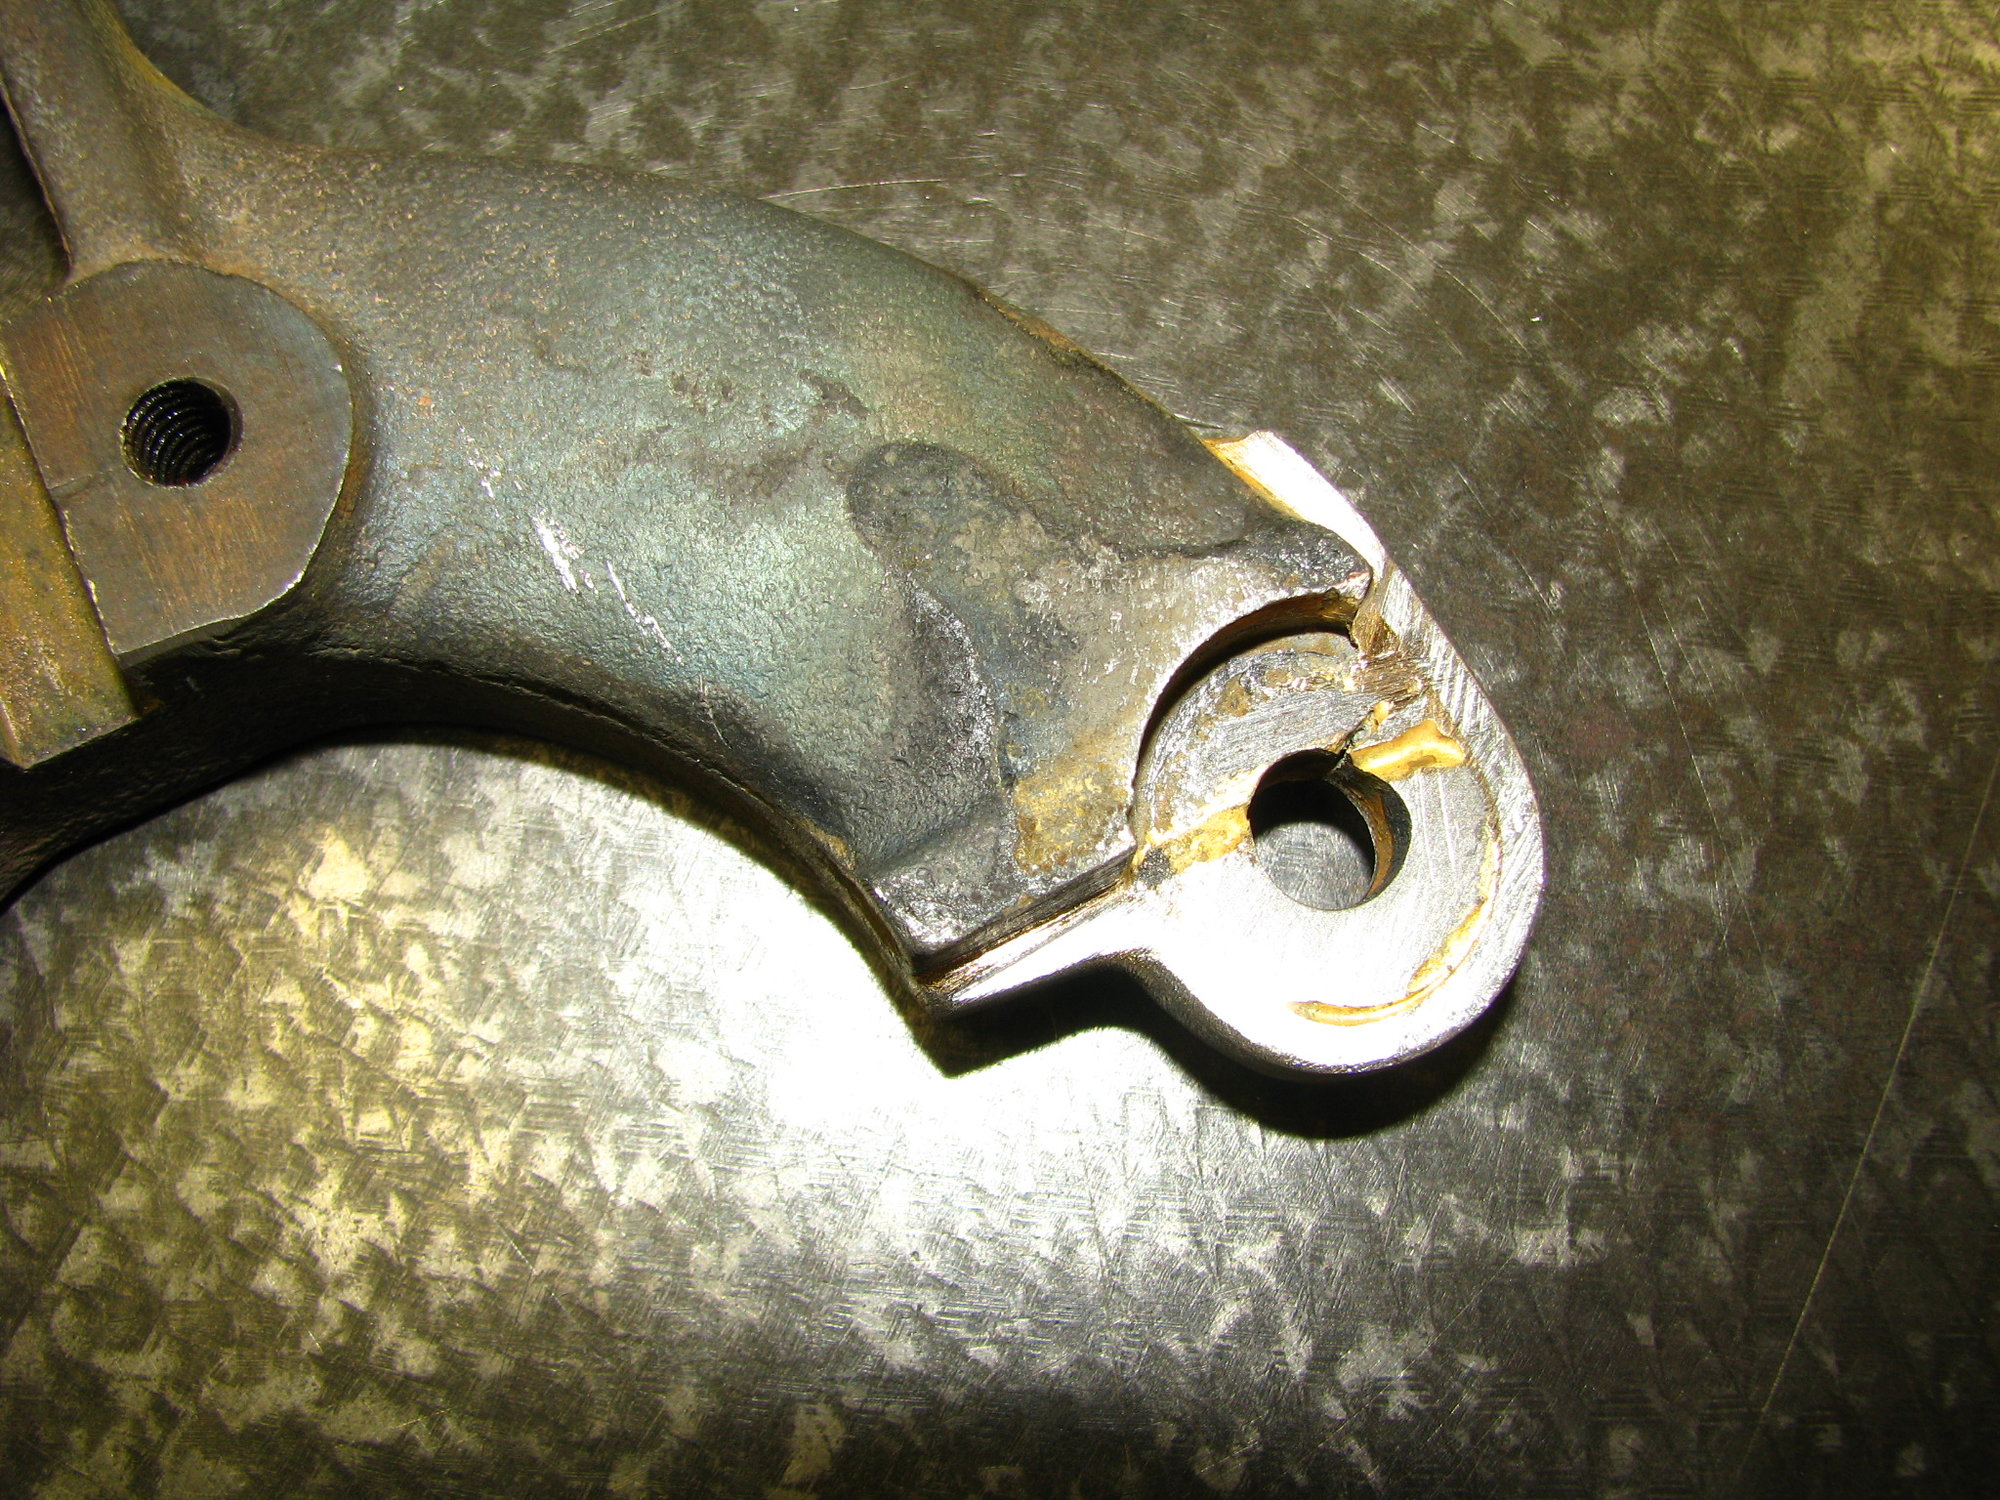
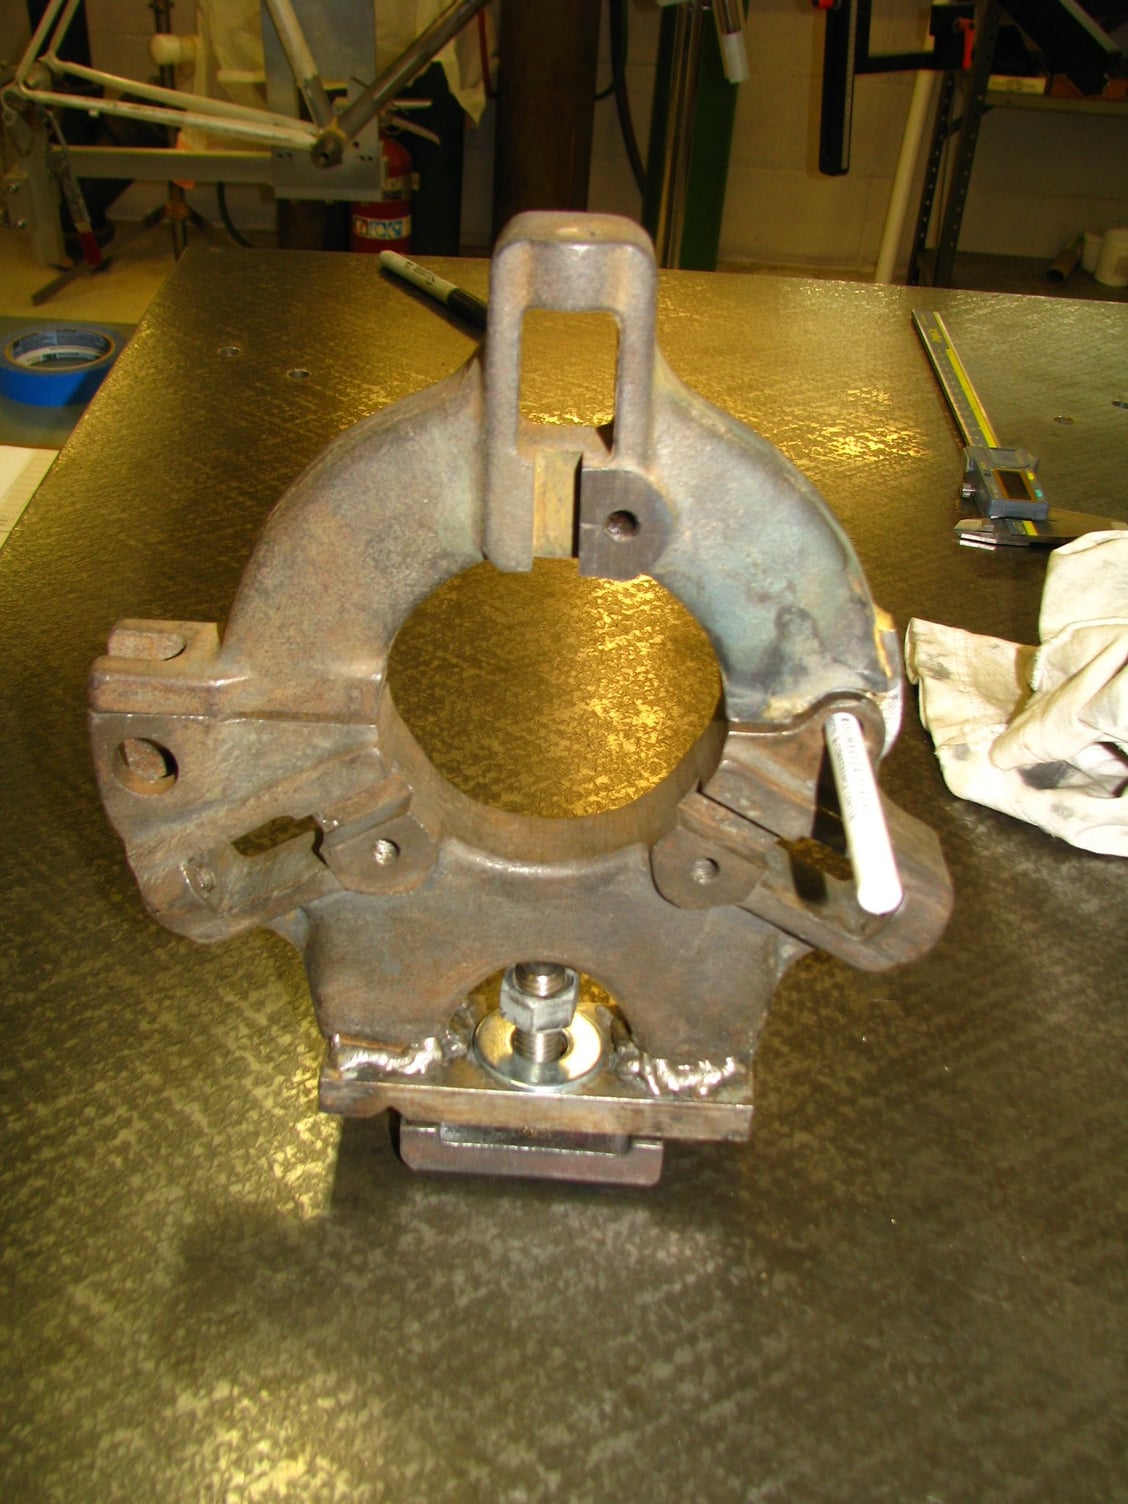
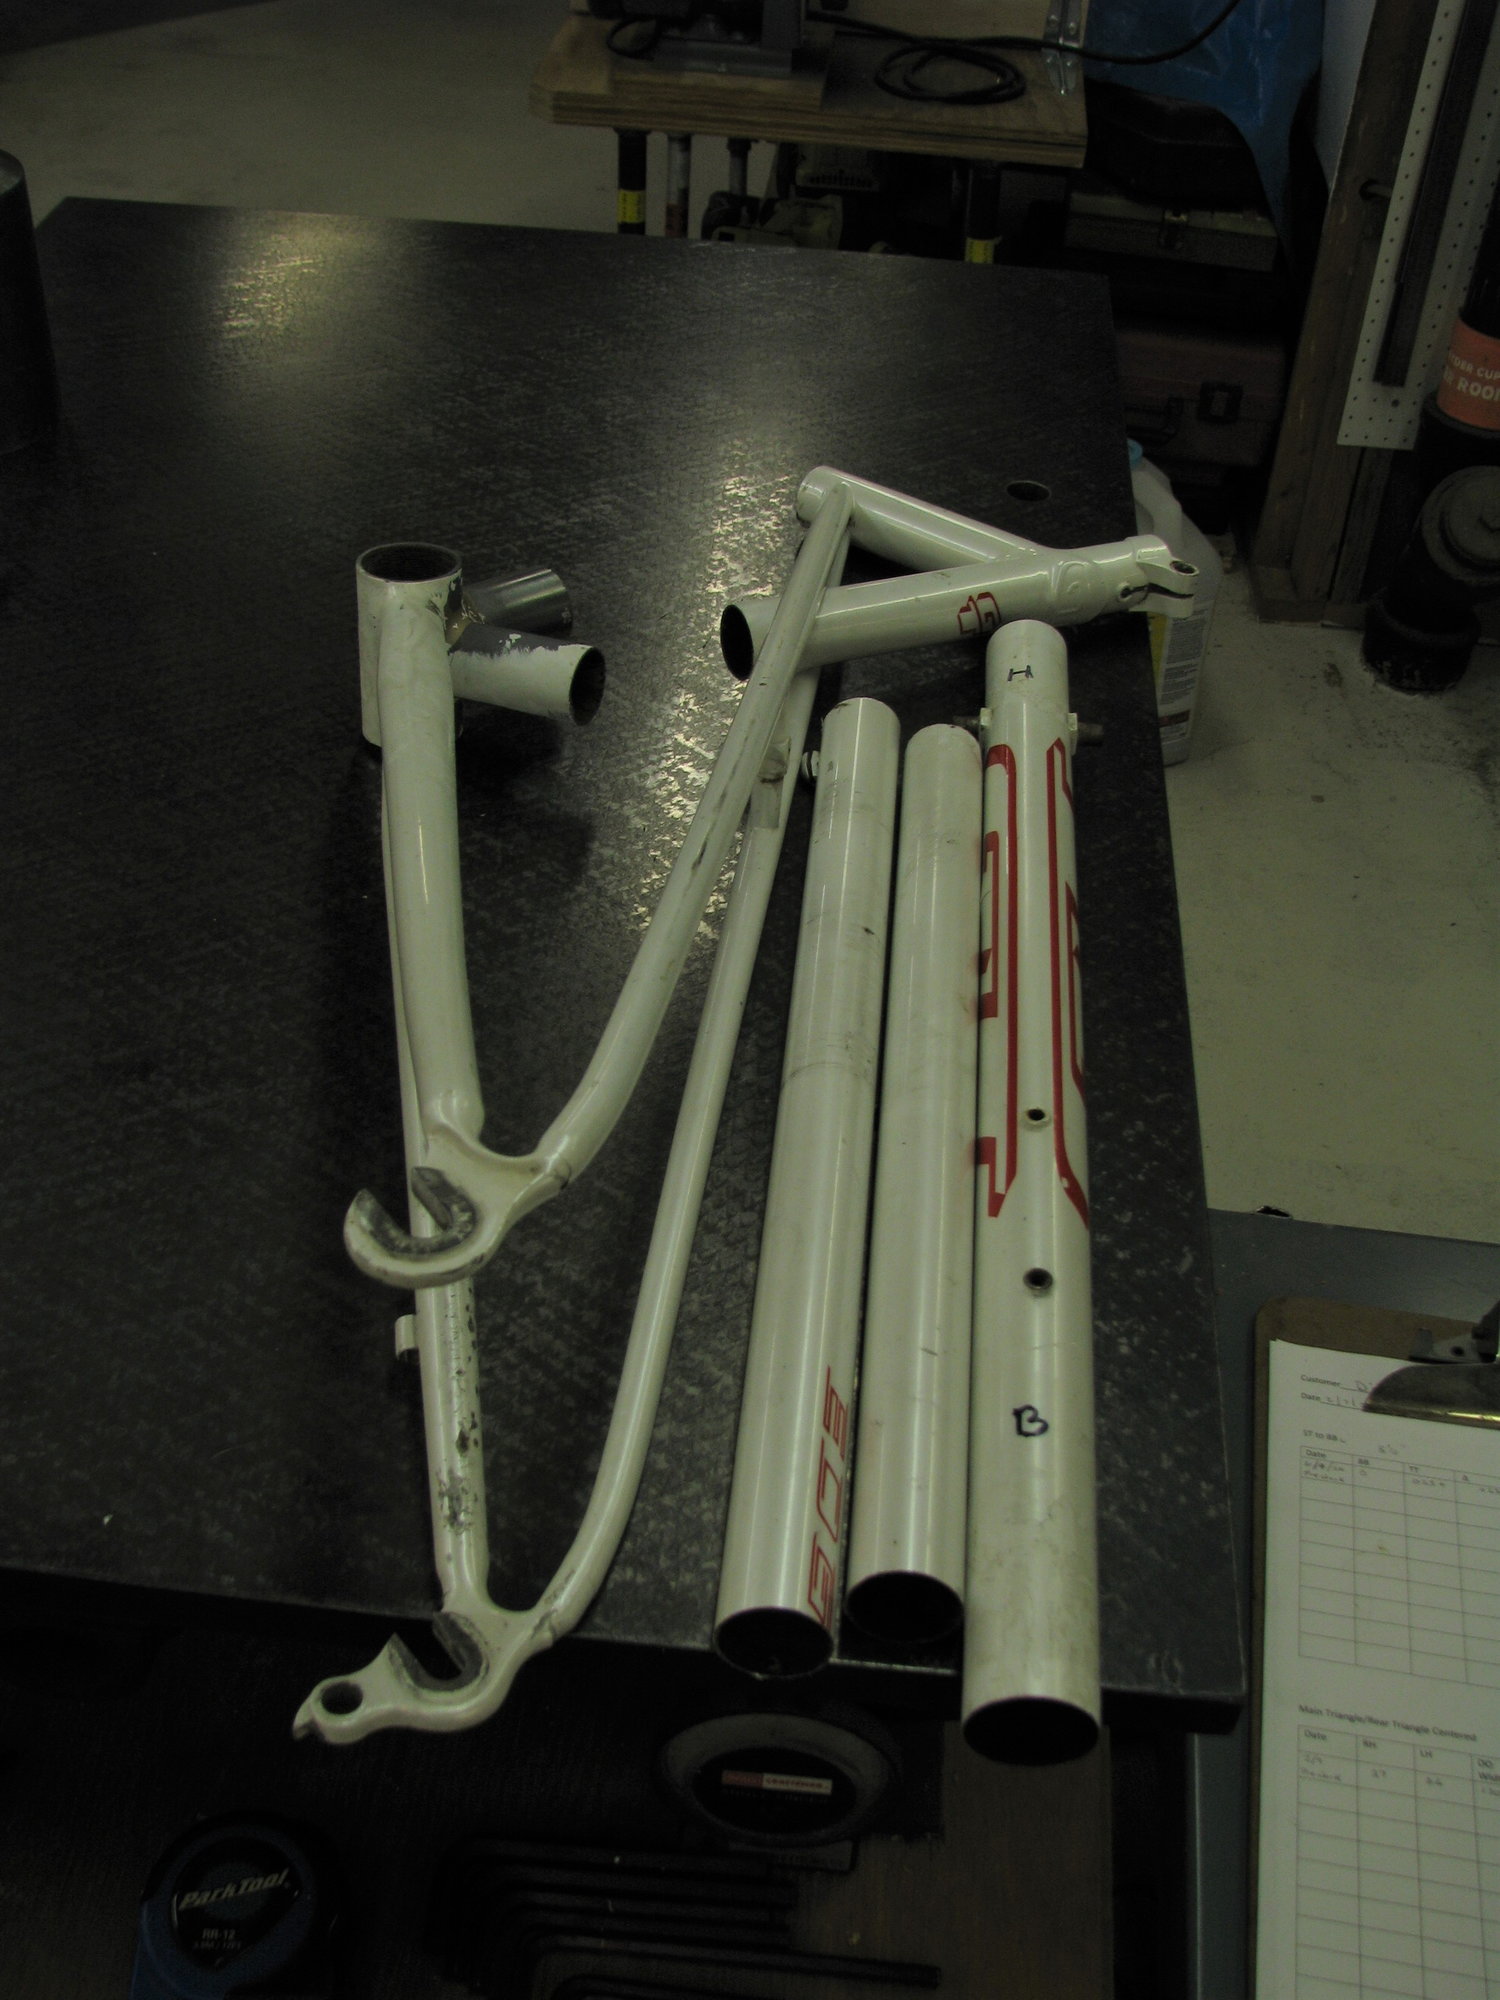
The frame is a mid 1990s GT Edge. This was a made in CO, USA frame. IIRC Forest Yelverton (SP?) headed their skunk works before GT was sold off. Gt was producing a small production of both road and MtB bikes in CO that were their top models, I believe that they supplied their team riders from there. What is more interesting is the Excel (SP?) tubing they used on this model. Very uncommon and at .7/.4/.7 very light. (Just what my friend and crit rider who was 6'4" and 195 lbs of solid needed, a flexy frame. It is his frame, or was 20 years ago). Most un common is the joining. It supposedly was TiGed then filleted over with brass. It's down tube was slightly dented at some point and a year+ later the dent started to crack. My friend stopped riding this bike and later asked me if I was interested in replacing the DT. Fast forward 20 years and I have lost contact with him and decided that I would do the repair as a practice. Here's a few shots. Andy
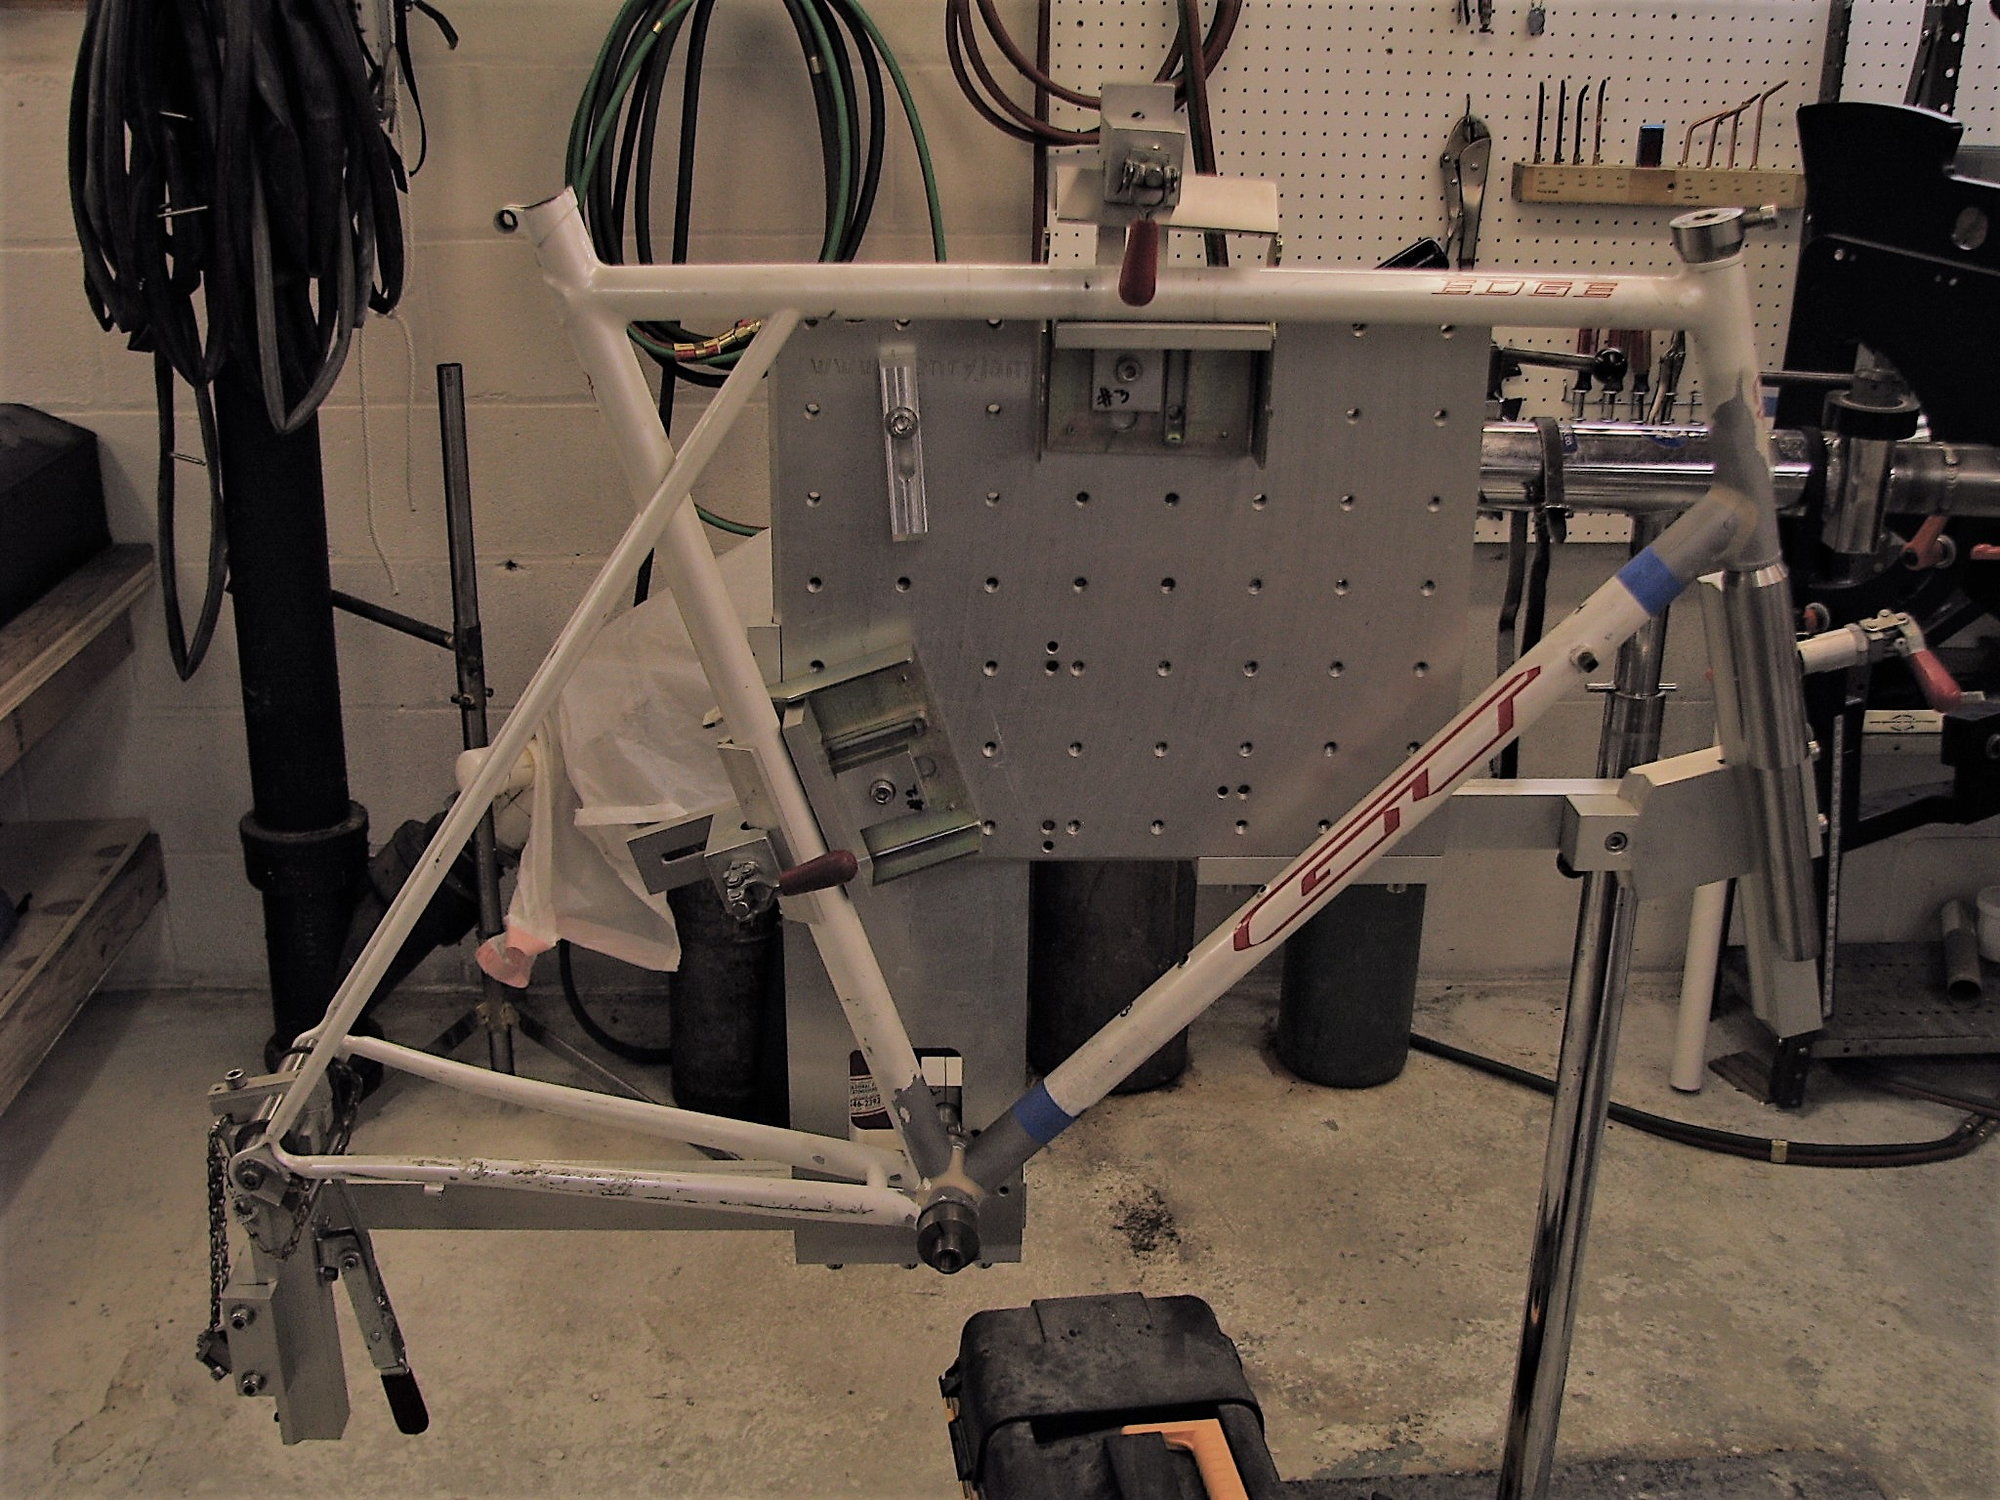
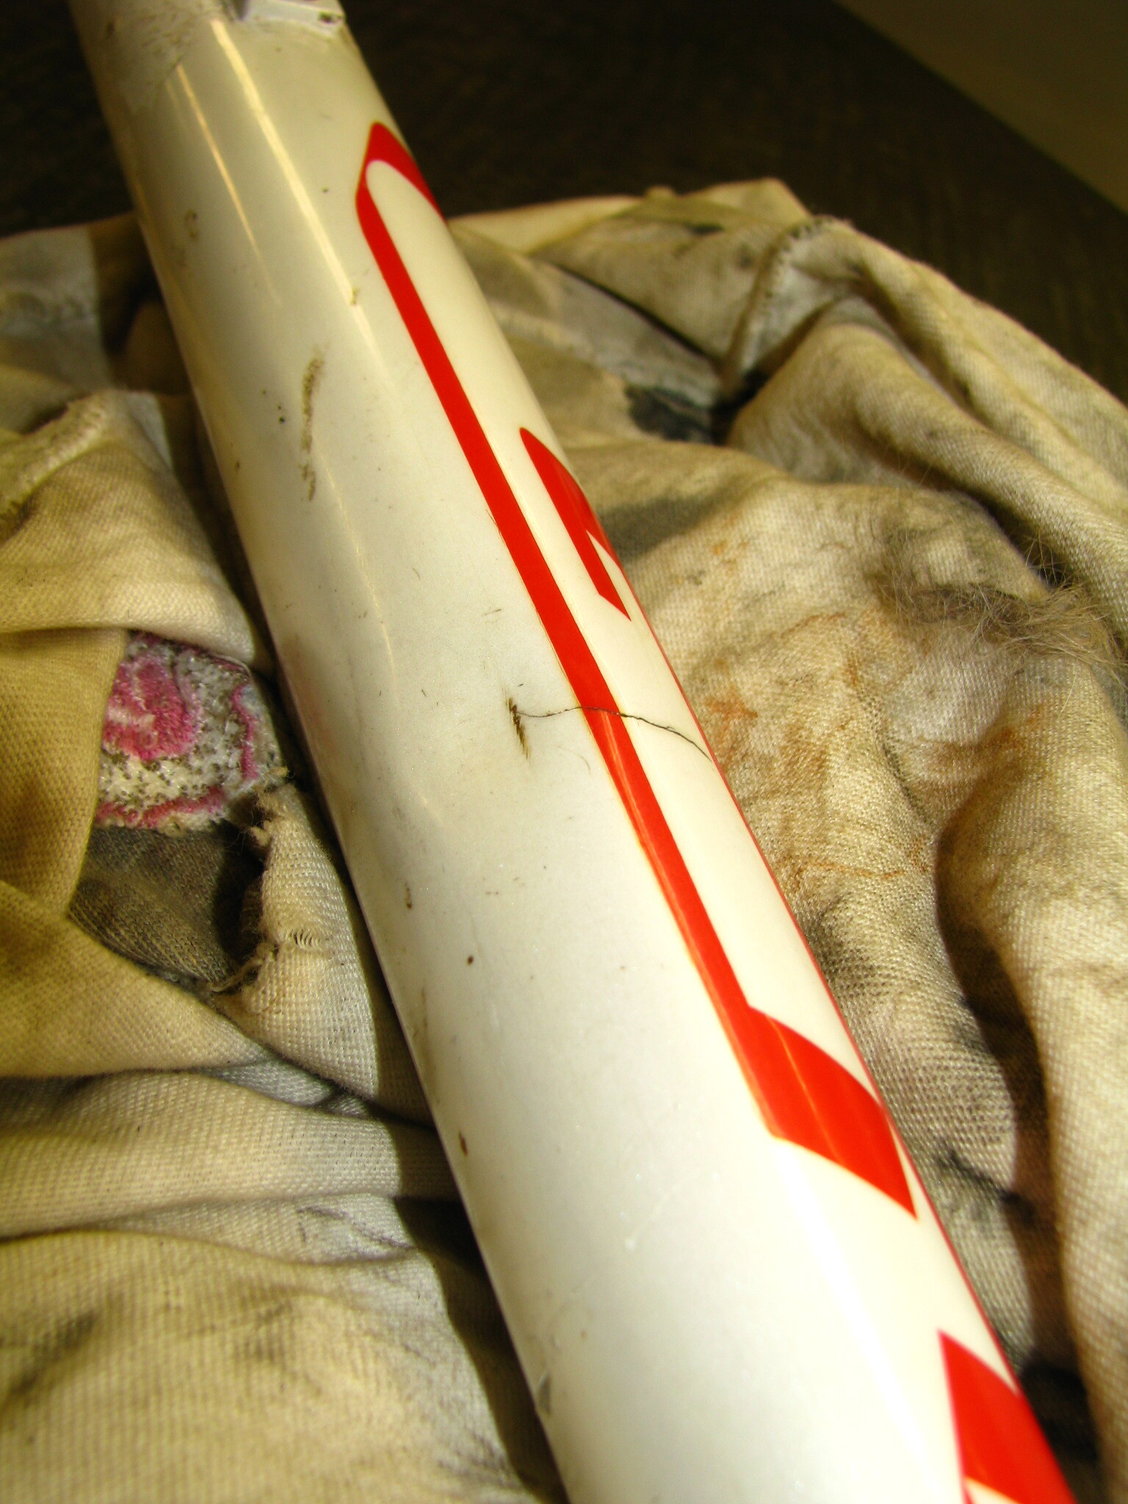
The frame is a mid 1990s GT Edge. This was a made in CO, USA frame. IIRC Forest Yelverton (SP?) headed their skunk works before GT was sold off. Gt was producing a small production of both road and MtB bikes in CO that were their top models, I believe that they supplied their team riders from there. What is more interesting is the Excel (SP?) tubing they used on this model. Very uncommon and at .7/.4/.7 very light. (Just what my friend and crit rider who was 6'4" and 195 lbs of solid needed, a flexy frame. It is his frame, or was 20 years ago). Most un common is the joining. It supposedly was TiGed then filleted over with brass. It's down tube was slightly dented at some point and a year+ later the dent started to crack. My friend stopped riding this bike and later asked me if I was interested in replacing the DT. Fast forward 20 years and I have lost contact with him and decided that I would do the repair as a practice. Here's a few shots. Andy
__________________
AndrewRStewart
AndrewRStewart
Likes For Andrew R Stewart:
02-24-20, 11:44 PM
#12
Senior Member
Join Date: Jan 2019
Posts: 528
Mentioned: 8 Post(s)
Tagged: 0 Thread(s)
Quoted: 237 Post(s)
Likes: 0
Liked 83 Times
in
64 Posts
Excell tubing from France. They also made a silly steel tube with carbon fiber reinforcements that was no stiffer or lighter than their other steel tubes.
02-25-20, 06:58 AM
#13
Senior Member
Join Date: Dec 2011
Location: NE Ohio
Posts: 2,595
Bikes: 1992 Serotta Colorado II,Co-Motion Speedster, Giant Escape Hybrid, 1977 Schwinn Super Le Tour
Mentioned: 4 Post(s)
Tagged: 0 Thread(s)
Quoted: 455 Post(s)
Likes: 0
Liked 112 Times
in
85 Posts
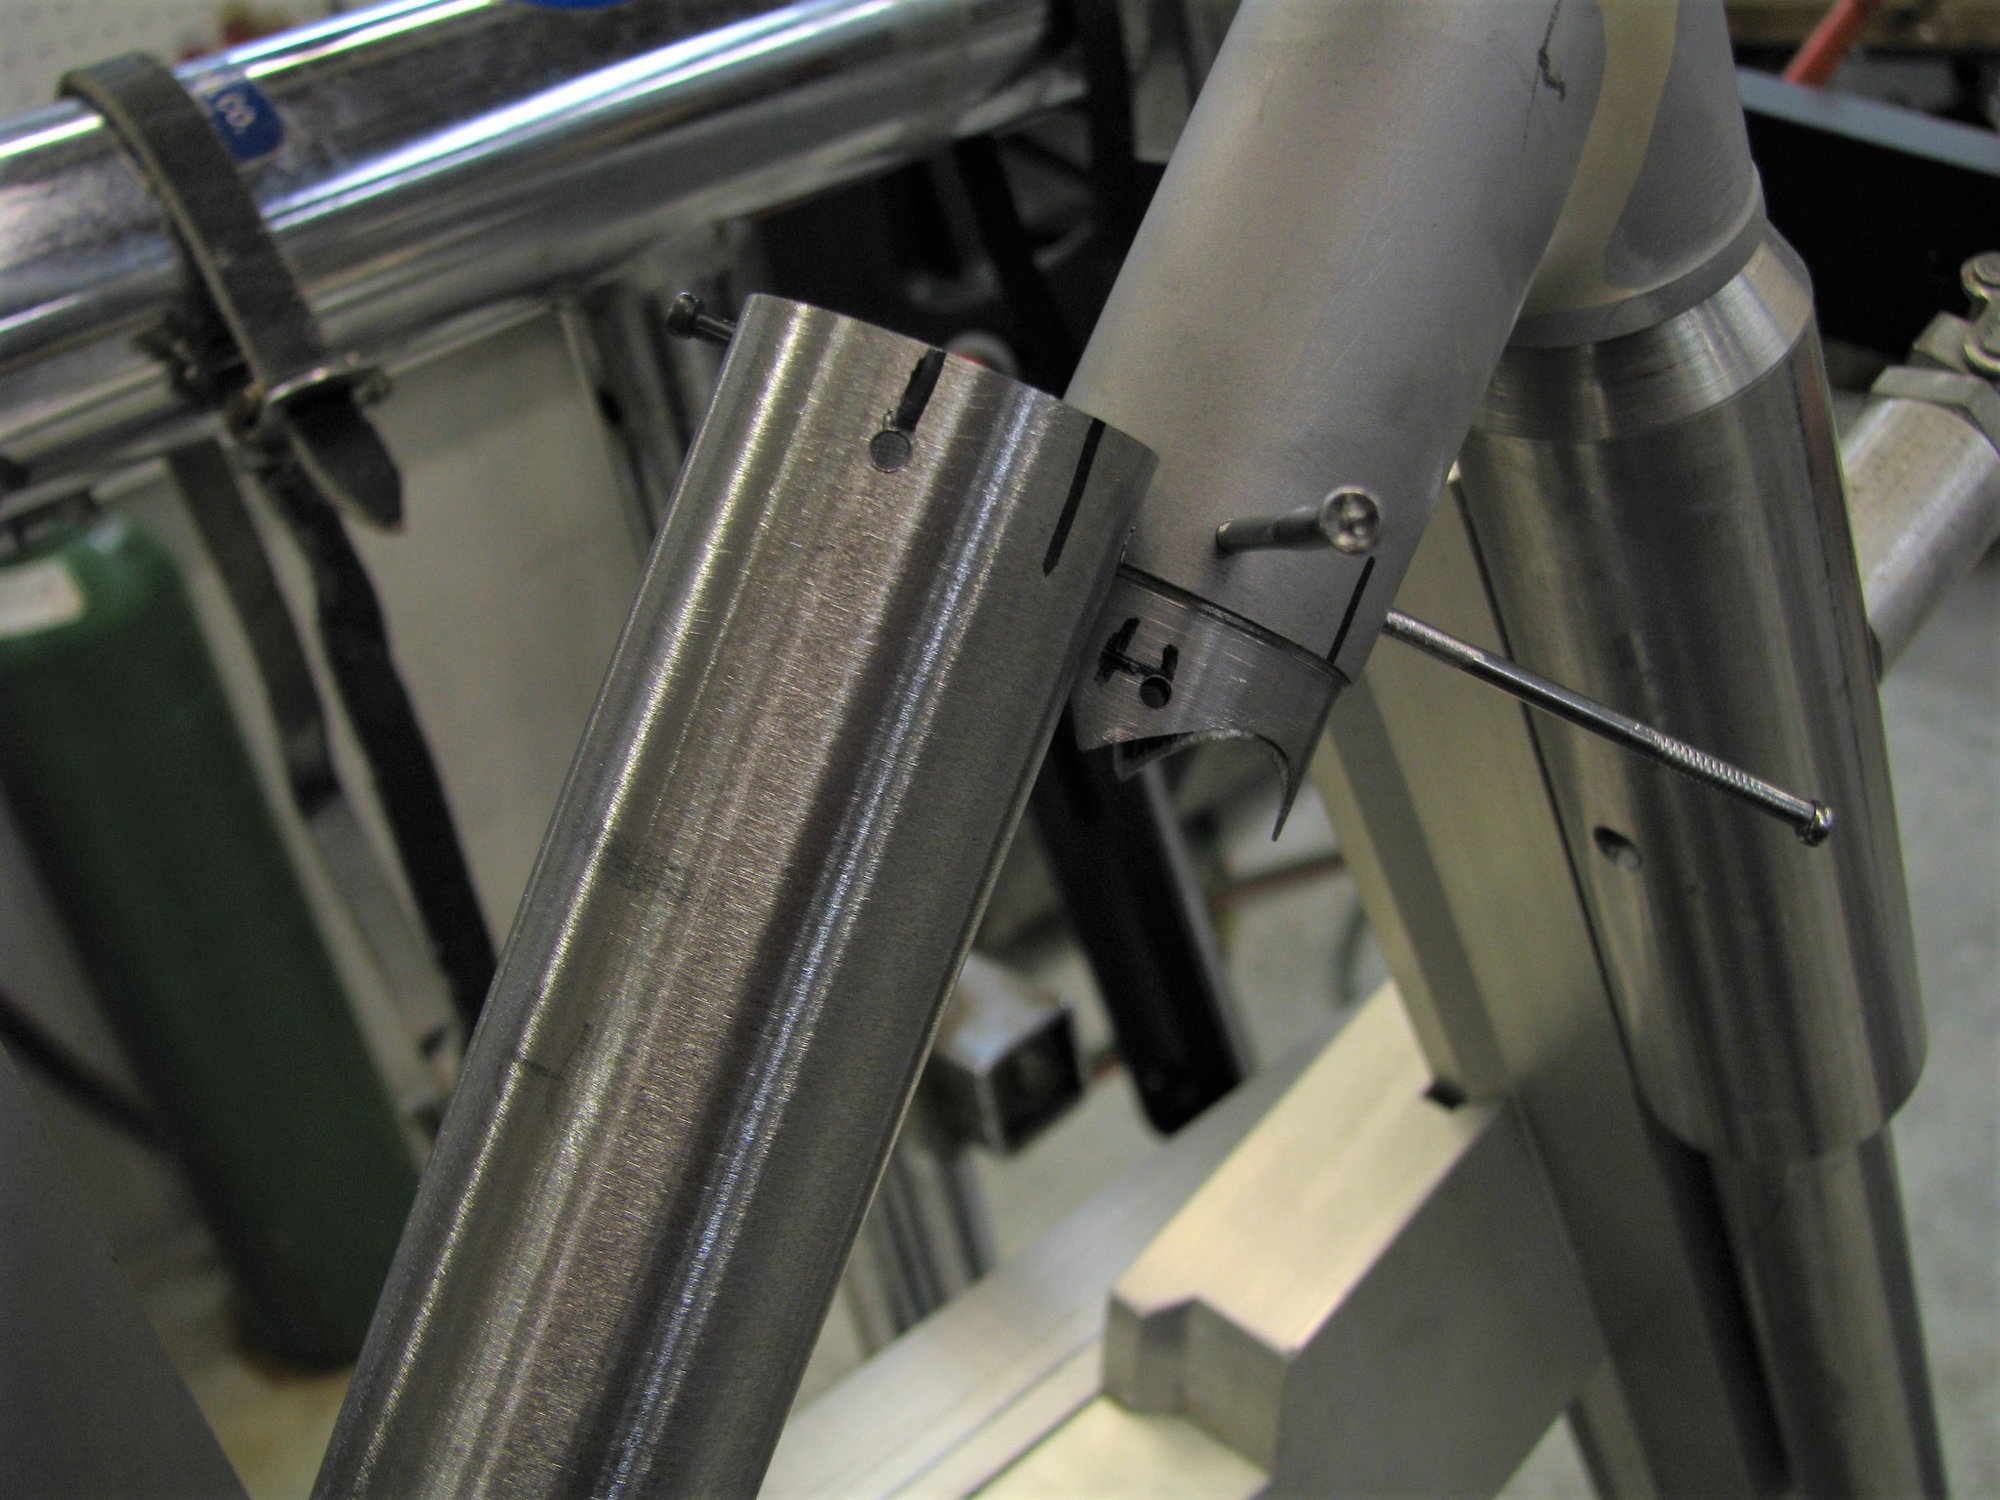
A question. It appears,from the picture, that the coupling is " shaped". Is there a reason why it is not just straight?
Thanks!
Thanks!
02-25-20, 08:27 AM
#14
Senior Member
Thread Starter
Join Date: Feb 2012
Location: Rochester, NY
Posts: 18,095
Bikes: Stewart S&S coupled sport tourer, Stewart Sunday light, Stewart Commuting, Stewart Touring, Co Motion Tandem, Stewart 3-Spd, Stewart Track, Fuji Finest, Mongoose Tomac ATB, GT Bravado ATB, JCP Folder, Stewart 650B ATB
Mentioned: 0 Post(s)
Tagged: 0 Thread(s)
Quoted: 4210 Post(s)
Liked 3,875 Times
in
2,315 Posts
The "coupling" is an internal sleeve that I turned down on my lathe (see the connections with the other topics in this thread). I scalloped the sleeve's ends to have fun. The nails are locating pins that will also serve as witness ports for filler flow. Andy
__________________
AndrewRStewart
AndrewRStewart
02-25-20, 06:36 PM
#16
Newbie
Why do think they went through all the trouble of tig�ing then brass braze or was this marketing speak?
02-25-20, 07:08 PM
#17
Senior Member
Thread Starter
Join Date: Feb 2012
Location: Rochester, NY
Posts: 18,095
Bikes: Stewart S&S coupled sport tourer, Stewart Sunday light, Stewart Commuting, Stewart Touring, Co Motion Tandem, Stewart 3-Spd, Stewart Track, Fuji Finest, Mongoose Tomac ATB, GT Bravado ATB, JCP Folder, Stewart 650B ATB
Mentioned: 0 Post(s)
Tagged: 0 Thread(s)
Quoted: 4210 Post(s)
Liked 3,875 Times
in
2,315 Posts
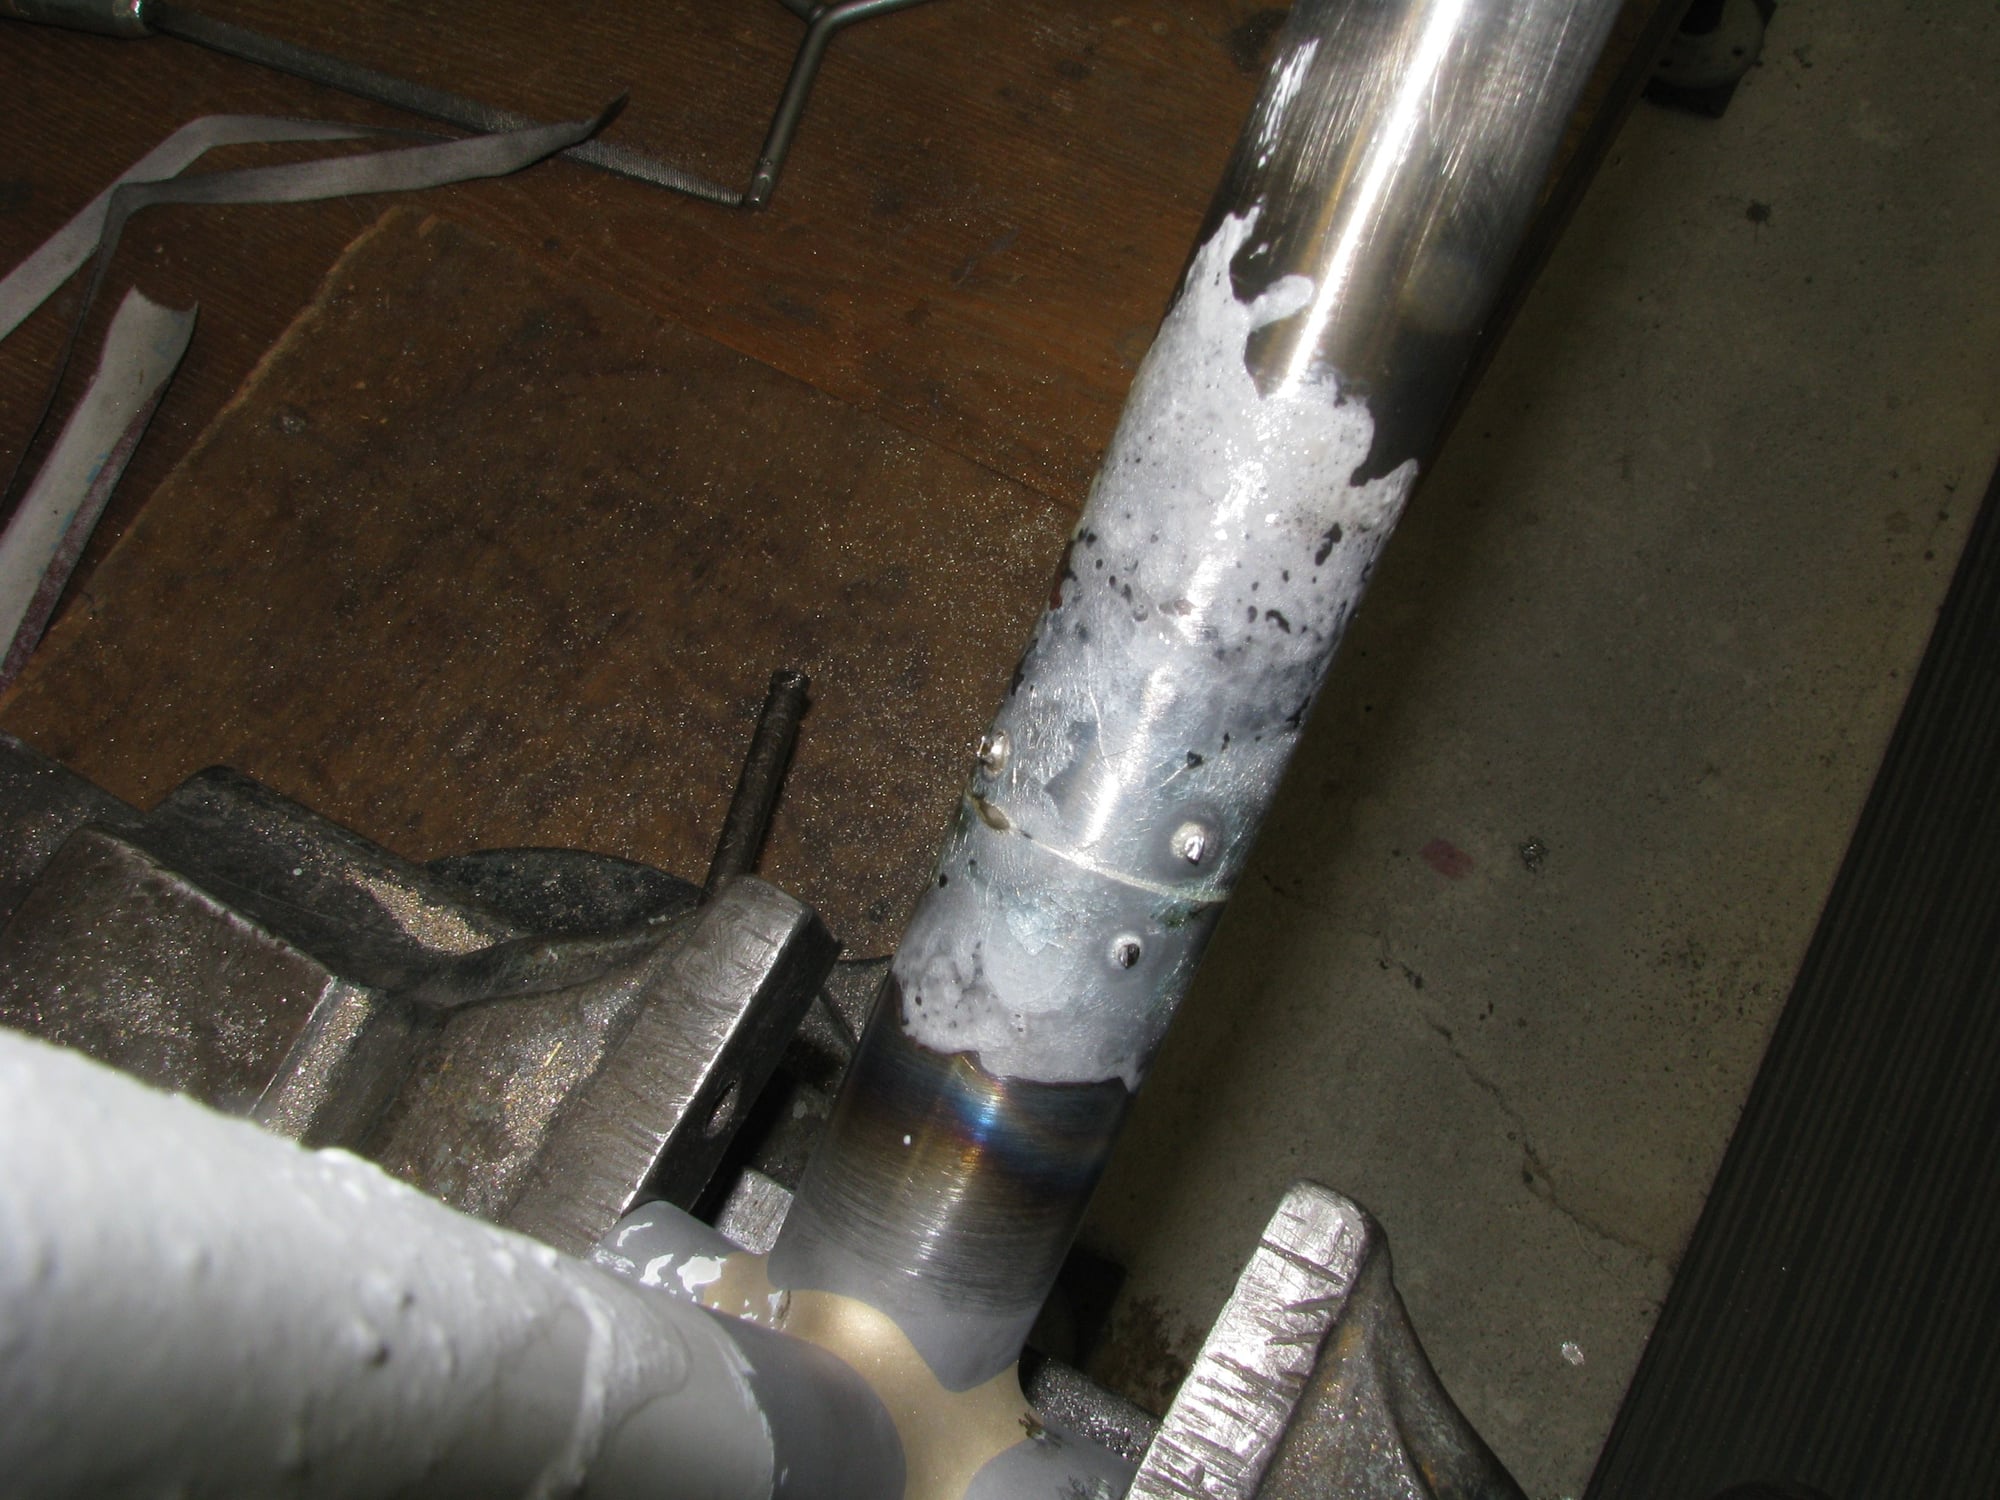
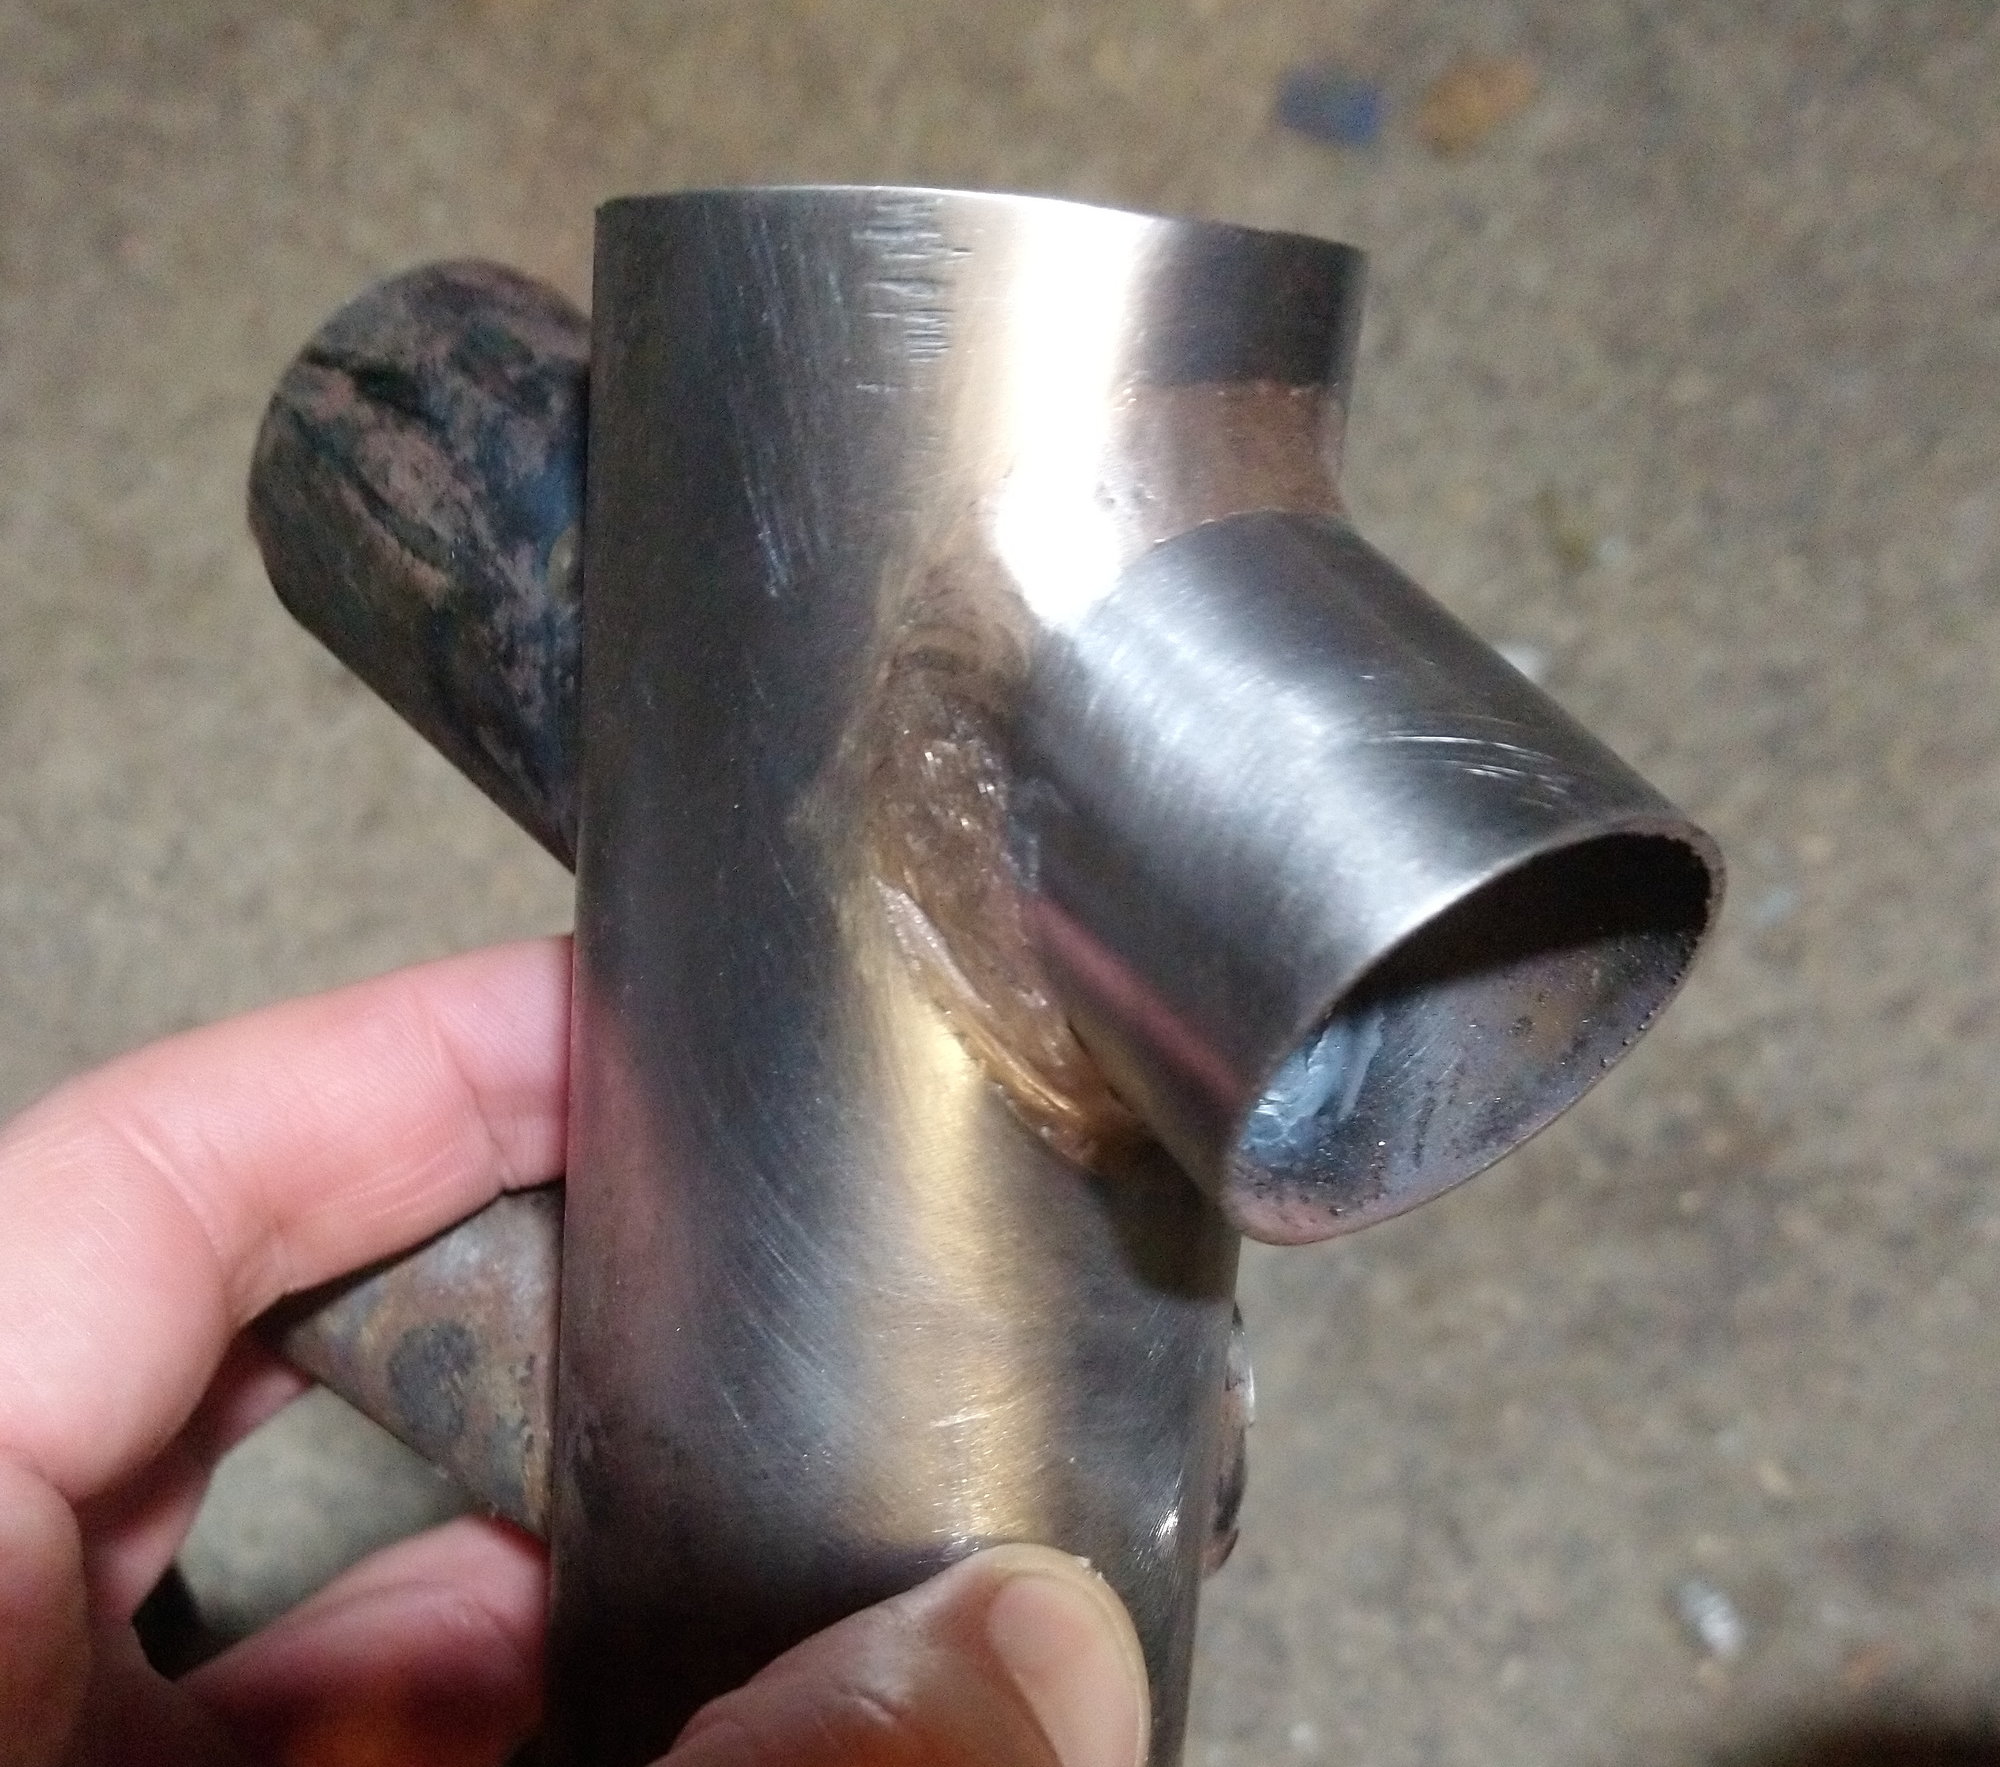
Here's a couple of poor images of the inside ends of the DT. I didn't see any brass but also no weld fusion. What looks to be flux in the first photo is really hard and didn't chip off with my feeble efforts.
Today I brazed the new DT section in place. Shot 3 is one of the joints. Not my best but ok looking. Andy


Today I brazed the new DT section in place. Shot 3 is one of the joints. Not my best but ok looking. Andy
__________________
AndrewRStewart
AndrewRStewart
Likes For Andrew R Stewart:
02-25-20, 07:43 PM
#18
Banned.

Join Date: Jun 2004
Location: Torrance, CA
Posts: 3,061
Bikes: Homebuilt steel
Mentioned: 18 Post(s)
Tagged: 0 Thread(s)
Quoted: 2193 Post(s)
Liked 425 Times
in
337 Posts
You taught me something Andy. I didn't know a tube replacement could be performed that way. Are your joints on the thick part of the tube?
02-26-20, 05:05 AM
#19
Senior Member
Join Date: Dec 2019
Posts: 956
Mentioned: 3 Post(s)
Tagged: 0 Thread(s)
Quoted: 321 Post(s)
Liked 263 Times
in
212 Posts
Fake fillet braze with TIG weld plus TIG silicon bronze over the top.
02-26-20, 05:08 AM
#20
Senior Member
Join Date: Aug 2007
Location: Evanston, IL
Posts: 5,096
Bikes: many
Mentioned: 63 Post(s)
Tagged: 0 Thread(s)
Quoted: 1446 Post(s)
Liked 1,395 Times
in
762 Posts
Andrew R Stewart Are the cuts in the butted (0.7) areas on the downtube? What is the replacement portion? Just being a looky lu, I'm really unfamiliar with the lengths of butts and whether or not 0.7/0.4/0.7 (heat treated?) tubing is widely available.
02-26-20, 10:31 AM
#21
Senior Member
Thread Starter
Join Date: Feb 2012
Location: Rochester, NY
Posts: 18,095
Bikes: Stewart S&S coupled sport tourer, Stewart Sunday light, Stewart Commuting, Stewart Touring, Co Motion Tandem, Stewart 3-Spd, Stewart Track, Fuji Finest, Mongoose Tomac ATB, GT Bravado ATB, JCP Folder, Stewart 650B ATB
Mentioned: 0 Post(s)
Tagged: 0 Thread(s)
Quoted: 4210 Post(s)
Liked 3,875 Times
in
2,315 Posts
"Are your joints on the thick part of the tube?" I believe so. The frame's top one certainly is but the bottom might just be at the beginning of the transition. The replacement tube is cut still on the thick butts at both ends. I use a butt gage to indicate where the transition begins and ends, marking the tube OD with a sharpie.
"This is a test weld. Obviously a bit rough especially by the standards of Andrew Stewart but with some more smoothing and lots of patience I might be able to achieve the look I'm going for." Don't assume I have a high standard in my own brazing: I have never watched or done Tig brazing so can't comment on that process. But the image looks not too bad before final finishing.
"Are the cuts in the butted (0.7) areas on the downtube? What is the replacement portion?" The replacement DT is a Rey 631 .8/.5/.8. This is one reason why I turned down the sleeves, because of the different sleeve diameters for the different tube wall thicknesses. Had I a .7/.4/.7 not sure if I would have used it anyway. The OEM one didn't hold up so why do all this work for no long term bennefit. (Not that this frame will ever see the road again). I have no worries about mixing tube wall specs. Andy
__________________
AndrewRStewart
AndrewRStewart
02-28-20, 10:03 PM
#22
Senior Member
Thread Starter
Join Date: Feb 2012
Location: Rochester, NY
Posts: 18,095
Bikes: Stewart S&S coupled sport tourer, Stewart Sunday light, Stewart Commuting, Stewart Touring, Co Motion Tandem, Stewart 3-Spd, Stewart Track, Fuji Finest, Mongoose Tomac ATB, GT Bravado ATB, JCP Folder, Stewart 650B ATB
Mentioned: 0 Post(s)
Tagged: 0 Thread(s)
Quoted: 4210 Post(s)
Liked 3,875 Times
in
2,315 Posts
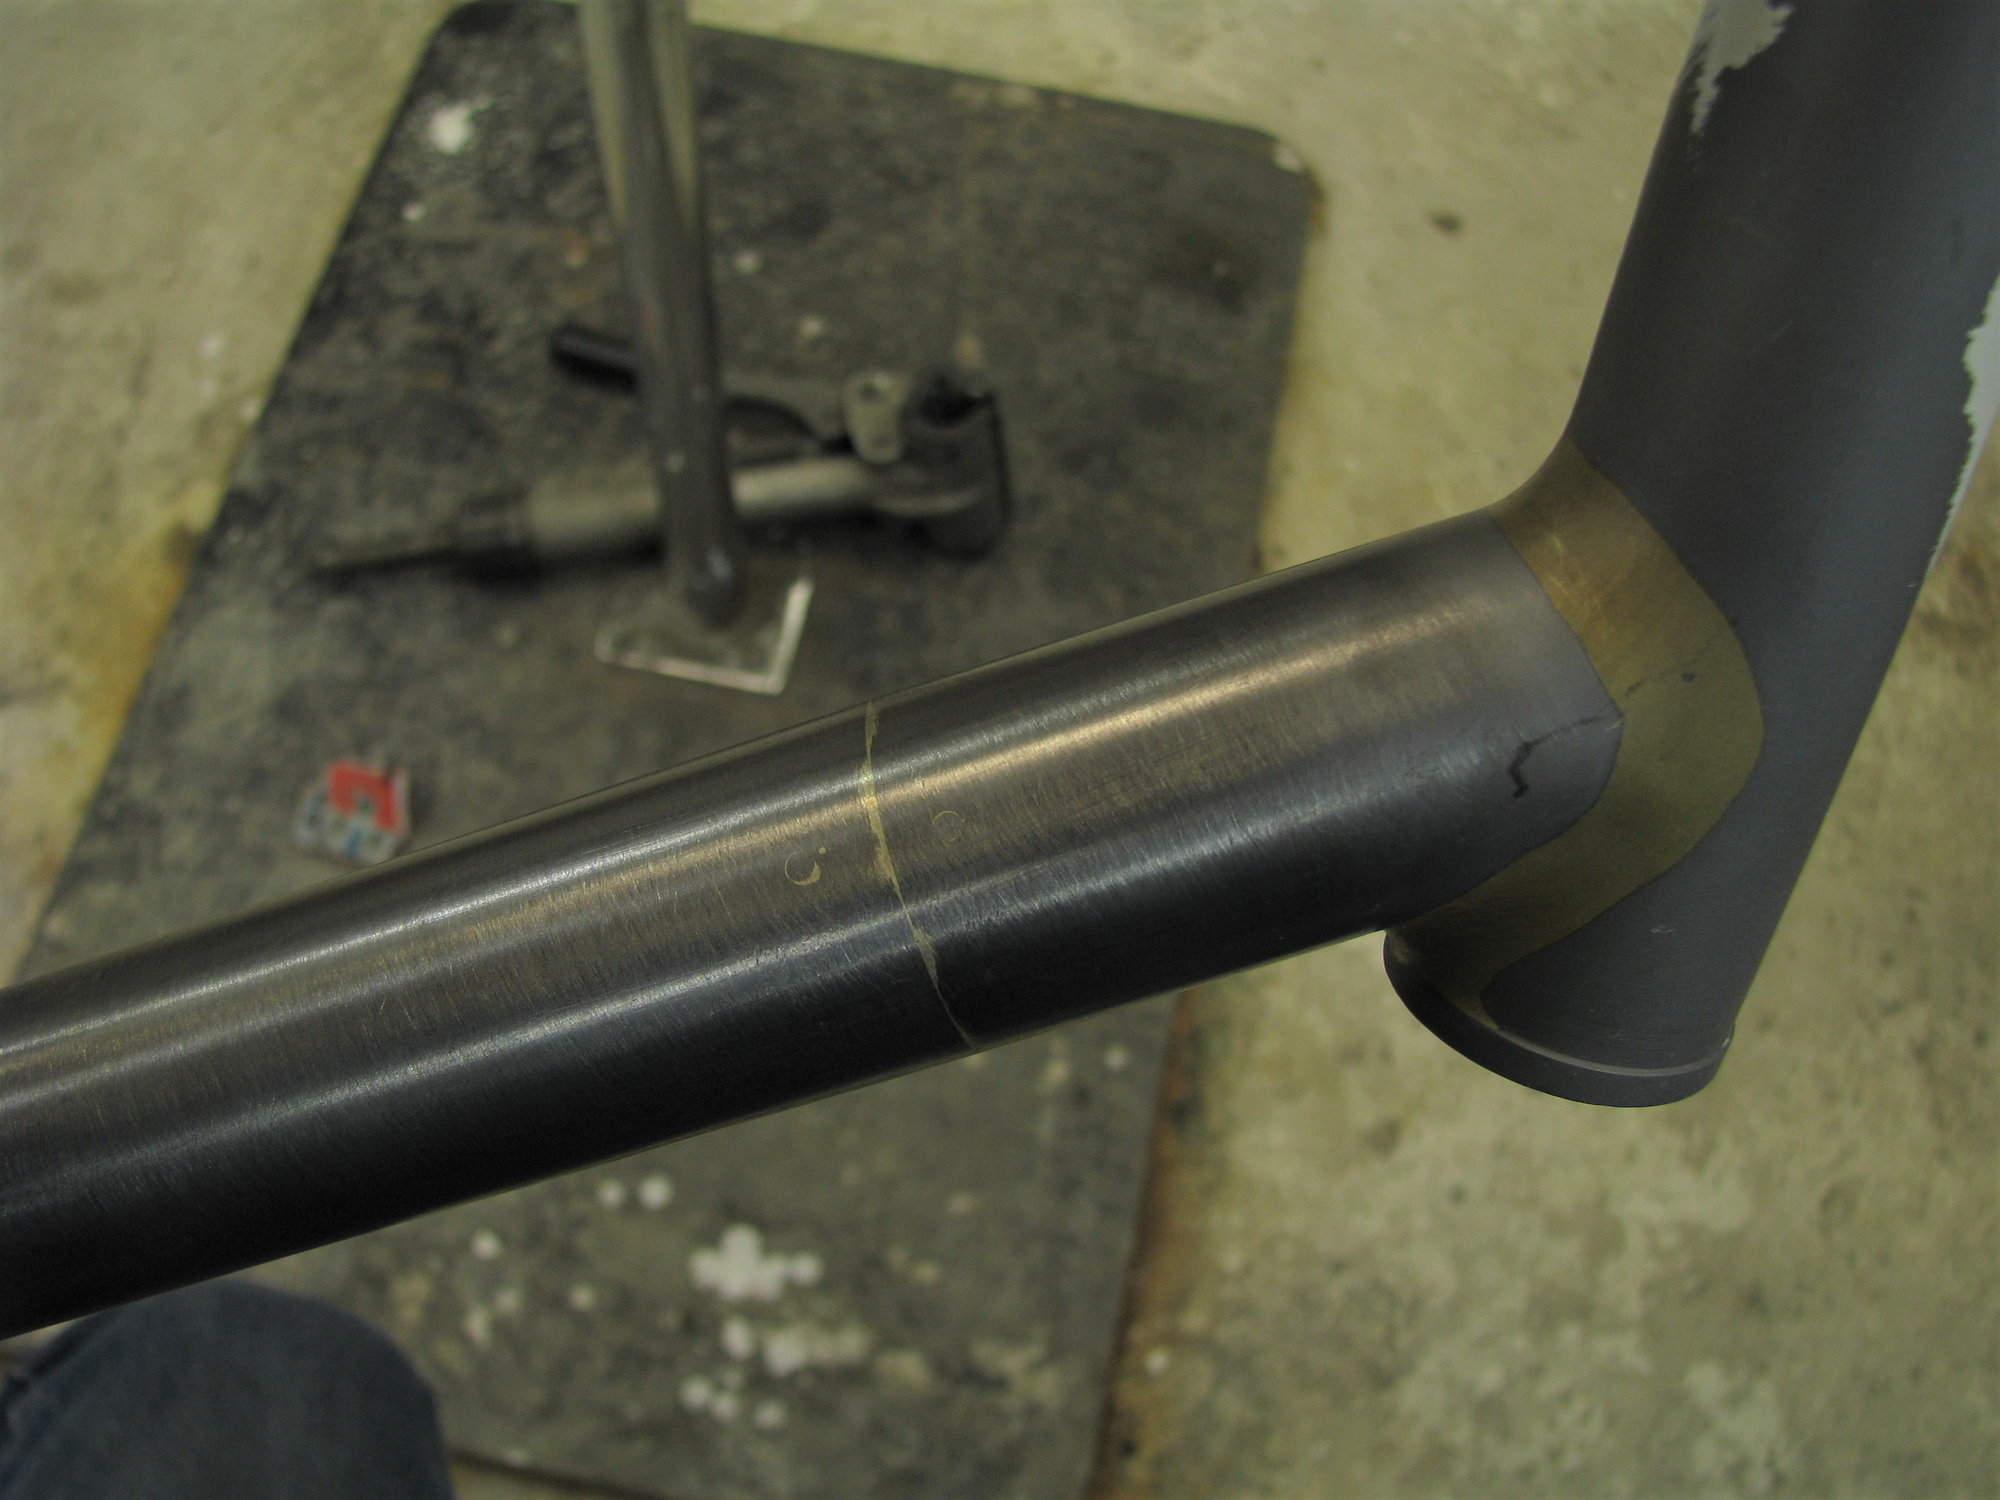
To close out the thread drift to the GT Edge DT replacement- I did the finishing work, going back with the torch to neaten up the joint's seam. On both joints one side had turned out well with very even transition from tube to tube. But on the other sides the tube surfaces didn't quite lay flat/even and some filler fill in and filing were needed to get a smooth transition. This was easily seen if one looked at the lines of reflected light along the length of the tube. You can see a slight wiggle or dog leg in the reflected streak at the seam. Here's a shot of one of the good sides.
What did I learn from this exercise? First is to not do this type of replacement (sectioning the tube and sleeving in a new one) if best looking results is job 1. If one must then use an outside sleeve (scalloped like a lug?) as the obvious boarder will hide the almost but not quite transition between the original and new portions of the tube.
Well I did say that this frame wasn't going to see the road again I didn't take a shot of the internal sleeves after cutting then out. My flow was pretty good on most of the sleeves but a few edge gaps remained. This is another reason to use an outside sleeve, it's easier to insure complete flow if you can see the shorelines. One tidbit I did learn was this frame wasn't quite so unique in it's construction. What I thought was a completely tigged joint then fillet brazed over turned out to be a Tig tacked one. The tacks were about 1/4" long and ran across the miter's ears. I suspect the builder filed a flat across the thin ear first. Oh well. learn and live some more. Andy
What did I learn from this exercise? First is to not do this type of replacement (sectioning the tube and sleeving in a new one) if best looking results is job 1. If one must then use an outside sleeve (scalloped like a lug?) as the obvious boarder will hide the almost but not quite transition between the original and new portions of the tube.
Well I did say that this frame wasn't going to see the road again
I didn't take a shot of the internal sleeves after cutting then out. My flow was pretty good on most of the sleeves but a few edge gaps remained. This is another reason to use an outside sleeve, it's easier to insure complete flow if you can see the shorelines. One tidbit I did learn was this frame wasn't quite so unique in it's construction. What I thought was a completely tigged joint then fillet brazed over turned out to be a Tig tacked one. The tacks were about 1/4" long and ran across the miter's ears. I suspect the builder filed a flat across the thin ear first. Oh well. learn and live some more. Andy
__________________
AndrewRStewart
AndrewRStewart
02-29-20, 12:18 AM
#23
Senior Member
Thread Starter
Join Date: Feb 2012
Location: Rochester, NY
Posts: 18,095
Bikes: Stewart S&S coupled sport tourer, Stewart Sunday light, Stewart Commuting, Stewart Touring, Co Motion Tandem, Stewart 3-Spd, Stewart Track, Fuji Finest, Mongoose Tomac ATB, GT Bravado ATB, JCP Folder, Stewart 650B ATB
Mentioned: 0 Post(s)
Tagged: 0 Thread(s)
Quoted: 4210 Post(s)
Liked 3,875 Times
in
2,315 Posts
The last couple of days have been odd ones for my hobby. I completed the GT project then cut it up. While this was my plan all along it is a bit different to invest a bunch of hours to only throw it all away later. Next up was returning to the topic of this thread, making lugs. As first motivated by a frame I made last year. The start was my "making Lugs" thread. I never posted shots of the finished bike as after building it up and riding it I decided I really screwed up the geometry. Here's a bad shot of a detail of that bike.
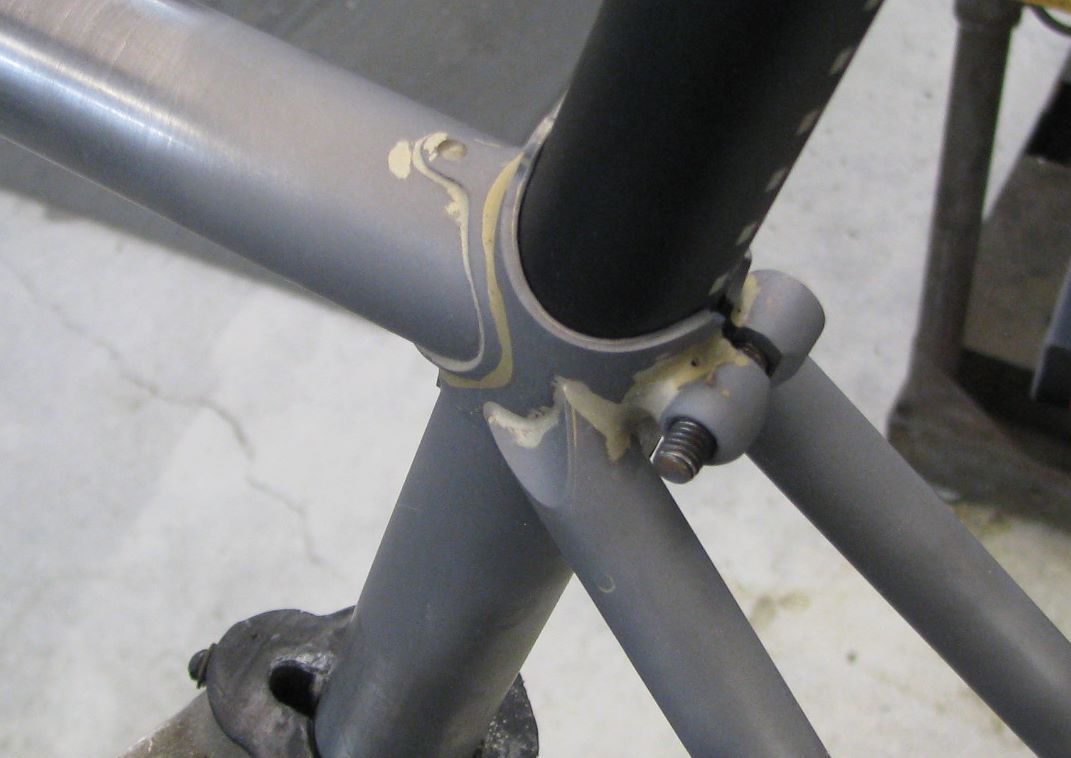
At first I thought that I had located the DT too low down on the HT, the HJ jig I was using uses the TT and HT intersection as it's locating point. So placing the DT lower would result in the bike rotating up and back, much like a fork with a longer A-C does. That when I rode it my hips bothered me should have been a sign that more was going on, even with the seat all the way forward my set back was way long.
Today I returned to the bike and decided that I would replace the DT (just had some practice, remember) at the correct location on the HT and trim off the extra HT. I tried to install the frame in the same HJ jig using the BB, the size and ST angle and the HT top. Now I don't bother to record the jig settings with my frames and started with the jig set to my original Bike Cad plans. I was not able to get all the contact points to line up with only a lowered HT bottom. I stopped, ate some and returned to the problem. I tried to set up the frame in the jig from the back end instead. Set the CS length by actual fit (and is within a mm of design) as well as the drop. Found the ST angle to be way laid back. In comparing the various arrangements I tried with the jig and frame I think the drop setting on the build was also way off. Why? Not sure except to say I likely was distracted, still it was my mistakes that lead to this. Time to move on and remember the frustration I feel now. Andy
I've revisited the geometry, made a couple of minor tweaks and will start fresh soon. My posts of progress will be slow in coming as we're close to the bust LBS season.
At first I thought that I had located the DT too low down on the HT, the HJ jig I was using uses the TT and HT intersection as it's locating point. So placing the DT lower would result in the bike rotating up and back, much like a fork with a longer A-C does. That when I rode it my hips bothered me should have been a sign that more was going on, even with the seat all the way forward my set back was way long.
Today I returned to the bike and decided that I would replace the DT (just had some practice, remember
) at the correct location on the HT and trim off the extra HT. I tried to install the frame in the same HJ jig using the BB, the size and ST angle and the HT top. Now I don't bother to record the jig settings with my frames and started with the jig set to my original Bike Cad plans. I was not able to get all the contact points to line up with only a lowered HT bottom. I stopped, ate some and returned to the problem. I tried to set up the frame in the jig from the back end instead. Set the CS length by actual fit (and is within a mm of design) as well as the drop. Found the ST angle to be way laid back. In comparing the various arrangements I tried with the jig and frame I think the drop setting on the build was also way off. Why? Not sure except to say I likely was distracted, still it was my mistakes that lead to this. Time to move on and remember the frustration I feel now. AndyI've revisited the geometry, made a couple of minor tweaks and will start fresh soon. My posts of progress will be slow in coming as we're close to the bust LBS season.
__________________
AndrewRStewart
AndrewRStewart
02-29-20, 05:19 AM
#24
Senior Member
Join Date: Dec 2019
Posts: 956
Mentioned: 3 Post(s)
Tagged: 0 Thread(s)
Quoted: 321 Post(s)
Liked 263 Times
in
212 Posts
Today I returned to the bike and decided that I would replace the DT (just had some practice, remember
) at the correct location on the HT and trim off the extra HT. I tried to install the frame in the same HJ jig using the BB, the size and ST angle and the HT top. Now I don't bother to record the jig settings with my frames and started with the jig set to my original Bike Cad plans. I was not able to get all the contact points to line up with only a lowered HT bottom. I stopped, ate some and returned to the problem. I tried to set up the frame in the jig from the back end instead. Set the CS length by actual fit (and is within a mm of design) as well as the drop. Found the ST angle to be way laid back. In comparing the various arrangements I tried with the jig and frame I think the drop setting on the build was also way off. Why? Not sure except to say I likely was distracted, still it was my mistakes that lead to this. Time to move on and remember the frustration I feel now. AndyI've revisited the geometry, made a couple of minor tweaks and will start fresh soon. My posts of progress will be slow in coming as we're close to the bust LBS season.
02-29-20, 08:29 AM
#25
Banned.
Join Date: Jun 2004
Location: Torrance, CA
Posts: 3,061
Bikes: Homebuilt steel
Mentioned: 18 Post(s)
Tagged: 0 Thread(s)
Quoted: 2193 Post(s)
Liked 425 Times
in
337 Posts
Andy,
My condolences on the frame building fail. And thanks for sharing. Remember, "it's only a mistake if you do the same thing wrong twice." Live and learn...
My condolences on the frame building fail. And thanks for sharing. Remember, "it's only a mistake if you do the same thing wrong twice." Live and learn...